In order for the floor to be well-laid, even and strong, in 9 cases out of 10 it is laid on joists. Without joists, it is very difficult to level and strengthen the floor surface so that it does not sag under the weight of furniture, does not creak or vibrate when walking.
Correct installation of joists will level and strengthen the surface of the floor so much that it will not sag under the weight of furniture, creak or vibrate when walking.
Theoretically, any materials can be used as lags.
The main thing is that they are smooth, durable and have a small coefficient of deformation under load. Metal, reinforced concrete, plastic and wood meet these requirements. However, in practice, in the vast majority of cases, a wooden block is used to install lags, since it is much cheaper than similar plastic products, not to mention metal.
Video of installation of adjustable floor joists
Recommended reviews and articles
What other disadvantages do you think this device has? Your feedback is very important for people.
Join our Telegram channel and VKontakte Group, and you will be the first to know about the latest reviews of laser levels! We hope that our reviews will help you make your choice and save money.
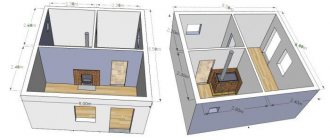
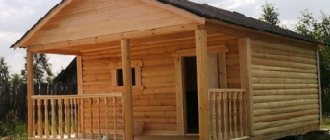
A variety of methods and materials can be used to construct floors. Floors on logs, which can be installed on any base, including floors on the ground, are considered popular. The main structural element is wooden logs; they are laid in a certain order.
A heat insulator is installed between the logs, and communications can be laid. Then the rough sheathing is sewn on top. Usually plywood, chipboard, OSB, and ordinary wooden boards are used, which often act as flooring.
Flooring with joists is one of the most popular. This floor is based on wooden blocks of a certain size.
Installation of floor joists can be done using various methods, it all depends on the need to level the surface and other installation conditions. When laying, all steps must be followed exactly; the wood will first have to be treated with an antiseptic and fire retardant to ensure protection from insects and fire.
Determining the step size for laying joists
Scheme for calculating the distance between lags under OSB panels
Calculating the optimal pitch for wooden beams is quite difficult to determine.
If there is a directly proportional relationship between the cross-section of the beam and the size of the span, then with the interval of laying beams the situation is different. A simplified version of the calculation should be as follows: the larger the step between the logs, the thicker the board that is laid on the wooden sheathing. Why is that?
The explanation of this rule is not difficult to understand: the thicker the board, the less it will be subject to deformation. However, it should be taken into account that the interval between the layout of the beams does not depend in any way on the material from which they are made. Indeed, in this case we are talking about the ability of the board to withstand static and dynamic loads.
How to carry out the calculation and determine what the step size should be? To do this, consider a simple formula:
Base length = distance between beams + gap between beams and wall + beam width. For clarity, let’s analyze the expression with numerical substitutions:
10 m = 0.6 m*(T-1) + 0.03 m*2 + 0.07 m*T, where T is the total number of beams.
In this case, the expression T-1 is the step between the beams laid at a distance of 60 cm from each other. In the course of simple calculations, we find out that T = 16 (beams). That is, to construct a subfloor from logs, a total of only 16 beams will be required.
In this case, the sum of the intervals between the beams will be equal to: 10 - 0.06 - 16 * 0.07 = 8.82 m. Now the resulting expression must be divided by the total number of intervals: 8.82 / 16 = 0.55 m. In our case, to assemble a wooden sheathing, the logs must be installed in 0.55 m increments.
What are the advantages of lag?
Floors on joists have certain advantages over other structures.
It turns out not only durable, but also warm. This flooring allows you to level the surface and create a high-quality flooring for soil foundations in private homes. Among the advantages it should be noted:
The logs place the minimum load on the foundation.
- Thermal insulation characteristics, such a floor allows you to avoid heat loss. Lumber for work has an attractive price, they are much cheaper than concrete screed, which requires some experience in arrangement. There is a minimal load on the foundation, this is significant for frame and dilapidated houses. Such floors are also suitable for wooden floors. The floor can be installed at any level that is required. The consumption of building materials is minimal, which has a positive effect on the budget. Construction time is minimal, there is no need to wait for the solution to harden, except for floors on the ground, where pouring is done under the supports. Inside an optimal microclimate is created in the room. You can make joist floors yourself; no special experience is required.
Wooden floor construction with joists.
During installation, you need to correctly determine in which direction the logs will stand.
There are rules for installing subfloor joists. The finishing flooring is always carried out parallel to natural light, and the joists should run in the opposite direction. This should be foreseen in advance so that you don’t have to correct everything later.
If laying the floor is planned for rooms with high traffic volumes, then the logs must be laid in the direction of travel in order to strengthen the structure and prevent it from loosening. It is important to immediately foresee how the floor boards will go, how the sheathing slabs will go if plywood is used. All fasteners for the finished floor must be on the joists themselves to make the flooring durable.
Waterproofing and soundproofing of the floor
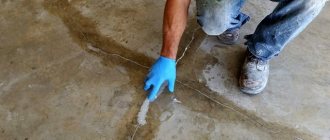
To prevent capillary suction of water from wood, the logs must be insulated. There are different methods used depending on the type of raw material from which the floor joists are made. For example, laying foamed polyethylene on a reinforced concrete floor is done in the following ways:
- over the entire area of the room;
- directly under the block.
In winter, moisture condensation occurs on the surface of cold reinforced concrete. If the cross beams are mounted on brick pillars laid on a soil foundation, then types of materials such as dense polyethylene film or roofing felt are used as waterproofing. Waterproofing is laid between:
- soil and posts;
- posts and wood.
Often, beams used as cross beams combine two functions at once. It is not necessary to install waterproofing on wooden floor beams in a private house if all the material used has the same moisture content. There is no need for waterproofing when the house has 2 floors, since the humidity of all beams is the same.
Before installing the logs on a concrete base, it is recommended to lay a special waterproofing material. Thus, the beams are protected from moisture penetration into the material. It is a good idea to include soundproofing materials in the design. They can serve as ordinary roofing felt. There are also special substrates, so the choice of materials suitable for various tasks is quite wide.
Methods of fastening and installing joists
Scheme for attaching joists to a concrete base.
To secure the joists to the base, you can use various methods. Previously, nails of the required size were used for this, but this method is not the best and most durable; such fasteners quickly fail. Today, the best method is to use galvanized metal corners and dowels.
Instructions for fastening the joists:
- All metal corners are attached with self-tapping screws. One plane of the corners is fixed to a wooden beam. Self-tapping screws are screwed in to a depth of 3-5 cm. The lower plane is attached to the beam of the lower frame. For brick supports, it is necessary to make a layer of waterproofing, and then additionally make fasteners from dowels.
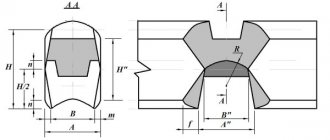
Options for joining the logs: end-to-end and cutting into the wood floor.
Instead of corners, you can use a special fastening in the form of a U-shaped part. It provides a strong fixation, especially if the bars have to be extended. This method is applicable for large rooms where additional fasteners are required.
The joints for the joists themselves can be arranged in this way:
- Close to each other. Using a notch. This method of joining is the most effective, but it is necessary to carry out the cutting very carefully so that the joints are tight.
If it is necessary to strengthen the joint, nails are used to stitch the fastening area.
Additionally, you can use pieces of lumber, which can be approximately 1 m long. If the beams are mounted staggered, then a step of 50 cm or more must be observed between the connection points.
What it is?
Pillars for brick logs are a masonry structure with a cross-section of one brick. They are erected on a prepared concrete pad, reinforced with reinforcement with a diameter of 5-8 mm. They ensure that floors do not sag during prolonged use and under significant weight loads. For ease of fastening the logs when laying, a bracket with a thread in the upper part should be mounted in the center of the structure, to the base of which a metal plate 3-5 cm thick and 15x15 cm in size should be welded. It is important that the brackets are centered and aligned to zero horizontally. Covering them with bricks on 4 sides will provide support for the joists.
Requirements
When building the foundation, an underground space is left for the floors of the first floor of the house. Its depth depends on the height of the constructed foundation, or it can be further deepened by removing excess soil. Be sure to tamp, as loose soil retains more moisture. When constructing columns, moisture-resistant clay bricks are used. Silicate species have high water absorption and their use for these purposes is strictly not recommended, since they are quickly destroyed by the moisture of the underground soil.
For concrete work you need to take cement M 500.
The pedestals under the logs are laid out on a concrete pad, when concreting it, M500 cement is used. The erected columns must be waterproofed. The constructed structures are controlled using a level in the longitudinal and transverse directions. The height is chosen taking into account the thickness of the logs, which will be the basis for the floor.
Posts for joists are an important technological stage of flooring. This design will avoid deflections and subsidence, protect the floorboard from dampness, mold and mildew, thereby extending its durability.
Installing a floor on the ground
Installing floors on joists is not as difficult as it might seem at first glance. They have a simple design; they can be made for an apartment, private house, or country cottage. Unlike concrete pouring, the weight of such a structure is less, but the floor is in no way inferior in strength.
To install logs, you need to follow fairly simple instructions:
Scheme of a wooden floor on joists on the ground.
First, the soil base is inspected, after which the soil is thoroughly compacted with a vibrator. If there is no such equipment, then the work can be carried out with a piece of large-diameter log. A layer of crushed stone is then poured onto the ground; it should be approximately 5 cm.
This layer will serve as the base. After this, it is necessary to build formwork for each support separately. A preliminary diagram of the location of supports is drawn up in accordance with the size of the room and the conditions of construction of the entire structure. If the formwork is ready, then you can fill it. Next you need to build brick supports.
In this case, a layer of waterproofing must be provided between the supports themselves and the base. This will reliably protect the structure from moisture. Another layer of waterproofing should be done over the brick support and a soundproofing gasket should be installed. Next, floor joists are installed.
The boards are pre-cut into pieces of the required size, and then their surface is treated with an antiseptic and fire retardant. This will protect them from damage by insects, from mold, and make them more protected from fires. The logs are fixed to the supports with special dowels, which ensure reliability and stability. After this, you can lay a special cranial block, make a primary plank flooring, you can use ordinary boards for it.
After rolling, you can lay out another layer of waterproofing material. A heat insulator must be installed between the joists. Various materials can be used in this capacity. Manufacturers offer a wide variety of insulation materials suitable specifically for floors on joists.
In this case, you can take expanded clay, other bulk materials, foam plastic slabs, mineral wool slabs. During insulation, it is necessary to ensure that no air layers or cavities remain, as this will negatively affect the state of the thermal insulation and heat loss will be observed. After this, logs are necessary to level the floor. The upper horizontal level is determined. All excess is cut off, and the level of the coating is checked by the building level. The finished floor is mounted from sheets of plywood or chipboard; any floor finishing materials can be laid on them.
During installation, you will have to ensure that there is a temperature gap of 2 mm between the slabs, and 10 mm between the slabs and the wall. For strength, plywood can be laid in 2 layers, the total thickness of the sheathing is from 12 mm to 20 mm, it all depends on the requirements for the floor. It is necessary to leave a small ventilation gap between the sheathing and the insulation. After the floor sheathing is completed, it is necessary to check the horizontalness of the floor again, and then grind the surface.
To avoid damaging the sander, the heads of the screws should be sunk into the wood during fastening. The last step is laying the flooring. The process depends entirely on what material was chosen for the job.
Installation diagram of fasteners for adjusting the height of the logs.
If the floor is not so level, then its height can be easily adjusted with lags. For this purpose, special fastening elements are used that can withstand significant loads, up to approximately 5 tons for every 1 m². Adjusting elements can be made of metal or special plastic.
These are threaded elements that can be given the required height. The logs are attached to such elements, and the required height is set. The floor and walls are first marked to determine the level of finishing.
For concrete floors, dowels are used, and for wooden floors, self-tapping screws are used to withstand the necessary loads.
After this, all excess is cut off. The logs are attached at the required height; if required, a heat insulator is added to make the floor more comfortable and the microclimate more pleasant. Plywood or chipboard is laid on top, after which you can begin installing the floor covering.
Joist floors are a strong and reliable structure that allows you to level the surface. It’s not difficult to make such a floor with your own hands; there are many options from which you can choose the right one. To work, you only need boards for making logs, a heat insulator and sheets of plywood or chipboard for finishing cladding.
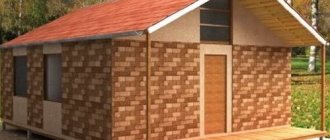
Despite the relatively short service life of multilayer wooden structures, their light weight, environmental priorities, and cost-effectiveness have a convincing effect on the owners. If foam concrete, brick, and gas silicate blocks can still compete with natural organic matter in the field of wall construction, then lumber is still the leader in the field of flooring. Basically, for the construction of multilayer wooden structures, floor logs made of durable polymer compounds or wood are used.
What attracts owners to a floor with unique air cushions formed by laying polymer or wooden blocks? The list of advantages includes important points, such as:
- excellent thermal insulation characteristics; affordability of lumber; formation of a minimum load on the foundation, on beams or concrete floor slabs; the ability to raise the floor plane to any level; reduction in the cost of building materials; speed of construction of a wooden floor structure, which does not force you to wait for the screed to harden; the presence of communications convenient for installation technological space; ensuring an optimal microclimate inside buildings or rooms; the ability to lay wooden floors on joists yourself.
Installation of floors along joists - quickly, economically, reliably
In addition, a well-executed floor arrangement using joists will eliminate the rather expensive leveling process, since it fully fulfills its function. The presence of ventilation voids in the floor structure will extend the service life of the lumber used for the arrangement, which is still recommended to be treated with antiseptics, wood aging and fire protection agents. Thrifty owners can use bitumen instead of antiseptic.
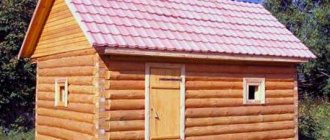
How to lay logs on the ground and make a wooden floor
Installing a floor on joists depends on the type of base used. Installation on wood or ground differs significantly in terms of execution. If you follow the plan strictly, you will end up with a strong and warm floor covering.
Laying logs on the ground. It is optimal to lay out the floor on top of the ground before laying load-bearing house walls or during interior finishing of the building. But the final finishing of the coating should begin when the ceiling is whitewashed and the walls are prepared.
The algorithm of actions is as follows:
- The soil under the future floor covering is compacted with a vibrating plate or a wide log. The earth is nailed down until it becomes dense. We pour crushed granite stone in a 5-centimeter layer, this ensures drainage and provides an incompressible base.
- We compact the crushed stone using a vibrating plate. We make formwork for each support column, pour cement into it, then strengthen it with reinforcement. This will serve as a foundation for the brick pillars.
- When the cement hardens, we cover each base with a roofing material layer and build brick columns. We lay a couple more layers of roofing material on top of the pillars and coat them with bitumen mastic.
- We put logs on the pillars. We attach a cranial block to them for support under laying the rough flooring. This decking is made from a base of inexpensive untreated lumber. The boards cannot be attached to the beams; they must lie freely.
- The floor needs to be covered with a waterproofing film or with roofing felt; for this we overlap the walls by 15-20 centimeters.
- Between the joists, we put insulation in the form of polystyrene foam, mineral wool or expanded clay on the waterproofing. We lay a vapor barrier on top of the insulation.
And between the vapor barrier and the outside of the finishing coating, a ventilation gap of at least 2 cm should be left. An exception is a double-sided vapor barrier membrane, thanks to which moisture will not penetrate into the insulation without a ventilation space.
How to install joists on a wooden floor with your own hands
Wooden floor beams are most often made from beams with a rectangular cross-section. And if their installation step is less than 80 cm, then the logs may not be needed, and the finishing coating can be placed directly on the beams themselves. But this rarely happens, so it is advisable to lay them down.
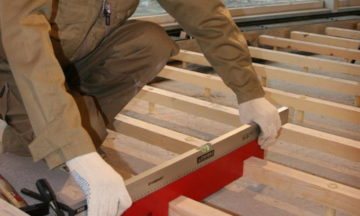
Working with a wooden base is much easier than with a brick or concrete one. The difficulty is that you need to determine the installation step of the beams and attach them firmly to the beam. The right joist should be 30 cm from the wall. And when each structural element is installed, check it for evenness using a building level.
To make the floor cozy and warm, you will need to install temporary flooring. And for the purpose of thermal insulation in a private wooden house, you need to use the following cheap materials:
- mineral wool;
- Styrofoam;
- ecowool and others.
As you can see, every owner can build a floor on joists with his own hands, even if he has never encountered anything like this before. There is no need to carry out complex calculations and there is no need for a lot of financial investments. Logs are an excellent solution for a warm and even floor.
What can joists be made of?
Lags are the transverse floor beams on top of which the finishing coating is laid. It is extremely rare to use metal and reinforced concrete beams as lags, most often wooden blocks or advanced polymer products. Wooden bars are chosen mainly because of their low cost, polymer ones because of the speed of construction and ease of installation.
Logs - transverse beams, most often made of wood or polymer
Note.
Instead of timber, which for some reason could not be purchased, boards selected in accordance with the cross-sectional dimensions of the timber, sewn together in pairs, can be used. It is permissible to exceed the cross-sectional dimensions. In such cases, installation of floor joists made from sewn boards is done on edge.
Builders of log houses to this day use straight logs with a similar diameter, hewn on three sides, instead of timber. In austerity mode, logs may well replace timber. The only condition: they must lie for about a year in a dry room before installation.
Preparation for installation
Dry, even beams are most often used as lags. It is important that their length is not less than two meters. It is better to purchase them two weeks before the start of work, since they need to stand for a while in the room where they will be installed. At this moment, some of the beams may change shape, for example, they will move like a screw. It is better to exclude such instances.
When planning work on installing wooden logs, you need to purchase material in reserve. In this case, the height of the beam should be 5-6 cm less than the length of the anchors used. This is necessary for strong fixation.
Correct choice of section
The cross-section of the bars selected for constructing the floor along the joists resembles a rectangle with a height that is a multiple of 2 and a width that is a multiple of 1.5 (aspect ratio in the section is 2×1.5). If the floor is laid on wooden floor beams, then the size of the cross-section of the bars will be affected by the size of the span between the elements on which they will rest.
The cross-section of the log depends on the thickness and strength of the floor covering
Please note those who plan to equip the floor structure with a thermal insulation layer.
There should be a ventilation gap of at least 2 cm (preferably 3-4 cm) between the bottom plane of the final coating and the insulation laid between the joists. This means that timber must be purchased taking into account the size of the ventilation gap. If the floor structure will rest on the ground, it will also be necessary to take into account the thickness of the bead laid on the cranial block attached to the joists.
It is recommended to purchase timber with a “margin” in cross-sectional dimensions for floors with joists.
When constructing a floor over an earthen base, in order not to use too expensive timber of a large cross-section, the span is reduced by installing brick columns. The intermediate distance between the supports is 1.2 m. They are made of red brick M100, silicate is only applicable if the level of the aquifer is below two meters.
Plan for laying the floor on joists with emphasis on brick columns
Proper laying of the floor on logs with brick columns requires equal distances between the rows of supports and between the beam elements.
Before constructing brick supports, a 40x40 cm foundation is poured under each of them. The foundation can also be poured in the form of a strip under a number of brick pillars. There are two bricks in each row of the support column; the height of the support depends on the level of the elements on which the beam will rest (beam of the bottom frame, concrete grillage).
The height of the brick column is determined by the height of the element on which the beam will rest
Optimal lag step size
If the thickness of the lags depends on the length of the span, then the size of the step (the distance between two adjacent lags) has a direct dependence on the thickness of the flooring.
The general rule is this: the greater the thickness of the flooring, the larger the lag step can be made.
This is explained simply: the thicker the board, the less susceptible it is to deflection. In this case, the pitch of the installed logs does not depend in any way on the selected material.
The ratio of floor covering thickness to pitch will be as follows:
- with a board thickness of 20 mm, the maximum lag step should be within 30 cm; with a board thickness of 25 mm, the maximum step should not exceed 40 cm; with a board thickness of 30 mm, the maximum step increases to 50 cm; with a board thickness of 35 mm, the maximum the step is taken to be 60 cm; with a board thickness of 40 mm, the step size should not exceed 70 cm.
As you can see, with an increase in the thickness of the floorboard by 5 mm, the lag pitch increases by 10 cm. This ratio continues to be maintained.
Geometric guidelines for installation
Orientation in space is a significant component of the correct floor arrangement. Those who want to know how to lay joists on the floor correctly should follow the following building rules.
- The flooring of boards in rest rooms and living rooms is carried out along the direction of the flow of natural light. The logs are arranged “cross” to the direction of the boards. In vestibules, hallways and other rooms with heavy traffic, the boards are laid according to the direction of movement, the logs, naturally, in the direction perpendicular to the direction of the flooring elements.
The logs are laid “cross” to the floor boards
Note. If the floor structure is strengthened by installing two layers of timber, the top layer is laid “cross” to the previous one.
What are logs and what functions should they perform?
Logs are logs, beams, metal or plastic beams that are laid horizontally. Most builders prefer them as a base for floor coverings and platforms. A floorboard is laid on top of the joists.
Previously, when construction technologies were not yet so developed, the beams were laid on a concrete base, and the boards were fixed to them with nails. Of course, over time, all the elements of the floor covering became deformed, which led to a constant annoying creaking of the floors. But experts have found a way to fix this problem:

- logs began to be “tightly” attached to the surface, even if the installation is carried out on a concrete base;
- the floor began to be ventilated.
A new type of structure has also appeared - adjustable floor joists, the installation of which is so simple that you can do it yourself by watching the video:
It is extremely important that repair products are made from good quality raw materials
If you plan to use wooden elements, then pay attention to the moisture content - it should not exceed 12%. The wood must also be treated with a special antiseptic in order to prevent the appearance of fungus and rotting processes.
To understand why logs are so widely used in modern construction, it is enough to familiarize yourself with the main advantages of this method of flooring:
- allow you to raise the floor level to the required height;
- have high strength and significantly reduce the load on floor slabs;
- They are quite cheap, so you can save your money;
- are installed using the “dry” method, so the work will take a little time;
- the air gap between the flooring and the base improves sound and heat insulation;
- The ventilated design helps to increase the service life of the finishing coating.
Now that we know all the advantages of installing joists, especially on a concrete floor, we can highlight the functions that they should perform: noise and heat insulation, surface leveling, load distribution on the base, ventilation and masking of communications. In my opinion, pretty good for their price.
Since, in most cases, logs are installed on wooden and concrete floors (much less often on polymer floors), I will describe the work with these two types of bases.
Mounting methods
Previously, logs were simply attached to a concrete slab or beams with nails. Not the best and not long-term method was replaced by fixation using galvanized metal corners. The instructions on “how to attach joists to the floor” read:
- The corners are fixed with self-tapping screws. One of the planes of the corner is attached to the beam. The depth of penetration of the screw into the beam is 3-5 cm. The corner is attached to the beam of the bottom frame in the same way. To a brick support or concrete grillage, which must be covered with a layer of waterproofing, fastening is done with dowels.
Instead of a corner, a U-shaped fastening device can be used.
U-shaped device used to fasten the beam
It often happens that the standard length of the timber is not enough. Elements can be joined in two ways:
- close to each other; by cutting, called “into the floor of a tree”.
Attention. The joints should be strengthened by nailing 1 m long pieces of lumber to one, or better yet, two sides of the beam.
Methods for connecting timber into a log floor
When installing the beam, the distance between the connection points of the beam should be at least 50 cm.
Sequence of work on installing a floor on the ground
A practical, democratic floor pie on wooden joists can be installed before the construction of load-bearing walls, for example, a frame house, or during the period of interior decoration. It is recommended to clean the floor after all plastering and painting operations.
When constructing a multi-layer cake above the ground, work is performed in the following sequence:
- The soil is compacted with a vibrator or the end of a simple log. The compacted crushed stone is filled with a layer of 5 cm, it will act as an incompressible base. Cement is poured into the formwork, specially made for each support or for a number of supports. The supports are constructed from bricks (between the base for the supports and the brick there should be be a layer of waterproofing).Another layer of waterproofing and a soundproofing gasket are placed above the support. The logs are installed and fixed. Then the skull block is laid and a boardwalk made of cheap lumber is arranged. Behind the runway, another layer of waterproofing is again located. The insulation is placed between the logs. The upper plane of everything installed the timber is leveled by trimming off the excess, the presence of deviations is detected with a spirit level. It is imperative to leave a ventilation gap between the floor boards and the heat-insulating layer. Finally, the floor boards are laid with a 2 cm indentation from all walls around the perimeter. This gap is necessary to compensate for wood movements that occur under the influence of moisture , temperature. After sanding and treatment with a finishing compound are carried out (you should read the relevant articles about performing these works), this gap is closed with a plinth.
Diagram of a floor with logs on an earthen base. Leveling the timber before laying the covering.
When installing a floor over ceilings, the process is shortened, since the logs are attached directly to the beam or to the reinforced concrete slab.
Video example of the work
It is not very easy to construct a multi-layer floor pie on wooden joists, but it is precisely this that significantly reduces the construction or repair budget. In addition to minimizing material consumption, the pace of finishing production is also increased. Thorough adherence to the technologies for arranging this floor construction scheme and compliance with the recommendations guarantees long-term operation and aesthetic appeal.
- Author: Alesya_SAPrint
Sources:
- www.supersadovnik.ru
- www.laser-level.ru
- 1poderevu.ru
- pol-master.com
There are no similar posts, but there are more interesting ones.