Despite the variety of flooring materials on the shelves of Russian construction stores, natural wood does not lose its popularity. No wonder. After all, solid wood is an environmentally friendly material that not only “breathes”, but also looks great in the interior. However, several factors can negatively affect the appearance of a wooden floor. Today we’ll talk about how you can seal the gaps between the floor boards, how to do this work correctly, and when you shouldn’t do it.
Floor screed repair: how to repair cracks, potholes and stop delamination?
Many residents of Khrushchev-era apartment buildings face the problem of repairing old concrete floors.
Over the years, the surface of the screed wears out and becomes covered with cracks. Typically, the floor covering laid on top does not make it possible to notice the defect in time. This leads to the formation of large cracks and chips. And only by undertaking to dismantle the old coating can hidden problems be discovered. Therefore, before laying new linoleum or laminate flooring, it is necessary to repair the floor screed. Naturally, the most correct thing would be if, when installing the screed, you do not make the mistakes described above, then you will not need to seal cracks in the floor screed. If this happens, then we repair cracks in the floor screed.
If they are opened slightly (up to 2 mm), then they can be sealed with cement diluted in water with the addition of PVA glue to the screed solution. This composition must be liquid so that it can easily penetrate narrow crevices and completely fill them.
Before this, we expand, deepen, and clean the cracks. Many craftsmen use liquid tile adhesive to seal thin cracks, which gives good results.
If they are wide, then sealing is possible with the cement composition M-100, at the same time, it must also be of a liquid consistency.
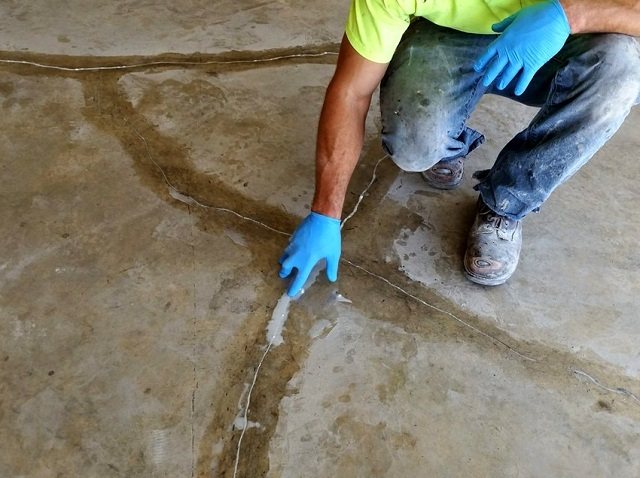
Initially, you should open the crack - that is, using a grinder, chisel, spatula and other devices, expand its upper part until it is sealed. Clean it from remaining solution particles, dirt and dust using a brush, vacuum cleaner, or compressed air (blowing).
Treat the surface with a primer to the entire opening depth using a brush, let the primer dry. Fill the cracks with the repair mixture to the full depth. For these purposes, special repair mixtures Ceresit CX15, Thomsit RS 88, polymer-cement putties, thixotropic compounds, etc. are also produced.
If the gaps are wide, it may be recommended to use fastening staples that are installed across the crack. To do this, use a grinder to make a transverse cut 150–200 mm long across the entire thickness of the screed perpendicular to the direction of the crack.
Wire staples with a diameter of 3–6 mm are installed into this incision, which are sealed with cement from the bottom and top. The crack appears to be mended with separate transverse stitches.
It should be remembered that the repair mixture solution must be prepared with high quality - this means thorough mixing, no lumps, the consistency must be uniform.
If all the described operations are performed correctly, you can repair cracks in the floor screed yourself.
The goal is a large gap
To fill the hole, the ideal option would be suitable sized pieces of brick, polystyrene foam, polystyrene foam or plastic. If the parts are large, then they need to be broken or broken - small filling components guarantee that they will fit inside the hole as tightly as possible and thoroughly fill the cavity. Be careful that when filling the gap, you do not deform the existing hole or expand it.
These materials will help you save expensive mounting foam, which should be poured into the gap after the previous materials. Practice shows that using bricks or other fillers, only one container of polyurethane foam is required to restore even very large damage.
You should not fill it to capacity, because it tends to expand several times. Fill the remaining space by about a third, in very severe cases - by half. If the layer turns out to be very large, then apply it not at once, but in parts, allowing the previous layer to completely expand and harden. This will reduce the risk of overfilling and subsequent falling out of rags of foam, and as a result, will save its volume.
Causes
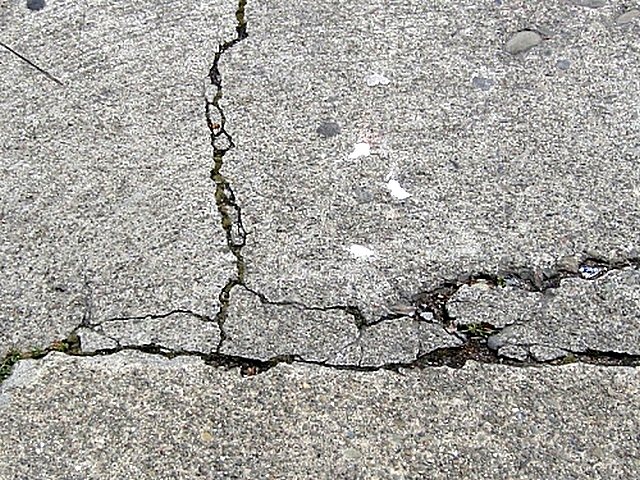
Cracks appear on large and small construction sites that are subjected to increased loads or collapse under their own weight, located in moderate or extreme climatic conditions. Defects are classified according to several criteria:
- Through and superficial, which can be deep and shallow.
- In width - cracks in concrete can be hairline (up to 1 mm), medium (1-10 mm), wide massive (over 10 mm).
- In relation to reinforcement - with its partial or complete exposure or without exposure of reinforcing bars. The latter option is possible if the defects are located along the edges of the structure or between reinforcing elements.
- By location - local, over the entire surface, at the edges and corners.
- By time of appearance - primary cracks formed during hydration or during shrinkage processes in concrete, and secondary cracks that arose during operation.
- In terms of impact on the integrity of the object - no effect, reducing strength (5-50%), destructive (decrease in the level of structural strength exceeds 50%).
The choice of pouring technology depends on the size and nature of cracks in the concrete.
Damage to a concrete floor screed does not occur on its own. For this, there must be reasons contributing to the appearance of one or another type of defect:
- Defect - Cracks and gouges in the screed. Reasons - There are no shrinkage joints in the floor. The filling was carried out with a solution of the wrong consistency. Weak reinforcement of the base during construction.
- Defect - Small holes all over the surface. Reasons: When pouring, air bubbles remained in the solution. The screed was poured without priming the surface.
- Defect - Peeling of the screed. Reasons: Pouring was done on a poorly cleaned surface. Incorrect preparation of the base before screeding.
- Defect - Heavy dust on the screed. Reasons: Intensive use of coating. The screed was made with low-quality concrete.
We suggest you familiarize yourself with How to get rid of fungus on concrete walls
First of all, we note that technically the floor screed cracks in two cases:
- Problems with the foundation. Heterogeneity, small thickness and other inconsistencies of the sole lead to breaks in the coating. In this case, we will not be able to restore it in any way. Only complete removal and bringing the base itself to the required standards will allow for high-quality cementation.
- Low quality of the screed itself as a result of errors during installation. This is what we will fight against.
In order to effectively eliminate cracks in the floor screed and prevent them from appearing in the future, we will consider non-compliance with the rules for pouring concrete that leads to them.
During hardening, uneven shrinkage processes occur in the cement mortar.
- differences in the thickness of the coating in different places;
- temperature differences;
- external loads coming from other building components.
One of the most significant examples is the appearance of a crack on the threshold of a doorway. This area is smaller in width than the rest of the room, so it will dry faster, experiencing the mechanical loads of neighboring rooms.
Such deformation does not cause any particular harm; it can be completely eliminated with a finishing coating. But if expansion joints had been created, it would not have appeared at all.
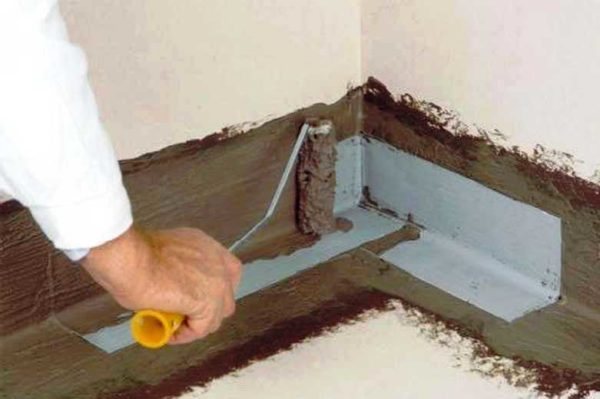
Also very important is the use of damper tape for heated floors. Many even experienced specialists discard this point, but in vain. The cast mass of concrete, resting against the wall at the moment of expansion, can both be damaged and cause significant damage to the side ceiling.
damper tape for heated floors. Many even experienced specialists discard this point, but in vain. The cast mass of concrete, resting against the wall at the moment of expansion, can both be damaged and cause significant damage to the side ceiling.
There are many reasons for damage to the screed - these can be external or internal influences.
A typical, but even worse, damage to a concrete screed is the appearance of a network of cracks.
- Changes in the soil can have a negative impact on screeds that are poured directly onto the subgrade. Deformations are possible due to poor quality compaction of the base. the cause may be the absence or insufficiency of thermal insulation - with the advent of cold weather, the effect of winter swelling of soils is possible. Another reason is that the screed was poured without regard for the very close location of groundwater.
All these factors can lead to instability of the soil layers, which is reflected in the concrete slab. And this is without taking into account possible seismic shocks.
- Impacts of an internal nature. This item most often includes the use of low-quality screed mortar, as well as pouring carried out in violation of technological requirements. Another factor is the completely natural shrinkage of the structure, which can create very significant internal stresses in the concrete slab, leading to its cracking.
- External influence. This group includes mechanical damage due to the fall of various heavy objects, violation of operating rules (exceeding the permissible load), or from exposure to moisture for a long time.
As you can see, some factors can be foreseen, and try to minimize the likelihood of their negative impact. But there are also reasons of a spontaneous nature, as well as natural aging processes of building structures. So repairing a concrete floor can become an urgent need for any owner of a house or apartment.
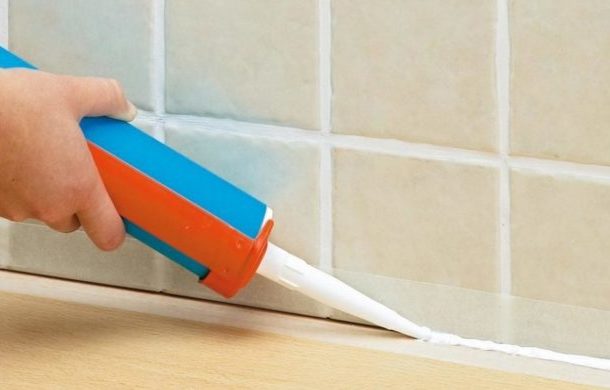
Gaps between floor and wall
This problem occurs quite often. Moreover, it can be either a house with a wooden floor or an apartment in a panel house. In any case, the problem must be solved: the sooner the better.
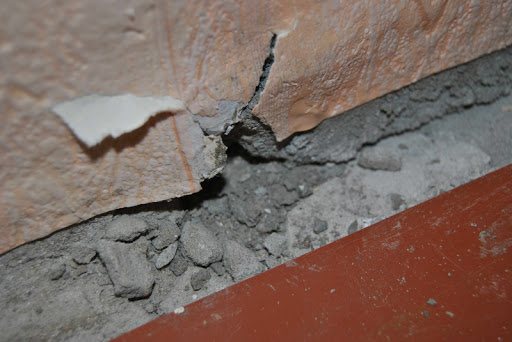
As for flooring made of boards, according to the technology of building construction, a small gap between it and the wall is necessary. This is a mandatory condition, since wood is a “living” material and can expand with high humidity or decrease in volume with dry air. In addition, this is also such important ventilation for wood. The initial width of the gap is in the range of 0.5-1 cm, the permissible increase is up to 2 cm. In the future, you will have to remove the plinth and eliminate the damage. By the way, skirting boards are effective for gaps of 1-2 cm, and their poor installation allows debris to accumulate between the floor covering and the wall, eventually destroying and deforming the joint.
To seal the gap, we dismantle the baseboard, thoroughly clean the gap from dirt and try to reduce its size. The choice of material to eliminate the defect depends on the depth and severity of the latter. Typically used:
- Felt (for caulking), jute, tow.
- Polyurethane foam.
- Plaster, putty.
- Acrylic or silicone sealant.
If the gap:
- Small (less than 3 cm). It is easy to seal it with plaster, polyurethane foam, cement mixture, putty .
- Medium (from 3 to 5-8 cm). Here it is necessary to use additional (preferably natural) materials - tow, moss, jute felt rolled into a “sausage” . They will add strength to the filling, and if processed, for example, in formaldehyde, they will prevent the appearance of insects in the future.
- Large (more than 5-7 cm). To fill the voids, the following are suitable: polystyrene foam, pieces of brick or wood . The main thing is that the filler is not very fine, covers a larger area, but does not make the gap wider.
When the gap is filled with auxiliary material, you can fill it with construction foam, cement mortar, etc.
If, when eliminating the gap, there will be plaster on top, then pieces of wood cannot be placed in the recess. They will absorb moisture from the solution, which can cause rotting, swelling, and mold.
After complete drying, excess material is removed, surfaces are cleaned, finishing work is carried out, and if desired, the baseboard is installed.
Types of concrete floor repairs
Naturally, the first thing to do on the floor is to carry out a thorough inspection of its condition. The resulting picture and the conclusions drawn about the reasons for the “ill health” of the coating will help determine the choice of damage repair technology.
There are several types of repair work on concrete screed. Each of them is suitable for a specific case, that is, depending on the causes and extent of damage.
- Dust removal. They resort to it when the screed shows low surface strength and is very dusty. The dust removal process can be an independent and sufficient measure for floor repair (but not so often). Usually it becomes one of the preparatory stage operations for other, more complex repair cases.
- Local repair is the elimination of small defects that appear in the form of potholes, protrusions, sinkholes, cavities, deep and wide cracks that have arisen in individual areas;
- Major repairs of the floor for the installation of a decorative covering or a “warm floor” system are carried out if more than 30–35% of the area of the entire screed is damaged. There is no point in thinking about “fighting individual shortcomings” - everything needs to be redone, initially with high quality.
Why can gaps appear between floor boards?
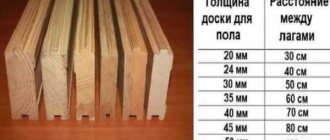
There are several reasons for this problem. The most common of these is drying out of the boards. Often, wood that looks thoroughly dried out is not dry. It is damp inside, which leads to cracks appearing over time. Therefore, when choosing boards, preference should be given to those that have been vacuum dried in production.
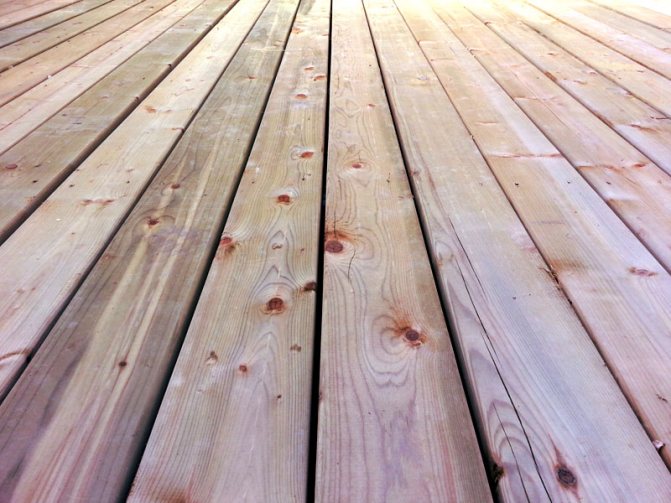
Gaps between boards can be a real problem
Another reason could be various installation errors. If the joists are laid incorrectly, the floor will “walk”, which will lead to the appearance of cracks.
Room humidity is too low. Typically, this problem occurs in winter, when the heating radiators are running at full capacity and the windows are closed. In this case, sealing the seams is not recommended. When the normal microclimate in the room is restored, the boards will begin to expand, which will lead to their arching - the floor will go in waves.
Only complete dismantling and refurbishment of the floor can help here.
You also can't ignore rodents. But there is no point in sealing holes and cracks until the root cause is completely eliminated.
Sealing cracks in floor screed
The final stage before installing a clean floor is a screed. Often cracks of different sizes and configurations appear on the finished surface. We will discuss sealing cracks in floor screeds and the factors that cause them to appear in today’s publication.
The screed is designed to level the base for laying the finishing floor covering. It eliminates all differences in elevations and brings the horizon to the same level. Therefore, the preparation must be carried out efficiently, in compliance with all regulatory documents and the project.
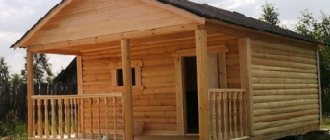
We invite you to familiarize yourself with do-it-yourself stoves for baths and saunas
But these requirements are not always met - hence the appearance of cracks on the surface, which is unacceptable. First of all, let's consider the probable reasons for their appearance.
If defects are found, you should:
- Inspect the entire building structure to identify problems.
- Determine the nature of the defects (surface, through, microscopic, massive), the width of the opening, the degree of exposure of the reinforcing elements.
- Select the repair composition in accordance with the survey data.
- Open up a crack in concrete by removing loose particles with a brush and vacuum cleaner before repairing the defect.
- If the defect has exposed the reinforcement, then it is necessary to clean it from corrosion products with a metal brush and treat it with an anti-corrosion compound.
- Open small cracks to a state in which they can be filled with a repair compound. Large cracks in concrete with an opening width of more than 4 mm - prepare for strengthening. To do this, grooves are made across the gap in the concrete element for laying reinforcing wire in them.
- Treat the surface to be repaired with a primer, which increases the adhesion of the repair composition to the base.
- Seal the cracks. Most often, cement-sand mixtures with factory-prepared expanding cement are used for this purpose. When deciding how to fill a crack in concrete - in the screed and seams between floor slabs - you can choose a mixture consisting of liquid glass (20% of the total mass), cement (20%), sand (60%).
If the defects are large, they are eliminated step by step. After pouring, the repaired crack in concrete is rubbed down and the surface is leveled. To improve the quality of the repair, a protective coating, such as a plaster layer, is applied to the concrete element.
This method is suitable for repairing defects that occur on the surface of swimming pool bowls, for restoring external walls and monolithic foundations. Stages of repair work:
- Cutting a crack, removing weak elements and dust.
- Measuring the width and depth of the crack.
- Selecting a suitable self-expanding cord or tape.
- Laying the cord or tape into the prepared cavity.
- Fill the remaining space with polyurethane sealant using a mounting gun.
A significant advantage of this method is the ability to carry out work at subzero temperatures.
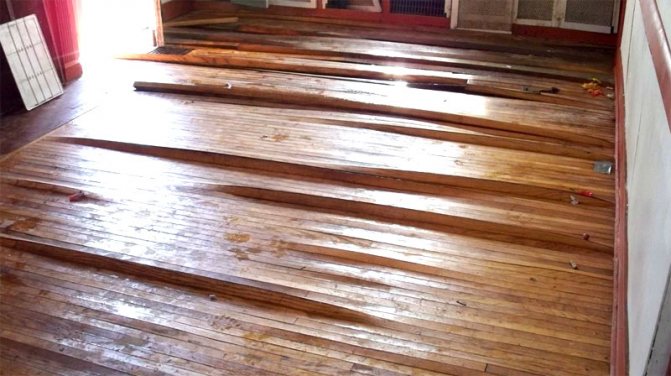
How to seal cracks in the floor
You should probably start by sealing the cracks in the wooden floor. However, before you go shopping for wood putty or make your own putty for floor cracks, it is very important to eliminate the cause of cracks, creaks and other serious defects. The fact is that if wooden floors become loose during use, then no amount of crack sealing will help or solve the problem. It is very important to eliminate it first, after which you can begin to seal the cracks.
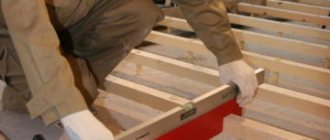
So, the easiest way to eliminate the squeaks of a wooden floor is to additionally fix the floorboards using self-tapping screws. We take a screwdriver and 76-size wood screws, and then firmly tighten the loose floorboards of the wooden floors.
Things are a little more complicated in the case of rotten beams under wooden floors; in this case, you will have to tear down the floors and replace the rotten elements. Once the cause of the squeaks has been identified and eliminated, you can begin to repair cracks in wood floors.
To seal cracks in floorboards, you can use different compounds, from factory-made wood putties to homemade putties. I would especially like to recommend to the reader a putty for a wooden floor based on PVA glue and small sawdust.
To make it, take a small amount of sawdust and simply mix it with PVA glue until you get a thick elastic mass. This is what you need to cover the cracks in the floor using a small metal spatula.
It is important that if the cracks in the floor are too large, then it is advisable to first plug them with a piece of rag, and only then apply putty. As a rule, these manipulations are quite enough to get rid of cracks in a wooden floor for a long time.
Stages of concrete floor repair
Each type of repair has its own technological features of its implementation. But the preparatory cycle will always come first.
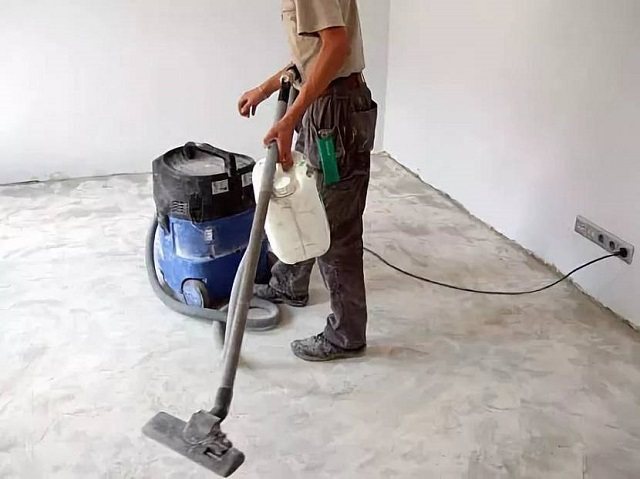
Preparatory measures include cleaning the floors from old decorative coverings, if any, and very carefully removing debris and dust from the surface. To reduce dust in the room, the surfaces to be cleaned are sprayed with water.
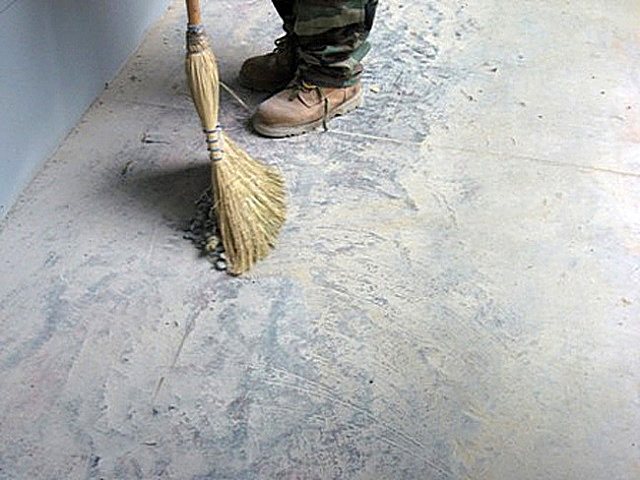
Cleaning the concrete base: with a broom - this is a last resort, or only for removing large debris. It is best to use a powerful vacuum cleaner.
After large debris has been removed, small cracks and potholes will open, which should be cleaned (try to the full depth) using a vacuum cleaner.
After the surface has been cleaned, it is necessary to inspect it very carefully and try to understand the causes of damage. At the same time, the actions that need to be performed will become clear. Based on the information received, it will be possible to select a technology for repair work and draw up a plan and implementation. Which, of course, includes the materials necessary for its implementation.
The tools usually required are very simple. These are, conditionally, cleaning devices, as has already been said. It is convenient to prime the surface with a roller, and in hard-to-reach places (in corners, narrow niches, behind pipes, etc.) with a brush.
To prepare repair compounds, you will most likely need a drill with a mixing attachment, or a construction mixer. Application and leveling of solutions cannot be done without spatulas, rules.
Some repair operations may require the use of specific tools (a hammer drill, an angle grinder, and others). This will be mentioned as we proceed.
Dust removal
If, after removing the decorative coating, it turns out that the surface of the screed is intact and has no serious damage, but the upper layers are unstable and very dusty, then fixing this is not difficult at all. To remove dust from a concrete floor, you can use one of the special water-soluble primers based on acrylic, polyurethane or epoxy. There are quite a few of them on sale – in a fairly wide range.
Dust removal of a concrete surface is not just removing dust, as it might seem, but creating conditions to stop its mass formation
For floors in outbuildings, as well as subfloors in residential premises, for example, Ashford-Formula, Elakor-PU or Neomer-LP soils are suitable. These compositions will bind dust particles, creating a protective layer about 150 microns thick.

One of the most proven and reliable strengthening and dust-removing impregnations is “Ashford Formula”
If it is necessary to remove dust from finished floors in any room, it is recommended to use Elakor-ED, GruntElast-PU and Retroplate, which are capable of creating a layer of up to 250 microns.
We suggest you familiarize yourself with How to make concrete floors in a bathhouse with your own hands - pouring options
Impregnations for concrete
As mentioned above, dust removal is usually carried out before more complex repair work.
Preparation for work
Filling such cracks falls into the category of cosmetic repairs. Preparation depends on what decorative elements your walls or floor are decorated with. If there is a baseboard, it must be removed, the wallpaper removed, the paint layer cleaned and removed, and the whitewash washed off. In the latter case, you need to let the wall dry completely. Remove all dust and dirt that may interfere with the quality fixation of the sealing materials.
If the sealing takes place in a room where you do not plan to carry out a complete renovation, then you need to remove the wallpaper only partially, or try to carefully tear off the strip from the wall so that after finishing the work you can glue it back, returning the wall to its original appearance. All surfaces that may get dirt during the repair process must be protected with film, paper and secured securely - this will avoid additional costs when putting things in order. Such measures will protect the floor and walls from polyurethane foam, plaster and paint. Paper or newspaper should not be used if there will be a lot of water in the workplace - it is useless as a protective material in this case.
#Promised bonus: Calculation of solution for self-filling screed
If you plan to independently prepare a solution for pouring screed, then all responsibility for the correct dosage of components, that is, for the quality of the future concrete, rests entirely with the master himself. To avoid making mistakes, use our online calculator.
Go to calculations
- The calculator will calculate, firstly, the total amount of solution required to fill the entire room.
- To do this, of course, you should indicate the area of the room.
— The difference in the base level is indicated (the difference between the highest and lowest points). That is, the unevenness (distortion) that will be eliminated with a screed.
— Finally, the minimum planned thickness of the screed is indicated.
— When planning, it is customary to include a supply of construction materials. In our calculator, the user can choose to leave a “net” result or take into account a reserve of 5 or 10 percent.
- Secondly, it is possible to carry out calculations taking into account the capacity of the existing concrete mixer (which should be indicated in the calculator).
The program will calculate both the number of batches and the “recipe” for each batch.
This means that the user will be shown how much cement, sand, water and plasticizer is required for one batch. Moreover, it is shown in units of measurement convenient for practical work - liters and buckets.
Remedies
Now, understanding why the floor screed cracked, it will be much easier to eliminate the deformation.
What should I do if the floor screed is cracked due to the lack of expansion joints?

We carry out the following work:
- We cut the shrinkage seams, creating the necessary mesh from them. We remember that the recommended distance between them is 5 m, and the depth of the cut is a third of the thickness of the layer.
- We seal them with polyurethane-based sealant.
Advice: the crack filling material must have the same level of strength as the main fill material. If the filler is inferior in strength, it will begin to crumble. If, on the contrary, it is stronger, then the areas adjacent to it will begin to crumble.
- We make a groove in the crack, thereby expanding it.
quick-drying floor mixtures do not need such care, but you should not leave them, for example, in bright sun.
Repairing cracks in concrete floors with a spatula
- After hardening, we rub the cracks flush with the rest of the surface.