- Roofing from corrugated sheets How to remove a rectangular chimney pipe
- Ondulin coating
- Extraction through a soft roof
- Passage through ondulin
- Elastic penetrations
- What is the goal?
- Pipe waterproofing Basic installation work
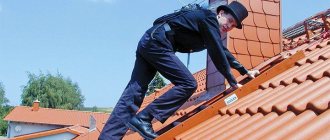
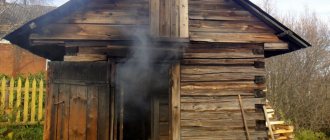
Objects that have a heating function from a boiler, stove or fireplace require normal exhaust of smoke to the outside, which is necessary to maintain the protection and safety of residents. Therefore, it is extremely important to know how to make a chimney pipe pass through the roof and roofing, taking into account all standards.
Chimney installation rules
If the house has a stove, then a chimney is also needed. Although instead of a stove there may be a special tank running on gas. In any case, the house is heated somehow, and combustion products need to be removed. There are several options for removing the pipe through the roof, related to determining the location. It is planned when a house project is being developed. The location is considered relative to the ridge of the roof - a horizontal edge that is located where two slopes meet. The pipe can be installed:
directly in the ridge;
at a distance from the ridge.
The first and second options have their pros and cons. On the one hand, it is easier to install a chimney in a ridge. But this is for someone who deals with this particular issue. But for arranging a rafter system, this is more difficult, because you will have to make a gap in the horizontal beam. On the other hand, when the pipe is in the ridge, this guarantees good traction. And the possibility of leakage under it is reduced to a minimum here. But still, most often the chimney is moved relative to the ridge.
Chimney offset relative to the roof ridge
In this case, the following building regulations must be observed:
If the chimney on the roof is installed at a distance of no more than 1.5 m from the ridge, then the pipe should be 0.5 m higher than it.
When installed at a distance of 1.5 m to 3 m from the ridge, it is made on the same level with it.
When the pipe is more than 3 m from the ridge, it can be lower than it, but no more than 10°.
The best option for locating the pipe relative to the ridge is not far from it. If you make the chimney much lower, the risk of damage from falling snow increases.
To ensure good traction, you must adhere to certain standards for placing the chimney relative to the roof ridge
There is a place where it is generally not recommended to install a pipe - the valley. This is the internal angle that two slopes of a complex roof form when connected. There is always an increased load on it, since precipitation flows there and snow is retained. With such an installation, the possibility of waterproofing damage is very high. This means that there will be leaks.
Chimney installation rules
- In no case should the chimney be laid in the place where communications pass (electrical wiring, sewerage, etc.).
- To minimize heat loss, it is recommended to locate most of the structure indoors.
- The outer part of the chimney must end with a deflector to prevent precipitation from getting inside. Don't forget about the snow guard. They will protect the gas outlet channel from damage.
- Keep the step of fastening the structure to the wall no more than one meter to avoid further curvature of the chimney.
- The place where the pipe passes through the wall must be additionally protected with thermal insulation material. To do this, the diameter of the hole needs to be made slightly larger than the diameter of the pipe.
- The sandwich pipe cannot be installed as the first pipe above the combustion tank. It is preceded by the so-called “sandwich start”.
- The length of horizontal straight sections of the chimney should not exceed 1 m.
- When designing a chimney, make sure that when passing through the wall there is a single pipe without joints. All connections must be visible and directly accessible.
A chimney through a wall can be done in two ways. The first option involves raising the pipe closer to the ceiling and then exiting. The second option represents a design that goes directly from the boiler in a straight line.
With the second option, almost the entire chimney ends up outside the house. The advantage of this type of design is that only one elbow will need to be used, which will affect the efficiency of traction. And the likelihood of soot plugs forming is much less.
Chimney outlet options
Before performing installation work, it is necessary to draw an assembly plan, calculating the diameter of the chimney and its height. There are some factors to consider.
Warm air rises, which means the higher the chimney, the greater the draft. It also depends on the diameter, so it is very important to correctly determine what size chimney you need. Its size is also affected by the power of the heating device.
The diameter of the double-circuit pipe directly depends on the size of the boiler installation pipe. Therefore, it is difficult to draw an installation diagram without knowing what type of heating device will be used. A simple rule applies here: the inner casing of the sandwich should in no case be smaller than the pipe itself. You can take more.
We invite you to familiarize yourself with the Gazebos with barbecue grill and sauna
For example, if the diameter of the outlet pipe is 120 mm, then the internal diameter of the sandwich pipe should be the same size or larger. In no case should you allow “narrowing” at the junction of the pipes and throughout the entire chimney, otherwise this may affect the draft.
Determining the chimney diameter
The diameter of the chimney is also affected by the type of heating device. Therefore, if you are building a smoke exhaust structure before purchasing a stove or boiler, then immediately take into account its power.
If the power of the heating device does not exceed 3.5 kW, then you can limit the diameter of the internal casing to 80 mm. For more powerful boilers (up to 5.2 kW), the pipe size should be increased to 95 mm. The larger the diameter of the inner pipe, the faster it will cool.
Calculating the height of the chimney pipe depends on the overall height of the house. If the height of the house is small (up to 5 meters), the height of the chimney in any case should be at least 5 meters. A short chimney can cause “smoke” in the house, and the power of the device is significantly reduced due to poor draft. And an excessively long pipe will increase fuel consumption, as if “forcing” the operation of the heating device, which affects the low efficiency of the heating system.
Calculation of chimney height based on boiler power
The optimal pipe length is considered to be in the range of 5-10 meters.
If the house is higher than 10 meters, then we focus on the ridge of the roof. The chimney should be 0.5 meters higher than the ridge to avoid creating turbulence. Consider also the material from which the roof is made. If the roof is covered with flammable material, then the top of the chimney should be 1 meter from the ridge.
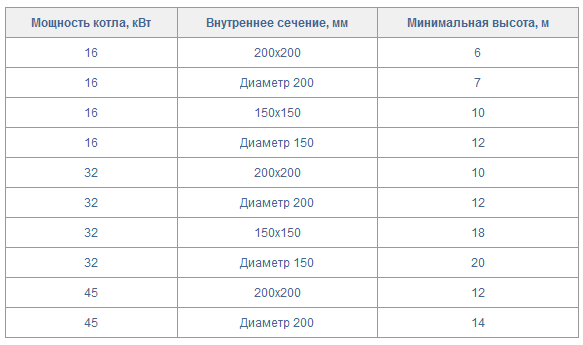
Before starting construction work, you should decide on the type of assembly of the pipes themselves: “smoke” or “condensate”.
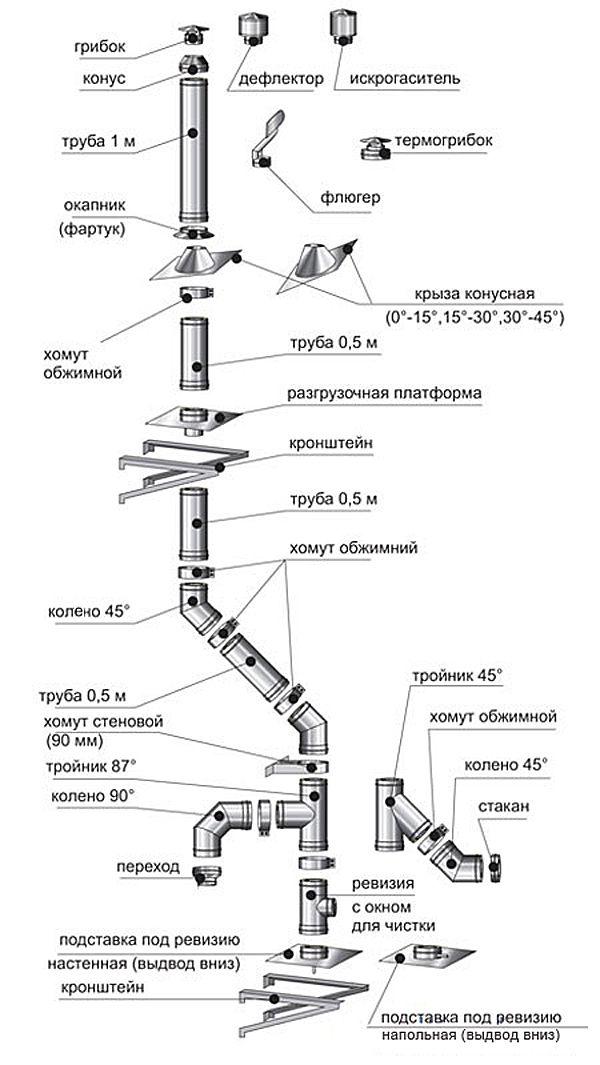
Sandwich pipe assembly options
Inner tube: The bottom element is inserted inside the top element of the sandwich.
The outer pipe is built in the same way as the inner one. The lower section is inserted inside the upper contour.
Each subsequent section is built upon the previous element, as if being put on top. This type of chimney connection is best used in stoves with high combustion temperatures.
Inner tube: take the upper section of the sandwich and insert it into the lower part.
Outer pipe: Here you have to do the opposite method. Take the lower element of the outer pipe and insert it inside the outer pipe of the upper element.
With this construction, condensate flows freely along the outer casing of the chimney into a special sump.
When is it better to use this assembly scheme?
- at low temperatures of combustion products;
- for external installation of a chimney;
- in stoves with a long burning function;
- in fireboxes with smoldering combustion.
Differences between smoke and condensate connections
Considering our task - to assemble a chimney outside the house, the choice of the type of sandwich connection is obvious. Pipes outside the house, when exposed to low temperatures, will cool faster, which means that the likelihood of condensation forming is high. Under the influence of moisture, soot begins to dissolve, forming acids. These substances pose a serious threat to pipe surfaces.
What tools are needed for installation through a brick or concrete wall?
- screwdriver;
- construction gloves to protect hands;
- ladder;
- knife;
- electric drill (for attaching the bracket);
- building level (to check the verticality of the chimney installation);
- perforator (for a hole in the wall).
What materials are needed for installation?
- metal box (pipe);
- dowels;
- sandwich pipe set;
- silicone sealant (necessarily heat-resistant!);
- tee (necessary to change the direction of the smoke and connect the pipe directly to the firebox of the heating apparatus).
- knee (45 or 90);
- support console, bracket (the entire structure is supported on it);
- clamps for connecting sections;
- foiled mineral wool (for insulating the pipe opening);
- plug (protective umbrella from precipitation and debris).
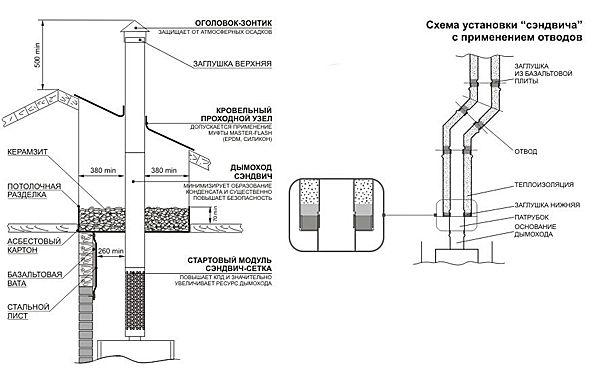
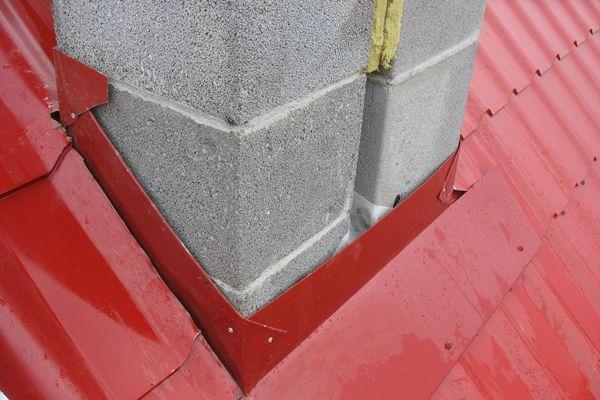
Protecting the roof from heat coming from the pipe
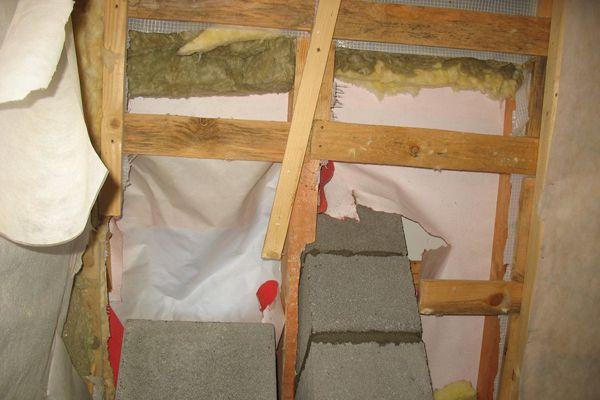
When organizing a pipe passage through the roof, it is important to insulate the roof from it. After all, the pipe gets very hot, which increases the fire hazard. The roof is protected using a separate box, the beams and rafters of which are located taking into account the requirements of SNiP. The minimum distance standard from the chimney to the load-bearing beams and rafters is from 130 to 250 mm. The inside of the box is filled with some material that does not burn. For example, it could be basalt or stone wool.
The chimney must never touch the roofing directly.
Further organization of the pipe outlet depends on what shape it is and what it is made of. The shape of the chimney can be made either as a regular square or round, or in the form of a rectangle or oval. And pipes can be brick, metal, asbestos-cement or ceramic. The material from which the roof is made is also taken into account. This can be slate, metal tiles, corrugated sheets, ondulin, roofing felt or bitumen shingles. Each case has its own characteristics.
How to install a chimney?
The chimney installation process is divided into several main stages, which consist of:
- Preparatory work;
- Installation of fastening elements;
- The actual installation of the chimney.
General stages of work:
- You need to drill a hole in the wall through which the chimney itself will exit, using a special tool. Modern models have adjustable nozzles and active cooling systems to prevent the appearance of cracks on the surface of the facade.
- Passage through concrete/brick wall. Concrete and brick walls are the most convenient material that does not require additional processing. It is recommended to additionally putty the place where the hole was created in order to eliminate the possibility of rapid degradation of the wall of the room.
- Passage through a wooden wall
When working with wooden surfaces, care must be taken to protect against overheating. Hot air passes through the pipe, which can cause materials to unintentionally ignite.
Ceramic mixtures, heat-resistant insulating materials and even glass wool are often used as insulating materials. You should not skimp on thermal insulation, as the consequences can be very sad!
The nuances of installing the passage of the chimney through a wooden wall
- After this, elements are installed on the outside of the house that will hold the chimney pipe in a single position. The kit usually contains dowels of the required diameter, with which you can perform this task.
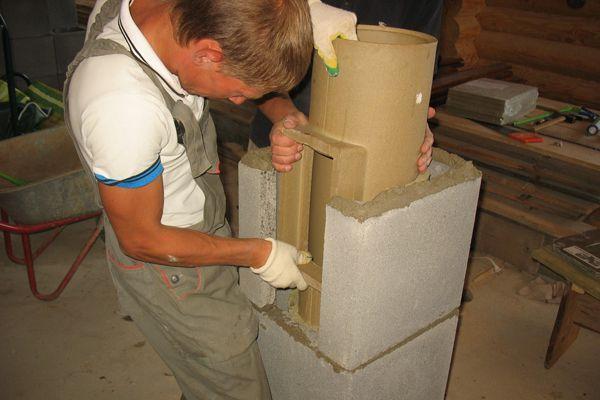
- The chimney itself is assembled from several separate parts, similar to a construction kit. Modern models have convenient fastening mechanisms that allow you to complete this stage in a matter of minutes.
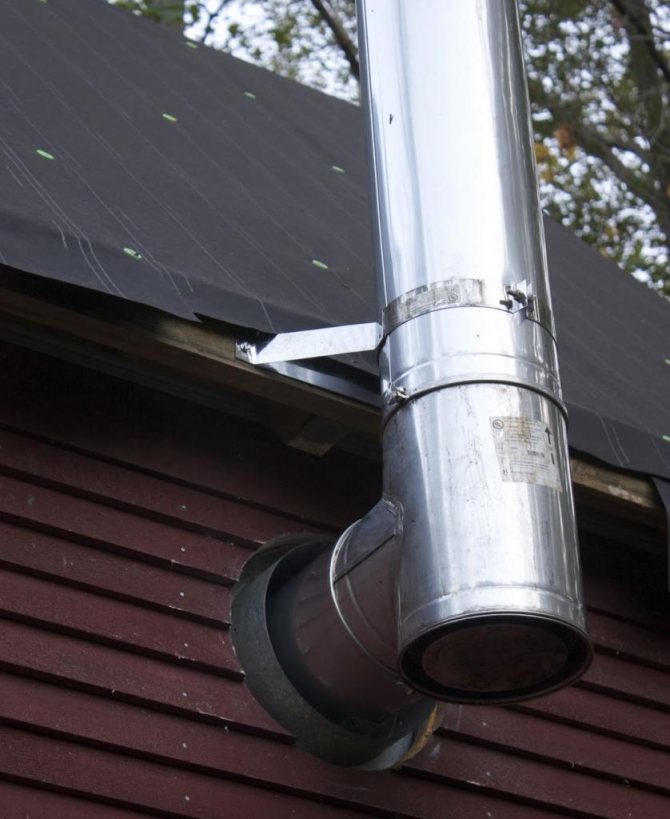
Installation of a round pipe
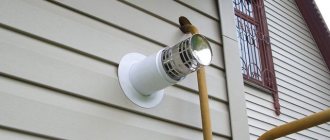
Often in construction a circular chimney section is used. To pass a round pipe through the roof and seal it tightly, special flexible adapters are used. They are made from heat-resistant polymer with elastic properties. In appearance, such an adapter looks like a funnel, at the base of which there can be a circle or a square. The base is called an apron, it is made in the form of wide fields. Since the material is elastic, it easily takes on different configurations. Therefore it has a wide range of applications. Such adapters can be used on roofs with any covering and slope angle.
Exit of a round pipe through an ondulin roof
The main thing is to choose an adapter that will match the diameter of the pipe. Although there are universal options for such products. They are made in the form of a stepped pyramid. To adjust their size to the pipe, the excess is simply cut off with scissors. Elastic adapters are attached to the roof using bolts or metal studs. They are installed in holes on the flange, which presses the adapter to the roof. The space between the flange and the roof surface is lubricated with a sealant that can withstand temperature changes.
Universal adapter for passing a round pipe through the roof
Features of a sandwich chimney
A type of round pipe is a sandwich chimney. It consists of two pipes of different diameters, between which there is a heat-resistant thermal insulation material. They are made of stainless steel. The sandwich chimney is in great demand because it provides stable draft, does not heat up, is easy to install and looks beautiful in appearance.
The passage through the roof of a sandwich chimney can also be done using an elastic adapter. However, it may not be in harmony with its mirror surface. In this case, a metal adapter is used, the material of which is also stainless steel. It is not flexible, so you must take into account the diameter of the pipe and the angle of the roof slope.
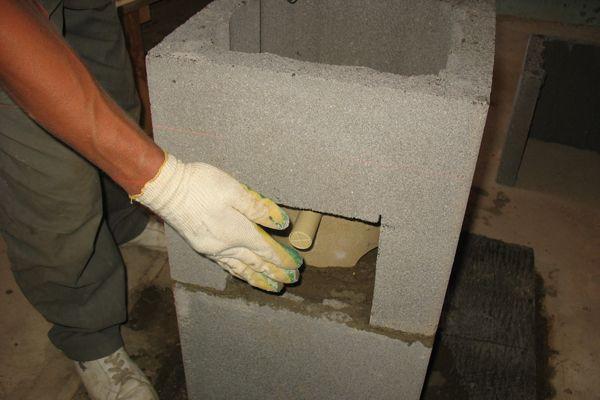
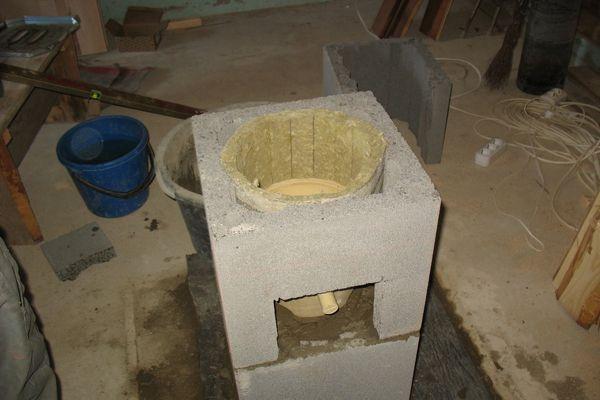
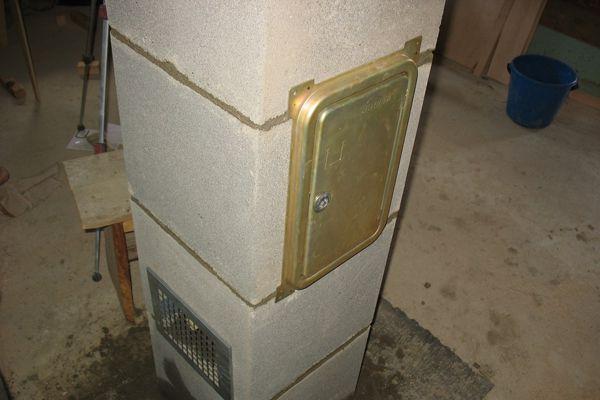
A special feature of organizing the passage of a sandwich chimney is the installation of a PPU - ceiling-passage unit. This device protects all wooden elements through which the chimney passes from high temperatures. It is a metal structure with a certain diameter through which a pipe must be passed. The material of its manufacture is galvanized steel or mineralite. The inner surface of the unit is lined with thermal insulation.
Ceiling-passage unit for a round pipe On our website you can get acquainted with the most popular sites in the Moscow region for the construction of a country house. In the filters you can set the desired direction, the presence of gas, water, electricity and other communications.
Drywall box
In this case, the instructions for installing the ceiling-passage unit look the same as with a metal box, with the exception that other materials are used. The procedure itself looks like this:
- It is necessary to make a square hole in the ceiling. In this case, the distance from the walls of the ceiling to the surface of the pipe must be at least 200-250 mm.
- Using heat-resistant plasterboard, make a high box. It will cover the pipe from blocking.
- On the ceiling side, a metal sheet with a circle in the middle (in accordance with the diameter of the chimney) is also fixed to the hole made.
- A metal pipe is pushed through the sheet.
- In the interfloor ceiling, a heat insulator is laid around the entire perimeter and along the entire height of the box.
As noted earlier, when installing a ceiling-passage assembly, expanded clay and other materials can be used instead of mineral wool.
Passage through metal tiles
Metal tiles are sheets of steel, copper or aluminum, which are coated with a polymer layer. In appearance they resemble natural tiles, which are folded in even rows. This roofing material is very popular. If a round pipe is to be passed through the metal tile, flexible adapters are used, which we have already described. When using a square or rectangular brick pipe, a different method of installation is used. It is as follows:
The connecting unit is being manufactured. It consists of two aprons - internal (main) and external (decorative). The material of manufacture is thin aluminum sheet or tin.
Before the metal tiles are laid, an internal apron is installed on the sheathing. These are 4 strips located on 4 sides of the pipe. They simultaneously extend under the metal tile (no less than 250 mm) and onto the pipe (no less than 150 mm).
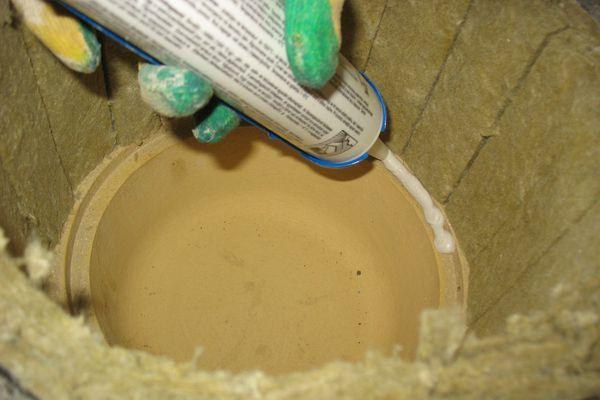
The apron elements are installed in a groove - a groove that is cut along the perimeter of the pipe to a depth of 10 to 15 mm. The groove is cleaned and filled with fire-resistant sealant.
To install the apron, you need to make a special groove in the pipe
The apron is attached to the pipe using heat-resistant dowels. The joints between the four planks are soldered. On the slats that are located on the sides, sides are made, the purpose of which is to drain water down.
The lower part of the apron is installed on the so-called tie - a sheet of metal with sides. This ensures water drainage from the chimney to the bottom of the roof. The width of the tie should be greater than that of the pipe by at least 0.5 m on both sides. Its length depends on the distance from the pipe to the edge of the roof.
After installing the tie and interior apron, the metal tiles are laid.
An external apron is installed on top. It is usually a corrugated sheet of lead or aluminum. There is a decorative strip in its upper part. It is attached to the pipe using self-tapping screws. The attachment point is slightly higher than parts of the inner apron. Before fixing the decorative strips, the fastening points are coated with sealant. To attach the corrugated sheet, its back side is provided with a self-adhesive coating.
Finished chimney pipe passed through metal tiles This might be interesting!
In the article at the following link, read about waterproofing a chimney on the roof.
A number of rules for fastening the passage
To correctly install a metal chimney to a wall, you must follow simple rules:
- For a pipe with a tee and a condensate drain in its lower part, it is best to use a special bracket.
- When installing sections one into another, the chimney should be secured to the wall using clamps every meter.
- It is necessary to ensure that the fastenings do not coincide with the joints of the sections.
- When going around the roof overhang, it is necessary to use elbows whose angle is only 30° or 45°.
If the installation of the drainage system has not yet been completed, then you should leave space for laying the gutter using fasteners of a suitable length.
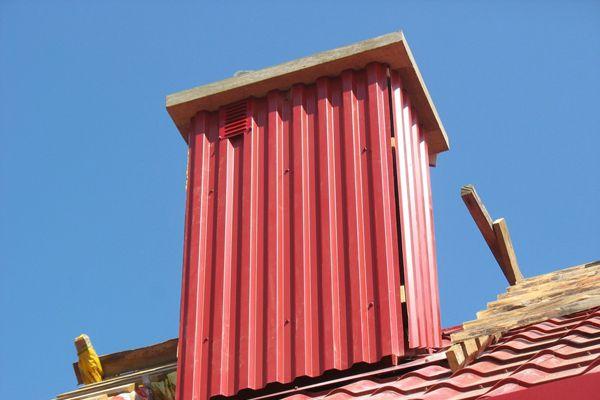
Installing a chimney through corrugated sheeting
Corrugated sheeting is a sheet of metal produced by cold rolling and then profiled. Mainly made of steel, but can be made of copper and aluminum. The sheet has ribs of oval, square, trapezoidal or polygonal shape. A special coating is made on top, which gives it anti-corrosion properties. Corrugated sheeting is often used as a roofing material.
To pass the chimney through the roof, in the case of a square or rectangular pipe, a device in the form of two aprons and a tie is used. The method is the same as for a metal roof. Installing round pipes in corrugated sheeting is not recommended, because it is difficult to cut the correct circular section into it. But if you still make a round chimney, the pipe is insulated using a universal elastic adapter.
Accessories for round pipes
Video material: tightness of a brick chimney through a metal tile
Corrugated roofing
This is a relevant material, often used in construction work. However, when using it, there is a risk of leakage, especially if technical rules are not followed. To prevent this outcome, it is recommended to place it in a vertical position. The roof hole is made with a grinder, but it is necessary to ensure that the resulting corrugated sheet does not have nicks or other irregularities.
How to remove a rectangular chimney pipe
In this situation, professionals recommend using galvanized sheet:
- Cutting four strips for further mounting on each side.
- Laying from the bottom edge to the cornice.
- Attach the strips and bottom fastening to the sheathing.
- Ensure tightness.
Exhaust of a chimney with a cross-section in the shape of a circle
In this case, installing a chimney through the roof requires rolled bitumen insulation or foil tape of the same name. After this, a penetration is installed, glued to the sheathing, and sealed with a heat-resistant sealant. If it is made of a rubber base, there is an increased risk of melting, so it is worth placing a clamp and gasket underneath that can withstand relatively high temperatures.
Passage through ondulin
Ondulin looks like regular slate, but its material is completely different. This is compressed cellulose, which is treated with bitumen impregnation. It comes in a variety of colors, is water resistant, but burns quite well. Therefore, when a passage through the roof is organized, maximum attention is paid to filling it with fire-resistant materials. The hole for the pipe in the ondulin is made large. To insulate the junction of the roof and the chimney, an apron is used, which is placed under the roof. In this case, elastic self-adhesive tape “Onduflesh” is used, made of bitumen with an aluminum insert.
Brick pipe passed through ondulin This may be interesting!
In the article at the following link, read about a chimney for a gas boiler in a private house.
Wall
An important point that has a significant impact on the design of the external chimney is the material from which your building is made. If the house or bathhouse is made of brick (and any other fire-resistant materials), then the outer pipe is removed and secured according to the simplest scheme, the basic principles of which are described above.
If you are thinking about how to remove a chimney through a wooden wall, then you should pay attention to some essential details. First, you need to immediately calculate the diameter of the hole so that the main pipe is at least 450 mm from the wall.
In this case, it is best to use sandwich pipes, which significantly increase fire safety due to their own non-flammable insulation located between the circuits.
Next, be sure to fill the space between the pipe and the wooden wall with non-combustible material. Most often, asbestos or brick are used for these purposes.
Secondly, it is necessary to select such elements for fastening the external pipe so that it is located at a distance of at least 100 mm from the wall. (This again will significantly increase the fire safety of the building).
Thirdly, the installation of spark arrestors is MANDATORY.
And finally, it is worth considering the presence of a valve (gate), which will allow you to close the pipe when it is not in use.
Installation of a chimney in a soft roof
Soft roofing is a flammable material, so it is important here that there is a gap of 13 to 25 mm between the pipe and the covering. The passage of the chimney through the roof is organized depending on its shape - flat or pitched. The material from which the pipe is made also plays a role. If the roof is flat, consisting of a concrete slab and the pipe is not made of brick, the passage is made as follows:
Around the pipe at a distance of about 15 cm along the perimeter, everything is removed, right down to the concrete.
Concrete is poured so that a side is formed, the height of which is 15 cm.
The roofing covering is applied to the walls.
Where the roofing material connects to the side, a metal strip is installed. Fastening is done using dowels.
An ebb tide is installed on the side.
If the pipe is brick, there is no concrete side. In this case, roofing material is placed on it and a metal apron is installed on top. A groove is made in the wall of the pipe (depth 1.5 cm), into which the edge of the apron is inserted.
When passing a pipe through a soft roof, many nuances must be taken into account
The junction is filled with sealant. In the case of a pitched roof, waterproofing is carried out as on other coverings, that is, using aprons (for square and rectangular pipes), as well as flexible or metal adapters (for round ones).
Smoke exhaust outlet through various types of roofing
Below are recommendations for installing a smoke exhaust duct depending on the roof material.
Tile roofing
In this option, to process the passage, professionals resort to the use of corrugated, self-adhesive, sheet aluminum or lead.
Exiting a pipe with a cross-section in the shape of a square or rectangle
If the smoke exhaust hole has a brick base, then due to non-standard dimensions, before removal, a small part of the covering sheets must be removed or cut to a larger size. To ensure waterproofing, elastic tapes with an adhesive base are used. They are glued by a specialist to the pipe base and roof sheathing. The upper edge is secured with a metal strip, and the existing connections are sealed with a sealed substance.
To prevent precipitation, it is recommended to install an additional tie.
Passage of a round chimney through the roof
This is achieved thanks to a special cap, which is responsible for the smoke exhaust hole. A small and even hole is made in the coating, according to the pipe dimensions. A master flush is put on it, and the existing connections are sealed with a sealed substance.
Installing a chimney in a finished roof
If the chimney is not installed at the construction stage of the house, but in a finished roof, the following is done:
There is a place for output taking into account the requirements of SNiP. This should be the space between the cross beam and the rafters.
A box is made of beams, the cross-section of which is equal to the cross-section of the rafters. The box is made such that the width of its sides is 0.5 m greater than the diameter of the pipe.
A hole is cut in the roof equal to the perimeter of the box. To comply with it, through holes are drilled from the inside in the corners of the box.
The roofing material is bent outward, a pipe is inserted into the hole and secured.
The box is sealed with fire-resistant material for thermal insulation.
The junction of the pipe and the roof is sealed. The flange (adapter) is being installed.
The pipe must be routed only through an adapter
Installing a sandwich pipe through a finished roof
Over the past few years, chimneys have been manufactured using sandwich pipes. People are attracted by its appearance, low cost and long service life.
An important condition is the ability to install a sandwich chimney yourself.
Installation of a vertical channel requires certain skills in the field of construction and knowledge of some nuances. However, with a lot of effort, you can do this work yourself. The main thing is to figure out how to do it correctly, as well as comply with safety precautions and fire regulations.
How to install a chimney through the roof
This operation requires a preliminary study of the location of the rafters and installed floor beams. The pipe must be between these parts. It is important that the outer wall of the smoke duct does not touch the combustible element. In this case, it is necessary to maintain a minimum distance of 13 cm. Moreover, this part must have insulation. To fulfill this requirement, the pipe is often shifted in two places at an angle of 45 degrees.
A special hole is made in the ceiling taking into account fire safety requirements. The distance from the chimney must exceed 250 mm, and thermal insulation must be laid on the ceiling.
To protect the edges of the hole, a fireproof material is used - mineralite, which is fixed using ordinary nails or self-tapping screws.
Next, the sandwich structure is inserted vertically into the made box. The pipe does not require strong fixation: simply creating a direction is enough. It will be kept from falling by 2-3 slats, while vertical movement will be completely free. This design is necessary so that the cylindrical product can move up or down. As the pipe heats up, it lengthens, which requires additional space and freedom of movement.
The remaining space is covered with basalt wool. You can cover everything with expanded clay or foam glass granules.
Several years ago, ordinary sand was used for this purpose. However, over time, he began to spill out through the existing cracks. Today, this option has been completely abandoned.
The front side is wrapped in stainless steel. A non-flammable gasket is made under the sheet. Previously, asbestos was used for these purposes. Today it is considered a carcinogen, which is why this material has been replaced by mineral wool.
But you can also use another method: cover the edges of the hole with mineral wool and only then install the assembled passage unit made of stainless steel sheet.
After the pipe is brought into the attic, a hole is made that passes through the roofing pie. Next, the waterproofing is cut crosswise. The resulting triangles are carefully wrapped and then fixed with a construction stapler. The opened sheathing must be cut, maintaining a distance to the smoke channel of more than 13 cm.
The photo, which shows the red arrows, shows an incorrectly executed pipe passage through the roof. The section separating the cylindrical part from the boards is of insufficient size. When manufactured correctly, the edges are trimmed with mineralite, taking into account fire safety requirements. The next photo shows the correct passage.
After the roof deck is made, the pipe is closed with a master flush. For this, a special skirt is made that matches the shape of the top of the building.
The junction of the cylindrical product and the rubber gaskets is treated with a heat-resistant sealant.
The sandwich system modules, as well as the internal chimney, must be tightened with clamps.
Exiting the chimney through the wall - instructions
Before figuring out how to remove a chimney pipe through a wooden or concrete wall, you should carefully study the diagram of the pipe exit from the stove.
Options for venting the chimney through the wall
Pechnoy.guru recommends using double-wall systems (sandwich pipes), which not only have a longer service life, but are also protected from smoke backflow into the system.
https://www.youtube.com/watch?v=t2uvRdWgAq8
Black steel or a stainless steel alloy is usually used as a building material, since this metal is most protected from the destructive effects of hazardous factors and smoke components.
DO NOT USE plastic or PVC pipes. The pipe will not be able to withstand the load, and may also be damaged during installation or exposure to environmental factors.
There is nothing complicated or problematic about bringing the pipe from the stove through the wall with your own hands. Understanding how a chimney works and carefully following the instructions will help you do all the work properly. Be sure that the result will not disappoint you!
The market for modern building materials makes it possible to build completely different chimneys, which, although they have a similar design, are still used in clearly defined conditions. Depending on the combination of these conditions, the basic requirements for chimney installation are imposed.
The most common installation is to install a chimney through the roof of a building, since this method is relatively simple and is carried out during the construction of the house and roof. But what to do if the construction has already been completed and it is necessary to organize a chimney in the finished building? In this case, a chimney in the wall of the house can be an excellent solution. Such external placement of the structure has both its strengths and disadvantages.
Chimney in a load-bearing wall - advantages:
- saving internal space of the building;
- the possibility of installing a chimney through the wall after completion of construction;
- fairly simple installation method;
- no need to organize a passage through the roof and ceilings between floors (read: “How to install a chimney through the roof”).
But at the same time, the chimney outlet through the wall can be characterized by the following disadvantages:
- chimney pipes must be insulated;
- it is necessary to have a sufficient area of land to organize such a chimney;
- due to its design features, such a chimney heats not the house, but the street;
- sometimes such a chimney in no way fits into the overall architectural design of the building.
To properly install a chimney through a wall, you must adhere to certain rules:
- in the place where the pipe passes through the wall, there should be no pipe joints with the internal communications of the house;
- installation begins with hanging the chimney from the heating boiler. The chimney exits through the wall at an angle of 90 degrees;
- the next part of the chimney will be installed perpendicular to the first section. In this case, a condenser tank is placed in the lower part, the main mass of the chimney will be connected to the upper part;
- The passage of the chimney pipe through the wall must be insulated. Various thermal insulation materials are excellent for these purposes; they must be selected correctly before insulating the chimney pipe. It is advisable to cover the entry and exit points of the pipe with a protective casing or plaster;
- each joint is fixed with a clamp;
- pipe fastenings to the wall are installed at an equal distance from each other. In this case, you should not exceed an interval of 100 cm. A distance of 60 cm is considered optimal;
- after completion of the installation work, install the cap on the chimney pipe;
- To prevent contact between the chimney pipe and the wall, a layer of mineral wool is laid between them.
It is important to remember that the thermal insulation must be thick enough to absorb the resulting heat from the pipe. A correctly installed chimney eliminates future problems associated with the quality of operation of heating equipment.
The best option would be to exit the chimney from the gable side. If the heating equipment does not allow such an installation and the chimney pipe will exit from the side of the roof slope, then it is necessary to assemble a support post to which the chimney will be attached with sliding fasteners. If the roof overhang is more than 40 cm, then it is quite possible to do without such a rack.
In this case, the chimney can pass through the roof overhang, where additional fixation of the pipe can be arranged. It is also important to install snow guards above the chimney exit point. They will protect the chimney from damage due to snow.
If a wooden house will be covered with siding, then it is worth keeping in mind that most manufacturers of this material indicate an operating temperature range ranging from -50 to 50 degrees. Therefore, it is necessary to install the chimney so that the distance to the facing material is at least 15 cm. The place where the pipe exits through a wall covered with siding must be additionally protected with heat-insulating material.
Installation of a chimney is a fairly important stage in the construction of a private house (read: “How to properly build a chimney in a private house”). Therefore, before starting work, you should prepare and understand the most important aspects of installation. Not only the functionality of this element, but also the efficiency of the entire heating system depends on the correct installation of the chimney. Only full compliance with fire safety requirements and chimney installation rules can ensure its proper operation.
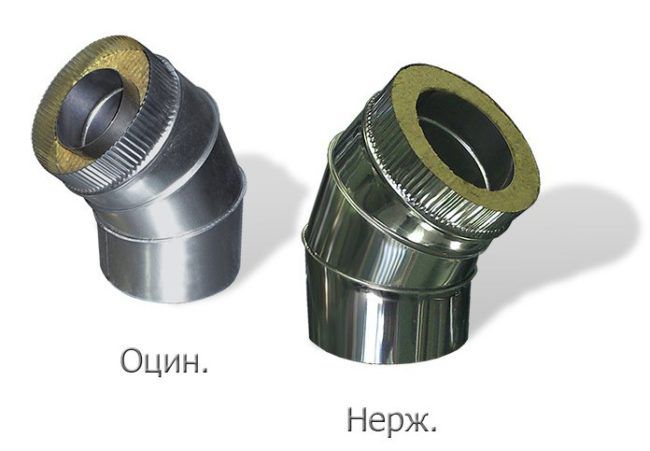
Increased heat resistance - up to 1000°C (and price)
For sauna and pyrolysis solid fuel stoves
As is clear from the table, different grades of stainless steel have different purposes. Cheaper alloys are used for the outer casing, more heat-resistant and expensive ones for the internal casing. This is necessary to reduce the cost of products, and high resistance to temperatures outside the chimney is not needed. There are even more budget options - the outer casing is made of galvanized steel. Externally, these products are inferior to stainless steel, but serve normally (with normal insulation and its thickness).
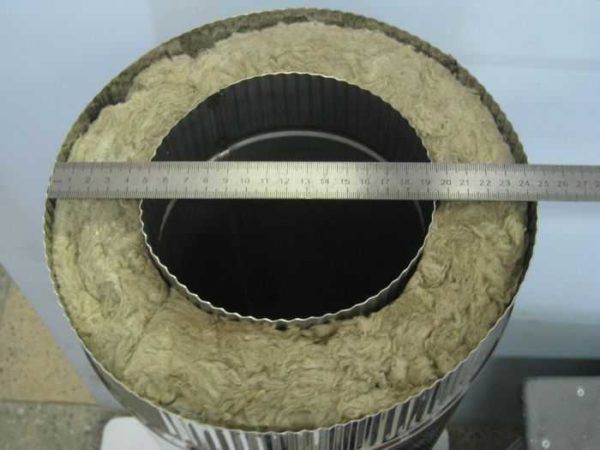
There is insulation between two layers of metal. Most often this is stone wool. The thickness of the insulation varies from 30 to 100 mm:
- With 30 mm thick insulation, the flue gas temperature should not exceed 250°C. Such temperatures are produced only by gas boilers of small and medium power.
- A 50 mm insulation layer can withstand temperatures up to 400°C. Scope of application - any gas and liquid fuel boilers, wood-burning, provided that the chimney is vented to the street (through the wall).
- A 100 mm layer of stone wool can withstand temperatures up to 850°C. Such a sandwich chimney can be installed on any type of solid fuel boiler, in fireplaces and hearths.
In addition to the thickness of the insulation, you need to pay attention to its brand, or rather, to the temperature range in which it can operate. Not every stone wool can withstand heating up to 850°C, but only some special brands. If you need a chimney for a solid fuel boiler, you will also have to take into account the heat resistance of the insulation.
A set of elements from which a sandwich chimney of any configuration is assembled
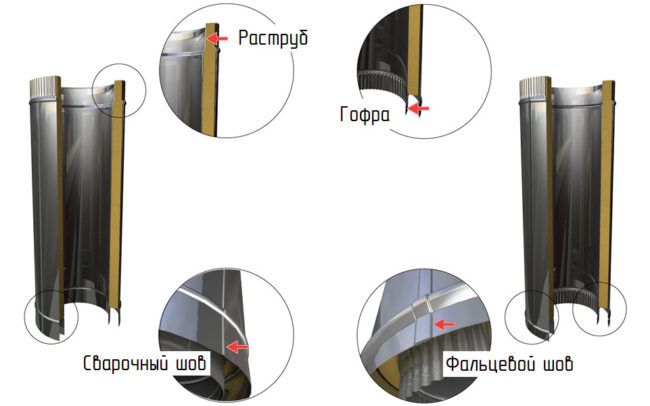
Connection types
Sandwich chimney elements can be connected to each other in two ways: with sockets and corrugated edges. A socket connection requires a slightly wider chamfer on one side. With this design, a high degree of chimney tightness is achieved. This type of sandwich pipe is well suited for gas boilers, where it is important to prevent leakage. There is also a minus: installation requires high precision.
The corrugated edge of the sandwich allows you to assemble the chimney without problems. The disadvantage of this solution is that to ensure tightness, a significant amount of high-temperature sealant is required, and it costs a lot.
Features of sandwich pipes for chimneys
It is also worth paying attention to the longitudinal seam. It can be welded or folded. If the seam is welded, it must be made in an argon protective environment (so that alloyed metals do not burn out). This type of connection is necessary for solid fuel boilers, sauna stoves and fireplaces. For all others, you can use a seam connection.
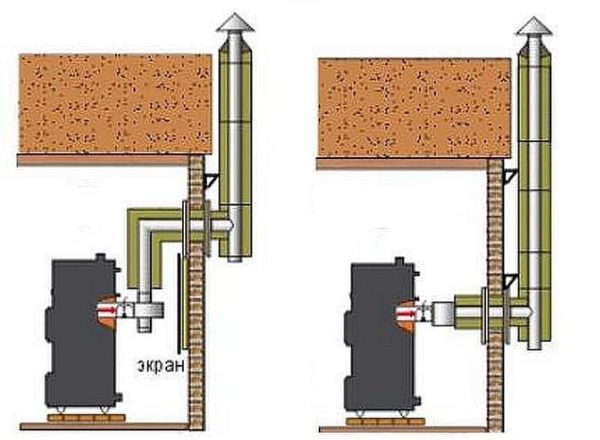
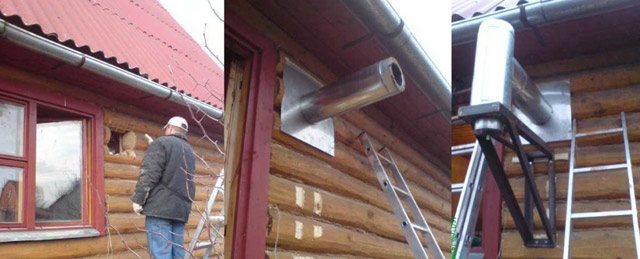
When venting a chimney through a wall, there are two ways. The first option (pictured on the left) is to raise it in the room closer to the ceiling and take it out there. The second is to draw a conclusion at the level of the smoke pipe from the boiler. In this case, almost the entire chimney ends up on the street.
How can a sandwich chimney be routed through a wall?
The second option is preferable - it has only one knee, which means, under equal conditions, the traction will be better. Also, with this structure there is less chance of soot plugs forming.
If the outlet of the smoke pipe is located not at the back of the stove, but at the top, the installation diagram changes slightly - a 90° elbow is added, then a straight section for passing through the wall, and then the same as in other diagrams.
The stove itself is placed on a non-flammable base, and the wall behind the stove is covered with a non-flammable screen. The easiest way is to fix a sheet of metal to the wall. It can be mounted on ceramic insulators 2.5-3 cm in height. There will be a layer of air between the sheet of metal and the wall, so the wall will be safe. The second option is to place a thermal insulation material under the metal - for example, mineral wool cardboard. Another option is an asbestos sheet (as in the photo).
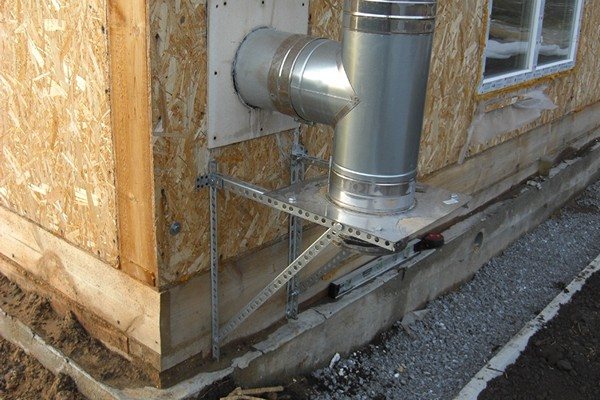
Preparing a site for installing a furnace and installing polyurethane foam into the wall with a piece of pipe
A hole is made in the wall. Its dimensions are determined by SNiP - the distance from the pipe to non-combustible walls must be at least 250 mm on all sides, and to combustible walls - 450 mm. It turns out to be a solid hole, especially if we talk about walls made of flammable materials. There is one way to reduce the size of the opening for the passage of the sandwich: make the dimensions according to the standards of non-combustible walls and sheathe the opening with non-combustible material.
An example of organizing the passage of a sandwich pipe through a wall
The opening can be round or square, as long as fire safety standards are met. Square holes are easier to make and cover, which is why they are made more often.
This is what a pipe passage through a wall, sealed with a sheet of metal, looks like
A passage unit is inserted into this hole - a box made of non-combustible material. The sandwich chimney pipe is inserted into it and fixed in the center. All gaps are filled with heat-resistant insulation, the hole is closed on both sides with non-combustible material. This is usually a sheet of metal.
Completion of installation
Upon completion of the assembly of the structure, the protective film must be removed from the pipe. The ideal length of the chimney, starting from the grate and ending with the head, is within 5-6 m. Special attention must be paid to these values. Then all gaps and existing seams are sealed.
The operation is performed using a heat-resistant polymer composition that can withstand temperatures of more than 1000 degrees. Sealant treatment proceeds as follows:
- Internal pipes - the outer wall of the upper part is covered.
- External products – one external surface is processed.
The junction of double-walled products with other parts is coated with a polymer composition only on the outer side of the circle.
The joints between the modules and the single-wall pipe are sealed according to the latter option.
After completing all work, it is imperative to check hazardous areas for their ability to withstand high temperatures.
To facilitate chimney maintenance, a special inspection is provided. This part has a removable part or is equipped with an opening having an opening door.
Using basalt wool
Basalt wool can be used as a heat insulator, but before purchasing you need to make sure that it can withstand high temperatures (more than 600 °C). Many experts tend to agree that this is not the best option. And there is a certain explanation for this.
The fact is that during the manufacture of this insulation, resins are used as a binder, which, when exposed to high temperatures, begin to release formaldehyde.
In addition, after attaching the ceiling-passage assembly, condensation sometimes forms in the chimney, and when moisture interacts with mineral wool, it loses its heat-protective properties. These qualities can be restored as moisture evaporates, but only partially.
Typical errors
When installing a vertical channel in a wooden house, fire safety requirements must be strictly observed. In this case, it is important to correctly make and process the passage of the sandwich pipe through the ceilings made of wood. These places must be well protected. Typically, sheet steel is used for this, in which holes are made. The free space is covered with non-flammable heat-insulating materials.
To make work easier, quite often a special ceiling-passage unit (CPU) is installed. Its appearance is very similar to a box. Its installation is necessary to perform certain actions:
- If the house shrinks or deforms, the chimney pipe must maintain its original position.
- PPU protects wooden floors and prevents them from catching fire.
The best option for laying a vertical channel is to install a special sandwich system. Typically, problems appear only if low-quality thermal insulation was used during installation, for example, general building insulation instead of special non-combustible material.
One of the options for such protection is basalt wool.
Sometimes it is used incorrectly. It is known that this material is capable of storing heat. If you simply wrap it around the chimney, then after 4 hours of operation the insulation will begin to release the accumulated heat back, thereby causing the chimney to overheat. To prevent this from happening, it is necessary to install a special steel sleeve that would cover the cutting insulating layer. As the latter, you can use superizol.
This steel element should look like a cylinder. It is important that the height of the part is equal to the thickness of the groove. The sleeve will prevent temperature increases and will help remove heat from the insulation.
It is necessary to organize a micro-ventilation system around the steel part, which is an air layer 3 mm thick. Air moving around the cartridge case will cool it, thereby reducing the temperature.
Installing a steel product allows you to use the heating device for a long time, eliminating the risk of overheating.
Exiting the chimney to the street
If the outer walls of a house or bathhouse are made of brick or other non-combustible material, then bringing a chimney through them is not so difficult. To do this, a round through hole is made, and subsequently a metal sleeve is installed there.
But in the case when the opening is made perfectly round in exact accordance with the dimensions of the sandwich, you can do without this element. It will also be impossible to insert the sleeve if the chimney passes through the wall at an angle other than a straight one.
When installing a gas outlet pipe, one should not forget that its joints should not be located in the thickness of the ceiling. Existing gaps must be filled with the selected fireproof sealant. By and large, installation of a ceiling-passage assembly for a bathhouse or home comes down to installing a pipe in the wall and connecting it to a vertical chimney.
At the same time, if the house is built of wood or using frame technology, then you should be guided by the same rules as arranging a chimney through the ceiling. In other words, you should also make an opening here, but in the wall and install a ready-made box or make it yourself. Then fill the internal cavity with a heat insulator and cover both sides with metal sheets (made of galvanized iron).
Installation of a chimney from sandwich pipes through the roof
The system for the safe removal of combustion products from furnaces, boilers, instantaneous water heaters is one of the most serious problems solved during the installation of such equipment. Moreover, safety issues are very diverse: this includes ensuring the correct operation of the heating equipment itself, eliminating the possibility of fire in building structures due to overheating, and guaranteed prevention of toxic gases entering the premises. This entire range of problems can be solved by competent installation of modern sandwich pipe sets, in strict accordance with technology requirements.
Installation of a chimney from sandwich pipes through the roof
Such products are produced in a wide variety of components, which allows you to assemble chimneys of any degree of complexity that optimally fit into the architectural specifics of each particular house. A layer of insulation between the inner and outer walls can significantly reduce the volume of condensate formed in the pipe channel due to a sharp temperature difference, and such chimneys are very often located outside buildings, which greatly simplifies general construction and installation work.
However, quite often there are situations when external installation of a chimney is impossible, impractical, or the owners simply refuse this approach for reasons of aesthetics of the facade of their house. The solution is obvious - install a chimney from sandwich pipes through the roof. True, this method seems more complicated, if only because of the need to carry out safe and well-insulated penetration through the floors and roof. However, there is nothing impossible about this.
What is a sandwich pipe for a chimney? Advantages and disadvantages of the system
The use of ordinary metal pipes as chimney ducts is not something new - they were used quite widely before, for example, for potbelly stoves or for sauna heaters. This wave is understandable - a number of advantages over, for example, brickwork are obvious:
- The installation of such a chimney does not take much time, since the installation is made from large parts.
- The circular cross-section of the channel is optimal for the best traction, since it does not create unnecessary turbulence in the gas flow.
- Good traction is also facilitated by the smooth inner surface of the pipe, which does not create unnecessary resistance, and in addition, soot build-up forms on it to a much lesser extent.
But at the same time, such a scheme also has pronounced disadvantages , and so serious that they can outweigh all the advantages listed above.
- Metal (steel in particular) has extremely high thermal conductivity, that is, in open areas of the chimney or when it passes through unheated rooms, the flow of gases will cool very quickly. And this leads to a decrease in draft in the pipe, and in addition, the amount of draft becomes highly dependent on current weather conditions.
- Combustion products of any type of fuel always contain a large amount of water vapor. The above-mentioned temperature difference inside and outside the channel causes abundant formation of condensate, which causes the pipes to quickly become overgrown with soot and intensify metal corrosion processes.
Abundant condensation always leads to very rapid overgrowing of the chimney channels with soot
- Since we are talking about corrosion, we must not forget that exhaust gases always contain very aggressive chemical compounds, in particular sulfuric acid. In such conditions, the service life of pipes made of non-corrosion-resistant metal will be very limited - they will quickly burn through. And this is a direct road to fire.
- Finally, the high thermal conductivity of metal means that the pipe indoors and when passing through building structures will always be a potential safety hazard. Thus, enhanced precautions will be required to prevent overheating and fire of the building structures of the house, in order to prevent thermal burns from accidentally touching the chimney in areas where it passes through the premises.
In order to preserve all the mentioned advantages, but at the same time minimize the disadvantages of a metal chimney, a system of insulated sandwich pipes was developed. Essentially, it is a “pipe within a pipe” separated by a layer of heat-resistant thermal insulation material. An approximate diagram of the device is shown in the illustration below:
The principle of constructing a sandwich pipe for a chimney
1 – the chimney channel itself. Special requirements are imposed on it - it must be made of high-quality steel with pronounced corrosion resistance, and the pipe must be manufactured only by welding, using argon welding in a protective gas environment (TIG technology). A pipe with a seam seam is absolutely unacceptable.
2 – outer metal casing. Most often it is also made of stainless steel. However, budget options are also available for sale - their galvanized steel. In addition, it is possible to purchase sandwich pipes with an external decorative coating, for example, if this is necessary to maintain the appearance of the facade or interior design of the premises through which the chimney passes.
3 – thermal insulation layer. As a rule, this function is performed by heat-resistant mineral wool made of basalt fibers, with a density of 120 to 200 kg/m³. The thickness of the insulation layer can vary - it is selected in accordance with specific conditions: the type and power of the heating device, the chimney layout, the climatic conditions of the region and other criteria.
4 – pipes are equipped with special elements for quick and reliable installation. In most cases, this is a system of bells and tapers, which, when connected, together with the sealants used, form a sealed unit. For greater reliability, additional tightening of these connecting nodes using clamps is provided. There are other installation methods, for example, some models provide flange connections with threaded fasteners.
As a result, the chimney structure assembled from such modules acquires new positive qualities:
- Due to the stability of temperature indicators inside the chimney duct, regardless of the weather and the location of a particular section of the system, stable, even draft is ensured.
- The formation of condensation, although not completely eliminated, is still reduced to a minimum.
- The outer surface of the sandwich pipe does not heat up to critical temperatures, and will not pose a danger to people living in the house if it needs to pass through the premises of the upper floor, attic, or attic.
- The organization of pipe penetrations through ceilings and roofs becomes much easier. In addition, many manufacturers immediately provide special pass-through modules of the required size in their kits.
- The chimney system itself, assembled from sandwich modules, does not have a significant mass, and it can easily be installed using the mounted principle, that is, the chimney rests directly on the stove or boiler. It will not put excessive load on the supporting structures of the house when attached to them.
The range of components for sandwich chimneys on sale allows you to assemble structures of any degree of complexity
- A wide variety of components for assembling such a system allows you to create a chimney of the required degree of complexity, diameter, insulation thickness, height, and the assembly process itself is simple and intuitive for any technically savvy homeowner.
Technical characteristics of sandwich pipes
- The thermal insulation layer prevents the outer pipe from heating to a critical temperature.
- Compact and versatile in use.
- The smooth surface of the inner casing increases the chimney draft.
- Low price compared to ceramic material.
- Operating temperature up to 850 degrees (for single-circuit pipes, for comparison, 500).
- Easy to assemble.
- The fire safety of the home increases.
- Easy maintenance compared to a solid pipe chimney (less soot accumulation).
- Does not create additional noise when drafting smoke.
- Material. Basalt fiber (mineral wool) is mainly used as a thermal insulation material. This type of insulation is resistant to high temperatures and chemicals. Mineral wool has excellent thermal insulation/sound insulation properties and is laid with a thickness of 30-60 mm. Due to their fireproof properties, multilayer pipes can be used in houses built from any material. More expensive alloys with a high degree of heat resistance are used for the inner casing.
The inner layer of the sandwich pipe is mainly made of galvanized steel, and the outer layer can be made of copper, brass, stainless steel, etc. The scope of the pipe and the price depend on the content of alloying materials, various alloys and the thickness of the heat-insulating layer.
Sandwich pipes galvanized and stainless steel
- Connection type. Sandwich pipe elements are connected in two ways: corrugated edges and sockets. The advantage of a corrugated connection is ease of installation, but to ensure tightness, a large amount of sealant is required, and this increases the cost of the chimney. With a socket connection, a high degree of tightness is achieved due to the presence of a wider chamfer on one side of the pipe. The advantage is a high degree of tightness, due to which the design can be used for gas boilers. But the downside is the complexity of installation and the need for very precise adjustment of all parts.
Types of sandwich pipe connections
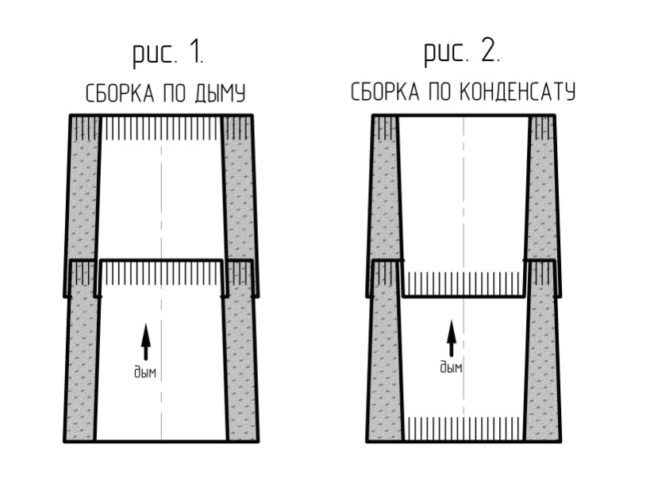
Installation of metal chimney elements is not difficult, the main thing is to observe the direction of connecting the elements “through smoke” and “through condensate.” What does it mean? When the stove is fired, smoke rises. If an obstacle is encountered in its path in the form of even a small plane formed by the previous element and facing downwards, solid smoke particles settle on it, and the chimney becomes clogged over time.
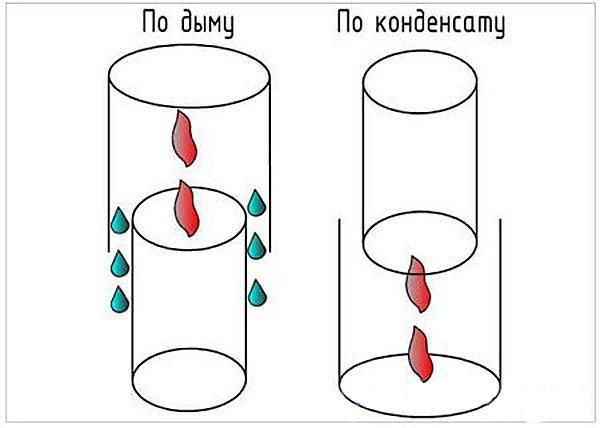
Assembly of chimney elements “for smoke” and “for condensate”
When working, be sure to use thick gloves - thin metal can cut your skin. When installing elements, it is necessary to check their verticality using a level and ensure that the distance to non-insulated combustible structures does not exceed 25 cm for sandwich elements and 60 cm for single pipes.
1. A single metal pipe is installed at the outlet of the furnace smoke collector. Its height determines heat transfer into the room. The pipe is placed “along the smoke” - put on the pipe from the outside. A damper is placed before or after the pipe to block the chimney. All joints are coated with heat-resistant sealant.
2. A starter sandwich chimney is installed on a single pipe: a double pipe, closed at the bottom end. Sandwich pipes are subsequently installed on it. The starting element is mounted on the pipe “along the smoke” and put on the pipe. The joints are also coated with sealant.
3. Begin assembling the chimney from the necessary elements; possible chimney elements are shown in the figure. Pipes and elbows are installed “along the condensate”, that is, they are inserted inside the previous element so that the draining condensate does not get into the fiber insulation. It is also advisable to coat the joints with sealant.
Metal sandwich chimney elements
4. When passing through the ceilings, unloading platforms are used, and the pipe itself is tightened with clamps every two meters and secured to rigid structures. It is better to do this in places where the pipes are connected, this gives additional strength to the entire chimney. The pipe is separated from combustible structures by a layer of basalt wool placed in a special box.
Chimney passage through combustible structures
5. For pipes with many bends and branches, it is mandatory to install inspection elements with a window for cleaning. They are installed in places with open access to the pipe, also “through condensate”.
6. Passage through the roof and sealing is carried out using a special lining - a conical roof, and an apron. The upper part of the pipe is equipped with a head or deflector.
7. During the first fire and heating of the pipe, the sealant hardens and creates additional strength and impermeability to smoke and condensate.
We invite you to familiarize yourself with the DIY pipe stove
The main difficulty in installing ceramic sandwich chimneys is arranging a reliable foundation, as well as assembling the outer shell. For the shell of chimneys, blocks of foamed expanded clay concrete are used - they are light, durable and not afraid of moisture. Ceramic pipes are heavier than metal pipes, so installation is best carried out by a team of two or three people.

1. Check the presence and completeness of all chimney elements in accordance with the project: pipes, blocks, insulation, additional elements.
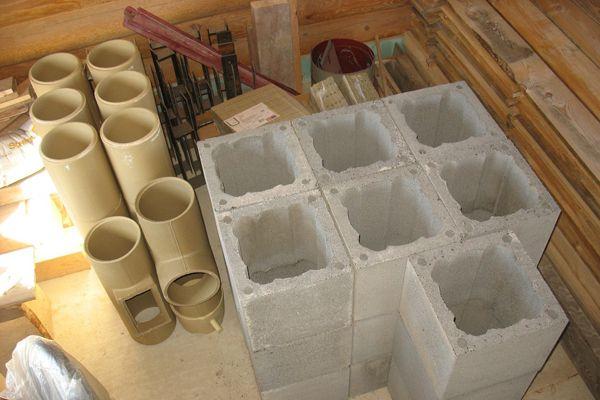
Ceramic pipes and concrete blocks for sandwich chimney
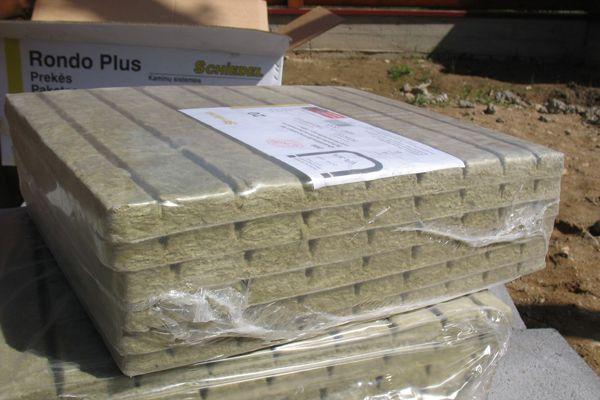
Insulation - basalt wool
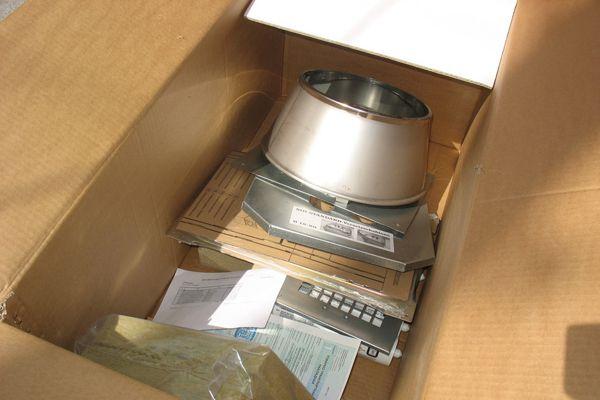
Additional elements, templates and headers
2. Level the foundation using sand-cement mortar and wait several days for it to gain strength. Two or three layers of roofing material are laid on top of the screed - the waterproofing will not allow moisture from the soil to penetrate the walls of the chimney.
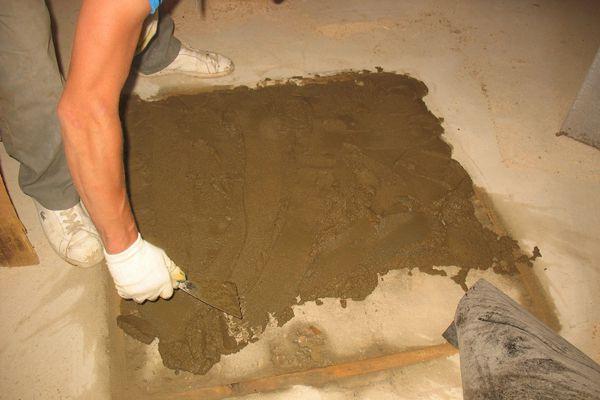
The foundation needs to be leveled
3. Install the base block first. This is a very important stage - any deviation from the vertical of this block will lead to a strong distortion of the entire chimney, so at this stage it is necessary to use a level.
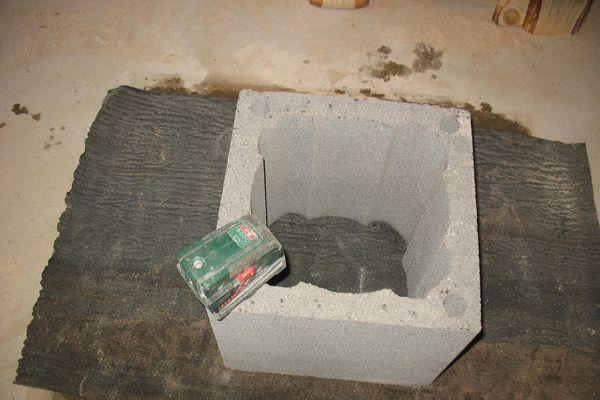
Fitting and alignment of the first block
4. After fitting and leveling, the block is placed on roofing felt using the same cement-sand mortar and finally leveled.
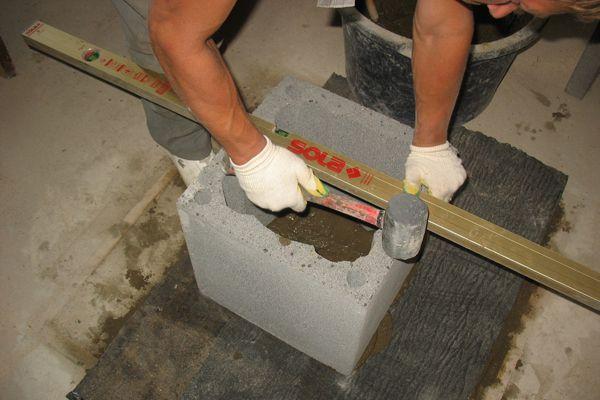
Installing the first block on the solution
5. For greater stability, cobblestones, crushed stone or broken bricks are placed inside the block and filled with cement-sand mortar or concrete.
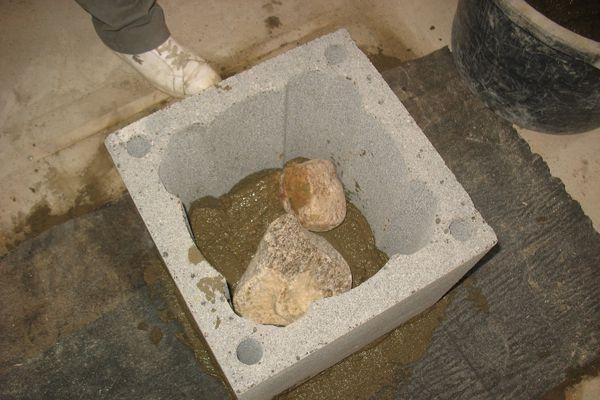
The base block is filled with stones and concrete
6. All the following blocks are fastened together using a special solution that is resistant to high temperatures - it is purchased together with the chimney kit. The solution is applied onto a metal template with a spatula.
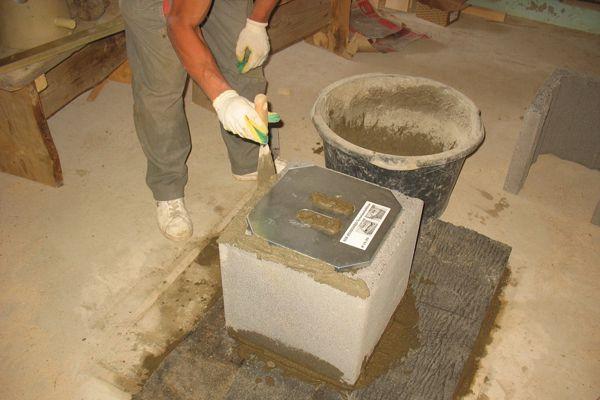
The heat-resistant solution is applied to the block according to the template
7. To install some elements - tees, revisions - it is necessary to make a cut in the blocks. It is performed using a grinder with a diamond-coated disc using a ready-made template included in the kit.
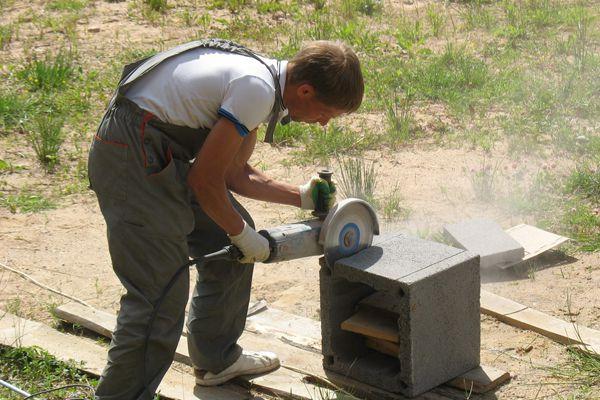
Cuts in blocks are made with a grinder and a diamond wheel.
8. The first element of the pipe is a condensate collector with an outlet; it is installed in a block with a cut hole for the ventilation door so that the outlet faces the cut in the block.
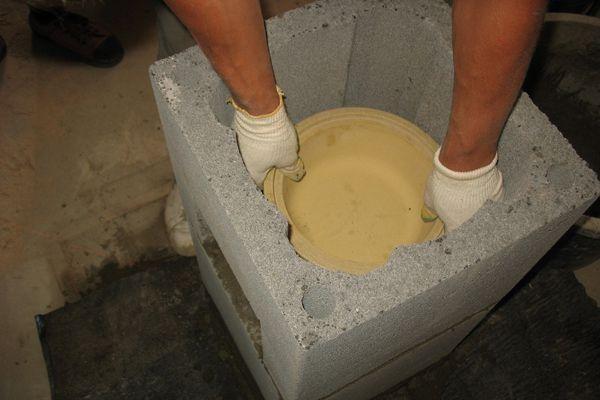
Installing a condensate trap
The condensate drainage tube is led into a hole in the block
9. A heat insulator is laid around the first pipe element - basalt wool mats.
Insulation is laid around ceramic pipes, filling the gaps
10. The next pipe element is placed on the condensate collector, connecting the elements with a special sealant.
The pipes are connected using heat-resistant sealant
11. Continue assembling the chimney. Blocks are connected to blocks with a heat-resistant mortar, pipes with a sealant. At the same time, do not forget to combine inspection elements and tees with cuts in the blocks, and wrap the pipes with heat-insulating mats.
Installation of a pipe with an outlet for the inspection door
The inspection door is made of metal and is included in the delivery set.
12. The passage of the chimney through the ceilings is secured to the rafters or beams using metal brackets, thereby increasing the stability of the chimney.
Pipe passage through ceilings
13. When the chimney exits through the roof, they try to make a minimum gap between the block and the roofing. The junction strips are installed and the pipe is sewn up with a suitable material, in this case, profiled metal.
Junction strips protect the pipe from leaks
The pipe can be sewn with metal
14. To prevent moisture from getting inside the chimney shell, it is covered with a concrete slab with a hole for the pipe itself. If it is not possible to find a finished slab, you can make formwork with reinforcement and fill it with concrete 5-10 cm thick.
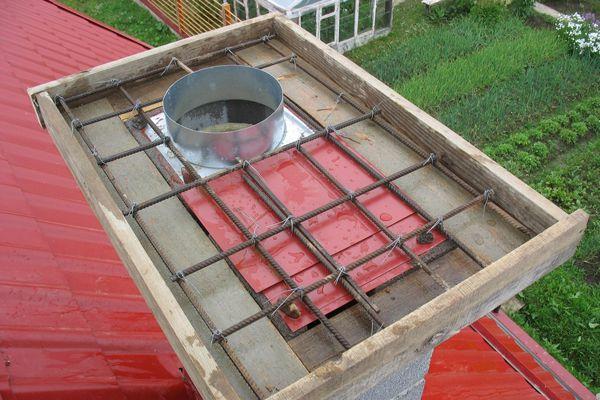
Formwork for concrete slab - pipe slabs
15. A cone-shaped head is placed on top of the pipe; it is also included in the delivery package.

Head for protection against precipitation
A properly installed chimney is not afraid of either moisture or overheating; it successfully copes with the task of removing smoke from a stove, fireplace or boiler. Timely cleaning and maintenance of the chimney will extend its service life, so before assembling a sandwich chimney, carefully consider the location of all inspection elements, and the operation of your chimney will become convenient and safe.
How to choose the right sandwich chimney installation kit
The selection of components for chimney installation must be approached with maximum responsibility. First of all, since the chimney will be installed indoors, with a passage through the ceiling and roof, the issues of ensuring complete safety of its operation come to the fore. Well. It is clear that such work is carried out with the expectation of long-term use, and so that after a few years the owners are not disappointed, the purchased components must be of high quality, certified, and accompanied by a documented manufacturer’s warranty.
The choice always comes down to evaluating several criteria:
- The quality of manufacturing of the sandwich chimney components and the materials used in the production process.
- The throughput of the chimney channel, that is, the cross-section of the internal pipe.
- The thickness of the required thermal insulation layer.
- A drawn up installation diagram and the parts and assemblies necessary for its implementation.
Let's go through these points one by one.