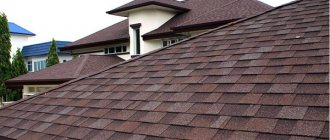
In this article we will tell you how to cover a roof with metal tiles with your own hands, calculate the amount of material for the roof and prepare for installation.
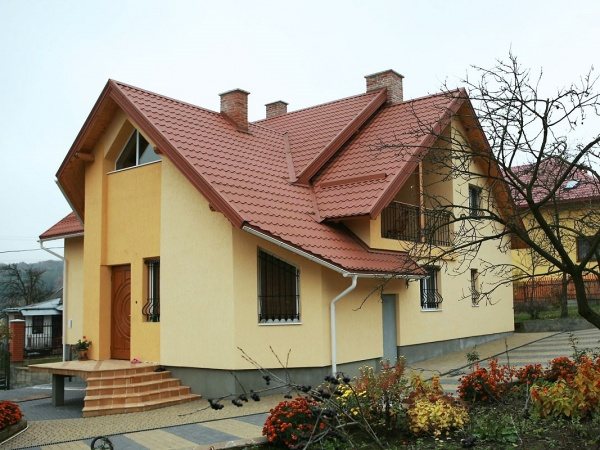
Metal tiles are a practical, beautiful and durable coating for a country house with excellent quality and performance characteristics. A beautiful roof made of this material will protect the house from adverse atmospheric influences. It will decorate the “head” of the building with a spectacular “wave” texture and will serve the owner for a long time if the roofing material is installed correctly according to the manufacturer’s technology. In addition, the tiles are lightweight and have the main consumer advantage - an affordable price.
Advantages of self-installation
- Saving. The cost of installing a metal roof includes the cost of purchasing materials, installation services, costs of consumables (screws, beams for sheathing, etc.) and transportation costs. When installing yourself, you can exclude the cost of installation of metal tiles from the expense item. And so you can imagine how much you save on this, we will give you the average installation prices.
Today, construction teams require from 230 to 300 or more rubles per square meter of laying material. The final cost will depend on the design of the metal tile, the complexity of the roof and its area.
Now calculate the area of your roof and find out how much money remains in your pocket when you install a metal tile roof with your own hands.
- According to the saying: “If you want it done well, do it yourself,” you need to do everything yourself to achieve the best result. Moreover, you will do it for yourself. And no one will put as much soul into work as you do - after all, it’s not the workers who live here, but you.
And now, warming yourself up with the thought that you did the right thing when you decided to lay the roof yourself, you can begin to study the technology so as not to make mistakes during installation. And it all starts with calculating the metal tiles for the roof.
Preparation for installation of metal tiles
Careful preparation is the key to ensuring that the installation of a metal roof will be done efficiently and the structure will not sag over time. As a rule, it is recommended to install rafters taking into account the selected roofing material. For metal tiles, it is correct to use rafters 100 (150) x 50 mm in increments of 60-90 cm. If the distance is greater, it is recommended to lath and maintain the recommended wood moisture content within 18-22°. In addition, it is necessary to perform fire-prevention and antiseptic treatment.
Main stages of preparation:
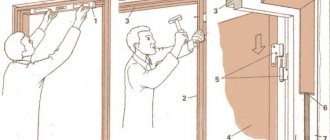
- The installation of the cornice boards is carried out in special grooves cut into the rafters. Thanks to the installation of the eaves board, the rigidity of the structure is ensured.
- Installation of the front board is carried out using galvanized nails. The board is attached to the end of the rafters.
- The overhang sheathing provides ventilation of the under-roof space. The most popular lining materials are soffits, siding, lining, and corrugated sheets. Be sure to leave ventilation slots during installation, and if necessary, install lamps. The sheathing material is secured to the sheathing, and the gaps between the wall and the sheathing panel are covered with fine mesh (from birds, insects, etc.).
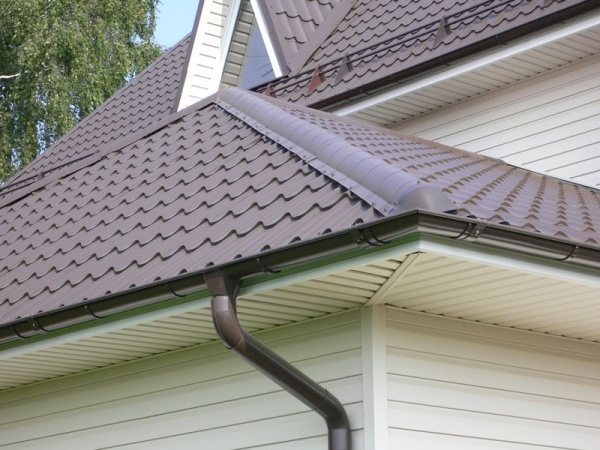
- Installation of hooks on which gutters are laid is carried out either on the rafters or on the eaves board. In construction practice, it is customary to observe the pitch of the hooks equal to the pitch of the rafters. Installation is carried out sequentially: first cut the grooves, bend the hooks into the grooves and secure them into the end part using self-tapping screws.
- Waterproofing will protect the roof structure from mold, rot and metal corrosion. The most popular waterproofing materials are:
- anti-condensation in the form of fleecy moisture-absorbing material;
- superdiffusion membranes;
- classic waterproofing films.
It is not allowed to use bitumen-based waterproofing under metal tiles. Waterproofing films must be laid with a slack between the rafters (20 mm), which will prevent the material from breaking when the size is reduced in cold weather.
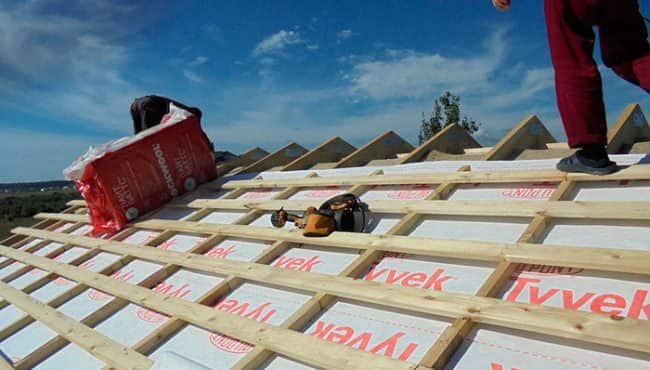
- Installation of lathing with a step of 280 mm between the 1st-2nd, 350 mm - for subsequent lathings. It is recommended to fill 2 boards with a pitch of 50 mm at the place where the ridge strip is attached, and a continuous sheathing around the chimney, roof windows, and valleys.
- The installation of the valley is carried out at the joints of the slopes. A continuous sheathing and waterproofing are laid under the lower ones and the valley is secured with self-tapping screws.
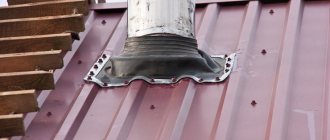
Installation of the apron at the exit points of the chimneys is carried out sequentially: select the strips, groove the pipe, remove the waterproofing and stick with adhesive tape. In addition, you can wrap the chimney exit area with film. The external decorative apron is made during the installation of metal tiles.
Material calculation
How to calculate how many sheets of metal tiles you need for your roof? The first step is to decide what size metal tiles are best for your roof. Standard material options:
- - single-module;
- — three-module;
- — six-module;
- — ten-module
One module is six waves with a step of 35 cm. The step is the distance between the waves. If you wish, you can place an order, and then they will produce metal tiles of the sizes you need. But keep in mind that it will be more expensive.
calculation of metal tiles
We calculate how many rows your roof will have, taking into account the dimensions of the sheets you have chosen. To do this, you need to divide the length of the slope by the working width of the sheet. The resulting result is rounded up. The working width is the part that will not be covered by the next sheet during installation - that is, the total width minus the overlap (approximately 8 cm).
For clarity : the roof slope is 7 m, and the working width is 1.2 m. Divide 7 by 1.2 and get 5.83. Round up to 6. This means that one roof slope will have 6 rows. This way we determine the number of rows for each slope.
Calculate the length of the row. To do this, measure the distance from the eaves to the ridge, and add the length of the eaves overhang to the result. To the result obtained, add the number of rows multiplied by 0.15 cm (overlap distance). The next stage, according to the rules for installing metal tiles, is:
Materials and tools
Before you begin installing a metal tile roof, you need to prepare the tools that will be required during the work process, purchase the necessary materials and become familiar with the safety precautions for performing the work.
Materials
First of all, you need to choose the main material – metal tiles. Today, there are many types of this roofing material of imported and domestic production on sale. The material differs not only in its place of manufacture, but also in its quality characteristics and appearance.
Having decided on the type of metal tile, you will need to decide on its quantity. And to do this you will have to take measurements from the roof, measure the width of the slopes and their height. If the roof has a complex, broken shape, it will be necessary to take measurements from each plane separately and draw up a plan of the roof to scale on graph paper.
You can calculate the amount of material required yourself; for a simple gable roof this is not difficult to do. In more complex cases, you can seek the help of professionals or use special computer programs for calculations.
Advice! In large construction centers that sell metal tiles, as a rule, there is a free service for calculating the amount of metal tiles for roofing.
At the design stage, it is necessary to decide on the layout of the sheets. If the slopes have a small height (no more than 4.5 meters, taking into account the width of the eaves overhang), then single-row installation can be used, that is, the joints of the material will only be in vertical rows.
On slopes of greater height, it is better to plan a double-row installation. In this case, 15 cm will need to be added to the total length of the covering to create an overlap between the rows. If you plan to install metal tiles without insulation, then, in addition to the main material, you will need to purchase:
- Roof waterproofing material
Advice! For waterproofing roofs with metal tiles, it is recommended to use membrane vapor barrier materials. Roofing felt should not be used for these purposes, since the service life of this material is much less than the service life of metal tiles.
- Roofing screws. These are special self-tapping screws with hexagonal heads, which are painted in the color of the base coating. The self-tapping screws are equipped with elastic rubber washers, which, when the screw is screwed in, fit tightly to the metal tile, sealing the mounting hole.
- Bars with a cross section of 50 cm, necessary for installing the counter-lattice.
- Calibrated boards with a thickness of 32 mm for assembling the main sheathing and boards with a cross-section of 50 mm for installation at the eaves.
- Galvanized nails for sheathing assembly.
- External and internal additions for the roof - cornices, wind strips, elements for arranging ridges and valleys, covering aprons and abutment strips for decorating places where the roof is adjacent to vertical superstructures on the roof.
If it is planned to build an insulated roof, the range of materials will expand. You will need to additionally purchase:
- The material is insulating. The most practical option is mineral wool slabs.
- A vapor barrier material that is installed to protect a home from the penetration of steam coming from inside the house.
- An additional number of bars, since in addition to the outer sheathing, you will also need to assemble the inner one.
Tools
In order to install metal tiles, you need to prepare the following set of tools:
- To take measurements and make markings you will need: a tape measure, chalk, an even and long strip as a ruler;
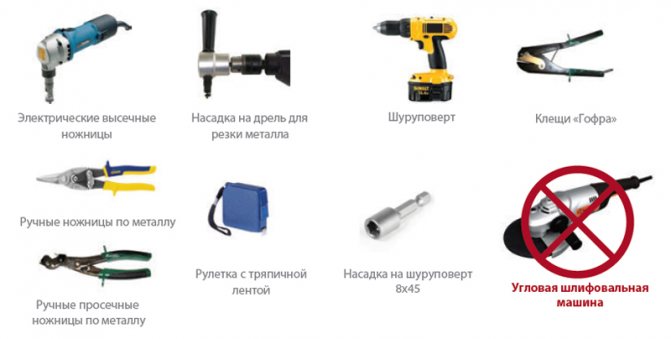
- To cut the material - a hacksaw, metal scissors or a jigsaw.
- Grinder (cutting metal tiles with a grinder is strictly prohibited, but to make grooves in vertical walls for installing junction strips, this tool will be required);
- Hammer;
- Construction stapler;
- A screwdriver with a special attachment for tightening roofing screws.
Advice! When using a screwdriver, you should use the adjustment function and set the torque limiter. The self-tapping screw must be screwed in so that the elastic washer is slightly compressed. Insufficient tightening of the screw, as well as scrolling, is not allowed.
Safety precautions
When studying the rules for installing metal tiles, we must not forget about the safety of workers:
- Do not pick up or carry sheets of material with bare hands; you should use protective gloves.
- While cutting material, chips may fly off, so you should protect your eyes with goggles.
- When assembling the covering, you need to carefully monitor the material, since loose sheets can be blown away by the wind.
- To move on the roof, you should use shoes with soft and flexible soles. You should only step into the trough of the wave, since that is where the sheathing boards are located.
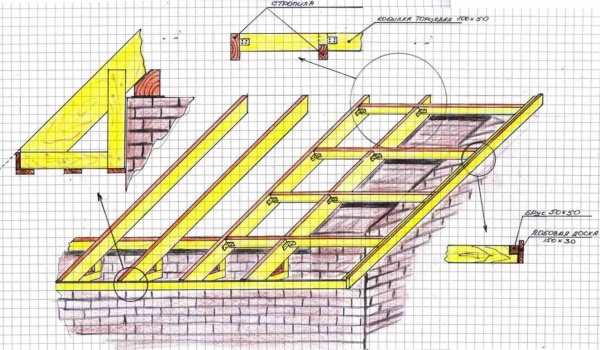
Laying rafters
metal tile installation diagram
To prevent the sheets from sagging, the distance between the rafters should be no more than 90 cm. Only dry beams soaked in antiseptic need to be installed. To give rigidity to the entire rafter system, it is necessary to attach the eaves board and the front board. The latter is attached to the end of the system.
To file roof overhangs you must use:
- — lining;
- - plastic or metal soffits.
If there are no ventilation holes in the casing, you will need to make them yourself. A drill and a drill will help in this matter. If it is wooden, then it must be treated with an antifungal compound and painted (varnished).
After laying the rafters, we move on to the next stage: installation of vapor barrier, insulation and waterproofing. In short, this is called a roofing pie.
Installation
Stages
Before you begin such a responsible undertaking as installation, you need to know what you will have to do and in what sequence. At the moment, it is best to install metal tiles by performing the following steps:
- Take accurate measurements.
- Calculate the amount of material needed for the job. Don't forget to include insulation, insulation and fastening materials in your estimate.
- Install the rafter system.
- Install the curtain rod. The gutter hooks will subsequently be attached to it.
- Hem the roof overhang.
- Install the fascia board, mounting hooks and gutter.
- Secure the counter battens.
- Lay down a waterproofing coating.
- Secure the battens along with reinforcing strips around the additional elements.
- Install the strips on which the cornice will subsequently be mounted.
- Take care of the apron around the chimney.
- Install the metal tiles yourself. Install windows if desired.
- Make the end cap and top carpet, as well as the outside corners and ridge strips.
You should also not forget about the arrangement work. Fences and walkways cannot be ignored. They will ensure your safety if you have to go onto the roof in the future.
Increased attention should be paid to the drainage system. The safety of the foundation of the house depends on how competently you do everything. Moreover, if you install pipes and take care of the tanks, every rain will supply you with water for irrigation.
Important! Roof grounding is done using a busbar. At the same time, it goes separately from the lightning rod.
At the end of the installation of metal tiles, the roof surface is cleaned of dirt accumulated during work. Problem areas are also treated. For example, if the protective coating is scratched during operation, it can be easily restored.
In addition to external construction work, you also need to do interior finishing. Usually it consists of laying thermal insulation. You also need to take care of the installation of counter rails. In order to prevent condensation from forming inside, it is necessary to make a vapor barrier.
Instructions on how to make calculations when installing metal tiles
Let's take standard galvanized sheets as an example. They have only one protective layer of coating, which can protect the entire structure from various atmospheric influences and mechanical damage.
Metal tiles are galvanized steel sheets with a protective coating. The full width of the sheet is always 80-120 mm larger than the working surface, so when choosing a coating, you need to know exactly the size of the area on which the structure will be mounted.
When calculating, you need to take the length of the sheet and divide it by its width. Rounding is done up. Next you will need to measure the roof slope. The correct way to do this is from the bottom up. In the calculations, you need to take into account the cornice overhang, usually 0.05 m is enough. The overlap will be about 0.15 m for each row.
If you buy sheets directly from the factory, you can agree on individual sizes of metal tile panels. In this case, installation will be much easier and faster. However, you will have to pay extra for individual parameters. With this approach to installation, the amount of waste can be reduced. The fact is that sheets can have different sizes. This, in turn, allows them to be installed more efficiently in particularly difficult places.
Important! It is believed that the most optimal size of a metal tile sheet for installation is 4-4.5 meters.
During installation, you need to place the sheets in such a way that the bevels are completely closed. Otherwise, rain moisture will penetrate inside the structure, gradually destroying it. Heavy rains will cause constant leaks.
Making rafters
First you need to calculate the step. It is best to use beams with a section of 150 by 50 millimeters for installing metal tiles. This is the optimal size. The gap between each sheet is 70-80 centimeters. If it increases, it will be necessary to install a sheathing.
Particular attention should be paid to the wood that you will use when installing metal tiles. Its humidity should not be higher than 22%. Also do not forget about antiseptic and fire protection treatment. This will protect the roof from possible fire, fungus and insects.
Curtain board, hemming hooks
When installing metal tiles, grooves are cut into the cornice board. The gutter hook will later be attached to this part of the roof. It will provide the entire structure with the necessary rigidity, thereby guaranteeing safety.
In order to hem the roof overhang and install the fascia board, you will need:
- rafter,
- metal tile sheet,
- waterproofing,
- strip under the cornice,
- frontal board.
By connecting all these elements, you can carry out further installation of metal tiles. It is best to secure the front board with galvanized nails for greater reliability. It is attached to the ends of the rafters.
When installing metal tiles, you must take into account that the space under the roof must be ventilated. To make this possible, it is necessary to make ventilation slots. For filing, it is best to use siding or corrugated sheeting.
The hemming block is placed on the wall at the same level as the lower part of the front board. You will need to lay boards between them. The result of your work will be the sheathing.
Important! Ventilation openings must be insulated. Otherwise, they will become a home for birds.
The hooks are needed to place the gutters on them. Installation of these fixing elements is an important part of the installation of metal tiles. They need to be attached to the cornice board.
First, the grooves are made. Only then is installation of the hooks carried out. The distance between them is equal to the distance between the rafter beams. The fastening is based on self-tapping screws.
Laying the roofing pie
hydro- and vapor barrier of metal tiles
For vapor barrier we use a special film. It must be mounted inside the rafters, that is, on the side of the house. You can use a construction stapler for this. It will prevent steam from reaching the insulation. Otherwise, the process of rotting will begin in it. We lay insulation on top of the rafter system. Mineral wool is most often used.
For waterproofing, you can use one of three options:
- - classic waterproofing;
- — diffusion membranes;
- - anti-condensation films.
At this stage, the preparatory work ends, and the turn of the main work comes.
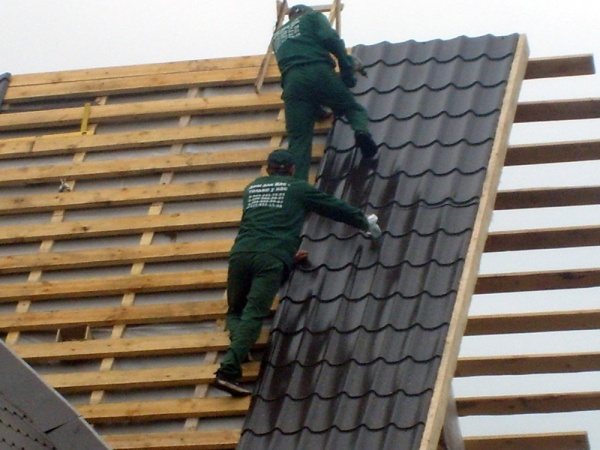
Installation work
The procedure for installing metal tiles is as follows:
- — we make another lathing on top of the waterproofing material;
- - laying the sheets
If the sheets are mounted in one row, then the layout of the metal tiles will be as follows:
- - the row is laid from right to left;
- - lay the first sheet, align it along the cornice;
- - fastened in the center using a roofing screw (just don’t screw it in all the way, as it will have to be removed);
- - lay the second sheet overlapping the first;
- — then we fasten them with self-tapping screws (already thoroughly);
- - in this way we lay out a whole row;
- - after this we attach the metal tiles to the sheathing (with the exception of the last sheet - it needs to be attached only after the second row has been laid out).
If you decide to do installation in several rows, then you need to adhere to the following:
- - the row is laid from right to left;
- - the first, second and third sheets are laid similarly to the first scheme (only they are not firmly fastened with self-tapping screws, so that it is possible to align the sheets during further laying);
- - the fourth sheet lies above the third;
- - the entire slope is laid in this way;
- - after you have laid out all the sheets, you can screw in the roofing screws until they stop.
Tips and tricks for installation
- The installation of the ridge of metal tiles is carried out last, since the sheets are laid from top to bottom.
- Subsequent rows must be slipped under the previous ones.
- The heads of the screws must match the color of the material so as not to spoil the appearance, and have a rubber gasket to prevent water from leaking through.
- Be careful, although metal tiles are strong, they are light and can be blown away by a gust of wind. And it doesn’t matter where it will be: on the ground or the roof.
Attention! Mistakes when installing metal tiles
- Do not work in shoes with hard soles
- You can't step on the crest of a wave
- Do not step on sheets with your full foot
- Do not place your foot perpendicular to the slope
- Do not handle material with bare hands
Our briefing has now come to an end. Finally, I would like to give one last piece of advice. If you have never encountered this kind of work, then the best instruction is the video installation of metal tiles with your own hands:
Laying metal tiles
Before you begin installation, you need to check the roof slope: the recommended slope is 12-14°. In addition, to lay roofing sheets you will need the following tools:
- roulette;
- hacksaw with teeth;
- screwdriver;
- marker;
- hammer;
- long rail.
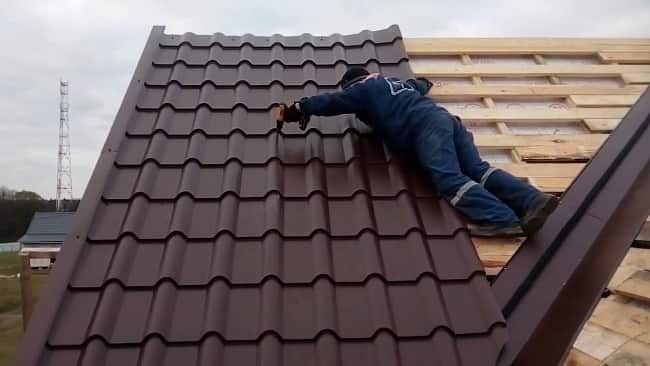
To cut the material, you can use electric scissors, metal scissors, a circular saw, or a jigsaw. The only thing that cannot be used to cut sheets is a grinder, since the polymer coating and zinc will be damaged (burnt out) under the influence of high temperature. The first sheet must be placed on the sheathing and secured with a self-tapping screw in the area of the ridge. Then install the next one, making sure the line that the bottom edges form is perfectly straight.
After laying the next sheet, it is necessary to secure the overlap with one self-tapping screw and continue laying. After the installation of four sheets has been completed, the sheets are finally secured to the sheathing. To install roofing material on a triangular slope, markings are first made, the center of the slope is determined, and the axis is drawn. Laying is carried out according to any pattern: in one or several rows. At the last stage of installation, external corners and accessories are installed: snow guard, transition bridge, roof railing.
In fact, installing a metal tile roof involves fastening the sheets with self-tapping screws at the rate of 7 pieces per square meter. Therefore, laying the material is successfully carried out by developers themselves. However, in order to avoid damage to the roofing material, it is recommended to take into account the advice of experts: wear soft shoes, step on the sheets in the sheathing areas or on the fold of the profile. To eliminate the capillary effect (penetration of water in places of overlap), you can make a capillary groove or choose a manufacturer that produces material with a capillary groove on the right in two directions.