Your own bathhouse on the site of a country house, like any structure designed for people to stay in it, requires a supply of electricity. However, given the specific conditions that involve high levels of humidity and high temperature, the power supply of the bathhouse requires compliance with certain electrical and fire safety requirements.

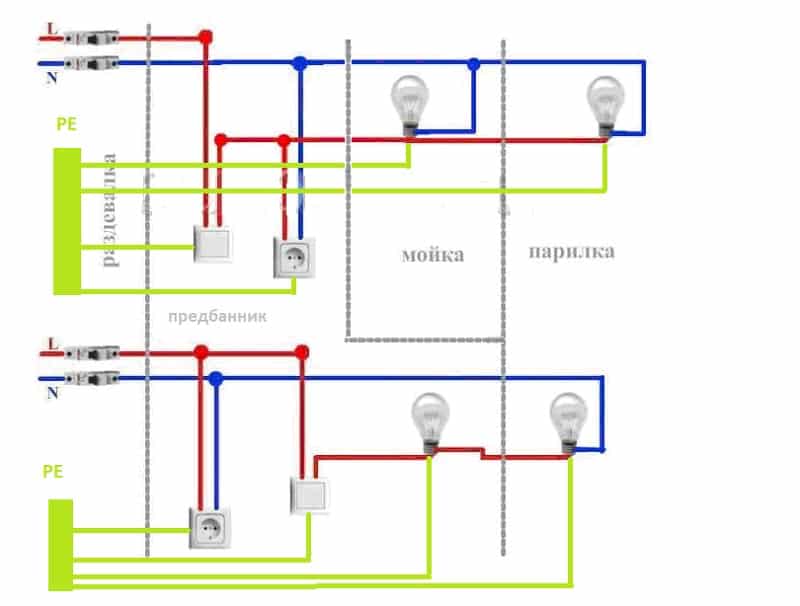
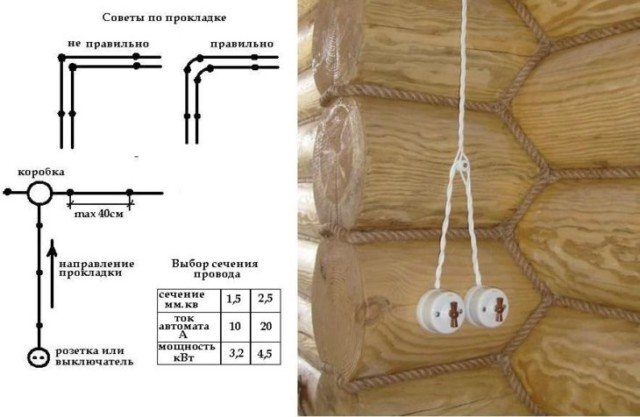
The photo shows a diagram of connecting the electrical equipment of the bathhouse.
>
Primary requirements
Among the main requirements for wiring in a bathhouse are:
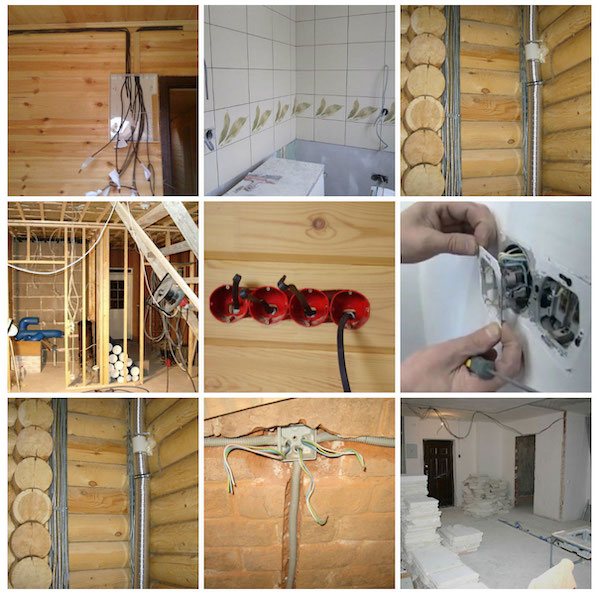
- In a wooden bath, wiring should be carried out openly in cable channels, PVC corrugation, metal copper or steel pipes. In a bathhouse made of non-combustible materials (cinder block, brick, etc.) you can make hidden wiring. A cable or wire with insulation resistant to high temperatures is laid in the steam room; in practice, RKGM is most often used. In fact, here we only need to connect the lamps; if we place them in the corners, we can make the wiring in the adjacent room and make connections to them through the wall. In other rooms, they follow the shortest path to electrical appliances (for example, to a lamp).
- In the dressing room and shower (washing area), electricians recommend VVGng-LS, laid in pipes or hidden (if the walls are made of fireproof material).
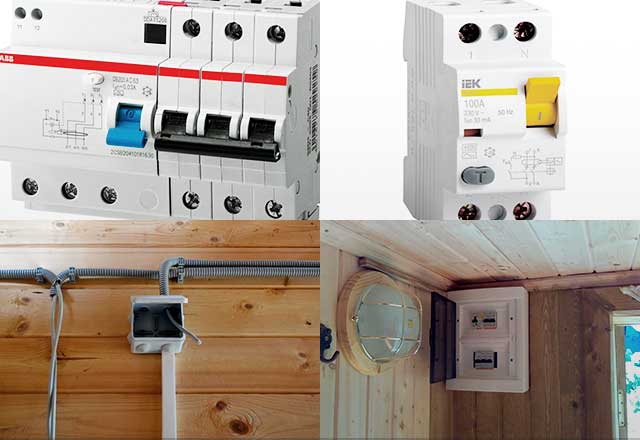
- The electrical panel circuit must necessarily include circuit breakers and RCDs with an operating current of no more than 30 mA, preferably 10 mA.
- Do not install sockets and switches in a washing room or steam room. Place them in the waiting room. All electrical fittings must be mounted outside the room, at least at the entrance; the requirements are similar to the placement of sockets in the bathroom - https://samelectrik.ru/gde-i-kak-raspolozhit-rozetki-v-vannoj-komnate.html.
- The protection class of electrical sockets and switches must be no less than IP-44 (fittings with special protective covers). The protection class of bathhouse lamps must be no less than IP-54.
- It is prohibited to conduct electrical wiring above the stove.
- The premises must be grounded; it would be very good if lightning protection is also provided.
- The connection of wires can be terminal, welding, soldering or crimping with sleeves.
- Pass the cable through the walls in a metal pipe.
The requirements for wiring in a wooden bathhouse are, in principle, similar to electrical wiring in a wooden house, as we discussed in the article we referred to.
We also bring to your attention some useful tips for installing electrical wiring in a bathhouse with your own hands:
- Lay the cable to the bathhouse with a cross-section corresponding to the electrical appliances in it. Especially if you have powerful electric heaters installed, for example, an electric stove and other appliances.
- Be sure to install a protective plate made of non-combustible material between the wooden wall and the switch/socket. However, there are disputes on this score, since modern electrical installation products are already made of plastic that does not support combustion and they have a back wall, which is adjacent to the wall.
- When using cables with -ng-LS insulation for external installation in a cable channel, it is permissible not to place a non-flammable lining between the wall and the cable channel. In all other cases, be sure to separate the wires from the wall at a distance of 10 mm, or lay a strip of fireproof material.
- Retro wiring on insulators is allowed in accordance with the PUE clauses 2.1.4, 2.1.37, 2.1.39, 2.1.40, tables 2.1.2, 2.1.3.
Components of the ground loop
Any grounding of a separate building must include horizontal and vertical components. There are ready-made devices on sale that make it very easy to install grounding with your own hands. You don’t have to look for materials to arrange the circuit, but such devices are not cheap.
Vertical grounding conductors
If you decide to use non-grounding elements, any products made of ferrous metals without galvanization or paint are suitable for vertical rods.
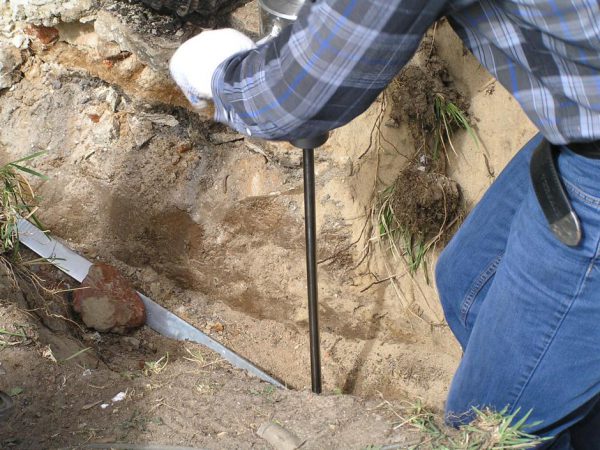
It is difficult to drive reinforcement with ribs into the ground; it is much easier to work with a channel or strip. The smooth surface of rolled metal is the key to easy, successful driving into the ground. When the house and bathhouse are located in a rocky area, you will have to call in well drilling specialists. Rods are installed in the wells, and the hole is filled with sand and soil.
The lower edge of the rod should be sharpened using a grinder. The soil must be moistened with water before work. The size of the rod is about 3 cm (diameter), the wall thickness is from 3 to 5 mm, the length depends on the freezing point in a particular area. You also need to take into account the location of the groundwater. Usually 2-3 meter rods are enough, and the ground loop will work fully.
Horizontal conductor
Horizontal elements are needed to connect the vertical ones and bring the entire system to the panel. They are made from a metal strip with a sheet thickness of 0.4 - 0.5 cm, with a width of 4 cm; a steel pipe is also suitable.
The horizontal conductor is secured with bolts and welding, and the joints are lubricated with bitumen with anti-corrosion properties. After being removed from the ground, conductors made of copper, aluminum, and steel are connected to the horizontal components of the circuit, then the wiring is connected to the bus.
What mains voltage should I choose?
Due to the different needs for providing the required level of power, the wiring in the bathhouse can power both lighting fixtures, and then in small spaces, and powerful equipment. Because of this, the type and level of voltage used differs:
- Single-phase network - used at an average level of load on the wiring in the bath from 1 to 14 kW. In this case, the entire bathhouse is powered from single-phase networks with a voltage of 220 V.
- Three-phase network - used for a wiring load in a bathhouse from 20 to 40 kW, when an electric stove, heated floor and other powerful electrical appliances (water heating boilers, pumps, etc.) are connected to the bathhouse.
- Single-phase low - allows you to power the bathhouse with a safe voltage of 12 V or 36 V, which can be used to illuminate the steam room in the bathhouse without endangering people. Relevant for small baths with low ceilings, in which the only consumer for the leash is the lighting system.
After selecting the voltage level, a wiring diagram is drawn up taking into account the locations of all consumers.
Circuit design
To draw up a wiring diagram for a bathhouse, you need to decide on the number of connection points to it - lighting devices, sockets for specific equipment, switches, etc. It should be noted that switches, like distribution boxes, are strictly prohibited from being installed in the steam room; they must be located in the locker room or dressing room. Washing is also not suitable for this due to the presence of moisture. The wiring in the steam room cannot be closer to the stove or chimney than 80 cm; these requirements must be taken into account at the design stage.
Look at the picture, here is one of the simple examples of electrifying a bathhouse. The wiring is connected to two independent terminals, each powering its own socket and a group of lighting lamps. This option will help you calmly leave the room if a short circuit occurs in one of the sections, since there are often no sources of natural light.
If you plan to install specific equipment, for example, a water heating boiler or a washing machine, you should provide a separate line for them in the wiring diagram with a larger cross-section than for a lamp. The washing machine and boiler must be installed in dry conditions. In this case, they should also be shown separately on the wiring diagram.
Device prevention
Once a year, it is advisable to check all switches and sockets. Tighten the contacts, because any decrease in the quality of the connection leads to the slow destruction of the contact. This is imperceptible and does not manifest itself in any way, but a short circuit may subsequently occur with unpleasant consequences.
When inspecting and identifying a possible malfunction, it is necessary to turn off the power, disconnect the contact and clean it again, connect it again. This preventative maintenance will keep the electrical wiring and all switches and sockets in good condition.
Wiring Tools
The list of necessary tools depends on what kind of wiring is planned - external or hidden. In the first case, no complex units are required; the user needs to acquire:
- screwdrivers for electrical work;
- pliers and knife;
- electrical tape;
- construction tape with a hydraulic level or laser level;
- drill.
If hidden wiring is planned in the bathhouse, the following tools will need to be added to the above list of equipment:
- a hammer drill and special crowns designed for drilling holes for sockets;
- materials for puttying, namely alabaster, lime, a mixer for preparing the mixture, a bucket or other container;
- spatulas.
DIY grounding
The quality of grounding largely depends on the soil. For example, it is difficult to organize a grounding loop on stones. The most suitable soil types are clay, loam and peat. The groundwater level is also important: the higher it is, the better the grounding.
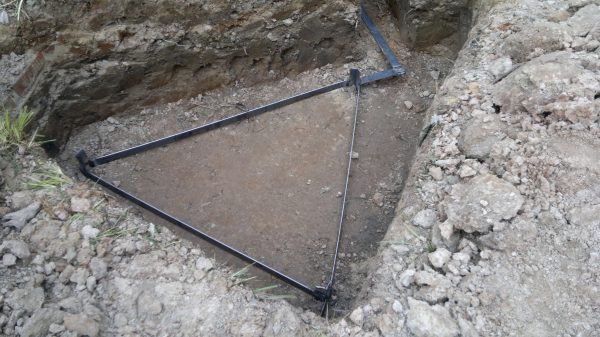
Independent organization of the grounding loop includes several steps:
- Choose a damp, shady place about a meter from the foundation of the bathhouse;
- Dig a triangle-shaped trench the width of a spade bayonet. The depth depends on the soil - the drier and harder it is, the deeper the trench. But in any case, this parameter should not be less than half a meter;
- Select suitable grounding conductors: iron corners, pipes, rods, fittings. More modern options are special copper or steel electrodes created specifically for these purposes;
- Cut off several parts of the ground electrode about 2 m long and hammer them into the corners of the dug triangle;
- Using special clamps or welding, connect all the parts together using a metal strip;
- Connect the created circuit to the grounding bus in the switchboard, using a wire with a cross-section of at least 16 mm2. Use bolt clamps for connection. If the input shield is made of metal, ground it too;
- Sprinkle the grounding loop with earth, add a little table salt, pour water on it and compact it thoroughly. If all actions are done correctly, then when measuring the resistance it will show no more than 4 ohms.
Selection of wires, switches, lamps
For the completed wiring diagram in the bathhouse, all its components are selected: wires, sockets, switches and lamps. The cable brand is selected in accordance with the conditions in each of the bathhouse rooms (high temperature and humidity).
Depending on the material of the current-carrying conductor, the wiring in the bathhouse can be copper or aluminum, but due to the much better mechanical and electrical parameters, the choice should be made in favor of copper wires. The main parameter for any cable brand is the wire cross-section. The cross-sectional area is selected based on the load connected to the corresponding section of the wiring.
For the steam room
The requirements of GOST R 50571.12-96 establish the following division of the steam room into zones:
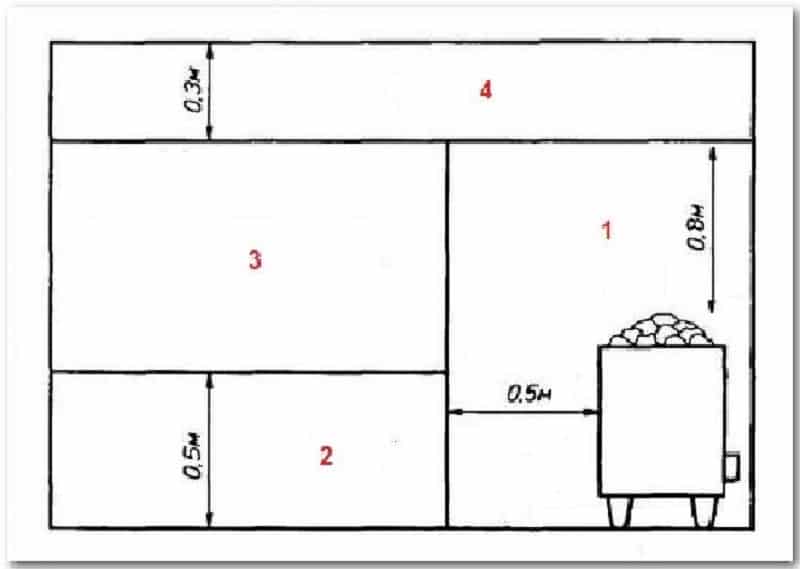
Rice. 2: division of steam rooms into zones
Look at the picture, all zones are built in accordance with the location of the stove, be it electric or solid fuel. In relation to laying wiring cables and installing other equipment, these areas have the following requirements:
- The first is intended exclusively for the stove, if it is an electric heater, then the wiring for connecting it;
- The second is considered the most loyal in terms of wiring requirements; no standards are provided for it;
- For the third zone, there are requirements for equipment that must normally withstand temperatures of 125°C or more, and wiring of 170°C or more;
- Only lamps, sensors and regulators can be installed in the fourth zone, but their wiring is selected as for the previous bath zone.
For internal electrical wiring in the steam room, heat-resistant cables should be used, for example, flexible copper RKGM, PVKV, PRKS or PMTK.
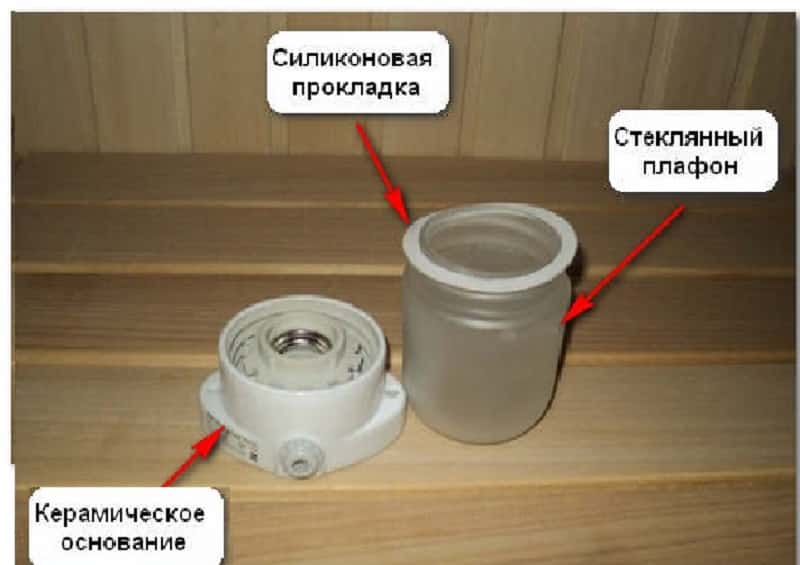
Lamps in the steam room must have a metal body to which grounding is connected, a sealed glass shade with a degree of protection of at least IP24. You should not choose models with a plastic body or parts to connect lamps, as they can melt and deform, causing moisture to penetrate inside.
Dressing room, locker room, rest room
In other functional areas of the bathhouse, the use of VVGng power non-flammable cables is allowed.
Important! To organize internal electrical wiring in bathhouses, universal flat wires (PUNP) are not used, which can become the main cause of a fire hazard.
When choosing circuit breakers for protection against power surges in the network, first of all it is worth determining their operating power. The main machine must have maximum power; for auxiliary devices this figure is significantly reduced.
To set the limit value of the machine for disconnecting from the network, the current strength in the circuit and in its specific section is taken into account. For example, if the current strength in a section of the circuit is 18A, then the maximum permissible threshold of the main circuit breaker is 20A.
No less important for the protection of electrical appliances is a residual current device (RCD). According to the PUE, the RCD response threshold should be from 25 to 30 mA.
How to choose wires and sockets based on load?
For example, you are going to connect two 100 W light bulbs, plug in a 1 kW electric kettle and a 4 kW electric heated floor. Thus, to calculate the cross-section, add up the power consumption of all consumers P = 0.1 + 0.1 + 1 + 4 = 5.2 kW. To the resulting power value it is necessary to add a 20 - 30% safety margin, for our example we get 6.24 kW.
To select a specific cross-sectional value for wiring based on the consumer’s power or the amount of electric current, you must use our calculator or table data.
Table: selection of wire cross-section
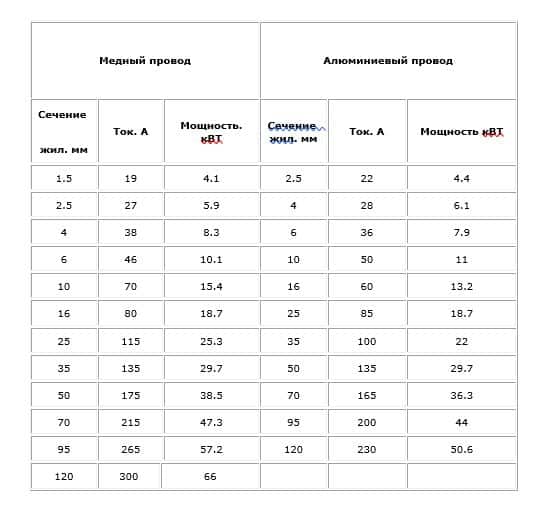
Look at the table; for a power of 6.24 kW, copper wiring with a core cross-section of 4 mm² or aluminum wiring of 6 mm² is suitable. If you have drawn up a power supply diagram with separation of wiring for different consumers, then it is advisable to perform the procedure for calculating the cross-section for each individual section, but the material of the conductor for the wiring must be the same.
The socket, like the wiring, has a certain current carrying capacity. Therefore, the selection of connection points to the mains voltage should be made in accordance with the devices being connected. For example, for a refrigerator it is enough to install a 10 A socket, but for a boiler, depending on the power, you will need 16 or 24 A.
Selecting a step-down transformer
The choice of electric transformer model is made according to several parameters.
Input voltage
In everyday life, a voltage of 220 volts is used, which must correspond to the parameters of the primary winding. To reduce the current and wire cross-section, models used in production are manufactured with a primary winding rated at 380V.
Output voltage
Should be 12V. If there are several terminals and no markings, a test switch is performed and the parameters of the coils are checked with a voltmeter.
Power
It is selected based on the total power of all lamps connected to the transformer with a margin of 20%.
For example, for 3 lamps with a power of 60 W, a power supply device with a power of at least P = 60 * 3 * 1.2 = 216 W is required.

Degree of environmental protection
There is an opinion that all electrical appliances, including electrical transformers, used in a bathhouse, must have a moisture protection rating of at least IP67. However, this only applies to equipment installed in wet areas.
Methods of conducting electricity into the bathhouse
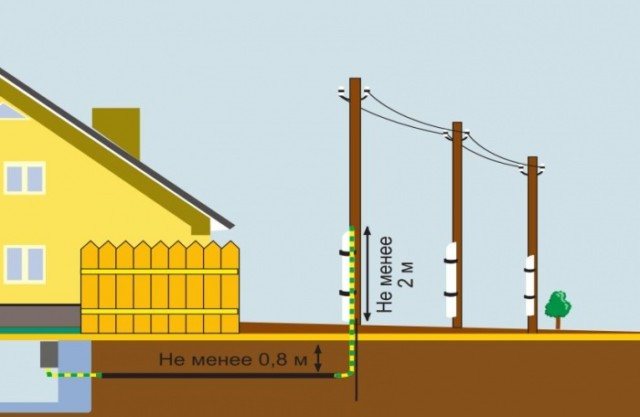
To conduct electricity to the bathhouse building, it is necessary to ensure its delivery from the central switchboard through the incoming power cable. You can lay the cable to the bathhouse in one of two ways: underground or over the air.
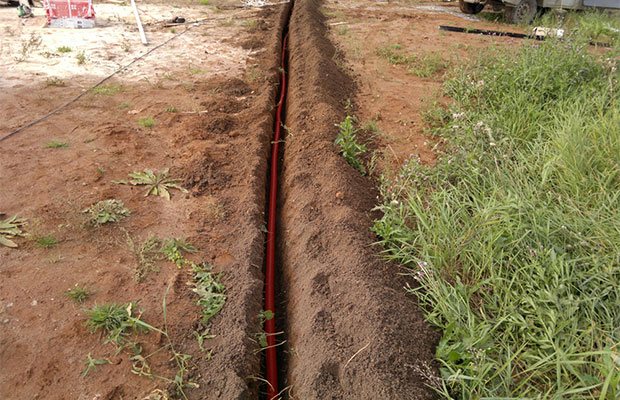
Underground installation method
The safest and most labor-intensive way to lay power cables, which requires preliminary preparation of an earthen trench, is from the power source to the bathhouse.
For underground input, a VBBShV cable with copper conductors with a cross-section of 10 to 16 kV is used. mm. It has increased strength, safety and durability. Protection from mechanical damage and biological effects is provided by heat-resistant insulation and steel braiding.
For underground cable laying, polypropylene pipes are used that are resistant to corrosion and freezing; metal pipes can be used when installing cables on poles or wall structures no more than 180 cm in height.
The technology for laying cables underground is as follows:
- Preparing an earthen trench up to 70 cm deep. Filling the bottom (10 cm) with a sand layer. Cable laying and re-filling with sand.
- The introduction of the cable into the building through a metal input sleeve, which is used to protect against damage to the insulation during shrinkage of the walls of the bathhouse.
- The cable is stripped of insulation before connecting to the machine in the input panel. Next, grounding and protection against lightning strikes are performed.
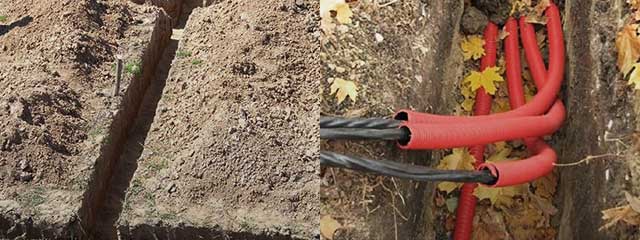
Important! Wavy laying of the cable in the trench will prevent its mechanical damage as a result of soil movements or shrinkage of the building.
Air installation method
Installation by air is more accessible and cheaper in terms of labor and financial costs, but it is not durable due to susceptibility to damage and deformation.
If you need to connect a wire from a house to a bathhouse, then you need to correctly calculate the maximum permissible distance between objects. When buildings are located at a significant distance from each other, aerial laying is irrational, since the risk of cable damage increases under unfavorable climatic conditions.
Selecting cable material
Before you begin installing electrics in the bathhouse yourself, you need to decide on the choice of cable. According to modern rules, it is unacceptable to lay wires made of aluminum, so you should stick to copper wires. Copper cables have a longer service life and are also more conductive.
You should also pay attention to the stiffness of the wire. Flexible cables are less reliable and have a shorter service life than rigid cables.
The number of cores in the cable also plays a role. Typically, three-wire ones are used for baths, since it is easier to ensure high-quality and correct grounding with them.
Cable insulation is an equally important criterion in choosing the type of wires, since only thanks to it can fire or spread of fire be avoided.
For a bathhouse, it is best to choose a wire with triple or double insulation. Silicone rubber or asbestos are the most popular cable insulation materials.
If the choice is between these two elements, then it is better to go with the first option, since asbestos insulation can release toxic substances when overheated.
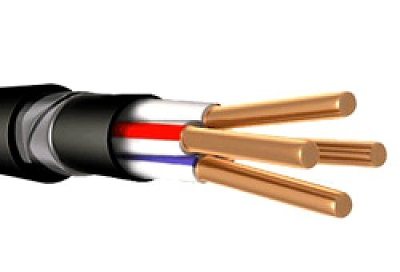
In order to supply electricity to the bathhouse, a certain type of cable is used, depending on the installation method, but at the point of entry into the room it must be replaced with another suitable for the atmosphere of the bathhouse.
For the underground installation method, a VBBShV cable is used; it has 4 copper cores, but its cost is quite high.
Thanks to the steel braid, the VBBShV cable is not afraid of laying underground, as well as moles and other underground rodents, because it is extremely durable.
Important! To lay the cable, you cannot use a metal pipe to avoid the appearance of condensation in it, which in turn shortens the life of the wire.
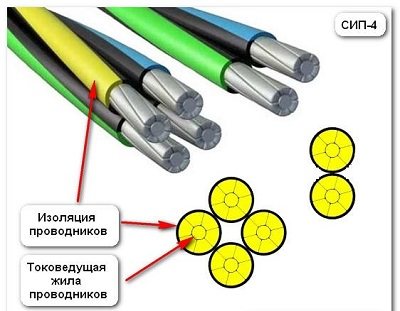
For the air installation method, SIP is usually chosen, since it is covered with a dense polyethylene layer, which protects it from any influences, and its core is made of aluminum. It is also quite rigid, so it does not require the installation of an additional frame.
Attention! It is strictly prohibited to use SIP cable in the house. When connecting it to the building, you need to replace the SIP with a more flexible cable, for example VVG with a copper core. It is recommended to introduce the cable into the house through the wall, since when running it through the roof you will have to face difficulties in trying not to damage the hydro-, heat- and vapor barrier
It is recommended to introduce the cable into the house through the wall, since when running it through the roof you will have to face difficulties in trying not to damage the hydro-, heat- and vapor barrier.
It must be remembered that the minimum height for cable entry is 2.75 m. If your bathhouse does not meet these requirements, then you can use a curved steel pipe.
It will help keep the cable at the required height, while inserting it through the wall in the optimal place for you.
To summarize, we can make a list of the basic requirements for a cable for a bath:
- A conductor made of copper;
- High rigidity;
- Insulation from non-flammable and high-quality materials;
- The presence of three cores.
Installation process in a bath or sauna
After installing the cable, the process of installing electrical wiring in a bathhouse or sauna can be divided into several stages:
- Installation of electrical panel;
- Wiring in the bathhouse from the panel;
- Installation of lighting fixtures and their connection to wiring;
- Installation of sockets and their connection to wiring;
- Installation of switches and their connection to wiring.
Stage 1: installation of electrical panel
The entire energy system of the bath structure will be powered from this device - the electrical panel.
During its installation, you must comply with some requirements and rules, including location:
- It is necessary to ensure unobstructed access to the electrical panel;
- Under no circumstances should the shield be placed in a steam room or other rooms with a high fire hazard;
- The room in which the shield will be located must be well ventilated and lit.
In most cases, the shield is located in the rest room, since this is the safest room in the entire bathhouse building. The minimum distance between the floor and the top of the shield is 1.5 m. It is best to route the cables from the shield through a corrugated pipe.
Important! It is mandatory to place a diagram of the electrical wiring of the bathhouse building next to the panel.
Stage 2: wiring
In order to proceed directly to the internal wiring, the wiring diagram must be ready. It also determines how the wires will be laid.
- The open method is more practical, since when repairing or replacing cables you will not have to damage the walls, since the wiring is very easy to see.
- The hidden method is practical from an aesthetic point of view, because in this case the wires are not noticeable and do not spoil the overall picture of the interior. However, if the need for repairs arises, you will have to open the walls and ceilings, and this is quite expensive and time-consuming.
At this stage, wiring is being installed in all bath rooms. It is best to stick to the open method of laying wires, but in this case they should be placed in a corrugation made of non-flammable materials. In order to connect the wires to the sockets, you need to make a U-shaped elbow and insert the wires from the bottom.
After drawing a line in each of the bath rooms, as well as connecting it to lamps and electrical appliances, you need to connect to the circuit breaker.
If you decide to do the electrical wiring in the bathhouse yourself, then follow these recommendations:
- The wiring coming from the shield must be solid;
- For a bathhouse made of logs or wood, it is best to use an open wiring method, but in no case should the wire be placed in a PVC pipe;
- For a brick bathhouse, you can make hidden wiring by hiding the wires behind a layer of plaster;
- It is not recommended to place wiring in conspicuous places, such as opposite doors or near metal pipes and radiators;
- It is important to note that there should be no twisting of the wires or kinks. The wires are located either strictly vertically or strictly horizontally;
- Due to high humidity, sockets and switches should not be placed in the steam room, since over time condensation accumulates inside electrical appliances, and this inevitably leads to a short circuit;
- Under no circumstances should wires be placed near or above the stove;
- Do not place wires in metal or pipe sheaths.
Stage 3: connecting lamps
It is necessary to carefully consider the choice of lamps. Their protection class must be at least IP44, and their power must not exceed 70-75 W. The lampshades are usually made of thick tempered glass, and the body itself is made of ceramic. The lamp body is connected to the protective core of the wire, so if it is made of plastic, deformation cannot be avoided.
It is recommended to place lamps on the walls, since placement on the ceiling is not the best, because this is where hot air accumulates. For a steam room, a minimum voltage of 12 (V) is usually used, and therefore there is a need for step-down transformers. It is unacceptable to place them in the steam room.
Stage 4: connecting sockets
Under no circumstances should sockets be placed in the steam room. It is best to give them a separate area in the safest room, such as a rest room or vestibule. The level of protection of sockets in a bathhouse must be at least IP44; the presence of protective covers on them is an advantage. The minimum height at which sockets can be placed is 90 cm.
Safety precautions
According to accepted rules, wiring in brick baths is laid inside the walls. Grooves for the cable are hollowed out and sealed with plaster after installation. Hidden installation of wires is not possible in timber, log and frame bathhouses. Of course, it is possible to make grooves, but this is prohibited by safety regulations. Sockets and switches are chosen with a high level of protection against moisture. This indicator is marked in the passport with the numbers IP-44. They need to be placed at least 1.5 meters from the floor, because above the level of humidity is different, due to the fact that steam rises upward according to the laws of physics.
Methods for installing wiring in a steam room
The first step is to connect the electrical wiring from the panel on the street to the structure in the bathhouse. Cable laying from the street can be done over the air or underground. To determine the appropriate method, you should learn about the advantages and disadvantages of each of them.
- The air laying method is a budget option, but it is short-lived. This is due to the use of a conductor fixed in the air. The overhead line quite often breaks due to strong winds or mechanical damage. The cable must be laid at a height of at least 6 meters, and if the route is long, additional supports must be made.
- The underground installation method is more labor-intensive and expensive. This is due to the cost of the protected cable. However, this wiring is reliable and has a longer service life. Laying the cable underground is considered a more reliable and reliable way to supply voltage to the bathhouse.
Description of the ground loop
A grounding system is understood as a closed circuit (an alternative is a linear circuit), which includes at least two grounding rods located in a vertical position, a horizontal conductor connected to the rods into a single circuit, a busbar for entering the bathhouse and supplying grounding to the devices.
There are different grounding systems. It is important that there is a connection to the main grounding bus or to the distribution panel. The most common systems are:
- Triangular. Involves driving three metal rods into the ground in the shape of an equilateral triangle.
- Square or rectangular. The number of rods increases to four, located according to the corresponding geometric figure.
- Linear. The rods are arranged in a line, with horizontal grounding conductors between them.
Sometimes a bathhouse, where there is a lot of equipment, is surrounded by a grounding loop - this is another option for a grounding connection diagram. There are two disadvantages - the need for additional space and cost, but the efficiency will be very high. Closed contours are considered more effective than linear ones.
General rules for internal wiring
When wiring, please take into account the following special requirements:
- Electrical installation from the distribution panel must be carried out in single pieces of wires and cables; any intermediate connections are prohibited.
- Conductors in metal sheaths should not be used.
- If the bathhouse is made of wood, then electrical wiring is allowed only in an open type, laid on top of wooden surfaces. It is prohibited to place wires in PVC pipes.
- Installation of wires above the stove is strictly prohibited.
- In the case where the bathhouse is made of brick, it is allowed to install hidden wiring hidden under a layer of plaster.
- Be sure to use protective grounding.

- The laying of wires from distribution boxes is carried out strictly at right angles, they must be laid only horizontally or vertically, no “diagonally” is allowed.
- The cores are connected by welding or soldering; twisting is strictly prohibited.
- Do not place wires near door or window openings, metal pipes or radiators.
- In rooms with high humidity and temperature, for example in a steam room, it is prohibited to place switching devices (switches, sockets, and distribution boxes). Otherwise, moisture will accumulate in them, which will inevitably lead to a short circuit. It is best to choose a dressing room or rest room for their placement.
Precautions when wiring
- All devices and shields must be located in a separate room, which is reliably protected from moisture. In conditions of excessive humidity, structures can fail and rust in a short time. This also applies to plastic devices - there are metal elements inside the structures. There is no need to worry about modern models of shower cabins with built-in water heating. The manufacturer cares about safety, so such devices can also be placed in a washing room.
- The body of the lighting fixtures should be aluminum, and the lampshade should be glass. It is recommended to mount them on the walls, since steam escapes to the ceiling, as a result of which an elevated temperature is established there, which is unacceptable for such devices.
- The transformer device to which the supply voltage will be supplied must be designed for 220 V. It must be installed in a dry place. Only 12 V can be wired through the wall. If 36 V light bulbs are installed, then the permissible voltage will be 42 V. It is recommended to install 12 V lamps in the steam room, and place the power supplies for them behind the wall, in other rooms
- If you want to install a washing machine in a steam room, then do not forget that it should be placed in a dry room. You will need to make a separate cable for the electric heater.
- A grounding loop should be laid around the steam room. A circuit breaker or RCD must be installed in the panel. The devices must be located in a container that is protected from moisture.
- If there is a need to install sensors to an electric heater, then you should know that they must be low-voltage and located at a distance of 1 m from the floor base. The control panel is mounted outside the steam room. The heater is installed without sockets.
- It is recommended to mark all elements on the shield with a marker.
Methods of “natural” grounding
It is believed that the so-called natural grounding conductors cope excellently with the task of current removal:
- Cast iron or steel pipelines in close contact with the soil, that is, not covered with insulation;
- Steel well casing;
- Metal poles of lanterns and fences;
- Lead braided underground cable;
- Reinforcement of columns and foundations located below the seasonal freezing point of the ground.
The aluminum sheath of an underground cable cannot be used as a grounding element, since it is covered with an anti-corrosion layer that prevents the dissipation of current along the ground.
A good natural grounding conductor is a steel water supply system that is not covered with insulation. The significant length of the structure reduces the resistance to current spreading. In addition, the water supply is installed below the freezing point of the soil, which means that neither frost nor summer drought will interfere with the current resistance. During the period of their activation, soil moisture decreases and resistance increases.
Foundation reinforcement as a natural grounding conductor
The use of an iron frame as a grounding element is justified in the following cases:
- If the area in contact with loamy, wet sandy, clayey and sandy loam soil is sufficient according to the PUE standards;
- Bringing out the foundation reinforcement to the day surface (at least in 2 places);
- To connect the frame elements, not wire, but welding was used;
- Calculation of reinforcement resistance in accordance with the requirements of the PUE;
- Installations of electrical connection with a grounding bus.
The main mistakes that are made when installing electrical wiring in a bathhouse
The wiring must be at a distance of at least 0.8 m from the chimney structure and the heater. In the steam room and shower it is allowed to install lighting fixtures with protection class IP44 and higher. An excellent option is to use 12 V halogen lamps. The cable must be single-core, heat-resistant and withstand temperatures up to 180 °C. The insulation must be silicone.
The cable must be fastened in increments of at least 40 cm; changing the direction of laying must be carried out smoothly, without fractures. In most cases, when installing electrical wiring, inexperienced craftsmen make the following mistakes:
- Installation of hidden wiring on combustible bases in plastic tubes. It is worth knowing that doing this is strictly prohibited.
- Installation of electrical wiring in a metal sleeve. This also cannot be done.
- Installation of lighting fixtures in the upper part. For safety reasons, it is recommended to organize lighting in the lower part, next to the cool floor. It is allowed to use spot lighting, which can be placed under the shelf. This will make it possible to create a mysterious and non-standard lighting design. It is mandatory to use a heat-resistant wire in a metal tube.
Electrical wiring for the steam room must be inspected every 4 years. You should know that aluminum wiring has a service life of 15 years. Copper wiring will last 20 years. After this period, the electrical wiring should be replaced.
In most cases, the bathhouse uses low-voltage voltage, so it is recommended to use step-down transformers. They should be placed outside the steam room. Sockets can be installed exclusively on the walls in the dressing room or rest room. They must be placed at a height of 95 cm. It is recommended to use devices with protective caps.
To connect the stove you will need wires that can withstand elevated temperatures and considerable power consumption. Wiring in a cable channel is suitable for this task. PMTC wires can be pulled to the distribution box, which is located outside the area of high humidity. From the box to the electrical panel it will be possible to insert a VVG cable with a cross-section of 3x2.5 mm.
It is quite difficult to install wiring in a bathhouse yourself. However, if there is a strong desire, then this can be done without the involvement of third-party specialists. The only thing you may need the help of experts with is drawing up a diagram. If you understand all the nuances, then everything can be done safer and better than hiring inexperienced craftsmen who pretend to be specialists.
Why is there low voltage in the bathhouse?
In most rooms in the bathhouse, ordinary household voltage ~220 V is used, but in the shower room, steam room and other rooms with high humidity this is allowed subject to additional safety measures:
- Installation of RCDs or automatic circuit breakers. These devices disconnect electrical appliances and wires when insulation is broken or people touch live parts.
- The room must have a TN-CS grounding system. In this case, the distribution of the neutral wire “N” and the grounding conductor “PE” throughout the building is carried out with separate wires, which are connected in the water panel.
- Availability of a potential equation system for the SUP. This is the connection of ALL metal parts of the structure - water and sewer pipes, lamp housings, window bars and other elements to each other and to grounding.
It is difficult to meet these requirements at home, so it is more advisable to lower the voltage to 36 or 12 volts. It is preferable to use 12V, as it is safer.

Reference! According to PUE 7.1.47, the use of electrical appliances with voltages higher than 12V inside a bathtub or shower tray is prohibited.