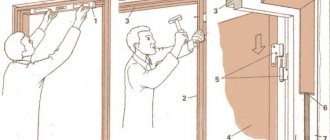
The procedure for attaching the cable channel to the wall
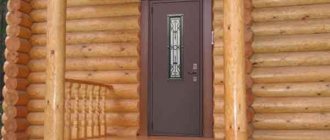
It is almost impossible to fit openly hanging wires into the interior.
About 40 years ago, there were two ways to conduct electricity in an apartment - bury the wires in the walls or leave them in sight, securing them to insulators. Leaving it in plain sight is unsightly and dangerous.
Bricking it into walls means there will be difficulties with replacing the wire and moving the sockets to a convenient place. Installation of cable channels eliminates these inconveniences.
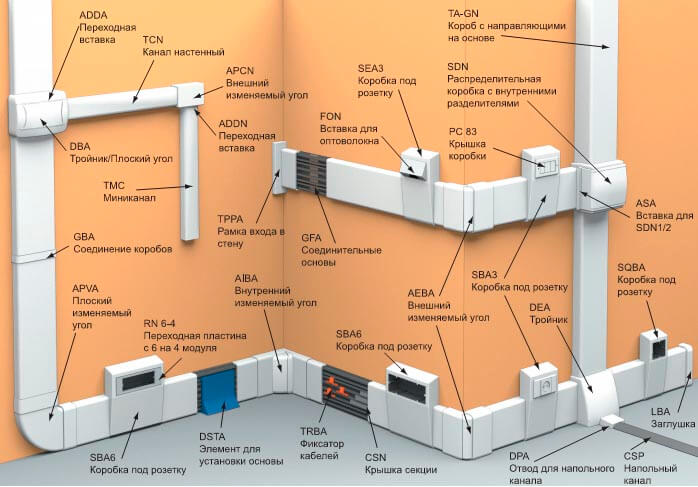
The cable channel is a rectangular, usually U-shaped profile, closed with a flat snap-on cover made of the same material. Sometimes they are called boxes.
Installation of cable channels is carried out around the perimeter of the rooms under the ceiling at a distance of 15 cm with vertical outlets to sockets and switches.
To lay wires through the walls, holes are drilled in the opposite channels and the wall.
To lay power and low-current wires in one box, profiles with one or two partitions are produced. The standard length of the box for walls and ceilings is 2 meters, the minimum profile section is 8x8 mm, the maximum is 100x60 mm.
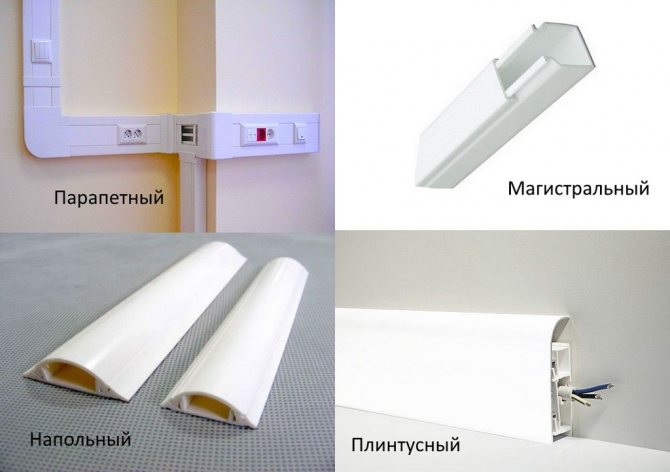
For laying a small number of wires, usually low-current, in the corners between the floor and walls, there are specially designed skirting boards.
If you need to connect the wire to a device far from the walls, there are floor-mounted options with a rounded surface.
Boxes vary in cost and performance characteristics depending on the material. Products are produced by:
- made of plastic. The most common option and the cheapest. For rooms with high humidity and on the external walls of a building, IP 55 plastic with a high degree of protection can be used. The color palette of plastic boxes allows you to choose the desired tone;
- aluminum with polyethylene coating. More expensive, but stronger and more durable than plastic ones. The number of cycles of opening and closing the lid is small due to the extension of the locks. The polyethylene coating is easily destroyed by mechanical stress. The color is given to the channels by a polyethylene coating and is quite varied;
- galvanized steel. Such structures are the most durable and expensive. Mainly used under high load conditions. For example, with floor wiring and in the external environment. The color of the products is varied.
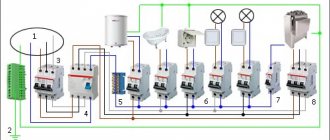
The choice of the type and size of boxes begins with determining the wiring throughout the house from the electrical panel and entry points for television, computer network, telephone and security alarm cables to sockets, switches and lamps, drawing the wire lines on the drawing of the apartment or house. Depending on the power of the connected equipment, the wires will be of different thicknesses; this should be noted on the drawing.
The cost of the structure greatly depends on the cross-section of the main duct. However, if boxes of different sections are installed along the ceiling in a room, this will ruin the interior.
Using the drawn diagram, we determine the cross-section of the main cable channel for each room and the total length of each standard size, taking into account the vertical supply to sockets and switches.
Of course, you can do without them, but the gaps at the joints and the difference in cross-sections will be noticeable.
Using sealant to seal cracks will lead to difficulties when necessary, for example, adding or replacing a wire in the main.
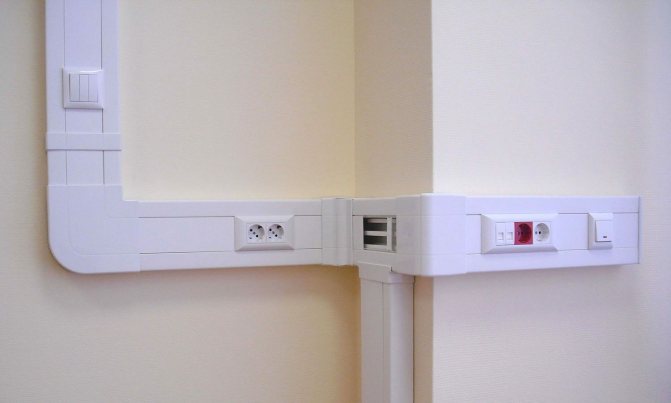
The wiring will take on an aesthetically finished look if sockets and switches are installed from the same manufacturer. They are ideal in both size and design.
We advise you to pay attention to the walls. The unevenness of the walls will be especially visible when installing the boxes. If the appearance of the room is important, in this case it is worth considering installing the structure along the wall along the floor.
Preparing for work
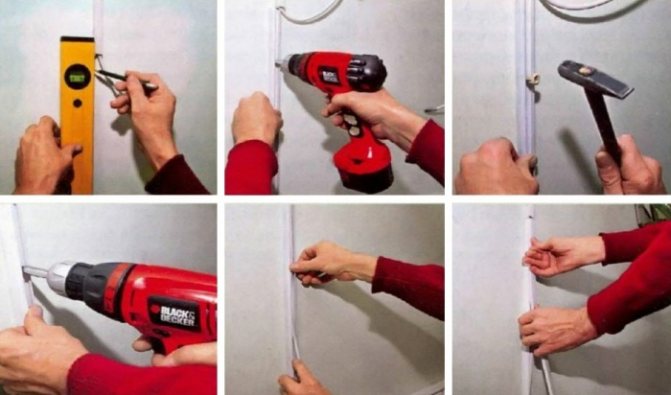
After determining and purchasing the required range of boxes and additional elements, installation locations should be marked.
At the same time, trying to maintain the horizontal and vertical lines of the installation, we advise you to focus on an equal distance to the ceiling of the main boxes along the entire length, and for bends - the distance to the nearest room corner.
To work, you will need a stepladder, a hammer drill, a screwdriver, a hacksaw for cutting plastic, and a level. Depending on the materials of the wall and box, other tools may be required, for example, a hacksaw for metal.
You should not saw off the main channels in advance - there is a high probability of an error. During installation, you can determine the exact size by simply placing them at the installation site.
How to attach the cable duct to the wall depends on the material of the walls, since they have different strengths.
The weight of the structure is determined mainly by the weight of the cable in the main box and ranges from 100 grams in the lightest case to several kilograms per linear meter. The distance between the screws should not exceed half a meter.
If the base of the box does not have holes for fastening, it is better to drill them immediately before installing each section. Let's consider each type of wall material and installation features.
There are several ways to attach a cable duct to a concrete wall. You can choose the most suitable one:
- Professionals do this work using an air gun and special nails. The fastest option, but dismantling will be difficult and the tool is expensive.
- We drill holes with a hammer drill in the pre-marked places where the cable channel is attached. We insert plastic dowels and secure the channel with self-tapping screws. The most common installation method for small volumes of work.
- Adhesive connection. For use only on flat surfaces. Subsequent dismantling clearly renders the cable channels unusable. Procedure: special glue (liquid nails) is applied to the base of the cable channel of the required length along a sinusoid and for a second it is applied to the place marked on the wall. After 2 minutes, the cable channel must be pressed firmly for the glue hardening time indicated on the package.
We invite you to familiarize yourself with how a metal guillotine works
Fastening the cable channel to a brick wall can be done in the same way as for concrete walls. It should be taken into account that dismantling the glued structures will lead to tearing off the plaster.
Installation of a cable channel on a wall made of wood or gypsum fiber board is almost the same. No drilling is required; the screws are screwed directly into the wall material.
It is worth noting that due to the fragility of gypsum fiber, the distance between the screws can be reduced. The adhesive method when applied to wood and gypsum fiber board has the same advantages and disadvantages as when applied to other materials.
If it is necessary to fasten the cable channels to a metal partition, you can use special metal screws 1.5-2.0 cm long with a drill at the end. If the surface is smooth, you can use the glue method.
Before purchasing and installing cable channels, determine the position and number of power and low-current outlets in each location. If you know where and what furniture and electrical appliances will be located, it will not be difficult to count the sockets.
It is more convenient to lay the wires in the channels in one bundle, while simultaneously closing the box. You can pull the wires one by one, securing the already laid covers with a small piece every half meter.
To attach a large number of wires to gypsum fiber sheets, you can use special nylon plugs for screws that are inserted into the wall.
Today we will talk about how to attach a cable channel to the wall with your own hands. In fact, installing an electrical plastic box is not difficult at all.
The main thing is to choose the right mounting method depending on what the walls in the house or apartment are like.
Next, we will look at all existing installation options and provide several important nuances that will allow you to properly secure the cable channel to the wall.
If you decide to install electrical wiring in a wooden house or apartment with plasterboard partitions, then the installation of the cable channel must be done with special wood screws.
The fastening step depends on what load will be placed on the plastic box, or more precisely, how many wires need to be stretched inside, and what their cross-section is.
As a rule, to securely fasten a cable channel to a wooden wall or drywall, it is enough to screw screws every 40-50 cm.
If the walls are uneven, it is better to reduce the fastening step, this will hide all defects and gaps.
You should not choose screws that are too long to install the cable channel yourself.
To securely fix the box in the wall, it will be enough to screw in fasteners about 40 mm long. For screwing, it is best to use a screwdriver with a Phillips bit.
We talked about how to choose a screwdriver for home repairs in the corresponding article!
If you need to attach a cable channel to a concrete or brick wall, which is a typical situation for an apartment or a house, you cannot do without dowel nails, also called “quick installation”.
In addition, for fastening you will need a hammer drill with a 6 mm drill.
So, in order to independently fix the electrical box for the cable on a wall made of concrete or brick, you need to perform the following steps:
- Pre-drill 6 mm holes in the bottom of the cable channel every 40-50 cm.
- Attach the box to the wall according to the markings (more on this later) and mark the drilling points that coincide with the finished holes in the cable channel.
- Drill holes according to the marks on the wall.
- Place the plastic box and drive the dowels into the appropriate places.
- Hammer the nails.
Using these simple instructions, you can install the cable duct yourself in a wall made of concrete or brick.
We draw your attention to one very important point - you should not drill holes with a drill while leaning the box against the wall.
When drilling plastic, the impact mode can provoke the appearance of cracks, which will have a negative impact both from the visual side and from the durability of the finished wiring.
Detailed video instructions for installation work
If there is a need to attach a cable channel to metal less than 2 mm thick or an aluminum profile, then we advise you to use metal screws, also called “bugs,” for fastening.
Installation Tips
So, so that you can install the cable channel correctly and at the same time quickly, we recommend that you familiarize yourself with the following installation nuances:
- First of all, carefully align the wall with the ceiling and prepare it for attaching the plastic box. The smoother the surface, the larger the pitch between fasteners can be. In addition, the absence of gaps will have a positive effect on the interior of the room.
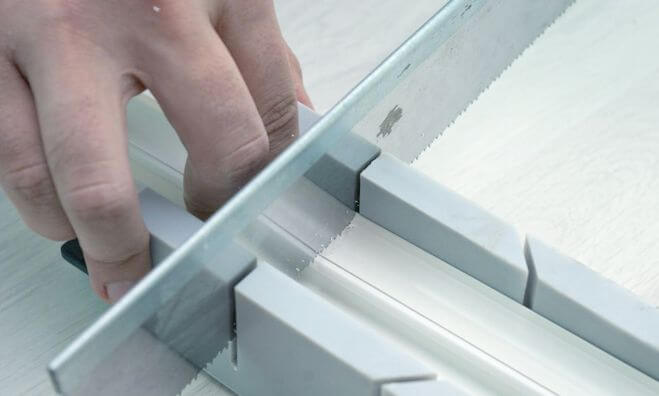
- To connect the cable duct at corners (external, internal, the junction of a vertical route with a horizontal one), make special angles at 45 o. To do this, you can use a miter box, as shown in the photo.
- In addition to point 2 - in order not to bother with cutting out identical corners, use ready-made components from the manufacturer: internal and external plastic corners, T-shaped connectors, plugs, etc.
- The cable channel must be fastened evenly, both vertically and horizontally. To attach the box horizontally and level, use a building level. To level the route vertically, it is best to use a plumb line.
- Before installing a cable channel on the wall with your own hands, you need to mark these walls. There are certain standards on this issue, which we discussed in detail in the article - how to install open electrical wiring.
- If you need to mount a plastic electrical box on a plasterboard or wooden wall, do not drill holes in the surface in advance. The self-tapping screws will fit into the wall well without this. As you understand, this option for attaching the cable box will not work with concrete and brick.
- If possible, start laying the cable duct from a corner, so that later it will be easier to join sections and trim them if necessary.
- There is not much difference in when you decide to install the cable duct - before or after the decorative finishing of the walls. We recommend laying the product last, because... Installing a cable channel on wallpaper is much easier to do than gluing wallpaper, cutting it due to the already laid route.
- If you decide to place plastic wire protection on the ceiling, do not forget to prepare the ceiling surface in the same way as the walls. The cable channel is attached to the ceiling in the same way as on the walls.
That's all you need to know about how to attach a cable channel to a wall with your own hands. We hope that the provided detailed description with photos and video examples was useful for you!
We suggest you read: How to quickly attach lining
Dowel-nails
You can secure the cable duct on a brick or concrete wall using dowel nails. To do this, you need a hammer drill with a 6 mm thick drill.
- First, holes are made in the box itself every 40-50 mm.
Important! Do not drill holes in the cable duct and the wall at the same time. The plastic electrical box may crack when operating the drill in impact mode. - The box is applied to the surface and the attachment points are marked.
- According to the markings, drill holes in the wall.
- Apply the cable channel to the wall and insert dowels, then hammer nails into them.
This method is also called “quick installation”.
The box can also be attached to a concrete wall using a special gun.
How to fix a cable duct to a concrete wall
During the construction of a house, electrical wiring is installed in a hidden way, under the plaster.
A complete replacement of the electrical wiring is usually carried out during a major overhaul.
In this case, grooves are made in the wall, into which the wire is laid.
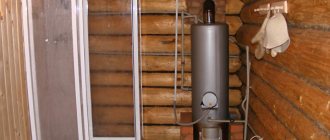
But what to do when there is no opportunity or desire to engage in dusty wall slitting? Or do you need to connect a recently installed powerful electrical appliance, such as a water heater? In this case, many choose the open method of laying electrical wiring, and fastening to the wall is carried out using a cable channel.
Several criteria are used to classify a cable channel:
- Size. There are small products for laying one wire of a small cross-section or large boxes designed to mount up to eight conductors of different cross-sections on the wall;
- Material of manufacture. They produce aluminum, steel and plastic structures. For indoor installation, plastic models are more in demand, and fastening steel and aluminum boxes is more often used when laying electrical wiring along the facade of a house;
- Location. The cable channel can be fastened in several places. The design of the product is maximally adaptable depending on the installation location. There are plinth, parapet, main and floor models.
We suggest you familiarize yourself with Attaching a small bathhouse to the house
Note! In terms of color design, the cable channel most often has a neutral white color, suitable for any decoration. Models that imitate a wooden structure are also popular.
Installation technology
The main advantage of a channel cable for open wiring is ease of installation. At the same time, the structure can be fixed on any surface: wall, floor or ceiling.
The surface material is of greater importance: the method of best fastening depends on this.
Let's consider the main installation options, as well as the types of surfaces to which the channel cable is attached.
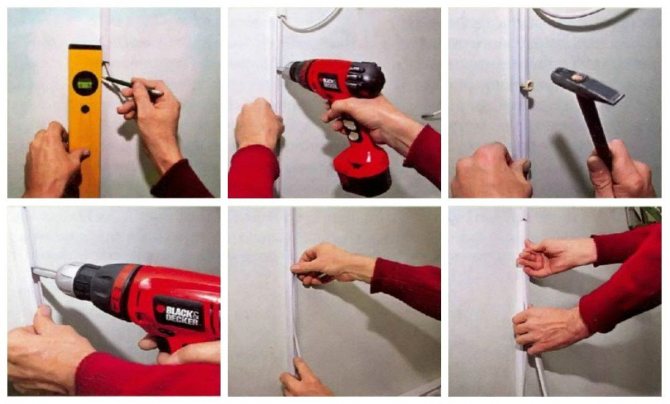
Before you begin to attach the cable channel, you need to make markings on the surface: the location of the electrical wiring boxes is marked on the wall.
This can be done with a pencil or chalk and a building level.
It is important to maintain horizontal and vertical lines, since after installation the unevenness of the gasket will be evident.
Self-tapping installation
To secure the box to a wooden wall, use ordinary self-tapping screws. The recommended length is 2–3 cm. This method is suitable for wooden houses, bathhouses and other buildings. Self-tapping screws are also suitable for walls covered with wooden clapboard.
When performing installation, holes are pre-drilled in the bottom of the box, into which self-tapping screws are then screwed.
The optimal distance between installation points is 30–50 cm, depending on the expected load on the cable channel (the number of electrical wires placed in the box).
Installing cable ducts on a concrete surface requires a more serious approach and additional tools.
This will require plastic anchors and a hammer drill or impact drill to make holes in the concrete wall.
This method is suitable for installing any profile: both metal and plastic, indoors or outside the building. The order of work is as follows:
- Holes for fastening are drilled at the bottom of the box. The distance between them, as in the previous version, is 30–50 cm;
- Then the cable channel is applied to the wall along the previously marked line;
- Using an awl or nail, the location of the fasteners is marked on the wall surface;
- Then, using a puncher, holes of the required diameter are drilled along the marks in the wall, into which plastic dowels are driven;
- After this, all that remains is to secure the profile using self-tapping screws.
To secure the electrical wiring box to a concrete surface, you can also use dowel nails, which are driven in with a hammer.
But this option has a significant disadvantage - if it is necessary to move the structure, certain problems arise with dismantling such dowels.
Glue method
Another option for securing the cable channel is to use mounting adhesive for fixation.
Most often, the adhesive composition “liquid nails”, produced under the Moment brand, is used for these purposes.
This glue is available in tubes for a mounting gun or in ordinary tubes for manual application.
The adhesive installation method is used for attaching cable channels to plasterboard, PVC wall cladding (plastic lining or panels), as well as in bathrooms on ceramic tiles.
It is worth noting that only plastic wiring boxes are suitable for this method, since their weight is minimal.
It is also desirable that the number of wires laid in the cable channel be minimal and do not create significant loads on the structure.
The technology of the adhesive fixation method is as follows:
- An adhesive is applied to the back of the profile. To ensure maximum adhesion area, the glue is distributed in waves;
- Then the cable channel is carefully applied to the wall along the marking line and immediately removed;
- After 2–3 minutes, when the glue has begun to dry, the strip is reapplied and pressed firmly for several minutes.
After the adhesive has completely set, additional fixation is performed in problem areas. For fastening, use small screws or hammer nails.
In conclusion, here are a few recommendations that will come in handy when installing cable channels.
To facilitate profile connection, use additional elements offered by the manufacturer: T-shaped and corner structures, strip connectors, various bends and other accessories.
To install sockets and switches, it is best to use overhead versions of these products or use box models with built-in structures.
Separately, we note that the installation of external electrical wiring is carried out last, after all finishing work has been completed.
Installation of electrical wiring networks can be carried out in an open or hidden way. Each of them has pros and cons, but the first option is often the only possible one.
Simple laying of the wire with fixation with hardware in small increments of about 100 cm is also not suitable according to modern operational standards and safety requirements. The solution is to use a cable channel, in the niche of which the wire is placed.
The technology is quite simple, but when using it it is important to take into account several installation nuances. How to attach a cable channel to a wall? The answer to this question will depend on the type of surface and operating conditions of the electrical infrastructure.
This is a mounting box designed for laying cable routes on different surfaces in a room. Its task is to mask and physically protect wires from damage and dust.
The main material used to manufacture the box structure is a plastic alloy, which can have moisture and thermal protection. There are also metal structures - made of galvanized or cold-rolled steel.
But the use of metal boxes is not always convenient due to electromagnetic interference and rigid structure.
The appearance of the product may vary in texture and texture.
The channel is also complemented by various mounting and adjustment fittings for laying in difficult places and creating functional electrical units.
The technology for installing and fastening the cable channel involves performing several operations. At the basic stage, the contours of the gasket are marked along which the channel will be laid in segments. Next, you should fix the base of the structure.
It should be noted that the channel itself is formed by several segments - at least it will be a load-bearing part in the form of a thin long panel that is mounted directly to the wall.
The second required part is the closing cover, which is fixed using latches or slot lock connectors to the already installed base.
We invite you to familiarize yourself with the walls of a frame bath in section
How to attach a cable channel to a wall? There are several methods: from fixation using holders to direct installation using screws, bolts or other screw-on hardware. In both cases, preliminary creation of formatted holes is required to deepen the fasteners. The only exception may be the adhesive fixation method.
Complex branching and intersecting routes must be securely fixed at the joints. A special accessory in the form of a distribution box allows you to correctly organize the installation at such points.
It is usually made of the same material as the main channel.
If there are a large number of intersections or connections of routes, it is better to use plastic kits, since during installation it may be necessary to create non-standard holes and perforations.
How to attach a cable duct to a wall with a distribution box? The marking is also done initially. Next, a box is installed at the junction points - this operation is performed using complete fasteners with anchors, brackets or screws.
It is important to maintain the position of the box so that the output sides are clearly oriented to the lines of the cable ducts. The latter are secured to the bottom of the box using plugs and other special clips, which must be included in the kit.
At the final stage, after connecting the wiring lines, the structure is closed with a junction box cover.
Working with corners
The most difficult areas for laying cable ducts are corners. Theoretically, it is possible to get by with a standard design in such places, by cutting and bending it correctly.
And for this, you should initially use a flexible cable channel that will not break during installation and will not break after some time of operation. But a more reliable option involves the use of special corners - internal and external.
Of course, there is no need for a joint as such - the route can be laid in a continuous manner, and connecting operations will only affect a bunch of flexible corners with two channels on the sides. All fastening operations are performed using the same list of hardware.
Preparation for installation, surface marking
Open installation imposes increased aesthetic requirements: everything must be “smooth and parallel.” In this case, the box is fixed along the preliminary marking lines. It is carried out using a level (laser or water, construction), a square, a tape measure, a marker, a ruler, a pencil (marker).
We invite you to familiarize yourself with: Rafter system of a gable roof - All about roofing
Installation instructions
Install the box according to the markings
Here's how to properly divide the process into stages:
- Initially, a diagram of the optimal electrical wiring is drawn up;
- lines on the wall are drawn by tapping according to the level, all branches are strictly at right angles;
- on them, with a pencil, according to the existing plan, the location of distribution boxes, sockets, switches is marked;
- necessary adjustments are made as work progresses.
You can make turns and angles yourself
At the end, you should calculate the length of the marking stripes, the number of installation points, turns, and corners. This will allow you to order the exact amount of working material.
Turns and corners can be purchased either ready-made or made from cable duct yourself. Using the former leads to increased costs. But work on difficult sections is faster, and the appearance of the route is better than when using homemade ones.
Self-production will require the additional use of sealants to seal seams.
If you have a laser, you don’t have to make markings
Boxes for installation can be cut in advance (for a large area) or during the process. The first case begins with precise measurements using a tape measure along the marking lines.
Then they cut the working material into the required lengths in order to install it later. Accuracy of measurements is important here.
It is easier to carry out the work according to the scheme: try it on - cut it - fasten it.
Drawing straight marking lines and using ready-made components will allow you to attach the cable channel without spoiling the beauty of the room.
Installation instructions
Glue (liquid nails)
Fastening the cable channel with glue is not very reliable; it is used where others cannot be used, for example, for fastening to tiles. You can combine it with others - with fastening with self-tapping screws or dowel-nails.
To glue the box to the wall, glue is applied to it in a zigzag line, as in the figure, then pressed against the wall along the markings so that the glue is imprinted on the surface, and removed. After a few minutes, when the liquid nails have set a little (the time depends on the specific type of glue, this can be read in the instructions on the package), the box is pressed firmly against the wall again.
Fastening KK on the surface of plasterboard boards
Attaching KK boxes to plasterboard boards (hereinafter referred to as GCP) with standard hardware is very problematic, since GCP are a layer of gypsum located between layers of paper. The compressive strength of such drywall is critical. If you are slightly “overzealous” when tightening the self-tapping screw while screwing the base of the box to the GKP, then the threaded part of the fastener in the plaster will begin to turn idle, reducing the strength of the fastening to zero.
To fix the boxes on the fragile surface of the GCP, reliable fastening can only be ensured by using special dowels, commonly called “butterflies”, or by using mounting adhesive, called “liquid nails”.
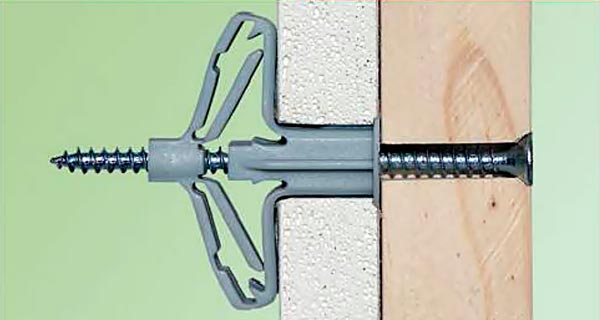
Fastening with a butterfly dowel to drywall
Decoration of corners
When installing electrical wiring in cable channels, you may need to make corner joints in the corners of the room or between the vertical and horizontal parts of the channel on the wall. To make a joint in the corner of a room, the end of the cable channel is cut from the side adjacent to the corner at an angle of 45 degrees. It is better to start installing the cable channel from a corner.
To make the junction of the vertical and horizontal parts, the cable channel is also cut at an angle of 45 degrees, but in a different plane. You can do it another way: cut the lid to the full width of the box. Minor defects can be covered with sealant.
Open wiring in retro style
Open electrical wiring on insulators, made in retro style, is an alternative to traditional PVC cable ducts. It can be attached on top of already pasted wallpaper. An additional advantage of using external electrical wiring in a retro style is the expansion of the designers’ capabilities in terms of non-trivial artistic solutions to imitate the interior color of the last century (country styles, loft, Provence, etc.).
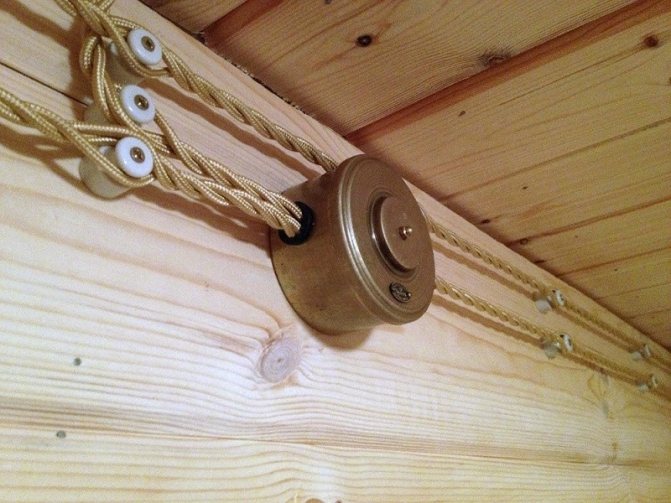
Retro wiring on a wooden wall
Technically, retro-style wiring is achieved by twisting two separate insulated wires into a twisted pair (pigtail), which is then mounted on the wall surface using porcelain insulators. Another name for this type of wiring, well-established among specialists, is vintage cable/vintage wiring.
We invite you to familiarize yourself with Izospan for roofing: how to properly lay isospan on the roof