Door opening sizes: how to change correctly
If we say that the quality of installation of the former largely depends on the size of the door block and the opening in the wall, you will probably consider this a truism. Nevertheless, most novice craftsmen get burned at this point and, as a result, a very simple job turns into complete torture. To prevent this from happening, the opening should always be checked to match the door block (or vice versa) and, if necessary, enlarge or reduce it. This will be discussed in this article, in which, together with the site dveridoma.net, we will talk about how the dimensions of doorways should correspond to the block of doors, and at the same time we will explain how to correctly bring them to the desired combination.
Dimensions of doorways: what to strive for
Anyone who has dealt with the installation, replacement or simply purchasing of any type of door knows that these products are standardized. This was done not only for the sake of banal convenience, but also in order to minimize the loss of living space in the premises caused by the presence of the doors themselves. Let's just say that in the bathroom doors are used with almost the smallest width (just enough for a person to enter and it is easy to bring in the necessary equipment). The front door to the house is wide so that any furniture and other household items can be brought into the home.
It is for this reason that a certain line of door leaf width sizes was born - all other door sizes are the same. Their height is 2 m, and their width can be 600 mm, 700 mm, 800 mm and 900 mm - the canvases can be combined if necessary. That is, the entrance to the room can have two door leaves - for example, 600 and 600 mm. Or 400 and 800 mm are double doors, which you can read about in another article on our website. It is to this standardization that the size of a standard doorway is tied.
- Width. Everything is simple here, and in order to correctly determine the required width of the doorway, you should add the thickness of the door frame to the width of the door leaf and a couple of centimeters for the gaps between the door block and the opening. Now in numbers. Let's assume that we have a door leaf with a width of 800 mm and a door frame thickness of 20 mm. As a result, we get - 800 mm + 40 mm (thickness of the frame on the left and right of the door leaf) + 40 mm installation gaps or, as they are commonly called, foam gaps (also 20 mm on each side of the door block). What do we get? And what we get is that for a door leaf with a width of 800 mm, a doorway is required in the range from 880 mm to 900 mm.
Ask what to do if the opening doesn't fit your new doors? Everything is simple - bring it to the required dimensions, which is what we will discuss further.
Profile configuration
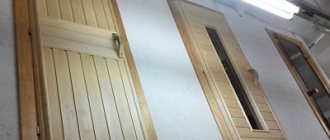
The door frame for interior doors is usually a rectangular beam with a selected quarter for the rebate.
The standard sizes are:
- Thickness – 35 mm;
- Width – 60, 70, 80 and 100 mm;
- Length – 2100 mm;
- The width of the rebate is 30 mm, and the depth is 10 mm.
The porch can be made in a semicircle or with ribs. For wide doorways, a quarter of 10/10 mm is made in the timber on the back side, opposite the vestibule. Recently, profiled telescopic boxes are increasingly being produced, into the side grooves of which the extensions and platbands included in the kit are inserted. A groove is made in the area of the narthex for fastening the seal. If there is no such groove, then a self-adhesive seal is attached.
Widening the doorway: it's easy only from the side
When faced with the question of how to increase the size of a doorway, you first need to pay attention to the type of wall - if it is a partition, then you don’t have to worry about the consequences of the expansion.
- If we are talking about a load-bearing wall, then you need to be careful with it so as not to collapse the ceilings; for this, preliminary reinforcement should be done. Lay a channel on top of the opening, strengthen it thoroughly with welding or studs, and only then begin to increase the opening in width or height.
- If this is a partition, then you need to pay attention to the material from which it is made - if these are blocks, then they also need to be strengthened with a crossbar so that they do not collapse during work or operation. The profile of the door frame is by no means a reliable deterrent for heavy blocks.
If you specifically, as they say, point by point, answer the question of how to increase a doorway in height or width, then all the work can be presented in the form of the following series of events.
- Strengthening the top of the opening. This stage can be ignored only if the doorway is increased only in width and not by much - a maximum of 100 mm. It will be possible to remove 50 mm from each side of the opening - if you move in one direction, then the top of the opening will have to be strengthened. How is strengthening done? Above the door, on both sides of the wall, a corner is laid (if we are talking about piers) or a channel (if we are talking about a load-bearing wall) - the metal located on one and the other side of the wall is tightened with studs. Only after this can you begin to disassemble or dismantle the unnecessary part of the wall
- Marking. We calculate the new width of the doorway and draw it on the wall using a pencil and level.
- Removing unnecessary material. It is better to leave the hammer, chisel and sledgehammer alone - you need a grinder or, if a large amount of dust scares you, then a hammer drill. In the right place, the wall can be cut with a disk, or many holes can be drilled along the intended line, and then the excess can be knocked off with a hammer drill. The grinder works faster, so if dust doesn’t bother you, then it’s better to give it preference.
To learn how to widen a doorway, watch this video.
Everything is simple - break it, don’t build it, but you should always remember that such work must be done carefully so as not to injure yourself and not destroy unnecessary things. Dismantling of walls is carried out correctly from top to bottom - everything needs to be disassembled, and not broken and destroyed.
The main stages of installing a door block
Now about how to install the door frame. The entire installation process comes down to a whole range of works, the main ones being:
- Taking measurements.
- Assembly.
- Installation of hinges.
- Installation, fastening and alignment of the block.
- Checking the functionality and finishing of the door.
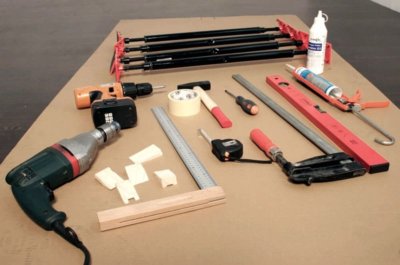
To do everything as expected, you cannot do without the appropriate tool. You will need:
- Drill or hammer drill with a feather drill.
- Roulette.
- Level, square.
- Hacksaw or jigsaw.
- Hammer, screwdriver, mallet, chisel, nails, dowels and self-tapping screws.
- Pencil.
You will also need wooden blocks, wedges and foam. Wedges can be made from any available material. Wooden or MDF board scraps are most often used.
At the very beginning, the old door frame is dismantled. This can be done using a nail puller (crowbar), having previously made cuts on both sides of each vertical bar, in order to then press this structure away from the opening. If anchor bolts were used when installing the old box, nails that are not possible to unscrew can be cut off using a grinder.
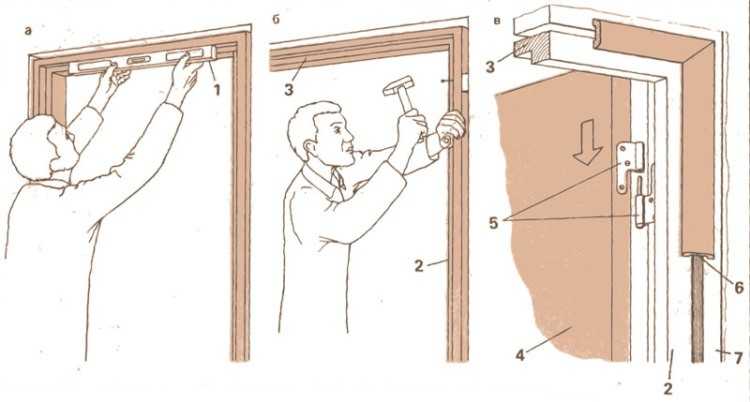
Before installing the frame of interior doors, it is necessary to check the verticals of the walls and take into account differences in the level of the walls and floor. The door frame must be positioned so that if there are any unevenness, the frame does not go deeper into the opening. This is necessary for the door trim to fit. In order to correctly position the door frame, you should use a building level and take into account all the errors in the opening.
First, the assembled door block is firmly fixed in the opening to achieve the initial level of rigidity using wedges. After completing the fixing work, it is worth re-checking the correct positioning with a level so that the frame is level with the door.
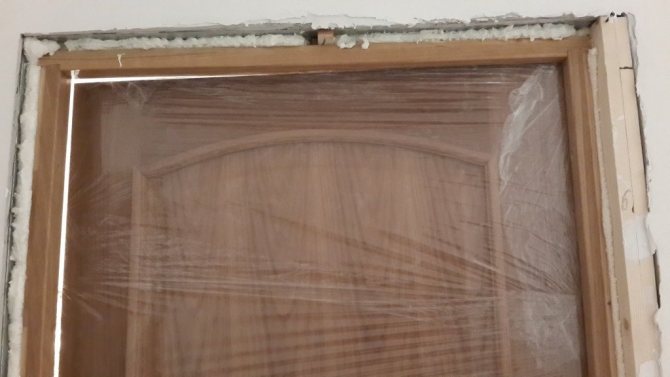
It is important to know that the foam that is intended for the gun is much better and more convenient to use due to the fact that it is more dosed and has a small expansion coefficient; it hardens much faster. Foam, which is supplied in large quantities with a straw, will expand longer. Before starting work, it is better to cover the door leaf with masking tape and film, because the foam is difficult to wash off.
It is important to know that you need to start foaming by fixing individual small areas. After 30 minutes you can already go through the entire perimeter. All cracks are filled with foam (50% of the total volume). Do not fill with a large amount of foam, because during expansion the foam will squeeze the box inward. We recommend using professional foams.
There are several ways to fasten a door frame in an opening, each of which involves the use of a special type of fastening. Various fastening options provide a certain level of reliability and strength of the fixed structure. We hope the video stories on options for installing wooden door frames will help you.
Do-it-yourself door frame - step-by-step assembly and installation process
The complete door set includes the door leaf, frame and hinges. It can be difficult to purchase a ready-made complete set, so there is nothing left to do but make a door frame with your own hands from profiled timber or entrust this task to specialists. The box, most often, has to be selected separately, and it is not a structure ready for installation, but several elements that need to be adjusted in accordance with the size of the opening, the necessary cuts made and assembled. It is not so easy to assemble a door frame with your own hands, so in addition to tools, it would be nice to have at least a little carpentry skill.
Structural parts
The door frame consists of the following parts:
- Canvas. Most often, solid wood, chipboard or MDF are used in home-made structures.
- Vertical bars – 2 pieces.
- Horizontal bars - 1 or 2 pieces. All bars are made exclusively from good natural boards. The lower one is often not used and is replaced by a threshold.
- Platbands – 3 pieces. These elements are usually made of MDF.
Installing the assembled product into the opening and securing it is not difficult. The most important thing is to maintain the plane. The structure is inserted into the opening and fixed with wedges, after which the evenness in all axes is checked. This problem is solved using a level and a plumb line. Correction of the position is carried out by the same wedges. Further installation is carried out in the order described below.
Door frame material
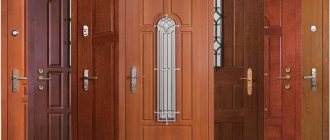
The frame serves not only as a frame for the door leaf, but also as a load-bearing base. The strength of the entire structure and its durability depend on the quality of the material and installation of the product. The choice of material depends on the purpose of the door and the material of the leaf itself. Metal-plastic and metal doors are usually supplied fully equipped, so we will consider only those cases when the door frame has to be manufactured independently. As a rule, in this case we are talking about two types of material: wood and MDF.
- Natural wood has different densities and is graded into soft and hard. The cheapest and most popular product is pine, but when it comes to installing entrance doors, you should focus on a harder and more expensive type of wood, for example, oak. It will ensure durability, strength and reliability of the structure.
- MDF is used exclusively for interior doors. If you are going to assemble a box from this material, you should treat all cut edges with nitro varnish to ensure protection from moisture.
Equipment and standard sizes
The door frame consists of several slats: two side, top and bottom, if the design includes a threshold. If the depth of the doorway exceeds the corresponding parameters of the timber, your kit must be supplemented with extensions that will increase the depth of the box.
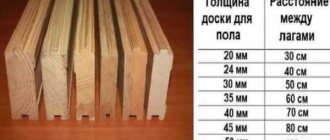
Standard door block sizes vary in width and height. The correspondence of the parameters of the door leaf, block and opening is indicated in the table.

Do-it-yourself door frame assembly is carried out taking into account the following points:
- There should be a technological gap of 3 mm wide between the inside of the frame and the door leaf along the entire perimeter.
- The gap between the wall and the top of the box must be at least 20 mm.
- The gap between the side planks and the wall is 10 mm from each side. When installing on polyurethane foam, it is necessary to increase the gap to at least 20 mm.
- The gap between the bottom of the sash and the frame or floor depends on the material and location of the structure. For dry rooms, these parameters can vary between 5–15 mm, for wet rooms, in order to ensure ventilation, - 50 mm.
Preparatory stage. What you need to have with you
Any dish cannot be prepared without missing ingredients. So it is here. To be prepared for independent activities, you must ensure in advance that you have all the necessary tools and building materials.
Before starting work, it is recommended to ensure that you have:
- electric drill (it will help drill holes in the wall and in the frame, ensure quick installation and reliable fastening of the door to the wall);
- hacksaws for wood or a jigsaw (the dimensions of the components of the box are larger than the doorway, and they will have to be cut);
- hammer;
- roulette;
- screwdriver or screwdriver;
- chisels (used to create small indentations in wood and clean out grooves);
- a level that will help correct all the irregularities and not warp one of the sides of the box;
- nails/screws (it is recommended to use a length of 75 mm);
- and polyurethane foam to hide the gaps between the wall and the frame.
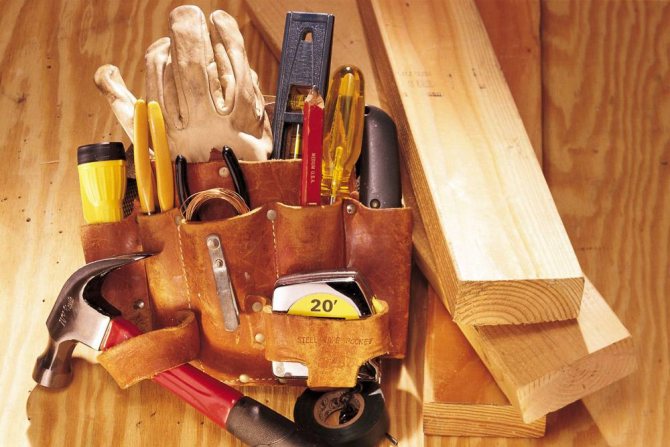
It’s better to immediately prepare the necessary tools
Options for connecting structural elements
The main difficulty in assembling door frames is the process of connecting individual elements. The joining of horizontal and vertical strips of the product can be done in two ways:
- I washed it down at an angle of 45 degrees. This process is best done with a miter saw, but in the absence of one, a miter box will do.
- At a right angle of 90 degrees. To cut the workpiece you will need a saw with fine teeth.
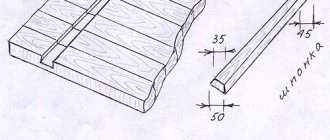
The joining of the planks is carried out using tenon joints or galvanized self-tapping screws. The figure shows options for tenon joints, which clearly show how to assemble the door frame yourself to ensure high strength of the joints.
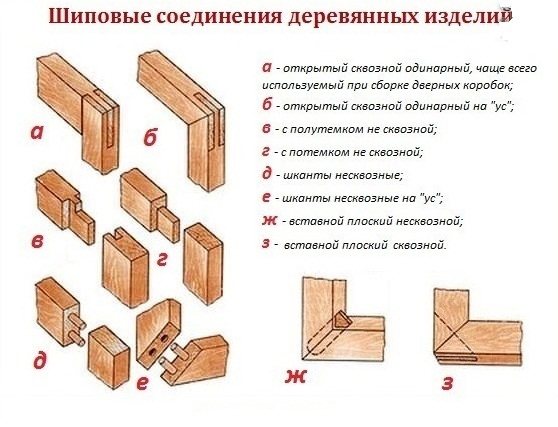
When calculating the parameters of the length and width of the profile slats, it is necessary to take into account that the length of the tenon should be equal to the thickness of the box beam. The tenon joint provides sufficient strength to the finished structure, but if desired, additional reinforcement of the joints can be made with zinc-coated nails.
Door frame assembly process
Let's look at how to properly assemble a door frame . As a starting material, we will need profiled timber made of natural wood or MDF.
The box is assembled in the following order:
- We check the parameters of the width and height of the opening. To install the box, you need to leave a gap of about 3 cm. Using a hydraulic level, we control the horizontalness of the floor covering in the corners of the opening.
- The canvas and timber of the frame must be laid out on a horizontal surface so that the outer part (the vestibules) is turned upward. The sash must be in the same plane as the beam. If the depth of the slats is greater, then it is necessary to level the planes by placing several layers of cardboard or books under the canvas.
- To ensure an even gap between the canvas and the timber, cardboard or pieces of old linoleum can be laid around the perimeter.
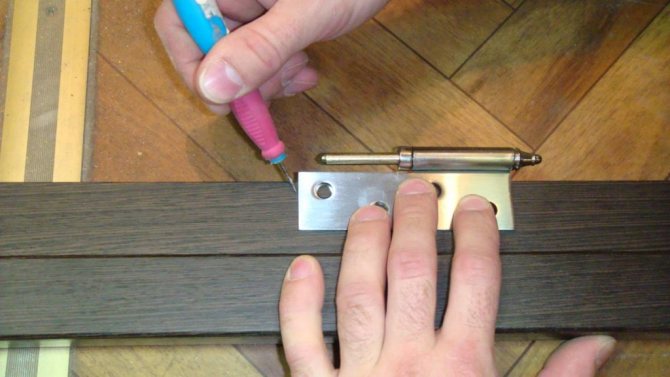
- Use a sharp pencil or awl to mark the control points and saw off the extra section of the crossbar in accordance with the chosen pattern.
- Since you have to work with profiled timber, the convex elements of the vestibule will interfere with the transverse joining. To get a smooth plane, you first need to mark the edges of the cut with a sharp object. Accuracy of measurements and careful work are very important here, since the slightest mistakes can ruin the appearance of the structure. The cut is made with a tool with fine teeth. Once the desired depth is reached, the remaining excess material is removed with a chisel.
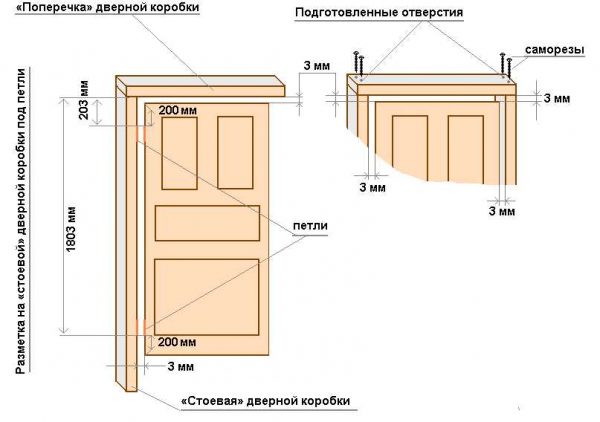
- Now we lay out the prepared bars around the canvas to mark the location of the loops. To do this, measure 203 mm from the top and bottom of the vertical beam. This is the standard hinge mounting height, plus 3 mm for the gap.
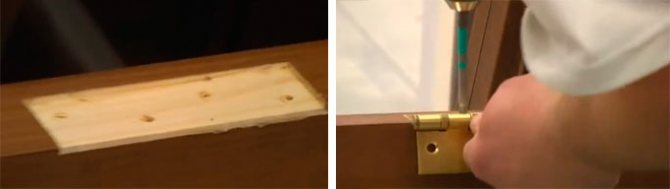
- Next, we attach the hinge card with two screws in accordance with the markings, and mark the shape of the fastening. Now you need to make a recess corresponding to the thickness of the card.
- We fix the hinge flags with self-tapping screws in the prepared recess. Installation of the lock strike plate is carried out after installing the box and hanging the door leaf to prevent discrepancies.
- Now all that remains is to make sure that the structural elements are perpendicular and fasten the top crossbar to the side posts.
- If the design includes a threshold, it is customary to attach it to the sidewalls at an angle of 90 degrees. Here, too, it is necessary to carefully remove the quarter to prepare a smooth surface for the joint of the crossbars.
- Before attaching the threshold, you must once again ensure that the entire structure is assembled correctly. Place it on a flat surface, put the canvas in place, make sure there is a gap, move the racks to the desired position, if necessary.
- Now all that remains is to fix the lower cross member and the self-made box can be installed in the opening.
Advantages of a telescopic box
Regarding door sizes, building standards vary from country to country. For example, in our country the standard swing door width is 600 mm, 700 mm, 800 mm, 900 mm. Similar standards are in Spain or Italy. But in France, 690 mm, 790 mm and 890 mm are considered the norm.
What to choose? More often they prefer to adhere to domestic standards: there is more choice. Installing doors that do not comply with building codes leads to the fact that in order to replace them you will need to look for the same ones or redo the doorway. There are no other features.

In general, the width of the door leaf and doorway is regulated by GOST. He defines them depending on the room:
- in the kitchen, the door width should be at least 70 cm, height 2 m;
- bathrooms - width from 60 cm, height 1.9-2 m;
- in rooms - 60-120 cm, height 2 m.

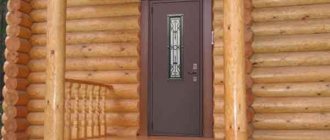
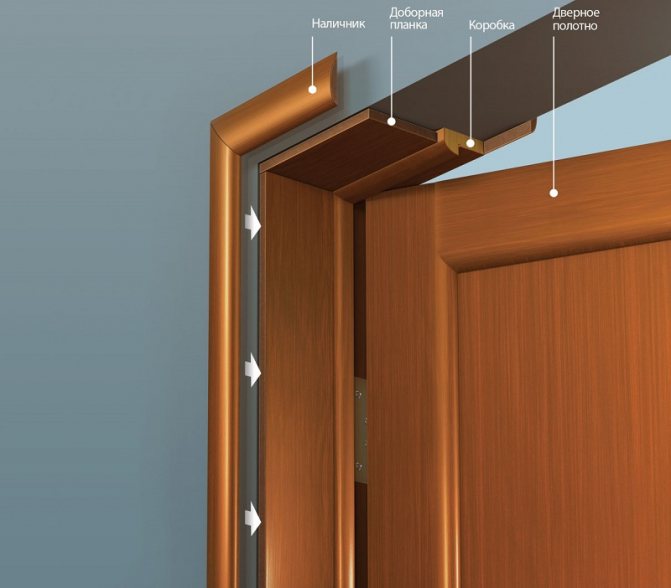
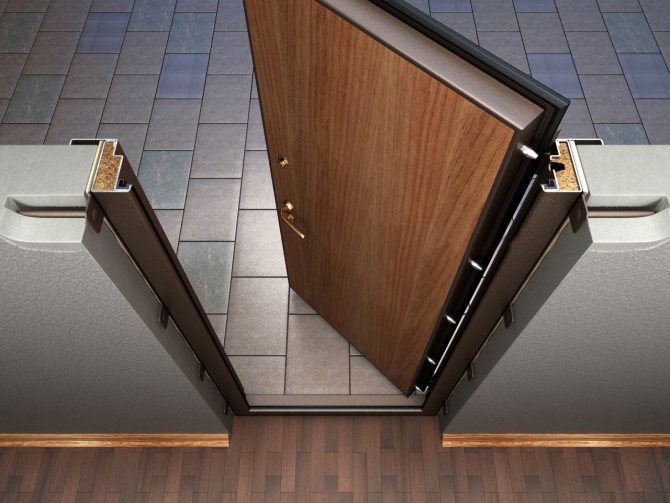
What does a door frame look like in a wall?
But the reality is such that we adapt to what we received from the builders. Therefore, to determine the size of the door and frame, you need to measure the existing opening. Based on the results (the smallest value), select the dimensions of the block, which will be slightly smaller. Necessarily less, since clearance is required for installation of fasteners and spacers.
There is also such a parameter as the depth of the box. The standard is 70-80 cm. But in many private houses the wall thickness is many times wider. Then the doors are installed flush with one of the walls so that the opening and slopes do not interfere with their opening. The remaining width of the opening can either be plastered and finished similarly to the walls, or an additional trim can be installed, which is matched to match the door leaf and door trim.
Read how to install the additional strip here. About installing trim on doors is written here.
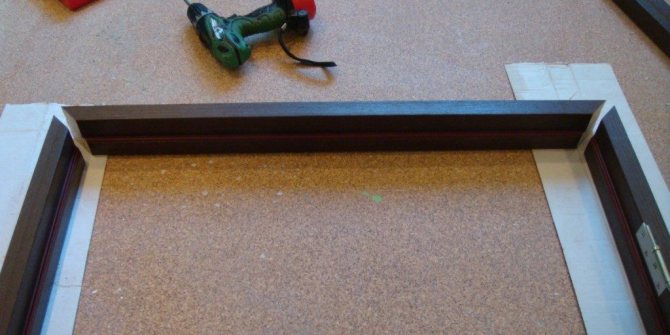
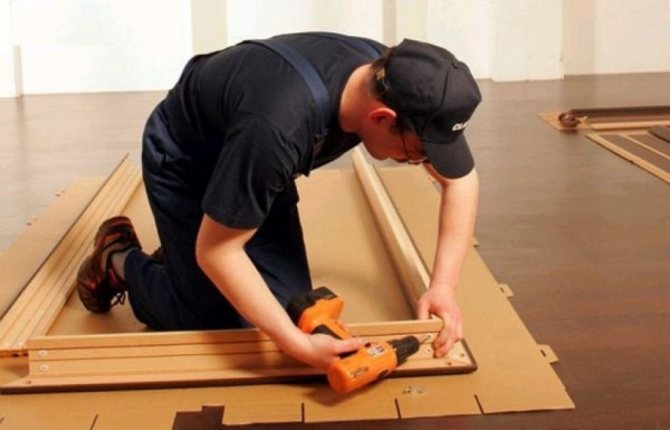
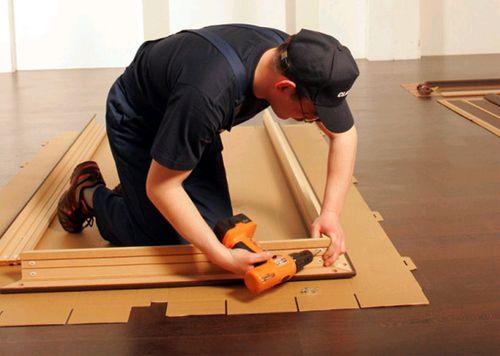
If you purchased doors with a frame, you will need to fasten the vertical strips - posts (jambs) - to the horizontal - lintel. This is usually done on the floor. Having laid paper or cardboard, the planks are laid out on the floor. Connect, checking the accuracy of the match. If necessary, eliminate defects: treat with sandpaper, ensuring that there are no cracks.
The dimensions of the door frame are determined by the dimensions of the doorway
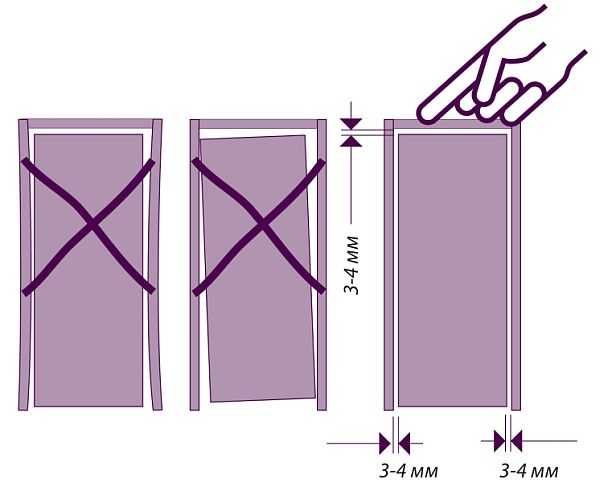
If you bought doors with a frame, you don’t need to worry too much about the size, but you still need to check. Just in case, so that you don’t have to redo it later. Therefore, having folded the door frame parts on the floor, place the doors between them. If everything is correct, then there should be a gap of about 3-4 mm around the perimeter of the door leaf. Only under this condition will the doors open and close normally.
A little should be said about adjusting the height. Typically, the side posts of the box are made 12-15 cm longer than the door. This is in case the doors are installed according to the rules: the racks will rest on the floor joists. But since this method of installation is rare today, the racks are shortened to the required length.
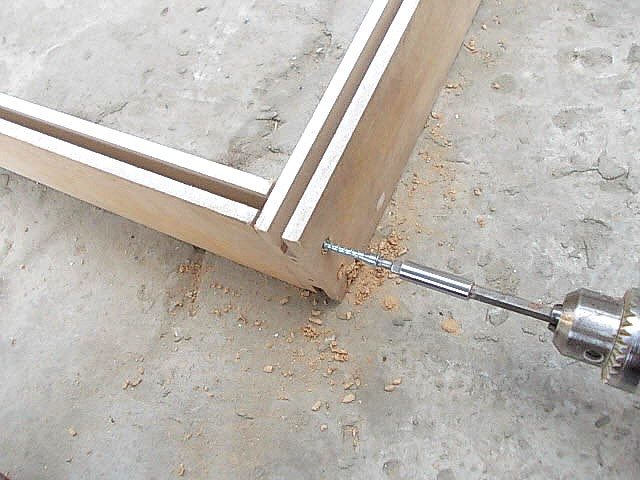
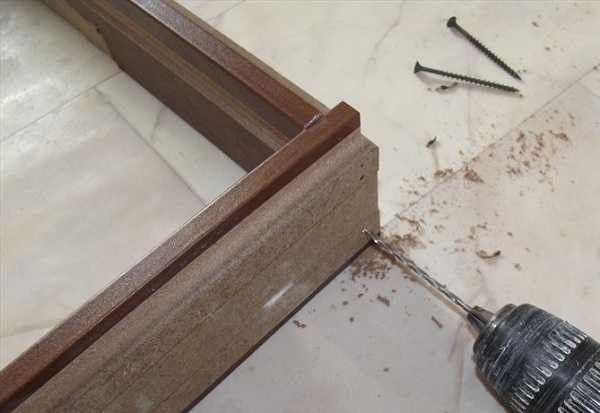
The next stage is assembling the door frame. It is better to do this with self-tapping screws. If the corners of the planks are cut at 45o, we drill holes diagonally for the screws on the side plank, as shown in the photo. Then we apply it to a horizontal block and twist it with self-tapping screws.

When assembling the door frame, we drill holes for self-tapping screws - this way the wood or MDF will not crack
If the corners of the box are filed at 90o, the work is somewhat easier, but it is still advisable to drill holes. This is definitely necessary if the box is made of MDF: this will guarantee that the material will not collapse.
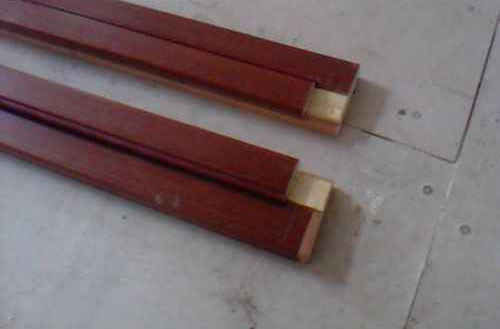
The top bar is placed against the side bar, the edges are aligned. Make two holes: through the top bar and into the end of the side one. It will be clearer if you look at the photo.
If the corners in the box are right (90 degrees), then the assembly is slightly different
By connecting the planks in this way, you get a finished box. The bottom bar is practically not used today, because there is nothing underneath. Check again, when assembled, the frame is 3-4 mm larger than the door leaf (and wider and longer). You can check.
Often the height of the racks is higher than necessary. Take a tape measure, measure the height of the doorway, subtract 1-2 cm, which will be filled with foam. This will be the height of the box. Measure on each side of the opening separately: Having measured again, put this value on the racks of the assembled box, draw a cutting line. Cut off the excess. Half of the installation of the door frame has already been done by you, and with your own hands.
We cut in the hinges
One part of the hinge with a pin is fixed on the door frame post (1), the second - at the end of the door leaf (2)
At what height should the hinges be installed? The distance from the edge of the door leaf should be at least 19 cm. For light doors, two hinges are enough - on top and bottom. On heavy ones, three are installed: another one in the middle.
The hinges consist of two detachable parts, one of which has a pin. We place them so that the pin faces up. It is important.
It is more convenient to embed hinges and locks directly on the floor. Therefore, we take the fittings, place them, mark them and make recesses. First we cut it in and secure it to the stand. Then, having placed the doors, we mark the place for the hinge at the end of the door leaf.
It’s convenient to work with a router; if you don’t have one, we use a chisel. You only need to remove a few millimeters of material, so it won't take much time. When folded, the hinges leave a gap of 4 mm between the door leaf and the post. Taking this into account and the thickness of your loop, we calculate the depth of the seat.
Having installed the hinges on the stand, we apply the canvas and at its end we mark the place where the hinges will be attached. We cut to the same depth as on the rack.
It is very important to install the doors evenly in horizontal and vertical surfaces.
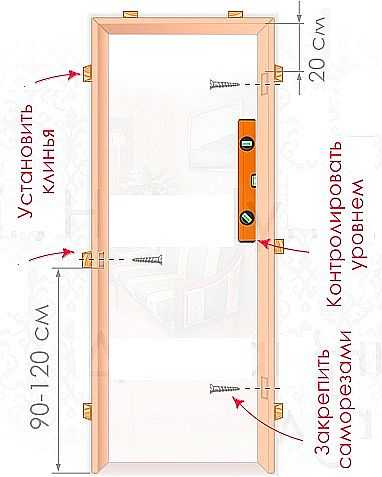
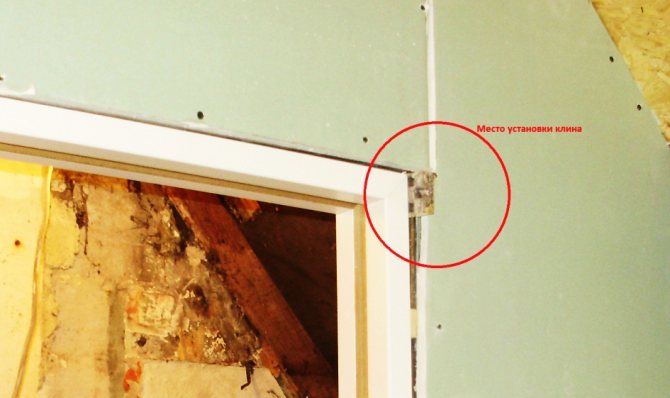
Place the pillars and lintel assembled in the letter “P” in the doorway. Using a level and/or plumb lines, you align in the horizontal and vertical plane. Fix the position with wedges and spacers, constantly checking the correct installation. Make sure that the racks are parallel and do not lean to the sides or forward. The comfort of using the doors depends on how smoothly you set everything.
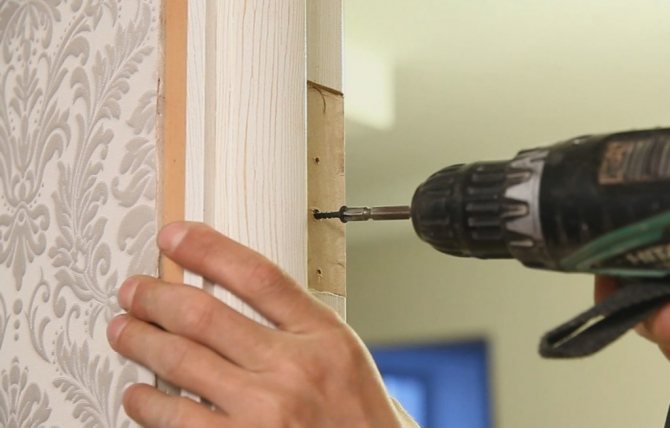
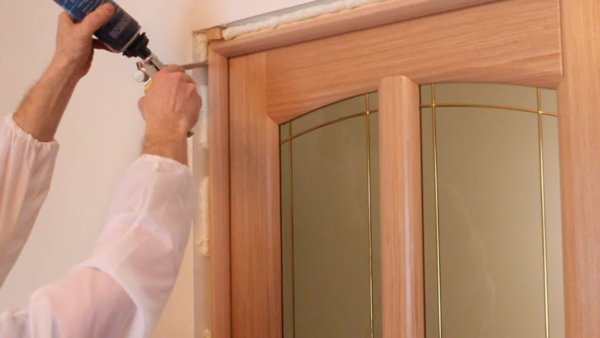
Having checked everything again, use long self-tapping screws or dowels - depending on the wall material - to fix the frame panel in the doorway. One fastening on the door frame is located at a distance of 25-30 cm from the other. It turns out that 7-8 screws can fit on the vertical posts, and 2-3 on the ceiling.
A hole is drilled in the box itself with a 4 mm drill, no more: the heads of the screws are 5-6 mm, and if you make more, they will not hold. This is where a timber built into the opening comes in handy (if there is one, of course). The self-tapping screws easily screw into the wood and securely hold the box.
If the opening is made of brick, building blocks or shell rock, everything is more complicated: installation of dowels is required. Moreover, they should hit the bricks, and not the seam. And the diameter of the dowels is more than 4 mm, and they still need to be installed somehow.
Proceed as follows: drill with a thin 4 mm drill, trying to leave a mark on the wall. Having drilled everything, they dismantle the box and check where they hit it: in a brick or a seam. To avoid getting caught in a seam, look at the area of open masonry, or make marks on the box in advance (only those that can be erased later). If everything is fine, they make holes for the dowels; if they hit a seam, they make adjustments. Dowels are inserted into the holes drilled in the wall.
Place the box again, ensuring that the holes in the box and the dowels match. Wedge it and check again how correctly it is installed. Insert the crepe into the dowels, periodically checking it relative to the vertical and horizontal planes. Do not overtighten - you may damage the wood or bend the post.
Now install the door leaf. It is simply hung on the hinge pins. After checking the functionality of the door, close it. Now the gap between the box and the wall must be filled with polyurethane foam.
Foaming
First, we fix the doors by placing some dense material, cardboard, for example, between the door leaf and the jamb. With the door closed, install wedges and spacers that will prevent the frame from bending.
Before applying polyurethane foam, spacers are installed
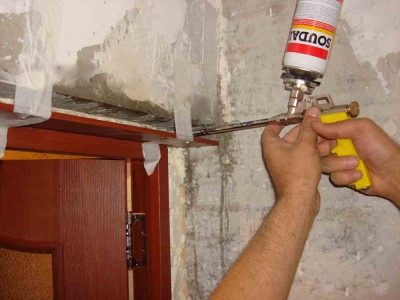
Then we take a can of polyurethane foam and fill the gaps between the box and the wall by about one third. No more foam needed. And this amount is more than enough. When it dries, it increases in volume very much. If there is too much of it, it can bend the slats of the box. You'll have to dismantle everything and start over. Therefore, 1/3 of the volume of the cracks is enough. Having laid the foam, leave everything for about a day.
After which you can remove the spacers, trim off the excess foam with a sharp knife and begin installing the extension (if the doorway is wider than the frame) or installing the trim.
There are several types of door frames.
Corner
A universal box suitable for any type of wall. It is a structure made of decorative casing attached to a frame. The corner frame requires additional sealing of the gaps between the frame and the door leaf.
End
It is most often used in openings with thin partitions, for example, made of plasterboard. This type of door frame is mounted in a metal frame to increase the strength of the structure. Otherwise, an unreinforced structure will lead to loosening of the door mechanism as a whole.
Covering
View of a box consisting of a frame and an extension with a platband. The best option that allows you not to worry about the preparation, modification and subsequent finishing of the doorway. As a rule, this type of box is already equipped with sealing elements.
Telescopic
It is a set of planks connected to each other in the manner of a construction set or laminate locks. Simplifies the process of adjusting the door frame to the characteristics of the opening.
Houses made from natural wood have the ability to “breathe” or “walk.” This manifests itself when the wood dries out and the house itself subsides. To prevent the doorway from moving along with the house, and the rigid door structure does not interfere with the “walking” of the wall, a casing (jam) is placed in the place of the opening. There are three main ways to install it.
They differ in different location of the spike:
- The thorn is a monolith. When the box panels have a monolithic T-shape with a spike in the middle, and a groove for it is made in the wall opening.
- Into the deck. The box panels have a monolithic U-shape with a groove in the middle, and a tenon is made on the wall opening.
Using a sliding embedding block. This is the easiest way. It should be considered in more detail.
To work you will need the following tools:
- fifty board;
- self-tapping screws
- sealant;
- roulette;
- level;
- construction stapler;
- screwdriver;
- chainsaw;
- block 50/50 mm;
- A chainsaw is used to cut out a doorway of the required size. In the middle of its vertical sides, select a groove for the block. Using the same chainsaw, cut a block 50 mm shorter than the length of the groove. You can use not a whole block, but assemble it from pieces. They hammer it into the groove so that it fits freely, but does not dangle. There is no need to fasten it, it is sliding.
- The board must be the required width. Cut it to a length 50 mm less than the height of the doorway. A quarter 50 mm wide and 20 mm deep is cut out in the upper part for the horizontal part. On the sides of the opening, staple strips of jute, leaving the beam free so that it does not wrap around the screws. Insert the boards into the opening and level them. Screw it with self-tapping screws 65-75 mm long through to the block, recessing it in the canvas, while being careful not to stitch the block through. The fastening points are puttied.
- Cut a horizontal board to length. At the top, on a quarter, apply sealant and drive it into place. Fasten the box together with self-tapping screws from the back side of the horizontal board. The distance remaining free above it is under no circumstances foamed, but filled with tow.
Step-by-step installation process
To secure the assembled frame in the opening and install the doors yourself, you must perform the following steps:
- Install the frame into the opening. To keep it in place, insert temporary spacers made of cardboard or foam plastic between the box and the wall.
- Prepare wedges that will be necessary for final installation and alignment of gaps. For them, you can use waste beams sawn at different angles.
- We begin to wedge the product. First, place the wedges directly under the hinges. They will prevent deformation of the beam when we screw it to the wall. Drive one wedge into each upper corner. To prevent the structure from moving, two wedges will be required from each corner. They are inserted from opposite sides so that the narrow parts intersect.
- Next, we check the position of the frame and each of its elements with a level. The box should be flush with the wall.
- We fasten the sidewall.
- We carry out the final installation of the cover part after we hang the canvas on the hinges. To ensure that the frame holds firmly while we screw the hinges and install the sash, we can partially foam the gap along the fixed side and in two or three places on the hinged part.
Tip: Before foaming, you need to clean the surface from dust and moisten it with water from a spray bottle. These measures can significantly increase adhesion.
- While the foam dries, we install hinges and other fittings on the canvas, then put it in place.
- We wedge the hinged part of the door when the door is in the closed position. Then we secure it and foam the cracks around the perimeter.
Another important condition in order not to disturb the geometry of the frame during the installation process is the use of spacer wedges that correspond to the width of the box and are inserted across it.
The final stage of installation of the frame and door is the decorative design of the opening with platbands.
Installation of trim strips without groove
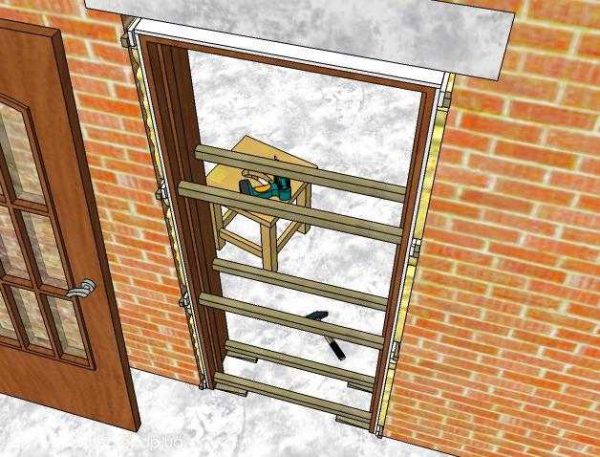
After installing the box, measurements are taken of the uncovered part of the wall. If the slopes are not plastered, then the planks are attached using the following method: a board or beam is screwed to the slopes so as to fix the extension on top and at the same time maintain verticality and maintain a right angle between it and the box.
If the slopes are smoothly plastered, then you can do without an additional block, provided that there is no need to maintain a gap between the extension and the wall.
Work algorithm:
- An extension is attached to the bar;
- The remaining gaps are foamed;
Important! To speed up the hardening process of the foam, the surfaces are moistened with water.
We eliminate the gaps after installing the planks.
- After the foam has hardened, the excess is cut off;
- The final stage is securing the platbands.
Is it difficult to change an interior door in an apartment and how to do it correctly with your own hands?
To install a new door in an apartment yourself, you need to know the basic rules of this work and stock up on tools. Everything will depend on how you plan to change the interior door: with or without changing the frame, perhaps it will be enough to update the worn parts. How to replace a door leaf in an apartment with your own hands, what materials and tools are needed - read on.
Preparatory work
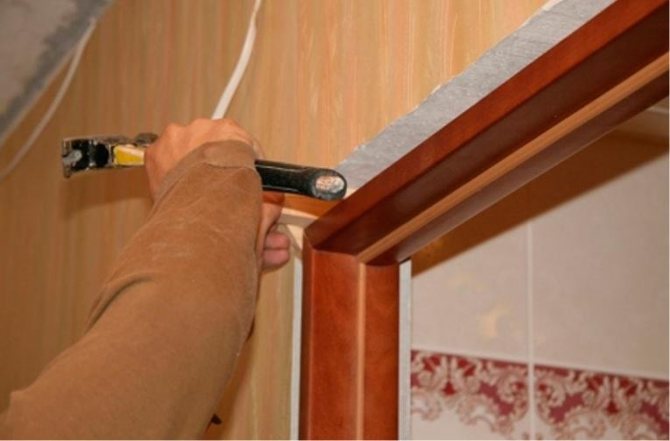
So, you have already chosen the model of your future interior door and prepared the tools. Now, in order to install a new door frame, you need to dismantle the old doors.
To do this, first remove the platbands, and then, trying not to harm the wall, remove the old door frame using a hacksaw, pry bar and other necessary tools.
If its fasteners cannot be unscrewed, then they can simply be sawed off with a grinder. After this, it would be useful to carefully examine the wall to determine whether it needs to be strengthened.
If you find many cracks on the surface, and the surface begins to crumble under slight impact, then for the reliability of installation and durability of the new door you will need to additionally carry out concrete work to strengthen the doorway.
Do-it-yourself replacement of canvas in an apartment
Required materials and tools
To change the interior door to a new one, you will need the following materials and tools:
- Hammer. The opening is enlarged by drilling and holes are made for the anchor dowel.
- Drill to form mounting holes.
- Screwdriver, attachments for it. Secures screws in hinges, door handles and locks.
- Jigsaw. The function of the tool is to unravel the extensions and platbands. Work is carried out in places that are difficult to reach with saws.
- Electric milling machine with cutters. Cuts hinges and locking mechanism.
- Marker or pencil. To display and mark the required ranges of work.
- Roulette.
- Calipers. Determines the depth of the cut, applies markings for fittings.
- Chisel. Cuts door hinges and fittings.
- Bubble level. They measure the vertical and horizontal slopes of the surface.
- Steel measuring ruler.
- Test metal square.
- Mallet.
To work you need to have:
- screws;
- loops;
- awnings;
- lock;
- bars for cutting;
- reverse strips;
- the door leaf itself.
Dismantling the old structure
First prepare the surface. The door is replaced by removing the old one. The old canvas is removed, the trim is removed from the door. Their replacement will depend on the method of initial attachment:
- When installing the structure using the glue-on or tongue-and-groove method, to remove it you need to lightly pry the elements and pull them to the sides.
- If the platbands are nailed to the box, you need to pry them well and pull them out. It is important to remove all the fittings along with the lock and hinges.
From the video you will learn how to disassemble an interior door:
Assembly and installation of the box
- First you need to measure the size of the crossbar and sidewalls.
- After choosing the type of cut, prepare the beams and cut them into fragments of the required width. The work is carried out at an angle of 90 degrees; sometimes doorways require a more delicate approach. The cutting is carried out at an angle of 45 degrees.
The box should be assembled on the floor on a horizontal surface. Then all fasteners and latches will be installed correctly, and there will be no distortions.
- Along the perimeter you need to arrange the elements of the box so that they are at a small distance from the canvas itself. This must be observed so that the door does not rub during movements.