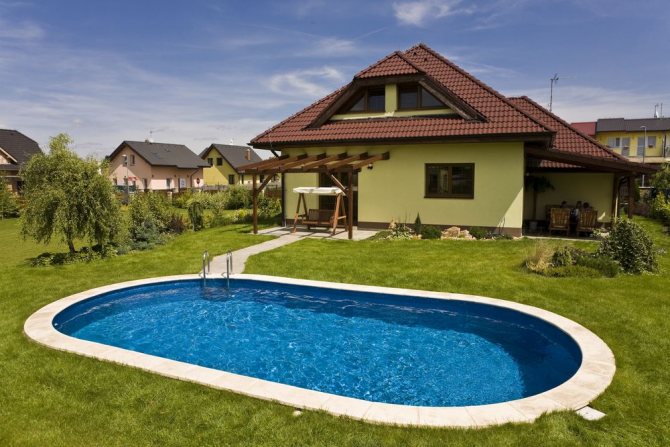
A DIY PVC pool is a very real and inexpensive implementation. If you are not a fan of special beauty and are not obsessed with bringing your site to perfection, then you can make a homemade pond from available materials at minimal cost, for example, from a PVC banner. But for lovers of everything beautiful, there are also DIY PVC options. Making a PVC pool - DIY construction tips. Stages of building a pool from PVC film with instructions - read here.
PVC film for finishing a pool can be purchased for 1,000 - 1,500 rubles. (Russia). The cost of the same material with patterns from imported manufacturers will cost twice as much.
Stages of building a frame PVC pool with your own hands.
- Choosing a location.
- Surface preparation.
- Construction of a platform or ditch for a future swimming pool.
- Construction of formwork.
- Laying with polyvinyl chloride.
- Installation of a filtration system.
Selecting a location
In order to make a PVC pool, the first thing you need to do is choose the right place for the future reservoir. It should be level, without slopes or holes. In a well-lit area, away from bushes and trees. To prevent additional debris from spoiling the water. Accessible to local water supply and electricity. It will be more convenient to collect water and connect the filtration system.

Wood frame
Required building materials and tools:
- pine beam 100x50 mm, board with a thickness of 25 mm,
- construction hair dryer, screwdriver, hand drill, wood antiseptic and bitumen mastic,
- self-tapping screws (black) with washers, suitable eyelets,
- PVC awning fabric,
- lining.
How many building materials are required to build the base depends on its chosen size.
The wooden beam should have a height that is half a meter higher than the height of the planned container.
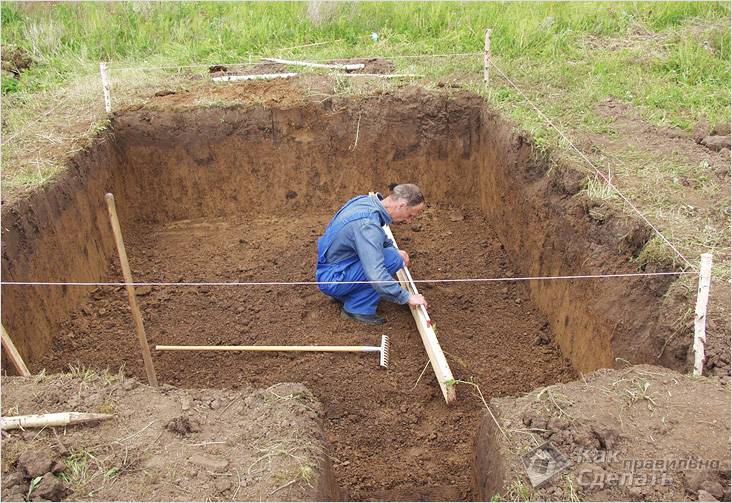
Site preparation
- The area for the pool needs to be prepared. Make markings for the future bowl using pegs and thread. If the pool is round, then a peg with a thread is installed in the center, and a bottle of paint is tied to the other end of the thread. It turns out to be a homemade compass, which is convenient for drawing a circle.
- Remove the fertile layer of soil. If the pool is above ground, remove stones, grass, and sharp roots.
- A wooden podium or concrete pad is constructed. As a last resort, the area under the frame pool is covered with sand. The pillow will help avoid deformation of the PVC material.
- If the bowl of the PVC pool is planned to be semi-buried, then you need to remove the fertile layer of soil from the edges of the marking, towards the middle. Moreover, the walls should be made at an external angle. This will help avoid soil shedding.
- The formwork is being constructed.
- The simplest and most economical option is to use wooden pallets. The pallets are installed in the order you require to give the shape of the future pond.
- They are knocked together with boards or plywood.
- Be sure to strengthen them with spacers made of beams. But the formwork made from beams will be of better quality, treated with bitumen so that it does not deteriorate.
- Then they are dug in and strengthened in the soil. The beams are sheathed with edged boards. The section of the bar is 100x50. Board thickness. 2.5 cm. The wood is treated with antiseptic and anti-rotting chemicals.
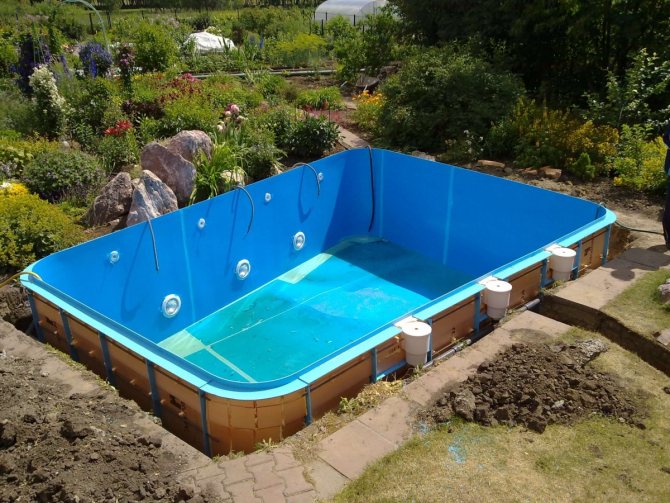
- Carefully stretch the PVC with your own hands onto the finished base and fasten it with staples along the top of the formwork.
- The finished container is gradually filled with warm water. Warm water makes the PVC membrane more elastic; it will take the desired shape of the bowl well.
It is important to know that when using a frame made of boards or plastic, it is better to cover it with reinforced film. It is more rigid and will create additional strength for the walls. But there are craftsmen who build a round or rectangular pool from film ,
Ordinary oilcloth for a greenhouse was used as a film covering. You can say the pool is disposable until the first puncture. Nevertheless, such a structure is also popular among summer residents in the hot summer. Moreover, after damage, the pool can be converted into a greenhouse.
Preparing the site - removing the turf and planning the soil
While small pools up to two tons can simply be placed on the lawn, this will not work with larger swimming pools. A massive “puck” will sink unevenly, and besides, the walls of the pool will almost always be damp and slippery.
Let’s start marking the area and first determine what shape “in plan” the base will take. For round pools, markings are made along a string tied to a peg in the center. Pools in the shape of a capsule are marked by two such circles connected tangentially by straight lines. Bowls with a contour close to an ellipse are drawn with three circles: one large in the center and two small ones at diametrically opposite points, then the conjugation is made manually.
The markings should outline an area that is 30–50 cm wider than the pool on each side. First, we go along the contour and undermine the turf with a shovel, driving it into the whole bayonet. We remove the top layer and take away the resulting “bumps” - good material for creating a new lawn. Using a long rule and a level, we prepare a preliminary horizontal plane, and remove the soil deposits with a shovel.
In the center of each of the holes on which the marking is based, we drive a 20 mm tube about 300 mm long so that its upper edge is at a level of minus 5 cm from the plane of the adjacent territory. For further alignment, you should prepare a radius rail - a block, through one edge of which a pin is screwed, inserted into the tube in the center. We tape the rack level tightly on top with tape, and screw a spacer board 100 mm wide from below.
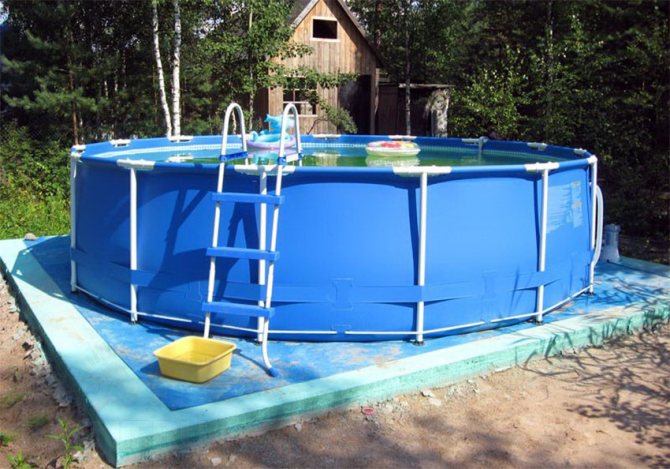
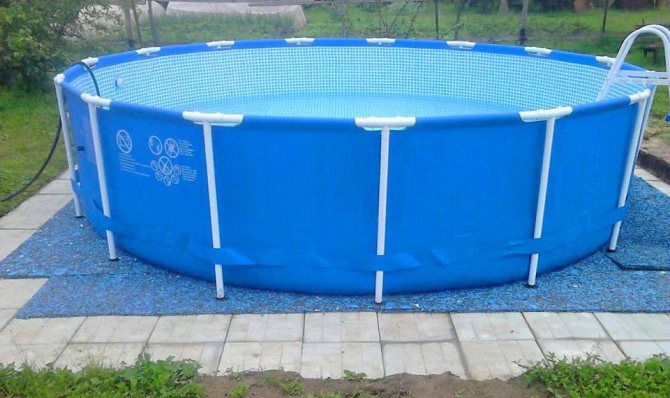
Installing a purchased PVC frame pool with your own hands
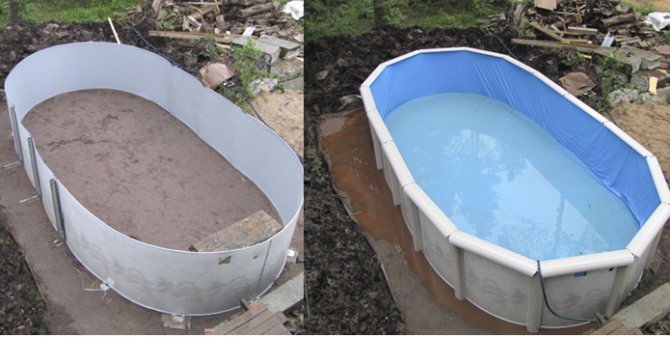
- Remove the PVC film covering from the packaging. Carefully place on the prepared sand cushion.
- Lay out the frame elements. These could be plastic pipes for a seasonal pool. Or metal plates for a pool intended for conservation.
- It is advisable to lay out the frame and number and sign all the parts. In the future, when installing and dismantling, it will be convenient to work and not get confused.
- Polypropylene pipes are assembled like a construction set. The kit comes with clear instructions. The material is immediately attached to the side elements and assembled in a circle, fastened with tees. Pipes from the base are attached to the board, in tees.
- The bowl is gradually filled with water and the film coating is smoothed out.
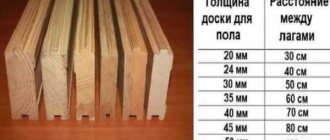
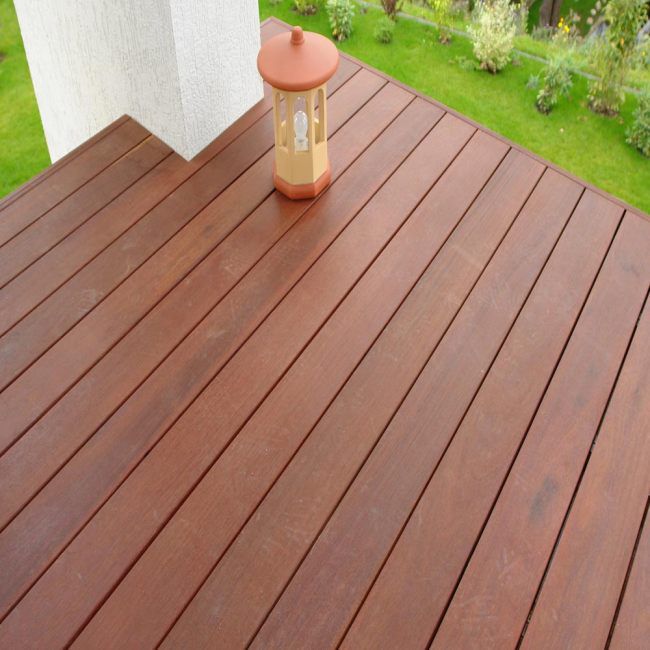
Which boards to choose for flooring?
The wood for flooring must be resistant to stress and moisture. Constant conditions of high humidity will deteriorate the structure and appearance of the material.
The best option for a base that tolerates contact with water well is larch or pine. Larch even becomes stronger from exposure to moisture. This breed is durable, looks chic and has an original pattern.
Pine wood tolerates moisture a little worse , but with good treatment it will also last a long time.
Installing a skimmer in a PVC pool
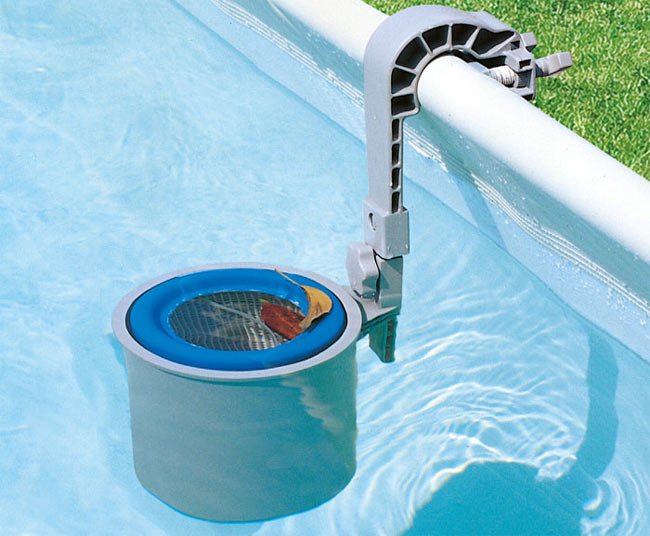
A skimmer for frame pools is usually mounted.
- It hangs on the side of the pool, and the kit includes fastenings for a frame pool.
- And it is connected to the pump using adapters and a hose.
If the reservoir is large, then it is advisable to have several skimmers around the perimeter for more intensive work. Skimmers are also necessary for the operation of a water vacuum cleaner. The hose from the vacuum cleaner is inserted into this device.
Installing a filter in a PVC pool
ADVICE!
The maximum effect is achieved by comprehensive cleaning - an earthen filter plus a floating trap for surface debris. The earthen filter is cleaned at approximately the same frequency, disposing of the filler that has become toxic, as recommended by the instructions for the finished pool filter.
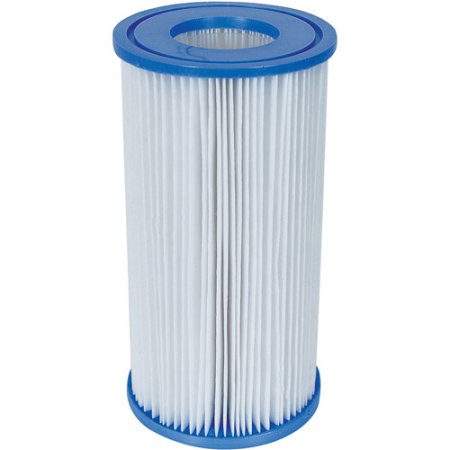
As for the filter, the choice of power is based on the volume of your pool. It is better to use a pump power several times greater than the volume of water in your pool. The throughput in liters per hour is indicated in the instructions. Such a filter can drive all the water out of the pool several times in a day, and accordingly, the cleaning properties will be higher. But the quality of clean water will also depend on the filter model. A more inexpensive option that comes with a frame pool is a cartridge filter. Other models are sand filters. They clean better by passing water through sand and are not very expensive. But the most reliable and high-quality cleaning filter is a diatomaceous earth filter. It not only mechanically cleans dirt, but also saturates the water with beneficial properties.
- The filter is installed on a flat, dry area. At a distance of 1 meter from the side.
- The hose for water intake, if there is no skimmer, is attached to the upper edge of the side. This is where most of the garbage accumulates.
- The water outlet hose is installed closer to the bottom, on the opposite side of the pool. Then the circulation of liquid in the pool will be better.
- The filter must be washed daily.
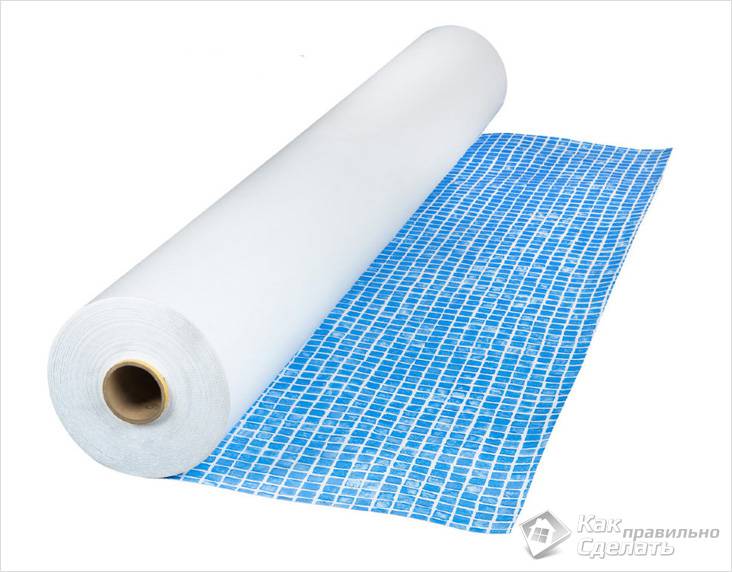
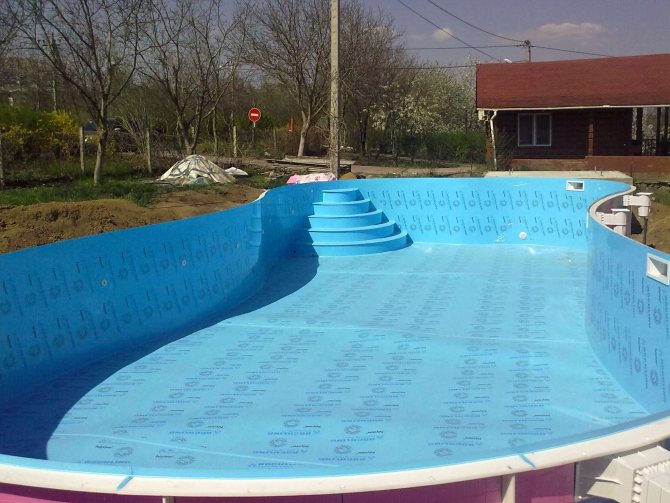
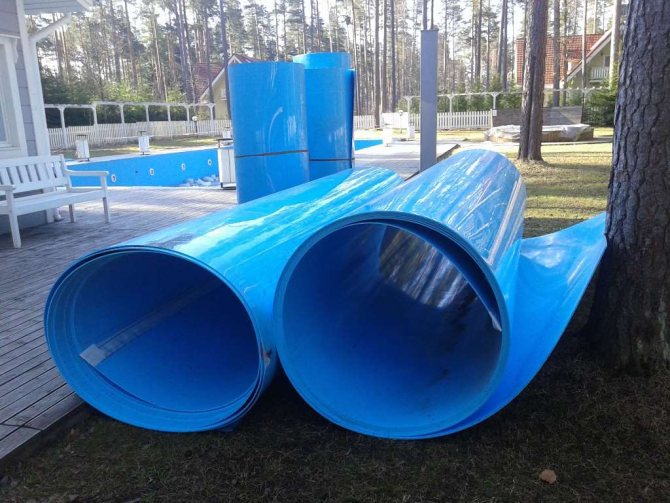
PVC film 2 in 1 – waterproofing and finishing
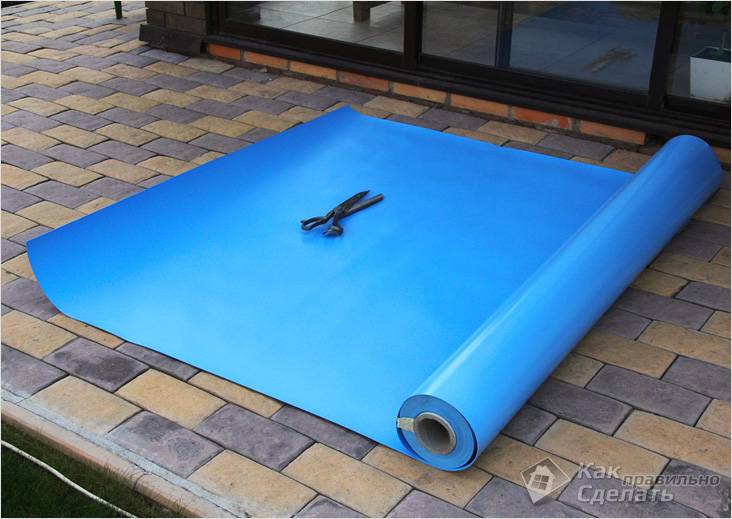
PVC film for swimming pools
Polyvinyl chloride film (PVC), in addition to looking aesthetically beautiful, has another important advantage - it can act as a waterproofing material. Water will not pass through such a film, so you can save your money on waterproofing the pool bowl itself. The nice thing is that even if there are cracks in the concrete, and all the work was carried out without waterproofing, appropriate waterproofing putties and primers, the PVC film will be able to hold all the water in the pool, despite the enormous pressure of the water column.
Due to this property, the film is often used in the restoration of old swimming pools, the bowl of which is cracked and problems with waterproofing have arisen. Covering the pool with PVC film will help save the situation. And what’s most amazing is that this can be done even without removing the old material, for example, mosaic. In this case, it is only important to take care of the tile’s strong adhesion to the surface so that it does not peel off. Thus, by choosing PVC film as a finishing material for the pool, you can kill two birds with one stone.
Varieties
Blue mosaic
Manufacturers took into account the various preferences, financial capabilities of people and the purposes for which the film will be used. Thanks to this, you can choose a pool cover from several types of PVC film:
- Simple unreinforced film. It is an economy class material that anyone can afford. This is the cheapest material of the three types of films. Its thickness varies from 0.65 to 0.85 mm. This film cannot be called very durable, but it still copes with its functions. It is impossible to make a frame pool from such a film, but it is quite possible to cover the bowl of a small pit pool.
- Reinforced film. The most common option. The price/quality ratio is completely justified, since this film not only has a thickness of 1.5 mm, which is 2 times more than the usual one, but it is additionally reinforced with polyester threads, which gives it greater strength. A pool with such a finish can withstand significant mechanical loads without deforming. This property is especially useful for those who want to make a frame pool, where the film serves as the walls. It takes on the entire load, being a load-bearing structure, so it must withstand enormous pressure, which it copes with.
- Anti-slip film. Its difference from all others is its ribbed surface, so it is often used to prevent slipping on the surface of the pool. Families with small children cannot do without such a film.
Reinforced film
Please note that there is also a material that has an acrylic coating. What does it give? Thanks to it, the film is protected from bacteria and algae that can colonize micropores. As experts say, with such a coating the film will last twice as long and will better retain color and elasticity. But what are the advantages of PVC films compared to other finishing materials?
What to Analyze
The usual desire for a person is to use his products for as long as possible. In most cases, this is made possible with good preparation and careful planning. This approach also applies to the construction of a swimming pool. Pay attention to some points.
- Neighborhood with buildings and vegetation. It is entirely possible to place the container near the house, but if this is done next to the pantry where food is stored, then the rodents that may be visiting in that direction will be able to break the structure, which will lead to its partial or complete destruction . On hot days, shade from trees is a salvation from the scorching sun. But for the pool, such “partners” can become destructive. For example, the root system of trees, growing, can damage the bottom. In a strong wind, a broken branch will destroy the frame when it falls. In addition, when falling leaves fall into the water, they contribute to the formation of bacteria and algae, which will require frequent water changes and pool cleaning. It is better to avoid areas that are under high-voltage transmission lines. This, in addition to electromagnetic radiation, poses a risk of electric shock.
- It is better to plan an area for the construction of a pool that has a slight slope. This will make it possible to simplify your task with draining used water, since it will be able to flow away by gravity. Excellent if the soil is clayey, since it has good density and does not allow water to pass through. In addition, such a coating will withstand sufficient weight without deformation, which could lead to a transformation in the configuration of the structure.
- Wind. The issue of determining the preferential direction and strength of the wind is extremely important. The air flow can raise clouds of dust and dirt, which will settle into the water. It is optimal to place the pool on a certain side of the building so that it covers the pool from gusts of wind. It is useful to take this parameter into account when choosing the shape of the pool. If it is a rectangular container, then it must be placed with the long side facing the wind. In addition, holes for overflows need to be made in the far part, where the wind mainly blows, then the garbage will flow into the drain on its own.
- Depth. The deeper the better. This rule does not apply to a home pool. It goes without saying that I would like to perform breathtaking, spectacular ski jumps, but this may be unsafe. If such a desire still exists, then in the place intended for diving, it is possible to make a depression of up to 2.5 meters or more. But the optimal distance from the surface of the water to the bottom is 1.5 m. It is in such conditions that it will be possible to feel safe, swim normally, and, if necessary, stand on your feet. At a time when there are children in the family, then the depth needs to be made even less. For younger children, it may not be more than 50 cm. There is nothing that prevents the bottom from being formed into a couple of levels. This will require a lot of effort, and then it will be necessary to closely monitor that the children are in a safe area. Additionally, it is possible to erect a partition from mesh or other material that will interfere with the free movement of children outside the territory allocated to them.
- Communications supply. You need to think in advance about how the pool will be filled. Will a long hose be used for this, or will a stationary system be implemented by connecting the pipeline specifically to the location. In addition, if the pool operates for a long time, it will require cleaning, which can be done automatically using special pumps. They require electricity to operate. This indicates that cabling will need to be done. Along with this, the importance of ensuring good insulation and grounding must be taken into account so that no one in the water is harmed.
- Lighting. Will swimming take place only during the day or do you want to spend time in the pool in the evening. Under such conditions, it is worth considering good lighting. It can be placed either on top of the pool or directly in the pool itself. There are many solutions for this, which will be discussed below.
Advantages and disadvantages of the material
One of its main advantages is its affordable price. Building a pool in itself is an expensive proposition, so finishing with PVC film is a salvation for some. Another important point is that, as already mentioned, it acts as both a waterproofing and decorative material. Moreover, this material is hygienic, resistant to ultraviolet rays and sudden temperature changes. The material is easy to care for, because it is not afraid of chemical care products.
Types of films
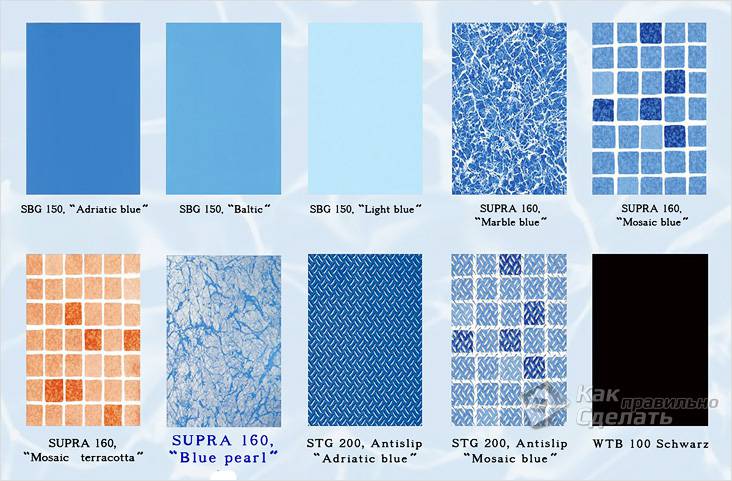
It should be noted that you can buy film in various colors. It is produced in different tones of blue, blue and green; they are able to “illuminate” the water and give it a beautiful “sea” tint. You can also buy material that imitates a mosaic of beige-white, blue-white and similar tones. One of the main advantages is that the film is easy to install if you have a special tool.
It is clear that, like all materials, film also has its disadvantages, they are as follows:
- during operation, scratches will form on the surface, which leads to rupture;
- over time, the saturation of colors is lost, all this will happen in 6–10 years, so the material will have to be changed;
- butt seams spoil the overall appearance of the coating;
- when in the area where the pool is located, groundwater is close to the surface, it is impossible to cover the pool with film.
So, having considered all the material options, their advantages and disadvantages, you can get straight to the point..
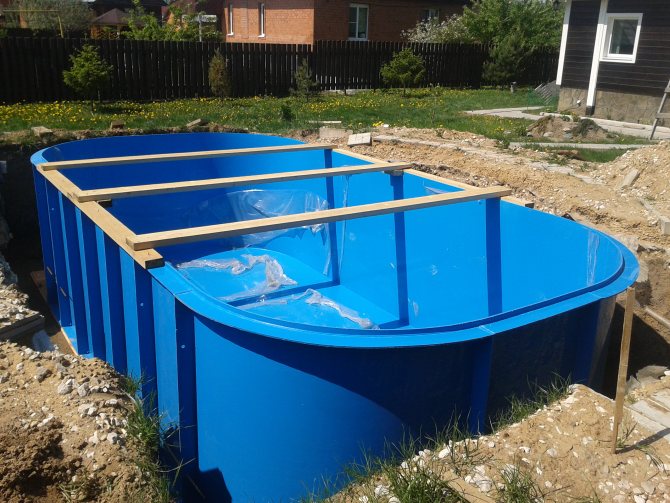
Work on the installation of a pit pool
Pool pit
If you want to make a pit pool at home or in the country, you need to follow this sequence:
- First, decide on the design and shape of the pool. After that, choose the optimal place where it will be located. It should decorate your site and serve as a suitable place to relax. You should not choose a place where the pool will often be polluted. Please note that the structure must be close to the water supply system.
- Now you need to choose the size of the future tank. Typically, such pools are made no less than 4x4 m. Choose the depth according to your preferences, it can range from 1 m to 2 m. The average depth, suitable for everyone, is 1.5 m.
- When everything has been figured out with the dimensions, the appropriate markings must be made at the site of the pool using pegs and rope. The pool can be rectangular, round or square.
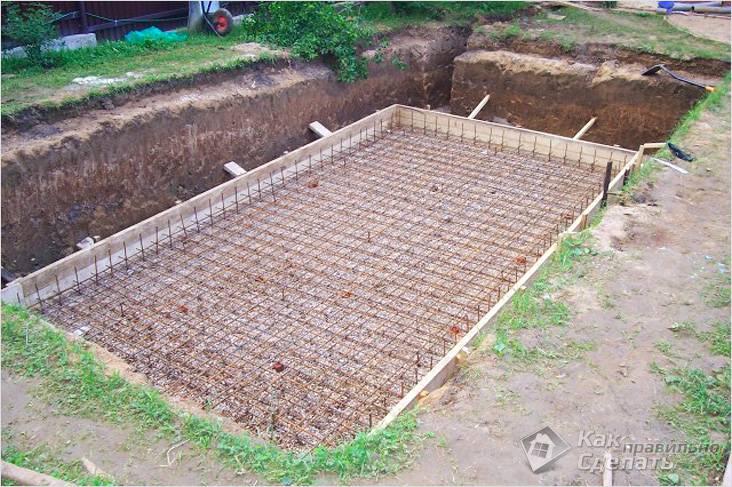
The formwork is installed and poured.
Now dig a pit of the required depth. This can be done either independently or by calling a special technique. Keep in mind that the pit itself must be made slightly larger than the size of the pool itself. For example, make the dimensions of the walls larger by 40–50 cm, and the same with the bottom, since waterproofing work, pouring, etc. will then be carried out. The bottom of the pit must be compacted.- Next, the finished pit is leveled and waterproofing work is carried out. Pour 30 cm of sand onto the bottom and compact it. Then lay roofing felt in 2-3 layers and bitumen mastic.
- At this stage, it is necessary to carry out all the work to ensure the drainage of water from the pool.
- To make the walls, build formwork along the edges of the pool.
- Now pour concrete between the soil and the formwork. In order to strengthen the walls, make a mesh of reinforcement in advance and install it.
- After the concrete has hardened, the formwork is removed.
- All that remains is to make the bottom. Pour another layer of crushed stone, install a reinforcing mesh and fill the bottom with hydraulic concrete. Now, after the concrete has dried, you can begin finishing the pool.
Supports
We are considering a terrace project on supports, each of which needs an individual foundation.
Consider the option of arranging concrete supports with a diameter of 12 inches each.
| Feet | Centimeters | Inches | Centimeters |
| 1 | 30,48 | 1 | 2,54 |
| 2 | 60,96 | 2 | 5,08 |
| 3 | 60,96 | 3 | 7,62 |
| 3,5 | 106,68 | 3,5 | 8,89 |
| 4 | 121,92 | 4 | 10,16 |
| 5 | 152,4 | 5 | 12,7 |
| 10 | 304,8 | 12,7 | 32,258 |
| 11 | 335,28 | 11 | 27,94 |
| 12 | 365,76 | 12 | 30,48 |
| 15 | 457,2 | 15 | 38,1 |
| 20 | 609,6 | 20 | 50,8 |
- According to the project, holes are dug of the appropriate diameter and a depth of about 4 feet.
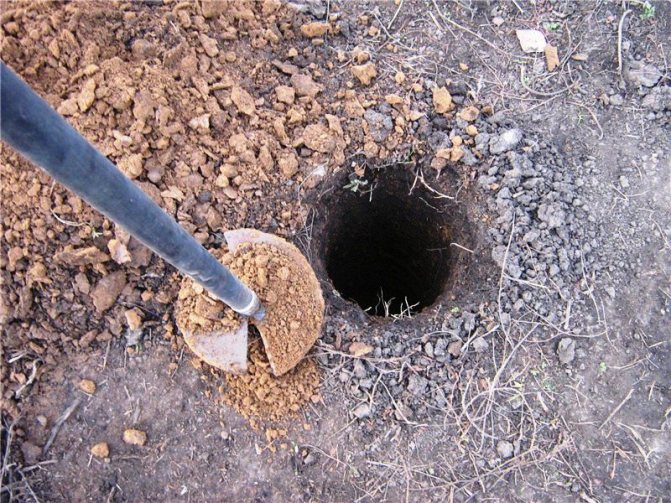
The holes should be the same depth when preparing - 4 feet or approximately 123 cm - Afterwards, so-called “sleeves” made of roofing material secured with adhesive tape are inserted into these holes. They should protrude approximately 1 foot above the ground surface.
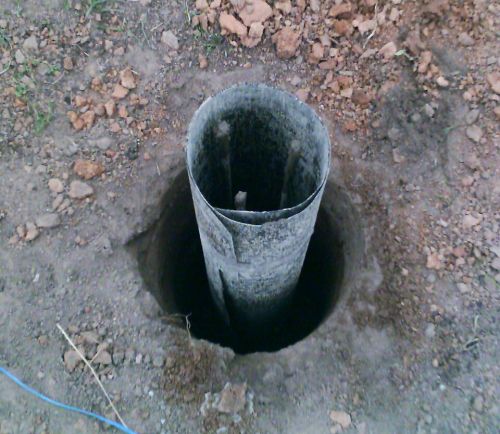
Roofing felt is installed and a frame of three reinforcing rods connected with wire is placed inside - Concrete is poured into these “sleeves”, and metal connectors are installed on top, to which wooden supports will be attached.
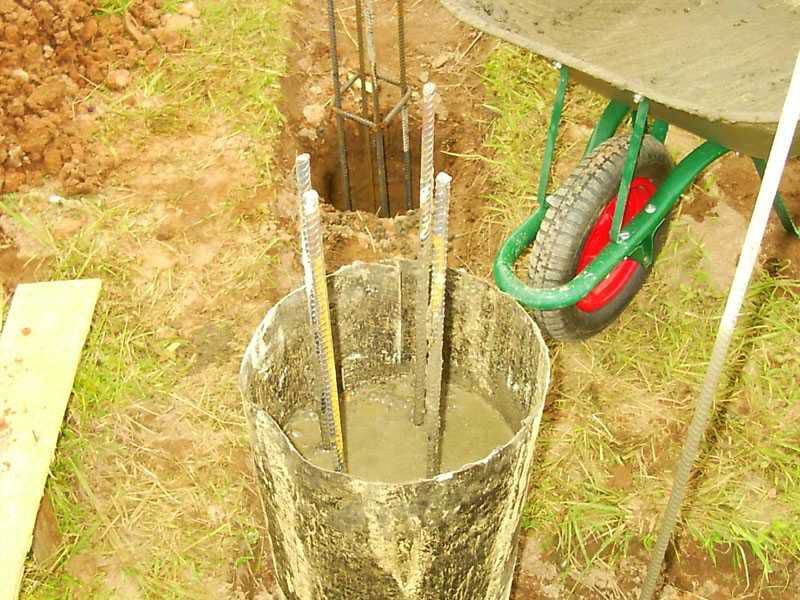
The solution is transported by wheelbarrow and poured into the formwork with a shovel, compacting or piercing the mixture with an in-depth vibrator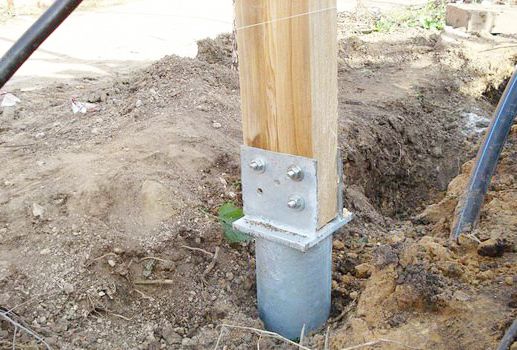
An example of attaching timber to concrete supports
To avoid digging holes again, make a sketch with dimensions that will show the coordinates of each support. It’s better, of course, to do this on a site plan, especially if there are plants in the construction area or there are communications, then you won’t have to uproot a tree or repair the water supply.
Figure 2 shows the location of concrete supports (Footings), as well as their coordinates. If the support ends up on a water pipe, or if there is a tree growing nearby, simply move the support slightly to the side. It is better to calculate everything and draw it on paper rather than face unpleasant surprises during the construction process.
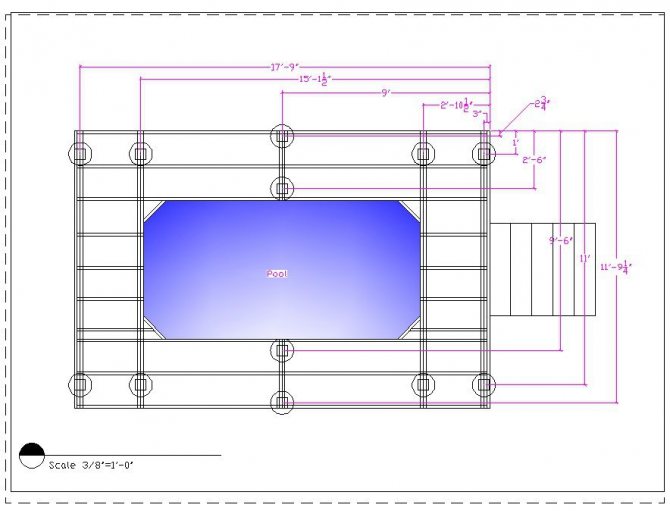
Figure 2. Location of supports
Having marked the location of the supports on the site, dig holes for them and concrete them. Don't forget to install post connectors into the wet concrete supports. After the concrete has hardened, secure the vertical supports in metal connectors. Use 4" x 4" cross-section posts for supports since the deck is less than 6 feet high.
The third picture shows a diagram of the concrete supports used in this project.
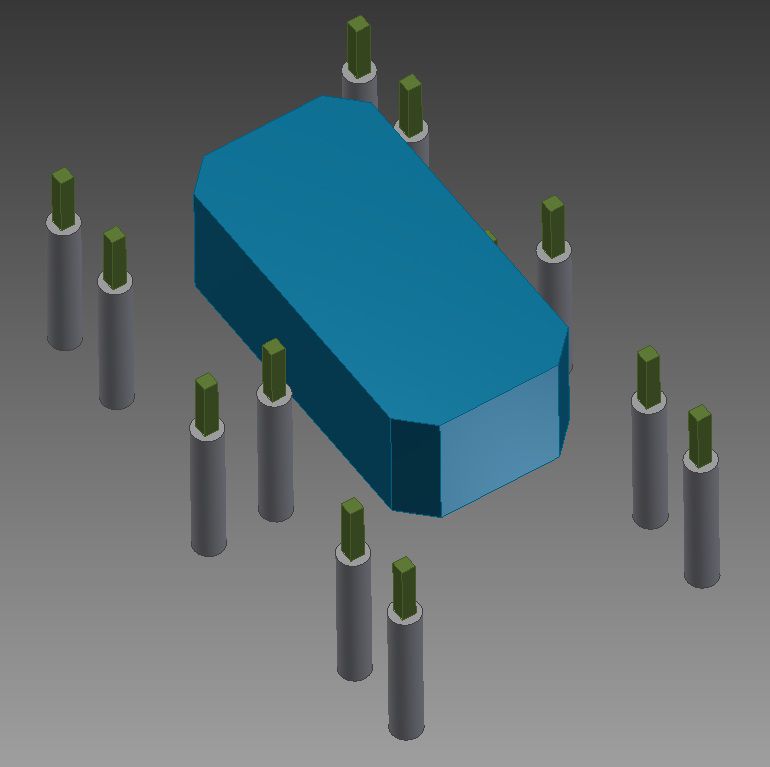
Figure 3. Scheme of concrete supports
Finishing work
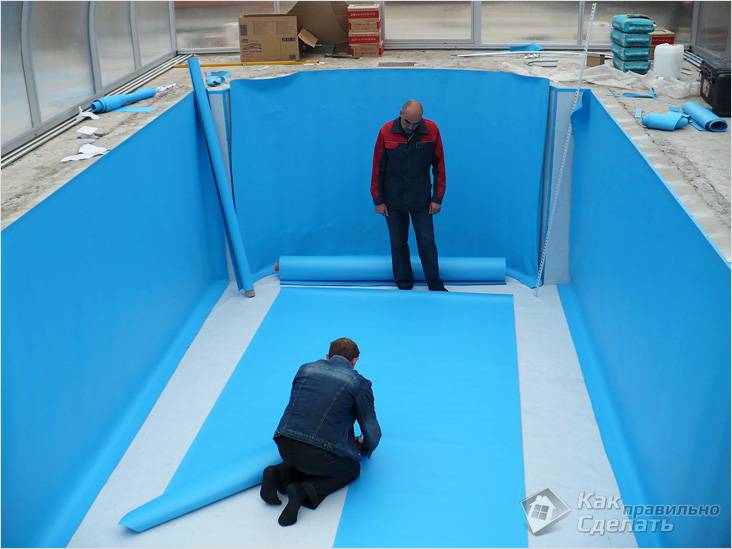
Finishing the pool with film
To install PVC film, it is important to follow the instructions. The process itself is simple, but requires attention. Even if you are a layman, the tips below will help you deal with this matter.
- First of all, you need to prepare the surface: remove all debris, leaves and everything unnecessary. If the poured walls and floor are not level enough, they must be leveled with plaster. A flat surface is necessary, since under water pressure the PVC film will repeat the relief of the bowl; if the surface turns out to be curved, after installation it will be very noticeable.
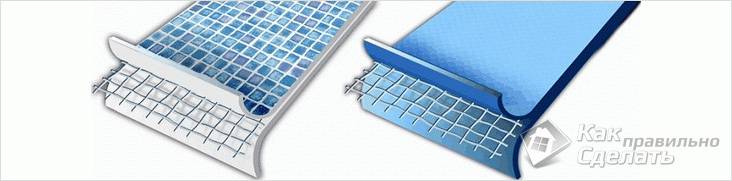
- To finish the pool with film, a fastening strip or corner is laid around the perimeter, which must be secured with screws. On one side, the strip has a plastic coating, to which the film will eventually be welded; if it is a corner, then the film must be secured with screws. When the pool is large, stripes are additionally fixed to the walls.
- Now lay a special insulation over the entire surface, thanks to which the friction of the film on the concrete will decrease, it will not wear off, and the service life of the material will increase. When the pool is placed indoors, geotextiles can be laid instead of insulation. The substrate is attached with fastening strips, and in difficult places it is fixed with glue.
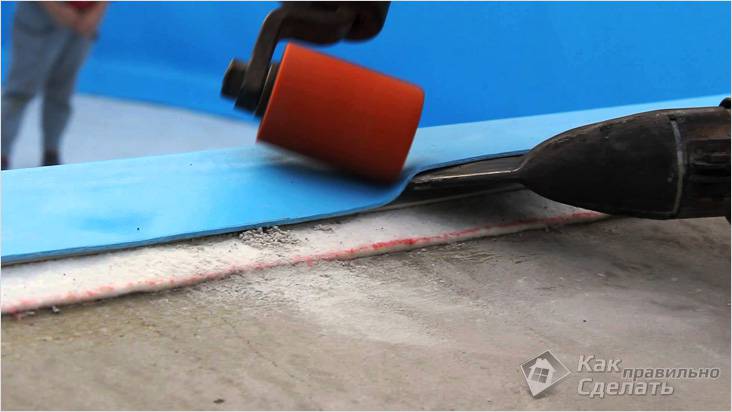
- After this, a film is spread on the surface with an overlap of sheets of 8 cm and a distance of 1–2 cm from the wall. To ensure that the film adheres well to the corners, use a corner.
- Using special equipment for gluing PVC films, weld the drain seams and additionally seal them with sealant.
- At the last stage, the PVC film must be connected to the mounting profile on the side of the pool.
Side mounting
You can see how this work is done in the video below:
All that remains is to fill the pool with water and test the new coating. Your pool is now ready for full use. To complete the job you will need the following tools:
- perforator;
- sharp knife;
- sealant;
- equipment for gluing PVC film;
- silicone roller;
- corner;
- the PVC film itself.
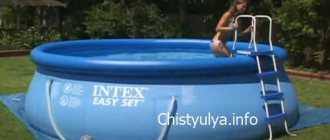
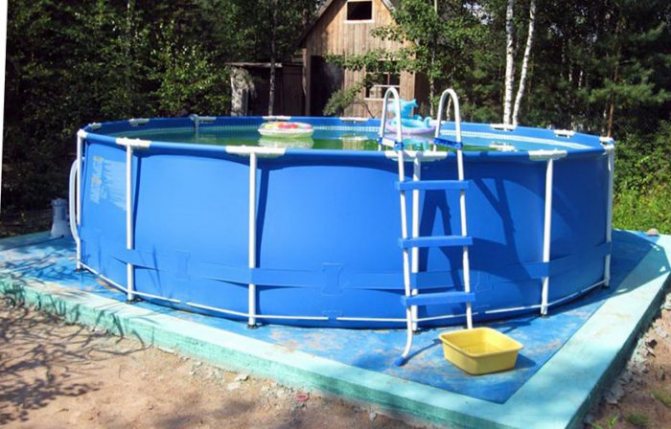
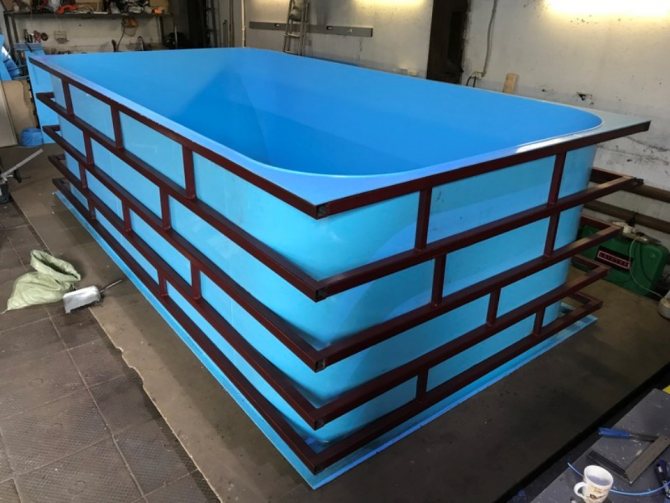
Frame pool made of PVC film
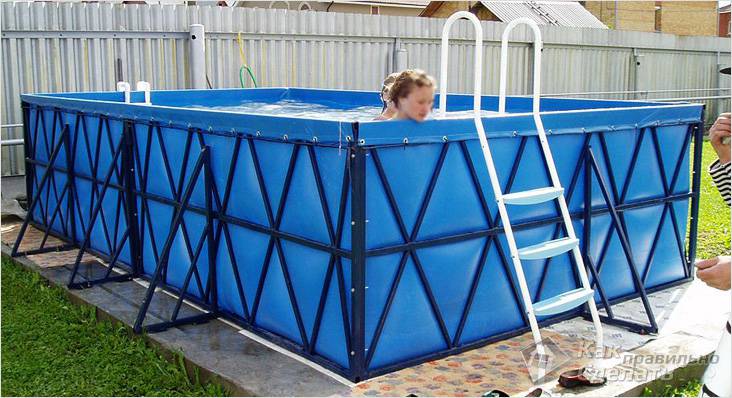
Frame pool
If you don't have the space or ability to build a pit pool, you can make a PVC frame pool that will be installed on the ground. We will look at a homemade pool made of wood and PVC film, which will have dimensions of 4.5 × 2 m and a wall height of 1 m. It can be made in a day.
- To install an in-ground pool, it is important to ensure a level and stable surface. Choose an ideal location to avoid labor-intensive excavation work.
- Prepare the site by removing the top fertile layer of soil, removing roots and unnecessary plants. The surface must be clean, free of pebbles and protruding solids.
- After this, make a sand cushion that will level the area. The layer of sand should be 5–10 cm. To simplify the leveling task, install level beacons, which will serve as a CD profile and stretch the sand to obtain a flat surface.
- Now we need to assemble the frame of the future pool. It can be made from wooden beams with a cross-section of 100×50 mm, half-edged and unedged boards 25 mm thick. Lumber should be cleared of bark and treated with an antiseptic. Dry wood, or at least dried wood, is better suited for this work.
- To make a frame, mark the corners of the structure. Check all dimensions to ensure everything is equal and even. After that, you need to make holes, manually with shovels or a drill, about 50 cm deep. To strengthen the structure, two additional posts are installed on the long sides, and 1 between the short sides.
- Vertically install the pillars, which will be wooden beams. To ensure waterproofing, the part that will be in the ground is covered with molten bitumen. The space in the pit is covered with crushed stone and compacted well.
- After all the pillars are securely fixed and leveled, they are tied with boards.
- Since the support pillars will bear all the pressure of the water column, they must be additionally strengthened with jibs.
- When the frame is ready, you should make a staircase. You can buy it in the store.
First you need to solder it.
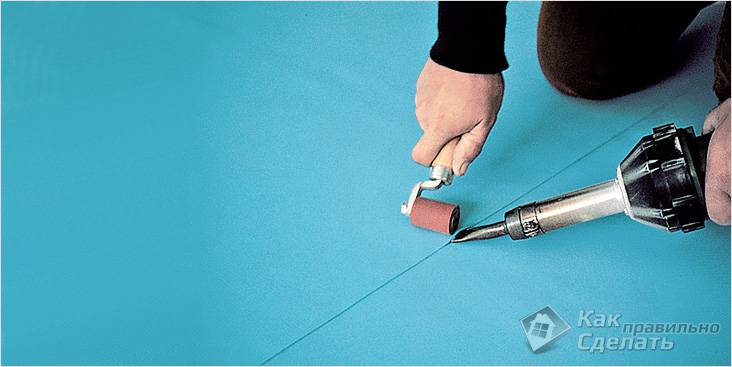
Now the pool is lined with PVC fabric. But first you need to cook it. Cutting and soldering of the film is carried out on a flat surface in a spacious room. It is important to be careful not to damage the material. So, take your welder and select a temperature that is acceptable for the material you purchased. Cut the material and lay it with an overlap of 2-3 cm. Heat the film at the joint until it melts slightly so that the material softens, and press it tightly with a silicone roller along the line, gluing the film together.- Watch the quality of the seam, because this is the weak link of the pool, which must be reliable and airtight. For best effect, seal the seam with sealant. In order not to spoil the canvas, you can practice on pieces of film to check the temperature, speed of movement and fill your hand.
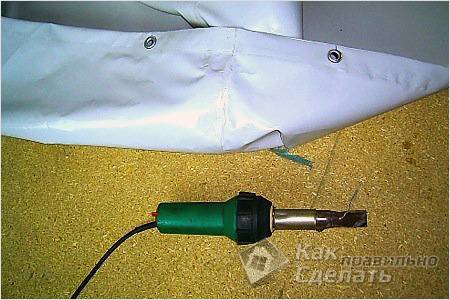
Processing the edge of the canvas
When everything is ready, fold the film 5–7 cm around the perimeter on top and boil it again. Now in this side you need to make holes in increments of 50 cm and install metal rings (eyelets) into them using a special press or flaring tool. Through these holes, the pool sheet will be attached to the frame with ropes or screws.- Finally, you need to connect the canvas to the frame. It is better to fix the film to the wood using self-tapping screws with a 35 mm press washer and additional large washers, which are larger than the holes made in the canvas. It is important that the fasteners are galvanized. Stretch the fabric well and perform all work carefully.
Installing the backlight
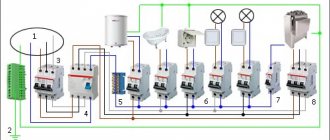
Illumination can be implemented both externally and underwater. In any of these cases, protected lamps will come in handy. Electricity can be supplied from home. To do this, you will need to install a mast near the pool. It can be made from both wood and metal. Its height should be 2.5 m. This will allow you not to catch the cable when passing under it. A hole is drilled on one of the walls of the main building and an anchor with an iron hook is fixed into it. Or a separate hook that is inserted into the dowel. A cable or steel wire is stretched between it and the prepared post. It will hold a conductor, for which it is better to use a two-core monolithic bronze cable in a double braid, for example, GDP. An automatic machine is installed on an entire separate circuit. The strength of the current it can withstand should be less than that of the central one, which is mounted throughout the panel. For example, if the main one has 25 A, then this one will have 16 A. Now it will be possible to properly power the filter pump and all the lighting elements.
To save energy, it is most profitable to use LED emitters. There are special ones that are designed for diving. In most cases, they are built in when pouring a cement base, but in this case, in order not to tear the awning, it is possible to make holders for them from plastic containers. They can be mounted at four corners on the bottom. To add a special atmosphere, you can take a sealed tape and attach it around the entire perimeter of the bottom or top of the pool. The most basic thing in this matter will be a scrupulous approach to ensuring the isolation of connections. To do this, you will need to use special plastic sleeves. First, the wires are connected using blocks. Then the resulting twist is placed in a special capsule. Epoxy resin, which comes with the kit, is poured into the middle. After pouring, you need to wait some time until it hardens. Then the resulting connector can be lowered to a fairly enormous depth without fear that someone might get hurt.
If there are still concerns about the safety of those who will be in the water, then all lighting devices can be located on the surface. To do this, it will be possible to build stands at the four corners. Control of all elements can be placed in an ergonomic place. It would be best to use sealed switches, which are protected from the ingress of both liquid and dust.
As you can see, making a pool out of wood is not that difficult. More time will need to be spent on arrangement, which will make your stay in the pool as comfortable as possible.
Video
To make your task easier, you can use wooden pallets as a frame:
Complexity of installation, high cost, long installation period - these are the reasons why owners of private houses refused to use swimming pools. The introduction of modern technologies and materials made it possible to solve the listed problems. Now ordinary craftsmen have the opportunity to make a pool from pipes with their own hands.
Pools are divided into types - stationary, frame. The frame of the latter is assembled from PVC pipes, and the bowl is made of film. Stationary pools are installed in a country house or the territory of a country cottage, and their assembly is carried out from scrap materials. A common option is a DIY polypropylene pool made from pipes.
steps
The next step in building a wooden deck is to install the frame for the steps. The basis is the stringers, which are located at a distance of 16 inches from each other.

Scheme of stringers
To make them, use a board with a cross section of 2x10. In order for all the steps to be the same in length and height, you first need to make a pattern for one step, and then sequentially mark the steps on the blank for the stringer.
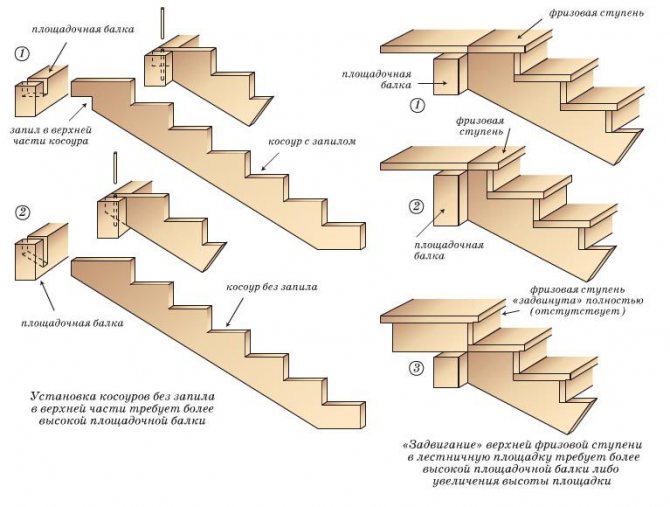
Stair stringer is a sawtooth-shaped wooden board or beam with rectangular teeth
For the convenience of ascending and descending the steps, the dimensions of each step, firstly, must be the same, and secondly, in terms of the height and depth of the step, they must be within certain limits. For height, it measures 6 to 8 inches, and for depth, it measures 12 to 16 inches.
There are, of course, non-standard sizes of steps, but most often they are made within the limits given above.
At the bottom, all stringers are connected by one board for stability of the structure. Figure 7 shows the frame of the terrace and steps.
We invite you to familiarize yourself with the DIY brick stove for a bathhouse, drawings
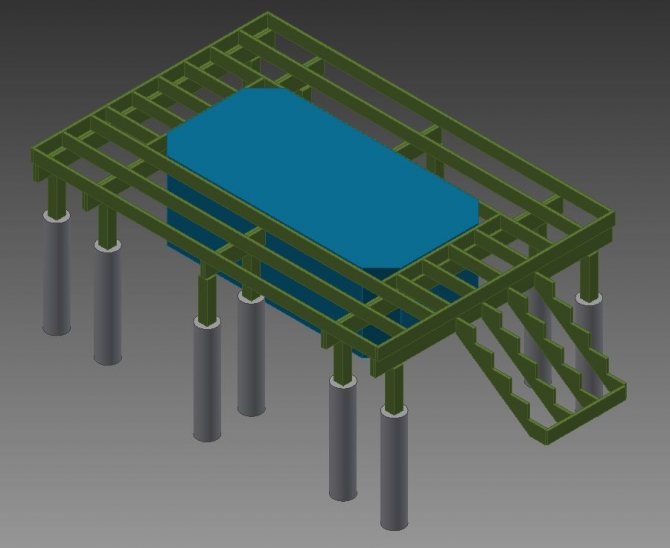
Figure 7. Frame of the terrace and future steps
Advantages and disadvantages of polypropylene as a material for a swimming pool
The physical and chemical properties of polypropylene have ensured its demand in the construction industry. If we talk about water features on private plots, where previously the only solution was a concrete bowl, a polypropylene pool has become an indispensable option. With the advent of polypropylene, it has transformed from a luxury item into an affordable addition to landscape design. Now leisure time with friends will become more active and unforgettable.
The advantages and features of polypropylene include:
- Flexibility, elasticity - is responsible for creating complex shaped shapes, which is important in conditions of limited space.
- Formation of a reliable seam with a waterproofing layer at the joints of parts.
- When installing component devices (filter, hydromassage, lighting), a pool made of polypropylene pipes does not require additional layers of sealing, since all elements are seated in the base of the structure.
- Cost savings on exterior finishing - the plastic frame has a flat surface and does not allow water to pass through.
- A bowl made of sheet polypropylene is installed in two ways: externally and in a pre-prepared pit. This diversity is due to the strength of the welds.
- Environmentally friendly - the material does not enter into chemical bonds with construction mixtures and water, therefore, during its operation no harmful substances are released that can have a negative impact on human health.
- A pool made of plastic pipes is protected from the development of pathogenic microflora and other microorganisms.
- Easy to clean - a homemade plastic pool is easy to wash and clean without the help of special detergents. The walls and bottom have a smooth surface, without notches, which simplifies the procedure for cleaning them and filtering water.
- Low level of thermal conductivity - maintaining one temperature regime for a long time.
- Light weight of the structure makes it easy to transport to the installation site.
- The installation process takes no more than 7 days.
Having assessed the advantages of polypropylene, do not forget that, like other building materials, it has disadvantages:
- the coating changes color under constant exposure to ultraviolet radiation;
- the prefabricated frame requires welding of the seams, so specialized equipment and welding skills will be needed.
It is worth noting the low resistance to mechanical damage, which is especially typical for pools over 8 meters in length. In this case, you cannot do without a frame made of corrugated pipe, made of iron; a video with installation details is presented on the Internet.
Feasibility of the idea
The finished polypropylene structure is complex and bulky in appearance. The average craftsman has a question about how to make such a structure himself. Installing a polypropylene pool with your own hands is quite simple, given that ready-made, fully equipped products are available on the market. All that is necessary is to mount them in a pre-prepared pit or create a frame from metal profiles, pipes, wooden blocks for the purpose of further sheathing the polypropylene bowl.
When preparing the site and installing the product, the main thing is to adhere to the technologies and recommendations of experienced craftsmen; you can find their master class in thematic blogs. Difficulties will arise only if sheet material is chosen for the construction of the tank. With this decision, the master needs to make the bowl himself, which will definitely require experience and professional skills.
Pipes for the frame
Polypropylene and metal-plastic pipes can be used as a frame for the product. Both options are quite durable and flexible, which makes it easy to install and join elements in hard-to-reach places.
A metal frame, which is assembled from a profile pipe, is considered reliable. The choice of frame material directly depends on the complexity of the design, the dimensions of the product, and the type of installation (submersible, external).
Cross beams
Next, according to the project, it is necessary to install beams on vertically located supports. This is the next step in building a deck around the pool.
Triple or double beams are installed according to the load. In the case where there is no more than 12 feet between adjacent beams located in one row, then double beams are installed, as in this project under consideration, where between each two nearest beams there is no more than ten feet.
The cross-section of the longitudinal beams can vary, ranging from 2x4 inches to 2x12 inches. This choice will depend on the number and distance between adjacent lines of longitudinal beams. It is best to use as few supports as possible; accordingly, there will also be fewer beam lines, and the distance between them will be greater. But then you won’t have to dig a lot of holes for supports, which are not so easy to build.
We invite you to familiarize yourself with the Interior decoration of a bathhouse made of foam blocks
The fourth picture is a diagram of the beams. The dimensions of these items are 2 x 10 inches.
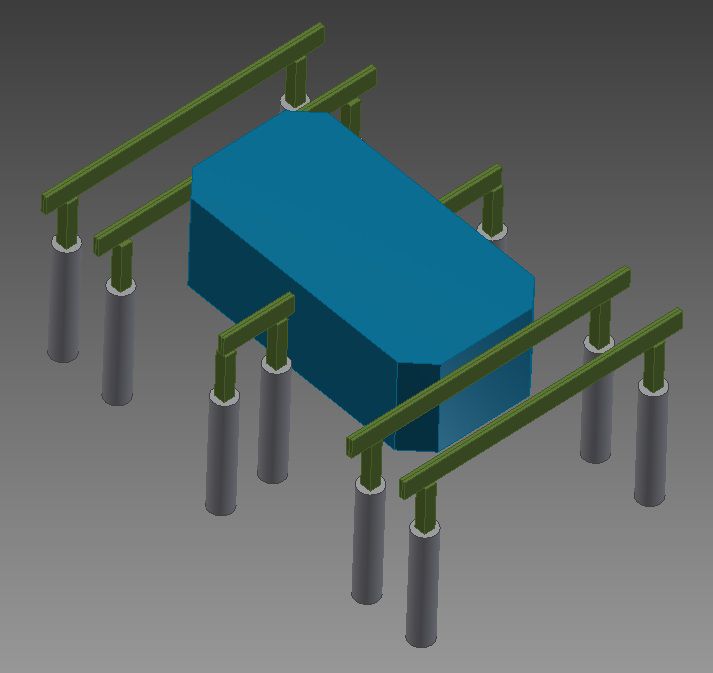
Figure 4. Beam diagram
After the longitudinal beams are installed on the supports, transverse beams are installed on top of them. At this stage, it is important to maintain an equal gap between the timber being laid. This value will depend on two conditions:
- how the deck boards will be laid (across the beams or at an angle);
- what material will the deck board be made of?
If the boards are laid at an angle, the distance between adjacent cross beams will be 12 inches. If the deck board is laid perpendicular to the joists, then the distance between the joists will be either 16 or 24 inches.
The cross beams are installed at 24" spacing if the following materials are to be used for the deck board:
- ironwood (Ipe Wood),
Ipe decking board (Iron wood) - Tiger Wood,

tiger tree - polymer board.
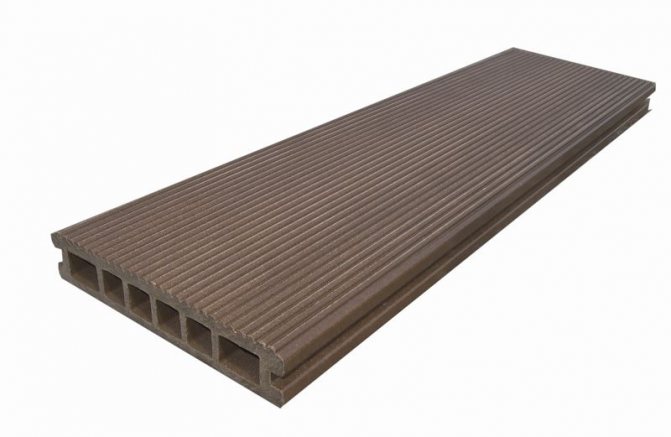
Wood-polymer composite decking board
These rocks have very high strength and are slightly deformed by bending under vertical loads, so the beams can be placed at a considerable distance from each other.
Also, durable and stable materials used for deck boards include polymer boards. Their advantage also lies in the fact that they do not require protective paint coatings, and also do not have knots that reduce the strength of the materials.
This project uses a fairly soft material, namely cedar deck boards. Therefore, the cross beams will be fixed at 16 inch intervals.
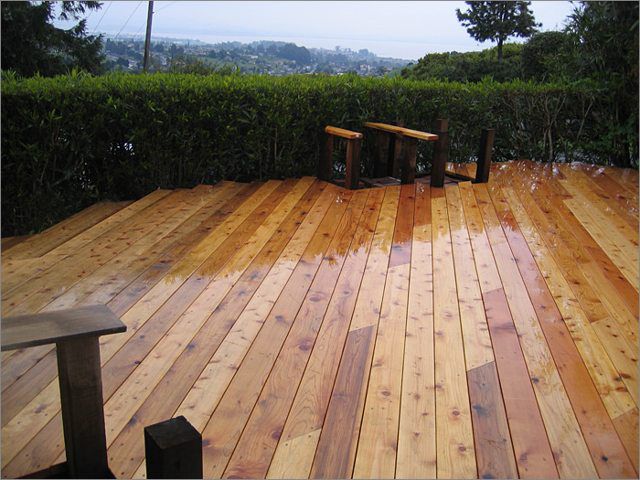
Canadian red cedar decking board
For cross beams, beams with a cross section of 2" x 8" are most commonly used.
Figure 5 shows what the frame of a wooden deck around a pool will look like with the cross beams installed.
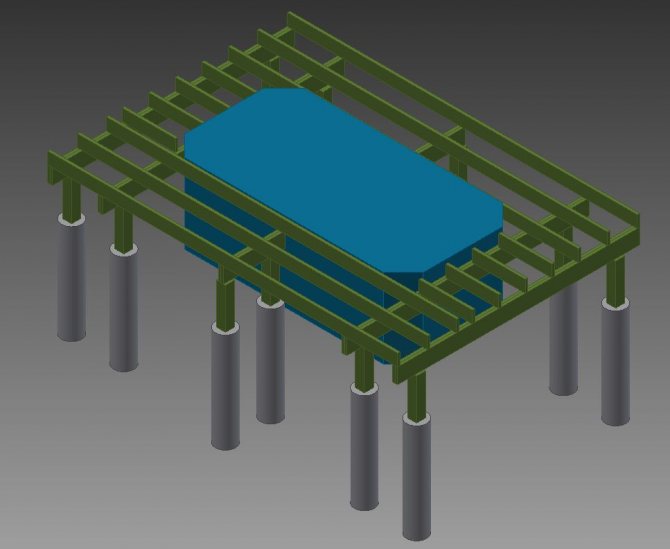
Figure 5. Frame of a wooden deck around the pool with installed cross beams
Once the beams are installed, they should be tied together, as shown in Figure 6, so that the structure becomes solid and as stable as possible.
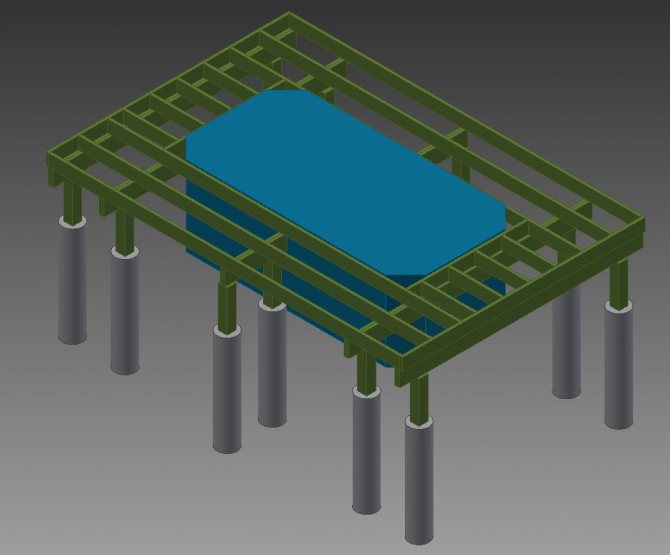
Figure 6. Bundle of decking boards
Terrace board
Preparatory work
At the preparatory stage, it is important to decide on the installation location - inside the house or on the site. For each of these options there is a clear sequence of actions and requirements. The most logical solution is to place the water structure in an open area.
How to choose the right place in an open area
The choice of location is guided by the following parameters:
- The slope level of the site is to determine the volume of excavation work.
- Soil type.
- The direction of the wind on the site will allow you to determine the location of the constant accumulation of garbage.
- Landscape design, taking into account the placement of buildings and large plants.
Experts do not recommend placing a pool near deciduous trees. This is due to the ever-growing root system, which can physically impact the structure. The second reason is the need to frequently remove leaves from the water, which have a detrimental effect on the filtration system.
Clay soil is considered the most suitable for construction, as it does not allow water to pass through. This soil will be a plus in case of violation of the waterproofing layer.
Preparing to build a pool bowl: determining dimensions
When assembling a submersible pool to construct the bowl, you will need polypropylene sheets of different thicknesses (more for the walls, less for the bottom). The market offers products with a thickness of 5–15 mm, with the following standard sizes:
The size and shape of the bowl are selected individually, based on the wishes of the customer. The wider the diameter of the bowl, the thicker its walls. As a rule, sheets 8 mm thick are sufficient. They are easy to weld and do not deform when exposed to heat.
The essence of creating an unusual pool
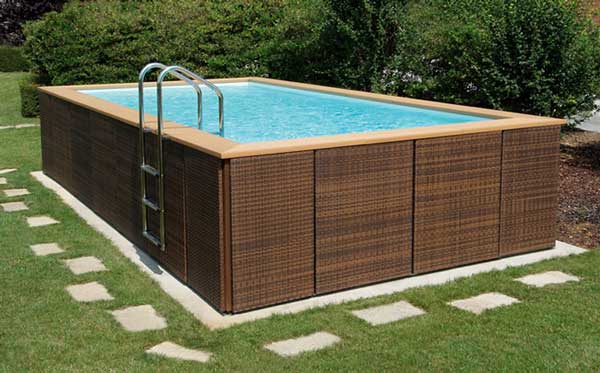
Photo example of a wooden pool
A solid concrete pool is created on traditional summer cottages, where a special garden style is not too strongly expressed. But if you have a rustic or landscape garden style, the presence of a concrete pool, especially if it occupies a large area, is unlikely to be combined with the rest of the landscape design elements. In this situation, there are two ways to solve the problem:
- Prepare a place on the site and buy a frame or inflatable pool, which is easy to install/dismantle and will decorate the site only during the swimming season.
- Create an unusual pool, finished with a material suitable for a certain garden style (if the rustic style is made of wood, the landscape style is decorated with paintings and vegetation, etc.).
Both the first and second options are very reasonable, but we are still inclined to ensure that the dacha plot has a permanent landscape design and all buildings are finished in the same garden style. That is why now we will tell you how to build a wooden pool with your own hands, which will decorate a country garden or simply make your summer cottage unique.