Material selection rules
The quality of the wood used directly affects not only its final cost, but also the service life of the laid floor covering, which is why the selection must be approached responsibly. In addition to the allotted budget, when choosing a material, you need to take into account the conditions under which it will be used in the future, the level of loads, the type of room and other important factors.
The best option for various indicators for apartments and private houses is coniferous wood. These include cedar, spruce, larch, fir, as well as pine, which, due to its more affordable cost and enormous prevalence, is in much greater demand on the market, but it has the disadvantage of the appearance of small cracks and irregularities that arise later for a while.
All of these types of wood, in addition to the relatively low price, have an optimal level of strength and wear resistance, due to which preference for coniferous wood is given much more often than the same universal oak, which is located in the middle price segment. Often, aspen and alder are also chosen for flooring in bedrooms and rooms where children live.
In order for the boards to be used for a long period of time without deformation, when purchasing them, it is necessary to pay attention to a number of the following indicators:
- Type of wood. The best option for finishing flooring is wood of the highest or first class. For rough flooring, you can freely purchase boards of 2 or 3 grades. If in the future you plan to paint a wooden floor that serves as a finishing floor covering, then you can choose second-rate floorboards for it.
- No defects. Regardless of the type of wood purchased, when purchasing, it is required to carry out a visual inspection to make sure that the boards do not have various defects, for example, cracks, chips, knots. This especially applies to the highest classes of material, in which they should be completely absent or present, but in very limited quantities.
Important! It is highly advisable to purchase boards whose length corresponds to the width of the room.
- Humidity of the material. A very important criterion that should be taken into account when purchasing, since when choosing insufficiently dried boards, they will not only undergo deformation and lose their original shape, but also, over time, cracks will form between them. For a subfloor, it is necessary to choose wood with a moisture content of up to 17%, and for a finishing floor covering this figure should reach no more than 12%.
- Floorboard thickness. This indicator for boards must correspond to the step through which the lags are laid. Thus, if a distance of 30 cm is maintained between them, then it is enough to choose floorboards with a thickness of 20 mm. When you plan to install wooden logs at a distance of 40 cm, then using 24 mm boards is a suitable option. For floorboards with a thickness of 30 mm, it is optimal to maintain a step of 50 cm between the beams, and so on.

The thicker the boards, the greater the distance between the lags is allowed. For example, taking into account the above technology, giving preference to floorboards with a thickness of 45 mm, you can maintain a pitch of up to 80 cm. The main thing is not to exceed the specified standards. If you are not sure that this is enough and during further operation the floor will be subject to significant load, then it is recommended to lay the logs closer to each other with a reduction in the previously indicated step. - The choice of material taking into account the installation location. If you need to lay a wooden floor in a kitchen or bathroom, it is recommended to give preference to species that can withstand moisture.
Note! All wood must be purchased from one batch, since otherwise the material may differ from each other not only in shade, but also in pattern, which can stand out from the general background. This should be especially taken into account when you plan to varnish a wooden floor in the future. If you have to paint it with paint, then this is not so critical.
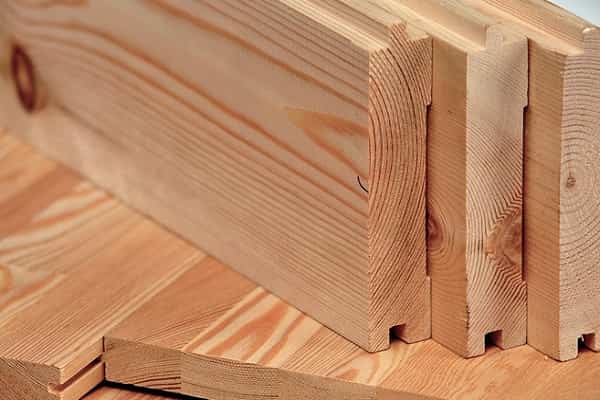
In addition, it is recommended to purchase wood with some reserve relative to preliminary calculations. Experienced experts advise purchasing about 15% more material. It is also better to choose tongue-and-groove or edged boards, since they do not require sanding.
Advantages and disadvantages of wooden floors on joists
If you are just considering the available flooring options and have yet to make a final choice towards one of them, it is useful to consider the positive and negative aspects of creating flooring on joists. Even today, floor construction in this way is carried out extremely often for a number of the following reasons:
- The floor covering consists only of environmentally friendly materials of natural origin, which do not contain substances hazardous to human health.
- Light weight structure. In this way, it is possible to avoid significant load on the floors of the building. This point is most important when there is a need to lay floors in old houses, in which they are often not able to bear a heavy concrete screed without damage.
- Attractive appearance of the finishing floor covering. Natural wood has an original texture, to emphasize which the material is often treated with varnish or wax. In its finished form, such flooring is perfect for different interiors, fully combining with wall decoration, furniture and other objects present in the premises, giving them both solidity and home comfort.
- When creating a wooden floor on joists, it is possible to lay insulation in the free space under them, thanks to which it is possible to achieve an increase in thermal insulation performance, as well as to carry out the required communications.
There are also disadvantages and they also need to be taken into account. These include the following:
- Low resistance to moisture and significant temperature changes. This deficiency manifests itself especially negatively in country and country houses, in which people live only periodically and most of the time the buildings are empty.
- The difficulty of laying a wooden floor. When carrying out work, it is necessary to secure the joists and floorboards to them as tightly and reliably as possible, since even minor defects that may be made during the installation process can lead to unpleasant sounds when walking. Often it is possible to get rid of squeaking only by completely re-lining them.
- High price. If the finished floor covering is created from expensive types of wood, then the final costs increase significantly and are several times higher than those that arise, for example, when purchasing pine floorboards.
- Flammability. Even with high-quality pre-treatment of the wood used for flooring using special compounds that reduce the material’s susceptibility to fire by an order of magnitude, it is still the most unsafe option in the event of a possible fire.
Taking into account the advantages and disadvantages, you can finally decide whether it is worth making a wooden floor at home or still consider other floor coverings that do not have certain negative aspects.
Warm water floor pipe laying diagram
A warm water floor is an excellent heating option for private and country houses, garages and workshops, because with its help you can reduce energy costs by up to 30%, and with proper installation, such a system will last up to 50 years.
In high-rise buildings, water floors are not used, since if the pipes leak, there is a risk of flooding the lower rooms and leaving the upper ones without heating.
The operating principle of this equipment is to circulate a coolant liquid (water, antifreeze, ethylene glycol solution) through metal-plastic or polypropylene pipes, which are characterized by a high level of strength and simplify the installation process.
Today there are three technologies for installing a water floor:
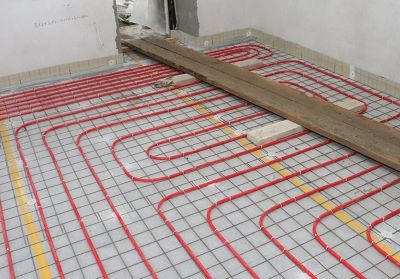
Concrete screed
- the most reliable and popular method, as a result of which the entire system is poured with concrete - the height of the layer should be at least 30 mm above the surface of the pipes. After complete drying, the decorative coating can be applied.
Polystyrene
– pipes are installed in special grooves made of polystyrene. Then they fill it with screed and place the floor covering.
Wooden
- a rather labor-intensive method, during which a wooden floor is laid with prepared holes for pipes. Then the structure is covered with polyethylene, gypsum fiber and a finishing coating.
Whatever technology you choose, remember that the efficiency of the entire heating system largely depends on the layout of the warm water floor.
By adhering to installation principles, you can influence the movement of heat in the house. Since the circulating liquid coolant, which heats nearby surfaces, tends to cool down, all schemes for laying water-heated floor pipes start at the walls and end either in the center of the room or at the exit.
THERE ARE SEVERAL SCHEMES FOR LAYING WARM WATER FLOORS. EACH OF THEM HAS BOTH ADVANTAGES AND DISADVANTAGES. MORE ABOUT THEM
- "snake"
- "snail"
- combined
Now let's look at each of the options.

DIAGRAM OF WATER HEATED FLOOR “SNAKE”
This scheme is the easiest to install and has a significant drawback - the temperature difference will be felt at the end and beginning of the circuit (fluctuations of about 5-10 degrees). This type is used where the temperature must decrease - in border zones. The simplest method is to lay pipes in loops parallel to each other from one wall to another. To avoid temperature loss, it is recommended to start laying from the outer wall, window or balcony, the optimal step is 20-30 cm.
This method is best suited for small rooms, but it is not suitable for a huge area: you will need to take a small step - this is fraught with uneven heat distribution and sharp bends can cause system failure.
Also, the “snake” is used in rooms divided into functional zones, where different temperature conditions are required or cooling occurs spasmodically. That is, the beginning of the pipe with hot coolant must be installed where the coldest section is located.
You can make a double “snake” - the supply and return pipes will be placed side by side throughout the entire space. This works for long and narrow rooms, for example.
For rooms where two walls face the street, lay out a corner “snake”.
WARM FLOOR “SNAIL” SCHEME
With this scheme, the temperature will be distributed evenly across the floor. This scheme is more difficult to implement, but is still used in almost 85% of cases. It has proven its effectiveness and is very popular when installing heated floors. This method is more labor-intensive to implement, but its effectiveness is much higher. As a rule, “snail” is used for areas with an area of more than 15 m2.
The pipes are laid in a spiral; hot and cooled water flow through them in parallel, tapering towards the center of the room. Thus, the room is heated evenly, and the level of hydraulic resistance is reduced.
It is noteworthy that the number of pipes required for the “snail” is less than in the serpentine design, and the bend itself runs at an angle of 90 degrees. The turn is smooth, the number of steps is reduced, and the load on the system is minimized.
If the wall of the room faces the street, then in this case you can use a double “snail”: a small spiral runs along the cold wall, and a large spiral occupies the remaining space.
COMBINATION OF WARM FLOOR LAYING SCHEMES

Not all rooms have a “correct” rectangular shape, therefore, depending on the situation, they resort to using this scheme. This is a combination of the two previous installation methods, part of the water-heated floor appears in the form of loops, and part - in the form of a right angle.
The hot water pipe will pass close to the outer wall, and by reducing the pitch, you can achieve increased heating of the extreme cold zones.
Combine pipes depending on your tasks, for example, use a “snake” at the entrance/corridor/bathroom (in these areas there is no point in intensive heating), and lay out the centers of the rooms in a “snail” pattern, because active heating is needed there. After looking at the possible options for laying a water-heated floor, you need to decide on several points:
- the heating method you choose will be the main or additional heat source
- schematically depict the floor plan: where the stationary furniture is located, its dimensions, so as not to install the floor where it is not needed
- Are there areas with temperature changes?
Then you need to make calculations for the design, putting together information about:
- room size
- what are the walls, ceilings and communications made of?
- what kind of thermal insulation material will it be?
- type of planned flooring
- water floor pipe diameter
It is most profitable to combine both schemes for laying heated floors. Thus, it is possible to save consumables while ensuring the desired temperature in the room. The main thing is to adhere to the following rules:
- each circuit must be located inside one room and regulated separately from each other;
- you should not load the heating circuit with the need to heat more than 25 m², otherwise the efficiency will decrease significantly (it is better to divide it into several zones);
- the maximum possible pipe length of one circuit is 100 meters;
- be sure to use damper tape to compensate for thermal expansion (at the edges of the room, at transitions between rooms).
It is necessary to approach the calculations very responsibly, because errors can appear after installation is completed, for example, “thermal zebra” - alternating warm and cold areas.
Water heated floors are a very efficient heating system. Competent design and selection of quality materials will provide your home with a feeling of comfort and coziness for a long time.
Any questions? Write to us!

Features of installing a wooden floor on joists
Initially, when considering this option, it is necessary to take into account that wood absorbs moisture, which is present in the place where it is used, which is why, with its increased quantity and temperature fluctuations, the material can begin to deform and even rot.
To avoid this, before laying a wooden floor with your own hands, it is imperative to lay a vapor barrier layer and treat the joists and boards with a special antiseptic composition, which will protect the wood elements from these and a number of other negative consequences.
The fixation of the beams to the base, and then the floorboards to them, must be done efficiently, excluding the presence of cracks, voids and sagging. When laying a finished floor covering, it is imperative to resort to the use of expansion wedges, which allow the floorboards to be pressed together as tightly as possible. You can easily make them yourself from one of the boards purchased for laying a wooden floor. This option is especially suitable when installing floorboards with tongue-and-groove locks.
To achieve the highest quality fixation of boards to the joists, it is necessary to use nails or wood screws, the length of which should be 2.5 times greater than the thickness of the material being laid. To avoid splitting the floorboards, before driving or screwing in the fasteners, it is recommended to first make holes in the required places with a drill, but their diameter must necessarily be slightly smaller than the fasteners used.
Note! When installing boards with a thickness of more than 25 mm, nails are a more preferable option for fastening them to the joists, since self-tapping screws in such a situation are not able to fully attract the floorboards to the upper surface of the beam.
Preparing the base
If a wooden floor is planned to be laid on the ground, reliable reinforcement of the joists must be ensured.
It is planned to waterproof the space under the floor; care must also be taken about insulation.
The base is prepared - for this, soil is removed along the entire perimeter of the room to such a thickness that it is possible to go 20 cm below ground level. A layer of crushed stone and a layer of river sand are poured onto the prepared base, moistened with water and compacted.
Logs for wooden floors.
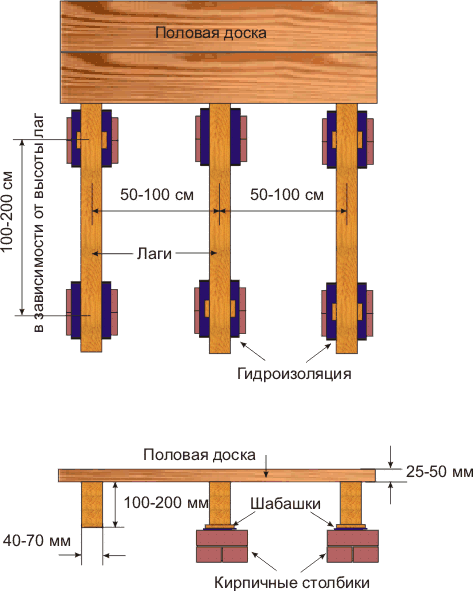
On this basis, several brick columns are installed, which will serve as support for the logs. The width of such a column should be two bricks, the height should be 20-40 cm. The bricks are fastened with ordinary cement mortar, and they are lined up at the same level on top. It must be taken into account that each of the lags should have at least two pillars, which will be located at the edges.
For long joists, posts are added in the middle. The distance between them is calculated depending on the size of the boards for the joists and the planned design load. To make calculations, it is better to contact professional designers.
When laying building materials on beams located between floors, no preparation will be required. On this basis, you can immediately begin distributing lags.
Related article: Brick barbecue next to a private house: we build it with our own hands
Rolled waterproofing material is laid on top of the beams or pillars. After this, the prepared logs are placed on special wooden plates and secured to the posts with anchors. The upper edge of the lags is brought out into a single plane using flats. The outermost logs are lined up using a level, a fishing line is pulled between them, after which the rest are laid along it.
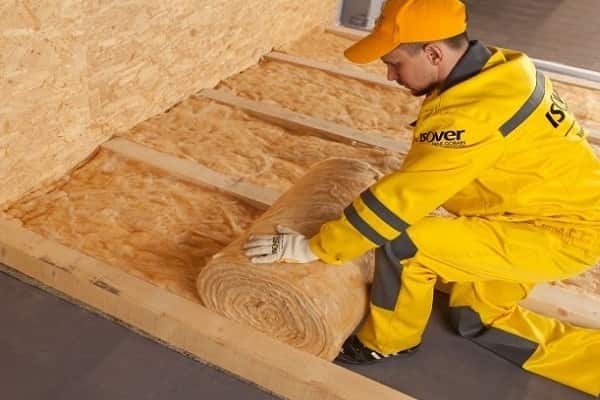
Parts for constructing the subfloor are attached to the bottom of the joists. With a base in the form of soil and logs on pillars, the bars are fastened across the entire length of the room. When laying on beams, the bars must be nailed to the sidewalls of the joists on both sides. For insulation, vapor-permeable materials are used - for example, mineral wool, basalt slabs. They are inserted into the spaces between the joists so that there are no gaps left.
Before laying the wooden floor, a vapor-waterproofing membrane is laid out. It must be laid with an overlap of 20 cm, the joints of the material are well taped. The attachment will depend on the finish chosen. For example, under boards made specifically for flooring with a ventilation gutter, it is not necessary to install slats for fastening.
Mistakes that reduce the service life of wooden floors on joists
One of the main shortcomings made during the installation of the material is the lack of a vapor barrier layer. Basically, when arranging it, dense polyethylene or penofol is used, which in addition allows increasing sound insulation performance. If the installation of a vapor barrier layer is omitted or its integrity is damaged, some time later the floor covering will rot, which will lead to the formation of mold, which will not only reduce the life of the wood, but can also harm the health of people living in the house.
The second extremely common mistake is using material with a high level of humidity. It is optimal when this figure does not exceed 15%. It must be taken into account that wet weather can negatively affect even boards that have a normal humidity level, because wood easily absorbs moisture present in the air.
In cases where it has been raining for several days and you are just about to start installing the floor, it is best to postpone this idea for now, especially if the boards were located on the street or in another place where they were not fully protected from dampness. Otherwise, if you lay the floor covering using insufficiently dry floorboards, over time, excess moisture from them will begin to evaporate, leading to deformations.
As a result, this will cause the formation of cracks and differences in height between adjacent boards, which will significantly deteriorate the appearance of the floor, and will also most likely contribute to the appearance of squeaking. In another situation, an unpleasant sound may occur if the same level is not maintained when installing the logs. In addition to creaking, this can also lead to the loosening of the boards over time, as a result of which the period of operation of the floor covering will also be significantly reduced and in the future there will be a need to periodically repair it.
Also common mistakes include failure to comply with technological clearances. The first and last laid boards must be at a distance of at least 10 mm from adjacent walls. Leaving such space is required for wood expansion, which occurs during temperature fluctuations. If this is not done, then when the temperature changes, the floor will be subjected to significant internal loads, which can cause cracks in some boards and squeaking when walking on the floor covering. Upon completion of the work, the gaps left along the length of the walls can be easily hidden using floor plinths.
Preparatory work
It is recommended to start performing them in the spring after the end of the heating season, when the wood and air in the room have an optimal level of moisture. Initially, you need to inspect the base on which the wooden logs are to be installed. Due to the fact that the beams do not require an extremely flat base, it is not necessary to level it, since with their help it is possible to avoid such a need by placing small pieces of chipboard, OSB or other similar material along the length of the products.
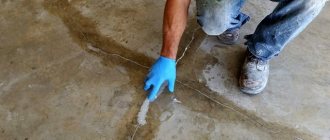
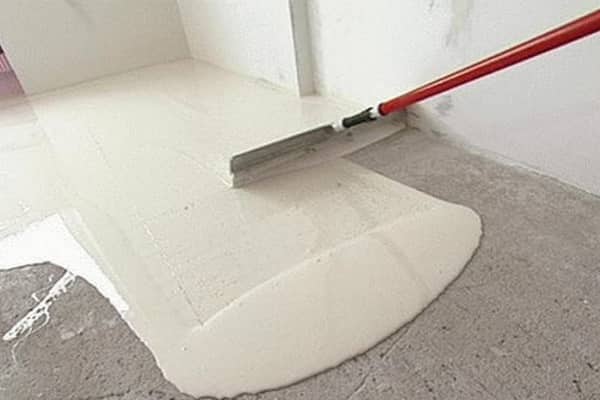
If there is a desire to level the concrete floor, then you should perform the appropriate work and wait until the fresh layer has completely hardened. The bumps present on the concrete surface can be removed by grinding, and self-leveling mixtures allow you to get rid of the holes.
In addition, before carrying out further work, if there is a need for a foundation, it is necessary to make holes for cables and other passing communications using a diamond drill.
Next, it is necessary to lay waterproofing, which will protect the joists and the laid floor covering from moisture, thereby increasing their service life. Polyethylene film is very often used as it. To lay strips of material, if it was not possible to acquire a solid sheet with the appropriate dimensions, you should overlap each other by 20 cm with gluing tape at the places where they join, and also make a 10 cm overlap on the walls. Instead of thick polyethylene or penofol, the best option for this task is also to coat the base with a primer.
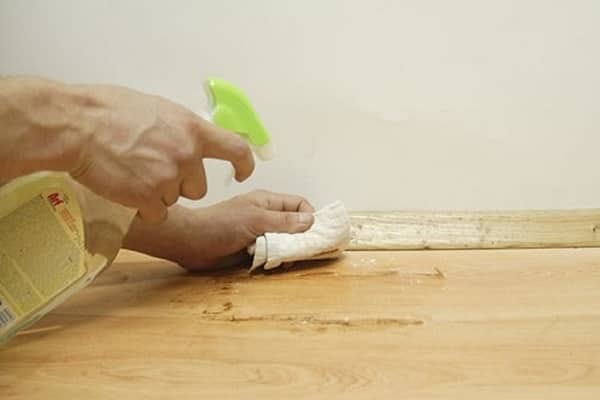
After preparing it, if such a need arises, and creating a waterproofing layer, it is necessary to re-inspect the purchased wood. Basically, products go on sale in a form ready for further use, but in cases where burrs are found, it is necessary to get rid of them using an electric plane, grinder or grinder, on which you can also put a special attachment for installing sandpaper in the shape of circles.
At the next stage, it is necessary to coat all the wood with antiseptics, which will protect the material from damage by fungus, mold, as well as from various insects and even partially from rodents. Before proceeding with installation, the wood must be completely dry. If the material does not need processing and is purchased in a completely finished form, then this step should be skipped.
How to lay a wooden floor with your own hands on joists on a concrete base
Before carrying out work, it is necessary to bring the wood into the room in which it will be laid so that it can adapt to the temperature conditions of the room. After a few days, you can begin to carry them out, performing actions in the following sequence:
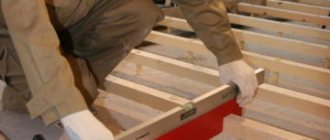
- The first step after the pre-made waterproofing layer is to install wooden logs. Initially, you need to install the two beams closest to the opposite walls, making a distance from them no more than 20, and preferably 10 cm. When installing, you should use a level to correctly align the joists and avoid distortions along their length. If necessary in the process, pieces of chipboard, OSB or other similar materials are placed under them. To secure the logs to the concrete base, dowels, anchors or other fasteners must be used, holes for which must be made using a hammer drill. It is often optimal to screw them in every 45-50 cm. Next, you need to tighten the thread between the two fixed beams, which will make it easier to mount all subsequent products that should be located between them. Their installation must be done in the same way, with obligatory observance of the level.
- After completing the installation of all the joists, insulation can be laid in the free space between them if necessary. It is optimal to insulate the floor with expanded clay, mineral wool, sawdust, polystyrene foam, ecowool, penoplex and other materials suitable for this purpose.
- The next step is not mandatory, so doing it or not is up to your personal discretion. In this case, if necessary, a rough flooring is laid, which is mainly sheets of plywood or chipboard, which in this situation are fixed to the joists before the finishing floor covering.
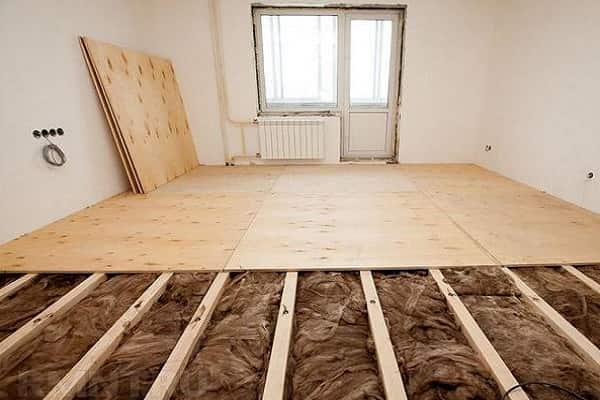
- Next, you can begin installing the boards themselves. If there is no rough flooring, then they should be attached to the joists, and if there is one, then to it. To do this, you need to use self-tapping screws or nails, which must be slightly recessed into the floorboards. In the case of second fasteners, the best option is to use a hammer. Laying the boards should be done perpendicular to the laid joists along the width of the room and start from the wall closest to the door with a distance of about 1-1.5 cm from it. The floorboards must be fixed to each beam, having previously made holes in the installed products for fasteners. They can be screwed in or driven in either from the outside or into the grooves. In the first case, when using 2 fasteners for each joist, it is possible to achieve a more reliable fixation of the floorboards, and the second method eliminates the need to mask the places where the elements are installed using putty corresponding to the type of wood. If boards with tongue-and-groove type locks are laid, then starting from the second one you need to use expanding wedges, thanks to which it is possible to achieve the tightest possible tightening of the products to each other. After installing all the corners, fixed sequentially to each joist and bringing the position of the floorboards during their tamping to the required state, you can begin driving nails or screwing in screws. Similarly, it is necessary to carry out work until the end board is laid, which should be trimmed if necessary.
- After laying the wooden floor, you can proceed to the next stage, which consists of puttying the places where the fasteners were screwed in or driven in. If fastening was performed in grooves, then this step is also eliminated.
- Next you need to sand the wood floor. For this task, the best option is to use a sanding machine with fine-grain sandpaper, through which it will be possible to remove small differences, which may well occur, especially if the floor covering does not consist of first-class boards, and to achieve maximum evenness of the surface. If the floor looks perfect after installation, then there is no need to sand it either.
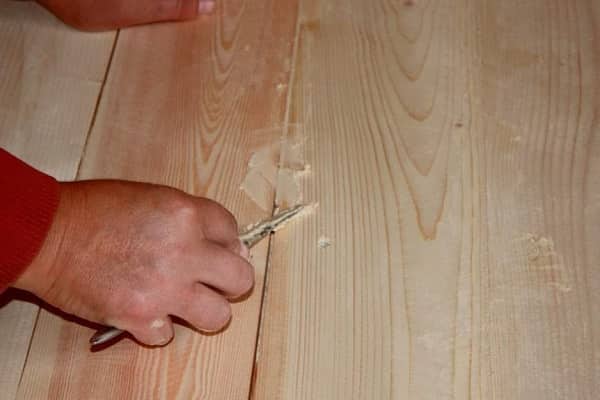
- Next, you need to thoroughly remove the resulting dust and, if cracks and small crevices or other defects are found, repair them using the same wood putty used to hide the heads of nails and screws.
After the mixture has completely dried, it is necessary to re-sand the areas where it was applied.
All dust and debris should be removed from the finished floor covering, and then it should be washed. After final drying, you need to varnish the wooden floor or first paint the desired color and only then apply it. Thanks to treatment with such compounds, it is possible not only to make the wood even more attractive, but also to protect it from a number of negative influences to which it can be subjected during further use. Lastly, you need to screw the floor plinth around the perimeter of the entire room, which will completely hide the gaps left at the walls and give the laid covering completeness.
After figuring out how to lay a wooden floor on joists with your own hands, you need to select and purchase suitable wood in the required quantity, do the preparatory work, and then begin laying it in compliance with the correct sequence of actions and accompanying nuances.
Video:
Concrete floor base
It is much easier to install wooden floors on a concrete base. The joists can be installed with greater frequency, which will reduce the bending load. It is much more convenient to align such logs. The acceptable pitch for logs with a thickness of 20 mm when installed on a concrete base is considered to be 30 cm. For boards with a thickness of 25 mm, the pitch must be maintained at 40 cm. To fix them, you will need construction pins with a diameter of 8-10 cm. Holes for them are drilled in the bars.
After the logs are aligned and secured, they begin laying the boards. It is better to use self-tapping screws for fixation.
At the end of the work, when all the boards are laid out on the floor, finishing is carried out. This can be grinding, scraping, coating with paints and varnishes.