- 4597
- strip foundation pile foundation columnar foundation furnace foundation
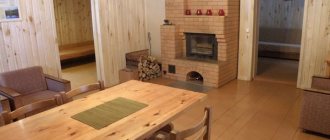
To heat a dacha or bathhouse, owners often use a potbelly stove, buleryan, or heating boiler. But in a country house with permanent residence, the most common option is a brick or stone stove: these are solid and durable structures that retain heat for a long time. In a residential building a Russian, Dutch or Swedish stove is used, in a bathhouse a heater is used. They all have a lot of weight; they have their own foundation laid under them during construction. How to choose, calculate and build a foundation for a furnace?
Why cover with brick material?
Any work must be done thoughtfully, and before execution it is necessary to understand the reasons. The designs are easy to install, heat up quickly and are accessible to everyone due to their low price, but they have a lot of disadvantages.
In addition to the high heating rate, the surface is a source of infrared radiation, which is unpleasant for humans and burns the skin at a considerable distance.
Steel heaters dry out the air, which prevents the creation of the correct conditions in the bathhouse necessary for a comfortable procedure. When heating quickly, such a stove instantly gives off heat and has to be heated regularly, which increases the consumption of firewood and creates a lot of inconvenience.
Brickwork acts as a protective screen, allowing you to retain heat for a long time and rid you of infrared rays. Covering a sauna stove with bricks is inexpensive.
Calculations for choosing a base
For the correct distribution of parameters, knowledge of the basic parameters is necessary:
- dimensions of the furnace and its weight;
- weight of stones in the heater;
- the mass of the container for heating the liquid and the volume of water (further calculations are based on the condition that a liter weighs 1 kilogram);
- the weight of the brick wall (depends on the type of stone, but standard fire brick = 4 kg).
When all the information is received, the specialist can easily carry out the necessary calculations. He will need to add up the weight of the stove, stones, brickwork, container and liquid. 20% is added to this amount to create an additional safety margin. It should be remembered that pressure is applied constantly, and if the boards do not meet the required characteristics, then sooner or later they will be pressed through.
If the resulting number does not exceed 600 kilograms, you can line a metal stove in a bathhouse with bricks without manipulating the foundation. For detailed calculations, you can use the information below.
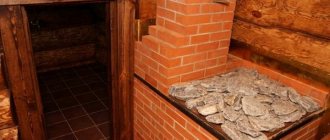
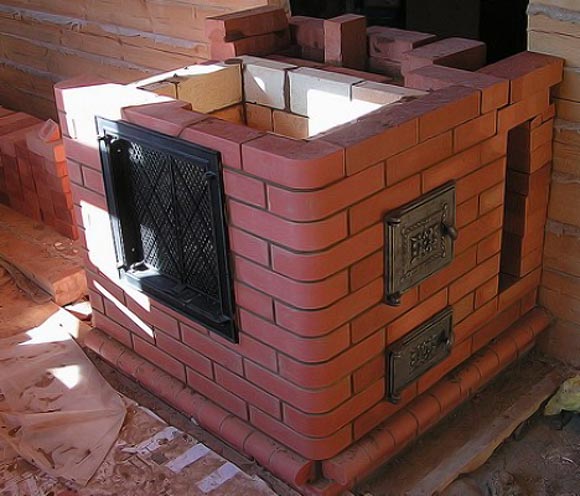
Brick foundation for a sauna stove
A brick oven is a fairly massive structure; it places a load on the foundation 4-5 times greater than an iron oven with similar parameters. Therefore, the foundation for such a structure should be stronger and more solid.
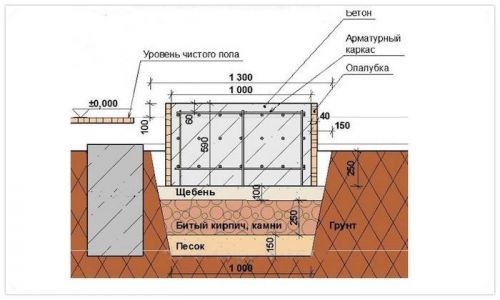
Foundation for a brick stove
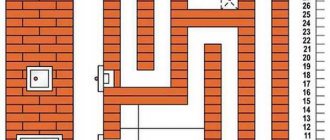
The foundation for a brick stove is formed using the following technology:
- First, a pit is dug; its depth should be at least 0.7 meters. As for the width and length of the pit, it is important that they exceed the parameters of the main structure by about 0.2 meters.
- The bottom of the finished pit is leveled and thoroughly compacted.
- Next, pour sand in a layer of up to 0.2 meters, moisten it well and compact it using a vibrating plate or other device.
- Broken bricks, crushed stones or stones must be poured on top of the sand layer. The height of this layer must be at least 0.2 meters. The rubble material is well leveled, covered with a small amount of sand, spilled with water and compacted thoroughly. Sand should fill all the voids in the rubble layer, so it is added until the material remains on the surface.
- On top of the compacted layer of rubble material and sand, crushed stone of the middle fraction is poured to a height of up to 0.1 meters; it should also be compacted using special devices.
- Formwork made of wooden boards is installed on the formed cushion. If the pit’s length and width exceeds the stove by 0.1 meters on each side, then the dimensions of the formwork structure must fully correspond to the length and width of the sauna stove. The wooden formwork should rise approximately 15-20 cm above the ground level.
- A reinforcing frame is laid inside the formwork structure; steel rods with a diameter of 12 mm are used for its manufacture.
- Next, you should prepare a concrete solution using classical technology and pour it into the formwork with a reinforcing layer. Before pouring concrete, the formwork walls are moistened to prevent moisture from being absorbed from the concrete mixture. The solution is poured in layers of 0.2 meters until the top level of the wooden formwork is reached, the surface is well leveled and left for 21 days for the concrete to gain the required strength. During this time, the foundation should be protected from drying out.
- After this, the wooden structure is dismantled.
- Between the walls of the pit and the finished foundation for the brick sauna stove, a space of 10 cm was created on each side, which allows waterproofing of the base. For this purpose, melted tar is used, which is used to cover the side surfaces of the foundation in 2-3 layers.
- Then the free space is filled with fine gravel or coarse sand. These materials create a kind of drainage layer.
Calculation of dangerous load on floors (kg/m2)
To assess how much load your floor can support, the technician needs to know what kind of joists are used. In the table below you can see the capabilities of different types of joists to support weight in kilograms per square meter.
| Section (cm) | Beam length between supports | ||||||
| 2 m | 2.5 m | 3m | 3.5 m | 4 m | 5 m | 6 m | |
| 10×5 | 734 | 585 | 490 | 420 | 367 | 325 | 293 |
| 15×5 | 1650 | 1321 | 1101 | 942 | 827 | 733 | 665 |
| 20×5 | 2930 | 2347 | 1955 | 1675 | 1464 | 1303 | 1172 |
| 20×10 | 4867 | 4690 | 3910 | 3353 | 2933 | 2733 | 2607 |
| 20×20 | 11730 | 3987 | 7821 | 6705 | 5866 | 6215 | 4691 |
| Cylindrical shape 20 | 6912 | 5528 | 4608 | 3950 | 3456 | 3070 | 2765 |
| Cylinder. f. 22 | 9200 | 7360 | 6132 | 5256 | 4600 | 4090 | 3682 |
Smoke exhaust pipe installation
When installing a chimney pipe, certain standards must be observed. It should protrude at least 0.5 m above the surface of a flat roof; the distance between it and the ridge on a gable roof of less than 0.5 m is not recommended; if the pipe height is the same 0.5 m or more. When installing a pipe more than 3 m from the ridge (gable roof), its height cannot be less than the ridge itself.
The damper is a mandatory attribute of any smoke exhaust system. It is best to install it in a steam room. Installation of this element in the attic space will require additional insulation, since sudden temperature changes will necessarily cause the formation of condensation.
At the junction of the pipe and the ceiling, a steel screen should be welded, which will not only allow the transition to be properly designed, but will also provide effective protection of the ceiling from the negative effects of high temperature, and in addition will increase the reliability of the connection of the pipe components to each other.
In parallel with the installation of the main pipe, the installation of a hot water tank and a heat exchange circuit is also carried out (in a situation where the oven is represented by a “samovar” formation model).
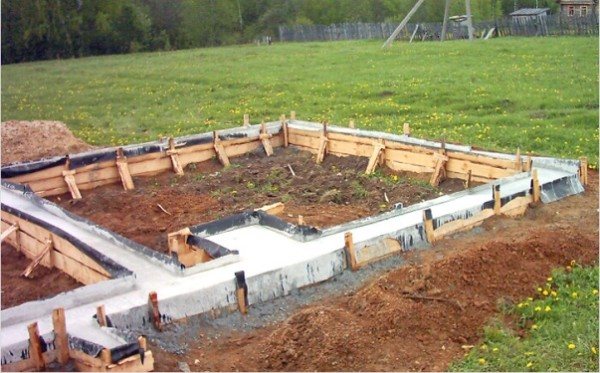
Construction on foundation
If a metal sauna stove lined with brick is not suitable for installation according to the table, then in this case it is necessary to make a foundation. This task is simplified if you have just started building a building with your own hands and you do not need to dismantle the stove and floors.
To build a foundation, a hole about half a meter deep is dug around the perimeter of the masonry and filled 3/5 with crushed stone or a mixture of gravel and sand. It must be taken into account that contact with the bathhouse foundation is unacceptable.
After laying the cushion, a cement screed and a layer of waterproofing are made, after which formwork is made, which is filled with concrete mortar. For such a product to harden properly, it must be regularly moistened with water to avoid cracks.
The next stage is the construction of brick pillars that serve as support. It is recommended to do the masonry using clay mortar. All work must be carried out taking into account the level, avoiding distortions.
When everything is ready, the metal product is installed and covered with brick.
How to make a foundation for a brick oven
But if, instead of a metal structure, heavy brickwork is planned, and you need to make a solid foundation for the stove yourself:
- Step 1. A pit is dug to a depth below the freezing level of the soil and a width of 10 cm wider than the foundation itself - this is necessary to eliminate all possible influences of soil movements.
- Step 2. Sand 15 cm thick is poured onto the bottom of the pit and filled with water. As soon as the water has subsided, the sand is added again to the desired level, after which it is filled with water again. As soon as the moisture disappears again, broken brick or stone is placed on the bottom - in a 20-centimeter layer. All this is compacted, covered again with sand and filled with water - this procedure is repeated several times until the sand stops settling.
- Step 3. Now a 10 cm layer of crushed stone is poured, compacted well and formwork is made inside the pit - so that there is 10 cm of free space between it and the sides of the foundation, and a reinforced frame is located inside the formwork.
- Step 4. Concrete is placed in the formwork, but so that its height is not lower than 15 cm than the ground surface. As soon as the concrete has dried, the formwork is dismantled, and melted tar is applied to the sides in several layers.
- Step 5. Coarse sand and fine gravel are poured into the resulting free space.
Floor base
If the weight of your structure does not exceed the established standards, you can place the stand directly on the surface. If the bathhouse is many years old, the technician will still have to open the floor and inspect the joists and boards for damage. You also need to remember that the brick base also has its own weight and will put pressure on the floorboards.
If the wood is not suitable for the job or is not in perfect condition, it is not necessary to replace it. It is possible to reinforce them with a metal channel or additional wooden beam. It is worth considering the distance between the beams. If they are located more than a meter apart, the specialist will need to install additional ones so that the clearance between them is about 600 mm.
To lay the base, floorboards are placed ten centimeters larger than the size of the structure with the lining. On the firebox side, it is necessary to increase this distance to avoid burning elements from hitting the wood. Then a sheet of refractory material is placed on the marked area, on which brickwork is made about 200 mm high.
It is recommended to use refractory bricks without hollow sections for these purposes. You need to use a clay mortar, to which you can add a little cement mixture. All actions must be performed using a level. After preparing the base, you can think about how to properly brick a stove in a bathhouse.
Materials and tools
Tools for arranging the foundation of the stove
Before starting construction work, you will first need to stock up on tools, selected individually for each stage. For excavation and carpentry operations you will need:
- shovel-bayonet for preparing a pit;
- shovel-scoop for mixing the solution;
- two sieve samples: for sifting cement and sand;
- hammer.
We suggest you familiarize yourself with Fungicide for fungus on walls
https://www.youtube.com/watch?v=otOR7DWf4zs
It is necessary to prepare a metal trough or other container for the solution, as well as a tape measure, a pencil, a building level and a mounting stapler. From the set of building materials you need:
- boards used for arranging formwork;
- polyethylene for waterproofing;
- sand, dry cement and selected gravel.
To strengthen the foundation, you will need reinforcing mesh or iron bars.
The first thing you need to do before starting construction work is to stock up on the necessary set of tools.
The work will have to be carried out not only in excavation, but also in carpentry, so prepare the following tools:
- Bayonet shovel (needed for digging the main pit).
- Scoop shovel (convenient to prepare sand-cement mortar).
- Hammer.
- Hacksaw or saw.
- Sieve for sifting cement (mesh size 1*1 mm).
- Sieve for sifting sand (mesh size 2*2 mm).
- Bucket for water (for preparing cement-sand mortar).
- A metal trough in which we will prepare the solution.
- Building level.
- Tape measure and pencil.
- Stapler.
- Concrete mixer.
Materials you will need:
- Boards (for making formwork).
- Polyethylene (for waterproofing formwork).
- Sand.
- Cement.
- Gravel.
- Reinforcing mesh or bars.
Construction process
If you plan to cover it with bricks on all sides, then it will be a full covering, if only some sides are partial. When completely surrounded, it is possible to control the movement of warm air masses. To do this, doors are made at the top and bottom of the screen to stop the movement of air when closed.
The model, completely covered with masonry, creates an ideal microclimate typical for a Russian bath. If at least one open wall remains, it will be more like a sauna, and the stone will protect you from burns and accumulate heat.
Screen construction options
To determine the answer to how to line a metal sauna stove correctly and with what kind of brick, it is necessary to consider all existing classifications.
By distance:
- solid - interferes with circulation, which reduces the heating rate;
- randomly - the brick is placed with holes, this type reduces the quality of shielding;
- a screen with doors at the top and bottom is an ideal option with the ability to adjust convection.
By arrangement of bricks:
- in size - increases the heating time of stones and consumes a lot of raw materials during construction;
- half a brick - the most suitable option with a durable wall and rapid warm-up;
- in a quarter of a stone - has good heating characteristics, but the strength of the masonry is reduced.
It is worth noting that an overly unstable option can be corrected using reinforcement with a special network, but still, a thin-walled lining should not be erected without good preparation.
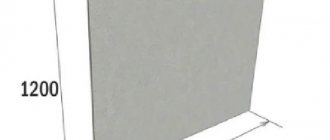
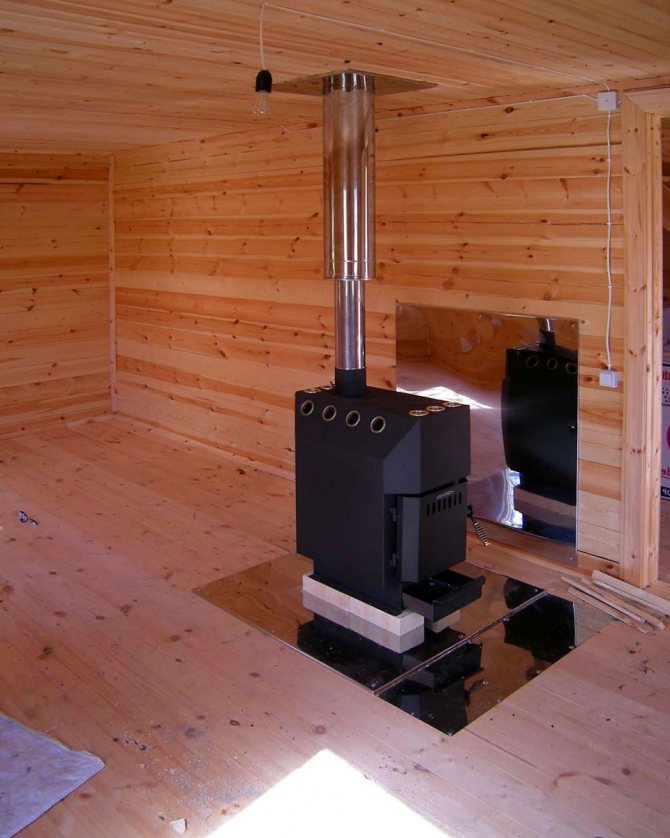
Furnace foundation height
There are three options here:
- below floor level;
- on the same level;
- higher.
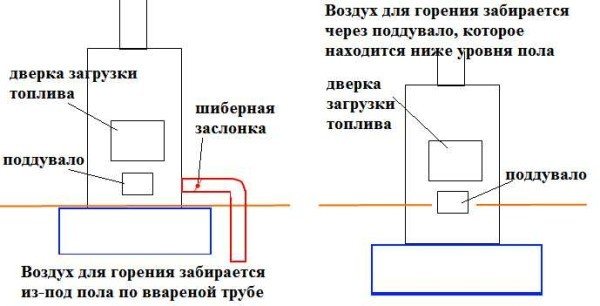
Questions may only arise about why to make the base of the furnace below the finished floor level. The answer consists of two parts:
- So that combustion air is taken from the underground. Then the stove, if you wish, can be heated from the steam room, and not from the rest room or dressing room: the oxygen in the room is not burned out, since it “stretches” from the underground. Only the foundation should have ventilation holes to allow air to flow through.
- So that the floor is warm. Despite the increased circulation in the underground, the floors with this arrangement of the stove warm up quickly. Then there will be no problems with a cold floor, be it wooden or concrete.
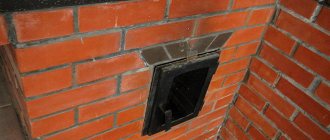
How to organize the supply of combustion air from the underground
Also, as a bonus, with this arrangement there are no problems with drying the floor. Only this is only true if the drainage and waterproofing of the floor is done correctly.
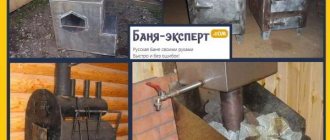
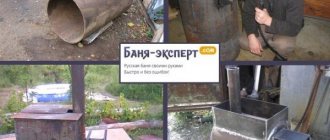
Everything will work if the blower is located below the level of the finished floor. If the foundation is made at the same level as the floor or higher, and air intake needs to be organized from the underground, the metal furnace is modernized (the option on the right in the photo). A thick-walled metal pipe with a gate is welded into the sidewall. The damper regulates the level of air supply and combustion intensity. Just note that if the integrity of the stove is damaged, it will be removed from the warranty (if any).
More detailed image of furnace modifications
In the same way - by welding the pipe - combustion problems of an already installed stove are solved. Problems arise due to lack of oxygen. And it is provoked by current technologies: to reduce heat loss and heating costs, we make thermoses in our houses and baths. If you forget to make ventilation or make it insufficiently efficient, then the stove burns poorly. Here, however, there is an option that does not require making changes to the furnace: the pipe coming from the ventilation hole in the foundation is brought out in the area of the ash pit. Sometimes it is enough to bring it under the boards, sometimes you need to bring it level with the floor or a little higher. Not the best or most aesthetic option, but the stove will burn normally.
Please note that if the foundation of the stove is located close to the base of the bathhouse (house), it is necessary to make them disconnected. This means that they should not touch each other. There should be a gap between them of at least 5 mm for an iron stove and 50 cm for a brick stove. In the case of an iron stove, the gap can be filled with a layer of heat insulator (basalt cardboard).
What kind of brick to cover a stove in a bathhouse
Before the main procedure, you must first prepare all the materials. On the modern market you will find a huge variety of bricks, varying in size, aesthetic qualities and properties.
The choice of brick must be made based on the distance from the metal to the screen being built. If it is less than 250 mm, then this will lead to strong heating of the masonry and therefore it is better to use fireclay.
The optimal is 500 mm. For such buildings, an ordinary fire-resistant red stone is perfect. If you plan to install vents from below, then this material can be used closer.
Characteristics of building materials
You can calculate the main indicators that a brick has for lining a metal or iron stove in a bathhouse using the following table:
| Options | Facing | Textured | Raised | Ceramic |
| Strength | M-250 | M-250 | M-250 | M-200 |
| Size, cm | 25×12×6,5 | 25×12×6,5 | 25×12×6,5 | 25×12×6,5 |
| Frost resistance | F35 | F35 | F35 | F75 |
| Moisture absorption,% | 8,5 | 8,5 | 8,5 | 6 |
| Weight, kg | 4 | 4 | 3,8÷4 | 4,1 |
| Thermal conductivity, W/(m×°C) | 0,61 | 0,61 | 0,61 | 0,72 |
Choice of solution
The most common option for carrying out such work is clay. It is mixed with sand, adding a little cement. A cement mixture with the same clay ratio is also used. For the cementless option, make a clay mixture with twice the amount of sand, which is diluted with water to the desired consistency.
Fireclay powder is best used for refining seams, because it binds bricks less firmly.
A simpler option is to purchase a special mixture. It is inexpensive and easier to use. Thanks to a wide selection of similar products, you can easily select the optimal solution. It is worth noting that the diluted mixture must stand for some time before use so that the substances contained in it dissolve better and the solution takes on the necessary properties.
Fencing an iron stove in a bathhouse
Before starting construction, it is recommended to thoroughly wet the bricks with water for 12-13 hours. This will allow them to achieve the desired level of humidity. Otherwise, they will dehydrate the solution.
The quality of the mixture is checked as follows: it is applied to a new brick, and if it does not spill or crack, then the specialist has created the correct consistency.
Now you can begin the laying process itself. It is important to check each row for evenness using a level.
If you are interested in what to line a stove in a bathhouse with (except for brick), you can always find a replacement. There are special casings that are cut to suitable dimensions. They are made from different rocks, are easy to install, and you will definitely find the right option for yourself.
Construction for a metal stove
If you decide to install a metal stove from a well-known manufacturer in a bathhouse, made of light sheet steel, then you will still have to build a foundation, even if the weight of the stove does not exceed 150 kg.
In this case, construction is performed as follows:
- A hole 50 cm deep is dug. Crushed stone is evenly poured onto its bottom and compacted. The thickness of the crushed stone layer should be 25 - 30 cm.
- Next, a solution of liquid consistency is prepared. To do this, you need to take cement and sand in a ratio of 1:4, add water and mix. The crushed stone is filled with solution and left for a day. It will take approximately this long for it to harden.
- Several layers of roofing material are laid on the already dry surface, which will serve as waterproofing.
- Next comes the preparation of the solution and pouring the top layer of concrete. To do this, take cement, sand and fine gravel in proportions 1: 2.5: 4. All this is mixed with water and poured into the pit. The thickness of this layer should be approximately 25 cm.
- Using a wooden beam, the surface is leveled so that it is completely horizontal. For control, you can use a building level.
- After 5–6 days, you can begin to lay out the brick base. It should be approximately 10 - 15 cm above the level of the finished floor. Burnt red brick is used for masonry. The base can also be made from concrete, but then you will have to construct formwork from boards.
- You can install a metal stove on the finished base.
For a brick stove that is planned to be installed in a bathhouse, the base is constructed using a more serious technology, because the weight of such a structure is much greater than the previous one, and therefore a more powerful and durable foundation is needed for it.
In this case, the depth of soil freezing is also taken into account, which was not done in the previous version. And if this moment is missed and the foundation is built at a shallower depth than necessary, then after a short period of time it will begin to deform, crack, and deviate from the vertical axis.
The base for a brick stove for a bath is constructed in the following order:
- The first step is to determine the depth of soil freezing. This determines how deep the pit will be, which is dug below its level. Its dimensions should be 10–15 cm larger on each side than the dimensions of the future foundation. For example, if you plan to pour a foundation whose dimensions are 100 by 60 cm, then the hole will be 120-130 cm by 80-90 cm. This reserve will allow you to easily install formwork and reinforce the base with gravel or sand, which will serve as additional protection against ground movements.
- When the pit is ready, sand is poured into it, which will act as a cushion for the foundation. To compact the sand cushion, it is watered several times with water, and if necessary, new portions of sand are added. At the exit, the layer should have a thickness of 15 - 20 cm.
- After the water has gone, a layer of stones or broken bricks is laid out. It must be compacted and covered with sand. In order for the sand to fill the voids between stones or pieces of brick as much as possible, it is watered with water in several passes. When the sand stops leaving, you can stop watering and proceed to the next step. The approximate thickness of the layer of stones should be 25 - 30 cm.
- Next, a layer of crushed stone is poured into the pit and compacted.
- Now you can build the formwork. For this, a board 4 cm thick is used. The space inside the formwork and the dimensions of the future foundation must correspond to each other. A building level is used to level the formwork. The structure is securely fixed, and a metal frame is installed inside it. The distance between the boards and the frame should be approximately 5 cm.
- Next comes pouring concrete into the space inside the formwork. As you add the solution, you need to use a wooden beam for compaction. The space is filled completely so that the layer is at the level of the upper edges of the formwork. The screed is carried out and excess mortar is removed. The structure is left for several days to harden. The surface of the poured concrete should be at the zero level of the bathhouse (finished floor level). This must be taken into account when constructing the formwork.
- After the concrete has dried, the formwork can be removed. It is also necessary to melt the tar and treat all concrete surfaces with it. This must be done several times. The space between the walls of the pit and the concrete must be filled with sand or gravel. Next, the structure is covered with film and work is suspended.
- After a week, you can begin laying the sauna stove.
Foundation on stilts
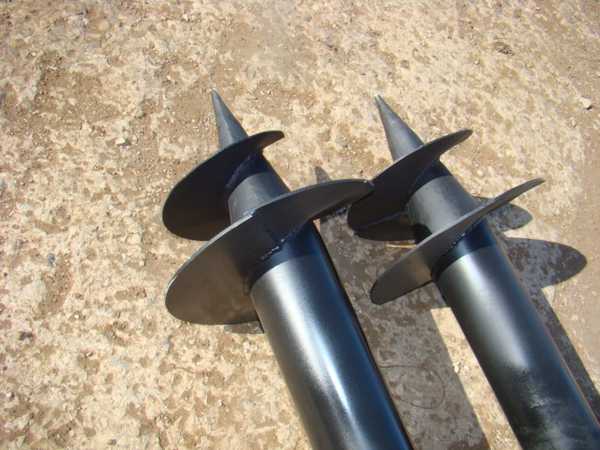
One of the types of piles
After determining the width and length of the structure, the parameters of the future foundation are calculated.
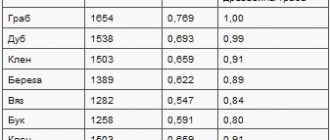
Brick kilns are the heaviest. The weight of 1 cubic meter of masonry is about 1300 - 1350 kg, including mortar and seams. This figure allows you to calculate the mass and determine whether additional base is needed.
Small stoves weighing up to 750 kg do not require a separate foundation. The stand is asbestos covered with a sheet of iron. This “pie” is laid on a clay solution. A structure of this size requires about 200 bricks. With a standard weight of one block of 3.5 kg, it is not difficult to calculate the weight of the future structure.
Brick products weighing more than 750 kg are considered heavy and require detailed calculations and a solid base.
Please note that the foundation for a stove in a bathhouse is laid with your own hands at the level of soil freezing in a particular area, since this indicator differs in different regions.
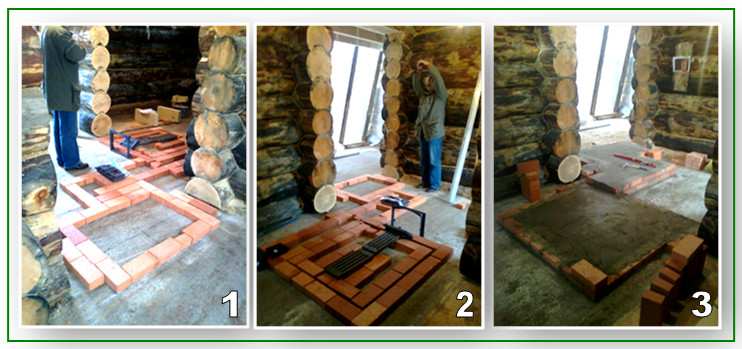
Stages of arrangement
So, here are the following step-by-step instructions.
- The pit is being prepared and backfilled with a cushion of sand and crushed stone. The resulting layer is compacted and filled with broken bricks or large stones. Next, you need to fill the foundation under the stove with mortar.
- Brickwork is made from solid blocks, maintaining the level and bandaging the seams. In this case, the outer rows are laid “under the shoulder blade”, and the inner ones - “back to back”. The surface is leveled to a perfectly horizontal state using cement mortar.
- To ensure waterproofing, the flooring is made of a double layer of roofing material.
- The final stage is laying several rows of bricks to floor level.
Now you need to wait until the masonry has dried, and you can begin building the heating structure itself.
Cushion for a load-bearing building structure made of crushed stone, sand and stone (brick).
This is the easiest and fastest way to make a reliable foundation for a brick. If the soil is strong enough, reinforcement is placed at the bottom of the pit. Then the concrete solution is poured to the ground level. Brickwork is done in several rows, up to a height of 10 cm below the floor.
The surface is leveled with cement mortar and covered with a layer of roofing felt. Boards treated with a waterproofing compound are laid horizontally on the base, and brickwork is laid on top according to the dimensions of the structure. Broken pieces or slag are poured inside.
Pouring process.
If the soil is wet, then iron ore brick is used for the foundation under the furnace. In this case, the lower part is filled with rubble or ordinary concrete, and the upper part is made of masonry. 1 part of lime paste is added to the solution, while in dry soils a clay-cement mixture is used.
- The pit needs to be dug 70 cm below the soil freezing line in winter. To eliminate the influence of soil movements on the base for a brick oven, the pit is made approximately 10 cm wider on both sides.
- The bottom of the resulting pit is covered with a layer of sand 15 cm thick. Then it is filled with water. After the liquid is absorbed, it is necessary to add sedimentary rock to the desired level. The procedure is repeated 2-3 times, then a 20-centimeter layer of crushed stone or broken brick is laid and compacted on the resulting base. After this, water is poured in again and sand is added. Such manipulations are repeated until the rock stops settling.
- A layer of crushed stone 10 cm thick is poured on top of the sand cushion. After compacting it, formwork is made inside the pit. In this case, a space of 10 cm between the walls of the recess and the wooden form remains empty.
- The inner part of the formwork is strengthened with a reinforced frame.
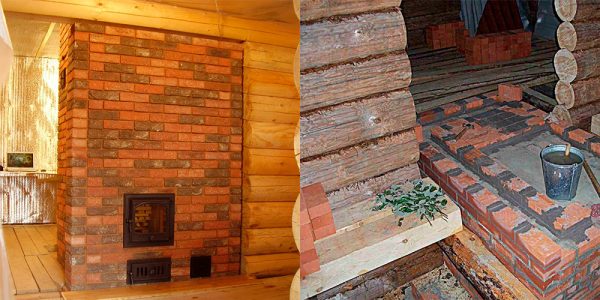
Finishing
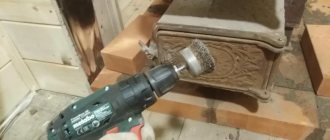
After setting, you need to make a lining so that the sauna stove, lined with brick, becomes a real decoration.
It is most convenient to remove excess solution using a drill with a special attachment. It is important to use personal protective equipment during the process. If after this procedure there are stains left on the brick, they can be removed with a brush dipped in a solution of laundry soap.
In order for the stone to retain its appearance for a long time, it is better to melt it slowly for the first time after lining, allowing the material to gradually warm up. Otherwise, the mortar may crack and the brick may lose its aesthetic qualities and properties.
Brickwork looks very beautiful regardless of the interior style. It does not require decorative finishing, and a huge selection of facing building materials will satisfy the most sophisticated tastes. All you need to do is keep it clean and protect it from damage.
Now you know how to cover an iron stove and boiler in a bathhouse with bricks. Regardless of the masonry method you choose and the materials used, you will immediately feel the pleasant comfort of the updated stove.