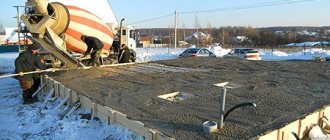
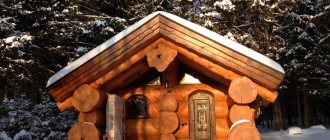
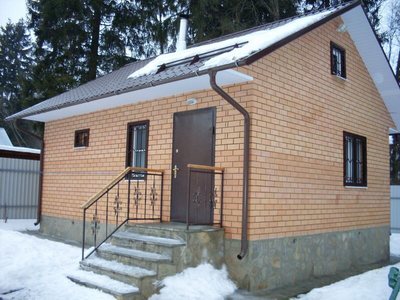
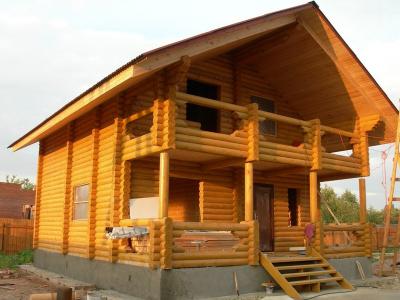
Everyone knows that a traditional Russian bathhouse is usually built of wood. The atmosphere there is favorable, and besides, such a structure is easier to care for. But technology does not stand still, and now completely different bathhouses, built of brick, are in fashion. The buildings look no worse, but they have many advantages. And they allow you to carry out construction from scratch to finishing with your own hands without any problems.
First, it’s worth understanding why you should choose the option of building a brick bathhouse. This design has many advantages, although there are also some disadvantages.
- Brick baths are durable;
- They are durable - they can easily withstand any vagaries of weather;
- The bathhouse retains heat for a long time;
- The material allows you to build multi-story structures of any shape and size;
- A brick bath has a low fire hazard;
- The material meets environmental requirements and is therefore completely safe for humans;
- Easily lends itself to almost all types of finishing.
It is worth considering the disadvantages of the material. For example, a brick bathhouse will definitely require thermal insulation and protection from water, otherwise there will always be dampness in the building. And, of course, a brick bathhouse is not for budget-conscious owners, because the material is more expensive than traditional wood.
Important! Brick is a heat-intensive material, so it will take more fuel and time to fully warm up. But the heat in such a bath will remain for a long time - if you heat a brick stove with your own hands in the evening, then in the morning the building will still be warm so that you can wash comfortably.
With terrace and gazebo
Brick stoves, like bathhouses made of the same material, are also convenient because you can attach an open
a terrace so that in the warm season you can enjoy nature and relax in the fresh air.
Usually it is attached to the porch so as not to change the layout of an existing building.
If a brick terrace and barbecue are initially planned in the structure, then their construction is included in the project.
There are some nuances that need to be taken into account when building a veranda.
- It is best to place the terrace on a separate foundation. It must be of the same type as the base of the bathhouse;
- The terrace is built close to the bathhouse, leaving two or three centimeters in the gap. These voids are then filled with polyurethane foam;
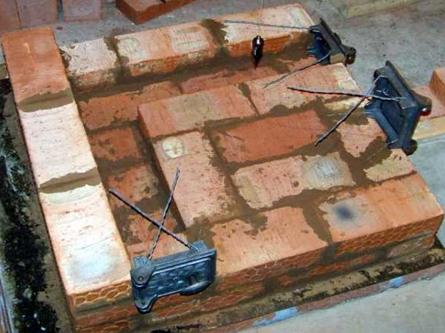
- For strength, it is recommended to connect both foundations with strong metal brackets. It is enough if such fasteners are located in two places;
- The roof is selected depending on personal aesthetic tastes - the gazebo can be placed under the same roof as the bathhouse, or a separate structure can be built. Corner brick gazebo baths are popular;
- Glazing a future terrace is voluntary, but not mandatory;
- It is recommended to build a terrace from the same material from which the bathhouse was built. This is not necessary - extensions made of lighter materials, for example wood, are allowed.
Attention! Since even a brick gazebo is quite light in weight, it does not need a reinforced foundation. A regular strip base is sufficient. Here the soil plays an important role, so the use of screw or pile structures is allowed.
The terrace construction technology depends on the material. In general, building a brick gazebo with your own hands is not difficult if you have basic builder skills. For example, wooden structures are made on a frame base, and brick ones are built according to the checkerboard principle, when half of the brick on top covers the junction of the two lower blocks.
It is not necessary to build a strictly rectangular or square terrace - modern materials allow you to install it of any shape and complexity. The same applies to openings for windows and doors - making the same arched transitions is not too difficult, and visually the terrace looks more airy and pleasing to the eye. If you are not confident in your abilities, you can order the construction of a turnkey brick extension.
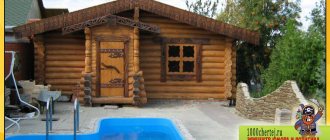
With swimming pool
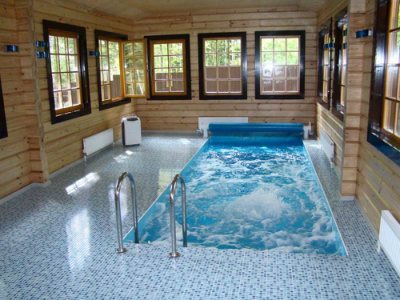
Many land owners dream of a brick bathhouse with a swimming pool.
After all, if you plan to have a swimming pool, then an ordinary steam room turns into a whole bath complex.
Here it is also worth paying special attention to the design of a 6 by 6 brick bathhouse, which will almost entirely depend on the type of pool itself.
Its shape can be any, but it is important to remember that dirt always accumulates in the corners.
Therefore, you should not choose a very unusual shape for the pool - otherwise you will have to clean the bathhouse almost every day. Standard shapes of rectangle, square, circle or oval are recommended.
There are two types of pools in the bathhouse:
- External;
- Internal structures.
Information. It is easiest to build a pool outside, but construction will take a lot of time. In addition, you will have to turn to earthmoving work. An outdoor pool requires special care and a significant investment. You will need powerful protection from groundwater and external influences.
Therefore, you should give preference to internal structures. Of course, it will also require a lot of money for its construction, but over time the costs will pay off - an internal pool in a bathhouse requires less spending on household chemicals and its care if there is a properly functioning sewage system. And you can use the pool at any time of the year, regardless of weather conditions.
It is recommended to allocate a separate room in the bathhouse for the pool, which will border on a shower and steam room. This location option is considered advantageous - from the steam room a person can immediately plunge into the pool, and then wash off the bleach under the warm streams of the shower. The pool itself in the bathhouse can be mobile so that it can be moved if desired. As a rule, structures of this type are designed for up to five people.

Or you can build a stationary pool in a bathhouse, which can be of absolutely any size.
It is only important to understand that a swimming pool requires full-fledged engineering cold water supply systems.
And also good sewerage.
Any pool consumes a large amount of water; the larger the size of the structure, the longer the pool will take to fill and drain.
In addition, your bathhouse must be large enough - the 6x4 brick version of the project will not work.
With attic
Bathhouses with a brick attic are an easy and relatively inexpensive way to significantly increase the usable indoor space on the site, without losing precious square meters of garden. The attic floor in the bathhouse has many different positive aspects. For example, you can also place a rest room there.
- You can get a large living space;
- Building an attic is much easier than adding a full floor;
- The purpose of the attic can be anything - from residential premises to storage and recreation rooms;
- Heat will be retained in the bathhouse because hot air will be sent upward;
- For the same reason, heating is not needed at all in the attic if it is used only in the warm season.
Important! It is advisable to make the roof of the attic in the bathhouse gable so that in winter snow does not linger on it - this increases the load on the foundation and load-bearing walls of the bathhouse.
The inside of the attic is usually not divided into rooms, but if necessary, zoning techniques are used to differentiate. If you need real partitions, then it is better to use lightweight wooden structures than to build full brick walls.
The attic is useful if the bathhouse is planned to be small. You can move a rest room or even a bathroom upstairs. Also, the top floor of the bathhouse is quite suitable for organizing a kitchen block. The only thing worth paying attention to is that the stove chimney pipe should not come into contact with walls or furniture.
You can cover it with a box or leave it as is, just don’t put anything close to the pipe.
A properly constructed brick stove will last for decades, but it must be handled according to all the rules.
Since a bathhouse is a place where there is a high level of humidity, the floors between floors need additional protection from water and steam.
This is necessary because they can break down over time.
Therefore, the ceilings on the side of the steam room in the bathhouse are lined with insulation and vapor barrier, and then the lining is laid.
On the attic side, it is also advisable to lay a layer of moisture protection under the floor material. Additional security measures are never superfluous, as has already been proven dozens of times. Therefore, it is worth paying attention to the quality of the materials used for construction.
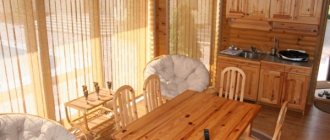
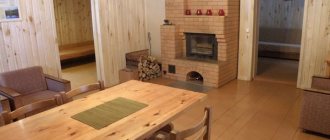
With a rest room
Almost every bathhouse has a relaxation room - the largest room in the building. This room often serves several functions at once, making it incredibly functional and useful for a bathhouse.
- There is a changing room at the entrance to the bathhouse. Here you can leave your outerwear and block off a little space to change clothes for swimming;
- It is also recommended to store a small supply of fuel in the rest room;
- Often the heater of the stove is located in the steam room, and the firebox is located in the rest room. This is necessary in order to heat both rooms in the bathhouse at the same time and not bring garbage into the steam room;
- The rest room has a table and benches. If the room is well protected from moisture and steam, then even upholstered furniture can be installed.
Even in a small 6x5 brick steam room there must be a room to rest. It is recommended to cover the room with clapboard made of aspen or linden - these types of wood are considered the most resistant to water.
Attention! It is allowed to use linings made of coniferous wood in the relaxation room - they are not suitable for a steam room, because they will release resin under the influence of temperature. And in the relaxation room, the pine needles will subtly smell like the forest, creating an unforgettable atmosphere.
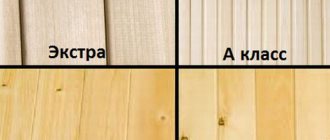
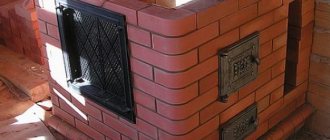
Important points: choosing a brick
The fuel chamber is made of fireclay bricks ШМ5. Its color options: white, light pink, or slightly yellowish. It copes excellently with high temperatures. There are some differences in its parameters. But this is not particularly important, because usually the combustion chamber is not connected to the furnace body. And adjusting the bricks to the same level is not required.
Attention! Such a brick is not suitable for creating an entire furnace. Because it cools quickly, and its price is much higher than red brick.
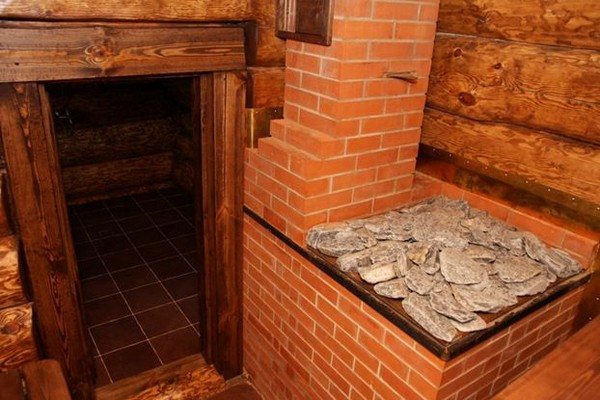
Stove-heater
The most important element of the bathhouse is the stove. Nowadays, heater stoves are usually used for these purposes. They come in brick and metal. It’s difficult to say what material the stove-stove is better made of. Here, rather, everything depends on certain circumstances, namely on the area of the bathhouse, the number of people staying in this room per day, etc. In view of this, we will consider the features of a metal and brick heater separately.
Heaters can also be closed or open. An open heater heats up quickly, but also cools down quickly. It works great for small companies. The stones in such a stove are stacked above the firebox. Their temperature can rise to 250º.
A closed heater transfers heat at one level. It has a steam door. During the combustion process, the door is closed, so that smoke from the fire does not penetrate into the room. The door can only be opened before entering the steam room. Thanks to this, the temperature in the steam room warms up to 60º.
Made of brick
The peculiarity of a brick stove is that it has thick walls made of heat-resistant brick. This type of stove is quite large, has a closed heater and a large volume of stones. Only solid fuel can be burned in it. As a rule, this is firewood or peat.
Among the advantages of the stove it is worth noting the following:
- Ability to heat baths larger than 30 m2.
- The design is fireproof.
- Retains heat in the bath for a long time.
- Even on the second day, the heat in the bath remains around 20º, which allows you to use the room, for example, for washing clothes.
Made of metal
Metal heaters heat the sauna for only 1.5–2 hours. They are quite compact, making them ideal for small spaces. Heaters are usually open type. The stones are heated by the combustion chamber. A metal stove can burn different types of fuel depending on the model.
Main advantages of the furnace:
- Fast heating of the bath.
- The design is small-sized and light-weight, which reduces the cost of its installation.
- Possibility of taking bath procedures during the heating process.
At this point, the general description of the process of installing a brick stove for a bath can be considered complete. For a more complete understanding of the process, you can familiarize yourself with the relevant videos on the topic.
More precisely about fireclay bricks
The composition for laying this brick is based on fireclay fire-resistant white clay. It is not difficult to purchase it at specialized construction retail outlets. You can use already created mixtures for laying fireclay bricks.
Laying the entire furnace on such a composition is not allowed. At temperatures of 600-800°C, it simply sinteres into a monolith. There are no such indicators in the external masonry, and gradually this composition is pulled apart and begins to crumble. As a result, the masonry itself collapses.
Fireclay is applicable only for the combustion chamber. For the remaining sections of the furnace, a composition based on clay from quartz sand is used. The required proportions here are: 1 share of clay / 5 shares of sand. Enough quarry and river sand. Although the second one is a little worse: its grains of sand are too rounded and have a round shape. The composition with such sand is weaker. If you want to create a stove that will last for many years, form the composition only from quarry sand. Before adding, it is carefully sifted through a sieve, the cells of which are no more than 2.5 mm. This way there will be no large elements in the mixture.
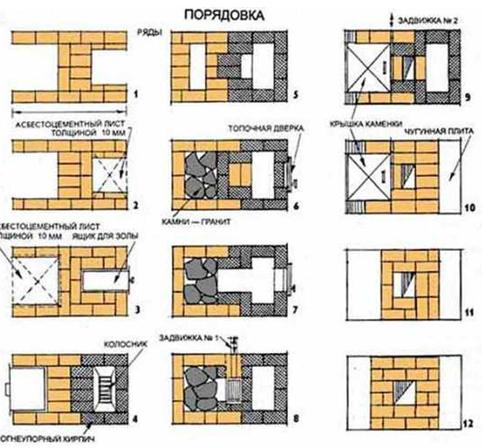
Sauna stove project: step-by-step order
As an example, we will consider the procedure for constructing a stove equipped with a built-in water tank. The dimensions of the structure at the base are quite impressive - 1020x1290 mm (corresponding to a laying of 4x5 bricks), height - 2100 mm. If desired, the owner can change the dimensions in accordance with the conditions and characteristics of the steam room being equipped. The design image of the structure under construction is presented below.
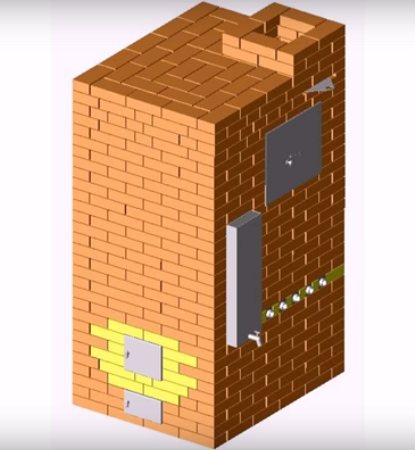
Design image of the structure under construction
A stove with the specified design dimensions will make it possible to provide a space of up to 10-14 m2 with temperature readings of about 45-50 degrees during washing and up to 100 degrees and higher during steaming. One firebox of such a stove will be enough for up to 10-12 visitors to comfortably take a steam bath and thoroughly wash themselves. The volume of the built-in tank (visible on the right side in the diagram above) is about 180 liters.
To improve the quality of heating and place stones above the fuel chamber of the furnace, pipes in the amount of 6 pieces (visible next to the water tank) with a diameter of 50 mm are laid. The length of the pipes to be laid specifically for this project is 1050 mm. The installed pipes become very hot during the operation of the furnace and continue to transmit thermal energy for some time even after the combustion is completed.
Above the stones there is a double door. Through the opening it closes, water flows onto the laid cobblestones, resulting in the formation of steam.
Let's proceed directly to studying the design order.
Table. Arranging a brick sauna stove
| Work stage | Description |
| 1 row | As noted, it is made solid and does not have any significant features. The diagram for laying the bricks itself is shown in the image. |
| 2nd row | At this stage, the formation of the ash chamber begins (dimensions and location are shown in the image) and the corresponding door is installed (highlighted in red in the diagram). Important! The dimensions of the hole intended for installing the door must be 5 mm larger than the dimensions of the mounted frame on each side. Fastening this, as well as other doors in the oven, is done as follows: - an asbestos cord is inserted into the prepared hole and covered with masonry mortar. A cord with a diameter of 0.5 cm will be sufficient; - on 4 sides the door frame is equipped with lobes - wire, pre-twisted from 3-4 rods 10-12 cm long. 10-centimeter pieces of wire with a diameter of about 0.5 cm are attached to the ends; — the prepared structure is inserted into the hole along the masonry and fixed with mortar. The wire embedded in the masonry ensures reliable and high-quality fixation of the door. |
| 3rd row | The laying of the ash chamber continues. |
| 4 row | The base of the firebox is made of refractory brick (yellow in the diagram) and 2 grates are installed. The gratings are installed in grooves specially cut for this purpose. |
| 5 row | The formation of the fuel chamber itself begins. The chamber is completely lined with refractory bricks. |
| 6 row | The fuel chamber door is installed. |
| 7 row | Laying of the fuel chamber continues. |
| 8 row | The actions are similar to the 7th row. |
| 9 row | The combustion chamber door is closed. |
| 10 row | Quarters of refractory bricks are laid at each side wall. Openings are formed between the bricks, the dimensions of which should allow the installation of the previously mentioned pipes. At the same stage, in the places indicated in the diagram, a place is prepared for installing a water tank. |
| Continuation of row 10 | On the same row, the previously mentioned pipes are laid in the spaces between the quarters of the refractory brick. The easiest way to seal holes around pipes is with basalt cardboard. |
| Continuation of row 10 | Also on the 10th row, a water tank is installed. |
| 11 row | In this and the following images, the water tank is not shown to make the masonry features easier to see, although the tank should be present. The previously laid pipes are covered with ordinary (not fireclay) bricks. |
| 12 row | The furnace mass rises higher. |
| 13 row | Similar to the previous one. |
| 14 row | Similar to the previous one. |
| 15 row | Similar to the previous one. |
| 16 row | Similar to the previous one. |
| 17 row | Similar to the previous one. |
| 18 row | Similar to the previous one. |
| Row 19 | Similar to the previous one. The water tank is visible in this image. The allocated space above the pipes is filled with cobblestones. |
| 20 row | 2 strips of steel are laid above the water tank (the placement and dimensional relationship can be assessed in the diagram) so that it can be covered with brick. |
| 21 row | The water tank is closed. The designated space is left free. In the future, water will flow onto the cobblestones through this opening. |
| 22 row | The construction of the furnace array continues, similar to the previous row. |
| 23 row | Similar to the previous one. |
| 24 row | Similar to the previous one. |
| 25 row | Similar to the previous one. |
| 26 row | The laying is carried out similarly to the previous row. The diagram is shown with a door installed for the opening through which water will flow. In general, the installation of this door had to be done earlier - when laying the row indicated by red lines. The door was not shown in the diagram so that the principle of masonry could be better understood. To cover the door, 2 steel strips are laid on top - the technique is already familiar to you from the previous stages of the work. |
| 27 row | The door is blocked. Preparations begin to cover the furnace. The space to be covered is quite large. To successfully cope with this stage of work, it will be necessary to lay 2 steel strips. The thickness of the strips is quite large - about 1 cm. To lay them, recesses are cut out in the bricks (marked in the diagram). It is advisable to place basalt cardboard spacers under the strips. |
| Continuation of row 27 | The mentioned strips are laid with 1-2 mm gaps (marked in the diagram), thanks to which the thermal expansion of the metal will be compensated during operation of the furnace. |
| 28 row | The furnace is being closed. At this stage, you need to leave a hole for installing the chimney pipe (marked in the image). A seat is made on the hole for installing a smoke damper, which is also visible in the diagram. |
| Continuation of row 28 | At the same stage, the smoke damper is installed. |
| Row 29 | The installation of the furnace ceiling continues. |
| 30 row | Similar to the previous one. |
| 31 row | The formation of the smoke exhaust pipe begins. |
| 32 row | The formation of the pipe continues. Next, the masonry is carried out in a similar sequence until the pipe reaches the design height (determined individually, in accordance with the characteristics of a particular room). |
The masonry is complete. The principle of operation of such a furnace is extremely simple: when fuel burns, hot gases heat the walls of the furnace and a water boiler installed inside the structure, pass through laid pipes and a stone backfill placed on top of them, and then go into the smoke exhaust pipe.
Do-it-yourself brick stove for a bathhouse
Beautiful brick sauna stove
A brick stove in a bathhouse is one of the most correct options
Bath stove
Sauna stove
Brick stoves in the bathhouse
Choosing clay for a brick sauna stove
Suitable clay is that which is mined in quarries, and at a minimum depth of 2 meters. A good check is also necessary. A small amount of clay is soaked in water and kept there for 24 hours. The volume of water for this test is 200 grams. After which the clay is rolled into a ball and dried. After 48 hours, another test follows: this lump is dropped from a height of 170 - 180 cm onto a hard surface, for example onto a stone slab. If the lump breaks up into large elements, the clay can be used for the intended masonry.
The selected clay should be prepared using this method: it is placed in water and kept there until it becomes like a paste. Then it is rubbed through a sieve with large cells, and later through a sieve with small cells.
What you will need for a sauna stove
This work will also require wire. Its required diameter: 2-3 mm. It will secure two doors: the furnace and the blower. Example in the photo:
Furnace casting is also installed using asbestos cord. It is used to tie around casting elements that are in direct contact with the brick. This method allows you to reduce the temperature of casting and eliminate the appearance of cracks in the masonry.
The fireclay base and the sauna stove body should be laid out separately. To develop the temperature in the fireclay masonry, basalt cardboard can be placed between it and the body. The necessary tools for this work:
- building level made of steel (60-90 cm),
- plumb line,
- special square 60 x 40 cm,
- hammer - pickaxe,
- small trowel for a mason,
- grinder with a disc for stone.
Classification of brick kilns
This classification, although simple and unpretentious, is understandable to many construction industry specialists.
All stoves that are built for Russian baths can be divided into 4 main types:
- built “in white”;
- "in black";
- "in gray";
- "with a stove."
The sauna stove, built of black brick, does not have a chimney.
This is the most popular type of Russian bathhouse stove in the village for many centuries. Among the advantages of such steam are its unique aroma and benefits for the respiratory system. The downside is the time it takes for wood or other fuel to burn completely.
The next stage of evolution in the construction of stoves was the “gray” option. A chimney appears in the design and the warm-up time is reduced. But soot still settles on the stone as a product of fuel burnout.
A stove built “in white” does not leave dirt, soot and smoke. It is quite practical and durable, but requires a long time to warm up (on average 10-12 hours). The stones in this design are heated by a metal plate that covers the stove.
A video on the topic will help you think through all the nuances before building a furnace:
Some craftsmen also offer their own version of the design of a stove for a bath: stones and a water tank are placed on 2 cast iron plates. Part of the stove is not closed, so the air warms up much faster.
Creating a foundation
A suitable look here is created from stone, concrete or rubble. Taking into account the load-bearing loads, the depth of its placement and parameters are calculated.
Its height is 90 cm. On each side it exceeds the width of the sauna stove by 20 cm. Suitable cement M500 and higher. Composition proportions: 1 share of cement, 3 shares of sifted sand, 5 shares of crushed stone (its fraction: 3-5 cm).
Example:
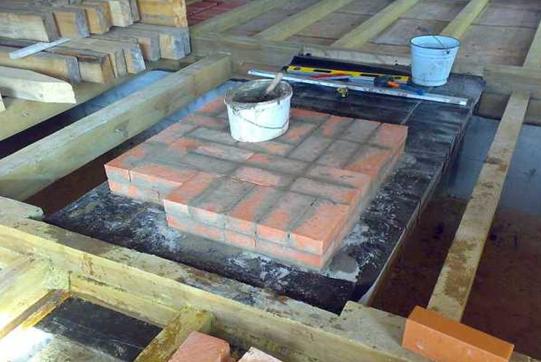
When the foundation is ready (in a day, preferably two), it is covered with two layers of waterproofing, for example roofing felt. Next comes the masonry. It usually starts with two initial brick lines. They are tied together. The seams are covered.
Design and principle of operation
The design of a mini sauna stove is not much different from large, productive models. Main structural elements: chimney for removing gases;
- combustion chamber in which fuel burns;
- grate;
- metal case;
- ash box;
- heater for fire-resistant minerals.
Additional elements on mini-stoves for baths are installed extremely rarely, since they take up additional space. The operating principle is the same as that of large furnace equipment. A man fills the combustion chamber with wood and makes a fire. He waits for the stones to warm up in the heater, pours water on them to generate steam, and carries out bathing procedures.
Do-it-yourself heater for a bath: the beginning of masonry
Laying must be carried out according to a specific plan. It matters what kind of heater you are planning: open or closed.
Next, we will consider the most popular options for open stove stoves.
- Do-it-yourself small stove stove. Size: 102 x 62. Steam room – 9 cubic meters. Availability of a tank for heating water. His position is separate. An open siphon is used to heat water. A pipe needs to be welded into the tank at a slight angle. Its ending is to solder. The pipe is positioned above the open fire in the combustion chamber. Water boils in it and enters the tank. It is replaced by unheated water. DIY projects:
The masonry is made only of red brick. The stones are on a cast iron or metal surface (slab). They are heated according to the degree of heating of this surface. - A similar option of modest size, diagrams:

Order: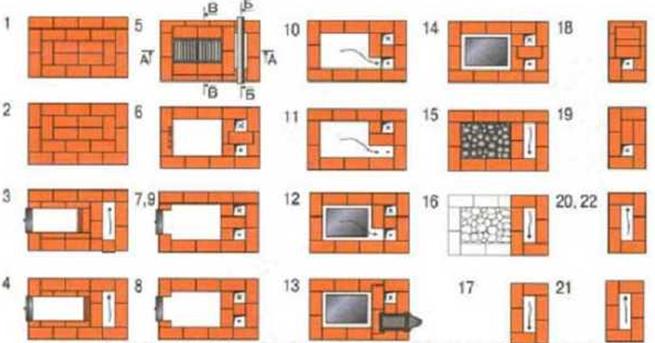
The modification with a closed heater is more difficult to construct. The compartment for stones is made of fireclay bricks. The order is: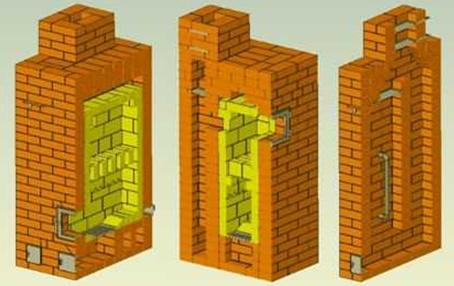
After laying, the sauna stove is dried for 10 days. Drafts are excluded. Only after this time is it possible to fire the stove. When laying a brick stove for a bathhouse with your own hands, it is important to consider the following aspects: - Each laid line of bricks is checked for horizontalness. Any deviation is immediately corrected.
- Typically, the fuel chamber in a furnace is large. It is necessary to warm up a lot of stones and wood for the fire. The air flow here must be appropriate. Therefore, you need to install grates with grates. It is directed from the door inwards. It's rare to find a factory version like this. And then two grates of smaller parameters are installed across the combustion compartment.
- Correct position of the heater: 55 cm above the firebox. This way the heating of the stones will be more intense. If the heater is positioned lower, heating will be slower. The heating of the stones is achieved due to the combustion of pyrolysis gases at the top of the combustion compartment. The low position of the firebox prevents the full implementation of this process. Thus, the heat in the room decreases, and there is a need for a large amount of firewood.
- If the stove is embedded in a wooden wall, the mandatory minimum distance to it is 25 cm. The wall is laid with non-combustible materials. Here you can also use brick. It fits between the wall and the stove. The wall is made of one brick.
The verticality of the row is also strictly checked. Even with modest inaccuracies, any brick oven will collapse or soon tilt.
After laying out the stove, you need to take care of its chimney. The chimney can follow through the floors and roof configuration. And there it is simply necessary to lay asbestos sheets in tandem with thermal insulation material. This is one way to get it out.
The second method is output to the wall. Example below:
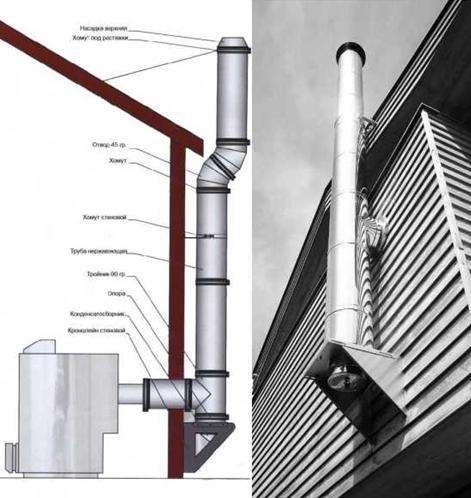
The implementation of the second method is simpler. You just need to secure the passage through the wall. In addition, this method is more reliable in terms of fire safety. Although it has its disadvantages:
- Not all stoves are placed right next to the wall that faces the street.
- In this situation, a significant amount of heat leaves the room.
No matter how the pipe is routed, there are no joints in the passage unit. Outside it they are permissible.
Now more about these pipe output options
External (through the wall).
To create sufficient traction, the horizontal zone should not be longer than one meter. The correct distance of the pipe from combustible walls and the extreme side of the roof is at least 50 cm. A protective screen is placed on wooden walls. Because they are close to a potential ignition source. You can place this source further from them, at a safe distance, then you will have to arrange fasteners to hold the structure at such a distance.
You also need to make a support for the chimney. It must be taken into account that its optimal height from the stove to its base (according to experts) is 5 m. Also, the chimney in baths changes its length under thermal influence. And it won’t be possible to install the fasteners tightly. It is necessary to leave some freedom for these metamorphoses.
Operations to create a safe passage through the wall:
A hole is created in the wall. The required distance from the outer edge of the pipe to flammable but already protected materials is 38 cm, and to materials without protection – 50 cm.
When working with a round pipe, a hole is created in the wall that is slightly larger than its diameter. The edges of the hole are finished with basalt wool, which can withstand exposure to 800-1000°C and above. Metal strips are placed on top of it. Scheme:
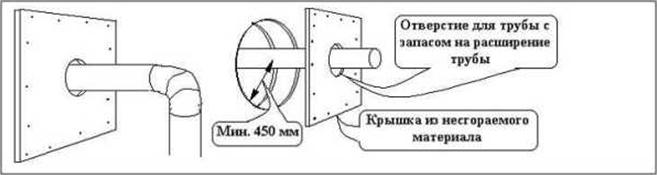
It is also important to install a metal cap on the wall. It can be arranged from the inside and/or outside. A square piece is cut out of a sheet of metal, larger than the size of the opening. A hole is cut in its center for the outer diameter of the pipe. This creates a stub. It is attached to the desired area. Example:
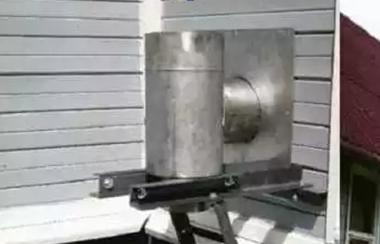
Creating a pass-through node:
- A section of the chimney is assembled. It follows from the stove to the area where it enters the wall. The assembly goes into a sandwich.
- The finished protective plug is put on. Contacts with wood are laid with thermal insulation.
- The pipe is centered.
- The structure is fixed.
- There is a space between the sandwich and the wooden wall; it is tightly closed with thermal insulation.
- A metal plate is attached to the top of this plug with self-tapping screws. Existing voids are filled in the same way.
Roof passage
With this method, it is best to install a square or rectangular pipe. Such products can be purchased ready-made, although your own version of the product is acceptable. Today, master flushes, metal aprons, and cartridges are very popular. They greatly facilitate the installation and waterproofing of the pipe.
Example of a pipe through a roof
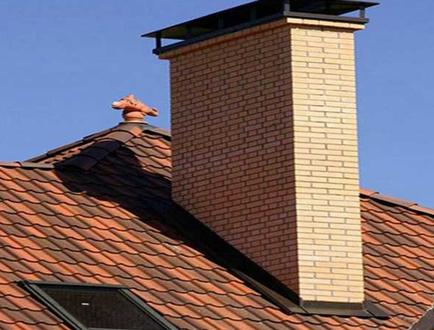
How to do:
- Creating a hole in the roof. The configuration and parameters of the hole are affected by the geometry of the pipe.
- Rafter legs and cross beams are used. A box in the format of an envelope is made 15 cm from the edge of the pipe along its circumference. This ensures better water protection.
- The edges of the “envelope” are folded down and attached to the beams and rafters. Fasteners: nails, staples, clamping strips. The fastening areas and the edges of the membranes are covered with sealant.
Here you should also not forget about the thermal effect on pipes. Therefore, it is necessary to fasten the pipe in such a way that its mobility to the roof is maintained.
DIY brick sauna stoves: assembly features
The quality of the stove directly depends on the material used. To install it, it is recommended not to skimp on bricks, but to choose high-quality fireproof material that will not crack after a year of use.
To make a stove, you will also need clay, which is easy to find in natural conditions, and can also be purchased along with bricks.
Step 1. Construction of the foundation
The brick oven is quite heavy, so it is necessary to make a foundation for it. It should be 5-10 cm larger than the size of the oven on each side.
For the foundation, it is necessary to prepare a pit more than 50 cm deep, fill it with sand (10 cm layer), pour water and fill it with crushed stone, broken bricks and stones. Next, pour concrete and fill it again with a mixture of stones and crushed stone.
We recommend reading:
DIY stainless steel tank
When building a foundation, you may also need to make formwork. At ground level you need to lay a layer of waterproofing, and then lay a brick foundation to the floor level.
Step 2. Assembling the oven
To install a sauna stove, you need to prepare a solution by mixing clay, sand and water. To decide how to assemble the stove, you need to prepare the order of the masonry. The first two rows are usually made solid - they serve as the basis of the structure, then assembly is carried out according to a pre-prepared scheme.
Below is the order of brick sauna stoves:
After laying each row, you need to check how evenly it is laid. Any deviation is unacceptable.
Step 3. Installation of the chimney
The size of the chimney must correspond to the size of the stove itself. When installing the stove, you need to ensure that it rises 0.5 m or more above the roof.
The pipe passage must be insulated with heat-insulating materials (for example, basalt wool).
Making a brick oven with your own hands is quite difficult. If you have experience in laying bricks and are confident in your abilities, then prepare the order of the sauna stove and feel free to get to work. But if you have doubts, it is better to contact an experienced stove maker (at least for advice). It is quite difficult to fix an already assembled stove; it often takes more effort than laying a stove from scratch.
Furnace laying
To lay out the outer walls of the oven, you can take a simple solid red brick. Silicate and hollow are not allowed. But for the lining and lining of the firebox, take the heat-resistant (fireclay) option.
The masonry should be installed in accordance with the order. To do this, “assemble the oven dry” (without mortar). Starting from some corner, select them so that the vertical gaps between the bricks are no more than 8-10 mm. Each laid out row is checked vertically and horizontally. Deviations are corrected immediately. All chipped parts of the brick: halves, three-quarters, quarters and smaller ones are prepared immediately.
After the dry laying is completed, determine the exact location on the ceiling where the chimney will be led. For what, use a plumb line. All that remains is to sign the bricks (row number/brick number) and that’s it – the ordering is done. The project is ready. You can draw a diagram and carefully disassemble it.
Cracks and gaps will become a source of carbon dioxide penetration. I think there is no need to explain the consequences. Here is an eloquent picture. Traces of soot indicate a lack of tightness in the dressing.
You cannot lay ordinary and heat-resistant bricks in the masonry. They have different expansion during heating. The result of such dressing is the appearance of cracks in the seams, through which carbon monoxide will flow into the room.
The zero row (laid on top of the waterproofing) is made in a continuous layer “in a whole brick”. It's called a brick foundation. It should be one level above the bath floor.
In this photo on the right, apparently they “safeguarded it” by making it in two bricks.
Lay the second row in such a way that each new brick is placed at the junction of the lower two. The same should be done in the following rows.
Wall masonry
Before applying the solution, the brick must be moistened (dipped into a bowl of water for a couple of seconds). “Clay glue” is then applied and the brick is firmly seated in place. One that does not lie quite exactly does not need to be trimmed by tapping. It is removed, protected from the solution, re-wetted and laid. Each subsequent layer is laid after the previous one is completely installed.
The excess mortar displaced by the brick is immediately removed, paying special attention to the inner surface of the smoke ducts. Having dried and peeled off under the influence of high temperatures, the remaining solution can clog the chimney channel and reduce draft.
Subsequently, from the outside, you can clean the surface from the remnants of the dried solution using a grinding machine. There will just be plenty of dust...
Installation of blower and furnace doors
The furnace cast iron is placed directly during the work process, and is fixed with soft knitting wire. For a tight fit, the oven doors are wrapped around the perimeter with asbestos rope. It (the rope) will “seal” the gaps between the cast iron and the brick, and will prevent the metal, which expands when heated, from gradually destroying the stove.
In the first bottom row there are small blower doors. Its fastening elements are sealed precisely in this row. After installing the lower fasteners, the upper rows are laid sequentially until the upper part of the door overlaps. A gap of approximately 10 mm is left between the brick and the casting. Fastening the firebox door is similar to the blower.
Installation of grate bars
They are placed strictly in a horizontal plane. However, they should not rest against the brick. Otherwise, over time, due to the thermal expansion of cast iron, this will cause gradual destruction of the brickwork.
Chimney
If a finished chimney (pipe sandwich) is not used, then its layout must be done in accordance with the brick order. Equipping the chimney with a damper will allow you to finely regulate the stove draft, achieving optimal heating. In those chimneys where horizontal sections are provided, it is strongly recommended to limit their length to within 1 meter. Otherwise, stagnant soot will be a source of poor traction.
Stoves with a water tank require the tank to be supported on walls or special columnar supports inside the firebox.
Finally: today, of course, you can find designs for stoves for a Russian bath, but the origin of these drawings is often unknown and whether something was built according to them, we also usually don’t know. Therefore, it is very useful to see a live embodiment before taking drawings and diagrams downloaded from the Internet as a basis.
An anecdote on the topic: Advertisement about services: I put stoves, fireplaces, stoves on fireplaces, fireplaces on fireplaces, I just put them on fireplaces or in fireplaces...
Good luck with your baking! See you!
Wisdom Quote: If you want to rise, help someone else rise (Booker Washington is not the president).
postroibanu.ru