One of the mandatory elements of a bath or heating system is a stove, which can serve not only as a source of heat in the house, but also to heat water for domestic needs. In this article we will tell you why you need a heat exchanger for a chimney pipe, what types of such a design there are, and also how it can be installed.
Mechanism of operation
A metal stove placed in a house, garage or bathhouse must be equipped with a chimney to remove carbon monoxide and organize draft. During the process of heating the furnace, this pipe can reach very high temperatures, about 200-500 ℃, which is unsafe for people in the room.
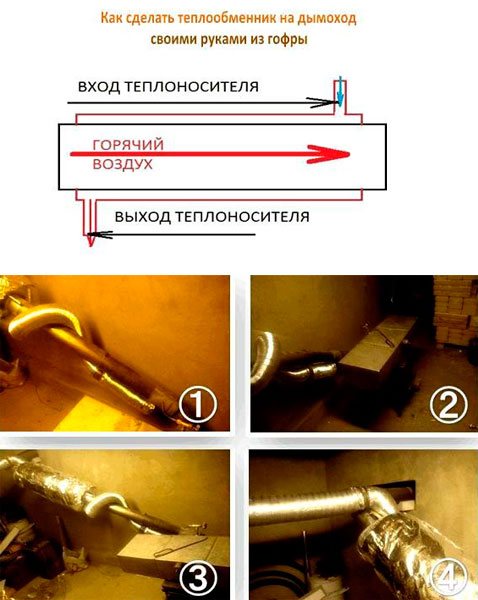
If you install a heat exchanger on the chimney, you can significantly increase the efficiency of the stove, and also protect yourself from direct contact with a hot surface. In a tank or coil installed on the chimney, the coolant will be water, however, you can also install an air heat exchanger on the chimney pipe. Due to the direct contact of the chimney with the coolant, their temperature indicators are balanced, that is, the water or air gradually heats up, and the walls of the pipe cool down.
As the temperature of the water inside the register rises onto the pipe, it rises upward, where it enters the water tank through a special fitting. Through the inlet fitting located at the bottom of the heat exchanger, cold water enters it, replacing warm water. This circulation continues constantly, and the water can heat up to very high values.
An air radiator on a chimney pipe has a similar operating principle. Cold air enters the heat exchanger from below, and after heating it rises up and is supplied through the pipeline to the heated rooms. In addition, the radiator fins also give off heat. An air heat exchanger is optimal for heating attics in a country house or dressing rooms of a bathhouse, if such rooms are heated only from time to time. It is not advisable to organize water heating in them, since you will have to constantly fill and drain water from the system.
Instructions for making a tank
Often in stores you can buy a heat exchanger for a heating pipe with an already made water circuit. All that remains is to mount it on the new factory stove and you can use it. However, if you wish, you can make a heat exchanger for the chimney pipe with your own hands.
The following materials will be required:
- sheets of steel and pieces of stainless steel pipes of different sections with walls 1.5-2 mm thick;
- 1″ or 3/4″ fittings to connect the water circuit to the heating system;
- large water tank made of galvanized or stainless steel with a volume of 50-100 liters;
- flexible hoses or pipes made of copper or steel for hot water;
- tap for draining water from the system.
Work on assembling a heat exchanger with a tank consists of the following steps:
- Drawing development. Based on the type of stove and the diameter of the chimney, the dimensions of the tank are determined. In simple metal stoves with a direct chimney at the outlet, the gases are very hot, so the heat exchanger can be quite large - about 50 cm high.
- The inner diameter of the walls of the storage tank must be selected so that it fits tightly onto the chimney pipe. The outer diameter of the tank should be 1.5-2.5 times larger than the internal cross-section. Such parameters allow you to quickly heat the coolant and ensure its free circulation. If the gases coming out of the furnace are not very hot, then it is better to install a heat exchanger on the chimney pipe for heating of smaller sizes, so that condensation does not accumulate and there is good draft.
- You need to use a welding machine to fasten all the structural elements together, making sure that the seams are airtight. Fittings for water circulation are welded at the top and bottom of the tank.
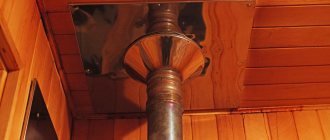
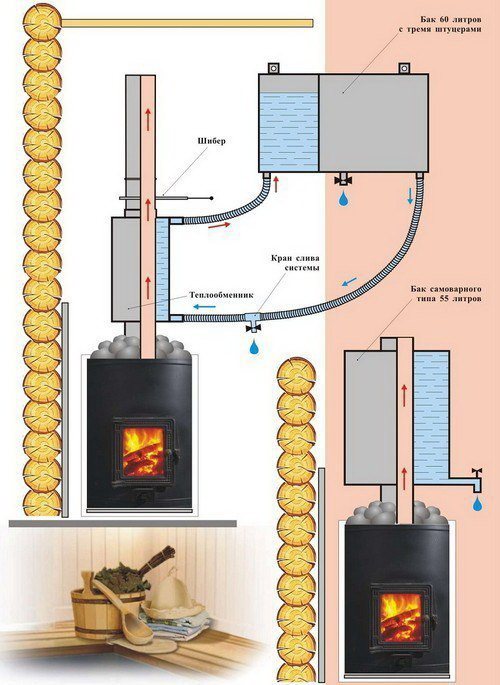
- The water boiler is seated very tightly on the smoke fitting, additionally treating the seams with heat-resistant sealant. In the upper part of the tank, an adapter is attached in the same way to an insulated pipe, which is led outside through the ceiling or wall.
- The heating circuit with coolant is connected to the storage tank. The incoming pipe with cold water is led through a fitting to the tank with an inclination of 1-2 degrees. The hot water pipe, connected to the tank through the upper fitting, has an inclination of 30 degrees. In this case, the storage device itself is mounted above the heat exchanger.
- A tap is installed at the lowest point of the tank to drain the water. In the steam room it can be combined with a tap for drawing hot water.
- Before heating the stove, water is poured into the system so that the metal elements do not overheat and the seams do not burst.
- Filling the heat exchanger with water can be either manual or automatic. If you fill the water manually, you need to install a transparent tube on the outer wall to monitor the water level.
It is worth noting that the distance from the circuit to the tank should not be more than 3 meters, and it is better to take the pipe diameter no narrower than 3/4″.
Order processing in the shortest possible time
For each facility, an individual technical solution is developed that can satisfy all client requests and ensure maximum energy efficiency of the cooling system.
Professional design of cooling, heating, and air conditioning systems is the key to uninterrupted operation of the main equipment and guarantees strict compliance with established technological conditions, microclimate standards and safety requirements.
Heat exchanger in the form of a coil
If the installation of the previous type of heating from a chimney pipe requires the ability to operate a welding machine, then the design of a heat exchanger in the form of a coil is much simpler. You just need to wrap a few rings of flexible aluminum or copper pipe around the chimney. These metals have a high level of thermal conductivity and are not destroyed due to corrosion.
The diameter of the tube should be convenient for connecting to the fitting of the storage tank. It is optimal to choose a pipe with a cross-section of no more than 28 mm for bending. The length of such a circuit should not exceed 3 meters in order for the water circulation to be correct. Using a flexible connection, you can connect the tank to the coil.
As a rule, coils are used to heat water, although sometimes for heating small rooms. Coils mounted on the chimneys of a metal furnace with a very high temperature of carbon monoxide perform best.
Heat exchanger for a chimney pipe: types, installation, reviews
Before you make a heat exchanger for a chimney with your own hands, you need to select the appropriate material. The best option is food grade stainless steel. It is good because at high temperatures the metal will not lose its physical parameters.
The product can be bent into any shape, and both ends can be completed with external threads for subsequent connection using remote tank fittings.
You can improve heat transfer, and at the same time increase the safety of the device, by placing it in a casing made of durable metal. You should also use non-flammable insulation, for example, basalt wool, for laying between the coil and its casing. Next, we proceed to install the fully assembled heat exchanger on the chimney.
In this case, it is important to provide a distance to the stove to allow the device to heat up from hot air, and not due to open fire. Both ends of the coil are connected to an expansion tank, which is located in the uppermost zone of the heating system. The principle of the movement of water, heated in the coil and entering the heating system, where it pushes the cold liquid to the heat exchanger for heating, is based on the natural circulation method. However, for this process to function properly, it is important to carefully make calculations regarding the length and diameter of the coil-shaped heat exchanger.
It is also necessary to take into account the fact that the coolant usually expands when it is heated to a certain temperature. The pipe should be bent so that the angles of inclination of liquid supply and its return filling are observed. Despite the ease of manufacturing such a useful device as a water heat exchanger for a pipe in the form of a coil, it has the following disadvantages:
Content
This design is perfect for both a stove and a heating boiler. Alexey, the whole point of this design, which I would like to do, is to reduce the release of heat into the chimney, literally and figuratively, and also to warm up distant rooms as evenly as possible.
In fact, I am completely satisfied with the stove; I heat the first floor for approx. Ayrat Tall ant with a red tulip. Ayrat, I was thinking about a boiler, but it doesn’t look as aesthetically pleasing as a stove with glass, especially since I haven’t seen boilers of such low power.
Perela I live here.
Negative points
Along with the benefits of a heat exchanger on a chimney, it is worth noting a number of negative factors. Firstly, due to this design, the temperature of the exhaust gases is significantly reduced. This can provoke excessive soot accumulation, condensation formation and poor traction.
An important point in arranging such a heating system is to calculate how much water is needed for its full functioning. If there is not enough of it, the system may overheat, the water in it will boil, and the pipes may burst. In addition, it is important to ensure the tightness of the seams.
In any case, installing a heat exchanger allows you to increase the efficiency of any furnace. For safety reasons, at least twice a year, visual diagnostics of the system and its maintenance should be carried out - cleaning soot, replacing defective elements, and so on. Then it will be possible to confidently use the heat exchanger for heating the house and heating water in the bathhouse.
Like them, other craftsmen choose not a wall or a stove, but a chimney as the location for installing the heat exchanger. Thus, without reducing the technical parameters of the heating device, the heat transfer of a fairly simple and compact unit increases three times. At the same time, it is important to ensure that the chimney can be cleaned and has good draft.
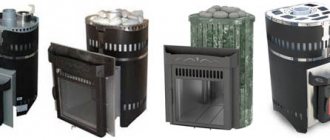
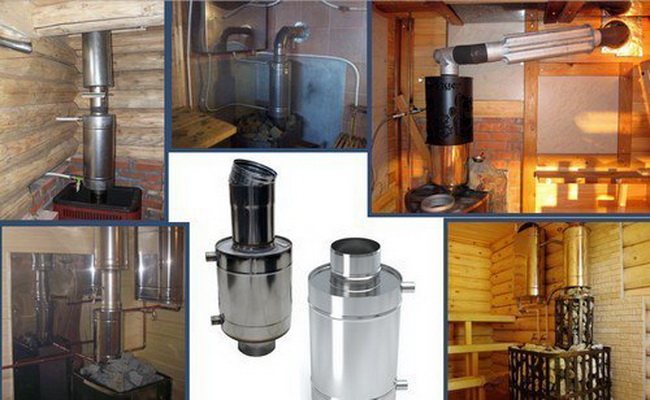
Varieties
Today, there are many design options for heat exchangers for chimney pipes. However, the following models are considered the most popular:
- air unit;
- device in the form of a coil;
- an apparatus equipped with a water container;
- corrugated heat exchanger.
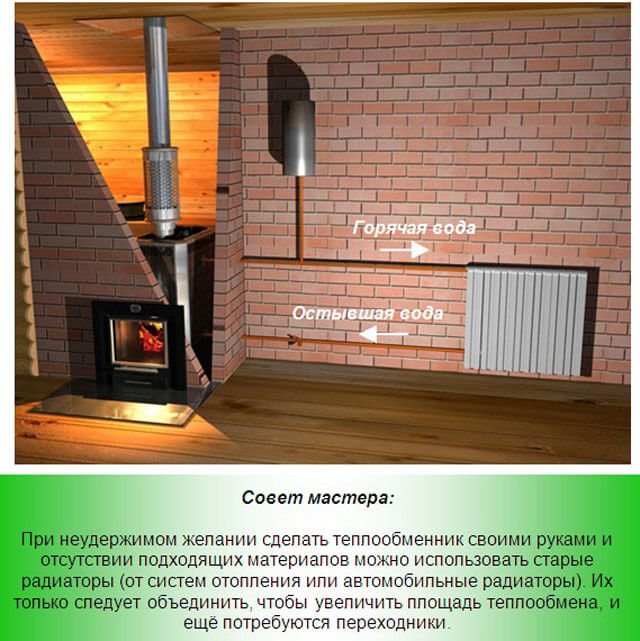
Each craftsman from the people, trying to create a useful device for his needs, introduced some personal ideas that contributed to its improvement. To implement the plan, the following components were used:
- radiators from car cooling systems;
- various coils;
- metal tanks;
- collectors;
- heating registers;
- radiator for home heating system.
We invite you to familiarize yourself with popular models of similar devices suitable for self-production.
Air heat exchanger
This device, which transfers heat from the smoke channel to the surrounding space, is made in the form of a metal structure with inlet and outlet pipes built into it.
The operating principle of this type of heat exchanger is similar to the operation of a simple convector. Through the input sections of the rolled metal product connected to the structure, air masses enter the apparatus and are discharged through holes in its upper part, filling the space of the heated room with heat. In this regard, the efficiency of the furnace is significantly increased, and fuel consumption is halved.
If you have certain skills, as well as an angle grinder and a welding machine, you can make an air heat exchanger for a chimney with your own hands.
A set of materials required to create the device:
- part of a metal sheet 1 mm thick with equal sides measuring 350 mm;
- a piece of pipe up to 2.5 m long and 1 ¼ inches (3.17 cm) in cross-section;
- a piece of rolled metal product with a cross-section of 2 inches (5.08 cm) and a length of 30 cm;
- tank with a capacity of 20 l.
So, to build an air heat exchanger with your own hands, follow the step-by-step instructions:
- On a metal sheet you need to draw and cut out two circles, the diameter of which should be equal to the similar size of the end parts of the prepared tank.
- A hole should be made in the center of each workpiece corresponding to a pipe diameter of 2 inches (5.08 cm).
- Around the central opening on both parts, you need to mark points evenly, in place of which you need to make holes for sections of pipe with a cross-section of 1 ¼ inches (3.17 cm).
- Part of the rolled metal structure with the specified parameters should be divided using a grinder. You should get 8 tubes equal in length (30 cm each).
- Welding work is carried out: a piece of pipe with a cross-section of 2 inches (5.08 cm) and a length of 30 cm is attached to the central hole, and 8 equal sections of the same length and a cross-section of 1 ¼ inches (3.17 cm) are attached to the side holes.
After manufacturing the heat exchanger core, you need to start constructing its body, using a metal tank for this:
- Using a grinder, cut off the bottom.
- A hole is cut in the center of the side elements of the container, the diameter of which corresponds to the cross-section of the smoke channel.
- Using the welding method, suitable sized pipes are connected to the openings made.
- The body created in this way is put on and welded onto a previously made core.
- The finished product must be coated with heat-resistant paint.
- After complete drying, the resulting device is installed on the chimney.
Principle of operation
The chimney of a metal stove installed in a bathhouse, house or garage becomes very hot when fired. Depending on the design of the stove, its temperature can be from 200 to 500 degrees, which makes it dangerous in terms of fire safety, and accidental touching it can cause a severe burn.
The heat from the chimney can be used for good by placing a heat exchanger on it: tank or coil . The coolant in this case is usually water, and in some cases air. When the coolant comes into contact with the heated walls of the chimney, their temperature is equalized: the chimney is cooled, and the water or air in the heat exchanger, on the contrary, is heated.
When heated, warm water rises to the upper part of the heat exchanger, and from there through the outlet fitting and pipe into the system or storage water tank. Instead of heated water, cold water flows through the inlet fitting. As it heats up, circulation continues, as a result of which the water in the storage tank can heat up to a high temperature.
Air heat exchangers operate on a similar principle: cold air is taken from below, and after heating it is supplied through a pipeline to the heated rooms. This way you can heat an attic in a country house or a relaxation room in a bathhouse, which are heated periodically. It is impossible to install water heating in them, since you will have to regularly drain and fill the system with coolant.
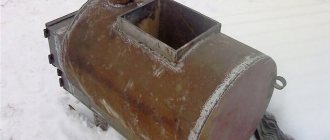
Tank with water circuit connection
The heat exchanger in the form of a tank located around the chimney is made of stainless steel or galvanized sheet . In this case, the design of the furnace should be taken into account. If it has a combustion mode for flue gases, and the smoke temperature at the furnace outlet does not exceed 200 degrees, you can use any material to make the heat exchanger.
In simple stoves without smoke circulation, the smoke temperature at the outlet can reach 500 degrees Celsius. In this case, it is necessary to use stainless steel, since the zinc coating releases harmful substances when heated strongly.
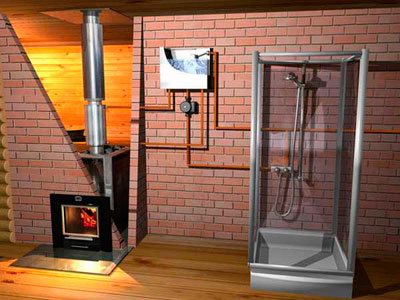
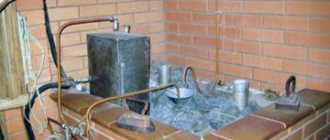
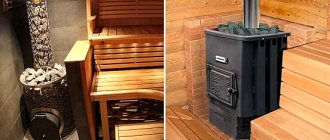
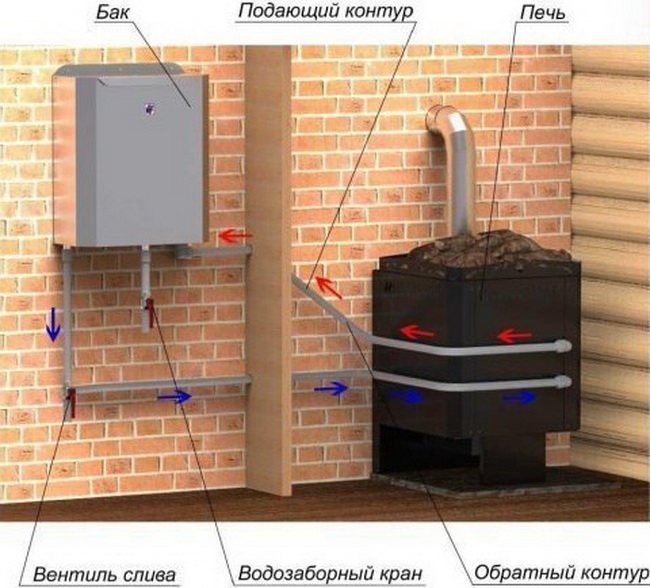
Most often, heat exchangers of this type are installed on a sauna stove and used as a water heater for domestic hot water. The tank is equipped with fittings in its upper and lower parts, and pipes leading into the system are connected to them. The hot water tank is installed in the shower or steam room. It is possible to use such a system for heating a utility room or garage.
Making a tank: step-by-step instructions and video
Heat exchangers for industrial furnaces are sold complete with some modifications; when installing a new furnace, you can choose a suitable model with a ready-made water circuit. You can also make a heat exchanger for the chimney with your own hands. To make it you need the following materials:
- pieces of stainless steel pipe of different diameters with a wall thickness of 1.5-2 mm, sheet steel;
- 2 1-inch or ¾-inch fittings for connecting to the system;
- storage tank made of stainless steel or galvanized steel with a volume of 50 to 100 liters;
- copper or steel pipes or flexible connections for hot water supply;
- ball valve for draining coolant.
Manufacturing sequence for a sauna stove or potbelly stove:
- Work begins with preparing a drawing. The dimensions of the tank installed on the chimney depend on the diameter of the pipe and the type of stove. Furnaces of a simple design with a direct chimney are characterized by a high temperature of the flue gases at the outlet, so the dimensions of the heat exchanger can be quite large: up to 0.5 m in height.
- The diameter of the inner walls of the tank must ensure a tight fit of the heat exchanger on the smoke pipe. The diameter of the external walls of the tank can exceed the diameter of the internal ones by 1.5-2.5 times. These sizes will ensure quick heating and good coolant circulation. It is better to equip furnaces with low flue gas temperatures with a small tank to speed up its heating and avoid the formation of condensation and deterioration of draft.
- Using a welding inverter, the parts of the workpiece are connected, ensuring the tightness of the seams. Fittings for supplying and withdrawing water are welded into the lower and upper parts of the tank.
- The tank is installed tightly onto the smoke fitting of the furnace, coating the connecting seam with heat-resistant silicate sealant. An adapter from a non-insulated pipe to an insulated one is placed on top of the heat exchanger tank in the same way and the chimney is removed from the room through the ceiling or wall.
- Connect the heat exchanger to the system and storage tank. At the same time, the required degree of inclination is maintained: the cold water supply pipe connected to the lower fitting must have an angle of at least 1-2 degrees relative to the horizontal plane, the heated water supply pipe is connected to the upper fitting and, with a slope of at least 30 degrees, is led to the storage tank. The storage tank must be located above the heat exchanger level.
- A drain valve is installed at the lowest point of the system. In the bathhouse it can be combined with a tap for drawing warm water for the steam room.
- Before starting operation, the system must be filled with water, otherwise the metal will overheat and leak, which can lead to poor sealing of welds and leaks.
- The water supply to the storage tank can be done either manually or automatically using a float valve. When filling manually, it is recommended to place a transparent tube on its outer wall to monitor the water level in the tank, so as not to run the system dry.
DIY chimney heat exchanger
This is a great way to organize heating in those rooms of the house where stoves are not installed. You can make such a device yourself. Corrugated nozzles are the simplest heat exchanger design. The efficiency of stove heating is not too high anyway. Why allow the heat of the gases removed by the chimney to simply escape into the atmosphere without doing additional necessary work? This is why heat exchange devices were invented.
The stainless steel heat exchanger is manufactured in a factory, but you can make it yourself by welding.
Heat exchanger functions in stove heating systems
The principle of the heat exchanger is to remove heat from combustion products leaving through the chimney and return it to the heated space through various designs of steel plates (or pipes).
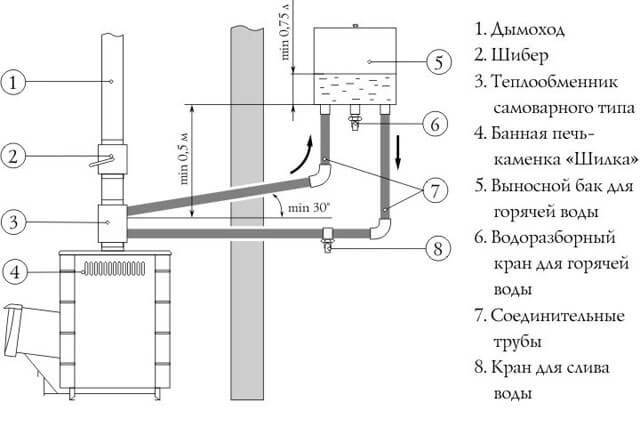
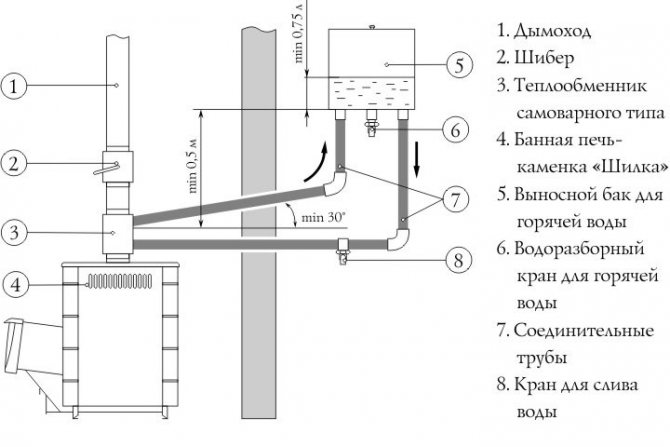
The heat exchanger also has more dramatic capabilities - for example, reducing the amount of air required for stable operation of the furnace. In this case, it is called a recuperator and is used to increase the efficiency of solid fuel boilers. Design and principle of operation of a heat exchanger for a bath: a tank with three fittings and a samovar-type tank. Since combustion products exit through the chimney, it is most advisable to install the heat exchanger there. In the simplest case, it is necessary to manufacture and install a coil of steel pipes, the components of which must be tightly adjacent to the inner surface of the chimney.
The smaller the coil pitch and the larger the pipeline diameter, the more efficient the heat exchanger will be. Based on the type of coolant used in the secondary circuit, air and water heat exchangers are distinguished. Since the heat transfer coefficient for water is significantly higher than for air, the efficiency of water heat exchangers is greater. However, when installing such a device on a chimney, you will have to be satisfied with the second option, since the heat exchanger will have to be mounted outside, and the use of water as a coolant in this case is associated with significant difficulties.
Especially if the heat exchanger will be installed independently. Option for external installation of a heat exchanger based on water as a coolant. Design options and principle of operation of heat exchange devices. The choice will depend on whether the furnace is designed with the possibility of subsequent installation of a heat exchanger or all work will have to start from scratch. In the first case, it is advisable to use a water heat exchanger installed next to a conventional heating furnace.
Such a heat exchanger will include:
- The actual body of the device.
- Storage tank.
- Upper and lower outlets from the furnace working space.
Heat exchanger and system drain valves
The principle of operation of the heat exchanger that provides hot water supply and is connected to the stove. The heat exchanger for an air-type chimney will have a completely different structure: A housing equipped with
inlet and outlet pipes. A rotary damper system that will regulate the speed and pressure of exhaust combustion products. Elements for fastening the housing in the chimney. We advise you to read the article about the convector on the chimney and find answers to your questions. The presence of rotary dampers, although it will require more careful control of the heat exchanger during its operation, will in return increase the efficiency of heat transfer by flue gases due to a targeted change in the paths of their movement along the chimney.
Selection of materials for the heat exchanger
Since the flue gases passing through the chimney have a temperature of up to 300-350°C, the use of ordinary steel for the manufacture of the body is not suitable. Heat exchangers made of stainless steel are durable (the most popular brand is 08Х18Н10 or AISI 304). If financial capabilities do not allow you to make such a choice, you can get by with galvanized steel. A stainless steel heat exchanger for hot water is connected to a tank placed on the wall. However, at temperatures above 200-250°C, the durability of the housing will begin to decrease. Moreover, with a further increase in temperature, the zinc coating begins to evaporate rapidly and in some cases can be sucked into residential premises, which is very dangerous to health.
At the same time, the second option will be very appropriate if the stove is installed in a country house and is not intended for long-term use. Methods for installing a heat exchanger in a chimney The easiest way is to mount the housing to the existing dimensions of the chimney when the stove is not working. A housing is mounted inside the smoke channel, so that the reduction in the passage opening does not exceed 40%. Of course, in this case the thrust increases and heat exchange occurs more intensively, but it will also be much more difficult to control such a process. You can also attach the heat exchanger to the stove, and then cover it with fire-resistant bricks.
Since there are no special loads on the apparatus, bricklaying is usually done “on edge”. The efficiency of the heat exchanger will depend on the walls of the housing - as their thickness increases, the device heats up more slowly, but then operates more stably. In this case, losses due to condensation formation are also reduced. The heat exchanger installation diagram shows the features of installing pipes and filling the tank with water. Stages of installing a heat exchanger with your own hands. Inside the chimney, a coil of thin-walled copper pipes is laid (a less successful option is stainless steel pipes), through which air will subsequently be pumped.
The pitch of the pipes is such that the distance between the axes of adjacent turns is at least four to five pipe diameters. At higher values, unnecessary heat losses occur, and at lower values, the consumption of copper pipes increases and a shielding effect appears, which results in overheating of the pipelines. The coil is welded using argon welding. Soldering is not suitable due to elevated (against those usually recommended for brazed structures) operating temperatures of pipes.
Corrugated nozzles are the simplest design of a heat exchanger. Even more structurally simple (although less attractive), a heat exchanger for heating purposes can be constructed from corrugated steel pipes. They simply wrap around the outer surface of the chimney, and to subsequently redirect the hot air to other rooms of the house, you can use the existing internal ventilation system.
Heat removal will increase if the corrugated nozzles are covered on top with heat-insulating foil material. A heat exchanger made of a corrugated pipe is applied as close as possible to the chimney and is insulated with foil to remove and retain the maximum amount of heat. The presence of a heat exchanger is always beneficial because it allows the use of stoves or boilers of relatively low power for heating individual houses, and, therefore, with lower fuel consumption. In addition, the service life of the chimney will be extended, and it will cool more efficiently.
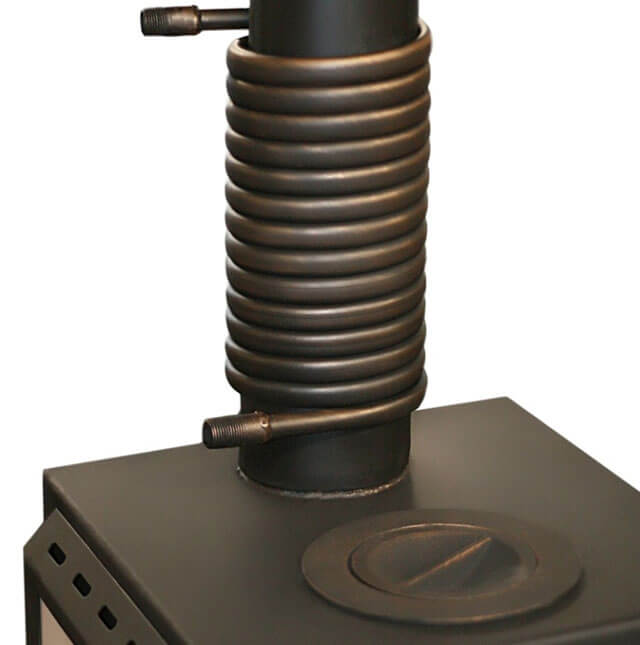
Simple design: coil
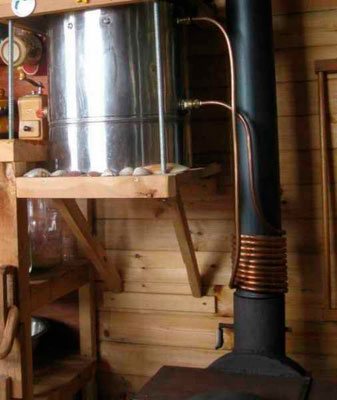
Installing a heat exchanger tank on a chimney involves welding work, which not everyone can do. A simpler design is a coil wrapped in a spiral around the chimney. The coil can be made from a copper or aluminum tube - these metals are easy to bend, have high thermal conductivity and are not subject to corrosion.
The diameter of the tube is chosen so that it is convenient to connect it to the fittings of the water storage tank. For bending, pipes with a diameter of no more than 28 mm are more convenient. In any case, the length should not exceed 3 meters - this is a prerequisite for natural coolant circulation . To connect the heating coil to the tank, use a flexible hot water line.
This heat exchanger design can be used to produce hot water, or less often for heating small rooms. Maximum heating efficiency is achieved if the coil is installed on the chimney of a simple stove such as a potbelly stove with a high temperature of the flue gases.
DIY chimney coil
A pipe heat exchanger is usually installed on the chimney of a metal stove installed in a garage or workshop to produce warm water or heating. It is also possible to install a coil on a sauna stove.
Necessary materials:
- pipe made of copper, aluminum or steel - about 3 meters;
- flexible hose for hot water supply with a diameter of ¾ inches - 2 pieces of the required length;
- a storage tank equipped with a float valve for water supply and a drain valve for its consumption;
- ball valve for draining the system.
Sequence of work:
- The most difficult thing when making such a heat exchanger is to bend the pipe into a spiral without reducing its cross-section. Copper pipes with a diameter less than 28 mm can be bent using a pipe bender without heating. Steel and aluminum, as well as larger diameter pipes, must be heated with a blowtorch before forming.
- You can also use this method: fill the pipe with dry sand and tightly plug its ends with wooden plugs. The pipe is bent according to the template - a pipe having the diameter of the chimney, after which the plugs are removed and sand is poured out, the pipe is washed under high pressure of water.
- Threads are cut at the ends of the pipe and adapters are installed for connection to the system.
- The pipe is installed on the chimney. To improve heat transfer, you can solder the coil onto the chimney with tin, having previously degreased the soldering areas and removed oxides with phosphoric acid.
- The tank is hung on the wall or placed on a support above the level of the coil. Connect the heater to the tank using flexible hoses. A drain valve is installed at the lowest point of the system.
When using a coil heat exchanger in closed heating systems, it is necessary to install a circulation pump! The coolant may boil, and if circulation is poor, water hammer can occur, destroying the system elements!
Video: receiving hot water from a coil heat exchanger installed on the chimney
Manufacturing according to customer drawings, specialist visit
From us you can order air-cooled heat exchangers of standard sizes and according to an individual project. Manufacturing of non-standard equipment includes:
- Design and thermal engineering calculation of a heat exchanger. Our specialists come to you for measurements, study the conditions for the upcoming installation and operation of the equipment, and calculate the necessary technical characteristics of the unit using modern software.
- Manufacturing of heat exchange equipment according to customer drawings or our project: horizontal, vertical, V-shaped (tent), modular heat exchangers.
- Manufacturing of heat exchange sections (batteries, modules) for repair, replacement and modernization of equipment. We offer a wide range of finned pipes: copper-aluminum, steel, etc.
- The equipment is accompanied by a package of official documents and drawings, a product passport and a manufacturer’s certificate.
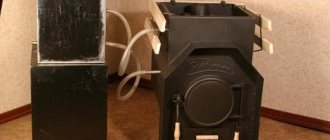
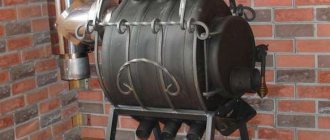
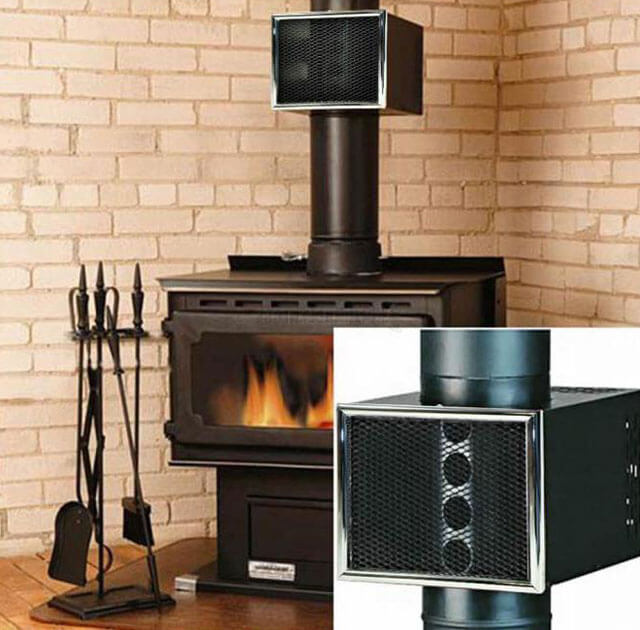
Air tank
You can improve an ordinary potbelly stove or sauna stove with a direct chimney by installing it on an air heat exchanger on the chimney . It is a cylindrical body through which several hollow pipes pass. Air is sucked in from below, heated in the pipe, it leaves the heat exchanger, increasing the efficiency of the furnace by 15-20%. The air ducts can be routed to an adjacent room, thus heating several rooms or sections of the garage from one furnace.
Video: how to make an air heat exchanger for a chimney
Another original design of a stove with an air heat exchanger on a chimney for heating a garage is shown in the video. With the help of such a stove you can heat not only a garage, but also any utility room, including agricultural buildings and greenhouses.
From corrugated pipe
A cheap and simple way to install an air heat exchanger is to use corrugated ventilation pipes for this purpose . They are wrapped around the uninsulated part of the chimney, as a result the air in the corrugation warms up and, due to thermal convection, enters the neighboring rooms. To make the corrugated pipe heat up more efficiently, you can wrap it together with the chimney in several layers of foil.
A system with a corrugated pipe is convenient for heating a garage in which a simple potbelly stove made of rough metal is installed. Such a stove quickly heats the air, but it rises to the ceiling, which is why the temperature at floor level remains low. If you move the air ducts closer to the floor, you can create natural circulation of heated air, and the temperature throughout the garage will become approximately the same.
Bell-type heat exchanger
Heat exchangers in the form of a bell are usually used for heating the attic or second floor . The principle of its operation is that the air heated from the chimney rises to the ceiling, where it is retained by the hood and, gradually cooling, falls down into the room.
The cap can be made of either galvanized metal or fire-resistant plasterboard and lead the air ducts to the desired location. Sometimes the cap is decorated with stones, which, when heated, serve as an additional heat accumulator.
Flaws
Despite many advantages, the installation of a heating element on a chimney pipe also has disadvantages . One of them, the most important, is a sharp decrease in the smoke temperature at the installation site of the heat exchanger. This can lead to deterioration of traction and the formation of condensation, increased soot deposition inside the pipe.
In addition, when connecting a heating system, for example, a garage, you need to calculate the volume of coolant to avoid boiling water and bursting pipes . Welds must be completely sealed.
Any heat exchanger design significantly increases the efficiency of the furnace . For trouble-free operation of the system, it is necessary to carry out a visual inspection of all its elements at least twice a year , and, if necessary, timely repairs, descaling, replacement of gaskets and other necessary maintenance work. In this case, water heating and heating systems will operate flawlessly for a long time.
Features and materials
For commercial, household and industrial purposes, devices of various types and performance are used - the specific engineering solution depends on a lot of factors:
- System task (climate control, heat removal from process equipment, freezing/storing products, technological processing of raw materials or supplies, etc.);
- System performance (calculated based on the assigned tasks);
- Type of system (possibility of using cooling systems of one type or another);
- Temperature values (minimum temperature value, maximum error);
- Coolant (air, freon-type refrigerants, glycol solutions, water, oil, etc.);
- Heat exchanger material (copper, aluminum, steel, protective coatings, etc.);
- Installation location, noise level.