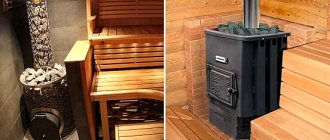
The heart of any sauna, of course, is the stove. The functioning of the entire structure depends on its type and correct installation. An incorrectly installed stove will not only prevent you from steaming effectively, but in the case of a brick stove, it can cause harm to your health.
Kamenka in a Russian bath
>
By and large, all sauna stoves can be divided into two main types: brick and metal. All other heaters: electric, wood-burning, gas, etc. are just subtypes of these two main ones.
The type of furnace should be decided at the stage of laying the foundation. If you are planning a brick oven, then a separate foundation is required for it. A foundation is not needed for a metal heater, but if you later cover it with brick, you may need to reinforce the floor, which means the foundation.
Furnace location
Metal sauna stoves are either electric or solid fuel. And the installation of wood-burning units has the greatest number of difficulties, which will be discussed further.
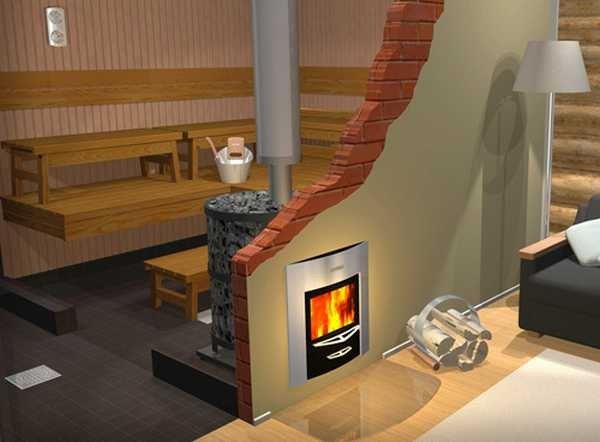
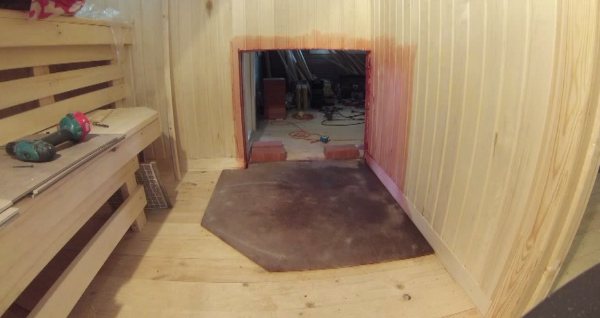
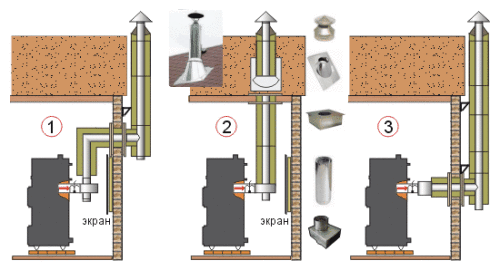
A wood-burning sauna stove is traditionally located in the steam room, but the door of the firebox can go into the adjacent room, onto the street, or the wood is loaded from the steam room.
Installing a stove in a bathhouse
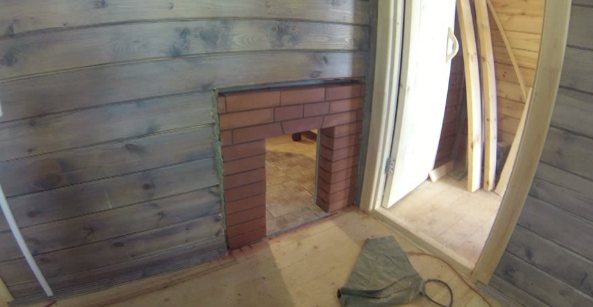
In the first case, when the firebox is brought into the dressing room or washing room, oxygen is not burned in the steam room, and one unit heats two rooms at once. Moreover, this option implies the provision of fire protection not only for the wooden floor, but also for the wall of the bathhouse. In addition, there is difficulty in installing the stove - if the installation hole was not provided during construction, it becomes necessary to break / saw out part of the interior partition.
The firebox opens into the next room
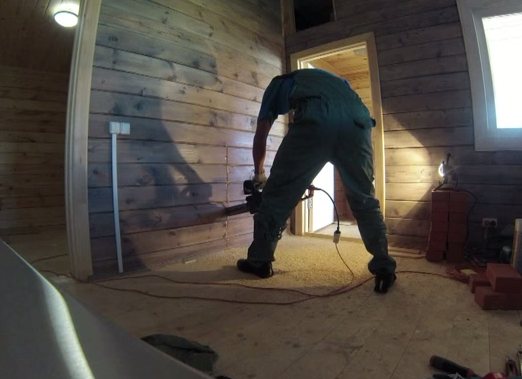
Cutting out part of the wall
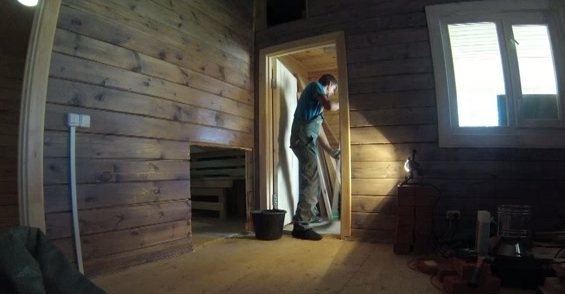
Opening for installing the stove
The second option, when the firebox goes outside, is associated with similar installation problems. Additionally, the disadvantages include increased heat loss and the inconvenience of regulating the intensity of fuel combustion and adding firewood (you will have to leave the bathhouse outside).
The firebox goes outside
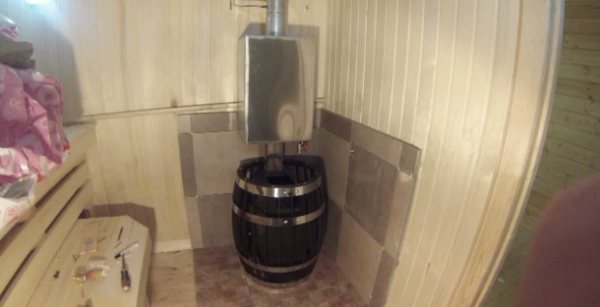
The third option is one of the most common. The stove is installed on an existing wooden floor with the obligatory arrangement of a fireproof base under the stove and protection of the wall located behind the stove. The problem of oxygen burning is solved by installing effective ventilation. Often the air supply is installed from the underground room (irrelevant for a monolithic foundation - slab). A stove installed in this way is easy to monitor during the steaming procedure, but there is not always a place in the steam room to store firewood and protect it from getting wet.
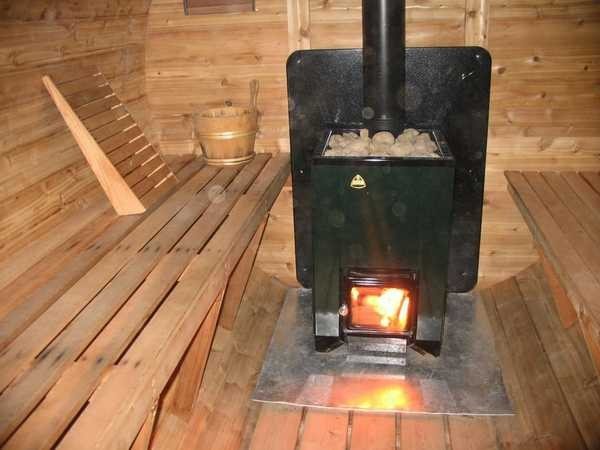
Sauna stove with firebox opening into the steam room
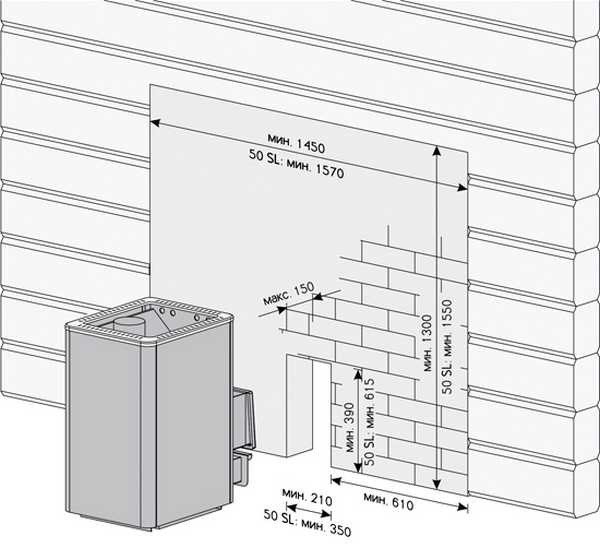
Regardless of which direction the furnace door of the stove faces, the unit must be installed at a safe distance from visitors to the steam room, so as not to provoke burns from accidental contact with hot metal or hot steam from stones.
Approximate installation diagram for a conventional heater
Arranging the area around the stove in the bathhouse
During combustion, the stove sometimes heats up to 400 C. The heat is distributed throughout the room, and primarily affects the walls located next to the structure. To protect a nearby wooden wall from overheating, they construct protective screens or cover it with non-combustible materials.
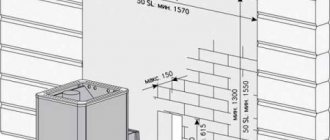
The need for protective installations when installing a heating unit in a wooden bathhouse arises primarily if the distance from the walls to the side surface of a brick stove is less than 32 cm, and a metal stove is 1 m.
The following thermal insulation methods are used:
- Installation of protective steel or cast iron screens purchased in the store. The product is equipped with special holes for mounting to the wall, so it is not difficult to use. The structure will reduce the temperature by 80-100 C. It is installed around the stove, at a distance of 1-5 cm from the side walls.
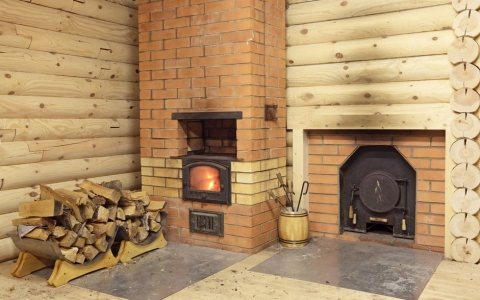
- Construction of a brick screen. It can cover all side surfaces of the structure or be located only between the potential flammable surface and the heat source. The masonry is made from solid bricks on clay or cement. The laying thickness is at least 60 cm (a quarter of a brick); if the owner does not experience a shortage of material, they make a laying of 120 cm (half a brick). The screen is raised above the stove by 20 cm. The distance from the heat source to the screen is maintained at 5-15 cm. The same distance is acceptable from the masonry to the wall.
- Reflective trims. Installed in combination with thermal insulation materials (basalt wool or cardboard, asbestos cardboard, mineralite). First, thermal insulation is attached to the wall, and a stainless steel sheet is placed on top of it. In order for the reflection of thermal rays to be ideal, the metal sheet must have a mirror surface. Fastening is carried out on ceramic bushings. They do not heat up and provide ventilation between the wall and the insulation.
https://www.youtube.com/watch?v=1yH8YkI27PI
The listed methods will protect the wall located nearby from the heat generated by the stove installed both in the steam room of a wooden bathhouse and in the dressing room.
« Previous entry
Calculations
SNiP II-25-80. Wooden structures
SNiP II-25-80
A metal stove, together with a heater, a water tank and a chimney, has a certain weight. Cast iron units are especially massive, as well as stoves lined with brick.
If a foundation is laid under the furnace, and also if there is a reflective brick screen, the load on the beams and floorboards is quite significant. Before installing the stove, you should find out its weight, then calculate the strength of the floors so that the floor does not break under the unit under any circumstances.

Example of a brick-lined oven
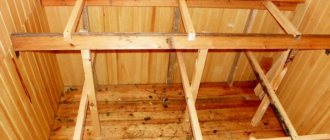
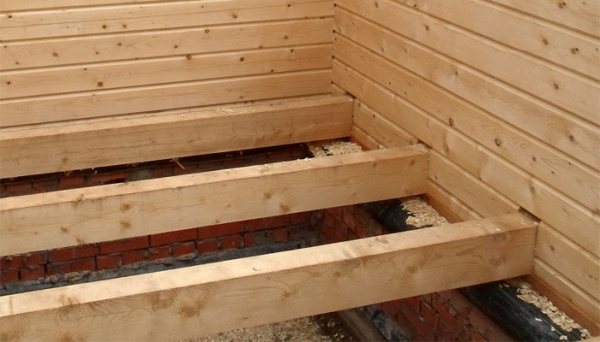
Floor beams can be made from solid solid deciduous/coniferous trees, provided their length is up to 5 meters. If it is necessary to use beams over 5 meters in length, it is better to use glued beams that can withstand increased loads.
Beam 10×15 cm, solid
It is important to know the exact length of the beam. This value is taken to be equal to the length of the span that will cover the joist plus the depth of the “nest” or notch made to secure the element. The length of the notches is usually from 70 to 150 mm.
The cross-section of the beams is selected rectangular or square, less often - an I-beam profile (a combination of solid wood and OSB/plywood). The best cross-sectional ratio of a rectangular beam is 1.4 to 1. The beams are made with a width of 40 to 200 mm and a height of 100 to 300 mm. Rounded logs (11-30 cm) are rarely used for arranging the floor in a bathhouse, despite their high resistance to bending deformation.
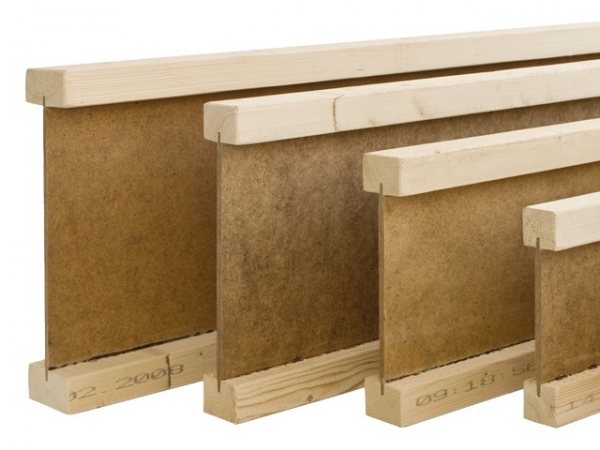
Wooden I-beams
The pitch between the beams is usually chosen within the range of 30-120 mm, guided by the width of the slab insulation, the location of the support posts of the frame bath, or the dimensions of the subfloor sheets.
Load calculator
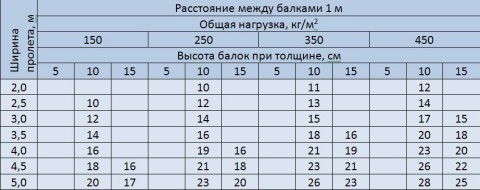
Table for determining the minimum permissible cross-section at a step of 1 m
On a note! You can use online services to calculate the floor load. Each of them requires entering accurate information about the type of beams and joists, cross-section, and dimensions.
Calculator (Excel format).
Calculation of a wooden subfloor
About loads and rigidity
According to the set of building codes numbered 2.01.07-85, any loads are divided into:
- permanent (they are also long-lasting) - from interior partitions and external walls, roofs, soil pressure, etc.;
- variables, i.e. arising from furniture installed in the bathhouse, equipment (including stoves) and visitors, as well as snow, wind loads and some others.
- if the step between the logs is 60 cm, then the dimensions for a span length of 2 meters are 75×100 mm, 3 m – 75×200 mm, 4 m – 100×200 mm, 5 m – 150×200 mm; 6 m – 150×225 mm;
- if the step between the logs is 1 m, then the dimensions for a span length of 2 m are 75×150 mm, 3 m – 100×175 mm, 4 m – 175×200 mm, 5 m – 150×225 mm, 6 m – 175×250 mm.
Rigidity is characterized by the ratio of the deflection to the length of the beam (beam). This figure for interfloor beams is 1/350.
The values of the maximum breaking load on the beams are presented in the table.
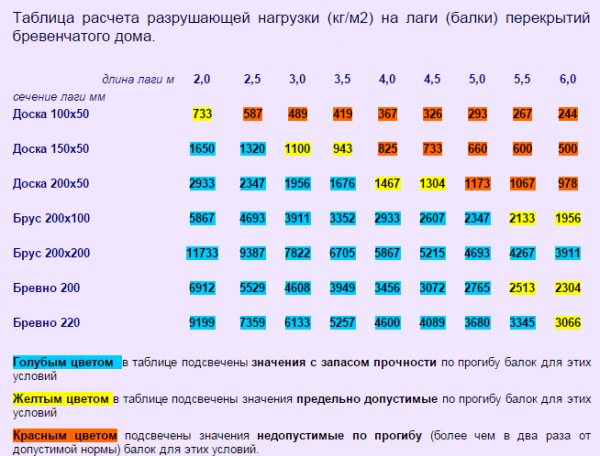
Table for calculating the breaking load (kgm2) on the floor joists (beams) of a log house
Video - Floor calculations
Accurate calculations of the maximum load on a wooden floor are quite complex; they are performed by specialists when designing large objects. For the floor of the bathhouse on which the stove will be installed, you can use approximate values of the maximum load.
Thus, if the heating device, together with the base plate and other structural elements, weighs no more than 400 kg, then it can be installed on floors with support joists of the following sizes:
If your stove weighs more, then it is worth reducing the pitch between the logs or increasing their cross-section. For stoves weighing more than 700 kg, a separate base is required, not connected to the main foundation. Installing such structures on a wooden floor is unacceptable. However, only brick sauna stoves with brick chimneys have this weight.
It is recommended to fasten floor boards 50 mm thick on top of the joists. Moreover, humidity levels should not exceed the norm.
On a note! A bathhouse is a room with increased fire hazard. Use fire-retardant impregnation for all wooden elements of the bathhouse before installing the stove on the floor.
Video - Ermak stove. Installation
Advantages and disadvantages
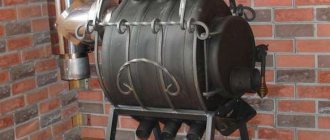
The advantage of the Vesuvius sauna stove is undoubtedly its modern design . Some internal components are manufactured in Finland. Another advantage is the different models of casings.
This company offers models in different price categories.
The disadvantages include inadequate quality control . Many negative reviews are due to manufacturing defects.
But in general, all the happy owners of the Vesuvius sauna stove give good reviews, believing that these stoves are universal and have shown themselves to be excellent in operation. On the websites of this company you can always get acquainted not only with the appearance of the furnace, but also better find out the detailed operational characteristics.
Foundation for a sauna stove
Those who build a sauna with their own hands often think about the advisability of arranging a foundation for an iron stove. It would seem that the unit weighs relatively little; you can lay a sheet of metal and use it. However, according to the fire inspectorate and in accordance with SNiP standards, flammable surfaces must be reliably isolated from hot surfaces.
A properly equipped base will also provide the stove with a long service life, because at the slightest distortion, metal heaters fail faster.
Option one
Installation diagram of the furnace on the foundation
We set up a simple non-combustible base directly on the wooden floor.
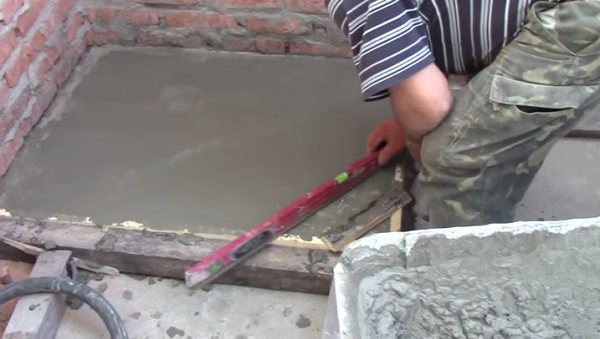
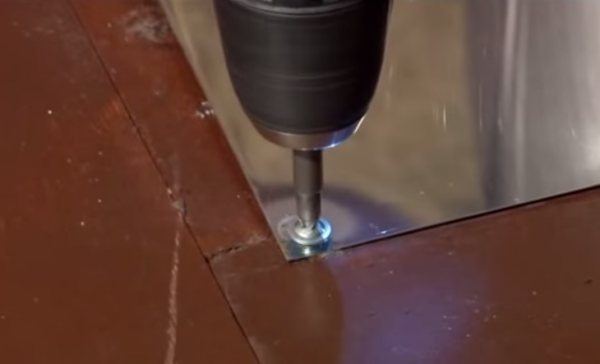
Step 1. Take measurements of the oven dimensions. We transfer the dimensions of the heater onto the floor boards (in the place where the stove will be installed). We take a meter ruler and expand the drawn rectangle so that in the future, in front of the firebox, the wooden floorboards are covered with steel by 50 cm, and on the other three sides the fireproof plate “looks out” by at least 5-10 cm.
If the stove has a firebox door in the next room, then in front of the loading chamber we make markings for the steel flooring (50 cm), and in the steam room we make markings for the foundation of the stove (plus 10 cm to the dimensions of the stove). At the same time, we make markings on the wall for cutting out the opening. If the stove is purchased as a factory type, then the dimensions are indicated in the instructions; in the case of installing homemade stove equipment, the distance between the metal walls of the heater and the inner surface of the made window is 25-50 cm.
Each manufacturer indicates in its passport the minimum permissible distances when installing metal stoves
If loading firewood will be done from the street, you should only take care of the markings inside the room. It is assumed that the area in front of the firebox door will be filled with concrete or lined with non-combustible paving slabs.
Step 2. If necessary, break out or cut out part of the interior partition (outer wall of the house).
Step 3 . We take a fireproof plate and cut out a piece identical in size to the mark drawn on the floor. The prices for some types of slabs can be found in the table.
| Name, brand | Description | Cost, rub. |
| PKVT 1260 | Heat-resistant fireproof plate. Ceramic fiber. With low content of organic components. Size 60x50x20 cm. | 325 |
| TISK-250 | Slab dimensions – 70x40 mm, thickness from 25 to 50 mm. The plates are made of calcium silicate and have high thermal and mechanical properties. | 289 |
| MKRP-340 | Thermal insulating refractory material. Resistant to alkalis/acids. | 301 |
We screw the slab to the floor with self-tapping screws.
Step 4. Soak fireproof bricks in water (full-bodied red ones can be used, but fireclay bricks are preferable). Mix the masonry mortar.
Masonry mixture
Lay out the bricks in a continuous layer. Adjust the horizontal level. If necessary, tap the bricks with a mallet or add a layer of masonry mortar.
Brick laying. Scheme
We lay out the second row in the same way as the first.
Step 5. Take a stainless steel sheet and apply heat-resistant glue diluted according to the manufacturer’s instructions. We lay the sheet on the bricks, tap it with a mallet, and check the level.
Heat resistant glue
You can install the stove on such a base after 24-48 hours.
Prices for fireclay bricks
fireclay brick
Option two
If the stove structure is too massive and the floors are not strong enough, it is worth making a separate foundation that is not connected to the main support of the house. Such work is carried out at the construction stage of the bathhouse or after completion of construction. Moreover, the second option involves making a rectangular or square hole in the floor, associated with dismantling work.
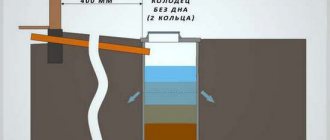
Step 1. For the foundation of a sauna stove you will need a pit with dimensions slightly larger than the size of the stove. Such a pit should be dug to the freezing point of the soil.
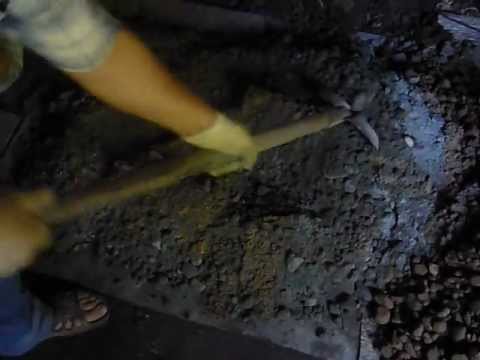
Removing the soil
Step 2. Compact the soil using a hand tamper. We fill in 20 cm of fine gravel and tamp it down. We pour sand (10-15 cm) on top of the gravel, followed by compaction.
Step 3 . We arrange waterproofing - we cover the walls of the pit with roofing material or a two-layer thick polyethylene film.
Step 4. We make a frame from reinforcement rods. The distance from the walls and bottom of the pit to the frame is 5 cm. We use supports for the bottom row of reinforcement or stick pins into the pillow, onto which we fix the rods with wire or welding.
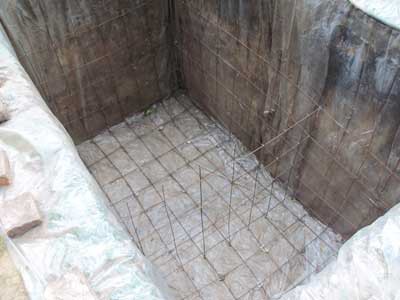
The photo shows the frame and waterproofing
Reinforcement example
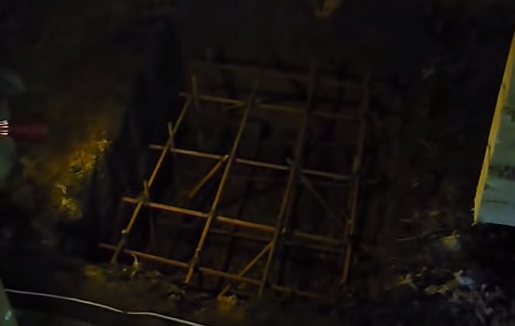
Step 5. Mix the concrete. We pour it into the pit. There should be 20 cm left from the top point of the poured concrete to the line of the finished wooden floor. We compact the concrete with a deep vibrator and cover it with two layers of roofing felt. To fasten the layers of roofing material we use bitumen mastic.
If you plan to raise the foundation above the floor line, use formwork
It is recommended to continue work after 21-28 days. To shorten this period, instead of pouring concrete, you can make brickwork up to the finished floor line. In the case discussed above, only two rows of bricks are laid up to the finished floor line.
A sheet of steel or ceramic tiles are laid on the floor in front of the firebox. This coating will protect the wooden floor from fire if coals fall out.
Prices for roofing material
roofing felt
Video - Foundation for a stove
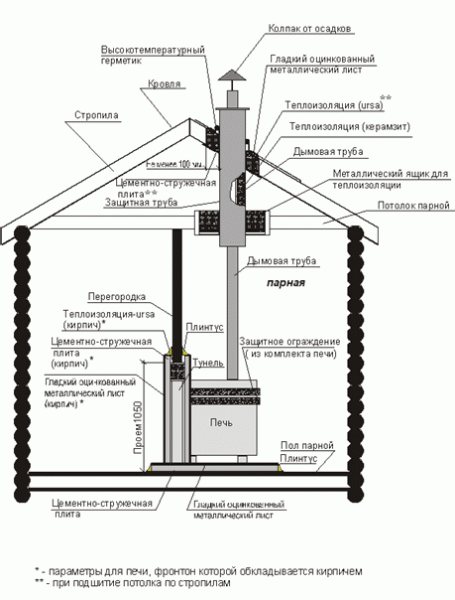
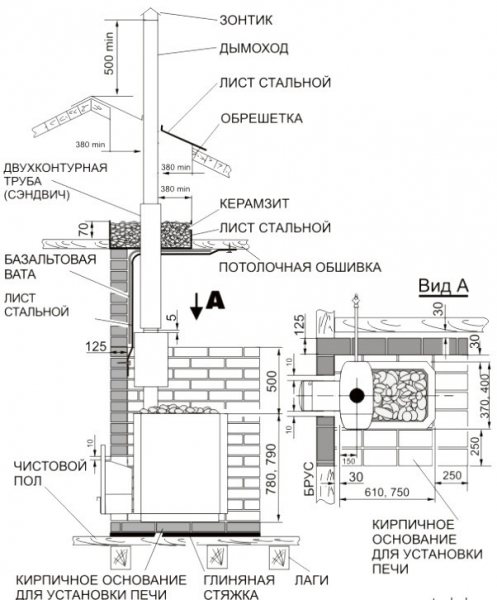
Installing a chimney in a wooden house
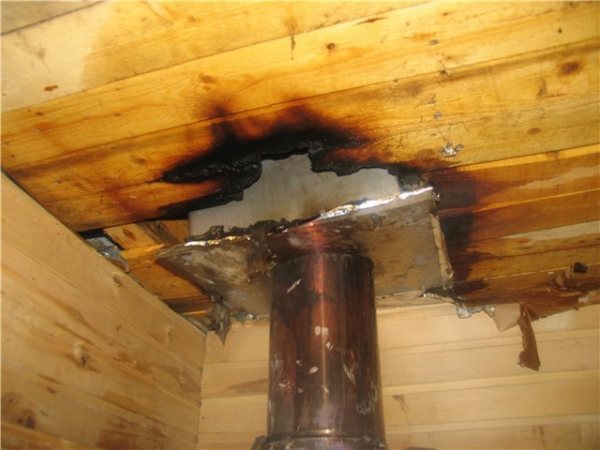
The combustion temperature inside the firebox of a solid fuel stove is at the level of 450-550°C. The surface of the chimney heats up to 300°C. When soot ignites, short-term heating to 800-1000°C is possible. Due to high temperatures, fire breaks must be provided when installing metal chimney pipes.
Existing PPB rules stipulate compliance with the following conditions:
- Chimney type - it is recommended to install a sandwich pipe made of stainless steel and ceramics with thermal insulation.

Breaks and thermal insulation materials - in places where they adjoin the walls, the pipe is removed from the surface by 25 cm. The walls are covered with basalt cardboard, followed by sheathing with stainless or galvanized steel.
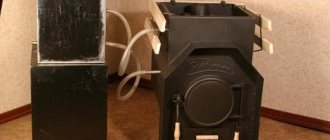
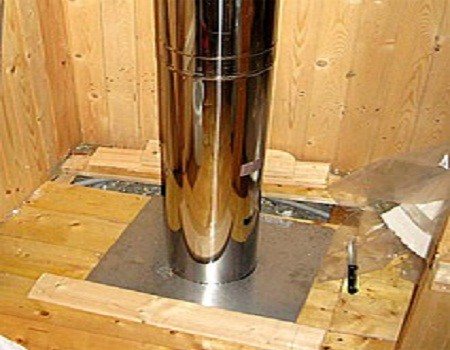
Installation of stove, tank and chimney
The sauna stove is installed on an equipped fireproof base without fastening to it.
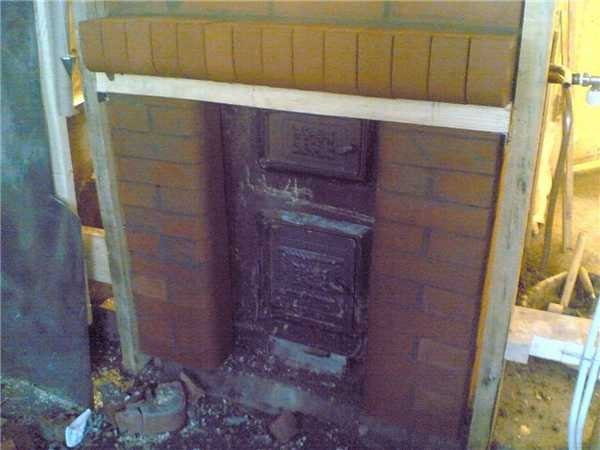
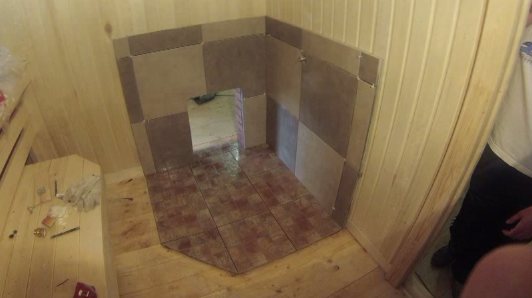
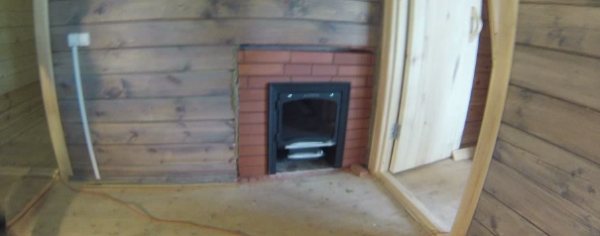
If the firebox is remote (opens into the adjacent room), then a brick is laid in the wall opening, and there should be a gap between the masonry and the metal walls necessary for laying heat-resistant sheet insulation. The gaps between the masonry and the wooden wall are foamed with mounting foam, and fire-resistant mastic (sealant) is used to seal the joints between the metal stove and the brick portal.
Steel sheet in front of the firebox
Brick portal
Protective screen made of porcelain stoneware
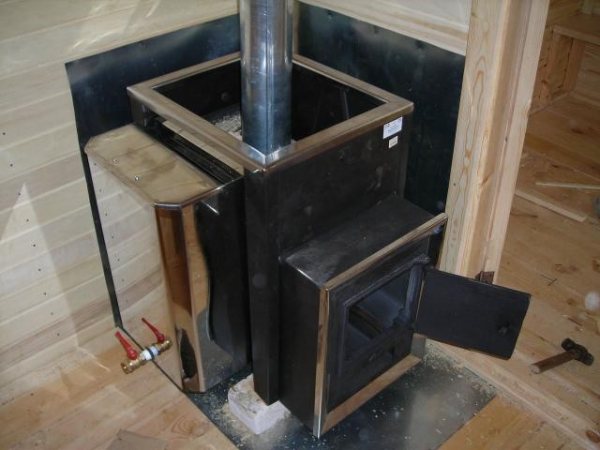
Installed heater with water tank
Firebox door on the other side
Kindling
If the firebox is located in a steam room, then the wall behind the stove is covered with solid brickwork (half a brick) or covered with a stainless steel sheet 3-5 mm thick. In this case, the stove must be at least 10 cm away from the wall.
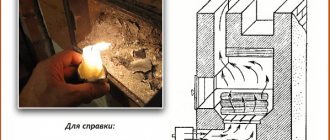
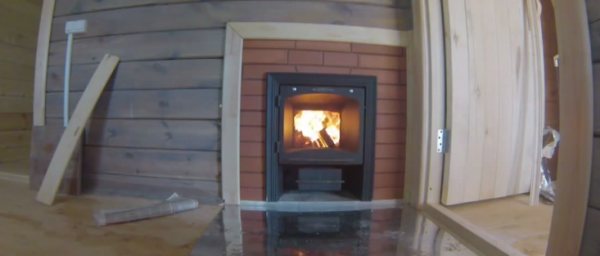
Note! Preliminary lighting of the stove before installation is a mandatory procedure prescribed by manufacturers of solid fuel units. This is necessary to completely harden the body paint and eliminate the appearance of odor in the steam room from chemical fumes that may appear during heating.
Next, the water tank is installed. It can be welded onto the chimney, hung on the wall of the furnace, or can be connected with flexible hoses to the heat exchanger of the furnace (threaded connections).
Heat exchanger
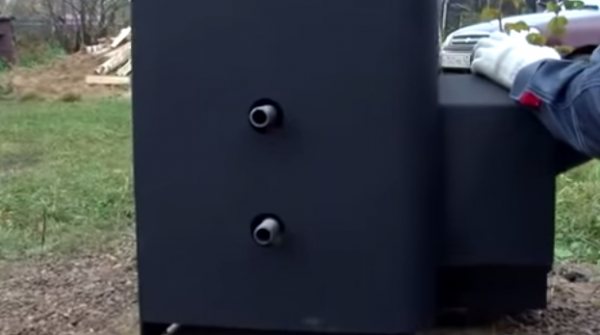
Threaded connections for connecting a remote tank to a heat exchanger
Video – Furnace water tanks
Chimney sandwich. Installation
Layout options for sandwich chimneys
Sandwich chimney pipes are easy to install and are characterized by increased heat saving due to the mineral wool insulation between the outer and inner walls. Such a chimney provides good draft, and soot and condensation do not accumulate on the inner surface. For the production of sandwich chimneys, only acid-resistant stainless steel with a long service life is used. Therefore, such a chimney is considered the best option for a sauna stove.
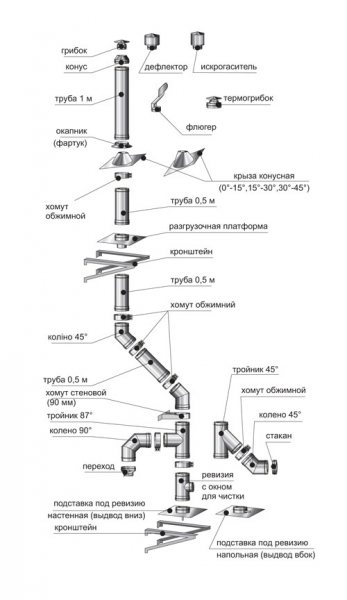
Chimney diagram
Prices for mineral wool
mineral wool
During installation, it is important to observe fire safety measures to avoid spontaneous combustion of the wooden sauna floors (wood ignites at a temperature of 170-270 degrees).
You must not make mistakes during installation and try to save insulating materials!
Dependence of the temperature of the flue gases on the type of furnace to which the chimney is connected
Fire protection is provided by galvanized sheets and asbestos fiber laid between the chimney walls and the ceiling. It is important to choose the length of the chimney so that a pipe joint does not form at the location of the ceiling. If the chimney pipe is longer than 6 m, then additional fixation is carried out with brackets and clamps.
Fastening the chimney section with brackets and a clamp
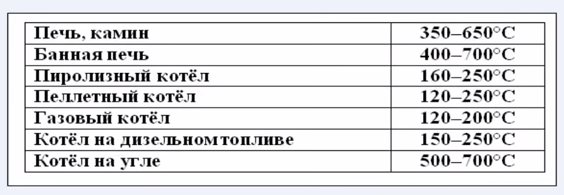
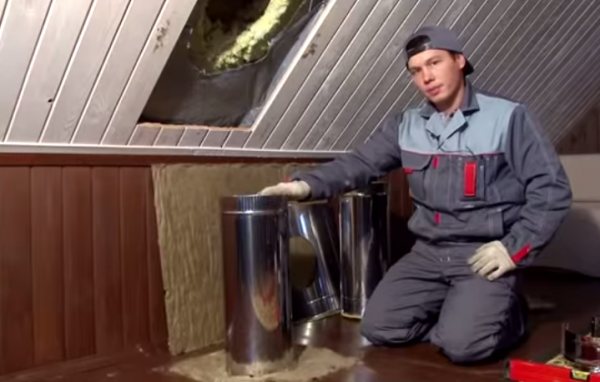
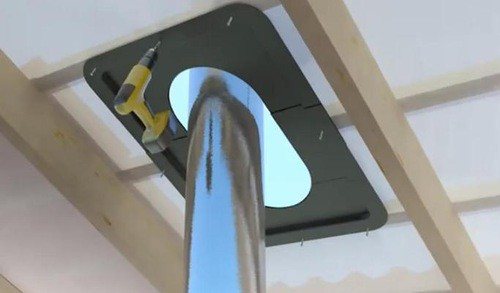
Step 1 . On the ceiling above the installed sauna stove we make markings for installing the cutting pipe.
Step 2. According to the markings, we saw the ceiling.
We apply fire retardant impregnation to wooden elements.
Step 3. Insert a cutting pipe (a metal box with a hole for a pipe) into the cut hole.
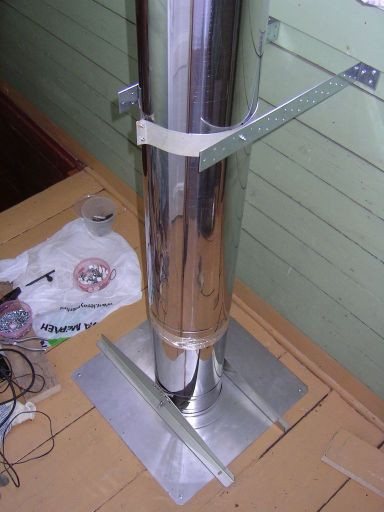
We fix it with self-tapping screws at the corners. Between the ceiling and the steel walls of the pipe we insert sheet asbestos or basalt insulation.
Laying insulation
According to standards, the thickness of the insulation should be 7-7.5 cm (that is, this is the distance between the walls of the box and the ceiling). The minimum distance from the pipe walls to the beams is 130 mm. And from the chimney to the walls of the bathhouse there must be a distance of at least 380 mm.
Chimney passage through the ceiling
Step 4. Directly to the stove pipe we connect (by welding or with a fire-resistant sealant) a section of an uninsulated single-circuit pipe. You cannot connect the sandwich chimney directly to the stove pipe - the insulation will burn. It is necessary to install a damper (smoke valve) on the same section of the chimney.
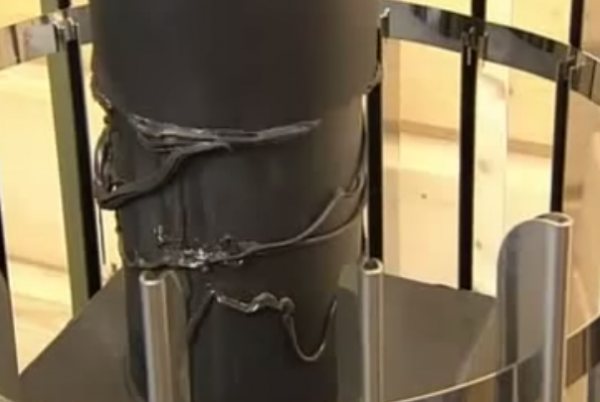
We apply sealant and put the chimney pipe on the stove pipe
Step 5. Connect the single-circuit pipe to the start sandwich (adapter). All connections are sealed.
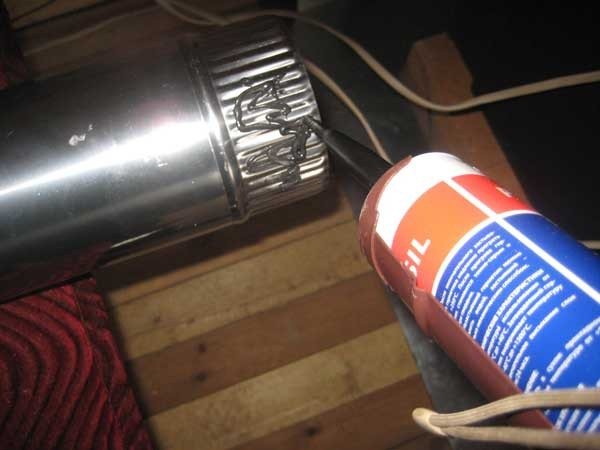
Applying heat-resistant sealant to the chimney
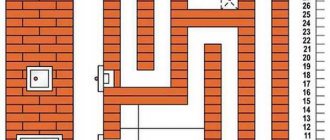
Step 6 . We connect the first section of the sandwich chimney to the adapter. We connect the sections of the sandwich chimney in the bathhouse not “by condensate”, but “by smoke”, that is, the walls of the upper element must overlap the walls of the lower section of the pipe (see figure).

Chimney diagram
We additionally strengthen the straight sections of the chimney at the joints with wide metal clamps.
Fastening two sections of pipe with a clamp
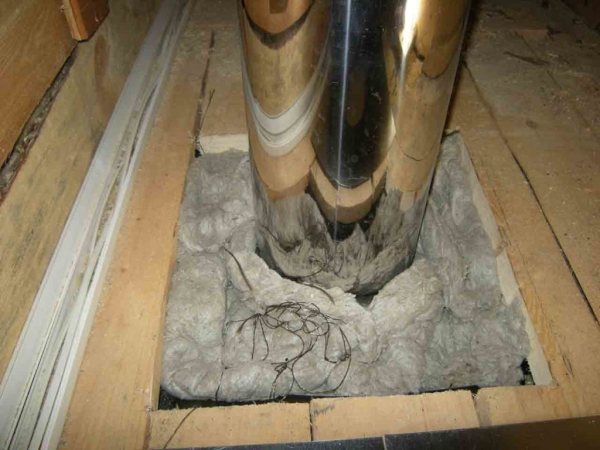
When the chimney is brought out through the cutting pipe, we put on a rectangular steel sheet from the attic side. We fasten the sheet with self-tapping screws to the floor boards.
Installing a chimney is a responsible matter
Fixing the steel sheet
Chimney. The hole in the ceiling is covered with a steel sheet
Step 7. We bring the chimney to the roof. We cut a hole in the roof. To pass the pipe through the roof, a special element is used - a roof groove. This is a pipe with an aluminum sheet soldered to it. We lubricate the aluminum sheet with fireproof sealant, and then fasten it to the roofing material (for example, metal tiles) with self-tapping screws.
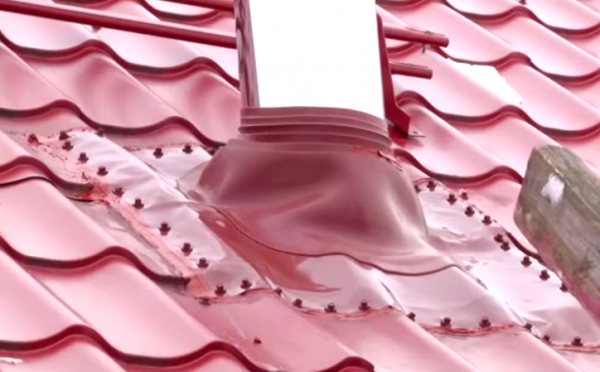
Chimney passage through the roof
The roof trim will prevent the chimney from coming into contact with the roofing pie materials. From the inside (under the roof), we seal it with basalt insulation and cover it with a steel sheet. Sheet in advance, i.e. Before the pipe comes out through the roof, we put it on the chimney.
Passage through the chimney roof. Fixing the steel sheet
Step 8. The last stage is calculating the elevation of the chimney above the roof of the bathhouse. This indicator can be clarified in the table.
| Conditions | Chimney length above roof |
| Flat roof | 500 mm |
| The roof is pitched, the chimney is located at a distance of less than one and a half meters from the ridge/parapet | >500 mm |
| The distance from the ridge to the chimney is within 1.5-3 meters | The height of the pipe is equal to or slightly above the top point of the ridge |
| The chimney is installed at a distance of more than three meters from the ridge | Visually draw a line from the ridge down at an angle of 10 degrees and find out the height of the chimney |
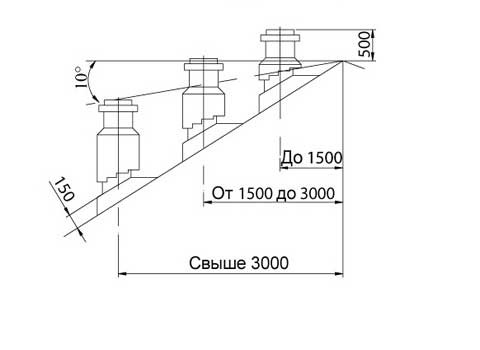
Chimney height
All that remains is to secure the deflector cone. Installation is complete.
Preparing for installation of a metal furnace
Installation of a metal stove in a house made of combustible materials provides for the following:
- A fireproof cutting, which is also called a fireproof sheet, must be installed on the floor under the stove. It consists of a layer of asbestos cardboard on which a sheet of steel with a thickness of at least 1 mm is laid. A rim made of non-combustible material should be made around the protective layer. This is necessary so that the coals that fall out of the stove cannot roll onto the wooden surface.
- The flush sheet on the side of the combustion door and on other sides should protrude at least 600 mm and 300 mm, respectively.
- Protective screens that are mounted on walls must be 30% larger than the corresponding sides of the stove and at least 300 mm.
- An uninsulated chimney should be located at least 1000mm from unprotected walls and ceilings.