As practice shows, a person can do a lot, even one who has never encountered anything before. The main thing is that he has a desire, and he can always figure out how to find opportunities. The article will discuss how to make a bathhouse out of a trailer, which is often left behind by builders on the site.
They no longer need it, and a zealous owner will always be able to find a use for such a “gift.” Its purpose is temporary housing in which people can be provided with a comfortable stay. Carriages are made from wood, metal, or a combination of these materials.
>
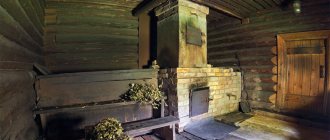
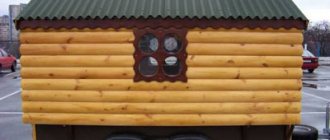
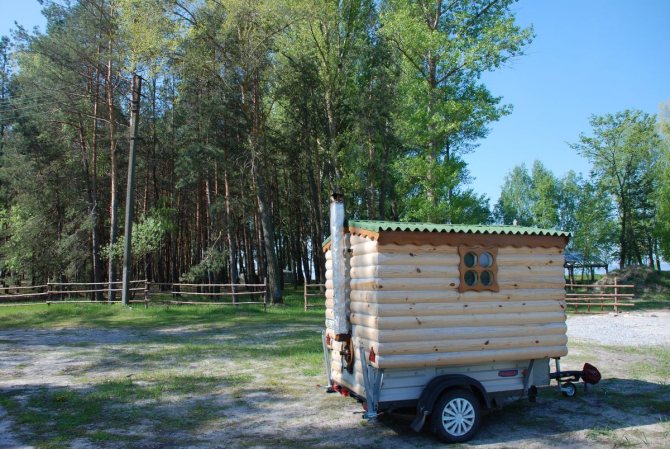
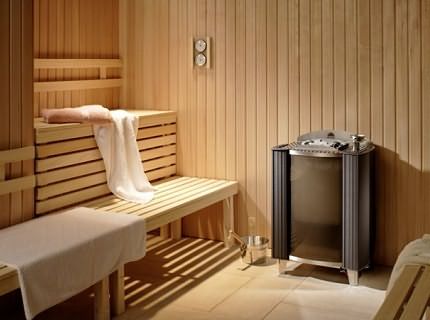
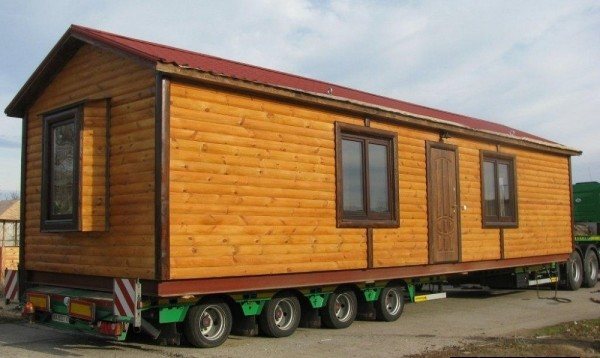
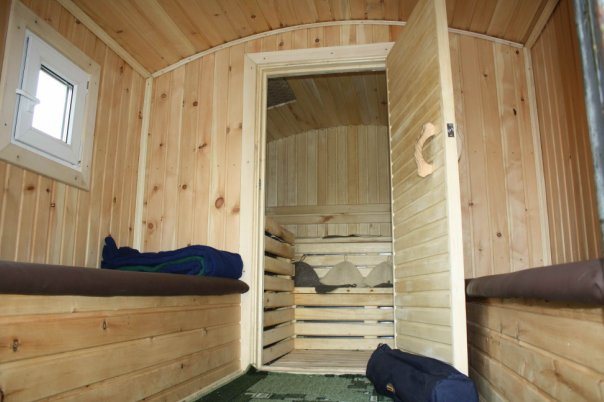
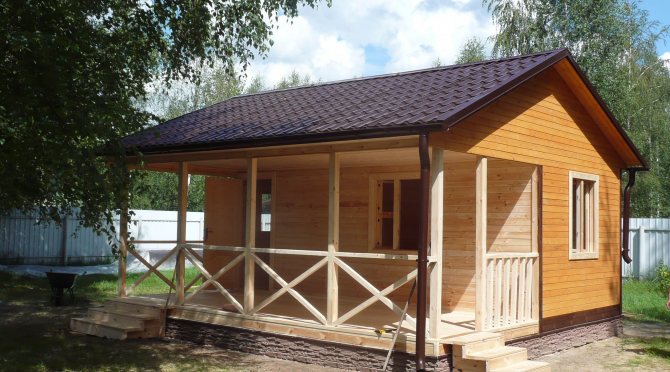
In the photo - a wooden sauna trailer
What is, first of all, interesting about this steam room option? You immediately receive a “semi-finished product” of the building. All that remains is to insulate it and decorate the inside.
Planning Guidelines
The change house is a secondary utility room, but you should not take the process of its construction and arrangement too lightly.
First, prepare a drawing. You can make it yourself or find a ready-made version in available sources. The drawing will allow you to imagine how the finished building will fit into the surrounding landscape, as well as calculate the required amount of building materials.
Select the dimensions of the structure and its layout at your discretion. As a rule, industrial structures intended for living are about 5-6 m long, about 2.5 m high and similar in width. Otherwise, regarding the dimensions of the house and its layout, be guided by your needs and preferences.
Finding a comfortable corner in the country house
At the very beginning, you need to decide on a place that would be suitable for arranging a bathhouse in a trailer at the dacha:
- If the dacha plot is located on the bank of a river, close to a lake or near a reservoir, then you should install the trailer fifteen meters from the shore, closer is not recommended - this trick makes it possible to protect the trailer from being flooded during a flood.
- If there is a highway on one side of the site, then you can put the trailer on the other side, away from the road.
- When the site is a small space, you can connect the carriage with an outbuilding, summer kitchen or garage. Foreign odors will not appear if ventilation is installed correctly and good insulation is taken into account.
ABOUT CHOOSING A CARRIER FOR A BATH
Having decided on the location, start searching for a trailer of the required size.
Note! Before purchasing a construction container, be sure to check its construction for cracks and holes. The fact is that they are often written off after they become unusable. Remember this extremely important fact.
Of course, you can use a barn for a bathhouse, but in this case, nuances may appear during construction (negatively, of course). Moreover, when using a barn, you must remember that from a structural point of view it is completely unsuitable for arranging a bathhouse due to obvious shortcomings. After all, repairing and sealing cracks on its surface will take up precious time and require a lot of money. In addition, if you use a shed, you will need to carry out a labor-intensive procedure to waterproof the foundation.
So, after choosing a suitable trailer and checking its strength and integrity, you can proceed to the next stage of building a bathhouse. For finishing you will need a lot of building materials, the most important thing is insulation, because the bathhouse is, first of all, intended for relaxation and enjoyment.
Heating equipment in the carriage
Country house from a change house
When choosing a location for our house, we take into account a couple of important points.
Firstly, we think about whether we will transport the structure somewhere in the future. For example, you are going to build a lightweight house for a couple of seasons, and then remove it to another place. If moving is part of your plans, it is best to place the change house as close as possible to the exit from the site.
Loading the cabin
Secondly, we decide on the purpose of the room. If the shed will be used only as a shed for storing various tools and other household supplies, it is best to install it approximately in the center of the long side of the main house so that it can be easily reached from any side of the site.
The change house can serve as a place to store equipment
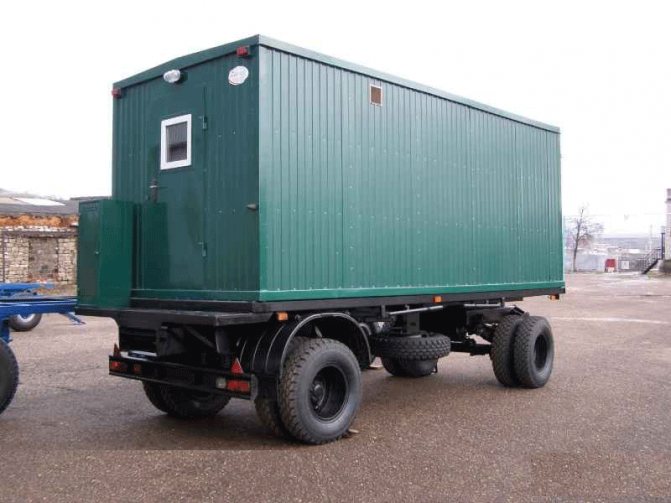
Decommissioned trailer
To transform an old decommissioned trailer into a full-fledged bathhouse, it will be necessary to make maximum efforts, associated, in particular, with the arrangement of a well-insulated and thoroughly insulated steam room.
To do this, first of all, you should carefully examine the trailer for the presence of visually visible defects (cracks, potholes and holes) in its walls, floor and ceiling and try to repair them with suitable building material.
Please note that when carrying out repair and insulation work you will have to deal with one of the following types of standard carriage buildings:
- metal welded structure;
- wooden frame covered with clapboard or chipboard.
Insulation with polyurethane foam
To insulate a metal trailer, you will need to modify its design. This modification will consist of preparing (welding to a metal frame) special plates with holes necessary for securing the wooden beams. The wooden frame mounted in this way will subsequently be used for insulation and finishing of the building; in this case, the insulation is supposed to be laid in the space between the individual bars.
To insulate the external and internal surfaces of the trailer (its door, ceiling, walls and floor), you can use such common protective materials as basalt wool, polyurethane or Isover.
From the outside, the insulation can be covered with edged boards or the bathhouse can be finished with siding.
Do not forget that the floor of the converted building is also subject to mandatory insulation, produced using special polyurethane sheets, on top of which a floorboard is laid. In winter, such a floor structure will protect the interior of the trailer from severe frosts, and will also allow it to retain heat inside its premises.
As for the choice of heating equipment for the steam room of a converted trailer, in such cases standard fireplace stoves are most often used. You can see video and photos of bathhouses from a construction trailer at the end of the article.
First you need to find out whether it is even possible to install a trailer on the site. This may be hampered by the terrain or inconvenient access roads. After all, the delivery and unloading of such a bulky product from the platform is carried out using a truck crane that has a certain boom reach. And it just may not be enough.
The rules here are simple:
- If you have a natural body of water on your property, install the bathhouse no closer than 15 m from the water. This will protect the trailer from flooding during floods.
- Keeping the bathhouse as far as possible from the nearby road will keep you calm and ensure complete relaxation during your health activities.
- The entrance to the bathhouse is planned on the south side - there is less snow drift there in winter.
- The windows are located on the southwest side if you plan to visit the bathhouse in the evening.
- Vegetation and trees near the trailer will add an ozonizing effect to the air and create a feeling of comfort.
When purchasing a construction container or trailer, you should check its appearance to ensure there are no cracks or holes, since they are often written off due to unsuitability, this is a very important fact. Instead of a carriage, old barns are used for a bathhouse, but you need to remember that its design is not at all suitable for equipping a steam room, because you can encounter significant problems. Repair work required:
- It is necessary to plaster the cracks over the entire surface of the walls, which will take a lot of time.
- Additional expenditure of money will be required.
- As well as carrying out a labor-intensive procedure to lay the foundation waterproofing.
We suggest you familiarize yourself with How to attach insulation with dowels
The stove must be installed in a separate room. To equip it, you will need to build a brick wall and fence it with metal sheets. For the chimney, use non-flammable, safe material, for example, asbestos is suitable.
About the foundation
Choose one type of foundation or another based on the characteristics of the soil and the area of the building. There are several such types:
- tape;
- slab;
- pile;
- columnar.
A columnar base at a shallow depth is most suitable for a bathhouse trailer. After all, the weight of the structure is not so large as to require the use of a reinforced strip foundation.
Bathhouse trailer
Also take into account the fact that in the future it may be necessary to move the bathhouse to another location. From this point of view, a columnar base has advantages over its reinforced concrete counterparts, because its disassembly requires very little effort and time. Moreover, even the cost of building a columnar foundation is three times less than, say, a strip foundation.
Build a base 30-40 cm high from the ground surface. This way you can add additional bedding to insulate the bottom of the trailer.
Note! If you do not have large funds, you can build a base from asbestos-cement pipes. Although its strength, as well as durability, leaves much to be desired.
It is advisable to resort to installing a pile foundation only in the case of heaving or swampy soil, but it will be very expensive.
In a word, you can build a base for a bathhouse from a trailer with your own hands, but to do this, follow the technology.
Making the base
The choice of foundation for a bathhouse site should be carried out taking into account the characteristics of the soil. There are their varieties:
- Tape base.
- Slab foundations.
- Pile fortifications.
- Column mounts.
For a carriage, experts recommend choosing the last type of foundation from the list above, located at a shallow depth, because the weight of the structure is insignificant and there is no need to use a reinforced strip foundation. Be sure to take into account the possibility of installing a bathhouse in another location.
A foundation should be built, the height of which is 30-40 cm above the ground surface. Then it will be possible to additionally add sand and gravel to the bottom under the trailer for insulation purposes. The construction of a foundation made of asbestos-cement pipes will lead to a large reduction in costs. It is advisable to install pile foundation fortifications in cases of heaving or swampy soil. By following the technological sequence, you can equip the foundation for a bathhouse car on your own.
Preparing the embankment for a bathhouse trailer consists of two stages:
- The place planned in advance should be cleared of dirt and debris, as well as vegetation should be cleared, bushes and trees should be uprooted.
- Mark the area along the perimeter with a cord and place small stakes.
- Remove the outer layer of soil from the area where the posts will be installed. When laying out a strip foundation, you need to remove soil along its entire perimeter.
- Preparing sand and gravel for a “pillow” 15 cm thick. Compact it and water it.
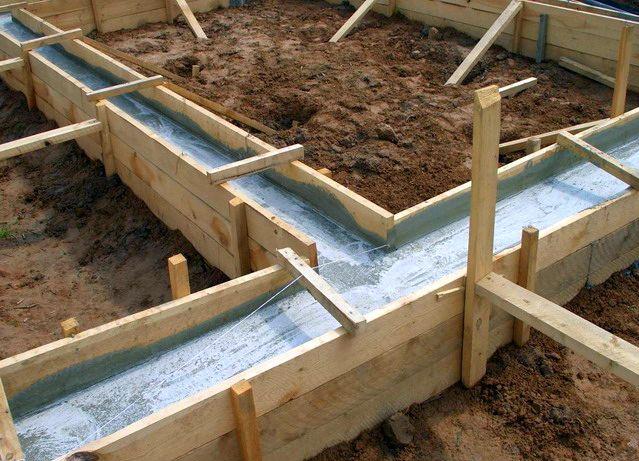
- Make a mound of columnar base “pillow” on top. Using concrete blocks or laying bricks, bandage the seams with a cement composition with the addition of sand. The formwork is prepared in advance, a frame is installed inside it from fragments of reinforcement, and a monolithic foundation is obtained. The outer wall and frame should be separated by a five-centimeter gap.
Then cover the base of the foundation with roofing felt for reliable waterproofing. A frame is installed on top, which is made of beams, their cross-section is 15x15 cm. Use metal corners for fastening. Before installing the frame, all its wood fragments should be treated with an antiseptic.
When laying the foundation, use a building level to check the level surface; if necessary, install a lining of bars under the base of the frame. The carriage must be placed on top of the foundation using special equipment. Install the car with a slight slope on the side where the steam room is located so that the flow is directed into the drain hole.
A change house bathhouse can be made out of the blue. With this solution for installing a trailer, you should:
- Find a convenient area and level it with compacted soil.
- To prepare the frame, use beams with a cross-section of 20x20 cm and install it on bricks.
- A bath container block is placed on top of it.
Our foundation will be the same for all three cabins. The only exception would be a ready-made trailer on wheels - there is no need to build a foundation for it.
Foundation
We make the basis as follows:
- we get rid of the top fertile layer of soil;
- compact the bottom and walls of the resulting pit;
- cover the hole with geotextiles;
- pour a layer of sand over the geotextile and compact it thoroughly;
- We place the cinder blocks symmetrically on the resulting pillow;
- We wrap each support with a layer of roofing felt.
Important! If you plan to attach a small porch to the shed, consider installing supports for it at the same stage.
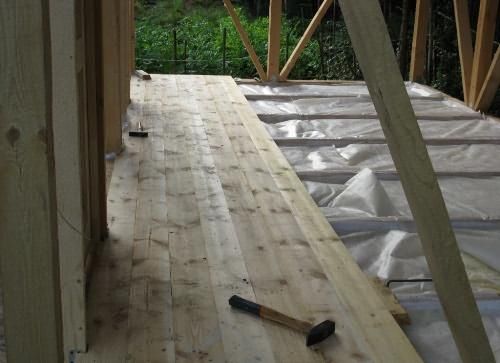
First, we construct a subfloor from boards treated with an antiseptic. We lay them out as tightly as possible to each other and attach them to the frame with self-tapping screws.
Subfloor in a change house
We spread a waterproofing film on top of the boards. We attach it to the joists using a construction stapler with staples.
We nail additional logs to the base for laying thermal insulation and attaching the second layer of boards. We fasten the logs in increments equal to the width of the selected thermal insulation material. Mineral wool, a relatively inexpensive and time-tested thermal insulation material, is well suited for floor insulation.
We lay insulation in the space between the joists. We fix a layer of vapor barrier material on top. A stapler with staples will help us with this again.
We lay the finished floor boards. We attach them to the joists using self-tapping screws. Finally, we varnish or paint the floor.
Foundation for a trailer
The design is selected based on the dimensions of the building and the quality of the soil.
There are four main types:
- tape;
- columnar;
- pile;
- slab.
The sauna trailer can easily be placed on a shallow columnar base. The “power” of the structure is not that great, so you can do without reinforced concrete tape. In addition, it should be borne in mind that the building can be moved at any time to another site.
Dismantling a columnar base will then cause much less hassle than a monolithic reinforced concrete one. Please also keep in mind that the price and labor spent on building a columnar foundation for a bathhouse will be several times less than a strip foundation.
The height of the base is 300-400 mm from the ground. This will make it possible to make additional bedding to insulate the lower part of the trailer.
The cheapest option is a foundation made of asbestos-cement pipes. However, its durability and strength are questionable. A pile foundation is installed in swampy and heaving areas, but its cost will be very expensive. It’s not difficult to build a base for a trailer with your own hands; the main thing is to follow the construction technology.
Preparation
Below are instructions for the preliminary stage.
- Clear the selected area of debris and bushes, and if necessary, uproot trees.
- Make markings using pegs and cord to mark the center lines. Place the columns of the future foundation at a distance of 2-3 m.
- Remove the fertile layer of soil in the areas of future foundation columns.
Advice: if you are installing a strip foundation, remove the fertile layer around the entire perimeter.
Manufacturing
- Make a sand and gravel bedding 100-150 mm high. Tamp it thoroughly with moisture.
- Build a columnar foundation on it:
- Made of red brick or concrete blocks. Conduct masonry with bandaging of seams using cement-sand mortar.
- For a monolithic columnar foundation, formwork must first be made. A reinforcement cage should be installed inside. The distance between it and the outer wall must be at least 50 mm.
- Waterproof the base by covering it with roofing felt.
- Install a frame made of wooden beams with a section of 150x150 mm on top. Secure the beams together with metal corners or make corner joints “into a paw”, “half a tree” or others.
Bathhouse foundation
Tip: all wooden elements must be treated with an antiseptic before installation.
- Check the foundation with a horizontal level, if necessary, place linings under the frame.
Materials for finishing work
The next step in equipping the department is the purchase of building materials for finishing work, where an important point is the purchase of a sufficient amount of waterproofing products to insulate the walls of the foundation of the steam room. Typically, for these cases, an insulating layer is used, which is capable of qualitatively protecting the car interior both from the outside and inside the container from heat loss and moisture gain.
After completing the finishing of the premises, it is necessary to install hydro- and thermal insulation material on the external and internal walls of the car. It is not recommended to leave dirt and debris indoors because it has a destructive effect on the protective material. The construction of the steam room should be carried out in accordance with the rules, then the bath will last for many decades.
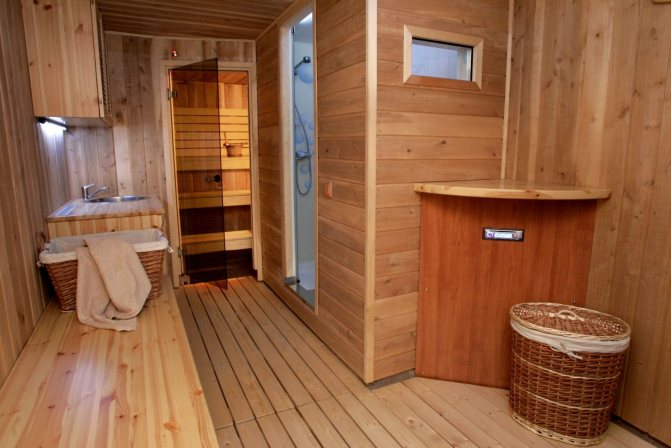
Bathhouse: arrangement
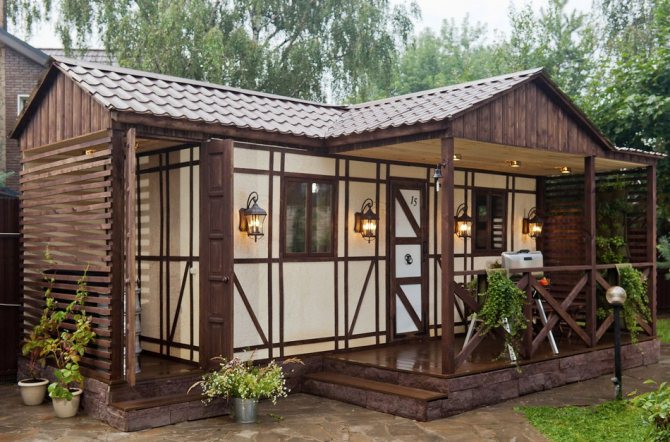
All wooden buildings have their own identical characteristics, so, taking them into account, we will talk about how you can make a bathhouse from a change house with your own hands. In this case, we have an almost ready-made room for arranging a steam room - we just have to complete the work by adding some elements. So, we’ll talk about what else needs to be done, and also, as an addition, we’ll watch a thematic video in this article.
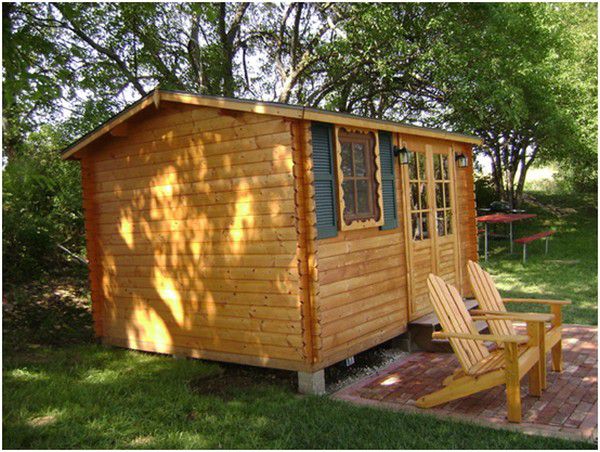
Change house with a sauna made of timber
Steam room from a cabin
Basic device
Lightweight columnar foundation with piping for bathhouses and cabins
- Any frame bath houses and timber houses are built on a strip, pile or columnar foundation, therefore, in this situation there can be no exceptions. Depending on the superior structure, as well as on the condition of the soil, the thickness of the foundation is selected.
Frame of the cabin before cladding
- In the photo above you see a frame that is installed for sheathing with material that imitates wooden beams. But it is not installed immediately, but waterproofing and a wind barrier are placed underneath.
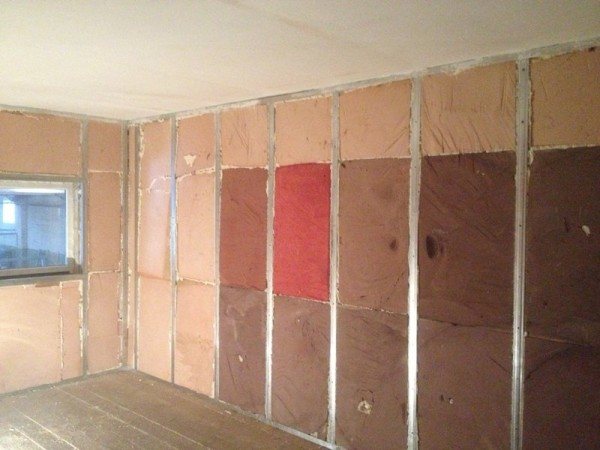
- The inside of the room is sometimes sheathed with ordinary boards, but in this case we are interested in how to make a bathhouse out of a change house. Therefore, between the outer and inner walls we install insulation, which can be mineral wool.
Advice. Mineral wool can be of three types - glass, stone (basalt) and slag, and any of them has good waterproofing qualities. But slag wool is made from molten slag from blast furnaces, and therefore contains particles of iron ore, which begins to rust at high humidity. For this reason, it is better not to use it for a bath.
The floor is insulated with mineral wool covered with cellophane film
- For the floor, just like for the walls, you need insulation, only without a wind barrier, and here it is best to lay a vapor-permeable film under the cotton wool with the smooth side out. Due to its porous structure, where the pores are made in the form of a cone, moisture can penetrate only in one direction and in this case it turns out that it will pass from the insulation to the ground. Although the price of such a hydrobarrier is slightly higher than a regular film, the insulation will last longer, and regular cellophane can be laid on top, under the boards.

Wall cladding
- Such cabins for bathhouses are also insulated from the ceiling side, and the method is used exactly the same as on the floor, only upside down - internal lining/cellophane film/mineral wool/vapor-permeable film/ondulin or corrugated sheeting. But this is not enough for a good bath - from the inside, under the wooden lining on the walls and ceiling, they put foil or foil-coated polyethylene foam, but more on that a little later.
What is needed for a bath
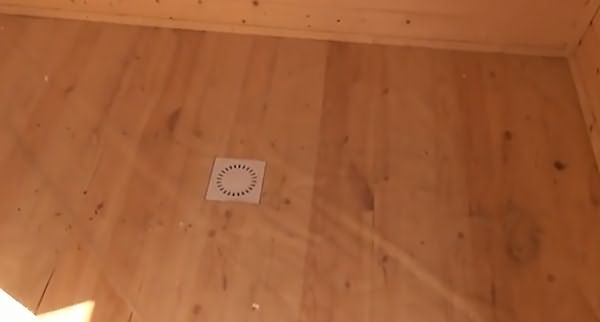
Drain in wooden floor
Of course, if we focus on ready-made bathhouses, then everything is already there, but we need to equip the room so that it becomes a full-fledged steam room with a shower and changing room. Therefore, first of all, we need to take care of the water drainage ladder, which must be installed in the washing and steam compartments.
Sometimes they are installed without connecting to the sewer, but this is wrong, since soapy and dirty water, pouring onto the ground, over time forms a hotbed that spreads unpleasant odors; moreover, it is unhygienic.
For wastewater, you can equip a very ordinary cesspool by laying a sewer pipe there from the bathhouse, but, again, such a place will have to be tightly closed with some kind of lid, otherwise the odors will spread throughout the entire area and to the neighbors. In order to completely get rid of the problem caused by unpleasant odors, you can equip a mini-septic tank for drainage.
We described its installation in another article, and in addition, there are instructions from the manufacturer - in fact, water flows into the soil, purified by at least 75%, which is quite acceptable for plants.
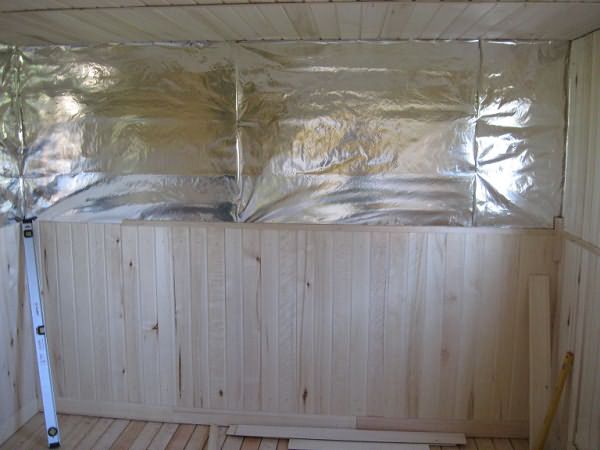
Foil in the bath as a reflector
As noted above, it is much better if aluminum foil or foiled polyethylene foam is installed on top of the mineral wool waterproofing. The fact is that foil is capable of reflecting thermal infrared radiation, which will increase the power of thermal insulation by an order of magnitude.
Advice. When installing foil on the walls, it is overlapped, only the top layer should overlap the bottom to prevent moisture from flowing in. If possible, it is best to seal such joints with foil tape.
Electric stove-heater for steam room
There is a ready-made bathhouse for sale with a stove made like a “potbelly stove”, but what’s the point of it if you want to equip it not just with a shower, but with a steam room? For such a small room, the temperature that will emanate from the steam room will be quite sufficient, and for additional heating you can even leave the door slightly open for a short time.
The whole question is what kind of stove to use for such a mobile steam room, and here, perhaps, the best option would be an electric heater stove, which can be either independent or mounted. The second option will probably be more convenient, since in our case there will be very little space, and it is better to save it.
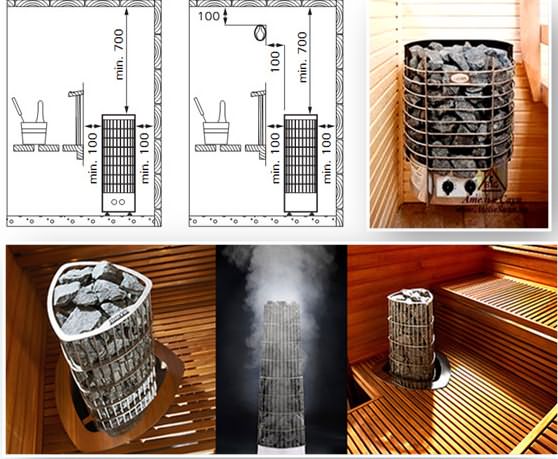
Distance from walls and ceiling
Despite the small size of the room, the stove must be installed with a certain distance from the wooden paneling of the room to avoid fire. Also, to use an electric heater of this type, an RCD (residual current device) circuit breaker must be installed on the side of the locker room.
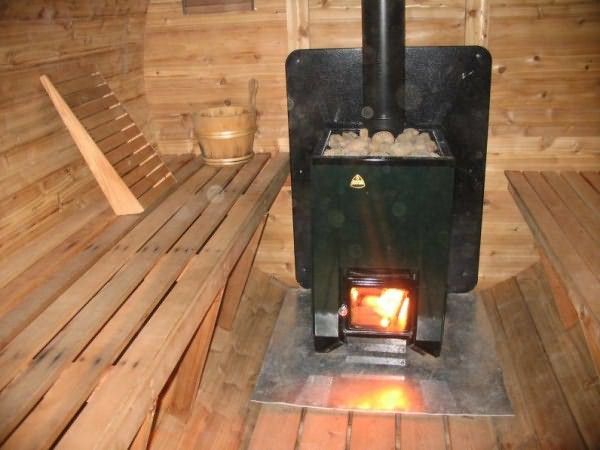
Solid fuel stove
You can also use metal sauna stoves using solid fuel, only in this case special fire safety measures are also required. Since we will be dealing with open fire, the floor must be covered with galvanized sheet, and on the firebox side the length of the metal sheet must be at least 70 cm, as shown in the top photo.
Such a stove, of course, will cost you less than an electric one, and it will also be more economical in maintenance, but it is larger in size and, naturally, will occupy additional space in an already small room.
Conclusion
In conclusion, it should also be mentioned that to equip a bathhouse based on a cabin, you need to take care of running water. If you have such an opportunity, then connect it to the main line, and if not, then use a deep pump or hydrophore, pumping it out of the well. For hot water, you can install an electric boiler (see also the article “Heating in a bathhouse: choosing the best option”).
9ban.ru>
We are building a wooden cabin
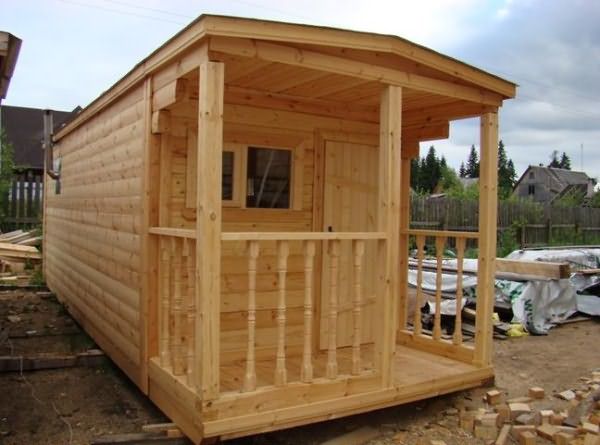
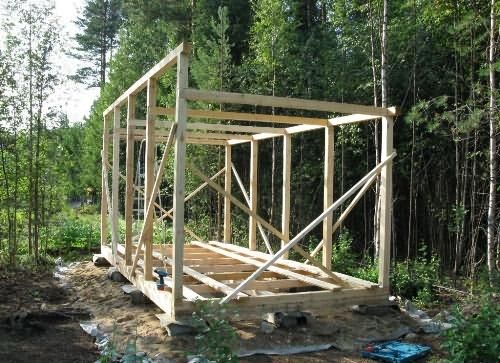
Wooden change house
Let's start building the frame of our change house. First, we lay a wooden beam around the perimeter of the future structure, as well as in its center to further strengthen the structure.
Bottom harness
We connect the opposite sides of the beam. To do this, we fasten the logs to the beam of the lower trim. You can connect in any suitable way. Connections using the tongue-and-groove method, using metal corners and anchors, have proven themselves well. We made preliminary selections to connect the elements and additionally strengthened the fastening points with nails.
We install vertical corner and intermediate posts. We install intermediate supports in meter increments. To do this, we use timber with a cross section of 15x15 mm. Don't forget to leave an opening for the door. To securely connect the frame elements, we use metal corners and self-tapping screws. At the same stage, we install support pillars for the future porch, if its presence is provided for by the design of the cabin.
Corner support posts
We mount the beam of the upper trim. The support posts of our cabins have different heights, so we work as follows: first we lay the timber on the tops of the higher supports, then we connect the low posts and install the side crossbars perpendicular to them. We make connections using the already familiar method with samples and nails.
We invite you to familiarize yourself with Insulating a bathhouse with foam plastic from the inside - All about insulation and energy efficiency
Upper harness
As a result, our frame will be divided into a number of rectangular sections. To strengthen the structure, we connect the opposite lower and upper corners of each such section with jibs made of boards.
We attach the rafter beams to the top roof sheathing. We use the boards that are as even as possible to make lathing easier in the future. We install the rafters in increments of about 500-600 mm. We pay special attention to the strength of connections on roof beams.
Rafter beams
We construct the roof so that it protrudes slightly beyond the boundaries of the frame. This will allow us to arrange a base for drainage on the back side of the cabin, and mount a canopy on the front part.
Roof made of ondulin
We choose the material for the finishing coating of the roof at our discretion. For example, ondulin is good. We lay it with an overlap, starting from the bottom of the slope. Before laying ondulin, you should lay out a continuous sheathing of boards and attach a waterproofing film on top of them. Instead of ondulin, you can use slate or other material of your choice.
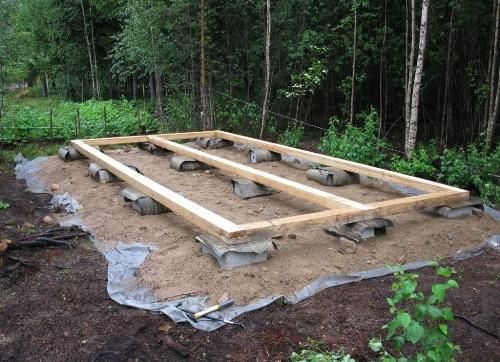
Foundation preparation
Preparing the site for the foundation
If you expect to get a solid building for use, suitable for use in winter, you will have to worry not only about reliable insulation, but also about preparing the foundation for it. The choice of the latter is determined, as a rule, by the characteristics of the soil at the location of your future bathhouse.
Let us note that for the situation we are considering (if the soil in the place where the bathhouse is located is quite dense), it is quite acceptable to use options for a lightweight strip or columnar foundation prepared to a shallow depth.
It is also very important to pay attention to the fact that the height of the foundation base you choose is at least 35–40 cm. Only in this case will it be possible to insulate the bottom of the building through the use of additional bedding.
Well, if you plan to make a mobile sauna trailer, you won’t have to make a special foundation for it at all, limiting yourself to simple supports made of reinforced concrete slabs.
We invite you to familiarize yourself with the arrangement of a sauna stove, preparatory work and installation technology
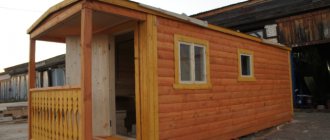
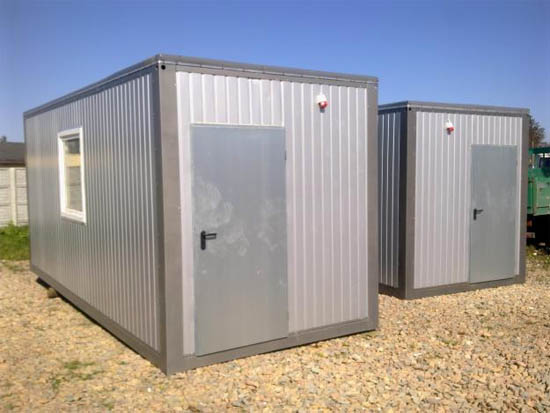
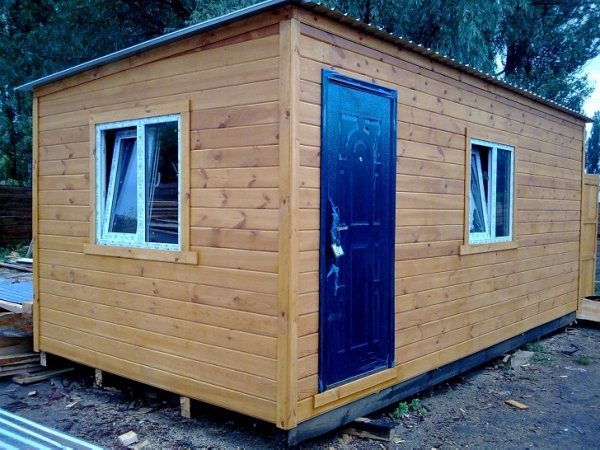
Change house from a construction trailer
Cabins on wheels
Don't want to bother with assembling the frame and other related activities? You can buy a ready-made trailer and equip it for a cabin. Such trailers do not even need their own foundation - you just need to carefully level the site and install the container (trailer).
If you equip a used trailer as a cabin, carefully examine its condition. Clean off traces of rust, replace heavily damaged cladding elements with similar ones, weld patches onto the through holes, coat the metal with a special primer and paint.
The installed structure must be insulated. The rest of the arrangement is at the discretion of the owner. These points will be discussed separately below.
You can also buy a trailer on wheels. The option is mobile and very easy to use. After completing all the measures for arranging such a trailer, it is installed on the frame of the trailer.
BATH WITHOUT FOUNDATION
Very often, trailer baths do not have foundations at all. In such circumstances you must:
- choose a suitable location;
- compact it thoroughly;
- build a frame using beams with a cross-section of 20x20 cm and install it on bricks;
- install the trailer.
Equip the inside of the carriage as a steam room
First, connect the lighting, then separate the dressing room from the steam room. Cover the floor with roofing felt so that the waterproofing layer of the material protrudes along the walls by about 15 cm. Punch a hole in one corner of the steam room and insert a tube into it to drain the waste liquid. The ceiling of the car with the floor and walls should be reliably insulated, except for the place where the stove is planned to be located.
Lay out the stove, leaving a hole in it for the chimney.
- Ensure reliable protection of pieces of furniture that may be located near the stove to prevent fire.
- Arrange furniture, install a door with windows, firmly isolate the dressing room from the steam room, prepare a place for the drainage hole.
- Ask an experienced stove maker for advice on how to properly install a ventilation device for the stove. The floors in the car should not be cold, reduce heat loss to a minimum.
CONSTRUCTION OF A BATH FROM A TRAILER CARRIAGE
When everything is ready, you can begin to transform the design.
Step one. First of all, supply electricity, then separate the dressing room and steam room.
Step two. Cover the floor with waterproofing material so that it (the material) extends approximately 15 cm onto the walls. Make a hole in the corner of the steam room, insert a pipe there - this will be a drain hole.
Step three. Insulate the walls and floor (we'll tell you more about this a little later) except for the place where the stove will be located.
Step four. Build a stove and make a hole in it for the chimney. Try to protect all items located near the stove from possible fire. Ask more experienced people what power the stove will require for your sauna.
Step five. Install furniture, doors and windows, insulate the dressing room and steam room, arrange a drainage pit and carefully consider the entire procedure for using the bathhouse. Consult with the same experienced people about ventilation for the furnace. Try to keep the floor not cold and heat loss to a minimum.
We build a shed from metal profiles
Change house
The construction of a frame made of metal profiles will require more effort compared to the construction of a wooden analogue. But the iron change house will last much longer.
The set of necessary tools includes:
- hammer;
- welding machine;
- drill;
- screwdrivers;
- corner;
- grinder;
- tassels;
- construction stapler;
- roulette;
- hacksaw
We also buy the following materials:
- profiled pipe measuring 2x2 cm, 4x2 cm, 4x4 cm and 4x6 cm;
- mounting rail 2x4 cm;
- galvanized sheet steel;
- corrugated sheeting;
- primer for metal;
- self-tapping screws for fastening corrugated sheets;
- screws for metal;
- staples for a construction stapler;
- rivets;
- OSB boards;
- polyurethane foam.
Making the base
We will assemble the base of the frame from a pipe measuring 4x6 cm. We cut the pipes in accordance with the dimensions of the structure being built.
We weld the pipes according to their external dimensions and get a rectangular edging. In total we need to make 2 identical rectangles. We will make the floor from one, and the upper part of the cabin from the other.
To make the floor reliable, we create a grid inside the rectangle from the same profiled pipes. We are making a change house with a width of 250 cm. With such dimensions, it is enough to weld 2-3 longitudinal pipes along the entire length inside the edging. We weld cross pipes every 50 cm.
Floor for change house
Next, we take a galvanized sheet and fix it with self-tapping screws to the base of our change house. We turn the base over and lay it with the galvanized sheet down on cinder block supports or simply a leveled area. The structure does not need to be attached to the cinder block - the cabin will be sufficiently supported by its own weight.
We mount the racks
Installation of racks
We make vertical supports from a 4x4 cm pipe. We cut it into pieces in accordance with the planned height of the change house. Usually it is 250 cm.
We place the first supports in the corners of the foundation constructed at the previous stage. We check that the angle at the junction of the posts with the base is strictly straight.
We fix the leveled rack by welding. Similarly, we set up the racks in the remaining corners.
Additionally, we will need to install intermediate racks. To do this without disturbing the geometry of the structure, we take the second rectangular pipe base made in the previous step and lay it on top of the corner posts.
We scald the resulting “cube” with intermediate posts and spacers. First, we take pieces of corrugated pipe 4x4 cm along the height of the structure and weld them vertically between the lower and upper bases. The recommended installation step is 100 cm. At the same stage, we provide an opening for the door.
We weld the horizontal cross member around the support structure. The pipe must be welded to the vertical posts at a height equal to half the height of the change house.
We make the spacers from a 2x4 cm profiled pipe. We cut it into 30-centimeter pieces. We cut each edge of the workpiece at a 45-degree angle. We scald all the corners of the structure with the resulting spacers. Additionally, we can scald the floor with them.
We make the roof
Frame for the roof
We made the lower part of the frame and the wall. Next we are engaged in the manufacture of the “skeleton” of the roof.
We invite you to find out what is the height of a log bathhouse
We make trusses in the form of isosceles triangles. We use a 2x4 cm pipe. The recommended installation step for the trusses is 1 m. We weld them along the length of the frame. We cover the roof with corrugated sheets. If you wish, you can use another material of your choice.
We cover all metal elements of the frame with a special primer, and after it dries, we apply paint of the desired color.
On carrying out insulation work on the carriage
Mandatory condition: the bathhouse must be insulated so that it becomes a reason for relaxation, relaxation, this applies to the steam room. The carriage can be of two types:
- From a wooden container.
- Iron construction.
In both cases, floors and walls will need to be insulated, only a metal trailer will require more insulation. When insulating the metal structure of a car, the beams should be secured with bolts that need to be welded. Then put insulation, it can be basalt wool, polystyrene foam or polyurethane.
The insulating wadding is wrapped in polyethylene film to prevent moisture from seeping through. Cover the insulation with siding strips or lining tiles. Often the sauna compartment, which is built on its own, is equipped with a fireplace. Its advantage is that the stone that is placed on top of it heats up perfectly and increases the temperature.
ABOUT INSULATION OF BATH
Be sure to insulate the bathhouse so that it truly becomes a place to relax. This is especially true for the steam room.
The trailer can be of two types:
- wooden;
- iron.
Both options will have to be insulated, with the only difference being that a metal trailer will require more effort and time. When insulating an iron trailer, weld the bolts to which the beams will be attached. After this, lay a layer of insulation (this can be basalt wool, polystyrene foam or polyurethane).
Note! Be sure to insulate the cotton wool with plastic film to prevent moisture penetration. Finish the insulating material with siding or clapboard.
Arrangement of a change house
We install windows and doors (it is better to purchase them ready-made). It is advisable that the windows have a hinged design and there are at least two of them - you will not have to waste time installing additional ventilation. We are starting to further arrange our cabin.
Windows and doors installed
Foundation for a bathhouse from a trailer
Before you begin installing and converting the trailer into a bathhouse, you should clearly determine its location, after which it will be necessary to carry out the following preparatory operations:
- clear the location you have chosen of stumps and debris;
- level and compact the soil at the location of the future bathhouse trailer;
- prepare a frame from 20x20 cm timber and install it on concrete blocks or brick pillars;
- sheathe the prepared frame with edged boards.
Upon completion of the preparatory operations, you can proceed directly to finishing the trailer.
Insulation of a bathhouse trailer
Bathhouses made from a trailer differ from ordinary trailer cabins in the level of thermal protection. This is especially true for a steam room, where it is not only necessary to create the desired temperature, but to maintain it for a long enough time. There are two versions of the trailer - wooden and metal.
Let's consider the last one as the most difficult.

Insulation of the trailer
- Weld pieces of a corner with a hole for a nail to the iron wall on the outside and inside; you can weld a plate, a strip, or weld a bolt.
- Attach a wooden beam with a section of 100x100 mm to them. In the first case, use a nail; in the second, pre-drill holes in it for the bolt and secure the material with a nut and washer.
- Install bath insulation between the bars, for example:
- basalt wool;
- isover;
- polyurethane sheets.
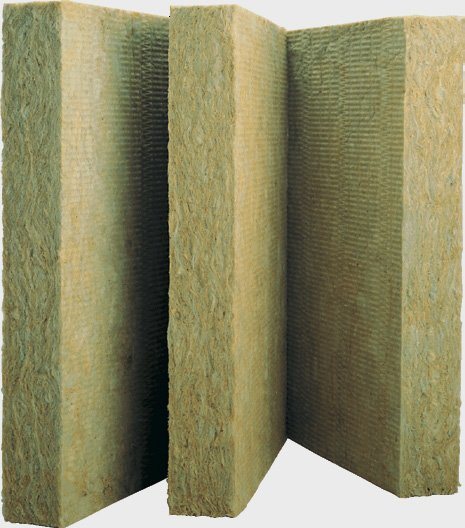
Basalt wool
- When using cotton wool, it must be protected from moisture with glassine or polyethylene film, which is placed on top of the beam.
- Cover the top of the structure with boards or siding.
- Insulate the trailer in the same way from the inside with 50x50 mm timber.
- Place polyurethane sheets on the floor and cover them with floorboards. This way you can reliably insulate the floor and reduce costs for heating the room.
Car interior inside
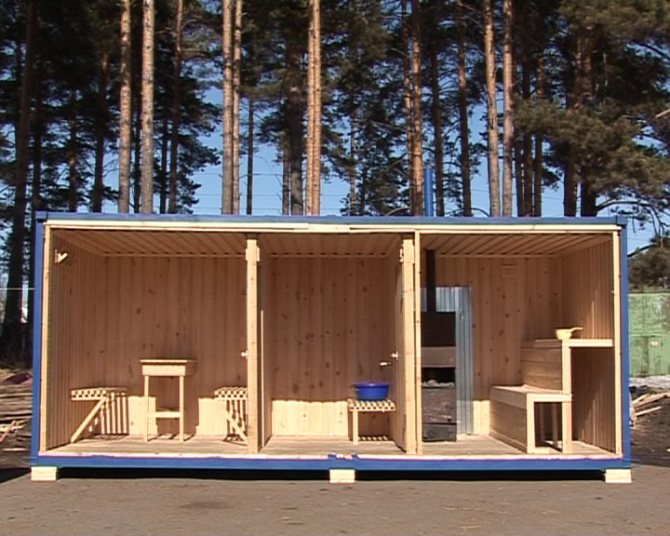
Typically, the bath compartment of a carriage contains four compartments:
- The vestibule corridor occupies the space up to the door of another room.
- Steam room.
- Shower in the dressing room.
- The section where they undress.
The place for clothes is never heated in order to save money. In order for the water to heat up, you need to place a barrel in the carriage to store water, which is heated from the stove, or connect an electric boiler. The arrangement of the bathhouse depends on the preferences of the owner and his financial wallet.
We carry out external cladding
We cover the frame with film
. The cabin trailer can be left without cladding, but a structure made of wood or metal will require mandatory external finishing. We won’t just leave the “bare” frame, will we?
We cover the frame with waterproofing film. Carefully seal the joints of the waterproofing strips with tape. Many different materials are suitable for external wall cladding:
- wooden boards;
- composite panels;
- siding, etc.
Choose at your own discretion. The cabins covered with a block house also look very nice.
External cladding of the cabin with siding
Electricity
Electricity in the change house
We will not install full-fledged wiring into the change house. Such buildings are not permanent and do not require such equipment. But how, in this case, can at least organize lighting and heating? A good extension cord with a cord of suitable length will help us with this. We turn it on to the nearest available source of electricity and pull it into the change house.
In a change house, we can include a tee in such an extension cord for greater convenience and the ability to use several electrical appliances at once.
Lighting
We arrange it at our discretion. In general, a few simple lamps installed in the main functional areas will be enough for a change house.
Lighting in the cabin
Water supply
For maximum ease of use of the cabin, we run water into it. We will not build a major expensive water supply system. It is enough to connect a flexible hose to a water supply source, insert it into the household through a pre-prepared hole in the wall and equip it with a tap to shut off the water.
We can install a compact water heater near the hose attachment point. Special bulk models are available on the market. It is enough to remove the top cover from such a tank, fill the container with water from a hose, plug in the heating unit, and after a short time use warm water at your discretion. If desired, a hose with a shower head can be easily connected to such a water heater.
A compact sink wouldn’t be out of place in your household. We attach it to the wall in a convenient place. We connect a corrugated pipe to the sink drain to drain water. We remove the corrugation through a pre-arranged hole in the floor and connect it to the sewer pipe. Water will flow through the sewer pipe into a drainage hole or other designated place.
DIY change house (interior)
We Build With Our Hands.rf
After purchasing a plot of land, pleasant chores begin related to planning the site, choosing a project, and purchasing the necessary building materials.
As you know, construction is not a quick task, and with limited finances it can last for many years. Well, how can you, if you have a plot of land, not relax, barbecue with friends, or spend a pleasant time on it while construction is going on? You can organize a good holiday on your site with a minimum of necessary buildings. The first thing that appears on the site and is building number one is the toilet. You can't go anywhere without him. For comfortable living during the warm season, an ordinary construction shed is suitable. In this article, we will look at how to diversify and complement your holiday with a Russian bathhouse, which you can make with your own hands from a change house or a container.
A good wooden sauna made of logs or timber is not cheap, and the construction of such a sauna will take at least two years, but you want to take a steam bath with a broom and fragrant steam today.
You can buy a not very expensive change house outside the construction season, that is, in winter, or buy a used one. The change house does not need a powerful foundation. It can be installed on small concrete blocks. The number of possible rooms in the future bathhouse will depend on the size of the cabin. In a small cabin you can only place a steam room and a relaxation room or washing room, but in a large one you can even place a toilet. When purchasing a change house that is subsequently planned to be converted into a bathhouse, you need to pay attention not only to its size, but also to the insulation of the walls, floor and ceiling. The minimum thickness of insulation in the wall should be at least ten centimeters. If the thickness of the insulation is less, then the entire frame of the cabin will have to be redone, since the timber for it is selected based on the thickness of the insulation. To retain heat in the steam room for a longer period of time, it is necessary to additionally lay foil insulation along the walls and seal the joints with foil tape. In inexpensive cabins, the inside walls are usually lined with hardboard, which is not suitable for a bathhouse. In this case, the walls of the change house will have to be redone with your own hands and covered with wooden clapboard. This will not be very difficult to do, since there is no need to arrange the sheathing. The lining can be fixed directly to the frame of the cabin. To decorate a steam room in a bathhouse, linden lining is usually used. It does not contain resin and does not emit harmful substances when heated.
The electrical wiring in the part of the cabin where the steam room will be located must be replaced with heat-resistant wiring. The lamp will also need to be replaced with heat-resistant ones. For greater safety and to avoid fire, it is necessary to install an electrical panel with an RCD (residual current device) and automatic circuit breakers.
Furniture for a bathhouse can also be made with your own hands from wooden boards, which will probably remain redundant during construction. For a couple of benches and a table you won’t need a lot of them.
From the outside, you can not touch the trailer and leave everything as it is, but if you really want to give it the look of a real log bathhouse, then you can fork out for a House block. Its installation can also be done by hand. The old finishing (wallpaper, corrugated sheet) will need to be dismantled and the House block attached to the existing frame.

To give a more aesthetic appearance to a bathhouse from a change house, it is better to convert the roof to a gable roof, if there was not one initially. To do this, you don’t have to dismantle the old roof, but just make rafters on it. Make lathing along the rafters and cover the roof with roofing material (corrugated sheets, metal tiles). For a more pleasant time on the site and using the bathhouse from the cabin as a gazebo, you can attach a spacious veranda to it with your own hands. To do this, we will need several concrete blocks instead of a foundation and several 100 by 100 mm bars. We make the lower trim from the bars, part of which we attach to the change house. From the same bars we make racks and the upper frame according to the principle of the bottom. We put up the rafters and cover it with a roof. If you make a gable roof, common with the change house, you will get a completely residential second floor.
The only thing left to do is purchase and install the stove. The choice of stove will depend on the size of the steam room. The larger the steam room, the more powerful and expensive the stove. For a bathhouse from a change house, a wood-burning stove, the so-called heater, is ideal.
As you can see, it is inexpensive and useful to make a bathhouse from a change house with your own hands. And if you get a little creative with the exterior design, you may well end up with a masterpiece that will remain on your property forever.