To make shelves in a bathhouse with your own hands, you need to be well prepared for construction. Suitable materials are selected, a plan, the shape of the shelves, and the number of tiers are developed. Compliance with the work technology will allow you to steam on new shelves within a few days after the start of their construction.
- How to make shelves in a bathhouse with your own hands
- Construction device
- Size of shelves in steam room
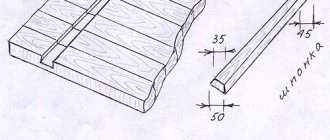
- Shelf boards
- How to cover shelves in a bathhouse
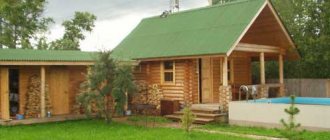
We are building a sauna
Wood selection
In extreme conditions of high temperatures and high humidity, Russian steam rooms are traditionally equipped with only wooden shelves for the bath, and they try to exclude plastic and rubber: after all, they can accidentally ignite or melt. In addition, high-quality shelves for a bathhouse can be made not from any wood, but only from its species that meet the following conditions:
- low thermal conductivity;
- minimum resin content;
- high fiber density;
- Resistant to extreme heat and high humidity.
In the Russian tradition of arranging baths, linden and aspen are most often used, and a little less often - birch and poplar. Relatively recently, an African guest appeared in the holy of holies of the Russian bathhouse - the exotic abashi tree. These types of wood fully meet the strict requirements for material for bath shelves, although each of them has its own disadvantages. Coniferous wood is not at all suitable for bathhouses. The rating of preferences for “bathroom” wood looks like this.
Linden wood is flawless, has almost no knots and is easy to process. Linden heats up slowly, but dries very quickly, it does not crack and stains from sweat remain on it. When heated, linden emits an unobtrusive, delicate aroma. The healing power of the linden tree has long been revered by people as a source of positive energy and well-being of body and soul. The cost of linden boards is low, and their only drawback is that they quickly darken in a hot and humid atmosphere.
- Aspen
Perhaps the cheapest wood for a bathhouse, and therefore very popular among builders. Aspen is famous among the people as a healer of spiritual adversity; it is capable of absorbing negative energy, freeing a person from it. Came out, reborn - this is about a steam room made of aspen. A significant, “hidden” flaw in wood is its tendency to rot from the inside.
Aspen boards that appear to be of good quality may turn out to be defective.
- Abashi
An African alien who grew up in a hot and humid climate is ideal for a Russian bath. It is not afraid of heat and moisture, it heats up extremely slowly and retains its original fresh appearance and luxurious color from yellowish to cream for a very long time. So far it has only one drawback - its high price, which is unaffordable for many.
Shelves made of abashi wood retain a fresh look for a long time and have a luxurious color from yellowish to cream
Types of shelves for baths
Construction supermarkets are overflowing with a variety of accessories for creating bathhouses, but if you personally realize the dream of your own unique bathhouse, then you definitely won’t entrust its holy of holies steam room to outside craftsmen and will probably make shelves for the bathhouse with your own hands.
When thinking about how to build shelves in a bathhouse, you should first decide what their design will be and how best to arrange them in the specific room of your steam room. Based on the design differences, three main types of bath shelves can be distinguished:
- benches;
- sun loungers;
- beds.
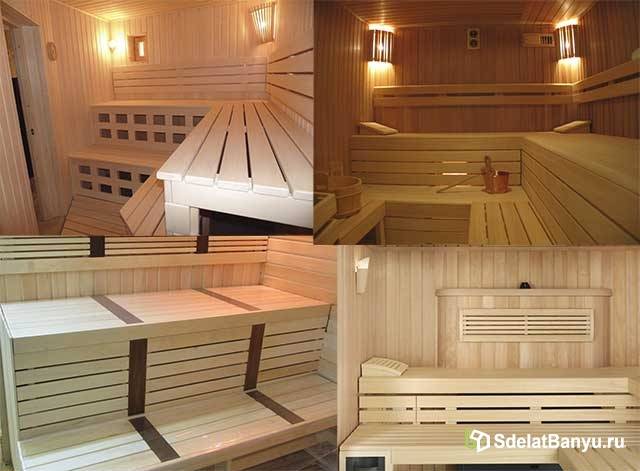
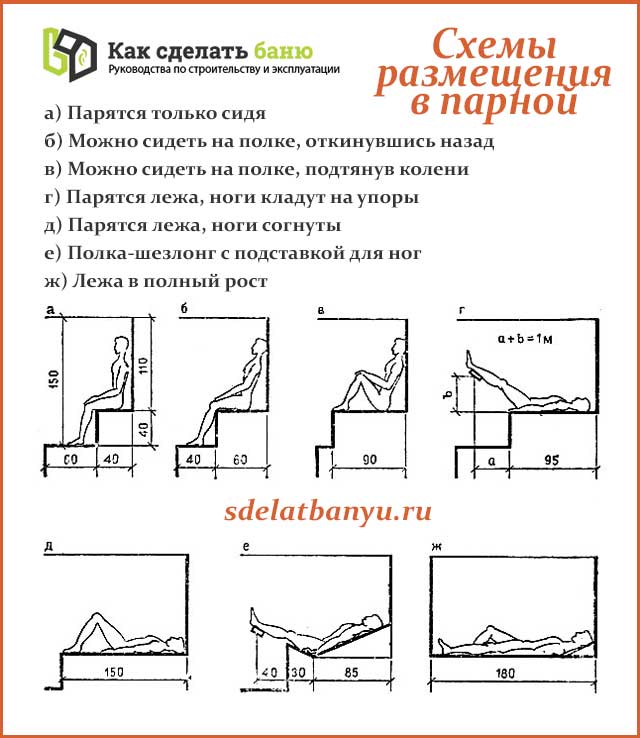
Already from the names of the shelves it is clear that fans of relaxation in a lying position will prefer couches, someone loves a semi-sitting position and will choose a chaise lounge, and those who like to steam and at the same time talk with a pleasant interlocutor will be completely satisfied with benches. The final choice, of course, rests with the owner of the future steam room, but the final dimensions of the shelves depend on the chosen design. The illustration will help you choose the ideal shelves for your bath - the photo selection presents not only the main structural configurations of the products, but also the recommended optimal dimensions for them.
Basic design configurations of bath shelves and their optimal dimensions
You can endlessly think about how to make a shelf in a bathhouse that will satisfy the preferences of all family members and appeal to potential guests and not find the right solution. Therefore, it is wiser to draw a drawing of shelves for a bathhouse, perhaps more than one, taking into account the dimensions of the steam room and combining different shelf designs.
Layout plans
When linking the design of the shelves to the steam room in the drawing, usually a three-tier one, several nuances should be taken into account.
- The height of the shelves is determined by the number of tiers. If the ceiling height of the steam room is low, the lower level of the three-tier shelf is lowered to the floor, providing only a gap for air circulation.
- The upper tier is always made wider than the others (about 90 cm) and used as a bed. The best place for benches and sun loungers is the first and second tiers.
- The distance between the third tier and the ceiling, which is most comfortable for a person’s well-being, should not be less than 1-1.2 m.
- According to safety rules, shelves cannot be placed along walls with windows: if hot water and steam get on cold glass, it can crack and injure people.
- In a spacious steam room, shelves will be placed along any or all free walls without windows. If there is not enough space in the room, choose the largest wall to install a shelf.
One of the three diagrams below will help you decide how to make the shelves in the bathhouse as compact as possible, but at the same time convenient. Three design options for the arrangement of shelves in the steam room:
- Coupe. The design is ideal for very small steam rooms: here two shelves (only the middle and top) are attached to one wall, one above the other. The top shelf is equipped with latches and hinges so that, if necessary, it can be lifted and fixed on the wall, as is done in a train compartment.
Do-it-yourself bathhouse shelves - step-by-step guide
Before installing the structural elements of the shelves, the beams and boards are carefully ground and sharp corners are smoothed. To ensure that the wood for shelves lasts a long time and is resistant to rot and pests, it is treated with a natural-based antiseptic solution. The use of synthetic antiseptic compounds is unacceptable: under the influence of heat and moisture, they can become a source of harmful toxic fumes.
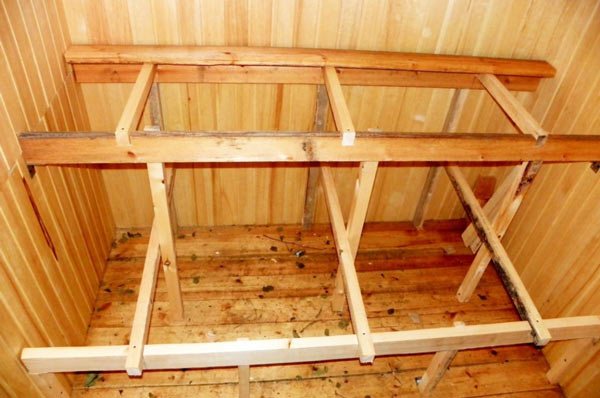
Step two - assemble the frame
Recommendations on how to make shelves for a bathhouse are extremely simple. First, the frame is assembled - several support posts made of thick timber 50x70 mm in cross section, installed vertically and fastened horizontally together with strapping. To give the structure stability and strength, the frame posts are sometimes attached to the wall. To prevent the future flooring from sagging, the vertical supports of the frame are installed at a distance of no more than 60 cm.
Step three - make benches
Benches, stationary or removable, are made of thin boards, stuffed onto the frame with a gap of 1-2 cm. For free flow of water, ensure that the seat is tilted at an angle of 1-2°. Boards are selected keeping the ratio of their thickness and width within 1:4 - this is a condition for the strength and quick drying of the product. If it is possible to make the shelves for the bathhouse collapsible, this should be foreseen in advance when preparing for installation. After all, by easily disassembling the bulky structure into small fragments, you can quickly dry them in the sun.
Two options for steam room shelves: removable and stationary
To connect structural parts, oak wedges are used, driving them into pre-prepared holes at the joints. When installing wooden structures for baths, try not to use nails and screws, at least in places of direct contact between the bench and a person, to prevent possible burns. If it is impossible to do without traditional fasteners, they try to bury metal screws or nails into the wood to a depth of 5-6 mm, or screw them in from the so-called underside of the shelves.
If the owner of the future steam room is not guided by his own considerations regarding the overall dimensions of the shelves, then standard recommendations are used in their manufacture:
- minimum bench length - 150-180 cm;
- width - 40-150 cm, depending on the preferred position for relaxation and the dimensions of the steam room;
- height - 40-60 cm between levels, at least 20 cm from the floor, at least 100-120 cm from the ceiling.
Step four - attach the shelves
The middle and upper tiers are attached to the wall with a ventilation gap of 10 cm. The lower shelf is usually mounted movable on specially designed runners - this simplifies cleaning the room. At the points of contact between the shelf frame and the floor, special rubber gaskets are placed for waterproofing. Sometimes the bottom shelf in a not too spacious steam room is made in the shape of a triangle, at the apex of which two sides meet - the adjacent walls: the design allows all the benches to be compactly placed.
Construction device
The shelves in the bathhouse are often called a bench in the common people. They are called that for a reason, since the entire structure is a flooring of benches that differ in level. Any shelf design for a bathhouse consists of two fundamental parts:
The frame is necessary for the correct fastening of boards for permanent decking; it is also used to support a collapsible decking system.
To build it, support posts are required; they can be compared to the legs of a bench. The racks are connected by large boards that serve as jumpers necessary for the correct, level position of the shelf. Very rarely they are built according to the stringer principle, which serves as the basis for installing a flight of stairs.
If Finnish technology is used, then when creating the frame there is no need to install supports, since the entire structure can be attached to the walls of the steam room. The flooring is made of thin planks, which are first made absolutely smooth by sanding. Their thickness is about 2 cm. It is recommended to choose linden or aspen as the material for production.
The boards are stuffed with a small gap. The flooring is attached to the frame or to the ladders, which need to be separately put together and installed on the floor. If the flooring is not fixed, it can be taken out into the fresh air for ventilation in the summer. Together with the flooring, you can build backrests for seats, devices for raising legs to a certain height, and sides of shelves.
The steam room is usually built in small sizes, since the smaller the room, the lower the heating costs and the faster it warms up to the required temperature for steaming. To set up a steam room well, you need simple, even furniture. Ladders for climbing shelves are often large and have 2-3 steps.

If possible, you can allocate the necessary area for the construction of a chaise lounge or sofa, often rounded in shape.
If the bath area is too small, it may not be possible to create a bottom shelf of a standard shape and size. In this case, you can build a triangular shelf. You should get an isosceles triangle, one of the legs of which needs to be attached to the wall, and the second is adjacent to the adjacent shelf.
Bath shelves are always multi-stage.
This is due to the simplest laws of physics. The hot air gradually rises upward, part of it goes outside through the ventilation, and the rest is reflected from the pre-installed overhead system, so it returns and remains at the top of the building. Gradually, the upper part of the room becomes much warmer than the lower part, so everyone has the opportunity to choose the optimal temperature for themselves by sitting on a specific shelf.
When constructing shelves, you should adhere to the traditional configuration, designed according to the principle of a ladder.
With each vape, a person will be able to independently choose a strong steam or a fairly moderate atmosphere. In addition to this aspect, the bottom shelf is of particular importance. With its help, the bath attendant can easily climb to higher tiers or use it as a podium for a convenient approach to the person receiving the procedure.
If the bottom shelf is not intended to be used as a supporting element, then the distance from the floor to it must be at least 30 cm.
In the steam room you can install shelves on both two and three sides.
A large number of them will allow you to invite more guests to the bathhouse. When planning the structure, it is necessary to take into account the possibility of free movement. Staying in the steam room should not cause traumatic consequences.
Another video about how to make shelves for a bathhouse.
Video instructions: do-it-yourself installation of shelves
When arranging a bathhouse, do not forget about the optional, but very pleasant additions to the shelves, without which spending time in the steam room would not be so comfortable. We are talking about wooden foot and head rests. In order to be able to lie on a shelf with your legs raised above head level, use a portable footrest. This is the simplest design of two wooden surfaces connected to each other at an angle of 30-45°, but how much benefit and pleasure it brings to people relaxing in the bathhouse. A similar design - a wooden “pillow”, unlike a footrest, is not only removable, but also stationary.
Optional, but pleasant additional accessories to the shelves bring special comfort to the atmosphere of rest and relaxation
It is recommended to leave the space between the two levels of shelves open, which is not always convenient for vacationers: you want to lean your elbows or lean against something. The solution is to create wooden backs by hammering wooden strips into two-centimeter gaps between the steps and not forgetting to leave gaps at the top and bottom for ventilation. If additional accessories are made from aromatic wood of medicinal plants, they can become an excellent component of aromatherapy.
The steam room and the shelves in it are the soul of the bathhouse. A very beautiful bathhouse can overnight turn into a dull log house if the shelves are poorly designed and carelessly executed.
In order to take a steam bath comfortably and profitably, you need to install shelves in compliance with certain standards. The decking material also needs to be chosen wisely. In this article we will tell you how to make shelves in a bathhouse with your own hands, give step-by-step instructions, as well as drawings, photos and video instructions.
Dimensions
Despite the fact that we have already published a detailed discussion of the issue of how to make shelves in a bathhouse correctly, choosing the optimal size, we will briefly go over the most significant points .
So, the dimensions of the shelf in width and height are determined solely by the type of use.
If it is intended exclusively for sitting , then a width of 45 to 60 cm, with a height of 35 to 50 cm, will be enough for you.
If you plan to steam while lying down on the shelf, the minimum width will be 60 cm, but there is simply no maximum - the sunbed can be a meter or two in width. The best thing is to measure the desired width of the material at hand and lie on these boards or something similar, trying it on for convenience.
Shelf material
The atmosphere in the steam room is characterized by high temperature and humidity; not every material can withstand this combination. Traditionally, wood is used for bath flooring. A suitable type of wood must have certain properties:
- low thermal conductivity, guaranteeing a comfortable flooring temperature for humans;
- moisture resistance;
- minimal amount of resin in the wood structure.
Experienced craftsmen recommend linden, aspen, maple, poplar, and abashi for shelves. Conifers tolerate moisture well, but at high temperatures, resin begins to appear on their surface. This can lead to burns, so it is better to use excellent pine or spruce wood for furniture in the rest room or washing room.
Linden - when heated, it emits a special aroma and healing fumes. The wood dries quickly, does not crack, and is easy to process. In a hot and humid atmosphere, the material changes color from light to dark.
Aspen is a common choice for shelving due to its combination of strength and low price. The boards retain their dimensions during temperature fluctuations and do not deform. According to pagan beliefs, aspen frees you from negativity and heals mental trauma. Externally, the material is preserved for a long time, but the inside of the boards is susceptible to rotting.
Abashi - expensive African wood has a beautiful yellowish or creamy tint, retains its high quality appearance for a long period of time. It has low thermal conductivity, flexible and durable material serves as a comfortable flooring. The high price of foreign wood makes it accessible only to a limited number of people.
Maple – shows excellent resistance to moisture and heat.
Location
You choose the number of tiers in the steam room yourself; if there are not many people going to the bathhouse, 1–2 tiers are enough. Three tiers can be placed in a high room; there should be at least a meter between the top flooring and the ceiling. The shelves are located along the walls that have no windows. Beds are placed:
- stepped along one wall;
- perpendicular to adjacent walls;
- parallel to each other on opposite walls, the top row reclines for convenience.
The dimensions of the shelves depend on the tier: the top one is 90 cm wide, the middle and bottom ones are 80 cm wide. The length can vary from 150 to 180 cm, it depends on the size of the steam room.
Shelf height
should be comfortable for a sitting person - the top shelf is attached at a height of 120 cm, the comfortable height of the middle flooring is 70–80 cm, the bottom shelf is attached at a level of 40 cm.
Installation
Before making shelves, the bars and boards intended for them are carefully sanded and treated with a special natural-based antiseptic. The shelf frame is constructed from bars, the support posts are made with a cross section of 50x70 mm.
- The position of the rear posts is marked on the wall, they are fixed to the surface with self-tapping screws.
- The horizontal beams, which form the frame to which the plank flooring will be attached, are screwed at their ends to the opposite walls. Transverse parts equal to the width of the shelf are attached to the walls along the entire length. Between the wall and the adjacent longitudinal beam, it is necessary to attach small pieces 10 cm thick so that there is a gap for water drainage. The horizontal plane of the beams is checked by level.
- The rear beam is attached with self-tapping screws to the vertical posts.
- The front vertical posts are installed parallel to the rear ones, rubber is placed under the ends. Correct installation should be checked using a level.
- The front beam is connected to the racks.
- Grooves are cut into the beams for attaching crossbars, at a distance of 60 cm from each other.
- The crossbars are placed in grooves and fixed with self-tapping screws.
- For reliability, the vertical posts are connected in the middle by beams.
- The length of the boards used is equal to the length of the shelf, width – 120 mm, thickness – 22 mm. They are screwed to the deck frame from the reverse side or the heads of the screws are recessed into the wood. The screw-in areas are covered with special mastic to prevent burns. A gap of 1–2 cm is left between the slats for water to drain.
Using self-tapping screws instead of nails allows you to securely fasten the structure and leaves the opportunity to disassemble the shelves to dry or replace the element.
This is how shelves for a bathhouse are made; if you are going to make several tiers, then they are made according to a similar scheme: the frame for the top shelf is assembled and the base for the bottom shelf is attached to it.
Video
Watch the video, which contains a detailed description of assembling the steam room shelf:
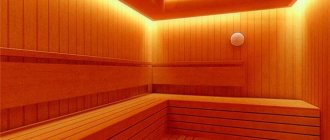
Any room, regardless of the specifics of its use, has some kind of “filling”, furnishings. In relation to a bathhouse, the interior design (except for wall decoration, installation of electrical wiring, etc.) consists of placing the appropriate pieces of furniture. Let's try to figure out how to make shelves in a bathhouse with our own hands, consider the drawings, dimensions and materials of manufacture.
To make bathing procedures more comfortable, the steam room is always equipped with a place where a person can sit down, lie down, and take any position convenient for him, that is, completely relax.
Since everyone has their own idea of comfort in a bathhouse, and desires are often limited by the dimensions of the premises, the author considers it advisable to present only certain options for the design of the shelves. In fact, these are floorings of various configurations and “number of floors” (in one or several tiers), of various lengths and widths.
Many people prefer (in order to save time and space) to limit themselves to just wide benches when arranging a steam room. For those for whom they are quite enough in the bathhouse, we will give the following examples.
Shelves in the bathhouse are a more complex option. The choice of a specific engineering solution depends, first of all, on your own capabilities. Not everyone is able to make a structure with their own hands, for example, a multi-tiered one. For readers who have a modest-sized bathhouse on their property, we can offer a simple model of a shelf. One can argue about its universality for a long time, but the fact that it fulfills its function is unambiguous.
Optimal sizes
In order to make comfortable and functional shelves in the sauna and bathhouse, you first need to decide on the appropriate dimensions.
Many bathhouse owners prefer multi-tiered structures; the most common option is three-tiered shelves. However, experts recommend choosing shelves in two rows for a Russian bath. This is economical and quite convenient for bathhouse attendants; in addition, it is easier to build them with your own hands.
To make a high-quality design, you need to focus on the following dimensions of the shelves in the bathhouse:
By height
The optimal shelf height is determined by the average height of visitors. This ensures the convenience of carrying out procedures, while the bath shelf must be located at the level of the thumb of the hand, lowered down in a sitting position. The average height is 80 cm.
It is also important to maintain the permissible distance between the bench and the ceiling of the steam room of 120 cm. This is determined by the level of comfort when the bath attendant is positioned in a sitting or lying position.
The height of the steam room should be at least 210 cm, which is enough to effectively heat the room with the formation of thick and clean steam.
Attention! If you plan to make shelves in two levels, then the height of the lower shelf from the floor base should be 50 cm, and the top – 90 cm.
At the same time, do not forget that it is not recommended to install bath shelves too high.
By length and width
The dimensions of the shelves in the steam room are also determined by length and width. For convenient procedures in a lying position, the length of the bench should be 220 cm and the width – 95 cm. This size is enough to fit a person of average or tall height with comfort and convenience.
The length of the shelves may be shorter if the bathhouse has more compact dimensions.
Attention! Between the decorative cladding of the walls and the shelves, a technological gap of 4 mm must be maintained on all sides, taking into account the expansion coefficient of wood during swelling.
When arranging a two-row structure, the width of the lower shelves is 55 cm, and the upper ones - up to 75 cm. Small gaps of 6 mm are also maintained between the individual elements of the benches. If there are side benches, their width is 45 cm.
The number of shelves is determined by the dimensions and operational features of the steam room.
Instructions for making your own shelf
It should look something like this:
The operating procedure is described in detail in the pictures, the necessary explanations are given, so adding anything else is completely unnecessary.
It remains only to clarify certain points. By the way, all this must be taken into account regardless of which shelf will be installed and in which bathhouse.
Design Features
- In order not to disturb the natural circulation of air flows in the bathhouse, the minimum distance between the floor and the lower edge of the shelf is 2 - 3, between tiers - 10.
- The bed is always located along a “blank” wall. Installing a shelf near a bathhouse window runs the risk that if hot water splashes on the glass, it will burst (crack) in winter.
- Since steam accumulates at the top, the distance between the top of the shelf and the ceiling should be at least a meter.
- Boards cannot be fastened end to end. There must be gaps between them so that the water does not stagnate, but flows onto the floor. For the same purpose, the seat flooring itself and the shelf itself is mounted with a slight slope from the back (about 1.5 º).
Features of the choice of materials
- Alder.
- Birch.
- Aspen (optimal choice).
- Poplar.
and more expensive ones, such as cedar, oak.
Options:
- Beam (for supporting elements of the shelf - racks) - cross-section of at least 5.
- Board. Their thickness is selected depending on the length of the shelf, in what order and how many supports are installed, their cross-section, and so on. It all depends on the diagram drawn up. The optimal ratio for a bathhouse (taking into account the total weight of several people) width/thickness of the board is considered to be 4 to 1. Reasoning is a good combination of the drying speed of the wood and the strength of the shelf.
For small steam rooms, it is advisable to install shelves according to the “compartment” principle - a bed on top of a bed. Their sidewalls are fixed on opposite walls.
Before use, any wood, especially in a bathhouse, is treated (antiseptics, fire retardants -). For the products from which the shelves are assembled, you cannot use preparations that contain “chemicals”, since at high temperatures in the steam room, intense release of toxic substances cannot be avoided. We can recommend impregnation with linseed oil - a fairly effective natural remedy.
When drawing up a diagram of a shelf and planning a method for fastening its structural elements, it is necessary to provide for the ease of dismantling the boards. To make them last longer, it is advisable to periodically remove them, take them out of the bathhouse and dry them in the open air, in the breeze and sun.
It is better to use wooden products (dowels, wedges, choppers, etc.) as fasteners. At least in those places where their contact with the human body is possible. Metal fasteners can cause burns in high temperature environments. Where it is impossible to do without it, it is necessary to drill out chamfers and install them in a hidden way, recessing the heads into the wood. Or screw in (screw in, drive in) from the back side of the workpieces.
Table of contents:
Do you need to build shelves in a Russian bath? Please note that the design of furniture in a steam room must meet clear rules and regulations, the implementation of which will allow it to withstand the harsh “climate” of the room, be comfortable, safe and easy to use.
We will dwell in detail on how to make shelves in a bathhouse, dividing all the useful information into several thematic blocks.
- Choosing the right building material
- Design of shelves for a bath; types, parameters and installation rules
- How to make comfortable shelves in a bathhouse? Additional accessories for them
- Making and installing shelves for a bathhouse with your own hands
- How do you protect shelves from premature “aging”?
After reading the material, you will have sufficient information on the topic and will be able to properly equip a steam room of any size.
How to make shelves in a steam room yourself and correctly
Well, we’ve come to the instructions. We bring to your attention three options for how to make shelves in a bathhouse in a steam room with your own hands - corner, folding and removable.
Angular: Step by Step Guide
So, make a corner shelf for your bathhouse with your own hands. This means that you will stretch it along two adjacent walls. Exactly what length is up to you to decide based on the dimensions of the steam room. As you understand, we cannot adapt to your specifics, so we will give one example of how to make shelves in a bathhouse , and you will act by analogy.
The first step is to build a drawing. To do this, we measure the room and determine the size and number of tiers of the future shelf.
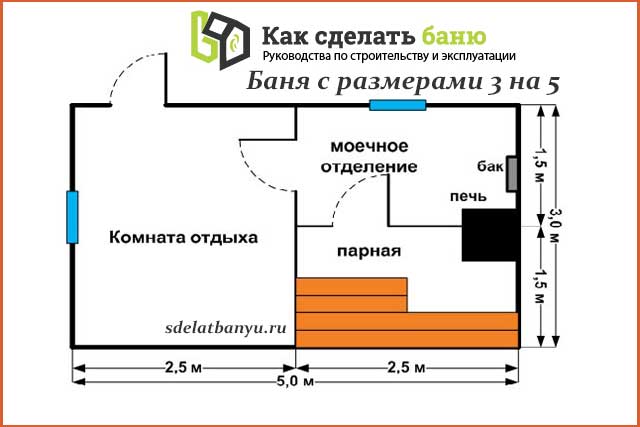
In our case, the shelves are corner, three-tiered, with dimensions of 280 by 220 cm . It has three tiers on the short side and two on the longer side. The first two tiers are the L-shaped structure itself, a solid one that has to be made. Fans of Russian baths don’t have to worry about the third tier - it is only needed in the sauna.
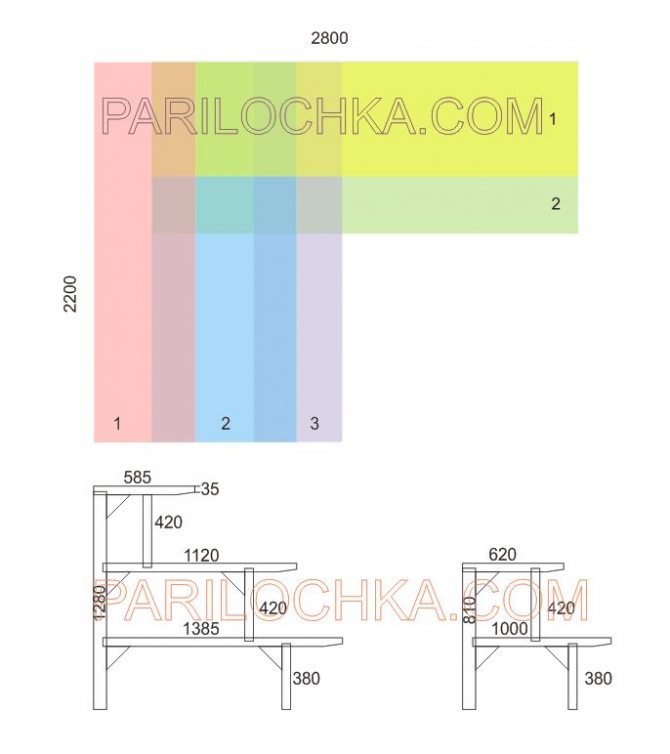
The figure shows a plan with a top view and with drawings of supports on one and the other side of the L-shaped structure. Your task is to make a drawing yourself to fit the dimensions of your steam room. Focus on the following:
The depth of the grooves is 20 mm throughout. The board used was 75 by 50 mm, processed, that is, its linear dimensions could have decreased during the leveling process.
Please note that the structure is made autonomous from the wall. When installing in a steam room, you do not need to attach the shelf in the bathhouse to the wall; they will stand autonomously, only point-wise fastened to the wall with corners with a gap of 1 cm .
The first stage after drawing the drawing is calculating the amount of material. Assume that there will be 5 large supports, 4 small ones. Or, proceed from the ratio of one support per half meter.
The next stage is preparing the lumber. You can even use cheap spruce or pine for the frame is better for flooring .
When the parts are ready, grooves are made in them. To do this, you should make a pattern and go over it with a milling cutter in the right places. Ideally, the inserted part should fit fairly easily, but should fit tightly so that the connection can be lifted by hand without it falling apart.
It is better to take galvanized ones that do not rust
The bars inserted into the groove are fastened from the outside with self-tapping screws - directly along the connection. The fastening of the remaining parts of the shelves in the bathhouse is done end-to-end and also with self-tapping screws. However, some may prefer corners.
The finished support should be sanded, after which it is covered everywhere with impregnation for saunas (you can read more about impregnations suitable for steam rooms here). It is advisable to do this: soak it, dry it, lightly sand it, soak it again.
Please note that for now we are just assembling the supports, each separately . We have not yet gotten to the point of assembling the shelves, because we will be doing this directly in the bathhouse. In the meantime, work can be carried out in a workshop outside.
The next stage is assembling the frame without flooring . You will need a plumb line and a level to ensure everything is level. In this case, the supports are assembled onto connecting crossbars, which will later become a support for the flooring.
The difficult point is the jibs, which are needed for the future flooring at the junction of two shelves at an angle of 90 degrees. Through this jib from below, you should later attach the boards, edged at 45 degrees, to the shelves in the bathhouse.
You can begin to sheathe the finished frame with boards, but first you should install it in the bathhouse and install the corners between the wall and the structure. Only then can you begin to equip the flooring .
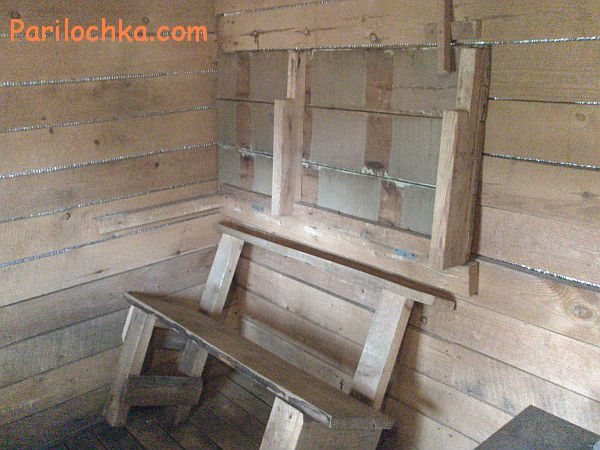
The first step is to mount the canopies - these are boards that will be under the knee of the person sitting on the shelf. The canopy is made from an ordinary linden board for a shelf, rounded on both sides, which is cut on one side to a flat surface. Then a 40 mm long block is glued from below to such a board, also straight on one side and rounded on the other. See picture below.

In the same picture you can see the chamfer removed after the visor has dried. It should be removed so that there is nothing digging under the knees.
Next, you screw all the other flooring boards onto self-tapping screws from below, not forgetting about the gaps, which are best set using inserts of the required thickness. All flooring boards are also prepared in advance - sawed, sanded, impregnated with the same composition for baths or saunas - as described above.
Since in this design each tier forms a kind of niche, you can safely sew up the gaps between the tiers - this is done with clapboard or shelf board.
Folding
The only difference between the folding shelf and the design described above is that you will not screw the flooring with self-tapping screws to the transverse bars of the frame.
Instead, the folding shelf deck will be assembled as a free-standing structure - the boards are attached to cross bars that are not connected to the frame . Since this creates protrusions, the easiest way is to make grooves in the frame for them, which, moreover, will increase the rigidity of the structure and prevent it from moving.
Below we show a diagram of how to attach the hinges to the timber and flooring. With this installation method, you have no chance of getting burned on the heated hinges, unless, of course, you stick your hands in