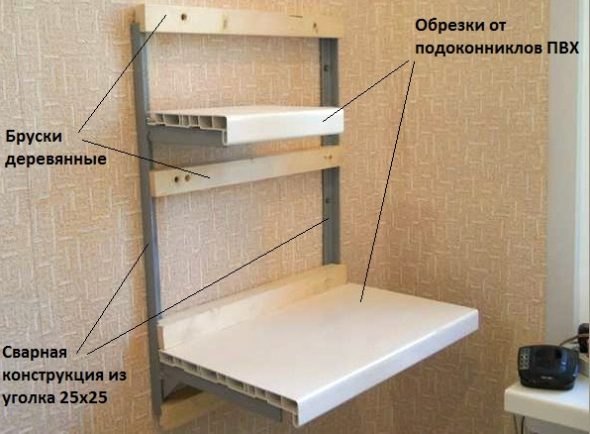
Today, old-fashioned sideboards and spacious wardrobes are fading into the background. Instead, designers suggest using shelves in rooms.
An interestingly made shelf becomes a wonderful interior decoration, and at the same time convenient for storing small items.
The presented piece of furniture no longer looks standard and the same type.
Today, shelves have many faces: hanging, asymmetrical, with drawers, glass, etc. They can take any shape, they can even be completely hidden under books, they can even be made from ordinary pallets.

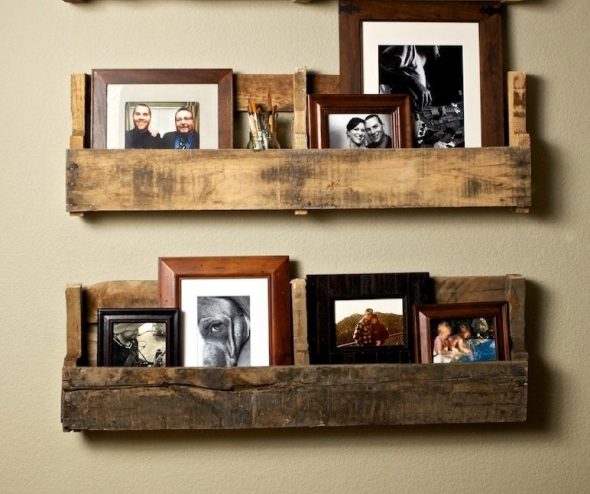
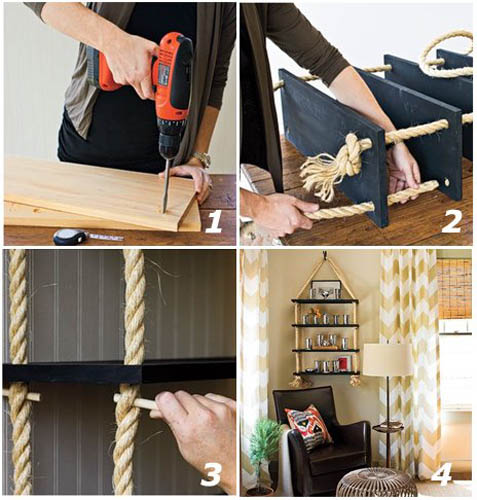
Shelf-hanger from... the back of a chair
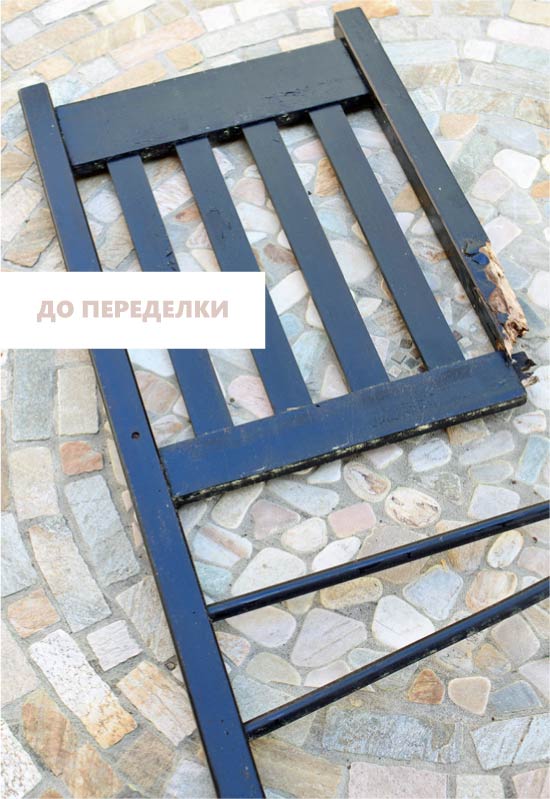
If you have an old wooden chair, or rather the back of a chair, then you can use it to make a cute shelf with hooks. It can be hung in the kitchen to be used for storing kitchen towels and aprons, in the bathroom, and in the hallway.
This is how the back of the chair was before the alteration...
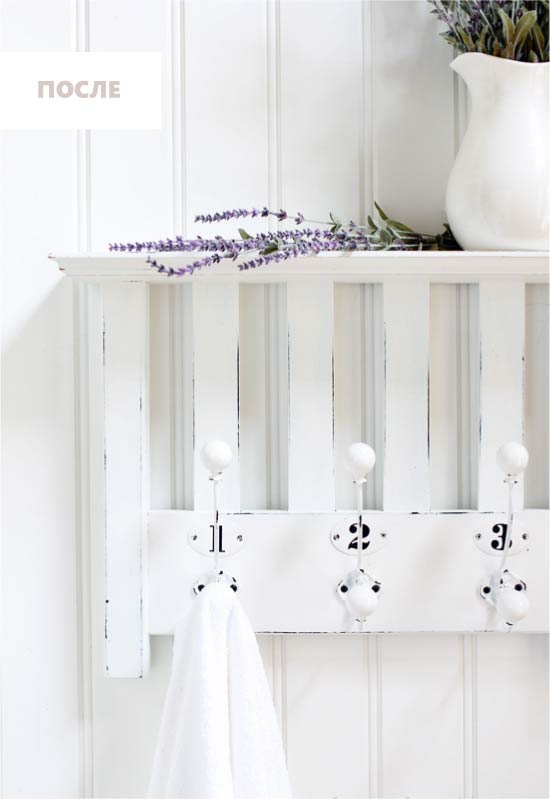
...and this is what I became after!
- Wooden chair back;
- A small board made of wood or plywood;
- Three metal hooks;
- Wood pendulum saw, grinder or jigsaw;
- 5 or more wood screws and a screwdriver;
- Drill and drill bit 3 mm;
- Medium-grit sandpaper (for removing old varnish/paint from the back of a chair) and coarse-grit sandpaper (for sanding a wooden shelf);
- Black paint (if you want to create a worn effect), white paint or any other desired color, brush;
- Wax or matte varnish;
- Wood putty;
- Wood glue.
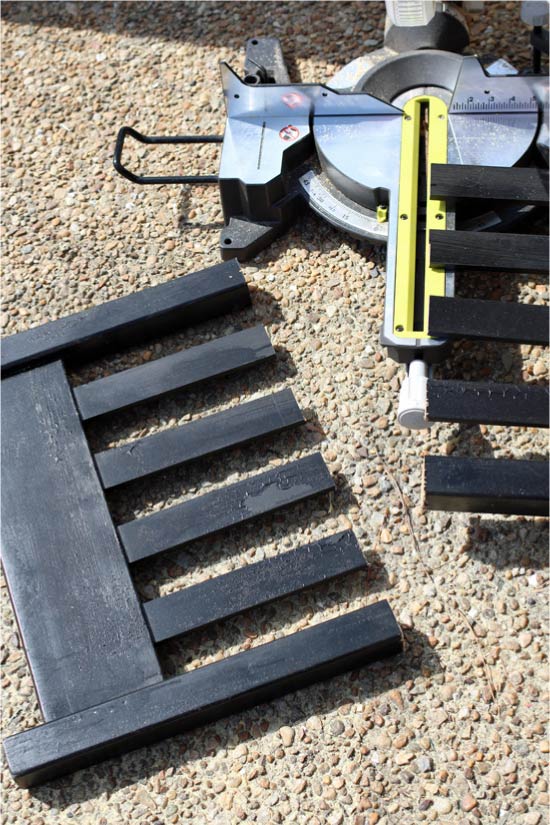
- Cut the back of the chair to the desired size, after marking it.
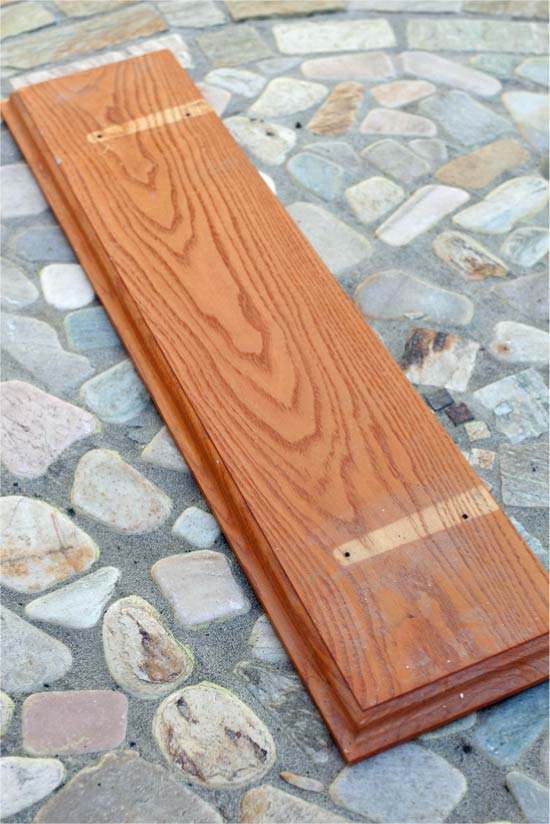
- In this project, the wooden base of a former hanger was successfully used to make the top shelf. You can use a board made of wood or plywood - you need to cut it to the required size, and then sand all the ends. If possible, it is advisable to shape the edges of the workpiece with a router.
- Use medium-grain sandpaper (for example, 220 microns) to remove the old coating from the back of the chair, then paint both parts with black paint and leave to dry. This is necessary so that in the future the black layer will show through the abrasions of the top coating.
- It's time to attach the board to the back of the chair. To do this, drill a small hole from each edge (from the outside, where you want to fasten the parts), then screw in the screws, drowning them flush. If your chair back has vertical slats like in this project, then it is advisable to attach them to the shelf with wood glue.
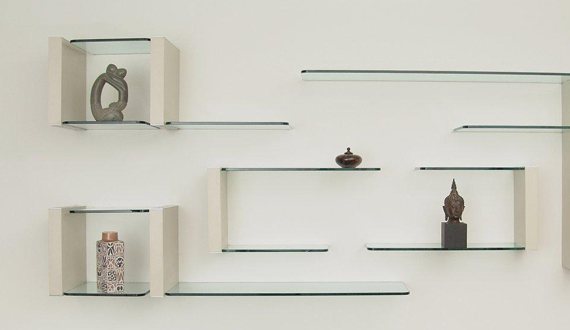
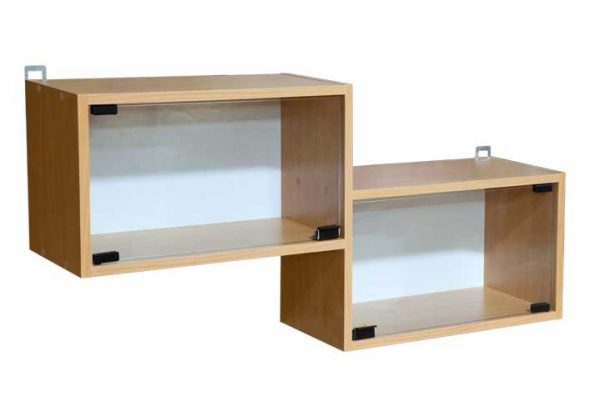
Glass shelves
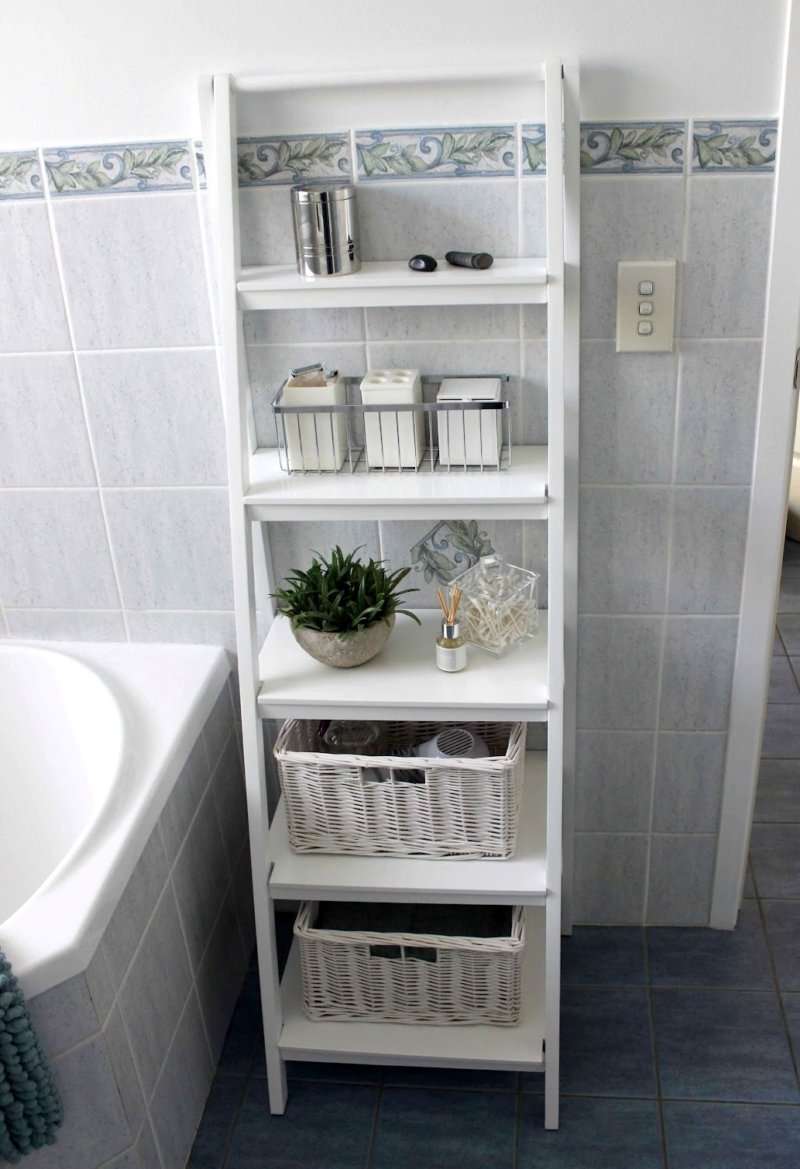
Glass shelves are traditionally made for the bathroom. The remarkable quality of the material is exploited, such as resistance to water and high humidity. But in small rooms, with the help of such shelves and racks you can solve the problem of lack of space. Glass does not visually clutter up the space, allows light to pass through, while providing a reliable place for placing small items, photos, vases and even audio or video equipment.
Glass shelves are suitable for open installation and in a closet. Especially if it is a wardrobe and it is possible to sometimes leave the door open to, for example, watch TV. Simple elegant designs of transparent racks and shelves are appropriate in any interior.
For work you will need
- Tempered glass for shelving 5 mm thick;
- Chipboard or laminated chipboard for 1 wooden shelf (you choose what material to make it from);
- 2 wooden support rails 27 mm thick;
- narrow chisel;
- drill, drill bit;
- screwdriver;
- dowels;
- fasteners;
- hanging fittings;
- glue;
- tape for covering the ends of chipboard (chipboard);
- sandpaper for sanding wooden surfaces;
- screws 5x90 cm;
- tape measure, pencil.
Prepare the glass shelves in advance - order the workshop to cut parts measuring 19x79 cm and fold the edges. The same should be done with a wooden shelf; cover the ends. If you choose wooden slats as a base, you should sand them yourself using sandpaper and smooth out the corners.
Description of work
- Saw off the ends of the support rails -5 cm at an angle of 30-45 degrees. When removing excess parts, keep both parts together so that the result is identical.
- On the slats, mark the places where the grooves will be made to accommodate the shelves. The marks on both strips match. Your number of glass elements may differ from the proposed option, then calculate the distance between them yourself.
- Start preparing the grooves after receiving the shelves. Their thickness determines the width of the recess (5 mm). Try to make cuts along the edges of the marked groove to a depth of 50 mm. Using a narrow chisel, carefully clear the cavity of wood. Then try to insert glass into the recess made. It should fit freely.
- Similarly, cut a groove for a wooden shelf 27 mm thick.
- On the back side of the slats, step back 300 mm from each edge, mark the fittings, and trace the contours.
- Make holes with a drill, clean out the cavities, and place the fittings on the glue.
- Lubricate the recess intended for a wooden shelf with glue. Insert the part into place. Prepare holes on the back side of the wooden shelf and secure it with 5x90 mm screws.
- The slats will be located one from the other at a distance of 250 mm. Install screws into the wall where the shelving hangs. For plasterboard and brick partitions, use dowels. If desired, wooden parts can be painted or varnished with your own hands before installation.
- Attach the support slats to the wall.
- Install the glass shelves into the prepared grooves. The free space between the glass and the wall of the groove must be filled, for which use pieces of insulating or double-sided adhesive tape. Cut off the excess protruding part of the filler.
Whatever material you make from (glass, boards, plywood, chipboard, chipboard, etc.), making such racks with your own hands will not cause much difficulty. The main thing is to be careful and follow the instructions.
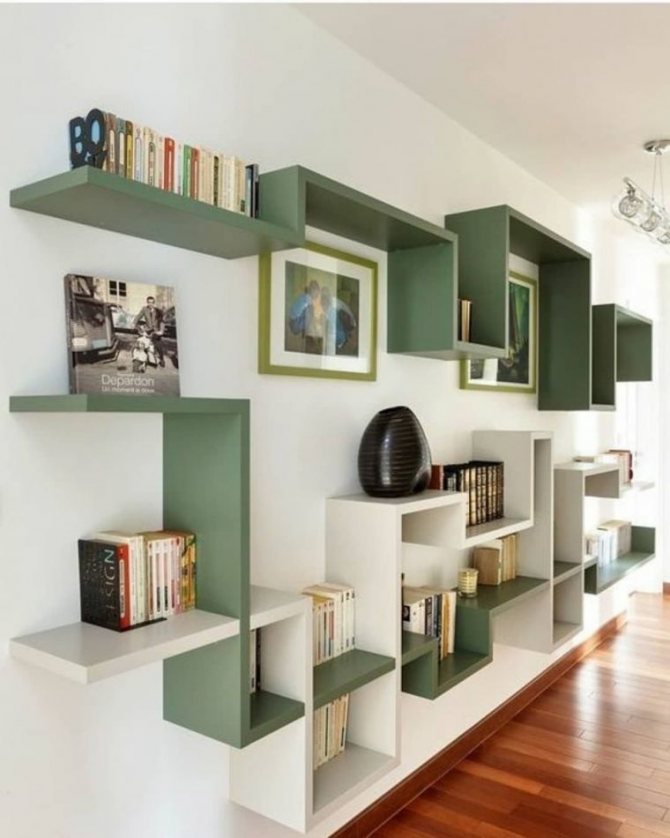
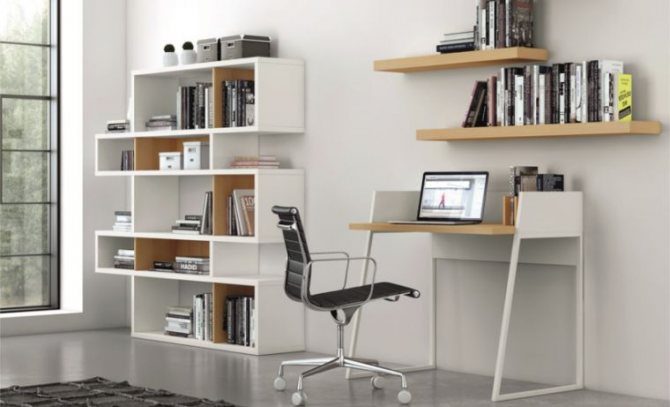
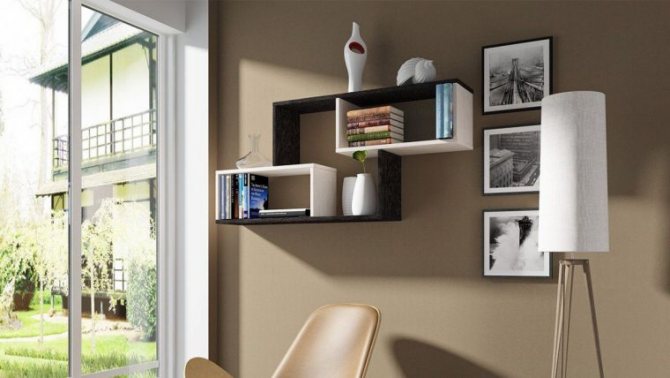
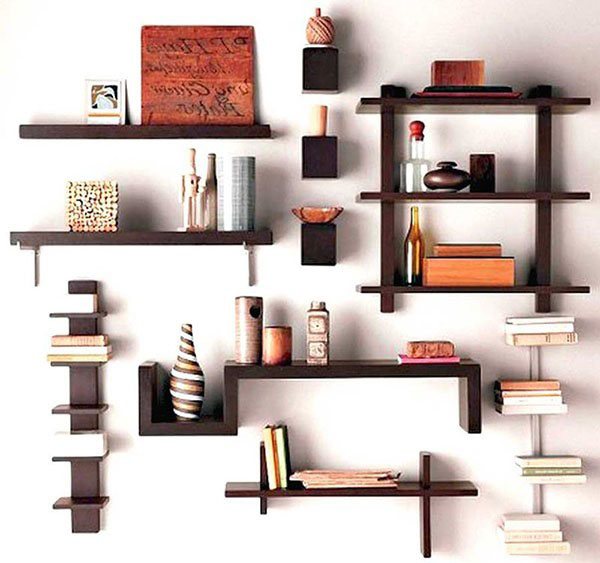
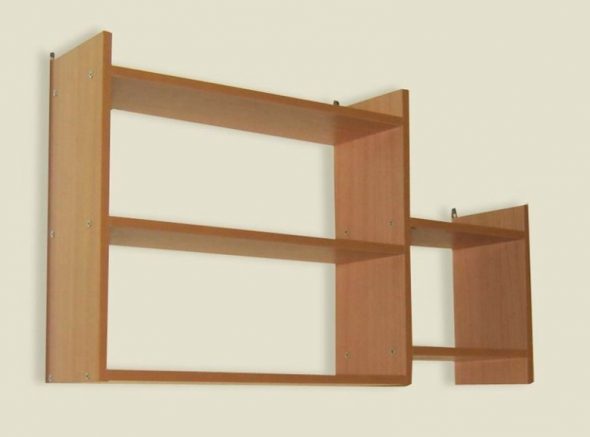
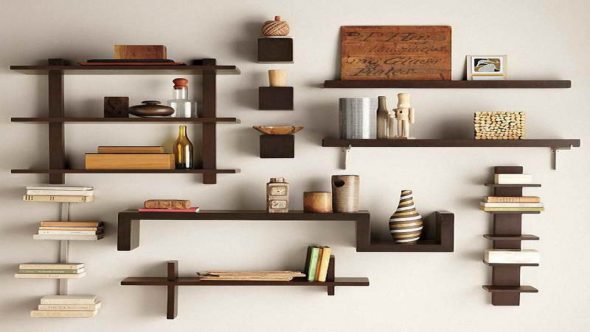
Variety of designs to suit every taste
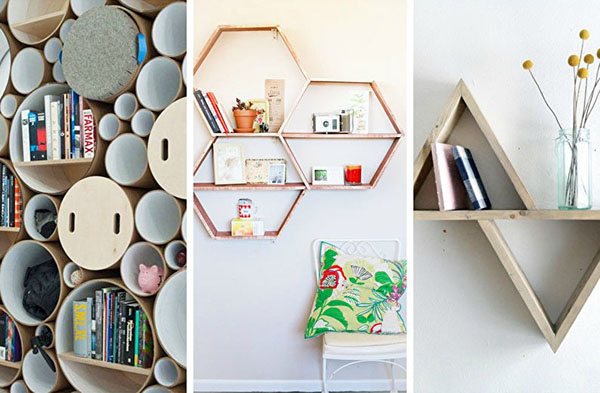
Each room consists of 4 walls, which can be decorated with various decorative items. But it is best to place them on shelves made by yourself. It’s good that modern furniture occupies mainly the lower part of the room. Therefore, shelves on the wall are an original solution for arranging a room.
There are a huge number of such structures. Let's mention only the most popular:
- open in nature (do not have front and side panels);
- closed options (reminiscent of a miniature hanging cabinet);
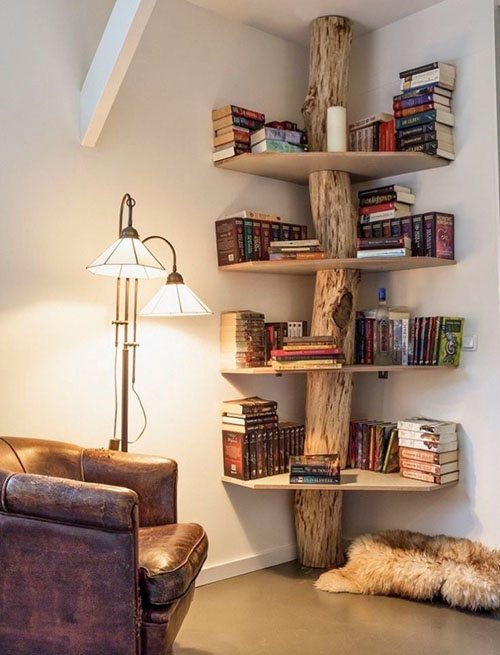
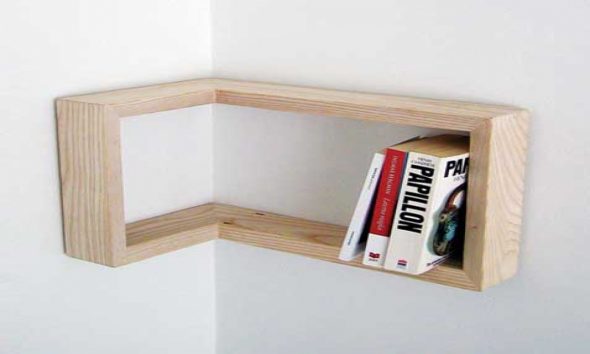
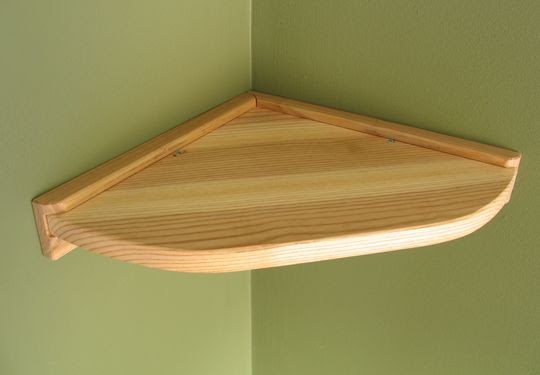
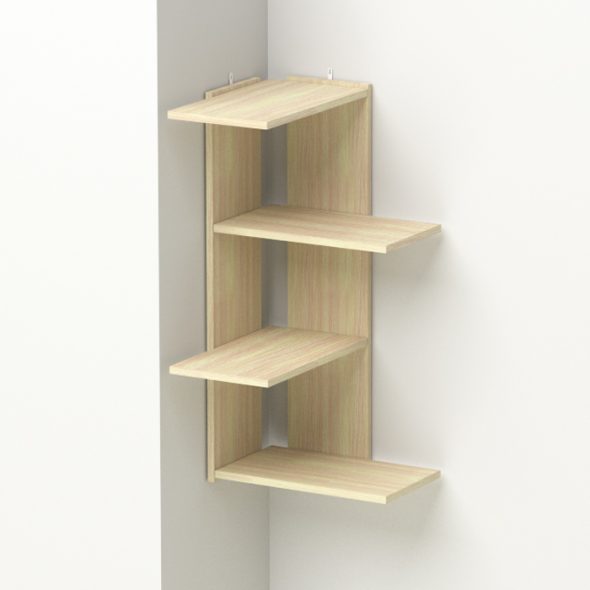
- corner structures (located on the internal or external corners of the walls);
- asymmetrical models (the shelf placement system does not have a main axis);
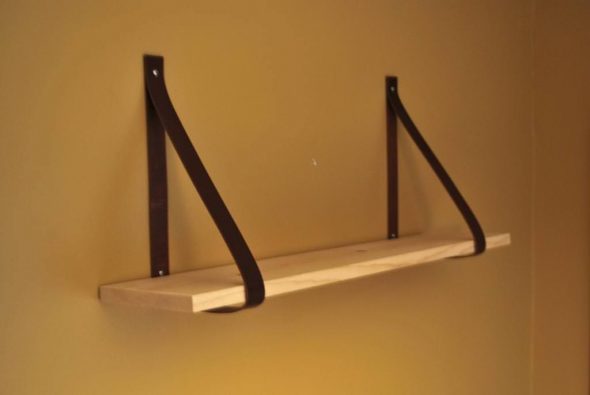
- suspended structures (belts, ropes or thick fabric are used as support);
- decorative interior elements (used for original placement of various decorations).
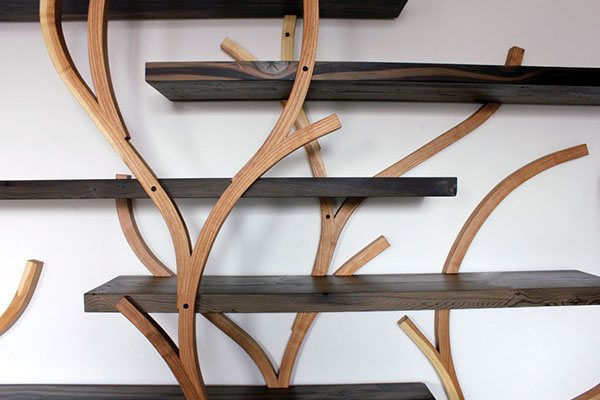
The types of wall shelves shown in the photo are visible evidence of such diversity. In addition, they are:
- multi-level;
- with rounded edges;
- in the form of various geometric shapes;
- traditional rectangular options.
To make shelves on the wall use:
- tree;
- chipboard;
- laminate;
- glass;
- plastic;
- metal;
- mirror.
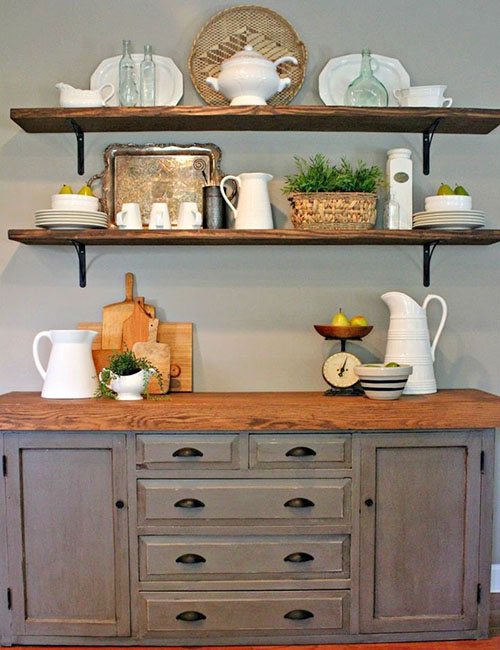
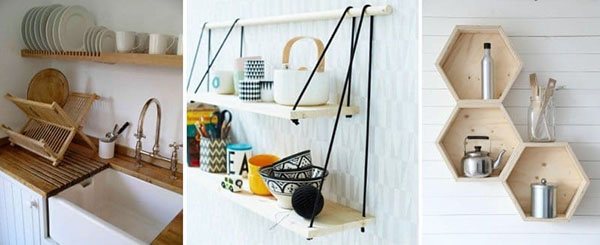
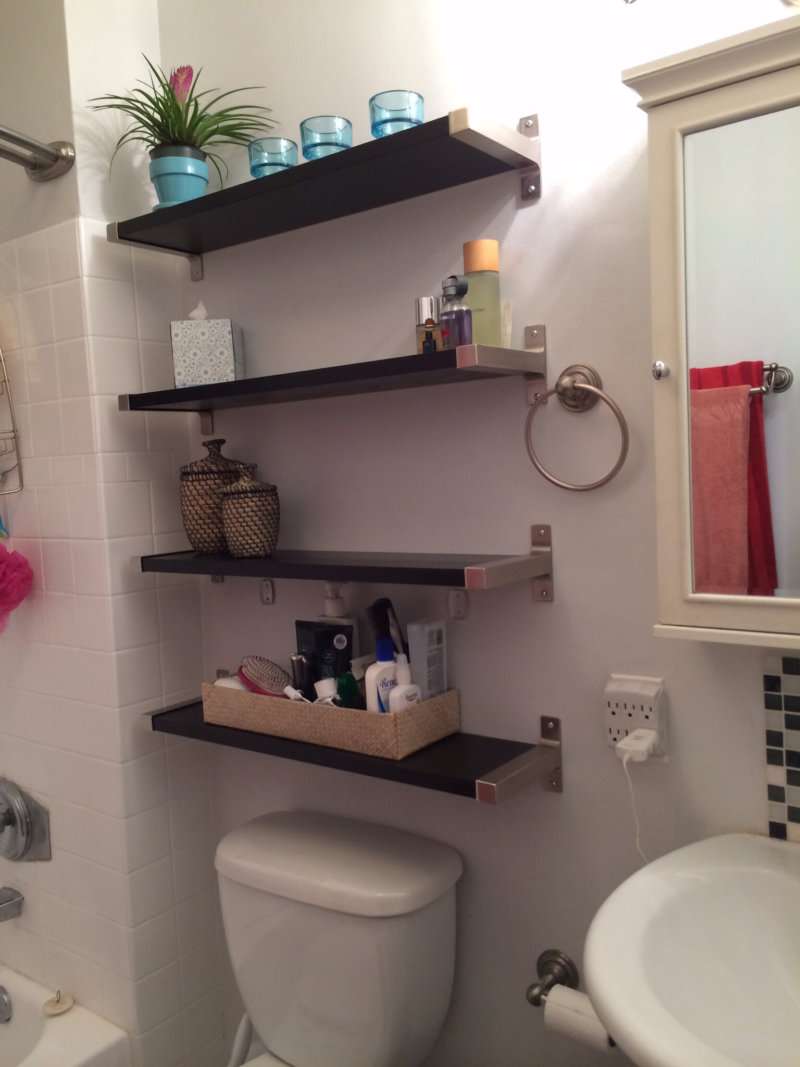
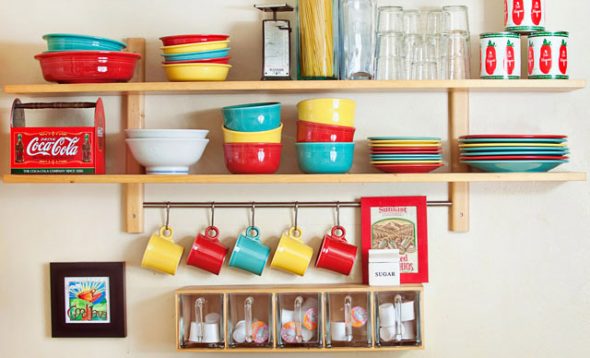
Depending on the location, open structures serve different purposes. Shelves by the front door are used as a place for hats and scarves. Options installed in the living room are decorated with souvenirs. The kitchen is a safe place for dishes and bulk products. If you attach homemade shelves to the wall in the bathroom, then detergents and toiletries will fit there.
For avid fashionistas, the design is installed in the bedroom so that cosmetic accessories are at hand. Children can place toys, textbooks, stationery and photographs of friends on the shelves. As you can see, such designs have different purposes and fit wonderfully into the modern interior of the room.
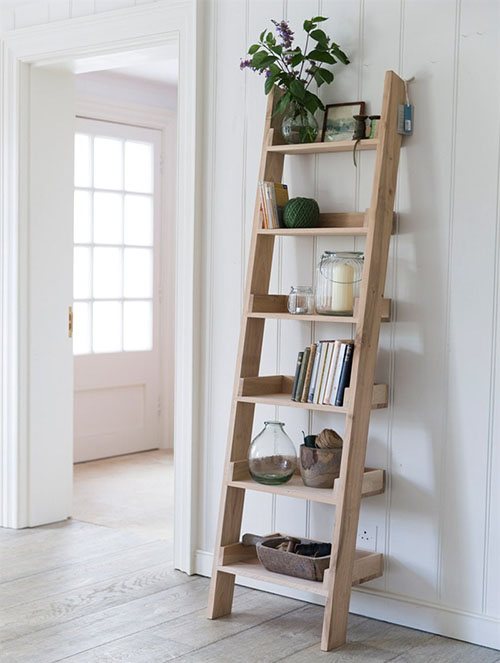
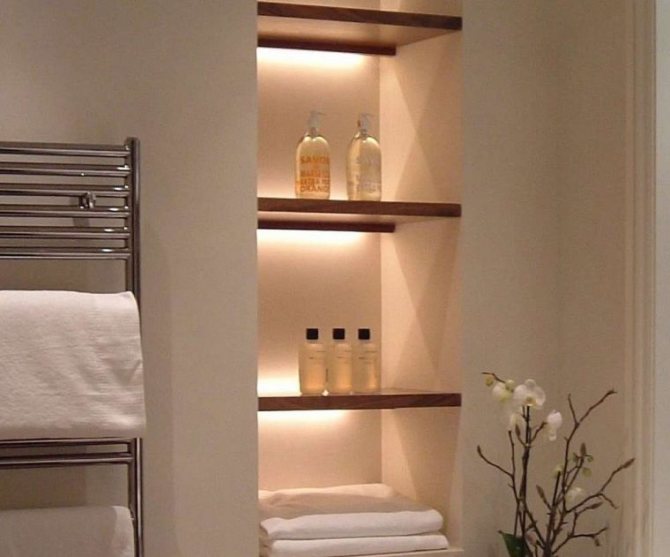
Setting up a bathroom
Having hung shelves in every room, we couldn't ignore the bathroom. Therefore, let’s look at a method on how to make a shelf in a bathtub. It's quite simple.
First, you need to prepare the wood by first coating it with a moisture-repellent agent. Before attaching to the wall, the wood must be sanded.

For high-quality and reliable fastening, you must use metal holders in the shape of the letter “G”.
If we approach the choice of furniture carefully, then we completely forget about the shelves. But this is fundamentally wrong.
A correctly chosen shelf that ends up in its place serves as an excellent decoration for the interior of any room. For general development, you should definitely look at the photos of making the shelves.
Do-it-yourself shelves on the wall: advice from an experienced craftsman
Before you start creating a useful structure for your home, it is advisable to think about secure fastening. The safety of household members and the safety of valuable things for which the shelf is being prepared depends on it.
There are different types of fasteners for wall structures:
- regular loops;
- decorative brackets;
- for glass options - the so-called “pelican”.
For example, hinges are most often used for wooden shelves. First, they are attached to the wall with self-tapping screws. Then holes are made into which dowels with a small head are screwed. It is on them that the homemade structure is hung.
To create regular and thick shelves on the wall you will need:
- boards (maximum thickness 20 mm, width - 180 cm);
- self-tapping screws;
- fastening devices;
- dowels;
- screwdriver;
- wood hacksaw;
- level;
- pencil for marking;
- sandpaper.
When the tools and material are prepared, they begin to create a useful structure.
For shelves, it is best to use pine wood, plywood, laminate, chipboard or MDF.
Marking and preparing material
Most often, the dimensions of a hanging wall shelf created by yourself are chosen in random order. In this case, the future method of use, the square footage of the room and the location of the structure are taken into account. If the edges of the top and bottom panels are connected to the side parts of the structure, then when calculating the height, allowances are made for this.
When marking corner options, it is better to use suitable boards. Their edges should be oblique. Thanks to this, the connection will fit harmoniously into the outer or inner corner of the wall.
A huge help when creating plywood shelves with your own hands are drawings made by experienced craftsmen.
Before proceeding with the installation of the structure, experienced craftsmen sand the wooden surfaces with sandpaper.
The finished elements are coated with a protective substance:
However, you always need to take into account the interior of the room, the color scheme of decorative items and furniture.
To reliably connect the ends, they are lubricated with special glue. Then the elements are connected using clamps or self-tapping screws so that they dry completely.
Creating a secure place for print publications
As an example, let's look at how to make a shelf for books on a wooden wall with your own hands.
First, the craftsmen prepare a set of tools:
The next step on the way to the goal is a well-written sketch of the future design. It should indicate the expected dimensions and configuration of the shelf. Next, boards are installed on the desktop, on which the appropriate markings are applied. After this, they are sawn, polished and treated with protective agents.
In a similar way, you can make a shelf for a computer on a wooden wall with your own hands.
To assemble the structure, you must perform the following operations:
- markings are made on the prepared boards;
- drill the joints of the parts;
- assemble the structure using self-tapping screws;
- brackets are attached to the side ends;
- prepare mounting points in the wall;
- install the structure in a permanent place.
A wooden book shelf can last for several decades without losing its original appearance. Often such structures are decorated with vases of fresh flowers, figurines, souvenirs or family photographs.
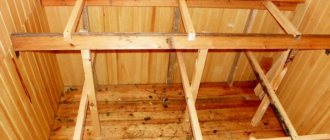
DIY folding shelves for tools
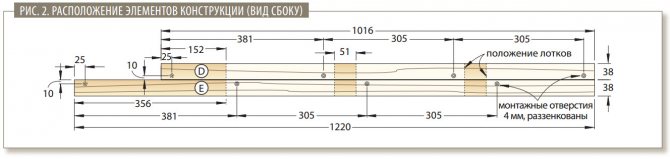
In a cramped basement workshop, it is important to make every centimeter of space work, including the spaces between the basement floor beams. To use them efficiently, make three hanging trays that are convenient for storing fasteners, paint cans, tools and supplies. The structure is located between plank beams laid at 407 mm intervals and occupies a space 1220 mm long, which must be free of pipes, wires, air ducts and other obstacles. If you remove one tray and shorten both pairs of slats, the smaller version will have a length of 914 mm.
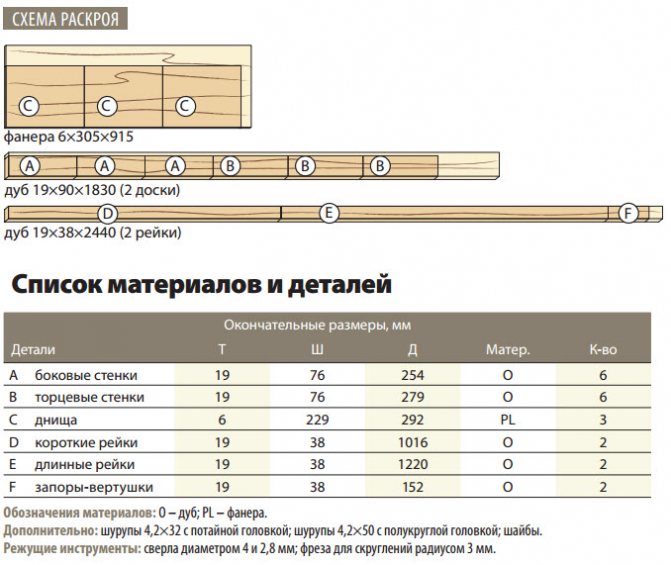
Make trays and slats
1. From boards with a cross-section of 19x76 mm, cut out six side walls A and six end walls B. Using a saw blade or cutter, select tongues on the inside of the walls for inserting bottom C (Fig. 1). To ensure that the trays lower and rise smoothly, make 3-mm roundings on the outer edges at the top and bottom to reduce friction on the rails D, E.
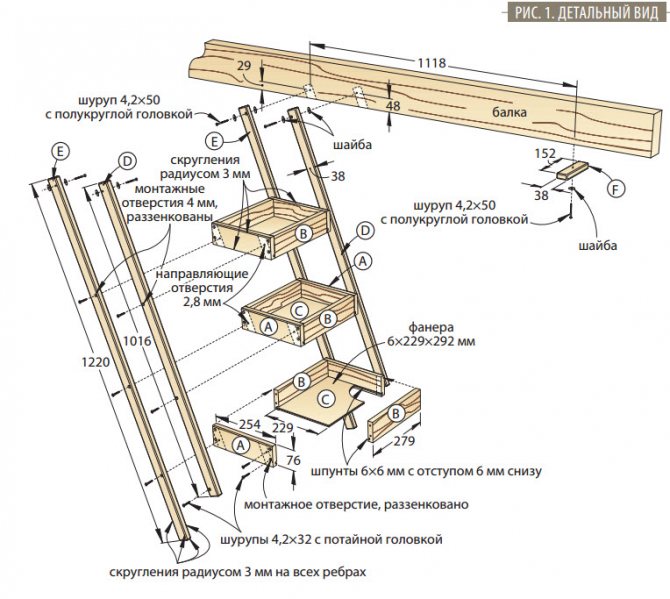
C from 6mm plywood and assemble three trays using glue and screws. Make sure the assembly is square.
3. From material with a cross-section of 19×38 mm, cut out two pairs of slats D, E of the specified length (Fig. 2). Mill the fillets on all the edges, then drill and countersink mounting holes in the places where the trays will be located, but there is no need to countersink the holes for attaching the structure to the beams.
4. From the same material as the slats, make two turntable locks F and drill a hole with a diameter of 4 mm in the center of each of them. Then mill fillets on all edges. Sand the trays, slats and stops with 180-grit sandpaper and swab on two coats of polyurethane varnish thinned halfway with mineral spirits.
5. To assemble the entire structure, place the slats D and three trays A/B/C on a flat surface and align the spacing between the trays (Fig. 2). Using the mounting holes of the slats, mark the centers of the guide holes on the trays, drill them, and then attach the slats to the trays with screws without tightening them tightly (the screws should rotate easily in the holes of the slats).
Hang shelves from beams
1. Lift the structure into the gap between the beams to check the dimensions. Then, using screws and washers, attach pinwheels F at the free end of the structure (which will lower). The latches should fit snugly against the beams, but still rotate freely. Nail a piece of board between the beams to temporarily support the second end of the structure, as shown in the photo, to free your hands to attach the slats.
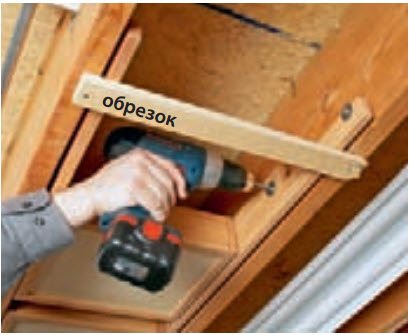
A scrap nailed to the beams supports the slats during installation of the structure, and its other end is held in place by turntables.
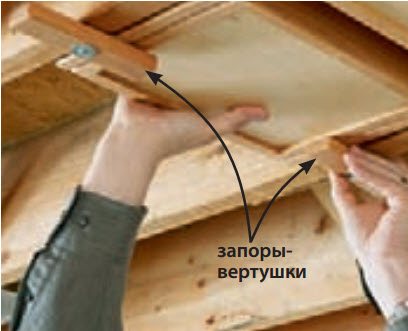
Swivel latches secure raised trays between beams. Add a couple more pinwheels in the middle if the trays store heavy items.
2. Remove the temporary support and ensure that the trays can be lowered and raised freely. To lower, support the tray from below, turn the locks parallel to the beams and slowly lower the trays. To remove the structure, lift the bottom tray diagonally until all elements fit into the gap between the beams and secure by turning the two swivel locks.
The walls prevent the contents from falling out of the trays when lifting and lowering.
You might be interested in:
Unusual DIY candlesticks...
Folding cart for carrying large sheets of plywood...
Storage stand for saw blades…
Universal pusher for milling table…
If only there was an invention, there would be material for the shelf...
All materials have their advantages and disadvantages. The following are suitable for wall shelves.
- Wood lumber is the most common and cheapest - it is easy to saw into blanks, processed and painted.
- Metal is not always suitable, it is more difficult to process at home, shelves made of it do not fit well into the home interior, and are susceptible to corrosion.
- Glass looks great in the interior of any room, makes shelves visually lighter and airier, but due to its fragility, it requires special tools and equipment for cutting complex holes and grinding.
- Plastic is the lightest material that can replace all previous ones.

Shelves are hung on the wall, placed on the floor, some are hung from the ceiling or beams.
FOR YOUR INFORMATION! A person’s imagination in choosing material for shelves on the wall is inexhaustible - old suitcases, TV cases, water pipes and corners. Even... trouser belts can be used as fasteners.
Much more often they are functional.
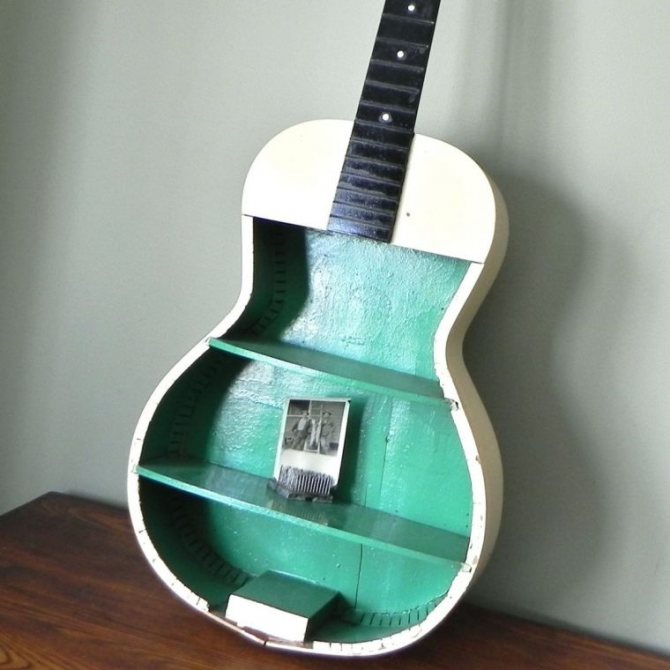
Unusual options
Anyone who likes to surprise will love unusual ways to make a shelf. An interesting way to decorate a shelf is from an unnecessary guitar case, which can be covered with old wallpaper or even newspapers.
If you have an old TV lying around in the attic, then, as an option, you can use it, after first removing all the insides from it.
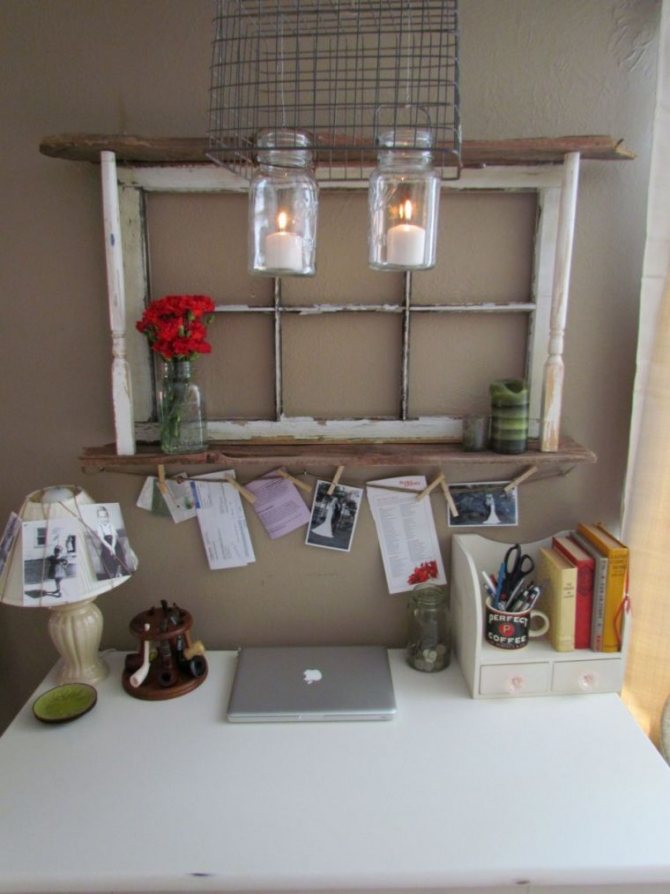
You can also use an old window frame or a chair back for a shelf; you just need to modify them correctly.
In fact, there are many options; you just need to work with your imagination a little.
Buy or make a shelf on the wall with your own hands
What is the advantage of homemade wall shelves over purchased ones? Furniture stores offer options for all occasions - bookshelves, for dishes, for phones, for flowers. But in defense of homemade products, the following arguments can be given:
- The purchased shelf does not always correspond to your ideas of beauty - either the color is inappropriate, or the shape is awkward;
- the dimensions of the purchased product do not fit into the dimensions of your room;
- the height or width of the shelves does not correspond to the size of the things you want to place on them;
- After the repair, there were pieces of good material and fasteners left - it would be a shame to throw it away, but there was no desire or space to store it.
But the best thing is that they are easy to make yourself, with your own hands.
ON A NOTE! Making shelves on the wall with your own hands is often cheaper than purchasing them from a well-known furniture company.

They are made of wood, plywood, laminated chipboard, fiberboard, and there are glass shelves.
The shelves are different
Before assembling the shelf, determine what type it will be. Furniture craftsmen have become adept at making wall shelves for all occasions:
- open – without side walls, front doors and back wall;
- closed - in essence, such shelves are hanging cabinets in miniature, differing from them in smaller mass, depth and height;
- corner – located at the junction of two walls, can be for both the internal and external corners;
- asymmetrical - the layout of the shelves is devoid of an axis of symmetry, provided that functionality is maintained;
- suspended - harnesses, cables, dense fabric materials, belts are used as hangers for shelves, and the ceiling is used as a support;
- decorative - designed to beautifully arrange interesting things.
The same materials are used as stands, but they are also made from metal, plastic and other absolutely incredible things - for example, pipes or bottles.
Module – universal solution
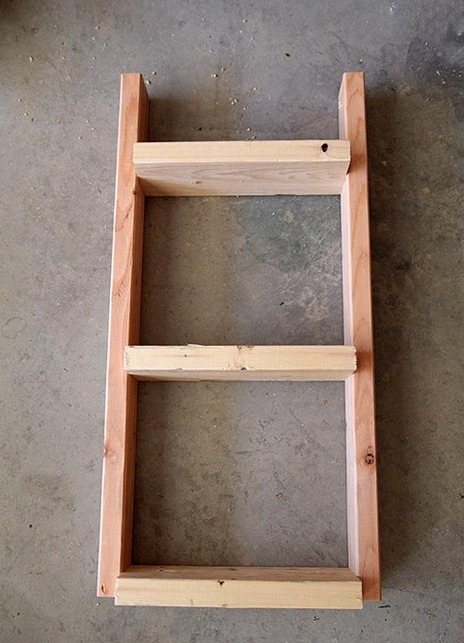
The easiest way to assemble wall shelves consists of side, top and bottom walls, fastened together with self-tapping screws or furniture fittings. Make the required number of such “modules” of different lengths and heights and fix them on the wall in the desired order. This option is well suited for making bookshelves.
In living rooms, it is not so important what material the shelf is made of. It is important that its design is in the same style as the interior.
You will need the following materials and tools:
- board 16-20 mm thick and 150-180 mm wide - it can be pine, MDF, plywood or chipboard.
- self-tapping screws;
- screwdriver;
- building level;
- furniture hacksaw for wood.
Even functionality is not always important: some play a purely decorative role. If they have anything on them, it’s only one or two items.
Marking and sawing
The height and width of the shelf are selected arbitrarily. If the ends of the upper and lower walls rest against the edges of the side walls, then, when determining their height, it is necessary to make an allowance for the double thickness of the board.
Their role is to give the interior of the home a special style and flavor.
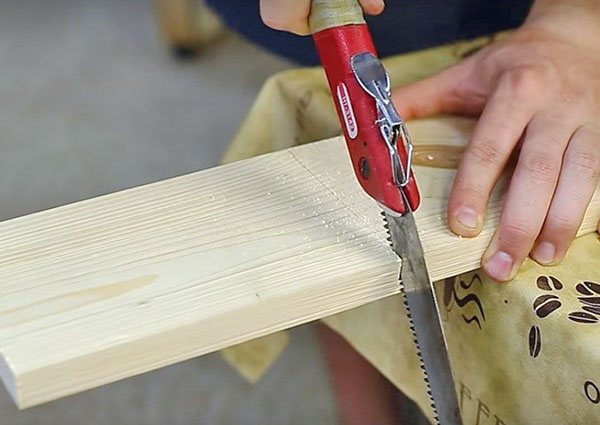
ATTENTION! To cut the board, use a hand-held circular saw or jigsaw. Their use allows you to make the cut surface smooth.
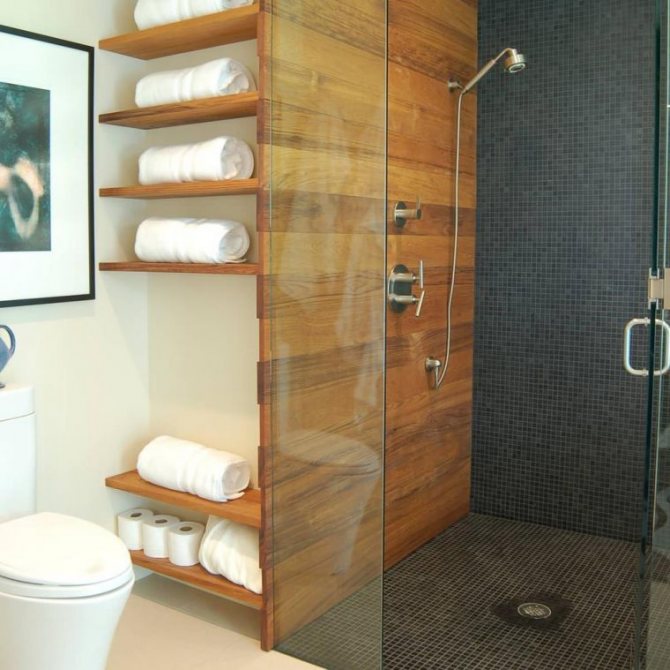
If we talk about shelves in technical rooms - the kitchen and bathroom, in particular, then in addition to aesthetic considerations, practicality requirements are almost universally added.
Workpiece processing
Before installation, the wooden parts of the shelves must be sanded and a protective coating applied. You can treat the wood with stain and varnish. However, such a shelf does not always fit into the overall color scheme of the interior. Then it is better to apply a primer and paint it in the desired color.

To secure the place where the self-tapping screw is screwed into the lower part of the sidewall, you need to pre-drill holes with a thin drill.
Assembling the shelf
To fasten the walls with self-tapping screws, you need to mark the holes. From the end edge of the bottom wall, measure a distance equal to half the thickness of the side wall and draw a line parallel to the cut. Marks are made on it for the drill, stepping back five centimeters to the left and right. The opposite end is also marked. They make holes. Secure the side walls of the shelf with self-tapping screws. Mark and fasten the upper wall of the shelf in the same way.
To ensure that the shelf is level and subsequently does not warp, in the lower part, on the reverse side, you can fix the location of the parts with flat window corners.
ON A NOTE! Other methods can be used to fasten the walls of the shelf - wooden dowels with wood glue, special fastening fittings - tie corners, eccentric tie.
Despite the fact that electronic devices are replacing printed publications from a person’s life, many people still carefully store books and magazines dear to their hearts, the storage location of which often leaves much to be desired.
Installing a shelf on the wall
It would seem that nothing is simpler. In fact, this is a crucial stage. You don’t want all your efforts to improve your home to collapse in one moment?
The easiest way is to use a hanging corner for shelves. The upper eye is attached to the wall using a dowel, the lower one is attached to the shelf with a self-tapping screw or bolt with a nut and washer.
IMPORTANT! When the load on the shelf is from 20 to 50 kg, use brackets. Mark the holes on the wall using a building level.
Hands must be clean, because untreated wood is very easily soiled.
The dimensions of the shelf will depend on the size of the books that will be stored on it.
Device for installing and fixing a folding sleeping berth in a passenger car
(19) 01 A 1 418 ESPUBLIN ts 4 B 61 R 31 00 STATE POD NIA K AUTHOR'S VIDEO RESPONDENT Fig.
d USSR TECHNOLOGY NOMITTEE FOR INVENTIONS AND DISCOVERIES SANIE IZOB (71) FEB Wagonbau Ammendorf (RR) (72) Beyer Alfred and Gerlitz Wolfgang (RR) (54) DEVICE FOR INSTALLING AND FIXING A Folding BED OF A PASSENGER CAR (57) The invention relates to railway transport and concerns a mechanism for tilting the sleeping bunk of a passenger car, for example the upper bunk in passenger compartments of a long-distance car, into a vertical daytime and horizontal night position, as well as for fixing said bunk in the mentioned and intermediate positions. The purpose of the invention is to simplify the design and increase safety for passengers in operation. According to the invention, the device on both end sides of the shelf is equipped with brackets attached to the compartment partition for installing toothed elements, as well as a device for fixing the shelf in various positions, wherein the toothed elements are located on the shelf and, accordingly, on the brackets. For this purpose, the elements located on the side of the shelf are made in the form of a toothed circular segment 3 with a pin and are supported inside the brackets 17 on gear racks 16 so that the shelf, rolling with the circular segments 3, like a hinge with rolling friction and in a circular manner, moves along the gear racks 16 towards the compartment partition or towards the center of the passenger room and at the same time is located tilting up and down around a rotary axis parallel to the partition. In addition, the shelf is equipped with rear stops 18, which interact with the support 19 located on the partition when the sleeping shelf is folded down. 1 3. i. f-ly, 5 ill.10 15 20 The invention relates to railway transport and concerns a mechanism for tilting up and down, for example for tilting the upper shelves up to the day position in sleeping cars of long-distance trains and for bringing them to horizontal or other intermediate positions, and for fixing the sleeping bunks in the named positions, which makes it easier for passengers to use the upper bunks and prevents the risk of injury. Simple mechanisms are known for folding the upper bunks in the compartments of long-distance passenger cars up to a vertical daytime position and down to a horizontal night position, as well as mechanisms for fixing sleeping shelves in the indicated end positions. The said sleeping shelves are suspended with the ability to be tilted down and up around a rotary axis located parallel to the compartment partition, using rotary pins fixedly attached to the shelves and rotary supports or brackets fixed to the compartment partition. In the horizontal sleeping position, each shelf is supported and prevented from falling down by simple link chains. Intermediate positions of the sleeping shelf between both end positions are fixed using separate thrust and locking devices located on the walls installed transverse to the longitudinal axis of the shelf. This solution has the disadvantage that these elastic suspensions interfere with passengers lying on the upper bunk, and individual thrust and fixing elements located on the walls located transverse to the longitudinal axis of the sleeping bunk disrupt the architectural appearance of the compartment in this area. A hinged frame for car seats is known ( German patent 2238899, class B 60 M 1/06, 1978), which has a frame element fixedly connected to the chair frame and a rotating frame element attached to the back frame, in which these frames can be connected to one another using a rotary axis with the possibility adjustment and fixation and in which, when turning the rotating element of the frame, the forcibly rotating axis motionlessly engages at least one ratchet, and a locking latch is movably secured to the fixed element of the frame. An axle is fixedly attached to the fixed part of the frame, which motionlessly engages a small gear, which is in engagement with an internal gear located on the movable part of the frame. A ratchet is fixedly attached to the same axis. 30 35 45 50 55 The specified mechanism acts as a gear transmission, which, when turning the adjustable backrest of the passenger car seats, receives the movement of the locking device. The turning point of the small gear, which then rolls along the inner toothed segment, performs a circular rotation movement around the rotary axis and allows the backrest to be locked in different positions using a locking mechanism. This known solution has the disadvantage that it can only be used to fix the backrest that rotates around the rotary axis in different positions relative to the seat surface. Folding the backrest down to a horizontal position for lying down is impossible, and shifting the support point of such a backrest, serving as a sleeping place, in the direction of the car cabin or carriage compartment is also excluded. The horizontal part of the chair with one part of the frame is located stationary in the car, and the other part of the frame is located on back, movably mounted on the fixed part of the frame of the chair and allows rotation around a fixed rotary axis. A joint with rolling friction is described (Folmer J. Gear technology: Handbook, 2nd ed. - Karl-Marx-Stadt, 1978, p. 331, fig. 917), but this only refers to a known principle, and not to an example application. The purpose of the invention is to create a device for installing and fixing a sleeping shelf, for example, the upper shelf in sleeping cars of long-distance trains, with the help of which the shelf can be folded upward into a vertical day position, into a horizontal night position and intermediate positions, as well as fixing the final and intermediate positions the shelves are significantly lighter, in addition, the internal appearance of the passenger compartments of the car is improved. The basis of the invention is to create a device for installing and fixing a folding sleeping shelf of a passenger car, for example, for folding the upper shelves of passenger sleeping cars up to a vertical day position, down to a horizontal night position and in various intermediate positions, as well as for reliable fixation of the shelves in the named positions, which allows, in the horizontal night position of the shelf, to abandon the unsightly flexible suspensions above the top bunk that interfere with passengers, as well as from prominent side fixing brackets on the compartment partitions, and, nevertheless , to ensure reliable fixation of the upper bunk, freely extending 5 10 15 20 25 30 35 40 45 50 55 in the compartment and significantly loaded with the weight of the passenger lying on the bunk, The device for installing and fixing the folding sleeping bunk of a passenger car consists of brackets installed on both end sides of the shelf , inside of which gear elements are mounted, as well as devices for fixing the shelf in various positions, and the gear elements partly relate to the sleeping shelf, and partly to the brackets. Provision is made for making toothed elements located on the flange side as a circular segment with a pin having gears, and fastening the latter in the area of the rotating axis of the shelf at its ends so that the centers of the circular segments coincide with the rotary axis passing through the axles. Using circular segments of the flange rests on gear racks fixedly located inside the brackets. As a result, the shelf can move along the brackets fixedly installed on the partition either in the direction of the partition, or in the direction towards the center of the passenger room, and the movement of the shelf is carried out like a hinge with rolling friction or wheel-like, and at the same time the shelf can tilt up and down to a limited extent around the passing through the centers of the segments of the axle located parallel to the wall. Another feature of the invention is that stops are installed on the sleeping shelf with corresponding supports on the partition. During a circular or similar hinge with rolling friction, the movement of the shelf with the help of circular segments along the gear racks of the brackets is mixed on both sides of the fulcrum of the sleeping shelf when the latter is folded down into a horizontal position towards the center of the compartment, and at the same time the shelf stops and those located on the compartment partition engage supports, which ensures reliable fixation of the shelf, and additional shelf suspension using link chains can be dispensed with. Thus, the entire surface of the sleeping berth is freely accessible to the passenger without any elements interfering with him. The toothed sectors of the circular segments coming out of the engagement of the racks under the vertical load of the sleeping berth due to the weight of the passenger lying on it is prevented by means of the racks located directly above the axle, parallel to the to the gear racks of the guide brackets. In addition, a device is provided for fixing the shelf in various positions. For this purpose, an additional toothed rack, equipped with sawtooth grooves, is movably mounted on at least one of the brackets, near the place where it is fixed to the wall, with the ability to rotate up and down around an axis preferably located parallel to the wall. This rack is elastically pulled towards the wall by a torsion spring. An additional feature of the invention is that each device, including the rack of the fixing device, is located behind the wall sheathing and each sheathing is attached to a corresponding bracket. Behind this casing, manual use of the rack would be impossible. For this reason, a handle is provided at the free end of the rack and, accordingly, a preferably circular groove is made in the casing for securing the handle. The casing protects not only from dust and dirt, but also protects passengers from injury when tilting the shelf up or down. In addition, the architectural appearance of the sleeping bunk is ensured, since the elements of the tilting mechanism are located behind the trim and are not visible. The device works as follows. In the daytime position, which is the initial position, the sleeping bunk is in a vertical position tilted towards the compartment partition, in which its surface faces the partition. Arranged on both sides, the pivot pins are in this final position of the shelf in its closest position to the wall, in which one of the pivot pins engages the rack groove that is closest to the wall. The rack with its groove remains in contact with the pivot pin thanks to the tensile force acting from bottom to top towards the wall, which elastically acts on the rack. The handle is in its upper end position. The circular segments fixedly attached to the double-sided pivot pins are their last, closest to the wall with the teeth of the gear sectors in mesh with gears, preferably straight gear racks, along the brackets and, acting together with the gear rack, hold the sleeping shelf in the daytime position. To tilt the sleeping berth down into a horizontal night position, you must first lift the toothed rack of the locking device using its handle, and it rotates down around its rotating axis located parallel to the wall, overcoming the elastic force of the torsion spring, thereby releasing the rotating axle. 14 The sleeping berth tilts down using its circular segments, for example, using toothed segments, wheel-shaped or like a hinge with rolling friction along gear racks, into a horizontal night position until the shelf stops on the wall side catch on the supports fixed on the compartment partition. Simultaneously with this movement of rolling the sleeping shelf with the help of its circular segments along the gear racks of the brackets towards the center of the passenger compartment, a rectilinear movement of the rotary pins along the brackets occurs from the final position closest to the wall to another final position, which is closest to the center of the compartment, i.e. e. to the final position - farthest from the wall with a relatively small part of the sleeping shelf freely extending into the compartment, behind the supporting rotary pins and circular segments located on both sides of the sleeping shelf, with which the sleeping shelf rests on the gear racks of the brackets. Thanks to its sawtooth configuration, the gear The rack of the locking device has on its upper part a number of toothed grooves that can be engaged with the rotary pin. As a result, it is possible to fix the sleeping shelf in various intermediate positions and eliminate the risk of an unexpected fall down. When tilting the sleeping shelf from a horizontal night position up to a vertical day position when the handle is released, the rotary pin automatically engages in individual grooves under the influence of the elastic force of a torsion spring. This provides increased safety against unexpected folding of the bunk down into a horizontal position and thereby prevents possible injuries to passengers. In FIG. Figure 1 shows the right bracket attached to the compartment partition with an upper shelf and a device for installing and fixing the shelf in both end positions, side view; in fig. 2 - right bracket and upper shelf (solid line), as well as a device for installing and fixing the shelf in a horizontal position and a rack of the fixing device (dashed line); in fig. 3 - the same, but the sleeping shelf is in one of the intermediate positions between both end positions; in fig. 4 - section A - A in Fig. 2; in fig. 5 - section B - B in Fig. 2. In Fig. 1, the upper shelf 1 is shown in a horizontal night position with a solid 18141 5 10 15 20 25 30 35 40 45 50 55 6th line and in the vertical final position, close to the partition, with a dotted line. Trunnion 2 and circular segment 3 are shown on the left in the horizontal position is correct in the vertical final position of the sleeping berth, close to the compartment partition, with a dotted line. There is a straight horizontal, forming a guide 4 toothed rack 16 along the bracket 5, which is removably attached to the wall 6 using bolts 13. This bracket 5 and together with it the sleeping shelf 1 extends freely into compartment 7 of the passenger car without any additional suspension for the sleeping shelf. On the bracket 5 is also visible guide 10, which is located directly above the pivot pin 2 and parallel to the rack 16 for the circular segment 3, and prevents the latter from loosening from the rack 16. The gearing 8 and 9 of the circular segment and the rack 16 are shown in Fig. 2. In FIG. 2 and 4, the center of segment x coincides with the rotation axis y of the rotary axle. The stop 18 at the rear end of the sleeping shelf has a counter support 19, which is fixedly attached to the bracket 5, but can also be located directly on the wall in order to limit the circular movement of the sleeping shelf around its rotary axis to a horizontal night position. Equipped with grooves 11 and 11, a sawtooth rack The locking device 12 is shown in a horizontal rotating position (Fig. 2) and in an intermediate position (Fig. 3), which is located approximately in the middle between the two end positions of the upper sleeping shelf 1. The bevel 14 on the rack 12 is adjacent to the rotary pin 2, Further tilting down the sleeping shelf around its rotary axis y as a result of the action of its own weight is prevented by the stop 18 and the counter support 19 on the wall. In FIG. 3, the rotary axle 2 is engaged in the middle groove 11, and the toothed rack 12 in this position prevents the horizontal displacement of the rotary axle 2 towards the middle of the compartment 7 and thereby the sliding of the circular segment 3 with its engagement 8 along the toothed rack 16, made in the form of a guide 4, t, e. prevent further tilting of the sleeping bunk down into a horizontal night position (Fig. 2). The connection on the hinges of the gear rack 12, the possibility of rotating the latter around the rotary axis g, the handle 21 on the free end 20 of the gear rack, the torsion spring 15 and the location of the device elements behind the casing 17, and Also, the groove 22 for the handle is shown in Figs. 2, 4 and 5. Formula 1. A device for installing and fixing a folding sleeping shelf of a passenger car, containing brackets attached to the wall on two transverse sides of the shelf, inside of which gear elements are mounted, one of which is located on the shelf, and the others on the brackets, and a mechanism for fixing the shelf in various positions, different in that the gear elements are formed by a gear segment rigidly connected to the flange 1. Volume 3 with a tsippa 2 and a gear rack 16, fixed on the bracket 15, while on the latter parallel to the gear rake 16 above the tsepfoy, the guide 10 for her tag 2, interacting with the specified mechanism of fixation, and the emphasis 18 for interaction with the shelter is mounted on the wall support 19.2. The device according to paragraph 1. characterized in that the fixation mechanism is made in the form of a jointly attached to the wall with the possibility of rotation in a vertical transverse plane and a pressed spring 15 torsion of a gear rack 12 with a bevel 14 on a free end 20, on which with the possibility of moving into a border 22 The handle is assigned to 21.1418141 B-B Rrekt Disn. 4/5 of Rod, Rect, 4 editor I. Gornaya KAZ 4108/17VNIIPISEDS11303 Production-IND E. Makrovtehred I. Verphydrazh of the 464th Committee of the USSR for Affairs and look at
Manufacturing of honeycomb shelves
A shelf of an original shape requires some imagination and a little more hard work, but your efforts will more than pay off - the original product will enliven the interior appearance of the room.
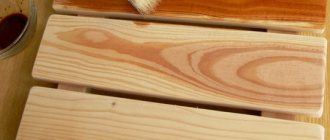
- We saw the board into 15 sections 300 mm long with a cutting angle of 30°.
- We make the first “honeycomb”. To do this, we glue the hexagonal section and strengthen its corners with self-tapping screws.
- We make all other “honeycomb” shelves without one wall.
- We stack them on the floor in such a way that the missing edge is replaced by the wall of the adjacent section. We fasten them together with glue and self-tapping screws.
- If there are segments of sufficient length left, then you can make shelves inside the “honeycomb” itself.
Each part needs to be processed with a grinder, only then can it be fastened with other parts into a single structure.
IMPORTANT! To avoid the appearance of cracks and distortions when tightening screws, pre-drill holes with a diameter of 1.2 mm.

Of course, you can’t do without a tool. The minimum is a wood saw and a Phillips screwdriver.
There are strength requirements for bookshelves: they can hold significant weight.
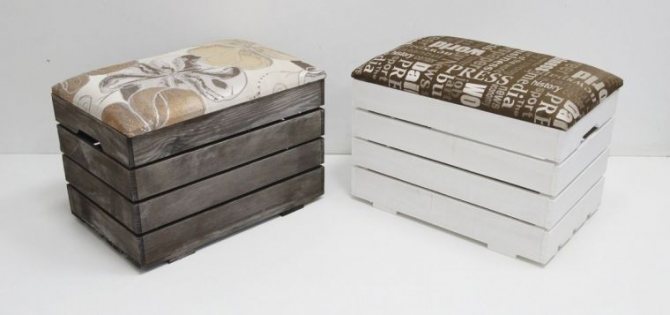
Shelf from a drawer
Don’t even think about how to make a beautiful shelf for your living room or bedroom. Just take the idea on board.
We prepare:
- box;
- the remaining piece of wallpaper or wrapping paper;
- plinth for decoration;
- ruler;
- hacksaw;
- glue.
We measure the sides of the box, then measure the corresponding distance on the baseboard and cut off each section at an angle of 45 degrees.
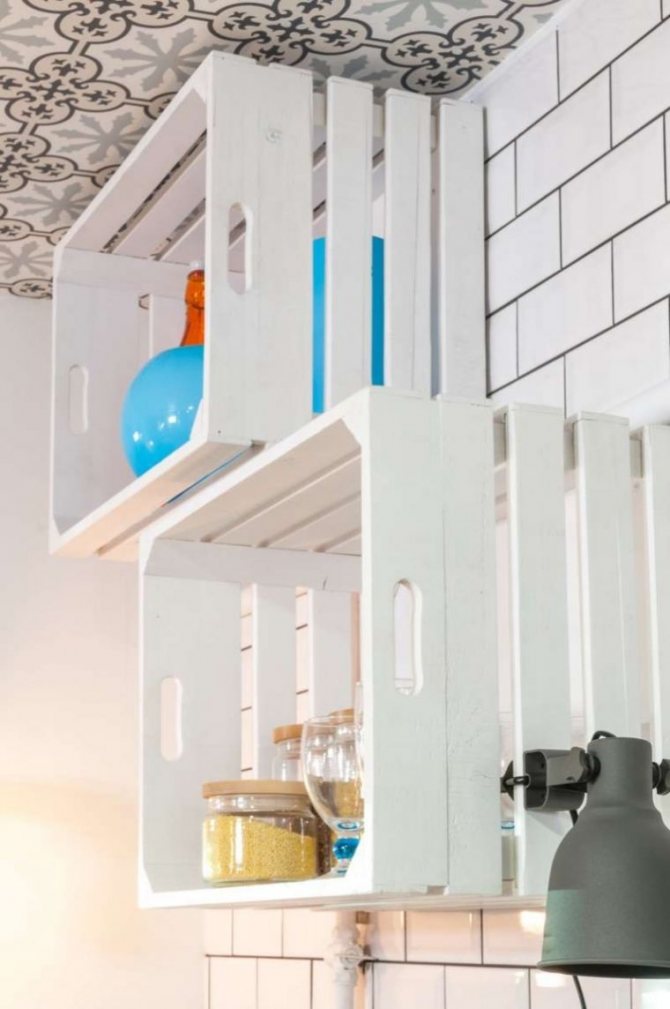
Next, measure out a strip of wallpaper that is half the width and length of the box.

The next step is to glue the box and glue the baseboard frame to it. That's all, in this simple way the shelf is ready!
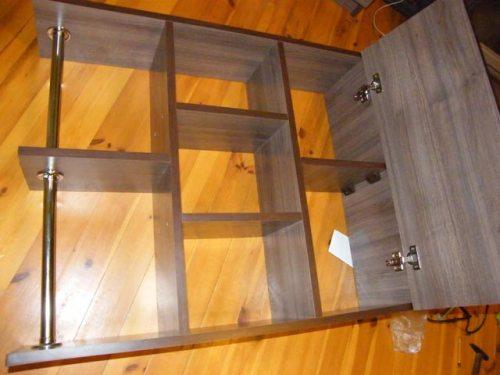
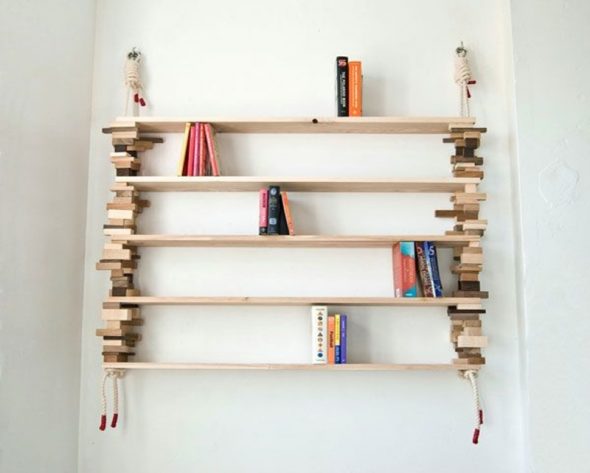
Bookshelf with hidden fasteners
If your taste is offended by the type of fastening hardware, then you can make a small open shelf with hidden fasteners.
The first thing you need to think about is the size of the shelf being made and decide on the place where it will be located, only then purchase boards.

It is often seen when people decorate their homes with artificial flowers, but still nothing can replace the freshness of a natural beautiful plant.
For this you need:
- wooden beam with a thickness of 25-30 mm with a well-polished surface;
- a board of the same thickness, made of the same material;
- dowels – cylindrical pins made of wood;
- wood glue;
- dowels and screws.
Thanks to a modern universal tool, a home craftsman can make almost any shelf, even in an apartment, not to mention working in his workshop.
Assembling such a shelf consists of the following steps.
- The timber and board are sawn into pieces of equal length.
- Using a template, matching holes are made in the side of the block and the future shelf, the diameter and total depth of which must match the length of the dowels.
- The beam is attached to the wall using dowels and self-tapping screws.
- Dowels lubricated with glue are carefully hammered into the holes of the timber.
- The surfaces of the beams and the shelves that will be connected with their help are also lubricated with glue.
- The shelf is “slipped” onto the dowels and pressed tightly. To be sure, you can gently tap along the entire length of the side of the shelf with a rubber mallet.
Of course, you immediately want to make something voluminous and beautiful, which is quite natural, but first you can try your hand at making a simple but neat shelf.
This shelf will look like a natural extension of the wall of your room. Just don't load it with too many items.

Moreover, these products may be the first self-made things. It's really simple.
Decor is everything
You have assembled and hung the shelves on the wall. But they look unpresentable - too empty or, on the contrary, littered with books and other small items. To make wall shelves in the interior of your room look aesthetically pleasing and eye-catching, follow these simple rules.
- The law of three colors - one dominant color for the shelf and two additional ones for the items on it. It is advisable that the color of the shelf contrasts with the objects standing on it - this way they will look more expressive.
- Control chaos with triads. Arrange items with similar colors on different shelves so that they are on the tops of imaginary triangles.
- Give more air - some things, especially large ones, require more free space on the shelf.
- Small things need a favorable background. For example, a figurine standing on a shelf next to a luxurious vase must be moved away from its spectacular neighbor and placed against the background of a small watercolor painting.
- Try to place objects that are similar in size and color relative to the imaginary vertical or horizontal axes of symmetry.
- The higher the shelf, the lighter the items should be. It is advisable to place all massive objects on the lower shelves, and light ones on the upper shelves.
- Don't forget about functionality - on a shelf located at your eye level, place the things you use most often.
A simple design is good: you can make any shelves with your own hands.
Don't be afraid to experiment. A wall shelf can be made from any material, but lumber works best. For installation, use hanging corners or brackets. And don’t be lazy to beautifully arrange books and vases on them.
Structurally, most shelves consist of the actual shelves and lintels.
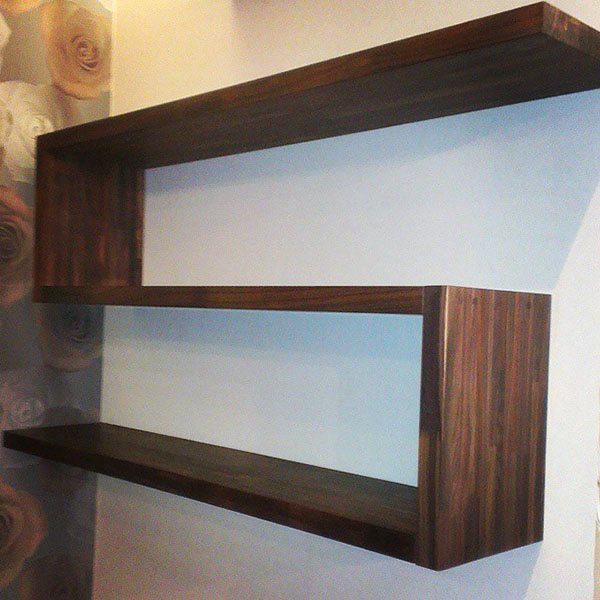
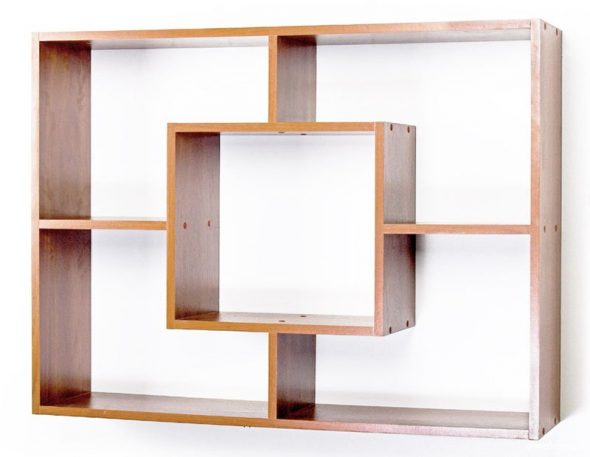
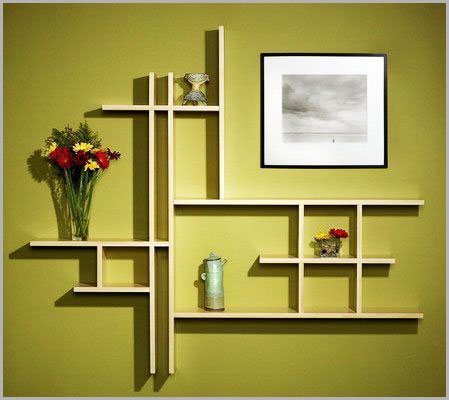
Many-sided shelf
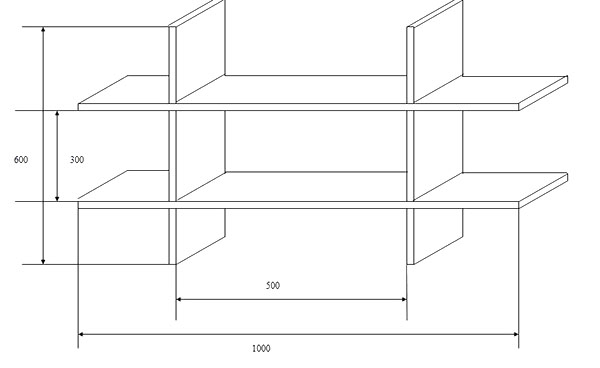
This flexible shelving system rivals the popularity of modular shelving in space and creativity. The mood on the wooden face changes depending on how you fill it.
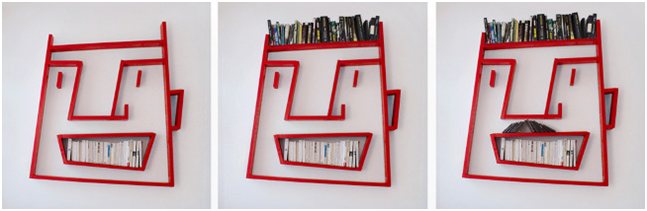
Want to make this DIY shelf to hang at home? Great. What bright and useful touch was missing from your wall?
What you need to prepare:
- wooden planks 30x140 mm;
- drill, drill bits;
- confirmations 8-9 cm;
- self-tapping screws for attaching the shelf to the wall;
- grinding machine with attachments;
- red paint (decide for yourself what color your shelf will be);
- protractor;
- tape measure, pencil.
Prepare parts for the shelf from lumber yourself or order cutting in a workshop. The elements are assigned letter designations, which can be seen in the image.
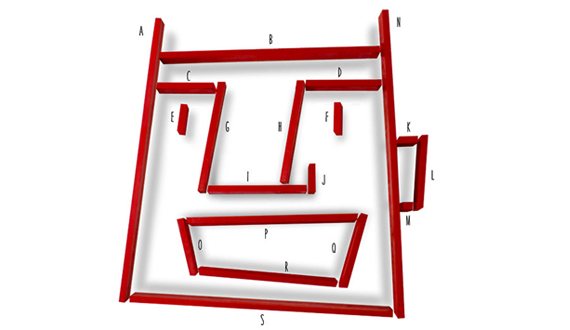
We prepare the holes for the confirmations in advance using a drill. We lubricate the joints with glue, then fasten them with two confirmations. The size of the parts, the bevel angle and connections to adjacent elements are indicated in the figure.
Once the shelf assembly is complete, begin the final sanding and painting. A handmade product can be hung in an apartment using the upper inner corners of the structure using 9 self-tapping screws screwed into the wall.
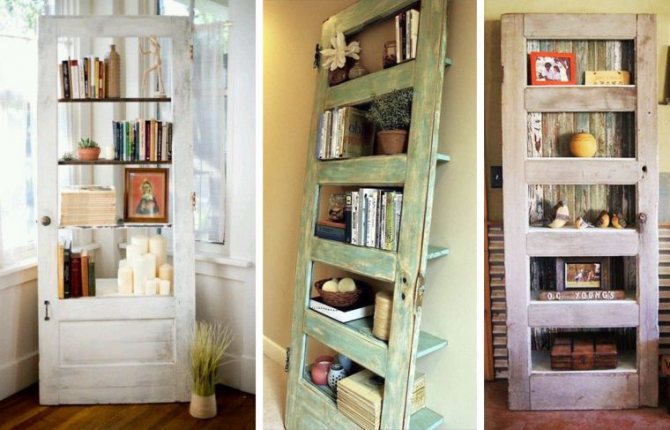
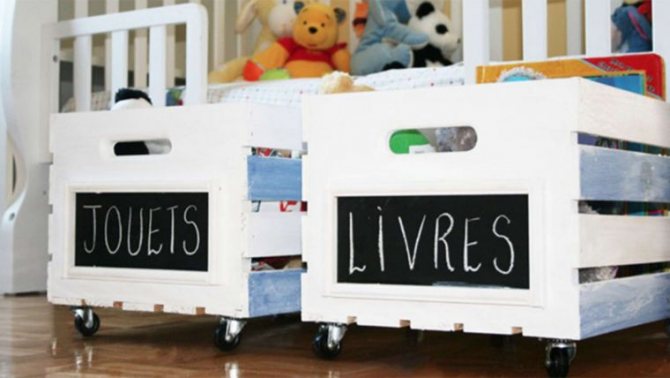
A popular modern trend is to use scrap materials and various items that have already served their purpose and it’s time to throw them away. Such creative uses give things a second life and add to the arsenal of useful, inexpensive devices.
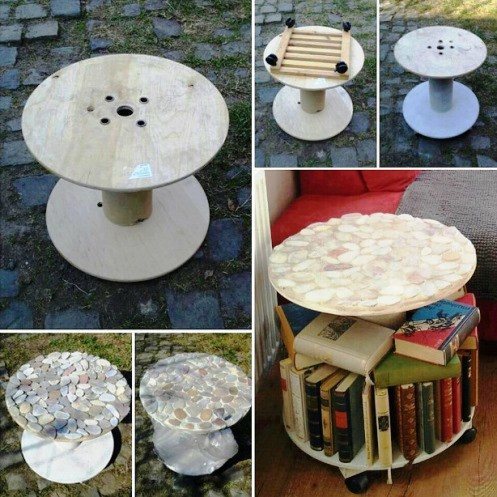
Cable reel - book shelf
If there are repairs or a construction site near you where empty reels lie idle, do not rush to pass by. This is a good chance to acquire an original and practically free piece of furniture at home, which you can easily and quickly make with your own hands.
We recommend preparing:
- small empty cable reel;
- wooden dowels;
- drill, drill bits;
- screws;
- 3-4 swivel furniture wheels;
- glue;
- sandpaper;
- saw;
- roulette;
- paint, paint brush.
Create an original round shelf
- Prepare the reel by cleaning it. Then use sandpaper or a grinder to refine the surface a little.
- You can start painting the bobbins and dowels. We recommend using white paint with a primer. To make the color more even, apply the product in 2 layers.
- When the bobbin is dry, turn it over. Attach the roller wheels to the self-tapping screws. It is better to install 4, then your shelf will be more stable.
- By measuring the distance from the top to the bottom circle of the bobbin with a tape measure, you will find out what size stops you need to make from the prepared dowels.
- We use a saw to separate the required sections, 5-6 pieces in total.
- We install the dowels on the glue, evenly distribute the workpieces in a circle.
After the glue has dried, your DIY home bookshelf is ready.