22.05.2016
Finally the time has come to start making your own steamer for brooms. Making it yourself will not be that difficult, but it will require some effort to implement this plan.
This will mainly concern the manufacture and fitting of wooden planks (hereinafter referred to as staves) for the steamer. If you want to make the steamer for brooms conical, that is, tapering towards its bottom, then you will have to make each rivet in the form of a trapezoid with bevels along the long edges. This, of course, will complicate the entire manufacturing process. However, its appearance will be worth it.
If you make a cylindrical steamer, then the shape of the riveting and, accordingly, the work itself will be significantly simplified. True, the appearance of the steamer will suffer somewhat, which will not affect its main functions of steaming brooms.
Description of the design of a steamer for a bath
The proposed steamer is made in the form of a cone tapering towards the bottom, which is formed as a result of assembling 18 trapezoidal rivets. The mating of adjacent rivets is made along their long edges, beveled at an angle of 10˚.
To ensure the reliability of the assembly, a method is used to connect the rivets using the clapboard type of cladding , that is, using the “tenon in groove” method. For this purpose, a longitudinal tenon is made on one side of each rivet, and a corresponding groove is made on the other.
The mating of the bottom with the rivets is also done using the “tenon-to-groove” method, with the bottom acting as the tenon, and the groove being the corresponding radius groove in the rivet itself. To simplify the riveting design, a simple, that is, straight groove is allowed. In this case, when assembling the steamer, you should pay special attention to ensure that there are no gaps between the bottom and the rivets.
111
In order to conveniently lift the steamer, two opposite rivets have an increased length, and their upper ends are processed to a profile that is convenient for gripping by hand.
The lid, which is a necessary attribute of this type of container, has a shaped hole for broom handles. This will allow you to properly immerse the brooms in water to steam them. It will be especially convenient to steam long brooms. To prevent the lid from cracking during operation, it is reinforced with three strips, the top of which serves as an ordinary handle.
The assembled steamer is secured with two metal hoops with a thickness of 0.3-0.5 mm and a width of up to 25 mm. It would be ideal if you can get a stainless steel tape. However, galvanized iron is also quite suitable. For example, mounting perforated tape, which is freely sold in construction stores.
The hoop is tightened with an M8 bolt and nut, which fits into the holes of two 3 mm thick galvanized steel corners attached to the ends of the tape. There are two ways to secure the corners to the tape: by welding, for example, spot welding, or with rivets.
This method of tightening the hoop has one drawback - it is not very attractive. But if the tightening unit is positioned so that it does not interfere with lifting the steamer, say somewhere on the side, then this method has undoubted advantages. Here they are: the ability to easily make at home and the ability to tighten the steamer when it dries out.
Basic materials and tools
Materials for making a steamer
Any hardwood is suitable for making a steamer. However, the best material is undoubtedly oak, although it is not as easy to work with compared to other woods. A fairly hard wood such as black alder will also work well. The main condition when choosing a material is the absence of knots on it, which could affect the tightness of our cooperage product.
Considering that the steamer for brooms will not be used in a steam room, then, as a last resort, you can use coniferous wood, for example, spruce or pine. If the steamer is not exposed to high temperatures, then the properties of coniferous wood to release resin will be completely eliminated. And the water will do its job.
The thickness of the boards for making staves can be in the range from 16 to 20 mm, and the width should be sufficient for their convenient processing into final sizes. For the bottom and lid, a thickness of at least 18 mm is suitable.
Basic tools and equipment
- Circular saw for wood.
- Manual frezer.
- Electric jigsaw.
- Screwdriver.
Features of product production
To create a healing atmosphere with aromatic light steam, it is important to purchase high-quality raw materials. You need to know how to properly steam a bath broom at home. It would seem that the most natural object obtained from nature should be competently manufactured. Twigs for collection are collected in good weather, at the end of spring and the first month of summer. The best time for preparations is morning. After cutting the branches, they are dried according to special rules.
We invite you to familiarize yourself with the diagram of a bathhouse with a steam room, a sink and a dressing room
The finished and dried material is constantly transferred during storage, preventing rotting. Only correctly carried out actions can guarantee the receipt of fees that can produce a good effect. A sign of an excellent option is matte green leaves with a bright aroma. Therefore, when purchasing bath accessories, you need to contact knowledgeable specialists who adhere to all the rules during production.
The VÖHRINGER plant guarantees excellent quality not only for accessories, but also for ovens. The catalog presents a wide selection of products, and experienced consultants are always ready to select the most optimal products.
Manufacturing of components
At this stage we have to make 16 short and 2 long rivets with handles, a bottom and a lid.
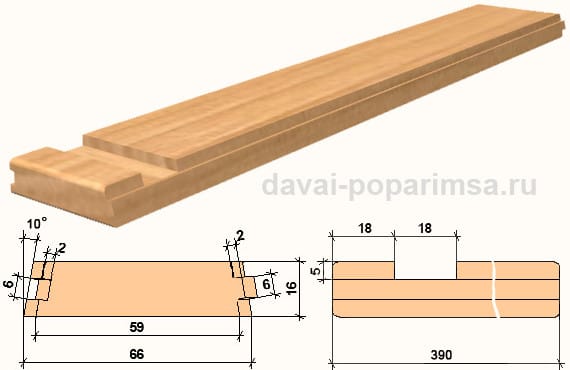
Due to the fact that the main problem will be in the manufacture of rivets, this is where we will dwell. The remaining parts can be easily made according to the attached sketches.
First of all, you need to cut the blanks for the rivets to the following lengths:
- Short 390 mm – 16 pcs.
- Extended 490 mm – 2 pcs.
For further processing of the cut workpieces, you will need to make two simple devices: for sawing rivets into trapezoids and milling their longitudinal edges in order to obtain a “tenon-to-groove” joint.
To be able to configure these devices, I recommend cutting an additional couple of blanks. We will conduct experiments on them, and only then, upon receiving positive results, will we finally process the remaining workpieces.
Circular saw attachment
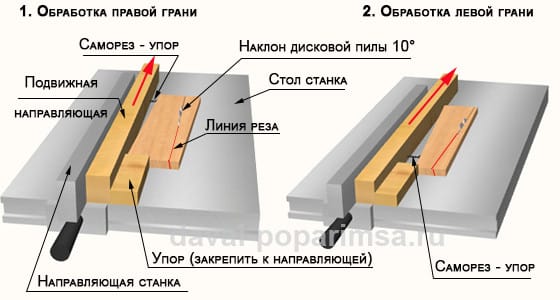
The presented figure shows a device for sawing rivets into trapezoids with inclined edges that have an angle of 10˚. It is this angle that will ensure the correct circumference of the steamer in plan.
The fact is that the guide stop of a conventional circulation machine provides for the production of workpieces only with the same width along the entire length. And we need, as mentioned above, to make blanks in the form of a trapezoid. This is exactly what our device will do.
To give the required angle to the workpiece relative to the longitudinal plane of the circular saw, use an ordinary wood screw (see sketch). By changing its screwing depth, you can also adjust the angle of inclination of the riveting. In this case, it is not the angle itself that needs to be controlled, but the value of the material being cut so that in the end the finished riveting ends up with a size of 59 mm (see sketch of the riveting).
For example, when cutting the right side, the difference in the cut material at its end should be (66-59) /2 = 3.5 mm greater than at the beginning.
When sawing, the device is fed into the cut along with the workpiece in parallel and based on the machine guide. Naturally, you should take the necessary precautions to avoid serious injury.
To trim the left side, the workpiece is turned over, and the adjusting screw is screwed into the beginning of the fixture.
It must be borne in mind that when setting up the device, you should take into account the allowance for processing the tenon. That is, the width of the trapezoid must be increased by its height, equal to 2 mm. Thus, they will be 61 and 68 mm.
Attachment for hand router
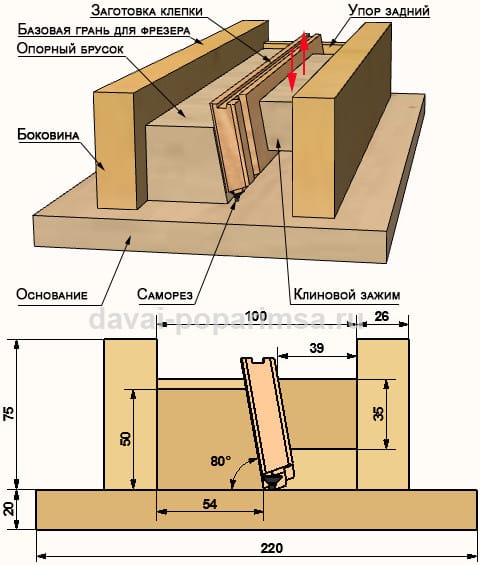
Before making this device, you must first make a support block and a wedge clamp. This must be done with the same setting (10˚ tilt) of the circular saw as when cutting the side edges of the rivets. Then it will be guaranteed that all angles will be the same.
An important condition for the manufacture of a device for milling a tenon joint is to ensure that all parts are parallel to each other. Therefore, boards and bars must be even and smooth. Otherwise, it will be difficult to get the correct joint of the tenon and groove.
If in the first device the self-tapping screw adjusted the inclination of the workpiece in the horizontal plane, then in this one the adjustment occurs in the vertical direction. In this case, the parallelism of the processed (top) edge in relation to the base faces of both sidewalls must be ensured.
Milling should be done in several passes. Then the quality of the milled surfaces will be higher. I advise you to first mill the tenon and then adjust the device for processing the grooves using it.
To prevent the sidewalls from wedging during operation, it is important to make them from sufficiently thick and durable boards. For greater reliability, they can be connected to each other with bars.
Note:
- Most likely, it is unlikely that it will be possible to obtain rivets with the dimensions shown in the working sketches. If the deviations are within reasonable limits (1-2 mm), then this will have a minor effect on the final result. For example, increased dimensions will affect the increase in the overall dimensions of the steamer, and reduced ones will do the opposite. At the same time, the correct shape of the steamer will not change.
- The main condition when processing workpieces on these devices is that the workpieces should be as identical as possible.
- It should be a rule that all workpieces must be processed in one setting of the device. For example, as shown in the circular saw sketch, the right side edge is machined specifically for all 16 short rivets.
- The principle of processing two long workpieces is identical. Only the device settings change.
Assembling a steamer with a lid for a bath
If the rivets are made of high quality, then there should be no problems when assembling the broom steamer. In this case, there is no need to use glue. Small gaps that may arise between the rivets and the bottom will be eliminated when the wood swells under the influence of water.
However, this will not be so easy to do at home without the proper equipment. Therefore, you need to arm yourself with patience and abrasive sandpaper to adjust each rivet to each other and to the bottom.
After which, having first made a test assembly, you can begin gluing the steamer using waterproof wood glue. You can choose the brand of glue by consulting with specialists or a salesperson at a hardware store. PVA D3 glue, which has waterproof and heat-resistant (up to 100˚C) properties, should be suitable.
Manufacturing and fitting of the bottom
Depending on the actual dimensions of the rivets, a bottom of the appropriate diameter must also be made. Its nominal size should be Ø316 mm with a truncated conical part Ø314 mm. If there are deviations in one direction or another, then the diameter of the bottom should also be changed.
It would be correct to cut out a test bottom with nominal diameters. This must be done using an electric jigsaw, tilting the file at a slight angle within 5˚. You need to take a circle of larger diameter as the cutting line. In this case, a smaller diameter will be formed by tilting the file. Its significance should not particularly concern us. The main condition is that it be sufficient for joining without gaps around the circumference with the transverse grooves of all rivets.
After a trial assembly of the steamer, you will see what else needs to be done: leave it as is, or change the dimensions of the bottom. If, for example, there are gaps between the rivets, then it will be necessary to reduce the diameter of the bottom. And, conversely, if there are gaps in the bottom, increase it. In any case, this must be done experimentally.
Assembling a steamer for a bath
If possible, it is better to assemble the steamer with the help of a partner. An additional pair of hands will greatly facilitate this important operation and allow you to assemble it quickly and efficiently.
Assembly is carried out by sequentially pairing adjacent rivets with each other and simultaneously inserting their transverse grooves into the bottom of the steamer. This must be done carefully using a preliminary hoop, pressing the already installed rivets to the bottom.
Having collected all the rivets in this way, you can begin to eliminate the gaps between them and finally tighten the steamer with hoops.
If glue will be used, then before installing the rivet in place it should be applied to all surfaces, both in the transverse groove and at the tenon-to-groove joint. It is enough to apply glue on one side of the rivet - either in the groove or on the tenon.
It must be borne in mind that the setting time of the glue is limited and varies depending on its brand. Therefore, this factor must be taken into account so that it is enough for the complete assembly of the steamer. Otherwise, problems may arise in eliminating gaps between the rivets.
And finally, the steamer needs to be tested in practice. To do this, fill it with water and watch what happens. If there are minor leaks, then wait until the wood has swollen. The absence of leaks indicates that the steamer is ready for use.
If water leaks still occur, then dry the steamer and apply glue to problem areas, including the bottom from the outside.
So, we have acquired another important and necessary bath accessory - a steamer for bath brooms. If this accessory serves us with benefit and faith, it means that the time spent making it with our own hands was not wasted! In the meantime, let's think about how we can also make a dousing device .
_
Dear friends! If it’s not difficult, share it on these social networks with your friends. Thank you!
What to do with a broom?
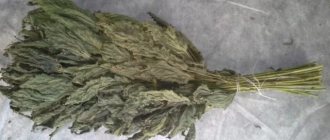
In the bathhouse they use brooms made of deciduous wood. Usually it is either birch or oak. Moreover, it is preferable to use a birch broom. It is better suited for this procedure. At a certain stage, these devices are collected, sorted and dried. After the broom is dried, it is ready for long-term storage. When the need for a broom arises, it must be prepared before the water procedure.
Oak and birch broom – a classic of bathhouse “art”
Preparing the broom
To prepare the broom, you need to process it in a steamer for a bath. It is a wooden bucket up to 30 liters in size. The material used for this device is deciduous wood - linden, oak and pine.
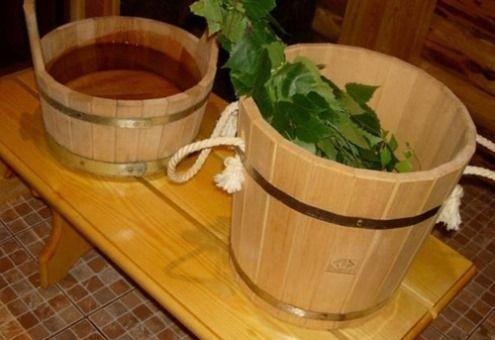
Preparing the broom
At the initial stage, the steamer is filled with cold water. Let stand for 2-3 hours. After this, the tree will swell and due to this, all the cracks in it will disappear. Next, you need to pour boiling water over it to disinfect. Subsequently, it is filled with water, the temperature of which is 60-80 degrees Celsius.
Preparing a broom will not take much time
At the next stage, brooms are placed in this hot but not boiling water and infused. Moreover, the technology for infusing a broom in a steamer for a bath is as follows. Immediately place the broom handle for a couple of minutes. Then, after 2 minutes, the broom is turned over and the leafy part is placed in hot water for steaming. After 5 minutes, the broom is ready for use and you can immediately begin the bath procedure.
Design
Most of our compatriots use basins or pans instead of a steamer. But such a replacement is not always justified. Those beneficial substances and aromas of natural origin that the broom receives in this steamed device cannot be compared with anything, and if a person tries to replace it with metal containers, then those beneficial properties will no longer be obtained. This means that the bath procedure will no longer be quite the same.
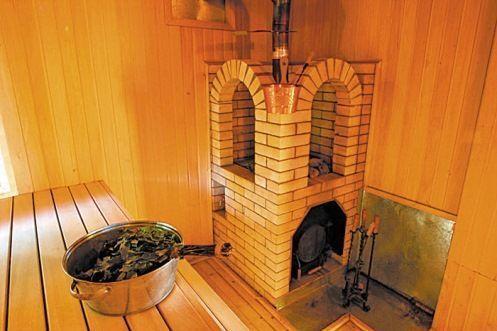
The only thing missing for this bath is a steamer!
Therefore, for maximum efficiency, it is best to use a steamer for the steaming procedure.
You cannot replace a steamer with a basin.

