Felting budenovka - a hat for a bath
To make budenovka we will need: bubble wrap. organza 60x80 cm, dishwashing detergent, 1 meter of backing for laminate for making a template and pattern for budenovka, merino wool, 2 large towels, good mood and gold handles.
How much wool is needed? And which?
I use 20 micron merino wool. We will need it: 50g - yellow, 50g - orange, several strands of melange - blue tones and several strands of acrylic wool - to match the melange, and also a little red - for the star.
Let's prepare the surface for work. In this case it will be the kitchen table. Wipe the surface of the table dry. We will make a template and pattern from the laminate backing. Like this:
On the left is a pattern, on the right is a template. And we begin to make the layout. First, with yellow wool in a vertical direction.
Then with orange wool in a horizontal direction
And now…..Star. Approximately above the future visor we place a piece of red wool.
Wet it with soapy water using a sponge.
Place a star made of plastic film on top
And on top of it we put a layer of orange wool.
On top of the orange wool we draw a star with strands of melange.
Now cover everything with organza and moisten it well with the washing solution.
Cover with bubble wrap and carefully turn over to fill the back side with wool.
Don’t forget to tuck the bottom cut under the pattern!!! We fill the reverse side with wool: yellow - vertically, orange - horizontally. And then we lay out strands of acrylic wool in the vertical direction. It shrinks less than merino and then you get snakes.
Cover with organza and wet it. Then turn it over. The bottom cut needs to be folded inward.
We roll the resulting workpiece into bubble wrap and begin felting. Very carefully at first. Turning the workpiece over from time to time.
Moreover, it is necessary to turn the pattern over inside so that the sides also fall. And change the direction of felting. As they say, both up and down...
When the wool shrinks and the pattern becomes large. We take off the future Budenovka and go to the bathroom to beat off the workpiece.
We rinse with hot and cold water alternately. And now the workpiece has almost shrunk.
Insert the template into it and cut out the star.
Now we turn the blank into budenovka. Like this.
And from now on we turn on spatial imagination and ingenuity. How to give volume to a plane?
To do this, I use the means at hand: a 3-ounce jar, a salad bowl, and scraps of backing for the laminate. I select the salad bowl according to the size of my head. I put it on the jar. I insert a cone from the backing into the top of the budenovka, put it on the salad bowl-jar and add it with my hands.
It turns out budenovka.
And like this.
Thank you for your attention, see you again.
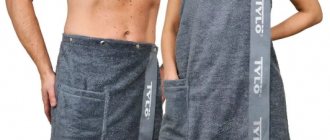
Bath caps: how to choose and how to properly care for them.
This article is dedicated primarily to my customers, as well as to everyone who is interested in purchasing such an important accessory as a bath cap. What to look for when choosing a hat and how to care for it - these are the two main questions that I will try to answer in this article. So, about this and something else in order...
Let's start by finding out why, in fact, there is a hat in the bathhouse?
Its task is primarily to protect the head from overheating. This is achieved by not fitting tightly to the head; the hat should be easy to put on and easy to take off. It should be selected so that there is a large volume of air between the headdress and the head (take this into account when discussing the size of the hat!!!! especially if you have long and thick hair). Air is known to transmit heat or cold very poorly, so even if a felt hat is heated in a steam room, it will take a long time for the heat to warm up the head. You will leave the steam room faster than this happens.
The hat protects the hair from overheating, which prevents its smooth surface from being damaged. A bath cap keeps the temperature in the hair constant for as long as the material from which it is made can.
Another function of this headgear is to protect the ears, since they are thin cartilaginous tissue; they can be scalded “in no time.” After all, they are located at our highest point, and the steam in the bathhouse (and the heat in the sauna) also rises. Therefore, a bath hat should cover the ears by at least two-thirds.
The next question is: what material should a bath and sauna hat be made of?
We exclude synthetics right away, we need only natural materials! Linen, cotton, wool are suitable. Felt hats serve best in bath conditions. This is explained simply. Felt is a porous material, and the air contained inside becomes a natural insulator between the human body and the environment. The felt hat becomes a kind of thermos for the human head. It maintains natural body temperature, protecting not only from cold, but also from heat. A simple experiment will help you verify this. If you wrap a piece of ice in felt, it will melt much later than exactly the same one, but left in the open air.
You should pay attention to what kind of wool the hat is made of. As a rule, thin and semi-fine wool is used. If you have very delicate skin, I advise you to purchase a felted hat made only from fine wool. It is soft, gentle and does not prick at all. The semi-fine coat may tingle slightly in the forehead and neck area (this depends on the individual sensitivity of the skin).
Next point: the shape of the hat.
It can be arbitrary. The main thing is that the following requirements are met: the hat must cover the forehead and back of the head to protect from the flow of hot steam or splashes of boiling water. The back of the head is considered the most sensitive to elevated temperatures. It works almost like a dog's tongue, and evaporates up to 50% of moisture from the human body. It must be locked in the steam room. Otherwise, at best, you are guaranteed a terrible headache after bath procedures.
Let's go further: the headdress for the steam room should be well maintained - washed, dried, etc.
More details on this point...
There are two points to remember when caring for bath caps:
1. Wet felt is a very plastic material; it can be given almost any shape.
2. Having dried in a given shape, the felt will “remember” it, will hold it perfectly and will not deform.
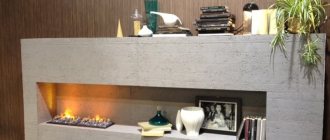
This implies the following: it is strongly recommended not to throw away a crumpled hat that is wet after use. You need to straighten it (you can directly on your head) and send it to dry. If the hat is dense and has a simple bell or cap shape, you can simply place it on any horizontal surface and leave it to dry. Like this:
If the hat has long ears or the shape of the brim does not allow it to dry in this way, then you can use a large jar or vase, or any object that even remotely resembles a head. The photo shows a clear example: a hat on a vase)))
As for washing. You need to wash the hat by hand in warm (not hot) water with any detergent (soap, powder). Rub without fanaticism (not because it will tear, the felt is dense, it will withstand..., but because hot soapy water combined with diligent friction can become shrinkage factors, and we don’t need this) When rinsing, the use of conditioner is encouraged, the felt will become more tender and soft. You can wring it out without twisting it in a towel. Then the most important thing is that the hat needs to be given its original shape. There shouldn't be any difficulties with this. I try to felt the hats very tightly so that they hold their shape well and do not shrink when washed. Therefore, we put the hat on the head, straighten it, and correct the shape. If the hat does shrink a little, you can gently stretch it and return it to the desired size. Then we send it to dry, as already described above. Another budget-friendly way to get an analogue head without having a professional blank is to inflate a balloon by placing it in a hat. And so dry it. The next photo shows a clear example of a ball head))) And the ball can be pushed into a vase or any container with a fairly wide neck.
And of course, bathhouse hats should be beautiful and uplifting!!! I try to constantly expand the range of my hats so that everyone can choose exactly what they need: floral, vegetable, mushroom, animal, gnome caps, kokoshniks, various helmets... For themselves, their loved ones, friends and cheerful company!!!
How to care for felted bathhouse caps.
My dear customers and just guests who liked the works presented in my store!
I often receive questions about how to care for a bath cap so that it serves you for a long time, maintaining its size and shape, and gives you a joyful and playful mood? Therefore, I decided to create step-by-step instructions and describe how I do it.
- So, you received the package with the hat, unpacked it... Shake the hat well. You can straighten the individual elements with your fingers. Felted products retain their shape perfectly - they can be crumpled, folded, put in a bag, and then taken out, and the felt will “remember” the shape specified by the master. If possible, place the cap on a horizontal surface for 1 night. Let her “rest” from the long journey.
- Questions often arise about how a hat will behave in a bathhouse - after all, it is humid and hot there. Some buyers are afraid that the cap may shrink. I roll my products very hard and they don’t shrink. But when wet, felt acquires a certain plasticity and can change its shape according to your desire. And the owner’s desire is to keep the product in the form in which it was purchased. While you are enjoying the steam in the steam room, you can be completely calm, because the hat is on your head, and it takes and maintains the shape of your head. Coming out of the steam room, you really want to dive into the pool or take a cool shower! Do not throw the cap away and do not leave it in the steam room to wait for your return - put it in a relatively dry place (put it down or put it on a bench). The same applies to the bath mat if you purchased one. Wool from some brands may stain when wet or wet (not all colors fade, but sometimes this happens), so after use, do not put a cap or bath mat with wet towels and a swimsuit in the same bag. Place them in different bags.
- “They brought him home, he turned out to be alive!...” So you enjoyed the bath, became healthier, rejuvenated, received a charge of vivacity and good mood, and returned home. And the hat came with you this way, folded in a bag, in a bag. And here we return to the moment of purchase: take out the cap and shake it. Even if you handled it very carefully in the bathhouse, the cap is still a little wet (after all, you put it on wet hair too), so put it on your head, straighten the decorative elements, fields, petals with your hands and place it on a horizontal surface on overnight or for a day - until completely dry. After this, the dry cap can be put in a bag and put away until your next visit to the bathhouse. Do not dry felted items near heating appliances.
- If there is a need to wash a hat, this is possible. I do not recommend washing by hand; it is better to use a washing machine. Place the hat in the machine, possibly together with the rug (if you also purchased one), and do not place any other woolen items. Add wool detergent and fabric softener as desired. Set the machine to a program for washing wool and silk, temperature 30 degrees, spin no more than 400 revolutions (with more revolutions, the product may decrease in size). Do not turn off the spin, otherwise you will have to wring out the product yourself, but you cannot twist it. The machine itself will do everything as it should if you have set the correct mode. After you take it out of the machine, we return to step 3 - put the hat on your head... If you don’t want to put a wet hat on yourself, you can first put a plastic bag on your head and a hat on top. Spread the decorative elements, fields, leaves, petals with your hands and place it on a horizontal surface for a day until it dries completely. A wet bath mat can be ironed with steam on both sides, and then placed on a horizontal surface until it dries completely.
I consider it obligatory to say that these care rules apply to products purchased in my store. I cannot give advice on caring for other craftsmen's products. Felt can be different, each craftsman has his own methods and techniques in his work, and the purpose of the products and the conditions for their use are different.
My recommendations are based on personal experience using the bath set for more than two years.
May your purchases serve you reliably and please you for as long as possible!
With best wishes! Olga Sivaks.
Master class: bath cap “Fried egg” made of felt
A woman's bath/sauna cap should be as beautiful as its owner! Your “eyes” with a magical look attract the attention of your fans. Techniques: wet felting/sewing. Materials: 100% semi-fine wool, carded 180 g, bubble wrap, dish film (Ikea), VSM (if available), needle, nylon threads, towel, rubber gloves, liquid soap, scissors, “golden pens” and an uncontrollable desire to create . Working time: hat 8 hours, flower 2 hours. Difficulty 3.
Today, unlike previous master classes, I will be laconic; in general, there are a lot of photos and, in my opinion, everything is clear from them.
1. First, lay out the carded eyes on the enlarged pattern, in the reverse order, or first lay out how it will look on the hat, then turn it over.
2. Carded (purple), lay out the first layer of the hat, as thin as possible, but without gaps. We protrude 1 cm beyond the side edges of the pattern. The bottom edge remains free, you can even omit about 1 cm so that the fibers do not interlock at the entrance to the cap (not visible in the photo).
3. Next, two thin layers of white undyed combed tape (sliver), cross to cross. Along the edge we leave about 1 cm of purple uncovered so that the white does not crawl out onto the front side.
4. Wet it with soapy water, cover it with bubble wrap, press it down, turn it all over to the other side, fold the protruding edge, and repeat the layout from the beginning. now the white should protrude 1 cm beyond the edge
5. Place the eyes along the edge of the wrong side (white side).
6. Felt through VSM film for 15 minutes on each side. If manually, then longer (at least 1 hour), turning over periodically.
7. Continue felting without film for another 15 minutes on each side. In all directions - along and across, and we go through the edges and folds.
8. Straighten the hat, iron the folds by hand, turn it inside out (now the face is on the outside), put the pattern inside, and felt the VSM for another 10 minutes on each side.
9. Straighten the hat, go through the VSM along the folds.
10. Roll in a hot soapy solution, periodically add it, straighten it, check the degree of shrinkage (you can do it with your own head :)). The hat should be worn loosely; the wool will shrink slightly when dried.
11. Give shape, cut out the edge. We wash off the soap. Iron with steam and iron. Shape again. Let's dry it.
12. Flower: lay out three circles of different diameters (18, 15, 12 cm), each of two colors, the first layer is radial, the second is circular. I have two circles entirely made of carded carding; it’s almost impossible to felt it manually (at least it didn’t work out for me), only with a sander. It is better to take combed tape, or in combination.
13. Wet it, cover it with film, and let it sit for 5-15 minutes, depending on the method.
14. You can make the edge according to the principle of “cabbage scarves”, but this is not important, then everything will come together. We wash, iron and dry.
15. With a “modernized” seam “forward needle” (who knows another name, tell me), we sew circles around the circumference, as in the photo. We take a long thread, then use it to sew the circles to each other and to the hat.
16. Tighten the thread (gather), maintaining the size ratio. We put the circles inside each other, sew them together and with the hat.
Thank you for your perseverance to everyone who watched to the end.