With the completion of the construction phase of the bathhouse on the site, work begins on the interior arrangement of the premises. You will have to think carefully about how to cover the walls, ceiling, and floors, because the rooms in the bathhouse differ in the degree of heating and the effect on the lining. One of the decor options is clapboard cladding. The practical and inexpensive material is environmentally friendly, and all the work can be done with your own hands. Let's figure out how to attach the lining to the ceiling in a bathhouse, consider installation options, as well as related work.
Stages prior to sheathing
Before you begin installing wooden lining on the walls and ceiling, you should make sure that you have not missed a number of previous steps and that they have all been completed correctly. For Russian steam baths and saunas, these technologies are the same, as they are aimed at energy saving, healthy air and the attractiveness of the room.
Selection of lining
You can choose wooden lining already when the box for the steam room, washing room and locker room has been built, that is, the finishing area and the amount of material required are already known. So what factors are important when choosing?
Assortment
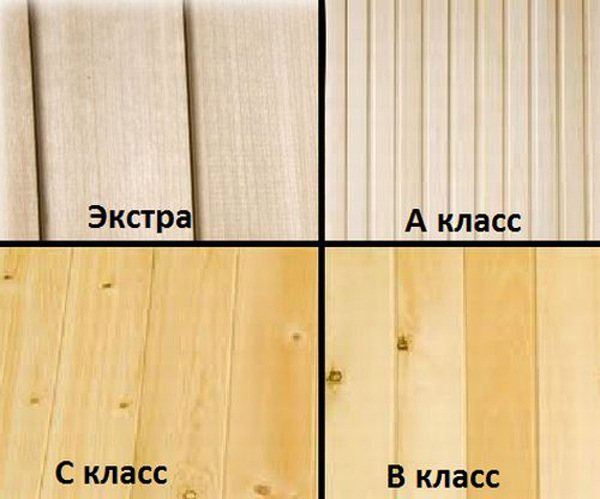
Four types of wooden lining
For wooden lining, there is a grade that determines its grade, and before buying such material, you can ask the seller for documents indicating the assortment, or do a visual inspection. Let's look at this in more detail:
- EXTRA class. Implies the complete absence of visually visible defects (cracks, knots, chips, rot). There are no sources of wood of this quality in nature, so flawless panels are produced by merging fragments. The joint is almost impossible to notice, and the glue used for this is environmentally friendly not only according to SanPiN requirements, but also according to international standards (ASTM, APL, EN, DIN, ISO).
- Class A. In the manufacture of panels, only the hard part of the solid wood trunk is used, that is, without the softer core, although its presence is allowed, but not more than 20% of the total area of the panel. Permanent small knots and small cracks are also acceptable, which do not affect the mechanical strength of the board.
- Class B. This grade is also suitable for finishing a bathhouse, although poor stitching of the tongues is acceptable there, but this defect is hidden during assembly. There may be knots that do not fall out, non-through cracks, chips and dents, the frequency of which is permissible no more than every 60 cm per linear meter, while the size of these defects should not exceed 30 mm.
- Class C. There are practically no restrictions for this grade - all of the above defects can occur on such panels. Therefore, such lining is used exclusively for technical rooms.
Recommendation for steamers. When purchasing, ordering from a carpentry shop or making lining yourself, avoid large knots. In these places, the wood reaches a high density and becomes very hot. If the air temperature in the steam room is raised to 110-120ᶛC, then you can get burned on a twig.
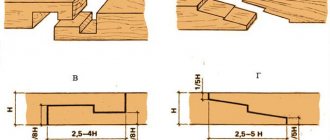
Profile configuration
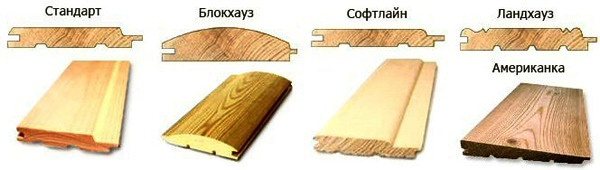
Wood paneling panel profile configuration
When choosing a panel profile, you should take into account the installation direction (horizontal or vertical cladding), the plane for which the finishing is intended (ceiling or walls), as well as the distance at the joints. Here are the main profiles:
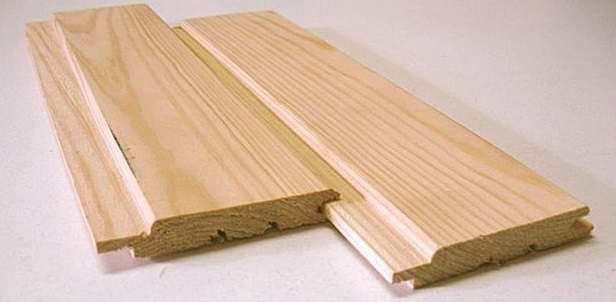
- Standard. This is a classic version of panels, in appearance before and after assembly they are very similar to the tongue-and-groove boards that were previously used to make the walls of freight cars, gondola cars and platforms for railways. The groove of the tongue is deeper than the width of the tenon - this nuance is very important when the lining swells and serves as something like an expansion joint in construction. For a steam bath, this is perhaps the best option.
- Calm. Essentially, this is the same standard, only with a rounded edge. You have to pay money for such decor, but it is unlikely to be needed for a bathhouse.
- Block house. The configuration of the panel is similar to a cut of a log and, after assembling the wall, imitates a rounded log. This finish is very beautiful and can only be mounted horizontally for aesthetic reasons.
- Soft-line. Translated from English, “soft line” means “soft line”. The outer edges on the board are beveled at 45ᶛ and rounded. But here there is an elongated tenon (wider than the depth of the groove), so this option is more suitable for a rest room or locker room, or for vertical installation in a steam room.
- Euro. As a rule, such lining has clear geometric parameters, which is very convenient when assembling the cladding. But the panel has a tenon that is longer than the depth of the groove, which is undesirable for horizontal cladding of a bathhouse.
- Land House. This is a very beautiful profile, but it is in no way suitable for a bathhouse, and even more so for a steam room - moisture will accumulate in the recesses on the surface. The material can only be used for the ceiling in the rest room or locker room.
- American. The board is beveled in thickness and used like wood siding. Mainly used for exterior decoration of buildings. Note. I’ve been steaming for decades, and I can say from personal experience that a profile with tightly closed grooves, for example, a standard, soft-line or block-house, is best suited for a bathhouse.
Wood species
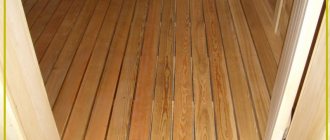
The finishing is made of larch lining
In most cases, wooden lining (especially for a steam room) is not bought ready-made, but ordered from carpentry shops, or made independently (if you have the necessary power tools). And here it is very important to choose the right type of wood, but in Russia alone there are 250 species of trees (information provided by Botanical Gardens Conservation International, BGCI) and almost every second tree can be used to make lining, so the choice is very wide. But we should not forget that you need the material for a room with very high humidity, so the wood must be appropriate.
If we talk about Eurasia, where the territory of the Russian Federation is located, then the lining there is made from the most common species, since they are cheaper:
- Cedar. Such panels are quite expensive, but they have an excellent appearance and exude an aroma that is beneficial to health. Cedar lining has bactericidal properties, so it is not afraid of fungal mold and insect pests. But it can be noted that flavored oils fade over time and only aesthetics remain.
- Larch. This breed is preferred because of its beautiful structure, reddish tint and high moisture resistance (it can last more than 30 years in a steam room, and even longer in a sauna). In terms of mechanical properties (impact resistance, fracture resistance), such panels are not inferior to oak, although a little cheaper, but at the same time, such a finish cannot be called budget.
- Oak. This is one of the densest types of wood, which, of course, increases the physical mass of the finished materials. But this is not a cheap breed, which can be a deciding factor for failure when choosing sheathing.
- Alder. This wood does not have a very high density, so it does not overheat, which is important for steam rooms and saunas - it is almost impossible to get a burn from touching it. It is an aromatic wood with a slight pinkish tint. But the alder finish can hardly be called budget.
- Linden. This is perhaps the most common lining for steam rooms and saunas, although it does not achieve high aesthetic standards - the panels turn out to be slightly pinkish in color (they darken over time, although not much) and without a clearly visible structure. But when heated, such wood releases healthy substances that help with bronchial asthma, colds, runny nose, and so on. Linden is easy to process, does not overheat, and this is exactly the budget finishing option.
- Birch. For Russia, this is the most common tree, which has even become a national symbol, and it makes the most inexpensive lining. But such finishing in damp rooms has a low service life and begins to deform (warp) due to changes in humidity and temperature changes.
- Aspen. Aspen lining is also used for steam rooms and saunas, but it has all the disadvantages that are inherent in birch. In addition, the finish will darken very quickly, which cannot be prevented without using paints and varnishes.
Coniferous species such as spruce and pine are also used for the production of lining, and such panels are used in residential premises, even in cases where there is high humidity, but this wood is not suitable for high temperatures. Avid steamers steam at 100-120ᶛC, and some even reach 130ᶛC, although this is extremely rare (more often it happens by accident). Such heating helps to release the resin from the needles, which will stick to the body, so you will no longer be happy with its aroma.
Which lining to choose for a bathhouse
The selection criteria are determined by the characteristics and properties of the lumber:
Board type
When finishing a pair of wooden linings, it is better to give preference to Euro linings.
- Firstly, because it has a large tongue-and-groove system (the length of the tongue reaches 8 mm).
- Secondly, because it is guaranteed to have compensation slots on the back of the lamellas, which promotes ventilation of the coating and prevents possible cracking of the lamellas.
- Thirdly, because the eurolining is already pre-treated with wood preservatives that can be used in a sauna.
Eurolining for a bath
Type of lining
For a steam room, only the first or highest (elite) grade of wood is suitable, in which there are no knots, wormholes, etc. Please note that even living knots can gradually fall out under the influence of temperature changes.
Wood type
To understand which sauna lining is best, you need to know the characteristics of each breed. We will not review all the breeds available on the market, but will focus on those that are recommended by professionals.
The lining of the bathhouse can be made of deciduous and coniferous wood. The choice depends on the purpose of the bath room: steam room, dressing room, washing room, shower room, as well as on the properties of the wood itself.
The most popular material for a steam room in a bathhouse or sauna is hardwood lining. Their common advantage is that the wood does not heat up in the sauna and cannot cause burns when touched, and is also resistant to moisture.
Linden lining for a bath
The most popular for saunas and baths is linden lining. The advantages of this wood are its ability to create a special microclimate. From a utilitarian point of view, the undoubted argument in favor of linden lining will be the strength of the species, resistance to drying out, as well as the beautiful color and structure of the wood. Linden is considered an energy donor.
Aspen lining for a bath
The second most popular place for baths is occupied by aspen lining. Aspen wood is beautiful, soft, and easy to work with. The peculiarity of the breed is that over time, aspen lining only becomes stronger.
Aspen is also good because it provides easy care for the lining in the steam room. It is enough to lightly sand it when it begins to darken. And popular belief says that aspen draws negative energy from a person.
Alder paneling for a bathhouse
In third place was the alder paneling. From a medical point of view, alder is good because it contains tannins. The wood of this species is hygroscopic and has a low thermal conductivity coefficient. However, the high cost prevents its widespread adoption.
Note. Lining made from linden, aspen, and alder is usually sold in short pieces. Commercial length is up to 3 m. This should be taken into account when planning the finishing of the bathhouse and making material calculations.
Oak lining for a bath
The most expensive and difficult material to process is oak lining for baths. But it does not rot, does not lose its properties and can be installed in a sauna without the slightest additional processing. Unfortunately, all this is not available to everyone due to the high cost of oak lining.
The situation is similar with ash paneling - very expensive and rare lumber for lining a bathhouse.
A common disadvantage of hardwood lining is that it loses color over time and needs to be protected.
Coniferous species are rarely used in steam rooms. Because the resin emitted by softwood lining (pine, spruce) makes it practically unsuitable for use in a steam room. They are more suitable for washing and dressing rooms. This is facilitated by such indicators as moisture resistance and low price. In addition, coniferous lining is easier to process, has a beautiful structure and a rich palette of shades, allows you to veneer rounded shapes and does not require additional processing (except for de-resining). Often the pleasant pine aroma also becomes an argument in favor of pine lining.
How to calculate the amount of materials
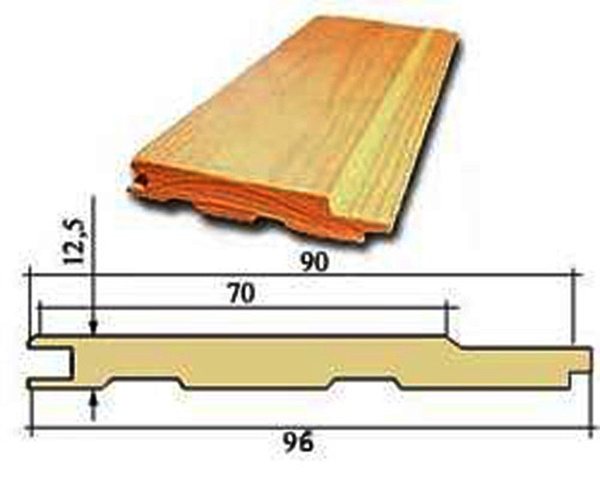
Lining "Standard" and its geometric parameters
To cover a bathhouse with clapboard inside, you need correct calculations on the amount of material, especially if you order it from a carpentry shop, so the question of where to start laying it is automatically removed. Imagine that you ordered less material than you need, but if one or two panels are missing, a deadlock situation may arise. That is, the carpenter, having completed your order, will move on to another and is unlikely to reconfigure the machines for the sake of two or three linear meters of panels, unless the workshop is not overloaded with work. But you shouldn’t rely on the Russian “maybe” - it’s better to order too much than to end up with a shortage.
So all the step-by-step instructions will not be worth a damn if you have a shortage of finishing material, therefore, you need an accurate calculation. Of course, you need to start your calculations with the total area of the ceiling and walls, and take away the doorway in the steam room, sink and windows in the rest room, locker room, if, of course, there is a need for this (usually there is none). The very first thing you need to pay attention to is the width of the panel, or rather, how it is determined in a store or carpentry workshop.
For example, let’s take the most common “Standard” profile, where the total width of the board is 96 mm, and the working (visible) width is only 90 mm (there may be other parameters). So, if the panel is 4 m in length, then its total area will be 4 * 0.096 = 0.384 m2, while the working area will be only 4 * 0.09 = 0.36 m2, that is, 48 cm2 and this is only for one board! Therefore, your calculations should be based only on the working area of the material, regardless of how the seller considers this parameter.
Let's make conditional calculations for a medium-sized steam room with a ceiling height of 220 cm and an area of 2.5 × 3 m2, therefore, the ceiling there will be 2.5 * 3 = 75 m2, two walls 2.2 * 2.5 = 5, 5 m2 and two walls of 2.2 * 3 = 6.6 m2. In total, the area of all finishing areas will be 7.5 + 5.5 * 2 + 6.6 * 2 = 31.7 m2, but will this amount of lining be enough, even if the seller takes into account only the working surface of the material? Of course not, so for the correct result it is better to count the panels one by one.
As a rule, carpentry workshops use standard pieces of wood 2, 4 and 6 m long (occasionally 5 m) to make lining, so they will make panels of the same length and you will have to pay for the waste. So, if you decide to do horizontal cladding (the most common option), then for a ceiling and walls 3 m wide, a 6-meter lining is best suited - you can just cut it into two parts. But for walls 2.5 m wide, 5-meter panels are, of course, better, but if you’re lucky and there are suitable blanks in the carpentry, but, most likely, for this purpose you will also have to buy (order) 6-meter boards (there will be a meter left).
On the walls, you need to raise the cladding by 220 cm with panels with a working width of 9 cm, which means 220/9≈24.4 or 25 fragments. It turns out that for one wall you need 25/2 = 12.5 or 13 whole stripes, and for two walls 26 strips. For the ceiling you will need 250/9≈27.7 or 28 sections or 28/2=14 whole panels. With a wall where the width is 2.5 m, everything is somewhat more complicated if there is no lining 5 m long, and if you use 6-meter panels, you will also need 26 of them, but this will result in 26 meter-long waste scraps. Personally, I usually use such scraps to assemble wooden panels on the cement floor of the steam room. But, be that as it may, as a result we got 26 + 26 + 14 = 66 pieces of lining. If one linear meter of a panel has 1 * 0.09 = 0.09 m2, then the whole board will be 0.09 * 6 = 0.54 m2, and 66 pieces will have 66 * 0.54 = 35.64 m2 of working area, although the net area of the walls is 31.7 m2.
The door to the steam room is usually shifted from the center to the side
You can, of course, go the route of austerity, if the dimensions allow, for example, on the wall where the front door is located, and it is almost always offset from the center and from the frame to the corner a meter or less, then this part can be covered with the remaining scraps. But what do we get on the other side?
If the distance from the wall to the door frame is no more than a meter, and the frame itself is 0.85 m, then you will need to sheathe an area 3-1.85 = 2.2 m wide, so you can save money only if there is a five-meter lining, which can be cut into two parts with a remainder of 60 m (also useful for floor panels). In short, the austerity regime is carried out in exactly this way - places where there will be no cladding are subtracted. Below is a video with an example of calculations.
Video: Calculation of wooden lining
You can also calculate in advance the number of clamps for fastening, since we know the number of linings. For horizontal installation of the cladding, a vertical sheathing is needed in increments of 40-50 cm, but we will start from the second indicator. For a wall 3 m wide you will need 7 guides, for a wall 2.5 m wide - 6, and for the ceiling another 6 pieces. Total, 7*2+6*2+6=30 guides. Clamps are not needed for the lining cut to width, and there are only 5 of them - one on the walls and one on the ceiling, which means there are 5 fewer strips left. One profile of wall sheathing will require 12 clamps, which means that the total number of clamps needed for the walls is = 12*26=312 clamps. For the ceiling, one rail will require 12*6=72 clamps, totaling 312+72=384.
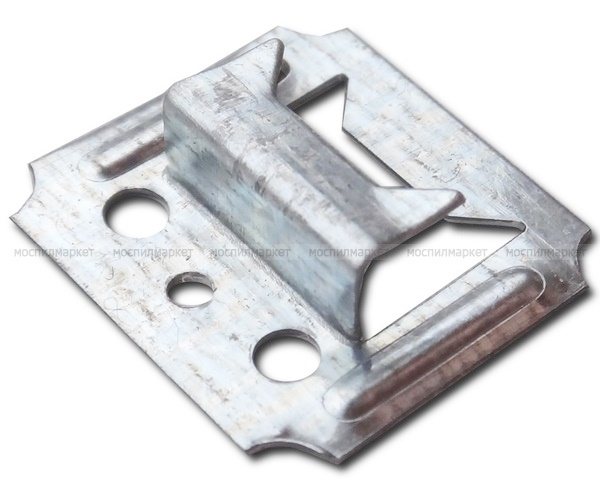
Metal fastening for lining - clamp
For reference. Cleimers are usually sold in polyethylene packages of 60, 80 and 100 pieces. In the same bag there is another small bag for 20 mm nails with anti-corrosion coating at the rate of 2 nails per bracket or 120, 160 and 200 pieces each.
Treatment of lining with protective agents
Sheathed walls are subjected to protective treatment.
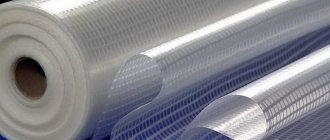
Solutions that are water-based or contain wax are considered the safest to use. They are environmentally friendly and harmless to health. A waterproof film is formed on the surface of the lining, which prevents moisture from penetrating into the wood, extending its service life.
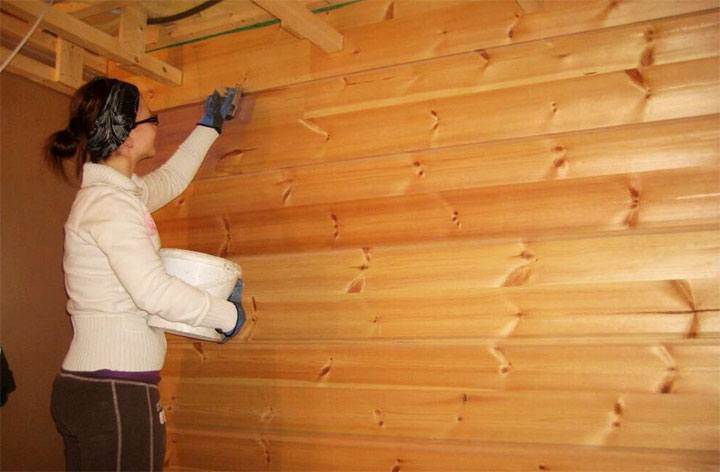
Before application, it is important to read the manufacturer's instructions. Often applying the product even in one layer is enough.
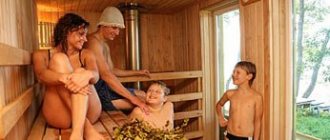
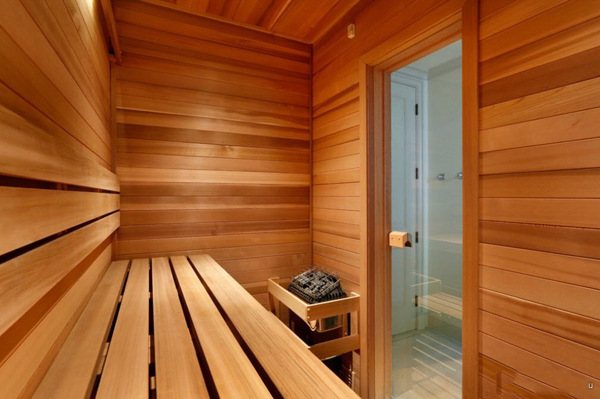
Using wooden paneling to cover the bathhouse, the owners create a special microclimate inside the room, which has a positive effect on the health of vacationers. Plus, wood is a natural material that fits perfectly into the interior decoration of the bathhouse, looks beautiful and smells nice.
Insulation, waterproofing and installation of lining
Note. I will talk about lathing, insulation, waterproofing, and installation of wooden lining only in general terms, since in this case we are interested in the sequence of work, and the process itself is described in the article “How to sheathe the inside of a bathhouse with wooden lining with your own hands” on this resource.
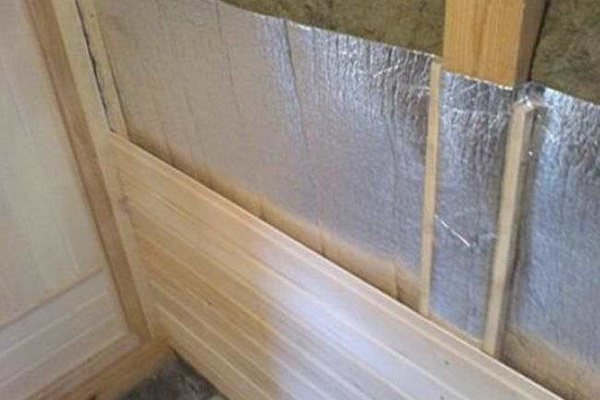
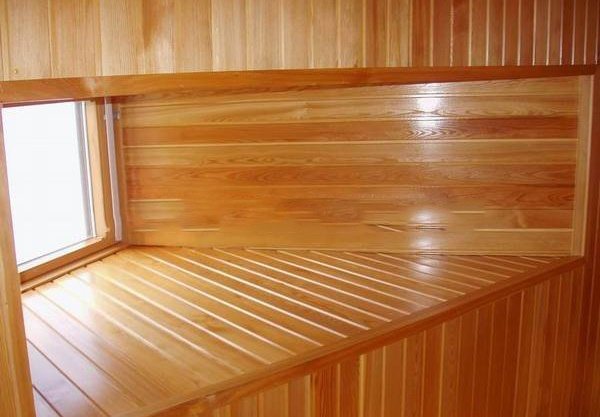
Insulation, waterproofing and installation of lining on the wall in the steam room
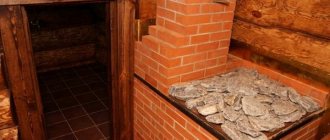
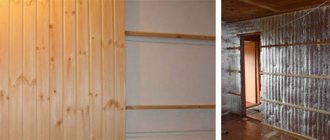
Let's start with the sheathing - it is made from 50x50 mm bars, 50x70 mm or 50x100 mm boards, as well as from galvanized CD profile, which was originally intended for installing drywall. In timber, log and frame houses, they usually use a block or board with an insulation thickness of 50, 70 or 100 mm, which is then covered with aluminum foil or thin penofol, as shown in the top photo.
The fact is that such foil has reflective properties for infrared (thermal) radiation, therefore, significantly reduces the thermal conductivity of the insulation. For insulation in baths, they use either foam plastic (PSB-S 15 or PSB-S 25 with a thermal conductivity coefficient of 0.043 and 0.041, respectively) and basalt wool with a coefficient of 0.046-0.032 - the lower this indicator, the worse the material transmits heat.
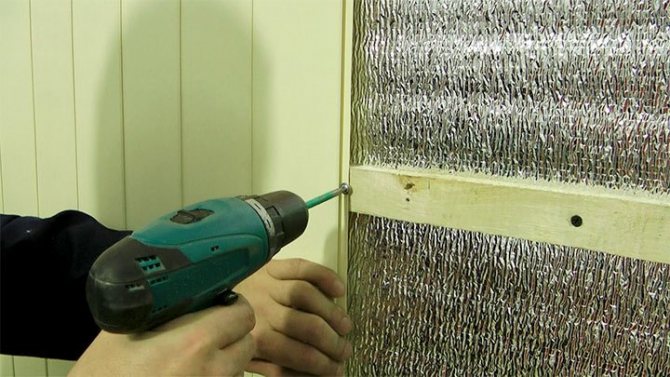
There must be a ventilation gap with a depth of 20-25 mm between the lining and the foil - this will allow air to circulate under the wooden finish and dry the moisture that the panels absorb. If the insulation layer is thinner than the protrusion of the sheathing, as in this photo, then the foil is fixed with strips, pressing it against the insulation and there remains a gap to the sheathing. When the insulation is flush with the sheathing, it is covered with foil, and a counter-latten made of slats 20-25 mm thick is screwed (nailed) on top.
Recommendation. Personally, I have installed more than one hundred and even a thousand squares of wooden or MDF lining on clamps. Therefore, based on my own experience, I can advise against fastening the clamps with the nails included in the kit - it is inconvenient and, moreover, unreliable. Instead of two nails, it is better to screw a self-tapping screw into the central mounting hole using an electric drill or screwdriver. This will increase the fastening speed by approximately 2 times and increase reliability by 4-5 times.
Video: Interior decoration of a steam bath
Ways to fasten the lining
Two types of fasteners are used for installation.
Kleimers
Safe type of installation. Doesn't damage the planks.
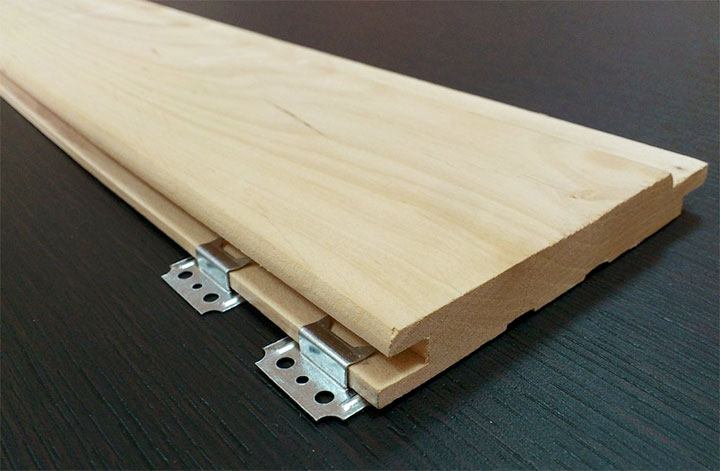
A clamp is a mounting bracket with 2-3 holes for self-tapping screws (nails or a construction stapler), which is placed on the lining tenon.
Having fixed the bracket on the tenon, it is attached to the sheathing beam. You need to start from the center, then move to the edges, maintaining verticality or horizontality. Claypers are used for laying lining on ceilings and walls. If necessary, it will be possible to dismantle several planks without damaging other elements of the bathhouse design.
Nails or screws
For the self-tapping screws, pre-drill a hole with a diameter slightly smaller than the size. Self-tapping screws are screwed into a tenon or groove at an angle of 45 degrees.
The nails are simply driven into the slats in the right places. To avoid rust on the surface, it is recommended to use copper or galvanized nails. But it is worth considering that they will cost twice as much as usual.
In any case, the cap will be flush with the bar. Places of fasteners are sanded and polished. There should be no burrs or defects left on the surface.
The disadvantage of through-mounting the slats is that the metal elements will gradually begin to rust, streaks will appear, or there is a risk of getting burned when heated.
Carrying out interior finishing
Covering a bathhouse from the inside with your own hands requires a certain sequence. Installation begins with preparing the frame. To do this, take the timber and assemble it around the entire perimeter of the room. to sheathe the steam room only vertically . This is explained by a large amount of condensate, which, in the case of a horizontal arrangement of the material, begins to accumulate at its joints. It is for this purpose that the timber for the frame is attached in a horizontal position to the walls of the steam room.
First, install the upper and lower guides near the floor and under the ceiling using a screwdriver and self-tapping screws. To ensure that the timber is positioned exactly horizontally, a plumb line is used, and intermediate elements are mounted in such a way that there is an equal distance between them over the entire area of the walls. When creating a frame, they use a standard distance between the bars of 70 cm. If insulation is used for sheathing, then the elements are positioned based on its dimensions. For example, with a mineral wool sheet width of 80 cm, the distance between the bars should be exactly the same.
The finished frame is impregnated with an antiseptic solution and left to dry. After this, sheets of mineral wool are laid between the beams, which are attached to the walls using a construction stapler. At the points of contact, they should overlap by 10 cm, and the wool itself should be covered with a waterproofing film, stapled to the frame, and the joints should be insulated with mounting tape.
As soon as the frame is ready, the finishing of the bathhouse with clapboard begins. First, measure the distance from the floor to the ceiling, after which the prepared boards are cut to the required size using a jigsaw. Work on finishing the interior of the bathhouse begins from the far corner, moving along the perimeter. The first element fixed in the corner must be positioned strictly vertically, which is verified using a level. The lining is attached to the timber using a hammer and nails. If work is carried out in a steam room, galvanized clamps are used.