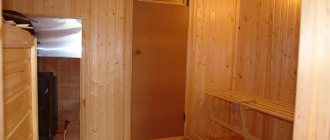
Installation of drainage gutters
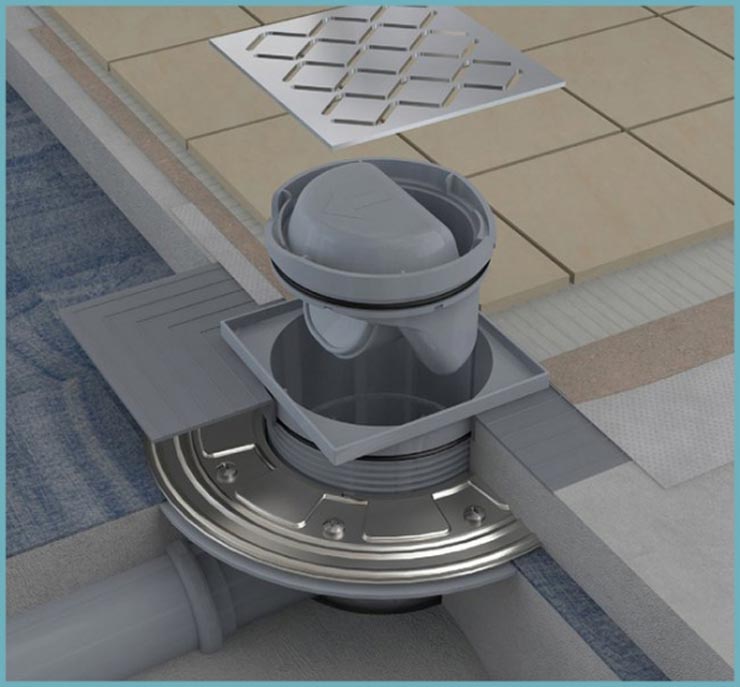
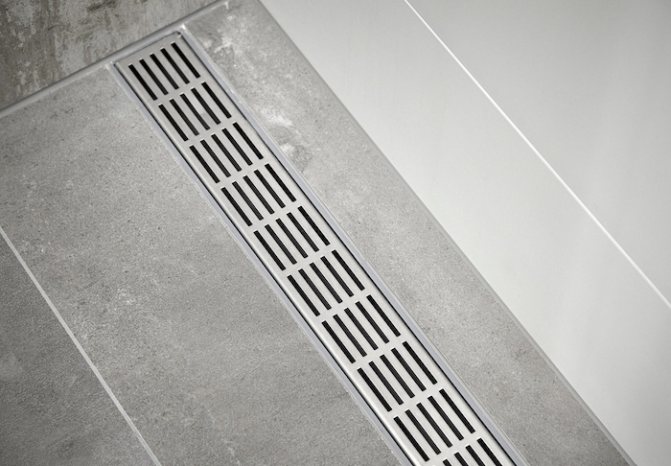
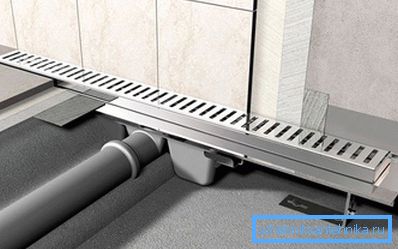
The shower drain in the floor under the tiles is a rather complex plumbing device. It is located in a special floor hole and is attached directly to the pipe. This design consists of the following elements:
- bends with couplings connecting to the sewer drain;
- removable grille to prevent clogging of the drain;
- a flange that hermetically fixes the waterproofing membrane;
- siphon creating a water seal;
- water inlet funnel.
For the manufacture of such drain structures, stainless steel is used. This durable and economical material is characterized by increased reliability. The removable grille can be made not only of steel, but also of chrome, brass and even ceramics. They can be round or square.
Types of ladders
A ladder, or structure for draining water, can be made in several different ways. Here are the most common options:
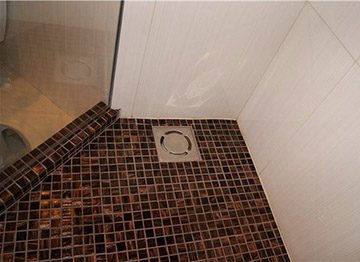
- Point drain. In this option, the hole where the water flows usually has modest dimensions. It can be located anywhere in the room (in the center, in the corner, against the wall). The hole is covered by a grill (it can be round or square). Naturally, the floor should have a slight slope in the direction of the hole to allow water to drain.
- Linear ladder. The shape of the chamber where the water flows is an elongated rectangle. Typically, a receiving chamber of this type is located near one or several walls, at a short distance from them.
- Wall ladder. A special design that, at first glance, looks like a linear one. Its receiver also resembles a narrow and long rectangle, but that’s where the similarity ends. The receiving chamber is hidden in the wall, and not in the floor, and the sewer pipe is also located inside the wall. The holes for water drainage are placed exactly next to the wall.
Most often, when constructing a floor with a drain, the drainage is organized using point drains. The reason for this popularity is the ease of installation and the low cost of the corresponding equipment. Linear drain structures are more expensive and therefore are used less frequently.
The most expensive and difficult to install is a wall drain. Often this is only possible with a major overhaul that involves reworking both the floor and the walls. In addition, equipment for organizing a wall drainage system has the highest price. Therefore, this flooring option with a drain is relatively rare.
What is a shower drain in a tile floor?
Which one to choose, you need to decide for yourself, based on your own capabilities and needs. However, in order not to make a mistake, it is necessary to take into account several important nuances. First of all, you should pay attention to the cost of the device. There is no need to save money, because too cheap models are of very low quality.
Do not forget that it is the correctly selected drain that will best ensure cleanliness, dryness and absence of dampness in the bathroom. Before purchasing, you need to decide on the height of the mounting system. In addition, you will need to at least roughly calculate your water consumption. It is important that the selected model has time to cope with the disposal of used wastewater.
The drain is part of the sewer system of an improvised shower stall. It collects the water used during the washing process and directs it to the general drain pipe.
The shower drain under the tiles performs another important function - it traps debris that risks getting into the water supply and causing it to clog.
The design of the device includes three main elements:
- a water inlet funnel with a flange into which wastewater flows;
- removable grid that filters large debris;
- a siphon that creates a water seal inside the system.
How to raise the bathroom floor under the drain
To install a drain, you will have to raise the floor. Even the most compact point drains are no lower than 60-70 mm in height, and in addition, you will have to create a slope in the direction of the drainage hole. Therefore, in order to install an entire floor with a drain in the shower or throughout the bathroom, it will have to be raised above the level of the main floor.
While it is relatively easy to raise the floor in a bathhouse, in an apartment building you will have to make careful weight calculations so as not to overload the floors. Today, several solutions to this problem have been invented. Each of them has its own pros and cons.
Various types of ties
The main disadvantage of this floor is its relatively large mass. In addition, the work will be significantly delayed, since you will have to wait until the poured mixture dries completely. However, the screed also has advantages: durability and reliability of the structure, the ability to install insulation, and combine the properties of several materials.
Here are several types of screed:
It is important to remember that the thicker the “pie” of the screed, the greater the load on the floor. With a thickness of more than 100 mm, the weight of the entire structure can already lead to the destruction of the ceiling. Therefore, all calculations must be carried out very carefully.
Podium on joists
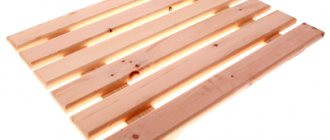
Wooden planks are not the best material for installation in a damp room, but sometimes there is simply no choice. The wood must be carefully dried and the boards must be treated with impregnations. It is worth choosing compounds for working outdoors (or for wood in contact with the ground), since the protective properties of such compounds are the highest.
There are two design options:
- Create a slope using joists by pushing them in the direction of the drain hole. The logs are laid in an envelope, and a layer of plywood is laid on top of them (grades that are resistant to moisture are used). Waterproofing, gypsum fiber board and tiles are laid on the plywood in layers.
- The floor structure is made flat, and the slope is created using different thicknesses of tile adhesive layers. This option is suitable for small areas (for example, showers).
Floors on joists weigh noticeably less than screeds. But such a design requires great attention to the quality of the waterproofing device.
Types of shutter
This seemingly simple device performs several important tasks. The shower drain in the floor under the tiles allows you to drain the water flow directly into the sewer riser. In addition, it is thanks to the presence of this design that the joints with the floor are sealed. Installing a water seal allows you to avoid the appearance of unpleasant odors emanating from the sewer.
Today, several types of such devices are produced. Each of them has its own advantages and disadvantages.
The simplest is considered to be a shower drain in the floor under tiles with a water seal. In this case, the function of a plug preventing the penetration of sewer stench is performed by water. Therefore, one of the most significant disadvantages of using this device can be considered constant dampness. To avoid the development of pathogenic bacteria around it, it is necessary to carry out regular disinfection. The advantages of such structures include relatively low cost.
The next, more expensive and modern version is the shower drain in the floor under the tiles with a dry seal. It should be noted right away that it does not create dampness, leading to the appearance of mold and mildew. This is due to the fact that all the water is instantly drained into the sewer system. The operation of the dry shutter is ensured by the presence of a special valve, which is a ball placed in a funnel.
As the ladder fills with water, this ball gradually begins to float, opening the drain. After the water is removed, it returns to its place, blocking the access of air from the sewer system. The only significant drawback of such drains is that over time the valve becomes overgrown with debris, as a result of which its operation is disrupted. To avoid such failures, it is recommended to clean it regularly.
Most often, to make a floor with a drain, point drains are used, much less often - linear ones. The installation of wall drains is generally quite a rare occurrence, since installation is possible only at the stage of major repairs, not only of the floor, but also of the walls. In addition, such devices are much more expensive.
Valve types
In addition to different design solutions, the water drain to the floor (point or linear) has different types of valves. A seal is a device that prevents sewer odors from entering a room.
The simplest seal is a water seal. In these devices, there is a bend in the outlet pipe in which water remains. It blocks odors. The disadvantage of such a system is the possibility of drying out. This happens if the water has not been drained for a long time. Drying out can also be caused by incorrect installation (the slope is chosen incorrectly) or the presence of floor heating - a warm floor in the bathroom “dries out” the water in the water seal.
Dry drains are made mainly of plastic, gratings are made of stainless steel or also plastic. There are models with a built-in check valve. It prevents water from rising when the drainage pit overflows. When installing a floor with a drain in an unheated bathhouse, look for models that can be used in cold weather (there are some).
DIY floor with drain
A floor with a drain is necessary for arranging a shower stall without a tray. It is quite possible to do it yourself. We understand the technology of organizing drainage by installing a drain and find out what materials are needed.
The reasons for installing a floor with a drain yourself are different. This design is necessary when building a bathhouse, but in a city apartment it may also be in demand when building a shower stall without a tray. To install a floor with a drain, you need to have certain knowledge of construction technologies. But still, this task is not as difficult as it might seem at first glance. Let's figure out how this is done in detail.
Types of shower drains by shape
The smallest floor-mounted drain ladder has a height of 6-7 cm. At the same time, in order for water to flow normally into it, it is necessary to ensure a slope towards the drain hole of at least 1 cm per meter. This means that when making a floor with a drain, the height of the floor towards the walls is increased. The zero point in this case is the upper part of the installed ladder. How accurately the floor rises depends on the size of the shower stall or the entire bathtub, if you plan to collect water from the entire area of the bathroom.
There are several ways to raise your bathroom or shower floor. When choosing a method, it is necessary to take into account the load-bearing capacity of the floor, otherwise you can cause damage to the entire structure.
The most obvious way to make a floor drain slope in the floor is to pour a screed. But the option is not always the best. Firstly, an ordinary cement-sand mixture has a lot of weight, and secondly, it “matures” for a long time. But there are several good options.
The most common way to create a floor with a drain is using a screed. It’s just that the screed can be different, especially since the thickness of the “pie” is usually significant - rarely less than 12 cm - which makes it possible to make it a combination. This allows you to provide the required reliability, but reduce weight.
Most often, the floor with a drain is insulated. But the maximum thickness of the insulation and screed is 10 cm, which is clearly not enough to install most drains. The remaining centimeters are “gained” by laying a rough screed, but it makes sense to make it from lightweight concrete to reduce the load on the floor.
On the logs
In order not to overload the floors, you can make a podium in the shower or bathtub on joists. The option is controversial, since high humidity and wood do not go well together, but sometimes this is the only option. When choosing such a floor drain device, you must use well-dried wood. Before use, it is treated with protective compounds (according to the instructions, but at least twice).
We invite you to familiarize yourself with the Types of floor screeds in an apartment
The advantages of these methods are minimal weight, the disadvantages are the complexity of execution, since attention to detail and high quality waterproofing are required.
As you can see, a floor with a drain in a bathtub or shower can be done in different ways. Choose the option that best suits your conditions.
Based on their design features and operating principle, drainage devices can be divided into two groups:
- with a water seal - a traditional option, where water plays the role of a stopper that traps odors;
- with a dry valve - equipped with a valve in the form of a funnel with a shut-off ball. When water enters the circuit, the ball rises to its level, opening access to the drain. When the liquid drains, the valve returns to its place, preventing the penetration of air from the sewer.
Models with a dry seal are considered more hygienic due to the absence of stagnation of moisture in the siphon. But all types of drains require periodic cleaning to remove dirt and plaque.
The devices differ in the diameter and height of the neck, the direction of liquid drainage (side/bottom) and the shape of the outlet (vertical/horizontal).
Installing a ladder during the construction of a private house does not present any particular difficulties. Here you can initially calculate the wiring of communications and achieve a certain thickness of the screed. In apartments, everything is more complicated - the thickness of the screed here is not sufficient to form a slope, so the floor level has to be raised. You need to act wisely and step by step.
Consumables:
- sand;
- cement;
- expanded polystyrene;
- damper tape;
- isoplast;
- tile adhesive;
- tile;
- sealant;
- construction tape;
- grout;
- plastic pipes;
- fully equipped ladder;
- screws.
Set of tools and accessories:
- level, ruler and tape measure;
- pencil or marker;
- grater;
- Master OK;
- putty knife;
- knife and scissors;
- tile cutter or nippers;
- screwdrivers and keys;
- rule.
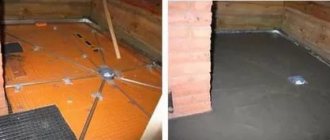
Work begins with laying a drain pipe and inserting it into the sewer system. When inserting, maintain a slope level at the rate of 2 cm per 1 linear meter. The cracks at the insertion point are filled with sealant paste.
Then the height of the screed is calculated, focusing on the axis of the pipe embedded in the sewer. To the height of the ladder add the thickness of the grating and a few centimeters per slope from the calculation indicated above.
The dried screed is coated with a waterproofing layer of bitumen or mastic, overlapping the walls. At this stage, it is necessary to decide on the location of the ladder, taking into account the tiled cladding. The drain grate should be positioned symmetrically relative to the tile elements.
Floor insulation
According to the instructions, assemble the ladder into a complete structure. All that remains is to fix it on the surface of the screed and connect the pipe to the sewer outlet pipe. The thermal insulation layer is created as follows:
- Expanded polystyrene sheets are cut into pieces in accordance with the characteristics of the distribution of communications on the floor.
- The finished sheets are laid on the floor.
- The material is glued along the perimeter with damper tape.
- The joints between pieces of thermal insulation are taped with construction tape.
Expanded polystyrene has high heat-insulating properties and will prevent heat loss in the bathroom.
At this stage, the main layer of screed is poured to form a slope. Work progress:
- Expanded polystyrene is covered with a reinforcing mesh.
- Beacon landmarks are installed to indicate the slope towards the drain hole.
- Prepare a solution at the rate of 1 part cement to 3-4 parts sand.
- Fill the surface with the prepared solution so that the drain device is completely covered with the mixture, but the flange remains open.
- Leave the screed to dry for at least 3 days.
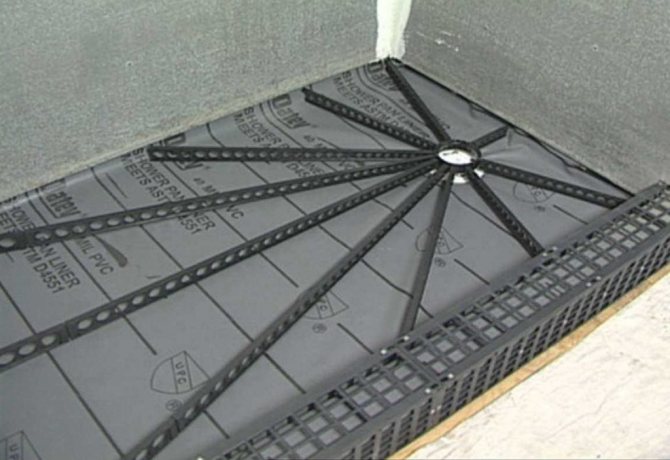
Floor waterproofing
It is recommended to use isoplast as a waterproofing material. A hole for the drain is marked and cut out in the material and placed under the remaining open flange of the drain. Along the perimeter of the hole, a layer of waterproofing is fixed with screws. When laying waterproofing, special attention should be paid to corners and joints, “fusing” heated isoplast onto the surface.
The siphon with a protective grille is connected to the drain body using a rubber O-ring. The finished waterproofing layer is poured with another layer of screed prepared from sand, water and cement. While pouring the screed, it is better to cover or remove the decorative grille so that the solution does not clog the drain holes.
They begin to lay the tiles only after the final layer of screed has completely dried. This stage will be the longest - at least 25 days, and better - 42-43 days.
You can lay the tiles on the screed using regular glue, leveling the layer with a spatula. Special crosses will help maintain the same distance between individual ceramic elements. The tiles near the walls will most likely have to be trimmed, but only after careful measurements, otherwise the cladding will not turn out neat.
Within a day, the tile adhesive will dry, and you can begin grouting the space between the tiles. Only moisture-resistant grout products are suitable for the bathroom. If all the work is done correctly, the end result will be an even layer with the drain grating located at the same level as the tiled covering.
Shower floor drain: legal or not?
Perhaps the main sign of a designer renovation in the bathroom is the absence of a bulky shower stall or large tray. Interiors with a drain in the floor, officially called a “shower drain with a hidden siphon,” look more modern, laconic and expensive. But the truth is that not always and not in all houses you can legitimize such a design project.
A shower drain is a drainage hole with a hidden siphon through which water flows from the shower stall into the sewer. Used in construction showers.
For example, this type of "construction booth" almost always requires raising the floor (and creating a podium) with a hinged lid so that the pipes can be easily repaired and easily accessed. This is the most important requirement of the housing commission for the installation of this type of drain.
But there are several problems. The construction pallet (podium) looks much less laconic than the “real” European version with a minimalistic drain in the floor. It creates a podium, which is even inconvenient, and for small children and pensioners (especially in combination with a wet floor) even dangerous.
The next problem is that it can be quite difficult to legalize a construction pallet. SNiP 2.04.01-85 completely prohibits the sale of shower drains (that same floor drain) and allows (or rather does not prohibit) construction pallets-podiums. This is because in the event of any problem, the pipes cemented under the tiles will be impossible to quickly repair, and in an apartment building this will lead to flooding of one or more floors below and damage of millions of rubles.
But even if you took everything into account: you made a hatch for repairing communications, you came to terms with raising the floor by 10–25 cm in part of the bathroom, you did the finishing in such a way as not to constantly trip over the podium, one problem remains - too high a load on the floors. Usually the pipes under the podium are poured into a screed, but even if you don’t cement everything there, but add expanded clay, the load on the floor slabs of an apartment building increases by 200 kg/1 sq.m, which is unacceptable in most cases.
Fact: if you remodel illegally, you will be forced to return everything to its original state at your own expense. A neighbor will see your “newfangled” shower, report you, and you won’t even know who did it. Or a plumber will come to clean the pipes and also write a message to the Housing Inspectorate.
Alternative? She is! Legal and as convenient as possible. These are low pallets, almost flat, which are mounted in such a way as to be removable, and the height of the podium for this is only 6 cm.
Loophole: in apartments (a special type of non-residential space that is actually used as temporary living space) you can make the pallet the way you want. True, you will need to calculate the load on the floors with the architect and make high-quality waterproofing.
Gangway placement
The location is designed even before the installation of the shower stall. A high siphon, which assumes a large slope of the drain channel, will increase the throughput of the system. If the siphon is located low, it will not cope with a large volume of liquid.
The placement of the drain largely depends on the location of the sewer riser. Accordingly, it can be located:
- in one of the corners of the shower - most often this is a triangular device that provides an angular flow of water, the most ergonomic model that does not attract attention to itself;
- in the center of the shower room there is a device of a rectangular or square configuration. To install it, it is necessary to ensure that the floor or pallet is sloped on all four sides;
- near the wall - an outflow of a narrow linear shape, located parallel to one of the walls, towards which the slope is made. This option also looks aesthetically pleasing, guaranteeing high throughput properties of the drainage system.
Pros and cons of a floor drain
Rooms for water treatments, where you can easily place a large bathtub with hydromassage, a stationary shower with equipment for spa treatments - a property of a private home or high-class apartment. In ordinary apartments and houses, you need to think about the rational use of every centimeter of the bathroom. A shower without a massive tray , just with a compact drain grate in the floor, is one of the smart options for saving space.
The side of a bathtub or tray is a serious obstacle for an elderly or disabled person. The problem for them is the slippery surface of the polished internal coating of plumbing fixtures. Water that gets on it can be a source of injury. A drain at the floor level in the shower is an opportunity to avoid even a low obstacle. In the most difficult case, a step no more than 10 cm high appears. Usually the floor in such a shower is flat, with a slight slope, and the surface is large-format tiles or mosaics . It is easier to clean in such shower rooms - there are no inaccessible places.
It is easier to avoid leaks due to faulty plumbing or negligence if water is collected from the entire floor area in the bathroom to a connection point to the riser located below its level. The correct choice of drainage kit, installation according to the manufacturer's instructions and carefully waterproofing the ceiling and its junction with the wall will prevent problems with neighbors below.
A variety of designs for drain grates, enclosures and shower doors, combined with a large selection of wall and floor tiles, allow you to give your bathroom a unique look. The use of drain floor structures, sometimes called shower drains, gives the bathroom interior the features of rational minimalism - a style that is very fashionable today.
The main problem when installing a floor drain in a bathroom is to ensure the slope of the pipe (min 2%) that drains water from the drain into the sewer. Problems arise when connecting to the sewer riser of a multi-storey building. Getting to the cut-in point below the floor slab level can be difficult. If the floor drain is intended to collect water from the entire bathroom floor, it is necessary to give the desired slope to the finishing coating, which leads to an increase in the level of the floor throughout the room and a noticeable curvature of its surface.
Siphon selection
In addition to choosing the design of the shutter, it is advisable to select the size of the mesh so that it is convenient to lay the tiles on the floor: it is desirable that the size of the drain be a multiple of the size of the tile (including mosaics). Pay attention to the material of the case. For a shower stall in an apartment or house, plastic is quite suitable. These are the most affordable options. Floor drains made of polypropylene are more expensive, and stainless steel is even more expensive.
It is also worth choosing the height of the ladder. The minimum value is about 6-7 cm, the maximum is up to 20 cm. Among the technical characteristics, this equipment only has a maximum throughput - how many liters it can dispense per minute. Select depending on the maximum pressure that your shower can produce:
Siphons for drains differ from their analogues only in the absence of a plug covering the drain hole. There is simply no need for this in a shower stall, so simple cheap siphons will have to be abandoned in favor of more technologically advanced devices. These include:
- siphons with manual control. The adjusting knob is located on the wall, which makes it easy to control the drain hole by simply turning it;
- click/clack systems (open/closed). The plug in these devices is mounted above the drain hole and is simultaneously responsible for opening and closing it. The first press of the plug with your foot causes it to lift - the hole opens and the water is removed. The second press closes the plug, preventing liquid from draining.
We invite you to familiarize yourself with the technology of installing a dry floor screed: an example of installation with your own hands; can it be done in a bathhouse? – all about baths
The classification of siphons by engineering features looks like this:
- bottle - installed mainly in kitchens, not suitable for showers;
- corrugated - are a flexible, embossed hose that can be laid at any angle to the shower tray;
- classic pipe ones - they are bent in the form of the letters U and S, and the hydraulic valve is formed directly in the bend of the pipe.
For non-standard drain location options, a corrugated siphon would be a good solution. In other cases, a classic tubular system is installed.
How to make a floor with a drain with your own hands. Step-by-step instruction
Work begins with creating an outlet from the sewer riser. The drain pipe of the ladder will be attached to it. The conclusion must be made as low as possible, since the sewer pipe must have a slope from the ladder to the riser. The further order of work is as follows:
- Using a level, find the height of the screed. The level beam is placed in the center of the pipe, the ladder is positioned so that its output pipe axis is located approximately 15 mm higher. Then the level is adjusted so that its beam is located 10 - 20 mm above the ladder grating. This will be the height of the screed; it is fixed to the walls.
- They make a rough screed. Foam blocks are placed on the floor and secured with reinforcing mesh. A damper tape is attached along the walls, and everything is filled with DSP screed. After this, you need to wait at least a week for the concrete to set properly.
- The floor and walls are coated with bitumen mastic. The joints between walls and floors are taped with waterproofing tape.
- Determine the location of the drain, put it in place and connect it to the sewer pipe.
- Expanded polystyrene blocks are laid along the ladder and secured with mesh. Damping tape is needed along the walls and ladder.
- The finishing screed is poured. In this case, it is important to set the plane of the ladder grating correctly.
You can lay the tiles only after 4 weeks, when the screed has completely hardened.
Installation features
To install a shower drain in the floor under the tiles, you need to slightly raise the floor level and create a slope in it directed towards the drain. During installation, it is necessary to ensure that the grille does not protrude above the floor level. At the first stage, you need to create a five-centimeter thermal insulation layer. You can use polystyrene foam for this.
The fourth layer should be a clean concrete screed, providing a slope for draining water. On top of it you can lay moisture-resistant ceramic tiles or other suitable finishing material.
Methods and procedure for installing a drain
Depending on the purpose - a shower in the corner of the bathroom or emergency drainage from the entire floor area - there are differences in the installation of the device. They relate to the method of forming the necessary slopes. For a compact shower, a box is first made to serve as formwork. This makes it easier to ensure the desired shape of the floor surface in a small area of the shower so that the water drains quickly and does not splash out throughout the room.
A reputable manufacturer of drainage systems provides their product with detailed installation instructions. The general principles and procedure for installing a floor drain are as follows:
- Surface preparation: removal of old coating, filling of irregularities and cracks, priming.
- Coating waterproofing of the ceiling.
- Marking the location of drainage elements, discharge pipes and connections.
- Assembly of the drain on stops (without clamps and grate), installation of the connection to the riser.
- Heat and sound insulation made of polystyrene foam with a density of 35 kg/m3.
- Screed device.
- For a shower that occupies a small area of the bathroom, a waterproofing fiberglass canvas or rubber membrane is laid, extending 20 cm onto the wall.
- The coating is cut through at the drainage point, gluing the joints with mastic.
- Beacons are placed to form slopes. To do this, you can use special guides made of perforated metal-plastic profiles, which remain in the mass of the screed.
- Finishing with tiles or mosaics. The floor tiles must go under the wall cladding.
Related article: Shower drains under tiles
Useful tips
- When purchasing a drainage device, you should choose models with a throughput of at least 1.5 liters per second.
- You need to create the optimal tile layout in advance using a computer program or manually.
- The dimensions of the tile joints should not exceed 2-3 mm.
- It is better to choose a metal grate for the ladder rather than a plastic one. It costs more, but will last longer.
- It is recommended to periodically moisten the cement that hardens in the screed and level it with a trowel. This will make the surface smoother and stronger.
- Isoplast waterproofing can easily be replaced by liquid coating mixtures - “Tekhnoprok”, “Elastomix”, “Elastopaz”.
- If you plan to install a modern “tropical shower” system in the shower room, it makes sense to install a linear drain. It has the highest throughput properties.
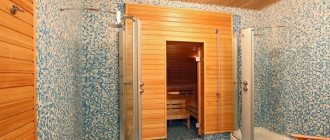
A tiled shower drain provides an excellent opportunity to create a shower room within a limited space. It will be appropriate in small apartments and rooms where water getting on the floor is inevitable. With proper installation and construction work, the system will operate stably and serve for a long time.
Installing a shower drain
Before installing the shower drain, you need to prepare the floor itself. A sewer pipe is installed in it, which is connected to the riser. For the ladder you need to prepare a recess. Then you can begin installing the ladder. The work itself will look like this:
- First, remove the decorative fasteners from the drain and connect it to the siphon.
- Install the ladder. Since different models are produced, use the included instructions from the manufacturer.
- Then connect the sewer pipe to the device. Along with this, you need to make a slope towards the riser. The height difference should be within 5–15 mm per meter. To ensure that the ladder is at the required height, it is possible to use special adjustable legs or place available materials under the device. Watch how the ladder is recessed into the floor. The device should not be higher than the level of the floor covering. It is better that the ladder is 1–2 mm below the floor.
- Now we are going to fix the ladder in its place using sand-cement mortar. To ensure that the surface of the device does not move away from the screed, the grate must be degreased (this can be easily done with acetone or a solvent);
- After the screed has hardened, you need to additionally secure the junction of the floor and the ladder. To do this, it is better to use silicone sealant.
- Then you may have to install a safety device, and you may be able to use the shower.
If the drain is installed before installing the finished floor, make sure that it protrudes above the surface by the thickness of the tiles and adhesive mass. Also, when installing the flooring, do not forget to think about the waterproofing layer. Your floor will be a kind of bathtub, which means it should not allow water to pass through (if only through a drain). Also, for such purposes it is better to use moisture-resistant tiles and adhesive mass. Otherwise, in the near future we will have to take on repairs again.
Advice! In modern construction stores you can find special acrylic or enamel pallets. Such structures can be easily connected to a ladder. Along with this, there is no need to meticulously check all the angles of the floor and worry about sealing.
Structural characteristics and purpose
The shower drain belongs to the category of complex plumbing devices, and is fixed directly to the pipeline through a special floor hole. This design includes:
- funnel-shaped water inlet or housing;
- siphon, responsible for creating an effective hydraulic seal;
- a flange through which the waterproofing membrane part is sealed;
- a grate that prevents clogging and failure of the sewer system;
- outlet coupling part connected to the drain part of the sewer system.
During operation of the drain ladder, the entire device must be securely fixed, and the removable part is represented only by a lattice cover. Most shower drain devices are installed in the floor, but some models are built directly into the wall.
Despite their apparent simplicity, drainage structures have a wide range of functionality:
- transport the water flow to the sewer riser;
- provide optimal tightness of the joint with the floor;
- carry out primary filtration of wastewater and prevent sewer clogging.
The built-in hydraulic seal prevents all unpleasant sewer odors from entering the room.
Shower floor drain - how to install it correctly?
Any part of a plumbing fixture such as a drain is an essential element of the shower design.
A shower floor drain is currently the most practical and quite popular solution when it is necessary to arrange an unhindered and efficient discharge of wastewater into the sewer system.
Types of structures
Depending on the specific application and purpose, drains may vary in several respects, including the material used for manufacturing, as well as the method of performing installation work.
In private households and apartments, it is recommended to give preference to lightweight but reliable, quickly installed products suitable for self-installation.
Vertical elements have greater throughput, but require special installation conditions.
Horizontal drains can be used in any type of premises, regardless of the number of floors, and therefore belong to the category of the most popular and frequently used plumbing products. The dimensions and height of a significant part of the drain models vary between 7.5-18.0 cm. The upper grille or front panel can be round, square or rectangular.
Drainage-type shower trays-channels are a variation of the traditional drain ladder and, while maintaining all functionality, are distinguished by a special, elongated shape. Narrow and longitudinal water intakes are located in the upper part of the drain, and are covered with decorative lattice-type overlays.
Such a channel can be installed both in the shower area and in any other part of the room. The high throughput capacity is complemented by a large catchment area, which allows for complete drainage with a significant volume of water supply. Preference for this design is given to “rain showers” and “waterfall” showers.
Valve options
The optimal option, characterized by a high degree of reliability, is the use of universal shutter systems with two levels of protection, successfully combining dry and wet odor control. Such equipment has an optimal ratio of quality characteristics and cost.
When choosing a special element of plumbing communications intended for drainage of wastewater into the sewer system, you must first of all pay attention to such a very important parameter as throughput indicators, indicating the amount of water that the drain can consistently discharge per unit of time. As a rule, the standard calculation of the required throughput is based on the following data:
- with a diameter of the upper shower head of 300 mm, the average water supply per hour varies between 30-90 l;
- using a cascade shower requires water consumption in the range of 1500-1800 liters per hour.
When choosing throughput, it is advisable to take into account a small margin of 5-10%, which will prevent emergency situations and flooding.
If you need to perform independent installation and have no experience in plumbing work, it is not advisable to purchase round models. It will be quite problematic to perform a perfectly smooth and beautiful installation of the floor covering when installing such a ladder with your own hands.
Advice from experienced plumbers
No matter how reliable the factory assembly of the shower panel may seem, the nuts of the connected pipes, hoses and pipes should be checked and tightened with a wrench. After installing the shower in place, all connecting nodes will be invisible.
What will happen there behind the blank panels is unclear. There is no point in bringing things to a flood. Tightness and tightness again. No pipe connections should leak a week or a month after the connection and installation of the shower is completed.
If the drain hole of the shower stall is too far from the sewerage inlet, then you will need to install a waste pump. It will not be possible to organize gravity flow through pipes here. This unit operates silently and is just the right size to be placed under a pallet.
All pipelines must be located at a slight slope. Gravity flow is needed for both sewerage and water supply. Sewer pipes are laid inclined towards the riser, and water pipes are laid from it to the shower stall, so that when shut off, the water completely flows out of the system.
In overly budget models, the drain can be made of silumin alloy. This drain will last a maximum of two to three years. It’s better to immediately spend money and replace it with a stainless steel analogue, which also comes with a normal siphon made of high-quality plastic.
Water pipes laid to the shower stall should be equipped with ball shut-off valves and dirt traps. Water in centralized systems is not always perfectly clean. If the holes in the watering can are not yet clogged with grains of sand, then the nozzles will definitely stop working. Filters with valves can be placed directly at the riser or at the ends of the inlets near the booth.
If you want to know how to repair a shower box, you can read one of the popular articles on our website.
Self-installation
High-quality modern drains can withstand the maximum load of wastewater for a long time, so their installation must be correct, ensuring the tightness of the seam joints and observing all sanitary and hygienic standards. Proper installation will ensure that the drainage device has a long service life while maintaining its visual appeal.
The preliminary stage requires a clear determination of the dimensions of all layers of the floor covering in the area of installation work.
Step 1. Determine the change in the height of the ladder. The drainage system should be positioned level, without protrusions above the floor covering. The recommended tilt angle of the system is one and a half centimeters for every meter of surface.
Step 2. Determining the location of the structure. The distance from the wall should be determined by the dimensions of the floor tiles and the joint. Compliance with this rule allows you to minimize the number of adjustments and cutting of finishing slab material.
Step 3. Finish markings. Determining the direction of the drainage system and the place of insertion into the sewer riser.
For finishing as a floor covering, it is advisable to use ceramic or porcelain tiles with a non-slip surface, as well as grout and standard plumbing sealant.
| Image | Manufacturer/description |
| Silicone sealant white 300 ml. UNIPAK | |
| Silicone sanitary sealant Ceresit CS 15 (white, transparent) 280 ml | |
| Adhesive-Sealant KWIK SEAL plumbing white 162 ml | |
| Plumbing sealant Quickseal Medium - medium fixation | |
| Sealant Henkel “Moment Germent” sanitary silicone colorless, 85ml |
Installation in showers located in old buildings may require removal of the old covering and installation of a new one with built-in drainage communications. Dismantling will require the use of a hammer drill, chisel and hammer, after which all construction debris will be carefully removed. The shower room prepared for installation must have a clean, usually concrete base, as well as a sewer system for the exit from the plumbing fixtures. It is advisable to replace old cast iron pipelines with new plastic pipes, which are more convenient for inserting a pipe from a shower drain.
Preparatory work
Since installing a floor with a drain requires precise calculations, work must begin with drawing up a project. This will allow you to determine how much and what materials will be needed to create a new floor, what financial costs the construction will require, and how much the finished structure will weigh.
You also need to determine where the ladder will be located. This determines how convenient it will be to use the drain system, what work will be needed for installation and how long it will take. Unfortunately, sometimes adjustments have to be made to this part of the project on the fly, as work progresses, taking into account newly discovered circumstances.
The design stage is often one of the most painstaking and lengthy, but you cannot rush at this stage: the more correctly the project is drawn up, the higher the quality of the finished floors will be. Often you have to go through several options until the optimal project is ready. It is also worth considering inviting specialists for on-site consultation.
Preparatory work also includes the procedure for removing old tiles and screeds, cleaning the floor, inspecting its condition and, if necessary, eliminating detected defects. It is also necessary to check the condition of the sewer pipes.