General description of the preparation process
Pouring the floor in a bathhouse is the final part of a long and rather complex process, which includes preparing the base for a screed or other covering. In the steam room and dressing room, as well as the washing room, there is always a large amount of water and moisture. Therefore, floors must be constructed with certain characteristics. They include the following requirements:
- if you decide to make the floor in the bathhouse with your own hands, you should provide a drainage area for water and form a slope towards the liquid drainage point;
- it is necessary to organize ventilation of the space under the floor if the building with a steam room, washing room, dressing room is not located on the ground;
- Before pouring the floor in the bathhouse, it is necessary to lay sewer outlets, arrange a drainage well to collect wastewater, create a drainage hole, or take other measures to drain or accumulate used liquid.
Most of the processes of final design of the coating in the steam room or dressing room can be done in-house. So that solving the problem of how to pour a floor in a bathhouse under tiles does not seem difficult, it is necessary to carefully prepare the base for a clean concrete screed.
Bathhouse floor with outlet
Drain and its principle of operation
The main characteristic of a bath room is high humidity. This is what you should use as a starting point when installing the floor yourself. A proven drainage technology is to arrange the surface at an angle, so that water easily collects at one point in the room. Waste water is removed through a special drain. You lay a background pipe from it, connect it to the sewer, or you can use a crushed stone filter placed under the bathhouse.
The quality of the drainage system also depends on:
type of foundation;
- type of ladder;
- seasonality of the bath.
Important! The main advantage of a self-leveling floor with a slope is the ability to avoid damage to the concrete screed due to the rapid evacuation of waste water.
Features of the bath floor
What extreme conditions are typical for a Russian bath? In the steam room, the floor covering is exposed to the most aggressive factors: water in the form of pouring liquid; superheated steam and its condensate that occurs upon contact with the floor surface; high temperature (up to 60-70 degrees), which at floor level drops to 40-45 degrees; mechanical loads. There are no very high temperatures and steam in the washing section of the bathhouse, but heated water flows here in a stream.
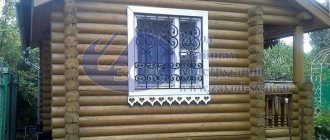
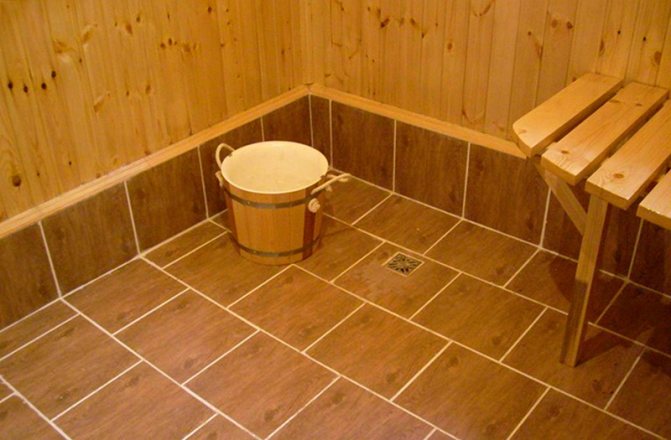
Bathroom floor tiles
In such conditions, corresponding increased requirements are placed on the flooring material, in terms of water resistance, wear resistance, and resistance to high temperatures. Ceramic tiles are the facing material that is ideal for a bath. It is able to withstand these extreme impacts for a long time.
When installing a tile floor in a bathhouse, which one is best is decided taking into account a number of specific factors. The classic floor in a Russian bath is a wooden version. Moreover, the traditional Russian bathhouse is built in the form of a wooden frame. Taking into account certain difficulties, a wooden floor in a bathhouse under tiles fully satisfies modern trends in bathhouse construction - with proper preparation, ceramic tiles fit perfectly on a wooden base.
Despite the fact that the most reliable subfloor under tiles is a concrete screed, a wooden floor is quite suitable for laying tiles on it
The most reliable subfloor is a concrete screed. This design can be perfectly leveled on the surface, and the tiles are laid in the usual way. Concrete pouring of the floor under the tiles in the bathhouse has its own characteristics, but all the work can be done with your own hands.
Which floor is best for a bath?
When installing floors in a bathhouse, two main features must be taken into account: high temperature and humidity.
Basic requirements for floors
- Environmental Safety. It is necessary to use only natural materials. The use of laminate or linoleum is not permissible, since when heated they release toxic substances. Use impregnations for wooden structures only that are suitable for these purposes.
- Injury safety. The floor should not be slippery. Metal elements of fasteners or accessories exposed to high temperatures can cause burns.
- Resistance to humidity and temperature changes. Wooden floors are best made from durable types of wood.
- Comfortable feeling when in contact with floor coverings.
All these requirements are met by floors made of wood or ceramic tiles.
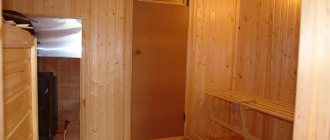
Wooden floor
The best option for covering a bathhouse is a wooden floor. The coating is suitable for a steam room, a washing room, and a rest room.
The great popularity of such floors is due to the speed of installation and the availability of the material.
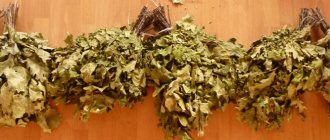
The best wood for wooden floors is larch, which has unique strength and durability. With prolonged contact with water, polymerization of the resin occurs, which is why the material is almost impervious to rotting.
Species of more valuable varieties are more suitable for finishing coating:
- cedar is a wood with a pleasant smell that, when heated, releases essential oils that are beneficial to health;
- aspen - absolutely not afraid of moisture, has healing properties;
- linden - stores essential oils for a long time, filling the air with them.
Figure 1. Types of wood for bath floors.
The wooden covering can be continuous, not leaking, or made staggered, leaking.
Non-leaking plank floor
A continuous coating is called non-leaking. It has no cracks
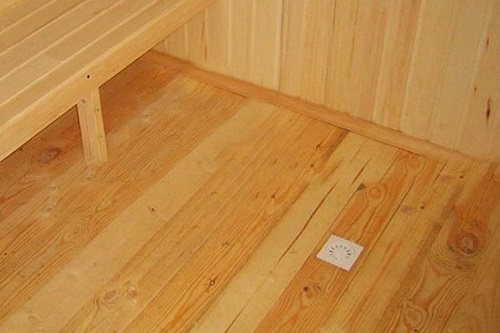
Figure 2. Non-leaking floor in the bathhouse.
The floor is assembled from boards tightly fitted to each other. Water flows down the slope into the drainage system. The edges of the floor are covered with a plinth to protect against moisture getting under the floor and wall cladding. The base is carefully insulated
Leaking floor
A leaking or cold covering is arranged with a gap of about five millimeters between the boards so that the water goes into the space between the floor and the base. It is difficult to insulate such a floor, so this design is not comfortable to use in winter.
When making this design, for use in winter, you can raise the covering above the level of the pillow under the stove and arrange special ventilation.
Figure 3. Leaking floor in the bathhouse.
To make a wooden floor, you need the material to be as dry as possible.
Important! There should be a gap of up to two centimeters between the wall and the coating to avoid distortions and deformations.
When attaching boards to joists, self-tapping screws should be recessed into the wood, and the holes should be sealed with heat-resistant mastic.
Subject to all installation rules and conditions, you will receive an ideal floor covering, ready for long-term use.
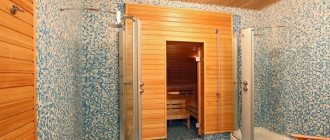
Tile covering
Porcelain or ceramic tiles are the least popular due to the complexity of installation, slippery surface and high heat. Installed on a concrete screed, with preliminary insulation.
Special wooden removable gratings will help improve the comfort of using such a floor. They are easy to remove for cleaning and drying.
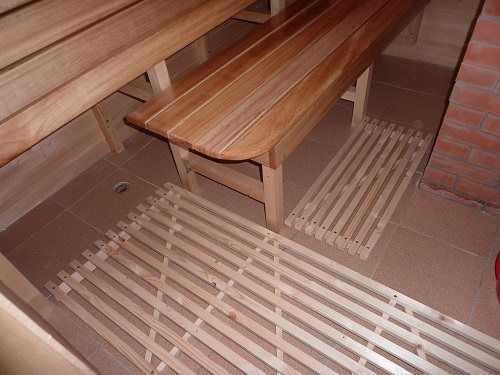
Figure 4. Removable floor gratings.
They will protect against possible burns due to strong heating of tiled surfaces.
Currently, there are many options for floor slabs with anti-slip coating.
The advantage of tiled flooring is easy maintenance and high hygienic performance.
For any finishing coating options, you must first make a rough screed, which will become the basis for any structures located above.
Dry screed for a bath - possible use.
The dry screed design consists of two components:
- Dry bulk material: perlite, vermiculite or expanded clay of different fractions.
- Coverings made of chipboard, waterproof plywood or plasterboard.
The materials used to cover the bulk layer are deformed and destroyed when exposed to moisture.
If water gets into the dry loose layer, the insulation loses its thermal insulation properties. Moisture can only be removed by removing the coating.
Important! The installation of dry screeds for steam rooms or sinks is unacceptable.
This design is perfect for dry rooms: rest rooms, attics, dressing rooms, provided that it is well insulated.
How to drain liquid from premises
Installing concrete floors in a bathhouse is the most optimal option, thanks to which it is possible to create a strong, reliable, resistant to various influences and durable coating in a fairly humid room. Despite the fact that a concrete floor requires quite complex and time-consuming work, it is quite possible to complete the task yourself.
For rooms with high humidity levels, a wooden floor is often chosen, which requires regular maintenance, repair and replacement. At the same time, the concrete floor in the bathhouse is of high quality, warm, and can last as long as possible without any manipulation.
Concrete floors in a bathhouse on the ground today are considered the most appropriate option.
What kind of floors can be made in a bathhouse:
- Clay - the oldest option, made in the format of a compacted dense layer of clay and acting as a water seal, where a drain was created outside the building. A layer of wood was laid on top of the clay, which had to be dried and ventilated after each visit to the bathhouse. Today, clay is no longer relevant, as it is not very comfortable to use.
- Wooden floors are made from species that are resistant to water. They are easy to install, warm, and make it easy to install a water drainage system. But in any case, wood and water interact poorly - wood is susceptible to the spread of insects, rodents, and microorganisms. It would be possible to protect the material from these influences with special impregnations, but they can be dangerous to human health.
- A concrete floor on the ground in a bathhouse is the most relevant option today: it demonstrates excellent strength, resistance to moisture, lasts a very long time, provided that a layer of thermal insulation is installed or a floor heating system is installed, it is comfortable to use. You can lay any coverings on concrete or leave the surface in its original form by installing wooden flooring.
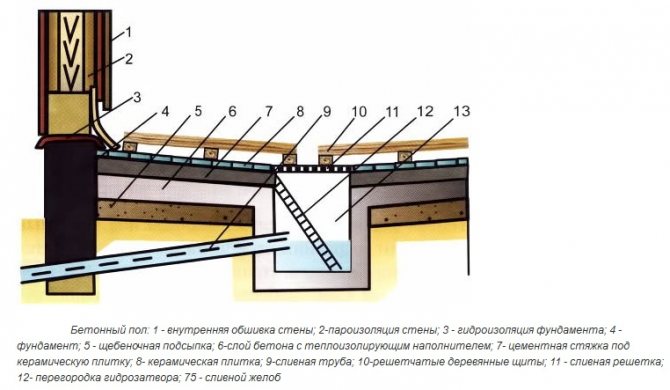
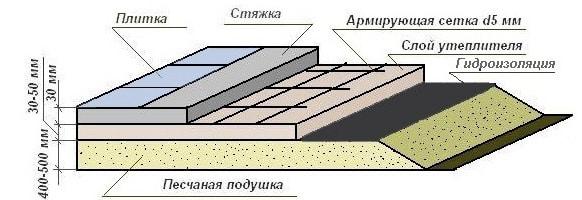
Floor Pie Composition
Before pouring the floor in a concrete bathhouse with your own hands, you need to thoroughly study the technology. In order for the floor to be durable and warm, a structure is made of several layers: the compacted soil is covered with a layer of sand, then gravel, a dense polyethylene film is laid, a rough screed is applied, a layer of waterproofing and thermal insulation is installed, and the process is completed with a finishing screed. This option is suitable for arranging a floor on any type of soil.
Today, there are two methods by which a concrete floor in a bathhouse is poured: directly on the ground or on special logs (creating a ventilated subfloor). The choice of technology depends on the budget, requirements and conditions of the work.
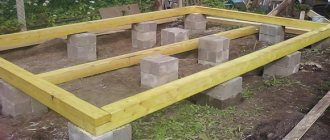
You can make a concrete floor in a bathhouse on the ground with your own hands directly on the base, having first removed a layer 40-50 centimeters thick. After compaction, gravel is poured into the hole in a layer of 15 centimeters, compacted, then sand is poured in a layer of up to 50 centimeters and compacted again. A screed is poured onto the sand at a certain slope, in accordance with the design and markings.
The concrete floor on wooden joists in the bathhouse is made to create a ventilated space under the floor. Thus, there is no need to install additional ventilation systems in the concrete screed. Wooden logs are pre-treated with special antiseptics, and then mounted in a system of beams with a diameter of 10x20 centimeters in the form of a grid.
Before pouring concrete on the bathhouse floor, it is necessary to properly prepare the base. Otherwise, the floor will have low strength and reliability characteristics, will last much less and is unlikely to provide adequate comfort.
Alignment
The drainage system from the pit is carried out beyond the foundation and is realized through a drainage pipe with a cross-section of 10-20 centimeters dug in the corner under a slope. Thanks to this design, it will be possible to ensure maximum comfort in the operation of the bath and avoid the accumulation of large volumes of water.
Seal
Before concreting, the surface must be compacted with a vibrating plate or a manual tamper made from scrap timber or logs. Sand is poured onto the compacted soil in a layer of 5-10 centimeters, then a layer of gravel 10 centimeters thick.
Both layers must be thoroughly compacted. They will protect the concrete floor in the bathhouse from rising moisture from the soil and other troubles.
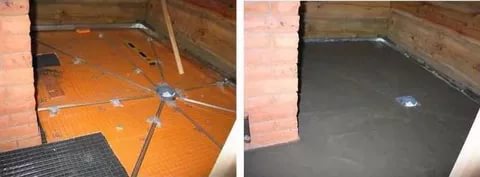
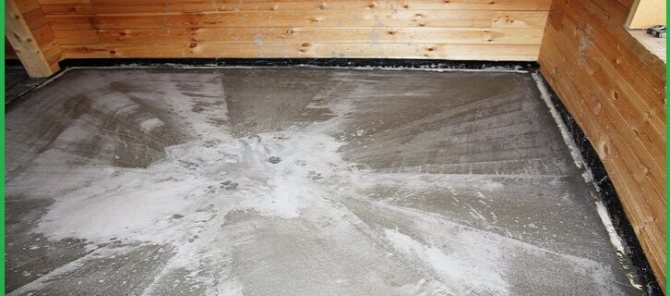
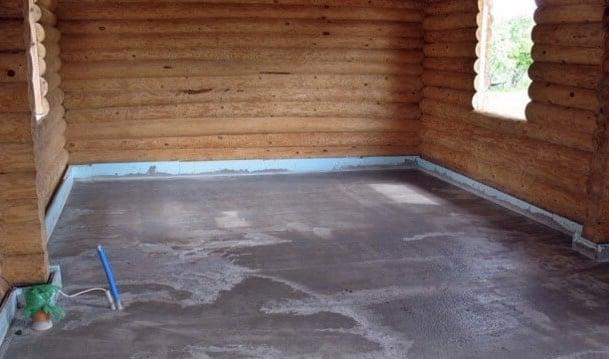
Rough screed
Before making a concrete floor in a bathhouse, it is necessary to perform a rough screed. Typically, the thickness of such a layer is no more than 10 centimeters (optimally 5-7).
We invite you to familiarize yourself with Heat-resistant panels for finishing walls near the stove
Mixture recipe
Concrete mortar recipe:
- Cement M400 – part
- River sand – 1.2 parts
- Crushed stone, gravel fraction 5-10 millimeters - 2.7 parts
Mixing
All components must be carefully measured and then mixed. The volume of water is determined during the process: the solution must be of optimal consistency: exceeding the permissible volume of water prolongs the hardening period and leads to cracks, while reducing it makes leveling the surface impossible.
When pouring the floor in a bathhouse with concrete with your own hands, you usually add water in portions and mix the mixture until a thick, plastic, evenly moistened consistency is obtained.
Insulation
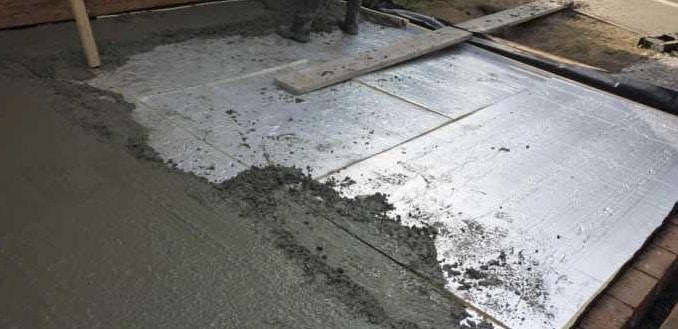
After the insulation layer has been laid, the floor in the concrete bathhouse can be poured. Filling is carried out layer by layer and quickly, carefully leveling the surface with the desired slope. Then they pause in work, waiting for the screed to harden and gain strength (2-3 days). These days the floor is moistened by spraying water or covered with a damp cloth.
To concrete a pit, first crushed stone is poured into it, then the solution is poured into a layer 5 centimeters thick. It is advisable to first cover the head of the drainage pipe with a lid or rag to prevent the solution from getting inside.
When studying the issue and trying to understand how to properly pour a concrete floor in a bathhouse, you cannot ignore the laying of layers of insulation. Without proper protection, the floor will not last long and will not provide comfort. Protection is needed both inside the room itself from moisture and from the ground.
Laying roofing felt
The second layer of waterproofing is laid in the same way, slightly moving it tangent to the first. The bottom and walls of the pit must also be covered with two layers of waterproofing.
Installation of EPS
Before pouring a concrete floor in a bathhouse, you also need to take care of thermal insulation. It is best to choose extruded polystyrene foam, which comes in slabs 5 centimeters thick. The material is not afraid of moisture and demonstrates good mechanical strength and density. Along the perimeter, the slabs have tongue-and-groove projections, thanks to which you can easily and quickly create a continuous thermal insulation layer.
Finishing screed
To properly fill the floor in a bathhouse with concrete, two screeds are made. After the rough and insulating layers, the finishing coating is poured. The solution is prepared in the same way as for a rough screed; the layer is made up to 10 centimeters, remembering the need for a floor slope towards the water drainage.
Reinforcement
To strengthen the screed, a reinforcing mesh of steel rods with a cross section of 5 millimeters is used. In some cases, it is possible to replace the steel mesh with fiberglass, which is explained by the absence of serious loads on the floor of the bathhouse. The screed is made 7-10 centimeters thick, the reinforcement frame should be located in the middle, and be filled with a layer of concrete of at least 3 centimeters on all sides.
When choosing a brand of concrete for the foundation for a bathhouse (finishing layer of the floor), preference is given to M400 or M500. The proportions are the same as when preparing the mixture for rough filling. It is better to prepare the mixture in a concrete mixer.
Work progress
The installation of a concrete floor in a bathhouse (finishing layer) begins with a pit. First, a finishing screed is made on the bottom, then wooden formwork is created and the walls are poured at the level of the thermal insulation layer. Here, be sure to ensure that the mixture does not get inside the drainage pipe (it must be covered with a lid or a rag).
Next, the mixture must be distributed evenly over the entire surface of the floor in a layer up to 7 centimeters thick, lay out the reinforcing frame, and fill it with a solution of the required thickness (at least 3-4 centimeters).
The final screed takes 2-3 days to dry, with the layer always being moistened during the process. If cracks begin to appear as the concrete dries, it is most likely due to the rapid evaporation of moisture. In this case, the coating can be repaired - carefully open the cracks, fill with a special repair composition of sand and cement mixed in equal volumes.
When studying the question of how to make concrete floors in a bathhouse, every master thinks about further finishing. Concrete allows you to implement any option - leave the screed in its original form and arrange wooden pallets or cover the floor with any material.
Ceramic tiles (an ideal choice in terms of durability, environmental friendliness, and resistance to moisture), a wooden false floor, or simply wood flooring (a less durable option) are perfect for a bathhouse.
When planning to create concrete floors in a bathhouse with your own hands, you need to study the whole process very carefully. Subject to compliance with technology and established rules, as well as the selection of high-quality materials, it will be easy to create a durable and durable floor covering.
Building your own bathhouse on a country plot is commonplace today. There is nothing difficult to do. The construction market is able to present a large number of stoves that successfully complement the classic options. But to do this, you should clarify how the floor in the bathhouse is poured. After all, it must correspond to the expected loads, last a long time in operation, not be affected by moisture, and not accumulate dampness and unpleasant odors.
If the soil on the site absorbs moisture well and consists mainly of sand or loose soil, you can install a self-leveling floor for a bathhouse directly on the ground. In a steam room, as a rule, there is no need to equip a water outlet. But for the shower and washrooms, drainage is simply necessary.
The main desire of every owner is to have a heated floor in his bathhouse (read: “How to make a heated floor in a bathhouse from a stove with your own hands”). Excellent protection against cold penetration from the soil guarantees accelerated heating of the bath, long-term heat retention, and maintenance of the required temperature regime. This feature is extremely important during cold periods of the year, when cooled soil takes away a large amount of thermal energy.
Features of floor preparation for tiles
The modern construction industry offers numerous varieties of ceramic tiles. In this variety, it is important to navigate correctly and choose the option that is most suitable for bath conditions. Such tiles must meet the following criteria:
- The surface of the tile should prevent wet bare feet from slipping. This condition is met when it is grooved or rough.
- The tile must have minimal porosity so that it does not absorb moisture either from above or from below. The moisture absorption coefficient should not exceed 10%. The most effective porcelain stoneware has a value of this indicator in the range of 3.2-3.8%.
- The mechanical strength of the tile must be quite high. Tile with a glazed surface, made using double firing technology, is well suited.
- The size of the tile is selected taking into account the need to form a slope to ensure water drainage from the surface. Many people prefer to use ceramic mosaic tiles for their bath floors, i.e. elements measuring about 10 cm.
Bath tiles must have a minimum porosity value
of 1. Making a drain hole. The sauna tiled floor is a non-leakage structure, which means that water drains along the surface of the floor. To ensure drainage in the floor, it is necessary to equip drain holes, which should preferably be equipped with special drains. The location of the drain can be different: in the center of the room or against the wall. One of the common options is a longitudinal ladder along the entire wall (on one or both sides).
2. Formation of the floor slope. An important condition for removing water from a room is to ensure its gravity flow in the direction of the drain hole. For this purpose, the floor has a slope of at least 10 degrees, for which it is necessary to ensure a level difference of at least 2 cm for every 1 m of floor.
To remove water from the bath room, make a floor slope of at least 10 degrees
3. Drainage system. The simplest option is to drain the water into a drainage hole located directly under the bathhouse. Such waste liquid discharge can be carried out in sufficiently loose soil, deep groundwater and in the absence of special environmental requirements. An important condition: the presence of a filter layer of sand and crushed stone.
We suggest you read: Is it possible to whiten with lime in a bath with lime?
4. Waterproofing the floor in the bathhouse under the tiles. A layer of waterproofing material is an essential element of a bath floor covering. Moreover, it should be taken into account that moisture comes not only from above, but also from the soil, especially when the groundwater level is close and during floods. Most often, roofing material is used for these purposes. In addition, a vapor barrier must be included in the floor structure in the steam room.
Preparing the foundation in a house with a subfloor
The two main problems that you will have to deal with in a structure located on the ground are as follows:
- reverse capillary movement of moisture from the ground to the screed;
- intense loss of heat, which simply goes into the ground.
When pouring the floor in a bathhouse with a slope, if construction is carried out on the ground, several features must be taken into account:
- you will have to make a massive pillow that will stop the rise of moisture;
- the cushion should act as a damper if the soil in the construction area freezes;
- The rough screed is made with increased thermal protection.
The problem of creating a reliable foundation for a floor covering in a building on the ground is solved as follows:
- the depth of the bottom point of the pillow should be 500-600 mm from the ground level;
- A layer of construction waste, stone fragments, large fractions of gravel, and concrete fragments is poured as a damper. Recommended zone thickness – up to 400 mm;
- A two-layer pillow acts as a neutralizer for the reverse movement of condensate. It consists of zones of backfilling fine gravel with a thickness of 100 mm, and 50 mm of sand. Each layer after filling is leveled, wetted, and compacted with a vibrating machine;
- After the layers of sand and gravel have dried, you can lay the rough support screed.
If construction is carried out on the ground, when solving the problem of how to pour a floor in a bathhouse under tiles or other covering, it is useful to provide good thermal protection. To do this, the rough screed is made using perlite. This material is lightweight, retains heat well, and you can lay a layer of mortar of increased thickness (more than 45-50 mm) without reinforcement.
If in a private house or other building where you plan to build a bathhouse, there is a high foundation and there is an underground floor (the distance from the ground to the load-bearing floor joists), you can make an all-season flooring. To do this, you will need to provide ventilation. Pipes are led into the underground space through the plinth; it is advisable that they be located on different sides of the bathhouse.
An all-season bathhouse floor will require careful waterproofing, antifungal and anti-mold treatment of the logs. Therefore, in order to achieve optimal results when solving the problem of how to fill the floor in a bathhouse with a slope, it is recommended to dismantle and reassemble the flooring when such an option is possible. This will allow the lags to be treated and ensure their durability.
Of all the existing foundations, it is possible to fill the floor on the ground only inside the MZLF tape, or, in extreme cases, inside a low grillage. It should be taken into account that the level of flooring in wet rooms (steam room and washing room) should be at least 2 cm lower than in other rooms (SP29.13330).
The bathhouse does not have constant heating; the load-bearing and enclosing structures, the soil underneath them completely freezes in winter. In clay soils, accordingly, frost heaving occurs.
For floors on the ground of buildings in which heating devices are turned on periodically, the following set of measures is used to reduce/eliminate heaving forces:
- replacement of the arable layer with non-metallic material - a layer of crushed stone at high ground level, sand on dry soil, since these materials do not have uneven swelling; An underlying layer of crushed stone.
- a layer of insulation under the concrete screed and under the blind area - allows you to retain the heat of the subsoil; Insulation of the floor on the ground.
Unlike foundations, ground floor drainage is not used, since this drainage system must be located outside the bathhouse foundation.
Important! The walls of the bathhouse are insulated, not from the outside, but from the inside, so as not to waste extra firewood to warm them up and reduce the time it takes to reach steam mode.
The bathhouse is the only room among the outbuildings, inside the rooms of which water pours onto the floor in large quantities. It is possible to collect and drain wastewater from the floor of a bathhouse along the ground only through a drain, similar to a shower stall.
For a small washing room, one ladder is usually used, towards which gravity slopes of 2 - 4 degrees are created on the outer surface of the concrete floor screed along the ground. The main nuances in this case are:
- The best option is considered to be moisture-proof floor coverings - porcelain tiles, tiles, which can be laid with specified slopes; Laying porcelain tiles with slopes towards the drain.
- however, for comfortable walking on such lining, you need either a warm floor or wooden flooring; Wooden ladders on tiles in the bathhouse.
- Therefore, in steam rooms and washing rooms of baths, a plank slatted floor is often used along joists; Slotted floor.
The slots are necessary for the drainage of liquid, which collects in the drain under the boards. To maintain the resulting underground, the boards are removable:
- fit into the grooves of the logs;
- hammered together into small shields.
If it is necessary to clean the underground or sewer, the floor covering is disassembled and then put back in place.
Unlike floors on joists with a ventilated subfloor, floors on the ground have a much longer service life, but are absolutely not repairable. Therefore, all communications (water supply and sewerage) are installed inside the building before it is concreted.
Base
Unlike foundations, a ground floor does not support structural loads from the building. However, heaving forces from clay soils act on it and operational loads are transferred from the weight of users, benches, and light metal stoves, which can be installed without their own foundation.
Only uneven heaving forces are dangerous for reinforced concrete structures:
- clay has a scaly structure, when it gets wet and freezes, it increases in volume unevenly, the screed can tear, lift in a separate area without the possibility of restoration;
- crushed stone and sand are non-metallic materials, even if they are saturated with water to the maximum, when they freeze they will increase in volume evenly;
In other words, the floor will rise evenly along the ground, the ice will thaw in the spring, and the structure will lower to a similar position without damage. The fertile layer is dangerous due to shrinkage due to the abundance of organic matter inside the chernozem.
Therefore, the base for the floor on the ground is made in the following way:
- the arable layer is completely cut off (usually 0.4 - 0.6 m deep);
- the pit is lined with geotextiles to prevent mutual mixing of non-metallic material with soils;
- on wet soil, layer-by-layer filling with crushed stone is carried out, each layer of 15 cm is compacted with a manual tamper or an area vibrator; at low groundwater levels, cheaper sand is used. Compaction of non-metallic material for the floor on the ground.
There is a nuance to this:
- the concrete floor screed on the ground must be protected from soil moisture;
- the waterproofing layer is made of rolled bitumen or polymer materials;
- roofing felt, Bikrost, steklogidroizol and other materials can be rolled out over crushed stone, but it is very difficult to seal the joints of overlapping strips, in addition, when further walking on the surface of the waterproofing for laying wire reinforcing mesh and pouring concrete, these materials can be torn by the soles of shoes on the uneven edges of the crushed stone.
Therefore, a thin leveling layer of sand is either poured over the crushed stone, or a footing is poured. This screed is made of low-strength concrete B7.5, is not reinforced, has a thickness of 3–5 cm, and is used as a large-format table for rolling out and sealing seams of waterproofing material.
Footing for laying waterproofing.
We suggest you familiarize yourself with How to build a frame bathhouse with your own hands step by step
Important! To decouple this rigid underlying layer, strips of extruded polystyrene foam are installed vertically around the perimeter of the foundation or the surface of the supporting structures is covered with damper tape.
Insulation layers
Traditionally, for reinforced concrete structures, the insulating layers are:
- waterproofing - lies on the base under the screed;
- thermal insulation - retains geothermal heat under the building to prevent frost swelling. Waterproofing and insulation of the floor on the ground.
Advice! The waterproofing does not have to be glued to the concrete base; it is enough to ensure the tightness of the joints of the individual strips of rolled material.
However, in most cases, the footing is coated with bitumen mastic and glass hydroisol is fused onto it to increase the service life of this layer, since it is not possible to subsequently repair it.
When choosing insulation for floors on the ground, you should consider:
- mineral wool can shrink, since the density of these materials is lower than that of other heat insulators;
- basalt and glass fiber lose their thermal insulation properties when wet, and moisture from these materials cannot evaporate in a concrete structure on its own;
- Ecowool is not used in screeds.
Extruded polystyrene foam.
Therefore, what remains is extruded high-density polystyrene foam, foam glass and expanded clay. Extruded high-density polystyrene foam has an optimal quality/price ratio, which is most often used in ground floors. Depending on the presence of a heated floor, the thickness of the insulation is 5 – 15 cm. The seams are filled with polyurethane foam.
Concrete screed
The SP standards do not indicate that screeds and ground floors, which they actually are, need to be reinforced.
However, to increase the service life, wire mesh (4 mm wire, 5 x 5 cm mesh) is laid in the lower level, maintaining a protective layer of 2 - 3 cm.
The thickness of the screed is selected depending on the construction of the floor on the ground and operating conditions:
- 7 cm minimum in the absence of underfloor heating contours;
- 10 cm when installing a metal stove without its own foundation with an additional layer of reinforcement in the operating area of the heating device;
- 15 cm for high operating loads, the presence of water-heated floor pipes or a heating cable, making slopes towards the drain to collect wastewater in the washing room and steam room. Floor pie on the ground for a bathhouse.
Bath screed technology
The floor screed in the bathhouse is done on the ground. To ensure a reliable and durable foundation, you need to stock up on the necessary materials and equipment:
- cement, crushed stone and sand for screed mortar;
- steel reinforcing mesh 50x50mm for reinforcement;
- roofing felt, bitumen mastic, membrane or dense polyethylene film, with a thickness of 200 microns, for waterproofing;
- extruded polystyrene foam with a density of 35 kg/m3 or polystyrene foam for insulation;
- a set of sewer system with a drain ladder, with horizontal or vertical connections, pipes and couplings of the required diameter.
Figure 5. Drain ladder with horizontal side connection.
When choosing a drain, you need to focus on the minimum floor height at the location where the drain is connected. The floor height near the walls should be maximum.
Sequence of technological stages of work:
- Installation of sewer drain
When pouring strip foundations, you need to take care of the technological hole for the drain to pass through the foundation. To do this, before pouring concrete, lay a piece of pipe in the formwork that exceeds the diameter of the sewer pipe. Otherwise, you will have to dig a trench to allow the sewerage system to pass under the foundation.
We dig a trench from the proposed installation of the ladder to the drainage hole, with a minimum slope of 3-5 degrees. It is better if the sewer pipe runs straight from the building to the pit, without sharp turns, to avoid blockages during operation of the system.
We install sewer pipes to the drain pipes in the washing room and steam room. We increase them to the level of connection with the ladder. We close the pipe openings with a special lid or plug made from scrap materials to prevent concrete or soil from getting into the pipes. We dig a trench.
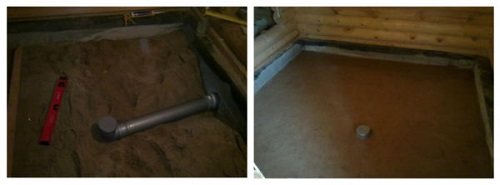
Figure 6. Preparing the base for the screed.
- Preparing the base
Level the soil surface and compact it thoroughly.
We make a backfill from gravel, then from fine crushed stone or sand, also carefully level and tamp.
We carry out horizontal markings of the top of the screed and the final floor covering using a hydraulic or laser level.
- Base waterproofing
On a compacted, flat sandy surface we lay a layer of dense polyethylene, extending onto the walls to the level of the clean floor. We make strips of polyethylene with an overlap of at least 15 centimeters and fasten them with tape. The waterproofing layer acts as a water barrier against groundwater and prevents moisture from leaving the concrete when pouring.
- Rough screed
We prepare concrete from crushed stone, sand and M-400 cement in proportions 4:4:1.
We install beacons along the waterproofing layer to ensure the evenness of the screed. Pour the concrete in an even layer, 60 mm thick, starting from the wall farthest from the door. We level using the rule according to the marks. Check horizontality with a level.
- Construction of a thermal insulation barrier.
On the concrete base we lay sheets of durable polymer insulation that is not susceptible to moisture - expanded polystyrene or cheaper foam with a density of at least 35 kg/m3. If the rough screed turns out to be uneven, it is better to lay the insulation on polymer-cement glue.
Important! To prevent deformation, leave a gap of at least ten millimeters between the wall and the insulation.
We lay the slabs offset, sealing the seams and gaps with foam.
- Finishing screed device.
Along the perimeter of the room we attach a damper tape to the wall above the top mark of the screed by two to three centimeters.
To strengthen the screed, we place a reinforcing mesh on top of the insulation.
We install beacons made of slats or metal profiles, with a slope towards the drain ladder or hole for water drainage.
We lay the mortar along the beacons, starting from the one farthest from the wall, evenly leveling it with a long lath or rule. We check the slope using a long level.
After the solution has set, we remove the beacon slats, and fill the remaining cavities with the solution and rub it. Cover the screed with plastic wrap until the solution dries completely.
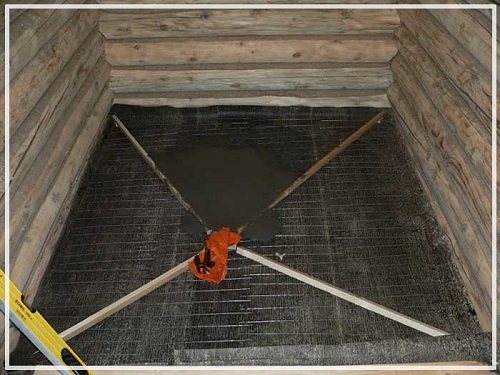
Figure 7. Installation of a screed in a bathhouse using beacons.
Important! To avoid discomfort when walking, and to allow water to drain from the surface, we make a slope with an optimal height difference of no more than two centimeters in height per meter of floor.
The finishing screed can be made from cement-sand mortar made in proportions 4:1. To make a concrete screed, the proportions of sand, fine crushed stone and cement should be 4:2:1, respectively.
After the screed has dried, you can make a final coating of tiles or boards.
This screed is suitable for installing floors in both washing rooms and steam rooms.
Features of a wooden floor
Despite certain difficulties, ceramic tiles can be laid on a wooden floor in a bathhouse.
Taking this into account, when deciding how to make a tiled floor in a bathhouse when it is made of wood, it is necessary to ensure the following conditions: eliminating mobility, i.e. strengthening the subfloor and leveling the surface.
The most common method of laying tiles is considered to be “dry”
1. “Dry” method. It is considered the most common and is based on installing sheet material on top of a wooden floor. It can be used as waterproof plywood, OSB, gypsum board. It is not recommended to use chipboard in a steam room, because its impregnating composition contains harmful substances that are released when heated.
Before laying the sheets, it is necessary to strengthen the base as much as possible, i.e. if necessary, replace the logs and install additional support posts. Reliable waterproofing must be provided on top of the rough structure. The most common way to make it is to apply a layer of bitumen and lay down roofing felt.
The seams between the sheets of coating are sealed with sealant and then carefully sanded. They are fastened to the base using self-tapping screws, and their caps must be recessed. The surface of the sheet covering is coated with a primer that will ensure reliable adhesion to the adhesive and tiles. When installing the floor, you should not forget about the thermal insulation that is placed between the joists. It is made of expanded clay, mineral wool or other heat-insulating modern materials.
When installing the floor, do not forget about thermal insulation
2. “Wet” method. In this case, a concrete floor screed is carried out in the bathhouse under the tiles on top of a wooden base. It is carried out with a special solution, and the thickness of the poured layer is 3-5 cm. The wooden base may not withstand a thicker layer. A damper gap of 1-2 cm wide must be left along the perimeter of the floor along the walls.
The flooring is made in this order. Waterproofing is laid on a rough wooden base in the form of a layer of bitumen, roofing felt, paraffin paper or thickened polyethylene film. The edges of the insulation are placed on the walls to a height of 10-12 cm and secured using a furniture stapler. A damper tape about 10 cm wide is fixed along the walls.
3. Express technology. Sometimes a simpler technique is used, which consists of gluing sheets of plasterboard with increased water resistance to the surface of a wooden plank floor. As a rule, polyurethane glue is used, and the sheets are applied in 2 layers.
Before constructing a concrete floor, the drainage system must be carefully thought out
Screed for a leaking floor structure.
The main condition for constructing the base of such a floor is its tightness.
The concrete layer is poured with a slope and a water intake funnel with a water container at its base.
This container must be connected by a pipe to the sewer drain.
The logs treated with moisture-proofing compounds are laid on brick or concrete columns, having previously laid roofing felt and coated with additional bitumen.
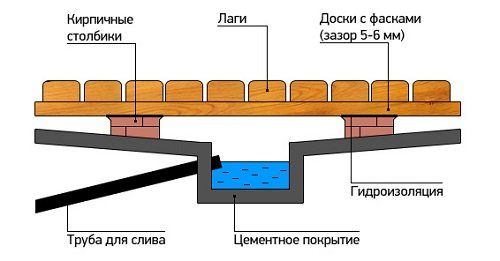
Figure 8. Leaky floor design.
We lay the boards along the joists with a gap of at least five millimeters. Water should pass freely between the boards, even when the wood swells.
Important! To prevent the floor from rotting, it is necessary to arrange ventilation, ensuring the access of warm air from the stove to the subfloor through a tin box.
We leave a gap of at least 10 millimeters between the board flooring and the perimeter wall to prevent deformation under the influence of moisture and temperature changes.
Basic work on creating a floor
Work on creating a floor in a bathhouse must be carried out carefully, with attention to all details. It should be remembered that in the steam room and washing room there is always a lot of water, and there are sudden changes in temperature. Therefore, a clear knowledge of how to fill the floors in a bathhouse under a drain, with or without a slope, under ceramics or plank flooring will help to do the job so that the coating lasts a long time and does not cause trouble.
- At the first stage, the surface of the rough supporting screed of the bathhouse is carefully waterproofed using a coating method. You can use both bitumen mastic and one-component polymers or special ready-made building mixtures.
- A special construction tape is glued around the perimeter of the room, which is separately coated with a waterproofing agent.
- The second stage is laying roll materials under the floor screed in the bathhouse. Ruberoid and glassine are effective, inexpensive, but have a limited service life. You can use a thick polymer film. Excellent results are shown by bituminous materials based on fiberglass and fiberglass. The strips are overlapped by 10-15 cm. In the case of bituminous materials, the joint area is melted with a construction hairdryer. The polymer film is glued along the seam with wide tape. The waterproofing should extend onto the walls, about 10 cm.
- The third stage is laying insulation. The classic option for bath floors is felt. Basalt, mineral, and glass wool show good results.
- The fourth stage is the creation of a second layer of waterproofing under the floor screed. Rolled materials are laid on the insulation. To save money, it is allowed to use polymer film. If you have some money left over, you can lay a one-sided membrane that will remove moisture from the insulation. The rules for creating a coating are similar to those given above for the first layer of waterproofing.
- The penultimate stage is gluing the perimeter of the bathhouse rooms with damper tape to compensate for thermal expansion of the final screed.
The last part of the work is creating the top reinforced coating. The rules and procedure do not differ from the process of forming a screed in an apartment or house and look like this:
- Beacons are mounted on the surface of the waterproofing. In the bathhouse, you need to carefully check their level to ensure that the floor screed slopes towards the water collection points;
- a mesh of steel or aluminum is laid, it is located at the level of a third of the height of the future screed;
- a standard sand-cement mixture is mixed, laid out, rubbed and smoothed over the beacons.
Floor care
After forming the floor surface, you should take care of it for 8-10 days. The screed in the bath should be moistened and covered with film to prevent severe loss of moisture. After this period, the surface is ironed. To do this, pour a layer of cement up to 3 mm thick onto it, wait for it to gain moisture until a slurry forms, which is rubbed into the screed.
The surface treated in this way becomes stronger, more durable, and after sanding it becomes smooth, suitable for laying any coating. Such a floor in the bathhouse is warm, smooth, and makes it easy to create a comfortable, stylish environment at the owner’s request.