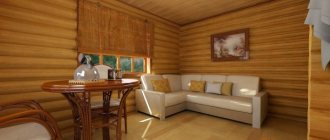
Many bathhouse lovers have noticed that the floor in the steam room, especially in winter, is very cold. Each owner solves this problem in his own way: some wear slippers, others lay walkways. If the floor is ceramic, then you have to put up with uncomfortable movement in the steam room and other rooms of the bathhouse.
But, if you provide proper insulation of the premises at the construction stage, these problems can be avoided, at least you can forget about the cold floor in the bathhouse.
>

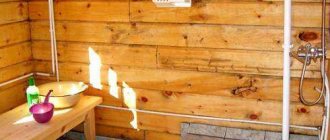
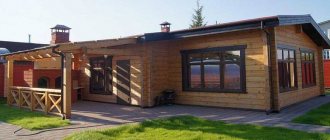
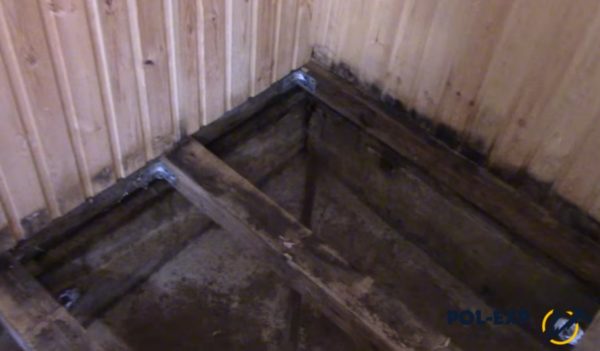
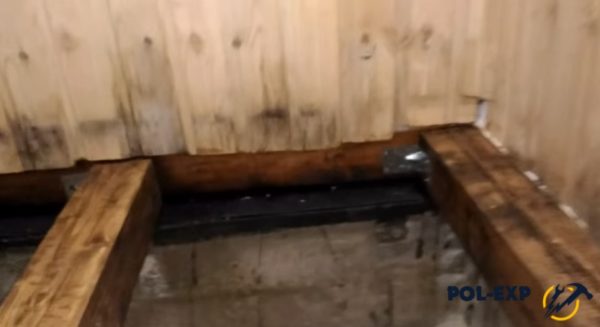
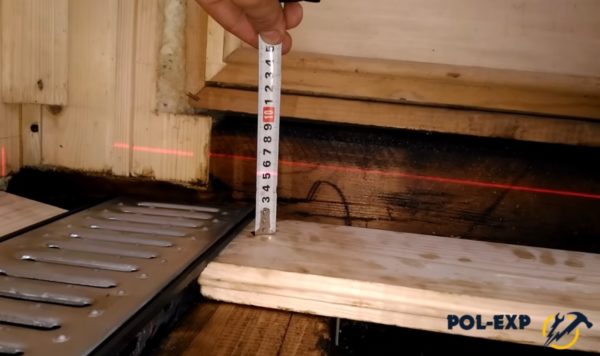
In the photo - there should always be a drain in the steam room, but often the floor is so cold that it is necessary to lay wooden walkways
Cold floor sources
The culprits of such discomfort:
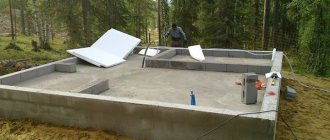
- First of all, the foundation may be improperly insulated or not at all insulated. The foundation is the basis of the structure and its correct laying affects not only the floor covering, but also the entire structure;
- the boards used for the flooring are not tightly fitted to each other, which causes drafts;
- installing the floor itself too close or below the foundation level;
- a thin layer of insulating material.
Since the bathhouse is mainly built from wooden material, it is most susceptible to the negative influence of various harmful microorganisms, rotting, and mold. There is constant high humidity in the building due to the use of water, the floors do not dry out, and the air temperature in the steam room is elevated.
All this leads to the active development of these factors. You should not lose sight of any bark beetles that are not averse to feasting on wood, thereby causing irreparable damage to the wooden structure.
Decoration of the walls of the Agate rooms
The walls of the Agate Rooms are lavishly decorated with gems, jasper, marble, bronze and other precious materials. The ornaments on the walls are made mainly of gilded bronze. The vaults of the rooms are lavishly decorated with stucco and picturesque ornaments. The flooring was made from exotic wood species. In addition to jasper, ophiocalcite was used on the walls of these rooms. This is a mineral that is classified as marble, but in fact it is softer, with a pleasant green color characteristic of this mineral.
Projects for facing the rooms on the second floor were prepared by the architect in the spring of 1783 and were presented to Empress Catherine for consideration. After some changes made to the proposed project by the empress herself, the walls of two offices were decorated with jasper.
Reasons for a cold floor in a bathhouse
There are several factors that negatively affect the floor temperature in a bathhouse:
- lack of thermal insulation or its thickness is incorrectly selected;
- violation of thermal insulation sealing;
- non-compliance with flooring technology in the bathhouse.
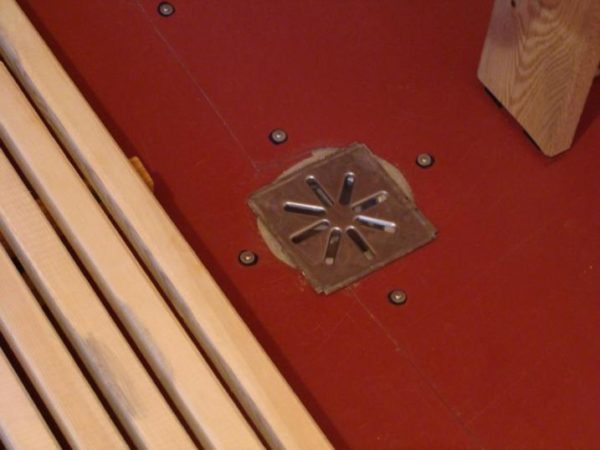
In the photo - there should always be a drain in the steam room, but often the floor is so cold that it is necessary to lay wooden walkways
These are just a few reasons, each building may have its own nuances. Before specifically considering the problem of a cold floor in a bathhouse, you need to learn a little about the specific requirements for coatings. This knowledge will allow you to avoid mistakes at the construction stage (and this is the most optimal way to solve the problem of a cold floor) or make the right decisions on insulation already during the operation of the bathhouse.

Schemes for installing floors for bath structures
Table. Specific requirements for the construction of the floor in the bathhouse.
| Name, photo | Short description |
| Maximum moisture resistance | The floors in the bathhouse have long-term direct contact with water at elevated temperatures. These conditions are the most favorable for the development of putrefactive processes and fungi. It should be borne in mind that currently there are no impregnations that can completely protect lumber for a long period of time. Only the integrated use of various construction and technological measures guarantees long-term use of the bathhouse. |
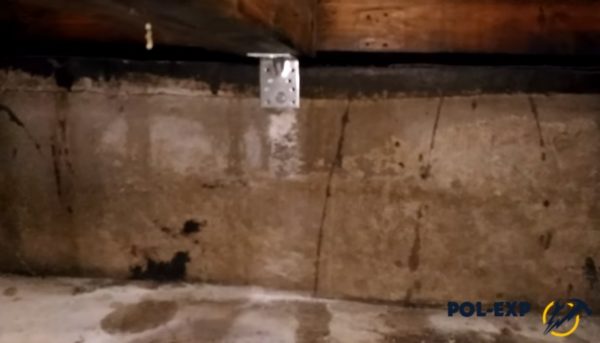
| The underground must have natural ventilation | There is no point in hoping that problems with rotting lumber can be solved only by impregnation with antiseptics or sealing; even theoretically, they cannot guarantee a long-term positive result. Natural ventilation, accordingly, cools the floors, this must be taken into account during their installation. But there is no way to do without it. |
| Water drainage issues should be addressed | To do this, it is necessary to install drainage sewer pipes, make receivers or settling tanks, etc. All these utilities make the arrangement of floors in the bathhouse even more complicated. |
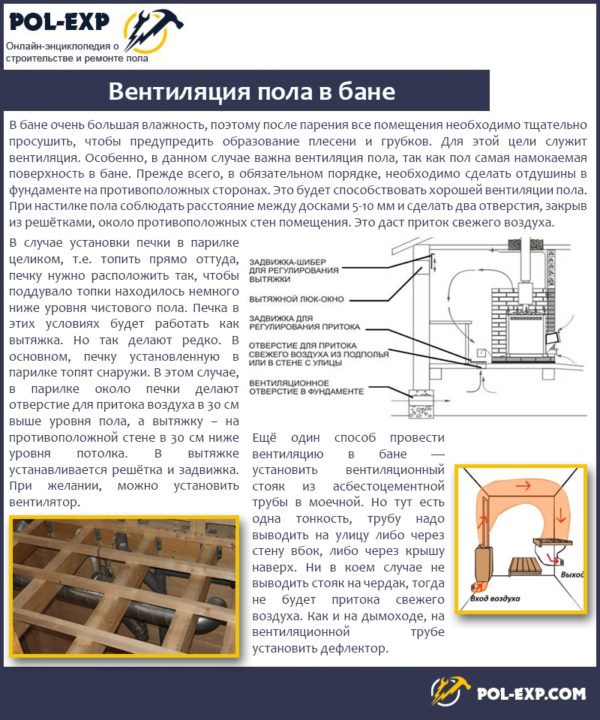
Floor ventilation in the bathhouse
It is very difficult to make a high-quality, durable and at the same time warm floor in a bathhouse, even using the most modern building materials and technologies. What did our ancestors do? Very simple. For the floors, coniferous wood logs sawn in half were used; the thickness of the coating reached 15–20 cm.
Due to this, they did not freeze, were not afraid of underground ventilation, and remained strong for several decades. After 30–50 years, the frame was raised, the rotten floorboards and lower crowns were replaced with new ones. After such repairs, the bathhouse again served regularly for several decades. Currently, this technology is not used for various reasons. What to do if you need to insulate the floor of a bathhouse in use?
Insulation of floors in the bathhouse
Preferred floor insulation
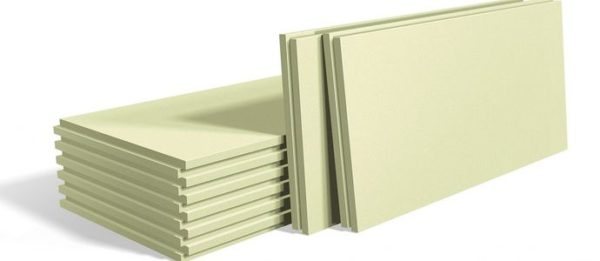
There are many thermal insulation materials in the construction range, but not all are suitable for use due to their low moisture resistance.
We invite you to familiarize yourself with Suggestions with the phrase HEAT IN A WATER BATH
A huge amount of water is consumed in a bathhouse and can be resisted by:
- polystyrene foam with high water resistance. Its internal structure is best suited for these purposes and can be used both with a concrete, wooden base and on the ground;
- loose insulation material - expanded clay (porous granules from clay rocks), perlite (small mineral balls), expanded vermiculite (hydromica from rock), etc.
Step-by-step instructions for repairing a cold floor
First, let's consider the most labor-intensive option for floor repair; it requires not only a loss of time, but also money. With a properly organized process and practical experience, it will take approximately two to three days to complete the work. The floor was made without insulation from edged boards; water drained through the cracks between them.
How to insulate the floor in a bathhouse
Step 1. Remove the old floor. If the boards are screwed to the load-bearing beams with self-tapping screws, they will have to be unscrewed. Use an electric drill or cordless screwdriver. Hardware can be reused; use a handkerchief cup to collect them. If the floor is on nails, then use a nail puller. To reduce damage to the boards, place pieces of boards under the metal part of the tool when pulling out nails.
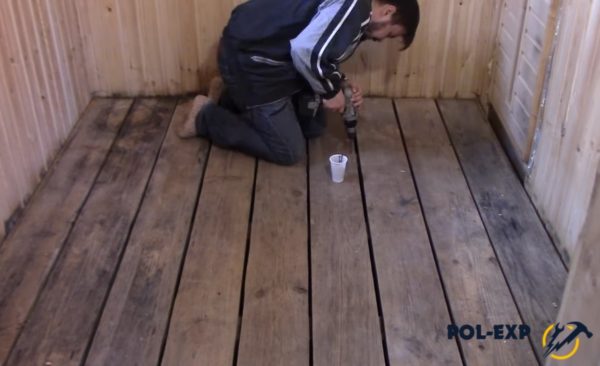
Dismantling the floor - unscrewing the screws
When unscrewing the screws, firmly press the sprocket against the heads; do not be afraid that the hardware will turn on the threads. Problems arise when the tool is not pressed against the head enough. The star rotates in the recesses of the cap and smoothes its edges. It becomes very difficult to unscrew such a self-tapping screw, and it is impossible to pull out the threaded part using a nail puller without damaging the wooden elements. In the best case, the head will tear out a piece of the board; in the worst case, the joists or supporting beams will have to be changed.
The boards have been removed
Step 2. Remove the boards and inspect the condition of the wooden floor structures. In most cases, problem areas will be visible, eliminate them before starting work. If serious damage to the beams is discovered, they will have to be replaced with new ones.
If there are problem areas, they need to be eliminated
Step 3: Unscrew the floor joists. They are fixed with metal squares and self-tapping screws; removing the structures is not difficult. As before, collect old screws in a container; the hardware will come in handy in the future, and you won’t need to buy new ones.
The logs are unscrewing
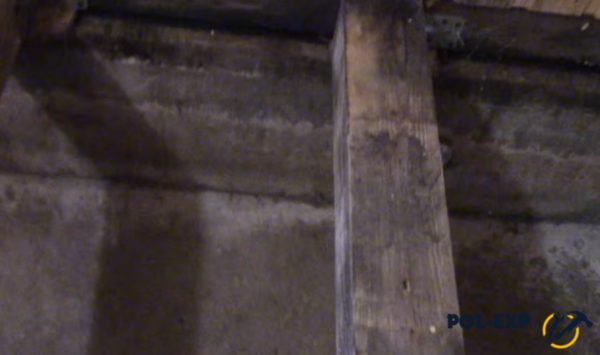
Step 4. Using an electric planer, remove the top damaged layer from the beams, process the lumber until completely healthy wood appears. There is no need to specifically control the thickness of the logs; lumber may differ slightly in size. All the same, in the future their planes will not be located on the same line, but will lie at an angle.

Removing the damaged layer from beams
Step 5. Remove mold from the wall trim boards around the perimeter of the bathhouse. To do this, you can use toilet cleaners that contain acid. It perfectly disinfects lumber and destroys mold roots. To enhance the effect, you can repeatedly wipe the surfaces of the boards with ordinary table vinegar.
Mold around the perimeter needs to be removed
Step 6. Install a heat gun and thoroughly dry the surface of the floor and walls. If desired, dry boards can be soaked again with factory-made antiseptics and dried.
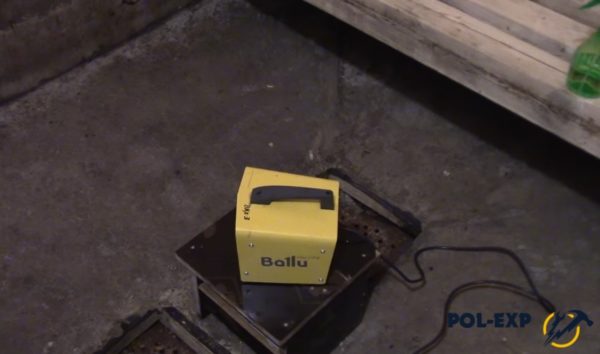
Heat gun

Everything is coated with used antiseptic.
After repairs, it is recommended to drain the water into the sewer; this method prevents the surfaces of the lumber from getting wet and is strongly recommended by professional builders. Do not rush to start repairs, give time for all surfaces to dry. If everything is normal, then you can lay a new, now insulated floor.
The floor will be laid with a slight slope, the water will be drained into a special tray located at the far wall.
Step 1. Determine the angle of the floor. To do this, use a long, flat board. Place it along the room from the bathhouse door to the drain tray. First, determine the position of the skirting boards; you can use ordinary cheap plastic elements with flexible rubber sides at the bottom. The sides will prevent water from getting onto the wooden cladding of the walls of the bathhouse.
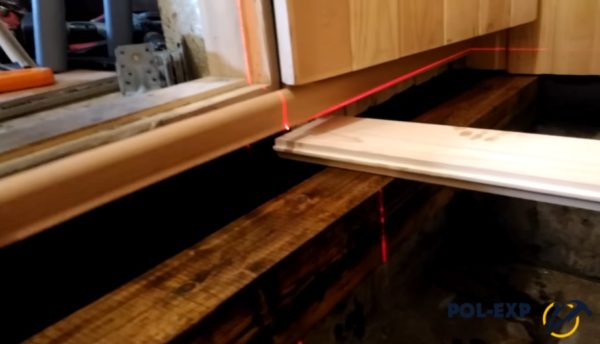
The position of the plinth is determined
It is more convenient to use a laser level for work.
The upper plane of the skirting boards should be 1–1.5 cm below the threshold level, otherwise they may be damaged when walking. Find these lines and subtract the height of the baseboard from them. This will be the floor level at the front door. The slope of the floor should be within a centimeter per meter. There is no need to do more; too much of a slope creates inconvenience when walking on the floor.
We suggest you familiarize yourself with Assembling a box part on a slab
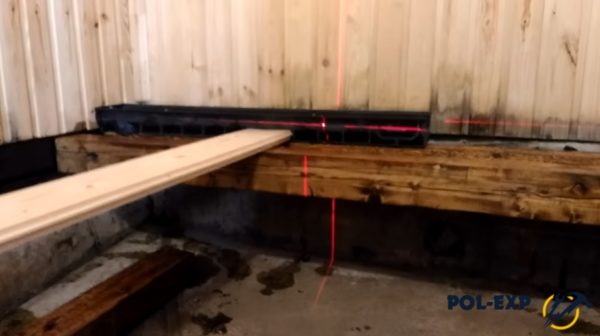
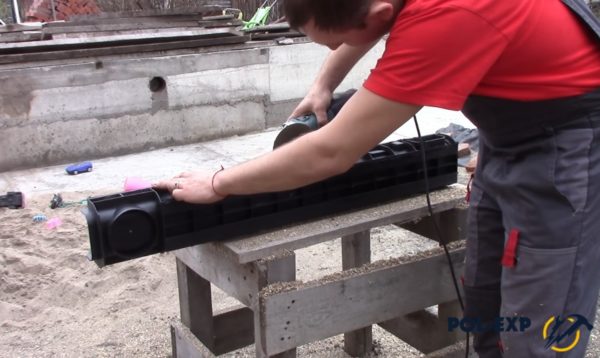
Step 2. Decide on the installation location of the tray, measure its length and cut the adjacent boards to size.
The installation location of the tray is determined
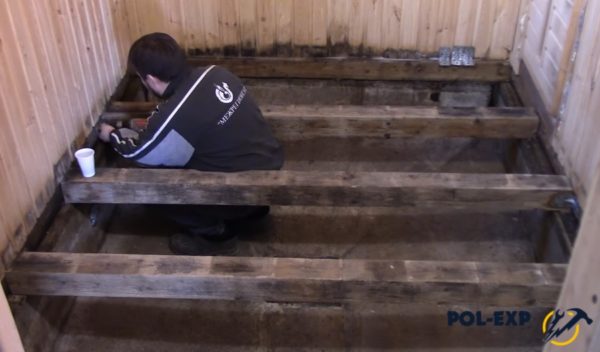
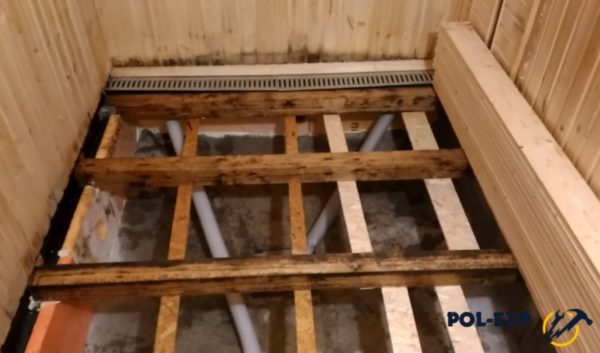
Step 3. Install the logs with an inclination towards the tray. To do this, first put the two outer ones in place, stretch the rope between them and secure all the remaining ones along it. Instead of a rope, you can use a long, flat strip or board, but it is more difficult to work with them. Fix the logs not only to the lower rim, but also to the concrete strip of the foundation; use metal corners and dowels for this.
The optimal mounting option is two corners on each side of the joist and one at the bottom. If the design does not allow the logs to be lowered for tilting, then they need to be sawed at the bottom; the depth of the cut must correspond to the angle of inclination of the floor. If deviations from the plane are detected, you can use shims. There is no need to worry that they will sag over time; the logs are firmly held in place by three metal corners.
The joists are fixed using metal corners
The logs must also be attached to the concrete foundation strip
Removing vertical stiffeners from a street tray
Step 4. Place the prepared tray in place. If its width is less than the distance between the joists, then the gap should be closed. You can use boards or durable extruded polystyrene foam for this. The second material is much easier to work with, and great strength is not needed to fix the tray. Check the slope and position of all joists again with a laser level. If all parameters are within normal limits, then you can continue working on flooring.
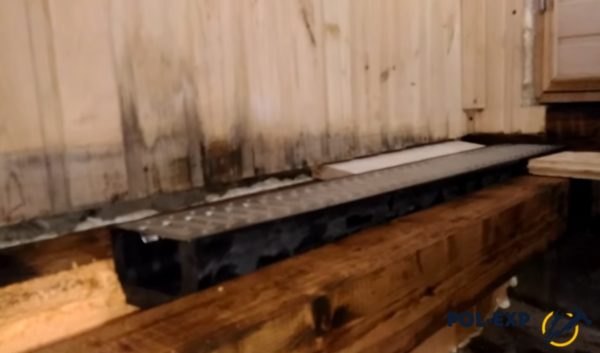
The tray is put in place
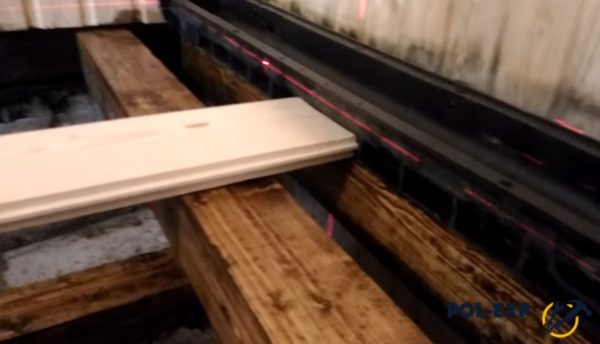
To install the tray on the boards, their ends should be prepared and chamfered. The width and depth depend on the size of the sides of the trays. Before installation, the ends of the boards and all fresh cuts must be treated with antiseptics; you can soak them several times in sunflower oil. Before fixing the boards, coat the landing sites with a high-quality sealant.
The fact is that it is very difficult to make perfectly even seats; it is much easier to use sealant for these purposes. The tray is screwed to the boards with small self-tapping screws. After fixing, it is also recommended to seal the drain perimeter. Pay great attention to these places. This is where water accumulates and lingers for a long time.
The slope of the future floor is shown
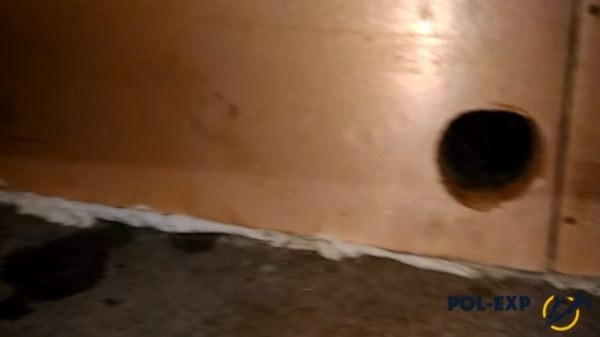
The foundation is insulated with polystyrene foam, a hole was left
Step 5. Attach drain pipes to drainage containers. These can be metal barrels with a capacity of 100–200 liters dug upside down. Use a grinder to cut holes on the sides of the barrels to allow water to drain out. In order to completely prevent freezing of water in pipelines, insulate them with soft polystyrene foam. But it is not necessary to do this; warm water and pipes do not have time to freeze during water procedures. Moreover, the angle of inclination of the pipelines is large and the water quickly goes into the barrels.
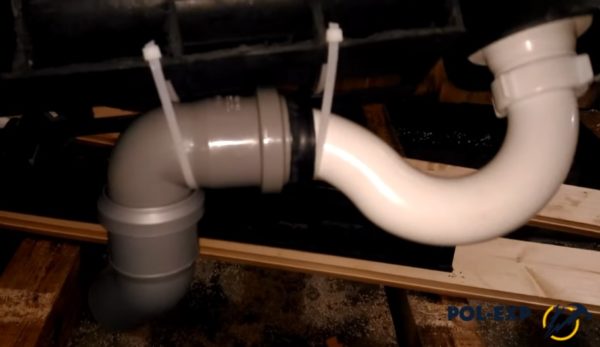
Example of a prepared drain
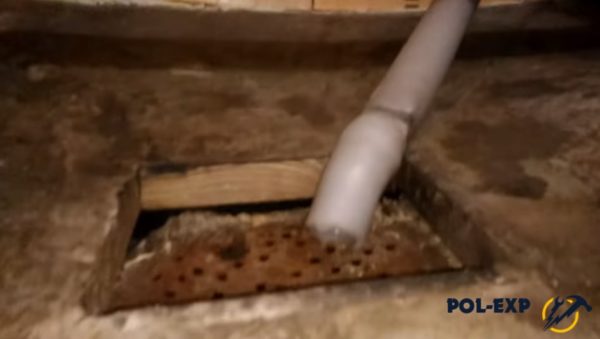
Connect drain pipes to drainage containers
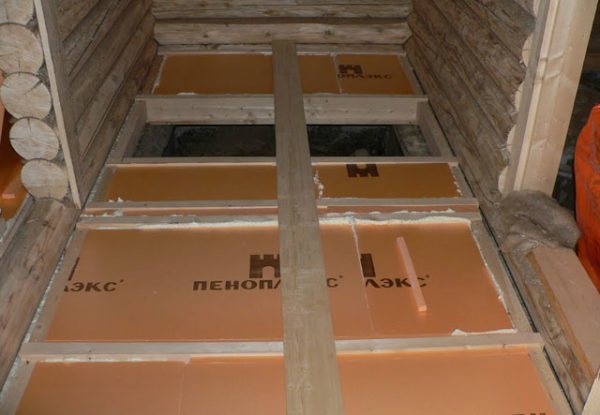
To insulate the floor in a bathhouse, it is better to use expanded polystyrene rather than mineral wool. The fact is that mineral wool is very afraid of increased humidity, a wet heat insulator sharply increases thermal conductivity, and the insulation efficiency approaches zero. In addition, wet wool takes a long time to dry; all this time, wooden structures are operated in very difficult conditions.
Extruded polystyrene foam for floor insulation
Expanded polystyrene does not have the above disadvantages; it does not absorb moisture at all, even with direct, prolonged contact with water. The only problem with polystyrene foam is that the material is damaged by rodents, but to prevent damage there is a simple way - to cover the ventilation holes with metal grilles.
We invite you to familiarize yourself with Grounding in a private house, calculation
Step 1. Nail any pieces of boards, slats or OSB boards of appropriate sizes to the bottom plane of the log; the insulation will lie on them. The distance between the boards does not matter, the main thing is that the boards have a stop in at least four places.
There are slats nailed to the bottom of the joists for installing insulation.
Using polyurethane foam, seal all gaps between the slabs and walls. After hardening, it must be carefully cut with a mounting knife.
Insulation is laid, joints are sealed with polyurethane foam
Step 2. After all layers of thermal insulation have been laid, you can continue laying the floor. You should start with one of the walls, fasten each board with self-tapping screws that remained after dismantling the old flooring. The thickness of the floorboards is approximately 20 mm, specific values are selected taking into account the distance between the joists. The boards must be tongue-and-groove and as even as possible.
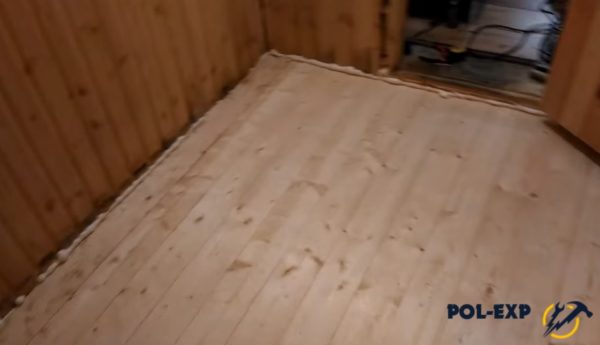
Laying boards
Cold bath
The central place in the ensemble erected by Charles Cameron belongs to the Cold Bath pavilion.
The model of the Cold Bath was completed in 1780, and in the spring of that year, construction began on the pavilion - a small two-story building. On its lower floor there were rooms for water treatments, and on the upper floor there were six richly decorated rooms for relaxation and entertainment, called the “Agate Rooms”.
The architectural design of the facades of the Cold Bath, as well as the entire complex, is based on the contrast of the finishing of the floors. The lower, ground floor is separated from the second by a cornice and lined with massive blocks of roughly processed, porous, as if corroded by winds and rains, Pudost stone, creating the illusion of “antiquity”, the authenticity of an “antique” monument. The second floor, on the contrary, is light and bright; Against the background of the soft yellow tone of the walls, niches painted in terracotta color stand out. Along the top of the walls there are round stucco medallions-bas-reliefs with mythological compositions. There are semi-circular windows cut in the longitudinal north-eastern wall, and rectangular window-doors placed in arches in the end walls. In the piers there are niches with sculptural figures of various allegorical and mythological characters.
The main, southwestern facade of the Cold Bath opens onto a terrace on vaults supported by massive brick pillars. The terrace serves as the basis for the Hanging Garden and is the connecting link between the buildings of Cameron's ensemble and the Great Tsarskoye Selo Palace. From the side of the Hanging Garden and the Cameron Gallery, the top floor of the Cold Bath is perceived as a completely independent one-story park pavilion.
The main facade differs from the other facades by the presence of the same columns as on the Cameron Gallery, which emphasizes the unity of these structures.
The Cold Bath is a rare example of a building in the history of Russian architecture, the very plan of which reflected the idea of following ancient models. When developing the Cold Bath project, Charles Cameron apparently used the layout of the central part of the Baths of Constantine, destroyed at the beginning of the 17th century and known from the measurements of A. Palladio, which he reproduced with comments in his treatise “The Baths of the Romans”. According to Cameron, the rooms of the Roman baths included the apodytherium, or dressing room; unctuary - for storing oils; spheristerium - a large hall for exercises; caldarium - hot bath; lakonik - steam room; tepidarium - a warm room with heated water and frigidarium - a cold bath. In the Cold Bath there was a bathing hall with a tin pool and a “hot” bathhouse, a “relaxation room”. All rooms on the lower floor have stone vaults and are lit by high-mounted semicircular – “thermal” – windows. They feature simple oak stacked parquet floors throughout and white-painted single-leaf panel doors.
In the interiors of the second floor, Charles Cameron used colored stone, painting and modeling. The stucco work in the entire building was carried out by O. Melnikov - the serf of N. A. Lvov, a famous architect and poet, and other masters, sculptural work by J.-D. Rachette and K. Goffert. Other talented master decorators who worked in St. Petersburg in the 1780s also participated in interior decoration, among whom the sculptor and decorator J.-B. Charlemagne-Bode, who acted as a contractor for most of the finishing work, and the painter I. Rudolf.
For the floors on the upper floor, parquets were used, made by master H. Meyer according to the designs of Yu. M. Felten for the house of A. D. Lansky, which was built in the same years in St. Petersburg (due to the death of the empress’s favorite, they remained unclaimed).
Despite the wartime damage, the original decoration of the pavilion's interiors has been preserved. Currently, the premises on the first floor of the Cold Bath are used for temporary exhibitions.
RUSSIAN BATH
From the entrance located in the middle of the building from under the arches of the Hanging Garden, a corridor begins, on the sides of which there were various services: rooms for servants, storage rooms for storing oils and various bath accessories, rooms where stoves and boilers for heating water were installed.
Today we enter the rooms on the first floor through a small oval vestibule, with niches similar to those on the facade. Immediately behind it there was a “hot bath”, arranged like a traditional steam room for Russia, small, previously entirely covered with wood.
Charles Cameron had no idea about the structure of a Russian bathhouse and to create it he turned to the Office of Buildings for help. The work was entrusted to the architect I.V. Neelov, who presented the estimate to the customers in October 1785. According to his design, a stove was placed in the southern corner of the room, on the lattice vault of which 250 cannonballs were stacked; they were poured with water to create hot steam. In the corner opposite there were shelves made of linden boards, benches and water tanks. The heated water came from a boiler located behind the wall.
The Empress descended into the Cold Bath along the stairs from the mezzanine, passing from her rooms through the Hanging Garden.
CORNER OFFICES. (“RECREATION ROOM”, MASSAGE ROOM)
The two corner cabinets have the same finish. Of Cameron's plans, only elegant Corinthian columns of colored and white marble were made. These columns support the heels of the vaults, on the sails of which there are round stucco bas-reliefs. Two of them are dedicated to the myth of Cupid and Psyche, the other two depicted Aphrodite and Adonis and a scene from the story of Selene and Endymion. The office closest to the stairs was called the “rest room” and was almost entirely occupied by the “antique bed.” Here, a white marble fireplace with female figurines on the shoulder blades and carved ornaments on the frieze, the work of J.-B., is perfectly preserved. Charlemagne-Bode.
The second corner room, located between the warm and steam baths, was intended for massage treatments.
BATHROOM (“WARM BATH”)
Adjacent to the “massage room” is the bathroom or “warm bath” - a spacious and bright room where there used to be a bathtub for bathing in warm water. The Bathroom walls were plastered and painted; Their only decoration was profiled frames dividing the planes of the walls into panels, and molded decorative vases in high relief above the pediments of the doors, two of which were false, serving a decorative function. In the 19th century, a light gray marble fireplace was installed in the Bathroom.
BATHING HALL
The most spacious and bright room on the first floor is the Bathing Room, covered with a double cross vault.
According to Cameron's original design, the Bathing Hall with a swimming pool should have looked especially elegant, striking with gold stucco decorations on the ceilings and also richly decorated walls made of artificial marble, painted with ornaments. It was planned to install a luxurious canopy over the pool on faience columns with gilded bronze eagles and pave the floor with multi-colored marble.
However, the empress rejected this project; Cameron managed to defend only part of his original plan and decorate the walls of the hall with relief compositions based on myths related to the water element.
Immediately under the arches there are large semicircular panels with multi-figure compositions: on the south-eastern wall - “Acis and Galatea”, on the south-western wall - “Pan and Syringa” and “Centaur Nessus and Deianira”. The bas-relief of the northwestern wall depicts Amphitrite surrounded by Nereids, Tritons, dolphins and cupids. Below is a continuous sculptural frieze, composed of rectangular panels alternating with round medallions, which depict such subjects as “The Toilet of Venus”, “Galatea and Neptune”, “Bathing Naiads”, “The Triumph of Amphitrite”, as well as allegories of rivers and lakes , an image of bathers and the muse Euterpe. The sculptural compositions were executed under the direction of J.-D. Rashetta.
Hidden under the hall's parquet floor is the brick frame of a 13-cubic-meter circular swimming pool in the center of the hall, surrounded by a wooden balustrade. Stairs descended into a tin bath made by master Albrecht. The hall featured a white marble fireplace decorated with gilded bronze.
During the Great Patriotic War, a stable was built in the Bathing Hall; the pool was broken, many of the doors were destroyed, and only fragments remained of the floors. Restoration work took place in 1949 and 1990.
LADDER
The two floors of the Cold Bath pavilion are connected by a spiral staircase, as if hanging in the air. Its spiral march is inscribed in the oval volume of the room without the usual retaining walls. The ends of the steps are inserted into a special channel selected in the wall and wedged with a stone; the edges of the steps are connected by means of curves and recesses, and thus the steps also rest on each other.
The reduction in costs for the artistic decoration of the premises on the first floor of the Cold Bath and the revision of design solutions also affected the staircase. To the question of Charles Cameron: “Make steps out of anything, from Russian marble or wild stone?”, Empress Catherine II answered: “From wild stone, but only the deceased.” Fulfilling the customer’s wishes, the architect made the steps from gray fine-grained granite. The staircase grille received a simple design in the form of vertical rods and smooth gilded rosettes; its polished handrail is made of virgin redwood. The floor of the staircase landings is paved with white and gray marble with a wide border made of Putilov slab.
The walls of the staircase space are cut through by two doors and a pair of windows, between which there are semicircular niches with marble sculptures. Above the niches there are round stucco medallions with mythological compositions by J.-D. Rashetta. The glass filling of the window-door overlooking the Hanging Garden, curved to the shape of the wall, was restored in 2012.
The white rosettes of the dome caissons above the staircase give the impression of a lace pattern. The base of the dome is surrounded by a molded cornice with a relief of lotus leaves, and under it stretches a wide frieze of graceful arabesques with figures of griffins and vases between them.
The silhouette of the staircase and its entire space, created by Charles Cameron, constitute one of the most perfect and exquisite creations of the Scottish architect, unique in the history of Russian architecture, with which his work was associated.
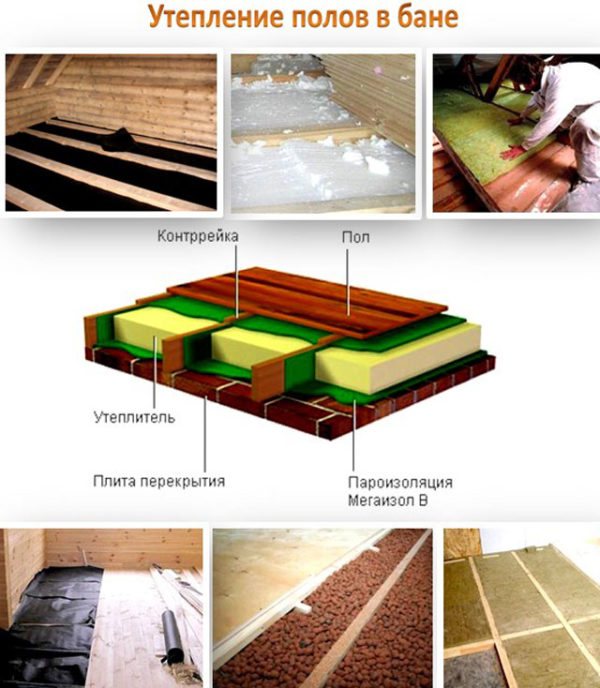
Methods for insulating floors in a bathhouse
There is a cold floor in the bathhouse - what to do? To prevent this, it is necessary to initially assemble it in compliance with technological norms and rules. There are several ways to thermally insulate the flooring in a bathhouse. Some options can be done on your own, without resorting to outside help and without using complex equipment (for more details: “How to make floor insulation in a bathhouse with your own hands - a guide from a master”).
Wooden floors are installed at the very beginning of the construction of the structure and are carried out in the following stages:
- We attach cranial bars to the lower edge of the beams.
- We place a vapor barrier material on top.
- Next, we create a retaining sheet for the insulation from chipboard, OSB or unplaned boards.
- We place a pre-prepared thermal insulation base on the vapor barrier between the beams.
- A layer of waterproofing is placed on top of the insulation. The amount of insulation must be adjusted based on the climate of the building site. For the floor of the bathhouse, 100-160 mm is generally consumed, plus lay an additional layer of heat insulation, bringing its thickness to 250 mm.
- The final touch will be the stripe of the floorboard.
To extend the service life of wooden floors, you will need to cover them with protective agents. The same applies to all wooden structural elements. With the correct process of heat, hydro and vapor barrier, it will be possible to protect the tree not only from the appearance and development of mold and pathogenic microbes, but also to retain heat in the room.
Modernity
Unfortunately, the German occupiers did not spare the rich cladding of the Agate rooms in the Cold Baths. Jasper and marble, gilded bronze cladding, and bronze sculptures that decorated the niches on the second floor of this pavilion were either destroyed or taken away. Jasper vases, bronze bas-reliefs and other decorative elements of room decoration also disappeared without a trace. But despite this, most of the authentic wall decoration has survived to this day. The latest restoration of the Agate Rooms lasted three years and began in 2010. During this time, the restorers completed a truly enormous amount of work. In 2013, the completely restored rooms on the second floor of the Cold Baths were opened to visitors.
Initially, after the completion of the last restoration, the Agate Rooms were used as museum premises for temporary exhibitions. Today, the Cold Baths are a museum that is open only during the summer season. This museum offers organized tours in the mornings. But if there is no group booking for an excursion, then the halls of this pavilion are also available to ordinary visitors with tickets. Several hours a day, interactive programs for children are held in the Cold Bath rooms. To become a participant in the program, you must first register. For ordinary visitors, the Agate Rooms are available from 14.30 to 18.00.