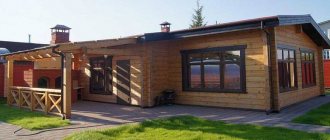
Do-it-yourself bathhouse made from boards. How to make it reliable and warm?
Advantages and disadvantages of a frame bath
Each building material has its own advantages and disadvantages that must be taken into account. Recently, frame baths have begun to become popular, so it makes sense to find out why they are better than structures made from other materials.
The advantages of such a bath:
- There is no need to make a capital foundation. The structure is lightweight, so it can be installed on a lightweight base.
- The foundation for the frame structure can be lightweight
- Low cost. They are preferred by those who want to get a high-quality design for a low price.
- Possibility of production in the shortest possible time. Together with finishing and insulation work, production will take 1–2 weeks. The structure is assembled 3 times faster than stone or timber.
- Heat retention. According to these indicators, a frame building is not inferior to a log or timber structure.
- Environmental friendliness. This bathhouse is made from natural materials that are not capable of harming human health.
- Possibility of production at any time of the year. The structure can be manufactured even at a temperature of -15°C.
- Comfortable microclimate. Walls can breathe as the material will absorb and return air.
- Seismic resistance. Thanks to this quality, the bath can be made even in an earthquake-prone region. It can withstand fluctuations of up to 8 points.
However, it is important to know that a frame bath has significant disadvantages:
- Costs for insulation and finishing materials. The frame building itself is cheaper than a stone or timber steam room, but the cost increases several times during finishing and insulation work. Panels for decoration and plastering are required.
- Shrinkage. The process takes at least 2 years, and the building may sag by 10 cm. This may lead to deformation of the finishing layer. To reduce the effects of shrinkage, it is recommended to use chamber-drying materials during the construction process.
- The difficulty of choosing high-quality material for insulation. If you use budget mineral wool, the bathhouse will not be able to fully cope with its functions. The use of budget polystyrene foam is also not allowed, since the material is easily flammable.
Tips for choosing material
The frame should be assembled from the following parts:
- bars;
- slats for creating sheathing;
- boards for the floor base.
Instead of plank flooring, the floor base can be covered with tiles. You need to choose based on personal preferences, however, in the case of a steam room, it is recommended to give preference to wood. There will also be materials for protection. Quite often, lining is used for wall cladding.
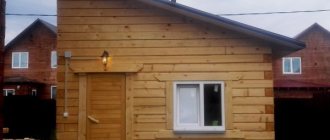
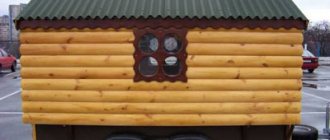
It is recommended to cover a frame bath with wooden clapboard
To cover the structure from the outside, you can use larch lining. The inside of the building is clad with clapboard made of coniferous trees. Sheathing boards must be mounted vertically.
Excess moisture and elevated temperatures will negatively affect structural elements, so it will not be possible to do without the use of special protective materials. You can use glassine, polyethylene or roofing felt. A vapor barrier should be placed between the insulation and the sheathing. The disadvantage of roofing felt is that during the heating process it will emit an unpleasant odor. Therefore, it is not recommended to use it.
You need to pay attention to the selection of material for thermal insulation. If you choose wisely and install the insulation correctly, it will be possible to significantly reduce heat losses, as well as the cost of heating a bathhouse building.
Mineral wool is used as insulation in most cases.
A good insulation material for a frame bath is mineral wool.
A good option is to use fiberglass. In some cases, the ceiling is insulated with expanded polystyrene, and the floor base with expanded clay.
The difference between steam rooms made from unedged and edged boards
To understand the difference between a bathhouse made from edged boards and steam rooms made from unedged boards, you need to consider lumber in more detail:
- Edged - boards that are cut from pre-processed logs. The wane (bark) is removed from it. After processing, the log is dissolved on a band saw. Cleaning may not be carried out, but in this case the lumber undergoes additional processing with a cross-cutting machine and stapler.
- Unedged - obtained by cutting logs longitudinally. The surfaces remain covered with bark. Because of this, the quality and class of lumber decreases.
Edged and unedged lumber can be made from coniferous and deciduous wood. For the first option, larch is more suitable.
Calculation of materials and list of tools
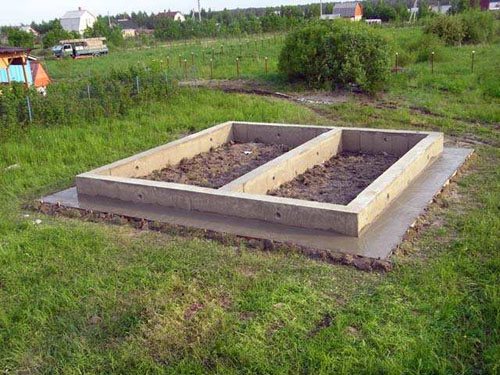
As an example, we will consider the calculation for a frame bath of the most common sizes. The frame is made of timber, the size of the structure is 5x4 m. The base will be reinforced columnar.
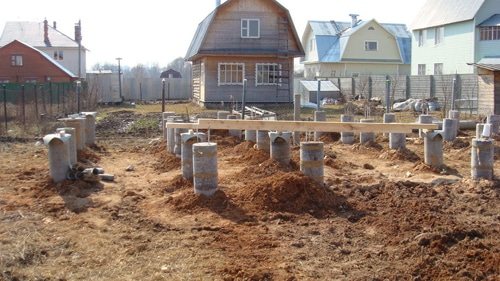
For the frame structure, you can use a lightweight foundation made of asbestos-cement pipes
Coniferous wood lining is used to decorate the walls inside and outside. The roof will be gable, the covering will be metal tiles.
A pressing issue is the choice of wood. The material must be dried. Linden, larch or aspen are most suitable. These rocks have low thermal conductivity; they are capable of maintaining their original structure for a long period of time. The walls are erected from boards 2-3 cm thick. Larch or pine slats are suitable for external cladding.
In terms of cost and reliability, a columnar reinforced base is the best option for frame construction.
Columnar reinforced foundation is suitable for the construction of frame baths in most regions
It can be used in most regions. You will need to prepare materials in the following quantities:
- concrete - 2 m3;
- edged boards for the frame - 0.3 m3;
- reinforcing bars - 80 linear meters
The frame can be made from boards, pieces of plywood sheets or OSB. If the soil on the construction site is clayey, then formwork is not necessary.
The most complex and financially expensive part of the bathhouse is the frame. The purchase of materials at this stage must be approached carefully. List of required materials:
- timber 120x120 mm - 5.3 m3;
- mineral wool 10 cm thick - 36 m2;
- vapor barrier material - 40 m2;
- wooden lining - 70 m2;
- material for waterproofing - 40 m2.
To save money, instead of bars you can purchase 50x100 mm boards.
To save money, you can use 50x100 mm edged boards during the frame manufacturing process
The timber must be of the second grade and lower, the board can only be of the first grade. The cladding of the walls on the outside can be done not with wooden lining, but with plastic sheets or corrugated sheets.
The floor is made of edged veneer boards. The ceiling should be covered with clapboard. If you want to save money, you can use mineral wool for thermal insulation. List of materials:
- edged boards - 1.8 m3;
- boards 150x50 mm - 0.2 m3;
- plinth - 20 linear meters;
- mineral wool - 20 m2;
- wooden lining - 20 m2.
You can save money on attic flooring. If you do not plan to use it, then the mineral wool can be covered with unedged boards or pieces of slabs.
The roof is gable, the attic can be used to store tools.
The best option for a frame structure is a gable roof.
There is no need to insulate the roof. The rafters will be hanging. You will need the following materials:
- drainage system - 1 set;
- slats for rafters - 0.2 m3;
- lathing strips - 0.1 m3;
- cornice slats - 0.1 m3;
- metal tiles - 20 m2.
In a bathhouse, quite often, instead of a drain, a blind area around the perimeter is installed using a cement-sand mortar.
List of materials that will also be needed:
- asbestos pipes;
- self-tapping screws;
- nails;
- staples;
- cement;
- gravel or sand.
You will need the following tools:
- square;
- building level;
- roulette;
- electric drill;
- Screwdriver Set;
- hammer;
- pliers.
It is important to think through all architectural and construction tasks, which include:
- internal lining of the bathhouse building;
- selection of optimal materials for construction work;
- actions that are required to ensure the safe use of the structure.
After preparing the tools and materials, you can proceed to construction work.
Preparation for construction: project drawings
Creating a drawing requires certain skills. If they are not there, then it is better to entrust this work to a specialist or use a ready-made drawing.
Before drawing up a diagram, it is important to decide on the following points:
- Location of the building on the site.
It is important to consider sewer and water drainage. Quite often, the main factor when choosing a location is the laying of communications. When choosing a place for a bathhouse, it is important to consider the location of communications - Soil at the construction site. If you plan to make a swimming pool in a bathhouse, then groundwater should not be located near the surface of the territory. The type of foundation to be built will also depend on the type of soil.
- Bathhouse construction plan and number of floors. If you plan to make a two-story building, it is important to take into account the additional load on the frame structure and foundation. At this stage, you should think in advance about the placement of the stove and what material it will be made of. This will allow you to understand where and which chimney to install, as well as the ventilation passages in the room.
- Laying communications. It is important to take care of ventilation, electrical wiring, vapor barrier and thermal insulation. It is worth considering the features of water drainage.
- An important element of any building is the roof. The service life of the structure will depend on it. You should take into account the material of manufacture, as well as its shape. This will allow you to calculate the power of the floors.
You need to include all the information received in the drawing, as well as supplement the project with the necessary details. The more detailed the diagram, the easier it is to build a bathhouse.
The more detailed the project, the easier it is to make a frame bathhouse yourself
It is recommended to draw up a separate plan for communications. If you have little experience, you should not create a complex project. You can use a ready-made diagram, slightly supplementing it based on your own needs.
A standard bath includes a corridor, a dressing room, a washing room and a steam room.
A standard frame bath consists of a dressing room, steam room, shower and rest room
Quite often a separate room for recreation is provided. It is recommended to mark the installation location of the stove on the diagram. If this is a steam room, then it is best to place the stove in the corner closest to the door. The stove can be stone or brick.
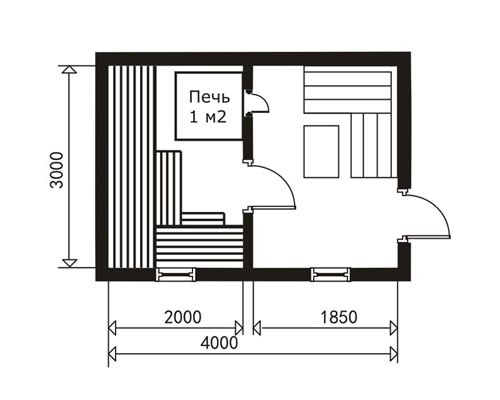
It is recommended to determine in advance the dimensions of each room and indicate them in the drawing. The standard dimensions of the steam room are 200x240 cm. The optimal ceiling height is 220 cm. This design can accommodate 2-3 people at the same time.
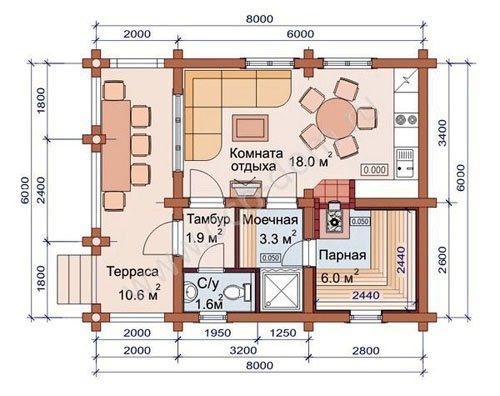
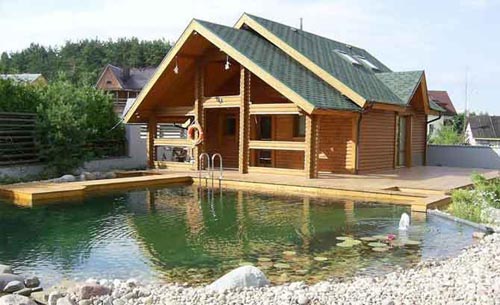
In the drawing you can see a bathhouse for a suburban area with a balcony measuring 1.5x4 m. The overall dimensions of the building are 4x6 m. The project is suitable for organizing gatherings in an open area in the summer.
A frame bath can be equipped with a terrace for gatherings in the warm season
This bathhouse consists of 3 rooms:
- steam room;
- washing and shower;
- rest room.
The corridor is shown separately in the diagram. There is no room for a locker room. There is a small changing area in the washing room. The terrace connects to the living room.
The optimal wall thickness of a frame structure is 100 mm or more. The wood that is used in the process of making a bath must be treated with an antiseptic. It is recommended to use dried, calibrated lumber.
It is mandatory to perform a vapor barrier of the insulating material on the internal base. In the steam room you need to use foil vapor barrier. The reflective layer can increase the temperature inside the steam room.
Walls and ceilings in the stove area should be made using non-flammable materials. For example, the frame is made of a rack-mount metal profile, which is coated with zinc. Cuttings can be made from asbestos cord. In these places, a basalt slab can be used as an insulation material.
Supply and exhaust ventilation is required in all rooms. Floors in the sink should be made with a slight slope or along a screed. The top and bottom floors need to be insulated in the same way as the walls.
The minimum size of a frame bath is 3x4 m.
The minimum size of a bathhouse for a comfortable stay of several people is 3x4 m
The budget version of the frame is made in this way: the racks are sheathed on the inside and outside with boards up to 25 mm, basalt insulation or ecowool is laid inside the frame structure.
If you plan to use ecowool inside the walls, it should be carefully compacted and horizontal platforms for unloading should be installed. The frame must be sheathed inside and outside. To do this you will need to make a sheathing. On the outside, the insulation material is covered with a membrane to protect it from the wind. In the horizontal plane, the use of ecowool is a more economical option compared to basalt insulation.
The outside of the frame structure can be covered with any facing material. The inside of the building is covered with clapboard, plasterboard sheets with tiles or imitation timber.
Layout of the premises of a frame bath
Before starting construction, it is extremely important to think through the design of the bathhouse, calculate the amount of materials, note all dimensions and at the same time plan not only the location of the premises, but also the furniture in them.
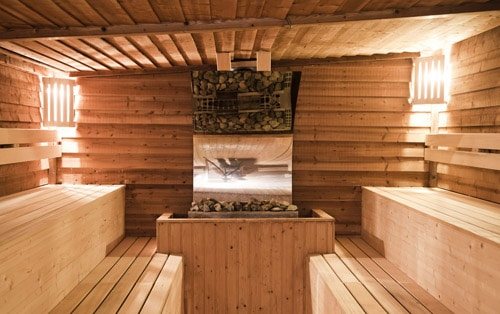
Arrangement of a shelf in a steam room Choosing the size of a bath
The main room in any, even the smallest bathhouse is the steam room. There must be two or three floors of shelves and a heater. Even if the dacha plot is small, and the bathhouse is planned to be very modest, the steam room cannot be made with an area of 3-4 square meters based on the simultaneous stay of two people (visitors should be comfortable steaming with brooms, sitting and lying on the shelves at full height). Such standards are determined by safety considerations (in a very cramped steam room it is easy to get burned on a hot stove or scald your skin with hot steam).
Steam room, interior
Also, if the entire stove is located entirely in the steam room and fuel is loaded from the same room, it is worth increasing the usable area of the room by another 1-2 meters to make it convenient to store and add firewood to the firebox. Directly in front of the stove, a pre-furnace sheet measuring 1x1 m must be laid, which is also noted on the plan diagram of the future bathhouse.
The bathhouse certainly includes water treatments, so you should think about a small shower located in a separate room or adjacent to the steam room. The second option, when the steam room and washing room are combined, allows you to save space and reduce the cost of installing sewer drains and interior partitions.
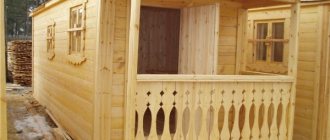
Bathroom layout
The last important room of the bathhouse is the dressing room or dressing room. There should be benches and hangers for visitors, a cabinet for bath accessories, and possibly a small table. It is also possible and preferable to have the heater located in the steam room, and the loading door opens into the dressing room, which allows you to save on heating.
The photo shows a small dressing room with a slatted wooden floor
In an economy bath you can do without:
- plumbing system. But you will have to equip a stove with a tank and bring water in buckets manually;
- separate bathroom. These amenities can be taken outside or into a country house if the bathhouse in the country house will be used only in the warm season.
But without electricity
Preparatory stage - where to start and what nuances to take into account
Before implementing your plan, it is important to take seriously the choice of location on the site and the development of a project for the future steam room. At each stage there are nuances that are best taken into account.
There is no holiday in the country without a bathhouse
How to choose the right place on the site
If there is not enough free space, it is recommended to make an extension to the existing building. For example, to a summer kitchen, bathroom or home. This option has its advantages not only in combining the usable area of different rooms, but also in saving on materials.
If you want to build a bathhouse separately, then take several points into account:
- for fire safety purposes, it is recommended to place the bathhouse no closer than six meters to the house;
- location near an artificial reservoir will provide comfort for further use, but for this purpose you can also purchase a ready-made pool, which is easy to assemble and disassemble as needed;
- it is better to choose a place on a hill that eliminates the possibility of flooding during a flood;
- the territory should be closed from neighbors and strangers by a high fence, other buildings or a living fence of plants.
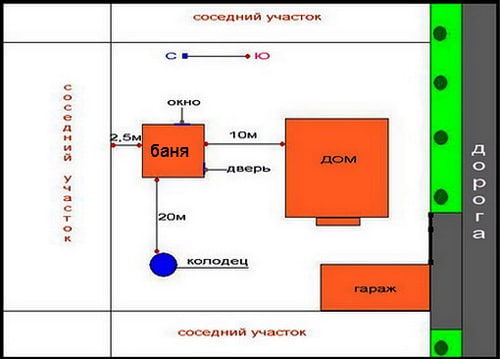
Example of location selection
Layout options and tips for choosing a project
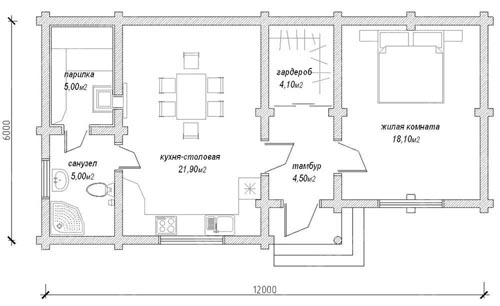
The main criterion when choosing a layout is the purpose of using the building and the maximum number of people who can be inside at the same time. The simplest and most economical option is a steam room for two people and a small dressing room where you can change clothes and relax. For a small family, it is recommended to make an area of at least 12 square meters. m, and also think over separate rooms for the steam room, washing room and locker room.
Project for a small family
If you plan to spend useful time with a large group of friends, then it is better to make a spacious relaxation room, expand the steam room and increase the number of shelves. There should be enough space for everyone to have a good rest.
Project for a holiday with a large family or friends
You can often find an option when a separate building is both a bathhouse and a guest house, where another family can freely live. Typically, this idea is made in one or two tiers with separate bedrooms, bathrooms and a kitchen.
One level project
Which type of foundation is better?
Only then will the bathhouse building not be subject to distortions and cracks if the foundation is correctly selected and of high quality. Determining the type of soil is a fundamental point in this matter. The ideal is a dry option with a uniform structure, but clayey, heaving or peaty soil is often found.
House with a two-level bathhouse near a pond
Strip foundation for heaving soil
Soil that can retain moisture is called heaving soil. Its danger lies in the fact that the amplitude of fluctuations varies from time to time by about 10 cm. The risk of deformation can be reduced by installing wall drainage, as well as a sand cushion of 20–30 cm. Be sure to provide a blind area to drain water.
In the presence of this type of soil, it is advisable to make a strip foundation:
- Place pegs around the perimeter and tighten the rope.
- Dig a trench 40 cm deep and 30 cm wide.
- Make a layer of sand at least 20 cm.
- The gravel layer is at least 7 cm.
- Install the formwork.
- Lay reinforcement with a cross-section of 12 mm or more. It is recommended to raise it to the middle using bricks.
- Pour concrete, periodically piercing the solution with a shovel or probe, as well as tapping the formwork from the outside to remove air pockets.
Belt type
The concrete is allowed to set for at least 10 days, then waterproofing is laid and further loading is applied.
Columnar foundation for slightly heaving soil
The name itself suggests that the columnar base consists of pillars laid at the corners of the building, at the joints and around the entire perimeter in increments of at least 1.5–2 m. The pillars go 1.5 m deep and can be made of asbestos pipes , brick or rubble stone, bound or filled with mortar. The option of slightly deepening into the ground is possible. Each pillar is installed on a layer of sand, which is spilled with water and compacted. Outside, be sure to use waterproofing made of roofing felt or bitumen mastic.
Columnar base
Self-construction of a frame bath
At the dacha there is already a house of 90 sq.m., but, despite this, superstasik decided to build a frame bathhouse on two floors. In order not to spend a lot of money, I decided to build it myself, and took my sister’s husband as my assistant.
In plan, the frame bath will be 6x4 meters (length of lumber). The boards were delivered while there was still snow. Board sizes: 150x150, 150x50, 150x40, 150x25. I built an 8-meter shed to store them. Foundation
For the bathhouse, he decided to make a columnar foundation of 12 pillars. Pillars made of 150 mm asbestos-cement pipes, filled with concrete. 4 reinforcement rods with a diameter of 10 mm with curved ends are placed in the concrete, which go into the expanded part of the pit at the base.
Before installing the columnar foundation, he hired Tajiks. They removed the fertile soil with a bayonet and dug holes for the foundation. Then they installed all the foundation pillars in two days. Installation of pillars
To install the pillars, a hole is dug 140 cm deep and 35-40 cm wide. 15 cm of sand is poured onto the bottom and compacted. Before filling the sand, groundwater was removed from the hole using a bucket on a rope.
Then about 20 cm of concrete is poured into the hole, and 4 pokers made of 10 mm reinforcement are placed in it. A pipe lubricated with bitumen mastic is put on the reinforcement, and after that the pit is filled with concrete to the brim. The concrete is bayoneted to remove air bubbles. A stud with a washer and 2 nuts at the bottom and a washer and nut at the top is inserted into the concrete.

The diameter of the stud embedded in the concrete is M 16, recessed in the concrete is 35 cm, and 15 cm comes out on the outside. The lower trim will be attached to the stud. The foundation of the bathhouse will not be closed from below.
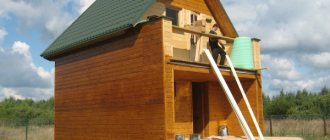
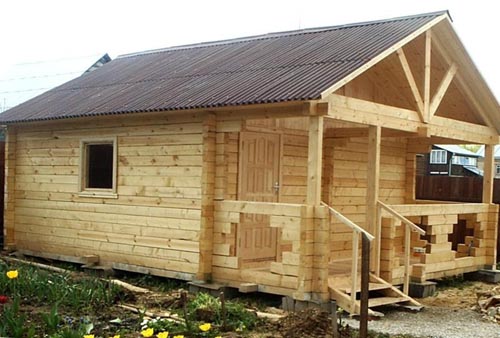
Construction of a bath frame
After the concrete had cured, they began installing the bottom trim. It is mounted on M 16 mm studs, which are installed in concrete.
A 150x150 mm beam was used on the bottom trim. It was pre-treated with Senezh for difficult conditions.
The walls of the bathhouse were assembled in a horizontal position. Cutouts were made in advance on the racks for the joists and supports for the ceiling beams. And then they lifted it and secured it to the bottom frame on galvanized corners with screws and leveled it plumb.
After installing and leveling the walls, superstasik built scaffolding around the frame of the future bathhouse for further comfortable and safe work. . It was very convenient to install the roof on the made scaffolding. The rafters were made using a galvanized template. During the installation of the outer trusses, scaffolding posts were used to temporarily secure them.
During all the work, the tree was sawed mainly with a circular saw, only some parts and the rafter teeth were sawed out with a jigsaw. Superstasik attached the rafter tie to the rafters with two 10x120 bolts. All other connections of wooden structures were assembled with screws using galvanized corners, and then nailed for strength.
Having finished erecting the rafter system, superstasik began installing the attic racks. Then he covered the roof with a vapor-permeable membrane, hammered in the sheathing and covered half of the roof with ondulin. After this, work was suspended because it began to rain.
According to the plan, the roof of the bathhouse will not be completely insulated. The attic will remain cold, and part of the roof - the attic walls - will be insulated. This decision was made because the bathhouse is not for permanent residence. But if there is a need to take a steam bath in winter, the bathhouse should be warm.
When the rains stopped, it was decided to urgently make a sheathing with a membrane for the second half of the roof. By this time, superstasik’s assistant’s vacation had ended and he left. But then, unexpectedly, a neighbor offered his services and helped put the sheathing on the roof. He hired his wife as an assistant to close the gables.
about the project
When thinking about the bathhouse project, superstasik first of all thought about the wise use of lumber, so he chose the dimensions of the bathhouse exactly as follows:
- The length of the building is 6 meters determined by the length of the board;
- The building width of 4 meters is determined by the minimum comfortable width for the room, and two-meter remains can be successfully used to convert the porch into a terrace;
- The pitch of the posts, joists and rafters was set relative to the width of the insulation;
- Along the 4-meter wall there are racks 360 cm high, and the remaining trim can be used for the racks of the first floor partitions;
- Along a 6-meter wall there are racks 300 cm long. One board makes 2 racks;
- Logs and floor beams six meters in length run across the entire bathhouse, and in the middle they rest on the central frame beam (joists) and on the partition in the middle of the 1st floor of the bathhouse (floor beams).
After such calculations, there is almost no waste left.
Consumption of lumber for the frame and rafter system
Beam size 150x150 mm – 5 pcs. 0.7 cube; Boards measuring 150x50 mm – 53 pcs. 2.5 cubes; Boards measuring 150x40 mm – 30 pcs. 1.1 cu.
Total; 4.3 cu.
Roof sheathing
I decided to seriously fasten the roof sheathing with self-tapping screws. For this I purchased a new screwdriver. It is very convenient with new batteries - one battery does not have time to discharge, and the second is already charged.
I decided to attach the sheathing carefully, because when reading topics about ondulin on forums, I read that on one roof it looked bad due to the sheathing drying out and warping. He is calm about his crate. His rafters were installed every 60 cm, and at the intersection of the sheathing and rafters he screwed in 2 self-tapping screws.
A method by which boards for gable cladding are used sparingly
To do this, you first need to lay out the six-meter boards close to each other, staggered, as in the figure. Calculations are made based on the actual dimensions of the board and the angle of the roof.
Then lines are drawn (red lines) along which the boards are sawn and the result is a set of boards for lining the gables. And triangles remain as waste (this is what superstasik did in his calculations).
Window
For the bathhouse, he ordered PVC windows with KBE Expert profile, 70 mm, triple glazing. Two windows measuring 120x123 cm. The windows have one sash opening in 2 directions. He also bought one small window 60x70 cm. He will install the windows in the bathhouse after covering the walls with boards.
Frame covering
The superstasik bathhouse frame was assembled without the use of jibs. And for his strength, he decided to sheathe the bathhouse with 25 mm boards diagonally. He believes that this way the frame will be strong and no worse than using OSB. I tested this in practice when building my garage.
Covering the walls of the frame with boards diagonally gives, according to superstasik, the following advantages:
- This will allow you to do without jibs and braces;
- A square meter of 25 mm board is cheaper than OSB;
- You can easily install siding on a boarded bathhouse wall with the required fastening spacing of 30-40 cm;
- The board, unlike OSB, is an environmentally friendly material, without chemical additives;
Slots in a dry board will allow vapors from the insulation to escape faster than through a solid layer of OSB. To prevent air from blowing through the cracks, a vapor-permeable membrane is used, which prevents moisture trapped under the siding from penetrating to the sheathing and frame.
Continuation of the topic here
Posted by member of the House and Dacha forum superstasik Editor: Adamov Roman
Construction of a bathhouse - choice of material
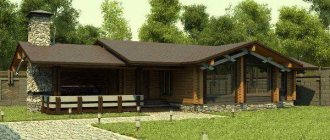
Before you make a bathhouse in your country house, you should decide on the type of future walls. A steam room is always associated with wooden beams, but brick, foam block and other modern alternatives are increasingly being used in its construction. The variety of roof coverings is also great and the main selection criterion is the owner’s preference.
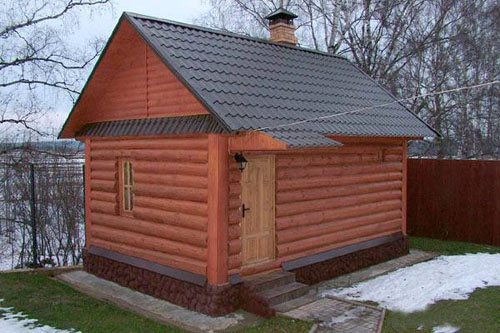
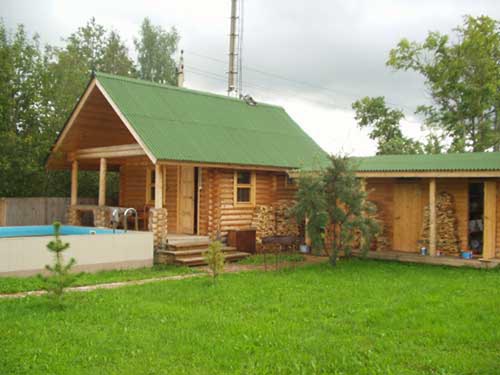
Wooden log house - ecology and comfort
Whatever type of foundation is chosen, a frame of thick boards rests on it and is attached, which will become the foundation. For construction, round timber of pine or spruce with a diameter of 20 cm or more is often chosen. It is acceptable to use other species and their combination - oak, aspen, larch and linden. For example, oak flooring is more reliable and durable. There are two methods for joining logs at corners:
- “into the paw” - the absence of protruding ends of the log;
- “in the oblo” - the ends protrude 25–30 cm beyond the perimeter of the house.
From pine timber
After laying each crown, caulk is produced, which is performed to seal seams made of tow, wool felt, jute or flax fibers. It is also necessary to caulk the external and internal seams after the construction of the roof and a year after shrinkage.
A bathhouse using wood is more environmentally friendly and comfortable, but we must not forget about fire safety and treating logs with anti-rotting and insect repellents. An unprofessional approach reduces the durability of the structure. Construction of a wooden steam room is a labor-intensive process that is best left to specialists.
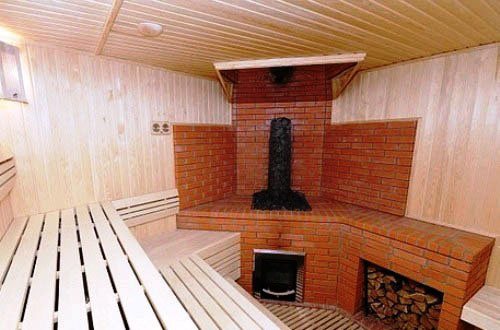
Brick walls - solid and durable
The construction of a brick bath is often done on a strip foundation:
- solid brick - laid below the waterproofing level;
- hollow – above the waterproofing level;
- red and silicate - for walls.
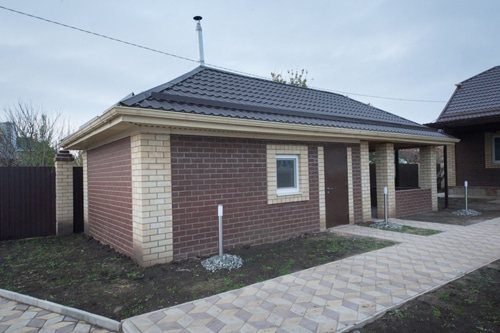
Brick bath
The durability and safety of such structures is undeniable, but for better heat retention, the thickness should not be less than one and a half bricks. The outside can be made with facing bricks or decorated with stone, which should match the appearance of the main house. Internal surfaces are leveled using putty and plaster, and clapboard cladding is also often used.
Modern technologies for construction
The most expensive material for bathhouse walls is brick, and the use of new technologies can significantly reduce the cost. Foam concrete - blocks made from a solution and foaming agent with air bubbles. It has attractive characteristics: durable, non-flammable, low thermal conductivity and light weight. Special glue is used for masonry. The outer surface is protected by siding from exposure to weather conditions.
Gas silicate - has greater soundproofing, fire resistance, light weight and low cost, but it is undesirable to use it in the construction of premises with high humidity.
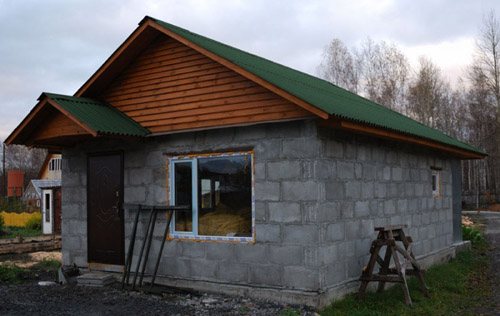
Construction using a block
Roof – variety of choices
There are several types of roofs for a bathhouse, depending on the structure:
- single slope;
- gable.
A single-pitch is suitable for small structures, it is easier to construct and more economical, but if the angle of inclination is insufficient, there is a risk of receiving too much load from precipitation.
A gable roof is more expensive to make, but it is what gives the building the appearance of an independent house, rather than an outbuilding. For year-round use, you should make an attic with an insulated ceiling, which minimizes heat loss.
The range of materials for roofs is huge and depends on the preferences of the owner and his financial viability - roofing felt, slate, corrugated sheets, ondulin, metal tiles and others.
Gable roof
How to build a frame bathhouse with your own hands
Frame baths are an excellent alternative to common brick and log products. The main advantage, of course, is the accessibility of construction due to the low cost of materials. At the same time, a do-it-yourself frame bathhouse is not a myth, but a reality. Construction is quite simple and does not have any pitfalls. It is important to choose the right material and follow the algorithm during the construction process.
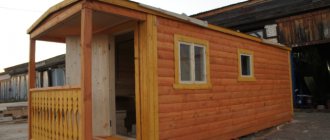
In the photo - frame bath
When compared with more common construction technologies, a do-it-yourself frame bathhouse will be pleased with its low cost, which is twice as expensive as the common options. At the same time, creating something with your own hands will be feasible for every person due to the lack of need for serious skills.
What materials will be needed?
The construction of a frame bath should begin with the preparation of the preferred project. Before you start generating documentation, you should take care of three important factors.
- It is necessary to decide on the design and select the frame of the bathhouse. This can be a separate building or a frame bathhouse with an attic.
- You should choose the optimal location. Focus on your own preferences so that the building is located in a convenient and easily accessible location.
- Decide on the type of soil where you will quickly build a frame bathhouse with your own hands.
Based on the above factors, certain soil requirements are put forward that are important to take into account. But often the technology for constructing a frame bath allows the use of a columnar base due to their versatility.
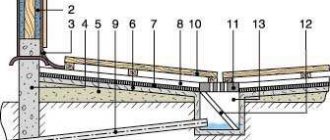
Diagram of a frame bath
The next step is the development of design documentation, that is, the development of design components. Usually the composition is unchanged - steam room, vestibule, dressing room. Additionally, the walls of a frame bath can include a recreation room or a place for a swimming pool, if the budget allows it. In the project, you must immediately mark the location for the stove. If you plan to place it in a steam room, you should choose a place in the corner near the door structure.
If you have definitely decided to “build a frame bathhouse with your own hands,” do not forget that the project should immediately display data regarding the organization of the chimney, the creation of ventilation equipment and its type, as well as the roof. Whenever possible, details and dimensions are shown in the drawings for ease of perception and to clearly display possible shortcomings.
If you are interested in how to build a frame bathhouse with your own hands, remember that a correctly written project is half the success. According to it, construction will be carried out quickly, inexpensively and simply, and there will be no need to spend a large amount of money for a bathhouse.
To make a frame bath, you need to calculate the quantities of materials. How to do it right? Calculations are carried out individually depending on the planned interior.
Attention! Wood remains the most preferred material for a bathhouse. With it, the bathhouse will acquire a cozy atmosphere, and the steaming process will turn into pleasure.
What protective materials are needed?
To create a frame, it is very important to use protective materials. They help protect the frame from various negative factors, as well as excess moisture and elevated temperatures. In order to choose such materials yourself, you should familiarize yourself with their characteristics. The most popular ones include polyethylene or glassine.
The construction of a bathhouse from timber necessarily requires high-quality thermal insulation. Thermal insulation material made can reduce heat loss and reduce the cost of heating. To insulate a timber bath, it is worth using mineral wool, polystyrene foam, expanded clay and other backfills.
Scheme of a columnar foundation for a frame bath
How to build a columnar foundation correctly?
The step-by-step instructions assume that creating a foundation is the first step of construction. A frame bath that is light in weight is built on a conventional structure. But it is best to choose a columnar option, in which slabs of asbestos cement and concrete are presented in the form of supports.
Step-by-step instructions for creating a foundation include five points.
- Purchase of materials. Usually, asbestos-cement pipes 4 meters long and 10 cm in diameter are sufficient.
- They dig holes, the depth of which is 150 cm, and the diameter is about 20 cm. You can use a gasoline drill.
- The pipes are cut in half and placed in the well. Next, they fill it with sand and compact it.
- Preparation of concrete - for 1 part of cement, take 5 parts of water and crushed stone, 3 parts of sand.
- The pipes are filled with concrete.
Next, you can begin to perform the lower strapping. Using construction manuals, we can conclude that the optimal choice of materials are boards with a thickness of 5 mm and a width of 15 cm. They are knocked together, and then logs, also made from boards, are inserted. Waterproofing material is placed under the structure for moisture protection.
A do-it-yourself frame bathhouse requires securing the piping to the foundation pipes. You can use metal plates. Subsequently, the structure is treated with an antiseptic.
Construction of frame bath walls
Walling
The construction of walls involves five main stages.
- It is necessary to mark the place where the racks will be located.
- Corner posts are mounted in place.
- Install intermediate elements.
- The organized part of the frame must be covered with OSB boards. Ordinary screws are used as fasteners.
- Next, the intermediate elements are sequentially mounted and the cladding is performed.
Remember that if you have chosen frame bathhouse projects with an attic, you should leave space for windows and doors. At this point, the construction of the walls will be completed and roofing work can begin.
Roof organization
Building frame baths with your own hands involves creating a template that allows you to easily assemble the rafter structure. In this case, the roof assembly is performed on the ground, after which it is lifted up and installed. It is important that all calculations are correct, since each structural element must have its own place above the rack.
Scheme of the roof structure of a frame bath
It is preferable that the roof be ventilated. To do this, lay the sheathing and ondulin between the rafters and the counterbeam. The gables are covered with OSB boards. After this, doors and windows are installed.
In general, the do-it-yourself frame bathhouse is already ready. Finally, finishing must be done. The outside walls are sheathed with hardwood, laying heat and moisture insulation materials. From the inside, the lining should perform a protective role. Finally, a stove is installed, which is called the heart of the bath. If you do not have the skills to do this work, you should entrust the work to professionals.
Important! Experts recommend placing the heating boiler in the dressing room, and the heater stove directly in the steam room; the wall that separates them is lined with bricks.
The frame bath has only positive reviews. This is explained by the fact that the design is easy to create, high quality and durable. In general, you can be proud of products built with your own hands. The created bathhouse using frame technology will allow you to get a place for good rest, a great time and personal improvement.
More details about how to build a frame bathhouse can be found in the next video.
UK 'gamer girl' Belle Delphine sells bathing water to 'thirsty' fans for £24 a can
A POPULAR British cosplayer and self-described "gamer girl" is committing murder online - and causing a sensation with her latest money - plotting a scheme.
Belle Delphine, who describes herself as a "weird elf cat girl", is now flogging water jars for gamer girls through her online store for £24 at a time.
5
GamerGirl Bath Water isn't the only thing on offer at Belle Delphine's online store.
Revealing the stunt on Instagram, Delphine said it was "for all you THIRSTY guys" as she shared a photo of herself in the bathroom wearing a tank top that read "Overwatch" as she held a can in one hand and a controller in the other . ,
She followed this up with a video of her filling some jars while she was in the bathroom.
In her online store, she claims the cans are "bottled while I play in the bathtub" and adds a disclaimer that "this water is not for drinking and should be used for sentimental purposes only."
Delphine has 3.8 million followers on Instagram, where she regularly posts her raunchy interpretations of anime and video game characters.
5
Some fans on Instagram responded to the news with more lewd requests. Credit: Instagram/belle.Delphine
5
A video posted on her Instagram page showed some of the cans being filled. Credit: Instagram/belle.delphine
In addition to selling bath water, she makes money by selling posters of some of these poses through her online store, as well as an anime-style mousepad of herself.
Delphine also has over 3,000 "patrons" on the crowdfunding site Patreon.
There, some users can simply offer support for less than £1 a month, but for around £4 a month, users can pay for "cute and sometimes weird selfies" as well as behind-the-scenes access to photo shoots.
Those looking to shell out a little more get "access to raunchy HD photo sets" or access to her "private" Snapchat, described as her "naughtiest" social media account.
The most expensive option is around £2,000 per month, for which there is no specified reward.
While it's impossible to know exactly how many fans signed up for each tier, if even half the total number of followers signed up for the first tier, which actually gives them something for their money, that would mean she's earning at least £2,300 a month after fees.
5
She posts interesting pictures inspired by video games on Instagram, but she also has a significant following elsewhere. Credit: Instagram/belle.delphine
Anyone who signs up for higher levels will obviously raise this amount.
Even if no one subscribes at the top tier, and if only 10 percent of her fans subscribe to the other higher tiers, her income from Patreon alone would be approximately £225,000 a year.
While some users weren't impressed with her stunt, many praised her business acumen.
“Belle Delphine is much better at business than Trump. She honestly could be president faster than him,” one fan said on Twitter, while another praised her social media savvy and said, “She’s a badass and deserves to succeed, super smart.” ,
“Say what you want about Belle Delphine,” said another, “she’s a business genius.”
5
The artful snaps have won her a legion of fansCredit: Instagram/belle.delphine
Some posts in her Instagram announcement were less charitable, describing her as "a disgrace to all girl gamers."
Another ordinary person begged fans not to accept the stunt, saying: "Please, no one bought this because it would have been very creepy and perverted."
Delphine trolled fans earlier this year by promising to create an account with Pornhub's popular smut peddlers - only to use it to post meme videos.
The Sun Online has approached Delphine for comment on the stunt.
PLAY DATE
PS5 release date, news, games, prices and controller - everything we know so far GAMING DIRTY porn shock as new VR app allows Randy gamers to watch 18+ clips on their PS4s BOXING CLEVER Microsoft 'unveils 2nd new Xbox' in August" is even cheaper than Series X
SEX GAMES
Man sues Twitch for 'showing so many scantily clad gamers that he hurt his penis
'
X MARKS THE SPOT
Xbox One X price dropped from £449 to £259 free play
KILLER INSTINCT
Best Call of Duty Warzone Guns - Fastest 'Time to Kill' Weapons Revealed
Although she's not the only one catering to smut-loving gamers.
Apex Legends fans are well served when it comes to such smut, while Randy Overwatch fans are also becoming a growing niche for adult performers and producers.
Pornhub, meanwhile, has produced official "parody" smut for both Fortnite and Red Dead Redemption.
PornHub's Fortnite porn parody 'Fortnut' turns the hitting video game into a cheese smut-fest
We pay for your stories! Do you have a story for the Sun Online news team? Email us at tips @ the-sun.co.uk or call 0207 782 4368. We pay for videos too. Click here to download yours.
,
Live, draw and enjoy at GetDrawings.com. Get free drawings, vector graphics and how to draw tutorials
Constant creativity is one of the most important human needs. Therefore, we agreed that we always want to create something new! It is, of course, easier to enjoy the fruits of other people’s work, but it is much more pleasant to do something of your own, original. And it doesn’t matter if it’s a new tool for doing important work or a piece of art: the ability to create something new is always creativity!
It is better to start drawing from childhood - this is one of the most fruitful periods for mastering the basics of fine art.
It may seem that there is nothing easier than drawing. It's difficult to compose music or poetry because you first have to imagine it in your head, come up with a line or motif, and only then think about how to translate your thought into an understandable and recordable form.
What about artists? What I see is what I draw on paper! I saw a tree - I drew, I saw a cat - I drew... What's so tricky? As a last resort, if things are changing too quickly, you can take a photo and then just draw everything from the photo. Nothing complicated!
This myth disappears immediately, right after you pick up a pencil, brush or start drawing. And it turns out that there is nothing complicated in this, but it is still impossible to create a masterpiece! It turns out to be only illegible writing.
This does not mean that we should refuse such thankless work. Just the art of creating paintings should also be studied like any other. Spare neither time nor effort on exercises with a brush and canvas, hard work, create and create without interruption - then in the near future, if you find talent and determination and if you do not become the second Picasso, then at least be Decorate a worthy painting as a gift to your mother possible March 8th.
Drawing or coloring is a method that will help you develop your child's creativity, regardless of his natural abilities. You will spend many exciting hours learning the basics of drawing step by step, and then you will be able to realize all your creative fantasies.
How to start drawing at home:
- good quality sketchbook;
- pencils of different softness;
- eraser;
- diagrams in which everything is clearly visible.
If pencil drawing has already been mastered, or you want to immediately move on to pastels or paints, all this should also be available.
Provide the aspiring artist with a great workspace: a comfortable table and chair, good lighting, and away from all distractions. It should be comfortable for the child.
Before drawing, be sure to tell your child about the following rules:
- There is no need to rush, everything works out only for those who try;
- You need to act strictly according to the scheme, especially if you are just starting to learn how to draw;
- Remember what you are doing and next time you may not need the diagram;
- Start with the simplest ones, gradually moving to more complex drawings.
Live, draw and enjoy at GetDrawings.com
,
12 pcs. DIY Environmental Protection Graffiti Bag Hand Painted Non-woven for Children Crafts Arts Color Filling Drawing Toys | |
Bullet Point: Durable and Eco-Friendly: Fabric bags are durable. The color is well covered. Safe, healthy, not easy to break, not dirty and edible. Lovely Design: Each bag contains cute and interesting sketches that allow children to fill in the colors to their liking. Quantity: 12 different children's bags, children can use them to draw and paint according to their own preferences. It can increase imagination, attention and creativity. Scenes: Craft parties, holiday gifts, party supplies, birthday gifts, etc., especially Halloween, Mother's Day, Christmas and even birthdays. Multi-function: DIY bag, great for storing candy, mini toys, children can practice and improve their ability to use paints, it is also a great party favor for every child. It can also be used as a storage bag.
Specifications: Material: Non-woven Size: 20 * 25 * 13cm / 7.87 * 9.84 * 5.11in (approx.)
Note. The color of the doodle bag is delivered at random. The handle in the picture is not included.
Package Included: 12 x Kids DIY Painting Bags
12 x Kids Crafts Drawing Bags
,
Interior work: from communications to finishing
It is difficult to imagine a modern building without existing utility networks, the implementation of which is planned during the construction phase and requires obtaining technical conditions in accordance with the law. For a bathhouse, similar wiring and connections are made as for a home, only to a smaller extent.
Utilities – water supply and electricity
Connecting to the water supply is facilitated by the nearby location of the well on the site. You should obtain technical specifications for the connection and lay water pipes to the building, making internal wiring with connections to the tank and plumbing. Laying across the yard is done at a depth of at least 60 cm with mandatory thermal insulation, which will prevent pipes from freezing in winter. The lack of a central water supply requires searching for an alternative, which could be a well or a well. In this embodiment, water is supplied using a submersible pump that provides pressure in the system.
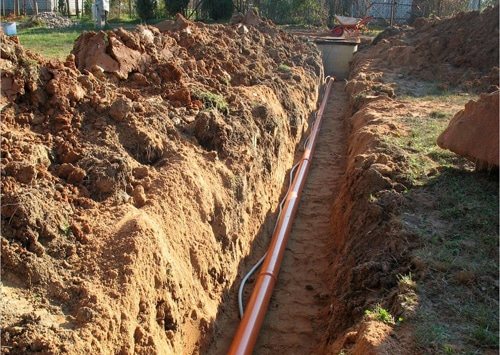
External engineering networks
In order to remove wastewater, a sewer system must be laid, for which connection to the existing central system is ideal. If this is not available, the option of a septic tank or drainage well is suitable. There is no need to make a large tank for a small family. Sewage pipes are led underground to the reservoir while maintaining the angle of inclination.
Connecting electricity and wiring must be taken seriously, since a bathhouse in a country house is considered a high fire hazard facility. In the absence of special knowledge, it is better to contact a professional.
It is possible to connect by air or underground. For aerial use a special cable. The simplest option is a copper cable, which is fixed to a supporting steel cable. All internal boxes and sockets should not be in the wall - only external devices are allowed. It is also dangerous to install the shield in the washing room - only in the dressing room. Laying the cable to the building underground is done at a depth of 30 cm and must be insulated.

Electrical wiring installation
Choosing a stove for a steam room
The heart of any sauna is considered to be a stove, the main function of which is to generate sufficient heat in the room and maintain the temperature. When considering, you should take into account existing types and their differences:
- brick oven or metal. A brick building requires a strong foundation, as it has a lot of weight. Metal is suitable for small spaces;
- hot and cold according to the temperature of external surfaces;
- according to the operating mode – constant and periodic heating;
- by type of fuel - gas, wood and electric.
Heater stove
Gas oven