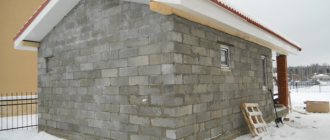
Characteristics and features of aerated concrete block
The main components of this building material are sand, cement and water. Gas is used in production, so the structure of the block is porous, and the brick itself is light in weight. There are blocks of autoclave and non-autoclave type of manufacture. To build a bathhouse, use the first option (according to GOST 31360-2007). Aerated concrete blocks are produced of the usual type and with tongues (a tongue-and-groove system - these require almost no leveling).
Advantages of using aerated concrete blocks:
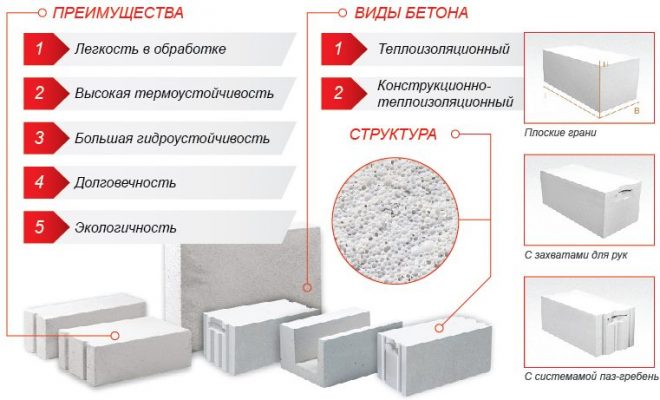
Advantages of aerated concrete blocks
- has the ability to quickly accumulate and retain heat for a long time;
- the material meets safety requirements during operation - non-flammable and environmentally friendly;
- has high strength properties, which has a positive effect on service life;
- lightweight, so no reinforcement of the foundation structure is required;
- the blocks have the same shape, so they make smooth walls, which improves the quality of finishing work;
- the price of aerated blocks is lower than that of wood products (logs, timber) and bricks.
Material properties
Aerated concrete is a popular material from which you can build a building for any purpose. The blocks are made using a special technology, adding aluminum paste to the concrete solution. The chemical reaction produces a gas that makes the structure of the product porous. Thanks to gas bubbles, the walls of the structure are able to reliably retain heat inside the room, which is especially important if you plan to build a bathhouse. Other positive properties of aerated concrete:
- ease of use without special assistance. technology;
- light weight;
- high coefficient of hardness and density;
- environmental friendliness.
Pathogenic microflora and mold do not settle or multiply in the gas block. The material is not prone to rotting and withstands mechanical and chemical stress very well.
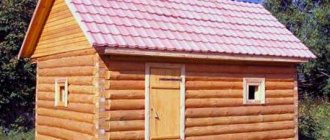
The first stage of construction - drawing up a plan
At the initial stage of construction, the general appearance of the bathhouse is determined, the foundation is laid, the waterproofing device is thought out (the use of membrane material to seal windows and doors, and facades with a ventilation system are designed).
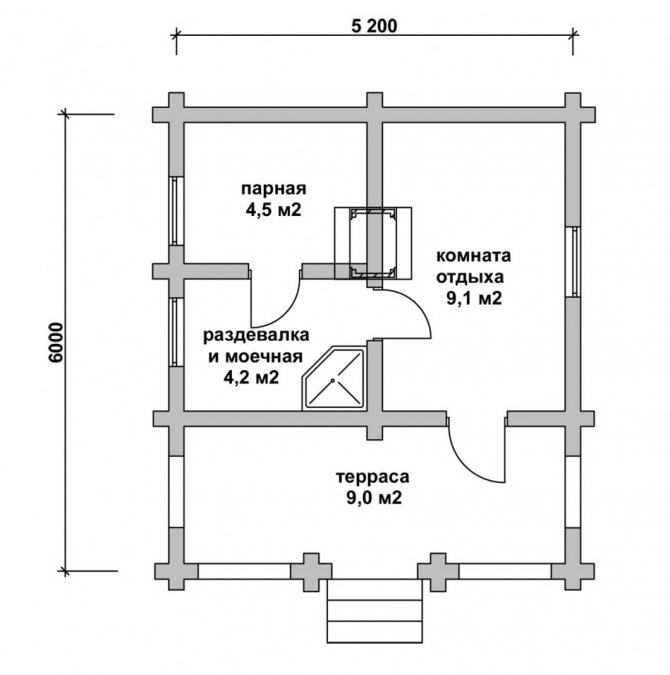
When building a bathhouse from aerated blocks, you need to take into account the following parameters:
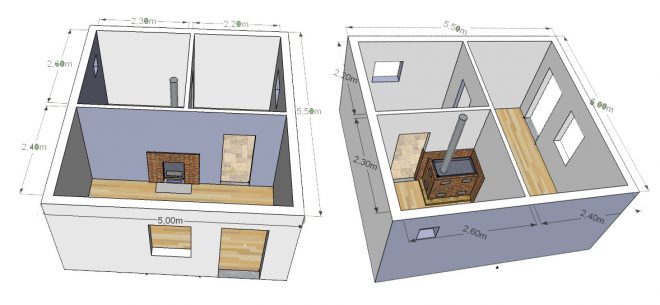
Layout of a gas block bath
- foundation design (strip type, monolithic, etc.);
- design and installation of communications (water drainage, etc.);
- arrangement of premises: dressing room, rest room, shower room, steam room (where they will be located, their overall dimensions);
- type of heating device (furnace);
- list of tools used (construction level, wall chaser, mallet, electric drill, electric mill) and materials for construction and finishing (internal and external).
Project and preparation
If, after familiarizing yourself with the pros and cons of aerated concrete, the decision to build a steam room from this material is finally made, at the next stage you will need to competently draw up projects, diagrams and drawings of the future structure. It is important to decide what the architecture and design of the structure will be, as well as what construction technologies are best to use to make the steam room strong and reliable. The project must include the following important points:
You cannot start work without drawing up a quality project.
- General geometric parameters of the building. If there are plans to build a guest house with an attic nearby, this will also be included in the project.
- Exact dimensions of all interior spaces.
- Foundation type.
- Amount of materials for construction.
- Type of stove, its location.
- Utility wiring diagrams.
- Installation locations and size of window and door openings.
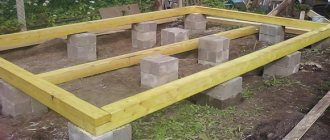
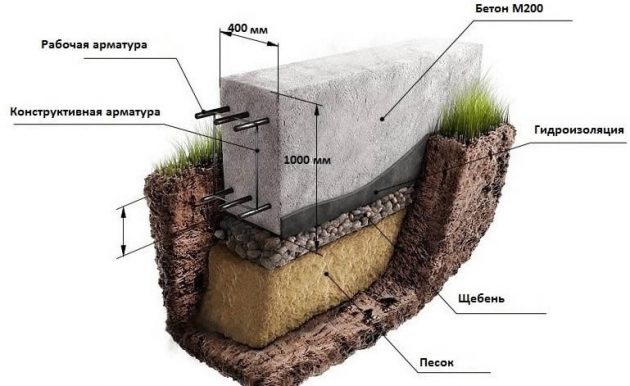
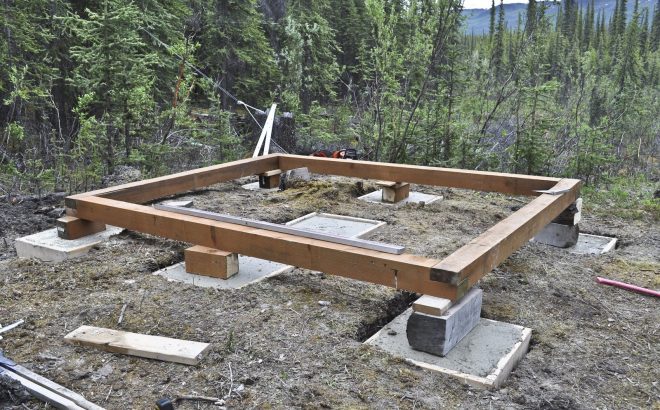
Construction of the foundation
It is an important stage of construction, since the foundation of the building is laid, and the strength of the structure of a bathhouse made of aerated blocks depends on the correct installation and quality of materials.
During construction, a strip foundation is usually poured; it is reliable and does not require large expenses (you need to drill holes in it for communication pipes).
Instructions:
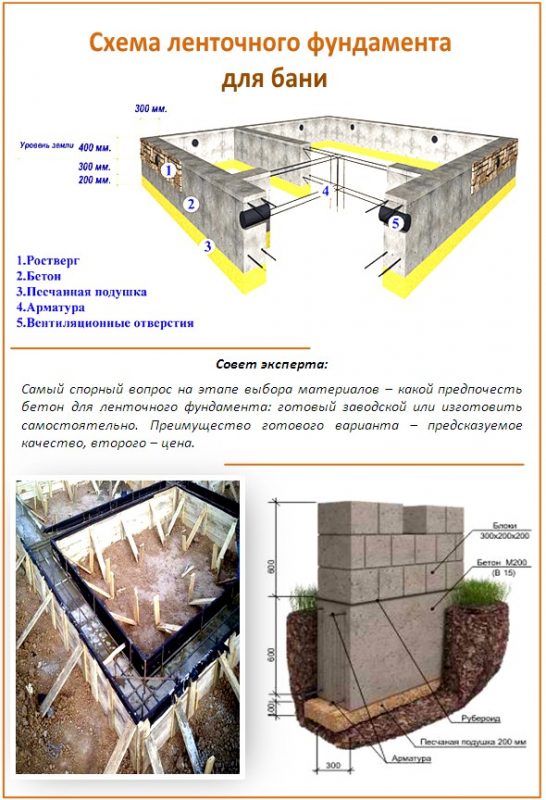
Scheme of a strip foundation for a bathhouse
- The soil is leveled (compacted).
- Marking is carried out according to the project.
- Trenches are dug 30–40 cm wide and 60–80 cm deep.
- The bottom is covered with sand, then with crushed stone of the middle fraction (layers of 15–20 cm are carefully leveled and compacted).
- A concrete mixture 20 cm thick is poured.
- The formwork is formed from plywood sheets or OSB sheets. For a more durable structure, a reinforced belt is used. A frame is made of iron rods around the perimeter and twisted with thick wire.
- Cement mortar is poured. For a small bathhouse, a height of 80–100 cm is sufficient.
- Wait several days for the concrete to completely harden.
- Then waterproofing work is carried out using roofing felt - a rolled material impregnated with bitumen.
A monolithic foundation using the pouring method is a less labor-intensive process, but more expensive due to the impressive volume of the required cement mixture.
Forming a foundation of this type involves pouring concrete mortar over the entire area of the building.
Filling stages:
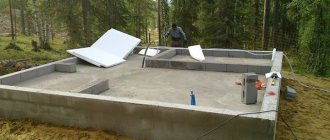
- A pit is dug for the entire building area to a depth of at least 80 cm.
- Layers of sand and crushed stone 15–20 cm thick are laid one by one on the bottom, leveled and compacted.
- Formwork is installed around the perimeter.
- Concrete is poured throughout the entire area of the pit.
- After complete hardening, waterproofing is done with roofing felt.
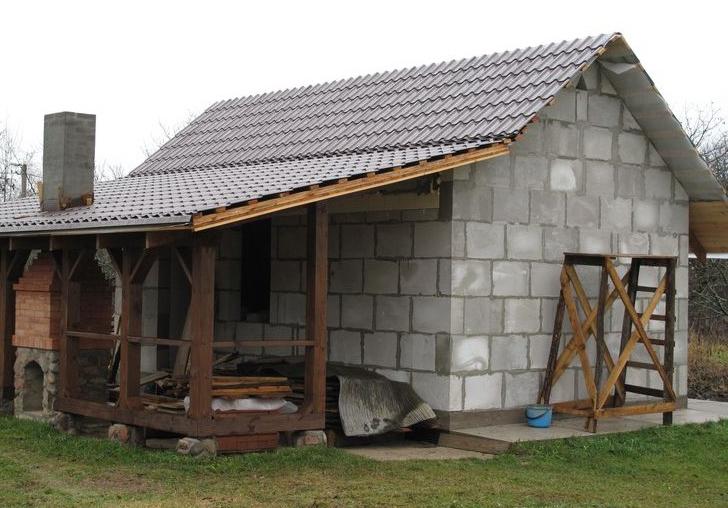
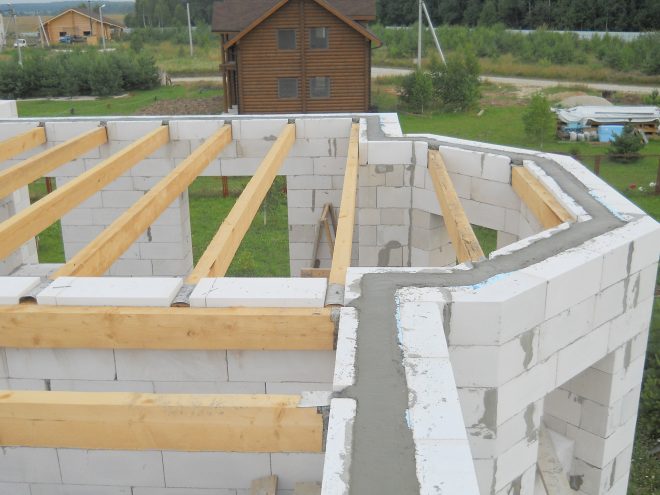
Construction of an aerated concrete bath
The assembly of any structure begins with the organization of the foundation. The light weight of aerated concrete baths allows you to equip any type of base. During the pouring process, it is necessary to provide communication outputs.
Before you start laying walls, you must cover the foundation with roofing felt or other waterproofing.
The arrangement of the first row begins from the corner with the highest level. First, the blocks are installed at all 4 corners, after which string is pulled between them. Installation of the initial row is carried out using cement mortar.
All subsequent rows are fixed with glue. The maximum width of the adhesive is 7 mm. When preparing it, you must remember that the dry mixture is added to the water, and not vice versa. The solution is stirred to a viscous consistency, left for 4-5 minutes and stirred again.
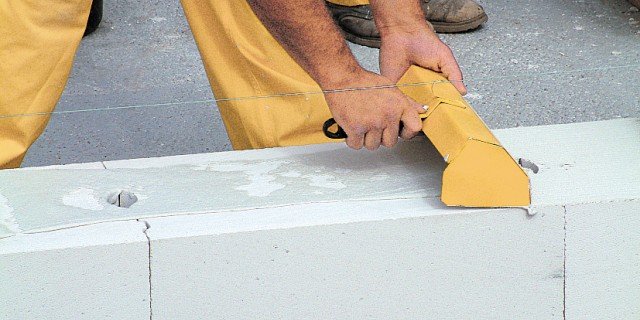
To apply the solution to the blocks, use special trowels. If it is necessary to cut the block into smaller parts, then a special stop is fixed on the edge of the product and the required section is separated using a regular hacksaw.
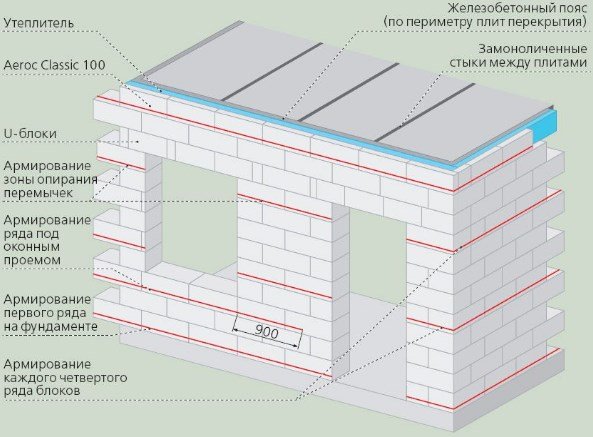
Every 4th row is reinforced with a special iron mesh, which enhances the reliability and strength of the walls. A reinforced belt is installed above window and door openings, as well as along the top row of walls. All laid rows are carefully sanded, and the dust is thoroughly swept away.
Wire twists with anchors are added to the belt, which will be needed to fix the Mauerlat.
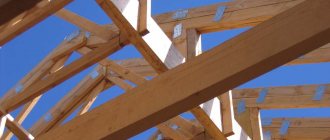
The construction of a bathhouse made of aerated concrete is completed by organizing the rafters. The roof can have different configurations and is covered with any roofing material.
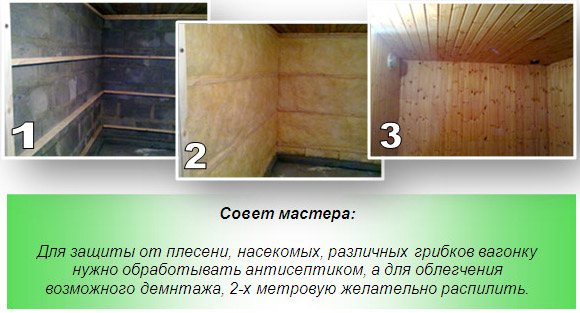
The porous structure of aerated concrete implies high moisture absorption. Rigid waterproofing, which should allow evaporation only to the outside, will help to avoid wall deformation:
- First you need to thoroughly sand the walls and fill the chips with glue used for the main masonry;
- Apply 2-3 primer layers, secure the beacons and reinforcement mesh;
- First lay a thick layer of rough plaster, and then, focusing on the beacons, apply the finishing composition. To maintain an optimal balance of humidity and keep the walls dry, you need to make sure that the inner layer is a couple of times thicker than the outer one;
- Attach a reflective layer of foil to the steam room and nail the lining. It is better if it is made of linden;
- In other rooms, you can simply cover the walls with clapboard or glue tiles without using foil.
Aerated concrete structures are not very attractive, so the outside is treated with a moisture-repellent primer and covered with decorative slabs, bricks, clapboards, and block houses.
The cost of a bath depends on the complexity of the project. The most budget option will cost about 15 thousand rubles per m2. When constructing it yourself, the main expenses will be on the purchase of building materials. The blocks selected for work must have the same size, color and precise geometry.
Technology and features of constructing walls from aerated concrete blocks
They begin to lay out the blocks from the corners, and stretch a rope or thick thread between them - a guideline for even laying of the walls. The first row is placed on a cement mixture (cement to sand ratio 1:3) and leveling is done manually. After it dries, the blocks are cleaned and sanded with a float (a special tool for leveling surfaces). The second and all other rows are laid using construction glue (thickness no more than 5–7 mm).
Laying of aerated concrete blocks is done with an edge, and you need to try to form a small number of joints (for better thermal conductivity of the bath).
Features of construction from aerated concrete
You should regularly check the evenness of the walls using a horizontal and vertical level; if necessary, the blocks can be adjusted using a mallet (rubber hammer).
In every fourth row, masonry reinforcement is performed. A cutter is used to cut out a channel along the entire perimeter, the depth of which is equal to the diameter of the iron rods. They are completely placed in the recess, and the armored belt is filled with mortar. To reinforce the internal partitions, one rod is taken and placed in the middle of the blocks.
The gas blocks are laid in such a sequence that the vertical seam of the previous row does not coincide with the next one. When forming openings for doors and windows, a belt of U-shaped blocks is used.
First, a support structure is installed under the opening, then reinforcement is placed and poured with concrete.
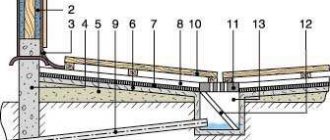
The final row of aerated concrete blocks is secured with a monolithic belt, which firmly fixes the mauerlat (the basis of the rafter system for constructing the roof - a log, beam or metal channel).
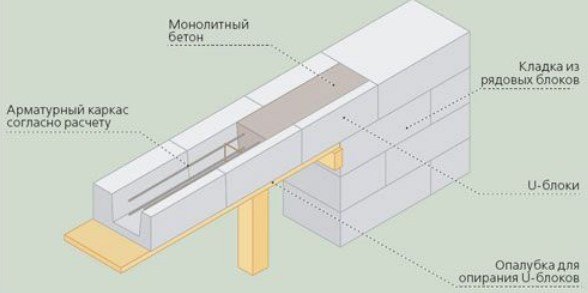
Diagram of the installation of an armored belt for aerated concrete
Tools and masonry mortar
You can use the usual mason's tools: a hammer-pick, a trowel, a level, a spirit level. It is good to cut blocks using a grinder using a concrete cutting wheel. But some even cut with an ordinary hacksaw or chainsaw. But the latter is still not worth recommending - it’s a pity for the tool. You also need to be aware that gas silicate is a terrible abrasive. Therefore, you should not be surprised at the rapid disappearance of saw teeth.
It is better not to use the usual cement-sand mortar for masonry - gas silicate blocks will instantly remove moisture from the mortar, and it will not gain strength. In addition to insufficient strength, the cement joint will act as a cold bridge. Therefore, the heat-insulating properties of the block will simply be unnecessary.
So for laying blocks you can and should use special glue. It will be a little more expensive, but ultimately much more practical. For those who have doubts and those who like to introduce savings on matches into construction, we can recommend additionally finding and reading reviews from practitioners - everything will fall into place.
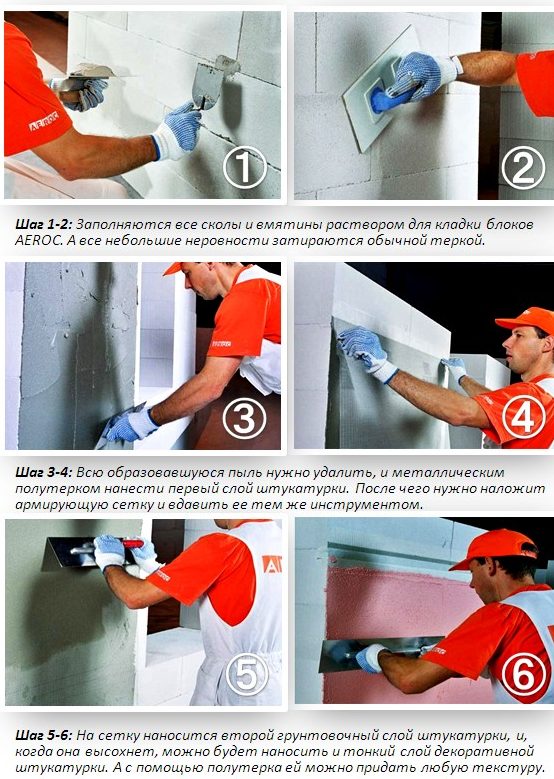
Carrying out external and internal finishing of the bathhouse
After the final stage of construction work, they begin finishing the internal and external walls of the bathhouse made of aerated blocks.
Vinyl siding is used for exterior cladding; it has many advantages:
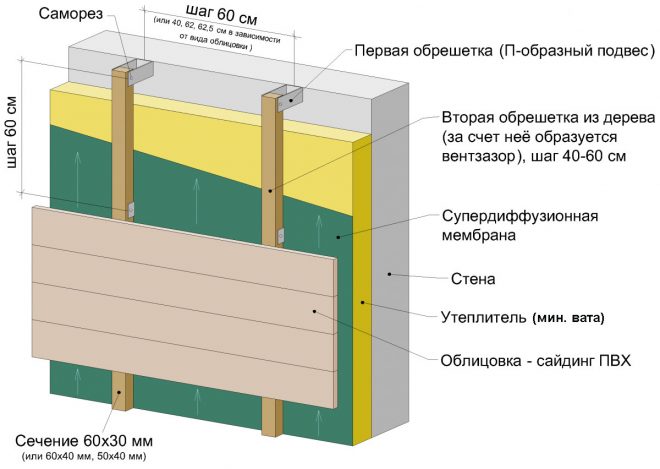
Scheme of facing a bathhouse with siding with insulation
- durable, protects walls well;
- original textures and colors;
- simple installation process.
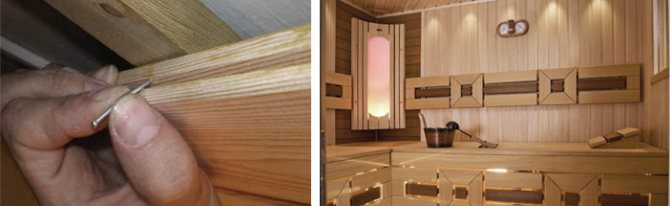
Walls made of aerated concrete can be finished with decorative facing bricks or lining (slatted wooden boards).
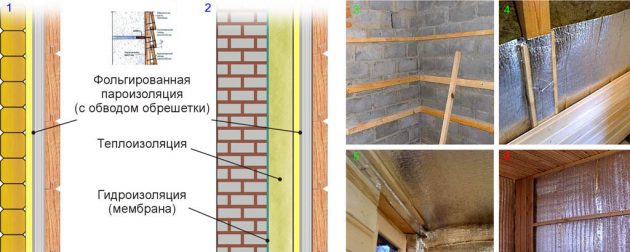
Before finishing the internal finishing of the bathhouse, the ceiling and walls are covered with waterproofing materials.
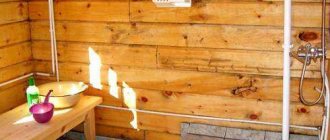
To finish the floor, wooden boards impregnated against rotting are used, as well as tiles with an anti-slip coating.
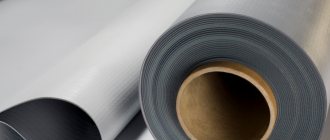
Before finishing the walls, use foil (the effect of a thermos is created - to better retain the heat in the bathhouse). There is self-adhesive and regular. When using a regular one, the joints are glued with aluminum adhesive tape. After gluing, the wooden frame is mounted and finishing is performed.
Finishing the bath inside
For it they use:
- carriage board made of hardwood - larch, linden, aspen;
- plaster.
Plaster cladding:
- Prepare the walls - clean them of dust, dirt and traces of glue.
- Impregnate with a hydrophobic primer in several layers.
- Beacon guides are installed, and the reinforcing mesh is secured along them.
- Apply the initial layer of plaster.
- After drying, cover with a finishing layer.
How to plaster aerated concrete
We build with our own hands
When building a bathhouse, as, in fact, during any construction, first of all you need to decide on the location, size and design. Projects can be ordered from special companies if you want something exclusive, or you can take any suitable standard project from the Internet.
Construction of a bathhouse from aerated blocks (video)
After choosing or drawing up a project, we proceed to laying the foundation. As mentioned earlier, aerated concrete structures are quite light in weight. Therefore, regardless of the type of soil, it is possible to equip a strip shallow foundation.
Making a foundation from aerated blocks is quick and inexpensive, but it is not advisable, since it will require enhanced waterproofing on all sides. It's long and expensive. Therefore, it is better to pour a reinforced concrete structure.
We follow the standard steps for laying the foundation:
- digging a pit below the freezing level of the soil;
- install reinforcing mesh;
- we put up the formwork;
- pour concrete;
- fill the drainage with crushed stone on both sides;
- On top of the foundation, after it has been built, it is necessary to lay waterproofing so that the gas block does not draw moisture from below.
An ordinary strip foundation can be laid under a bathhouse made of aerated concrete.
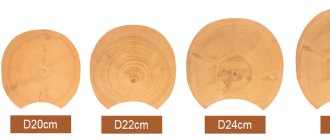
The optimal thickness of the walls of a bathhouse made of aerated concrete is 250-500 mm. Based on the selected thickness, we select the size of the material. The blocks need to be laid and leveled using a rubber or wooden mallet.
- We take the upper corner of the supporting structure as the basis for the level. We lay the first block on it.
- We lay the first row of aerated blocks on cement, carefully monitoring the horizontal and vertical positions of the walls. Wooden wedges can be used for leveling.
- We wait for the solution to set and clean the seams.
- We stretch the leveling thread and proceed to the main laying of the walls. All subsequent rows are laid with glue, maintaining a seam width of 60-70 mm.
- For maximum structural strength, every fourth row must be reinforced.
- U-shaped blocks are used for arranging door and window lintels, as well as for installing ceilings.
- The top layer of the modules must be reinforced and strengthened so that it does not crumble.
- To install the ceiling, standard beams are used.
- The roof can have any shape. Its installation is carried out according to the standard scheme.
Exterior finishing, in fact, can be absolutely anything: plaster, fur coat, plastic, etc. However, you need to remember about the absolute waterproofing of the walls before you start finishing.
Exterior finishing and insulation of aerated concrete baths
We can talk endlessly about interior decoration. It all depends on tastes, financial capabilities, and time to take care of yourself.
We invite you to familiarize yourself with: Turnkey bathhouses with utility unit projects and prices St. Petersburg photo plans
The options may be as follows:
- The simplest and cheapest option is liquid glass treatment. All internal surfaces are covered with liquid glass and covered with foil. This allows you to achieve the effect of a thermos and complete waterproofing of aerated concrete. However, it is worth remembering that liquid glass has a chemical composition, and therefore, when heated, it will release some toxic fumes.
- The most common, environmentally friendly, but at the same time, the most expensive option is cladding with moisture-resistant coniferous wood. This will allow you to achieve not only maximum environmental cleanliness, but also get the feeling of a real wooden bathhouse. But, I repeat, this option will require large financial, time and labor resources. In addition, it is unlikely that you will be able to cope with the work yourself. Most likely, you will have to resort to the help of specialists, which will also negatively affect the cost of the work.
Floors can be covered with tiles or laminate.
Option for interior lining of a bathhouse with moisture-resistant coniferous wood
You should also not forget about high-quality ventilation, which allows you to quickly dry the room after washing.
Reviews
Having answered the question whether it is possible to build a bathhouse from aerated concrete, you should move on to the process of constructing the building.
- Design.
- Calculation of material requirements.
- Purchasing everything necessary, preparing tools.
- Marking, digging a pit, laying out the foundation.
- Waterproofing the base.
- Wall masonry
- Installation of partitions.
- Reinforcement of masonry.
- Reinforcement under window openings.
- Pouring armored belt between floors
- Installation of interfloor slabs
- Insulation from the inside
- Finish lining.
In addition, the stages of installation of communications should be foreseen in advance.
A do-it-yourself aerated concrete bathhouse can be laid out in various ways. The choice to lay blocks flat or on edge is determined by the climatic conditions of the area where construction is taking place.
Another solution is to lay the products on the wide side. This allows you to make single-layer walls with a width of 40 cm and 60 cm. This approach is used in areas with long and cold winters, where good thermal insulation is necessary.
Another method is the construction of parallel walls, between which vapor-permeable insulation is laid. The surfaces themselves are connected by ties, anchors or reinforcement. A continuous strapping is made on top.
Thermal conductivity, durability and strength of load-bearing walls depend on the quality of this stage.
- Cleaning the foundation surface from dust and dirt.
- Applying a layer of mastic.
- Laying 3 layers of roofing felt.
After the first row of stones has been laid, the roofing felt should be turned upward and glued to their surface. This will protect the material from snow, rain and melt water.
To make your own aerated block bathhouse durable and beautiful, you must follow the rules for laying the blocks.
- The beginning of laying is from the corners, after preliminary measuring the evenness of the base.
- Bandaging each row with an offset of half a stone.
- Reinforcement of walls every 2 rows.
- Using hollow lintels to make openings.
The products have smooth edges. When laying, a special polymer adhesive is used, which has low thermal conductivity. Apply it in a layer 3 mm thick.
First row
The quality of laying the first row directly affects the progress of further work, solution consumption and the final result.
- The highest base angle is determined.
- Cement mortar is produced. Its task is to link blocks and align them.
- On the upper corner of the base, 2 stones are placed to form an angle. They are aligned vertically and horizontally.
- The remaining corners are made.
- A cord is stretched between them.
- Laying is carried out from top to bottom.
If there are gaps between the stones, they are filled with sawed-off fragments smeared with glue at the joints.
You can return to continue work no earlier than 2 hours after arranging the first row, so that the cement has time to harden. Laying should begin from one of the corners, overlapping the stones each time. Before applying the glue, the surfaces are sanded with a float and cleaned of dust with a wet brush. The verticality of the walls is constantly checked by level and plumb. Correction of the position of the fragments is carried out with a rubber mallet.
We suggest you read: What boards are needed for the ceiling?
Partitions
The partitions are installed after the walls are completely erected. The floors are pre-installed. In the wall blocks, cuts are made through 1 row to place the partition blocks perpendicularly. The dressing is done on half the stone. They are first sawed into blanks so as not to be distracted during laying, since the mortar’s lifespan is limited.
Based on the specifics of the project, a steam room, shower room, locker room and rest room can be fenced off with partitions. To make the room comfortable, it is advisable to make a vestibule to compensate for the temperature difference in the sauna and outside.
Masonry reinforcement
Every 2 rows, reinforcement is made of the raised wall from aerated blocks. For this, 10-16 mm reinforcement is used. The metal is placed in grooves, which are made with a grinder or a special tool. The groove cross-section is selected rectangular or triangular.
In the second case, much less work will be required, since only 2 oblique cuts are made, connecting in the middle of the walls. Radius bends are made at the corners, made by hand or with a pipe bender. After placement in the grooves, the reinforcement is filled with cement mortar flush with the surface of the stones.
Reinforcement under window openings is carried out to strengthen the area that will be subject to the pressure of a massive double-glazed window. First, the width of the window is marked on the wall, 2 grooves are made on it, which exceed the frame by 20-30 cm on each side.
Then the grooves are cleaned of dust and crumbs, cement mortar is poured into them, and steel pins are immersed. Excess material is removed and the surface is leveled.
The jumpers take on the load from the blocks on top. These parts are made in the form of U-shaped profiles. The cavity inside is intended for the installation of a reinforced concrete core, which has high strength and low flexibility.
- The part is cut so that its edges rest on the wall 40 cm on each side.
- The fragment is glued to the stones along the edges of the opening.
- A T-shaped support is installed under the jumper, supporting it along its entire length.
- A three-dimensional frame of square cross-section is made from reinforcement.
- The metal part is placed into the cavity and rigidly fixed in it. For this, staples or screws are used.
- Solid blocks are glued to the sides of the lintel.
- Concrete is mixed. The solution is poured into the groove and distributed evenly throughout the entire volume.
- Air bubbles are removed using a steel rod.
- Excess concrete is removed with a spatula and the surface is leveled.
The support can be removed no earlier than after 14 days, when the mixture has completely hardened. It is allowed to continue laying after 3-4 hours.
Disadvantages of aerated block construction
In a bathhouse made of aerated blocks, it is necessary to additionally insulate the foundation, since this material, due to its porous texture, quickly absorbs moisture.
It takes a long time to dry the bath. Installing additional ventilation will reduce the area of the premises. And installing windows for ventilation will lead to heat loss.
Cash costs are required for insulation and cladding (internal and external).
Insulation of the foundation of a bathhouse made of aerated concrete
Related video: Bathhouse made of aerated concrete
Publications on the topic
Review of popular brands of winter adhesive for aerated concrete
Self-construction of a foundation for a 4×6 bathhouse
Construction of floors in a house made of aerated concrete
Insulation of walls inside a bathhouse made of blocks
Insulation of a bathhouse made of expanded clay concrete blocks
Expanded clay blocks are an inexpensive and accessible building material. But its thermal insulation qualities are significantly inferior to those of natural wood, so a bathhouse built from expanded clay concrete needs insulation.
- Preparation for thermal insulation
- External insulation of the bath
- Facade
- Foundation
Internal insulation of the bath
Expanded clay concrete blocks have a porous structure and consist of sintered granular clay, cement and sand. Hollow and lightweight products containing a large fraction of expanded clay are used for the walls of the bathhouse. The insulation of enclosing structures is divided into external thermal insulation and internal. All walls of the bathhouse made of expanded clay concrete blocks are subject to external insulation, and internal insulation is required for the steam room to create a “thermos” effect in it. In this case, various insulation materials are used, the properties of which we will consider below.
Materials for insulating baths made of expanded clay concrete
Functionally, the bathhouse is intended for healing procedures, therefore all materials used for its construction must be of high quality and environmentally friendly. This also applies to insulation materials, whose action is aimed at maintaining a comfortable temperature in the premises. The negative impact of samples that are not resistant to its changes and emit harmful substances is greatly enhanced by the extreme “climatic” conditions of the bathhouse. Such materials are prohibited for use in such structures. Today, several excellent “qualities” claim to be insulation for bathhouses made of expanded clay concrete.
The interior decoration of aerated concrete bathhouse begins with the steam room. This room will need additional insulation. It is not recommended to use polystyrene foam for these purposes - this material has a low level of environmental friendliness. Mineral wool is also not worth taking. Its use is allowed in extreme cases. The ideal option is wood. But here, too, not everything is so simple: it costs more than other finishing materials, and besides, wooden cladding takes up a lot of space.
Taking into account the above, it is better to use foam glass for finishing the steam room. Its properties resemble polystyrene foam.
But there is one important difference: when exposed to high temperatures, glass does not become toxic. Foamed glass comes in the form of small tiles
In order to cover the steam room with them, you will need tile adhesive. It is also used as putty. There is no need to apply the glue in a thick layer, since the top will be covered with clapboard
Foamed glass comes in the form of small tiles. In order to cover the steam room with them, you will need tile adhesive. It is also used as putty. There is no need to apply the glue in a thick layer, since the top will be covered with clapboard.
Lining for room cladding
You should take a responsible approach to choosing wood for cladding. The greatest resistance to decay is inherent in coniferous species, but when heated they are capable of releasing resin. Therefore, it is better to use them when covering a dressing room or washing room. Of the deciduous species, oak has the optimal resistance; however, when wet, it becomes slippery. An important factor when choosing lining is the aesthetic side of the issue. Cedar, oak, and alder have rich, dark colors, while larch, hornbeam, and spruce are lighter in color.
Windows and doors in the bathhouse
It is advisable to make them wooden, for which pine or ash are suitable, and varnishing is allowed only on the outside, otherwise harmful fumes cannot be avoided. For the same reasons, it is not recommended to use polyurethane foam as a sealant; it is better to use natural materials, such as felt.
The windows in the bathhouse serve only for lighting, therefore, in order to reduce heat loss, they are made small and placed low.
Special attention should be paid to the door to the steam room - it should open exclusively outward and close only with a ball latch, so that it can swing open simply from a push or under the weight of the body if one of the visitors becomes ill. Dimensions are smaller than standard (to avoid waste of heat).
Electrical wiring in the bathhouse
When installing the electrical network yourself, you should not forget that in aerated concrete walls the cable, wound into a corrugated tube, is laid along grooves cut into the blocks. It is first recommended to carefully develop a layout of electrical appliances, as well as lighting points, sockets and switches inside the room.
According to the calculated power of lamps and other electricity consumers, it is necessary to select a cable of a suitable cross-section in order to avoid overloads and heating of the wire. Since the bathhouse is a room with high humidity, the insulation of the electrical network should ensure maximum safety, and sockets should not be located too close to the floor.
It is recommended to install a circuit breaker at the entrance of the electrical network to the bathhouse. It is also advisable to provide each wiring branch, in accordance with the diagram, with a separate fuse. This is a fairly important part of the work in installing electrical equipment, so if you can’t do it yourself, it’s better to invite specialists.