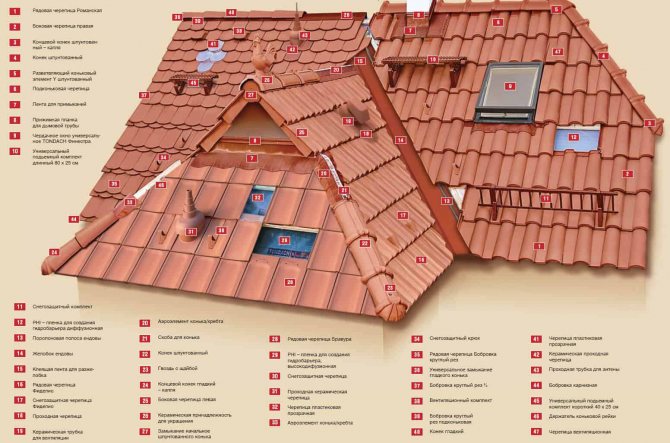
Base and sheathing
The rafter system of a tiled roof must be durable. The distance is determined by the design documentation, depends on the design load and the length of the rafters, taking into account the climatic region of the building, snow and wind loads, and the total weight of the roofing.
The greater the distance between the rafters, the thicker the sheathing beam will be needed. The recommended rafter cross-section is at least 50*150 mm.
Before installing the sheathing, the plane of the rafters is leveled: fluctuations in surface unevenness should be within the range of -5 to +5 mm per 2 m.
depositphotos
Laying waterproofing
A waterproofing membrane or film is laid on top of the rafters parallel to the eaves overhang with the front side (with the logo) facing up. The rolls begin to roll out from the bottom and move up without pulling tightly, leaving the membrane between the rafters to sag by 1–2 cm.
The size of the overlap of one roll on another is usually indicated by dotted lines on the film and is 10 cm. If the slope is steep, then the overlap is increased to 15–20 cm and the membrane is glued with double-sided tape.
The waterproofing materials are secured to the rafters with a stapler, and then with counter-lattice bars.
It is unacceptable to make cuts or tears in the film; folds are also undesirable. If the angle of inclination of the slope is less than 16°, then a solid base is made under the central tile, onto which a weld-on waterproofing is applied.
Installation of counter-lattice
A counter-lattice is mounted on top of the film on the rafters - bars 30 x 50 mm or 50 x 50 mm. They are nailed one after the other not closely, a distance of 5–10 cm is left between them for free air circulation and ventilation.
At the ridge, the ends of the counter-lattice bars from the two slopes are cut off and tightly joined.
Installation of sheathing
For the sheathing, bars 3–5 cm thick are used. The location of the first bar from the eaves depends on how much the tiles will hang over the drainage system.
The sheathing pitch can be from 31 to 35 cm, the exact value is indicated in the accompanying documentation by the manufacturer and depends on the angle of inclination of the slope.
To ensure uniform packing of the bars, it is recommended to make a template with a lathing pitch. At the junctions of the slopes, thickened sheathing is laid under the valley.
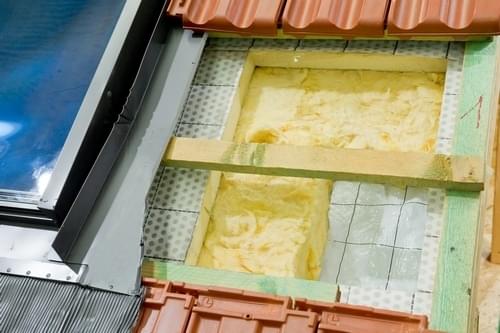
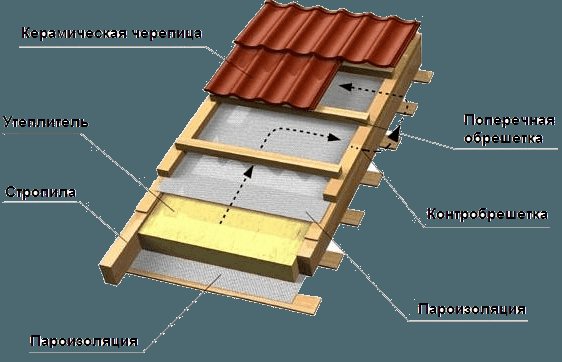
Composition of the roof tile roof pie
The roofing pie for ceramic tiles includes standard elements:
- waterproofing;
- thermal insulation;
- vapor barrier.
The waterproofing layer protects the roofing system and the under-roof space from precipitation and melt water. Thus, it is possible to avoid mold, fungal diseases, rotting wood or corrosion of metal elements. If the angle of the roof slopes is less than 22 degrees, a reinforced waterproofing and ventilation system is required.
It is recommended to use a rolled membrane as a waterproofing material. It does not allow water to pass through, but steam does pass through. Thanks to this, excess moisture from the interior is freely removed to the outside without condensation settling on the surface of the roofing elements. Calculating the amount of membrane is simple. The total area of the roof slopes, taking into account laying allowances, is multiplied by a factor of 1.4.
Installation of waterproofing is carried out from the top from the ridge strip down to the eaves. The rolls are rolled out along the ridge and eaves with an overlap of the next layer by the previous 10-15 cm. Additionally, allowances are left (they are cut off after installation of the roofing):
- 15 cm on gables and eaves;
- 15-20 cm – on protruding roof corners;
- in places where the roof covering adjoins the vertical elements of the roof: walls, ventilation shafts, antenna output, chimney.
The membrane is attached to the sheathing at the overlap points. You can use a special stapler for rolled materials or tape. Additionally, the membrane is fixed with tar paper nails or wooden slats around the perimeter and at the junction points.
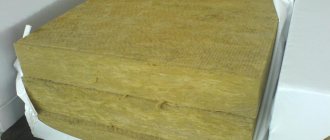
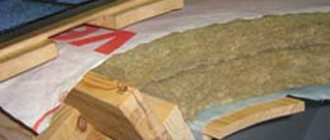
In any roof there are so-called “cold bridges” through which heat flows out of the house. To avoid heat loss, install a layer of insulation. There are many types of roof insulation. This can be expanded clay, polyurethane foam, polystyrene foam, foam concrete, foam glass, cellulose and basalt fiber insulation.
For private housing construction, basalt mats are most often used. Placed between rafters. To enhance the effect, you can put it in two layers. In this case, the second layer is laid so as to cover the joints between the mats of the first.
Do not allow the insulation to get wet. To prevent the accumulation of fumes from the interior, a vapor barrier membrane is placed on top of the mats.
Installation of drip
The cornice is the most visible place of the roof, important from a functional and decorative point of view:
- drainage is done here;
- the entrance of the ventilation hole for air intake into the under-roof space.
The metal drip is mounted on the eaves board, its total length is equal to the length of the slope plus 0.3 m on each side. The overlap of the waterproofing membrane onto the cornice is made at least 15 cm, it is left on top of the drip strip. An open ventilation gap is provided under the eaves board.
depositphotos
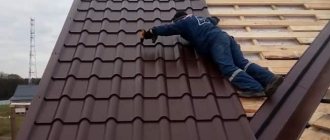
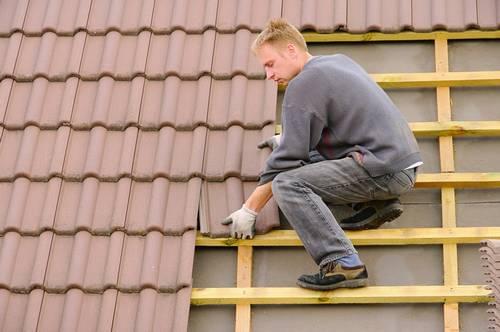
Installation of ordinary tiles
To distribute the load of cement-sand tiles on the roof during the work process, they are first laid out in 5-6 pieces, evenly placing the stacks along the slope.
Laying tiles in rows along the roof is done from bottom to top from right to left. The first and final rows of tiles are first laid out without fastening, and markings are made from them using a dye cord. Fastening is carried out using galvanized self-tapping screws into special holes, without tightening the fasteners until they stop.
Fastening with self-tapping screws to the sheathing is carried out only for those elements of the tiles that are located in the outer rows along the perimeter, as well as trimmed parts near the valleys. If the slope of the slope is steep (over 60°), then all the tiles are secured with self-tapping screws, regardless of their location.
Technology for laying ceramic tiles
As mentioned above, laying ceramic tiles is possible on slopes with different slopes; it is only important to comply with the general installation requirements, depending on the specific manufacturer.
- If the roof slope is 10°-15° degrees, when installing the tiles it is necessary to ensure maximum tightness and good drainage of rainwater. To do this, use rigid sheathing made of OSB boards or wooden boards, which are covered with roofing film or a roofing felt layer.
- If the angle of inclination exceeds 65° degrees, it is necessary to install a very stable and strong rafter structure, and laying the tiles is carried out by securing them with nails or wires to the sheathing slats. This angle of inclination is subject to certain risks, so it is necessary to consult a highly qualified specialist and the manufacturer of the selected coating.
The installation of ceramic tiles is carried out in such a way that the resulting coating becomes very rigid, but at the same time elastic - like scales that perfectly adapt to the shaped shape of the roof, various deformations or shifts in the supporting base.
Laying ceramic tiles
1 of 3
— +
1.
2.
3.
Ceramic tiles are a piece and very heavy roofing material. Depending on the type of tile, the weight of one element can reach 3.5-3.7 kg, and the total weight of a square meter of roofing ranges from 30 to 75 kg.
It is thanks to this massiveness that it remains very stable on the roof, creating an excellent soundproofing barrier.
The significant weight of the material provides a reliable rafter structure that can withstand significant external loads. When the choice is made, then at the design stage of the building construction, a significant strengthening of the rafters by 15-25% should be provided.
The finished roof structure covered with ceramic tiles is 5 times heavier than a metal roofing and almost 10 times heavier than a soft roof.
There is a special requirement for the wood used in the rafter system - this is ideal drying, which will avoid significant deformation of the roof during operation.
Roofing elements of ceramic tiles
Load calculation
Load calculations are carried out taking into account the specific angle of the roof, possible snow, wind and rain loads for a given region, further maintenance and the ability to withstand heavy material.
The roof structure used for ceramic tiles must withstand a load of at least 250 kg per square meter.
Keep in mind that when arranging a residential attic, additional load on the roof structure is exerted by: a layer of thermal insulation, plasterboard, which is used as cladding, and roof windows.
It is generally accepted to install this roof on a rigid base, so the board cladding must have adequate strength. When arranging a residential attic, they use cladding made of boards covered with a layer of waterproofing film or super-diffuse membrane.
Roofing pie for laying ceramic tiles
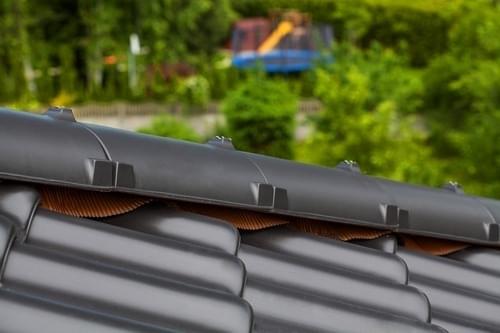
Arrangement of the valley
Waterproofing at the junction of the slopes is done more carefully: first, a roll is rolled out along the gutter from top to bottom, then the film rolls are overlapped from one slope to another.
In addition to the main lathing, two more types of it are packed on top of the film:
- diagonal sheathing - along the valley gutter;
- rapid - parallel to the main one.
Aluminum valley elements are installed along the gutter from bottom to top with an overlap of 10 cm and are attached to wooden blocks using staples. Foam rubber seals are installed along the valley elements.
depositphotos
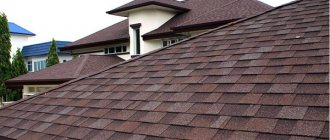
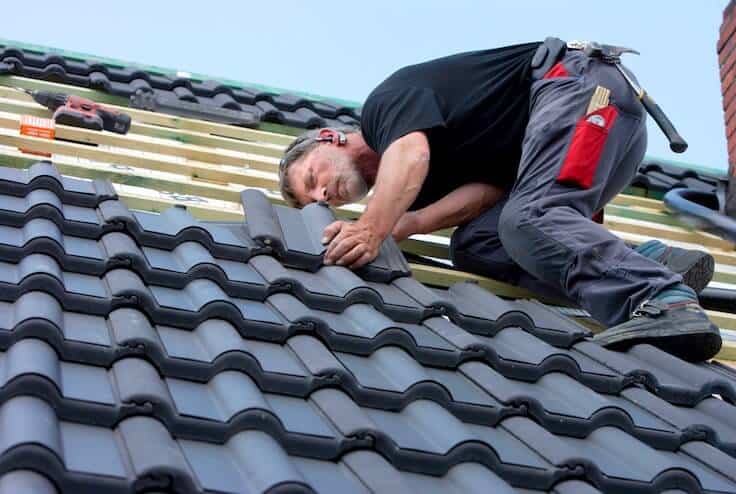
Laying natural tiles
Installation of natural tiles is done from right to left and from bottom to top, but first the top and bottom rows are laid out without fastening. The outer tiles should lie flush with the front board; if this does not happen, then it will be possible, knowing about the problem, to correct it due to a slight play at each of the joints. For ease of installation, vertical lines are struck every 3-4 tiles.
The first row of tiles is attached to the sheathing with galvanized steel screws and clamps. On triangular slopes, the bottom row must be laid out first, and then the vertical row in the center. It is better to cover gable overhangs with special side tiles, and use additional fasteners on complex units. In this case, a roof made of natural tiles will delight you with its impeccable appearance and reliability for at least 100-150 years. Ridge tiles are laid using special fasteners, which are fixed to the ridge beam. Aeroelements must be used, thanks to which the ventilation of the under-roof space will be impeccable.
Ridge formation
Ridge elements of cement-sand tiles are installed after completion of all other types of work.
Special holders are mounted on top of the connection of the slopes, and in them there is a ridge block, which is covered with insulating sealing tape with ventilation holes. Then the ridge tiles are sequentially “fitted” onto the beam.
The individual ridge elements cling to one another using special clamps, which are attached to the beam with self-tapping screws. The end caps are fixed with stainless steel self-tapping screws.
Compliance with the installation technology of cement-sand tiles will ensure the durability of the roof and save it from leaks.
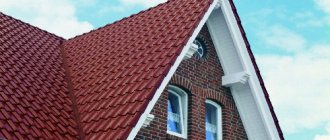
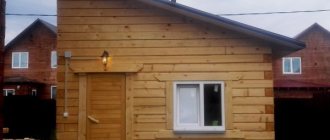
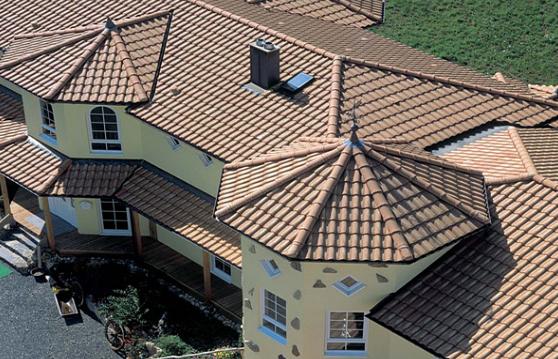
Tile roofing
The versatility of a tiled roof lies in the fact that it protects from bad weather and decorates both an administrative building or a multi-storey building, as well as individual buildings. It looks great on both gable and multi-gable roofs.
Another equally important feature of a tiled roof is its rigid and at the same time elastic coating, which hides errors in the roof structure and does not create stress during deformation and settlement of the building. In addition, it requires minimal maintenance since the coating remains unchanged for a long time.
The main disadvantage of ceramic tiles is their heavy weight compared to other types of roofing coverings. But if you install sufficiently strong rafter structures, the disadvantage will be eliminated.
Frankfurt tiles
In connection with the introduction of new technologies, tiles made using the BRAAS technology - strong and durable Frankfurt tiles on a cement-sand base - have gained great popularity.
The service life of tiles is at least half a century, and practice has shown that this is not the limit. In Russia, such tiles are produced by the Moscow plant BRAAS-DSK-1. When selling these tiles, a guarantee is given for 30 years, and if during this time a defect is discovered, it will be replaced immediately, thereby confirming confidence in the quality of their products.
There is a widespread belief that laying a tile roof is too complex and time-consuming work. But in fact, laying a metal roof made of smooth galvanized sheets is difficult. To manufacture it you need a highly qualified roofer. And roofing made from piece materials does not require highly qualified workers and is therefore not difficult. The main thing is to follow the roofing technology.
Procedure for laying a tiled roof
When starting to work with a mansard-type roof with insulation, first of all, you need to cover it with a waterproofing film, and the film should sag by 20-30 mm to drain the condensate. To secure it correctly, it is spread along the roof and secured to the rafters with slats. The thickness of the slats is selected at the rate of 40–50 mm. For complete ventilation of the under-roof space and rafter structure. This is the basic rule when installing an attic roof.
Then sheathing bars are fastened across the slats, on which the tiles are laid. The first block is nailed at the very ridge of the roof, the second is the lowest block at the eaves board, which is made thicker than the rest or an additional 15 mm is nailed. rail. This operation is necessary to ensure the same slope of the tiles of the first and subsequent rows. The ends of the bars are not cut until the first row of shingles is laid. The laying of tiles begins from the bottom row of the roof. This row is laid so that it hangs 25–40 mm behind the cornice board, leveled and secured with galvanized nails. The remaining rows of tiles are laid from right to left. If the roof slope exceeds 45°, all tiles are secured with nails.
After laying the first bottom row of tiles, the second row is laid, and the distance from the outer edge of the eaves board to the top edge of the second row must be at least 350 mm. And the lagging distance, depending on the slope of the roof, is divided so that the sheathing pitch is 320–375 mm.
Installing the bars allows you to determine the number of tiles needed. For example, if a roof with a slope of 45° and a slope length of 6320 mm has a pitch of 375 mm, then this will require installing 16 rows of tiles (6320–350 mm - (25–40) mm = 5930:375 mm = 15, 8 rows). With a useful width of horizontal tile spacing (with overlap) of 300 mm, 9 pieces per square meter will be required. Practice has shown that in this case it is better to add another row to the horizontal rows, and for convenience you need to make the width of the slopes a multiple of 300 mm.
You can lift the tiles onto the roof in different ways, but you need to lay them across the entire width of the slope in stacks of 6-8 pieces, alternating horizontal bars every other time, to ensure uniform pressure on the rafter system.
If you want to make sure that the roofing sheet is square, you need to take diagonal measurements in advance. Otherwise, problems may arise with the outermost tiles in the rows.
To add elegance to the pediment, you can purchase a shaped row of tiles. It will help close the gap between the board and the row tiles.
Special places
Kinks
Bends are the projections and depressions of the roof, all kinds of passages. If such a situation arises, the tiles are first laid on one side of the bend, then the overhanging part of the tile is cut off with a grinder exactly along the bend line. The tiles are fastened with nails at the bend points.
Valleys
The base for the valley is well strengthened. An additional central and two side rafter supports are added, plank flooring and waterproofing are made on them. On top of this entire structure is covered with a profile tin flooring. The tin needs to be secured to the side posts, the groove overlaps from bottom to top. These connections must be coated with mastic or sealant.
The edges of the tiles are cut exactly along the groove line and secured with nails. To make it easier to install tiles in such places, you can purchase special tiles shaped for valleys. Its cost is higher, but in this case it justifies itself.
Ridge elements
The roof is crowned with ridge elements. They are installed along the upper edge of the roof and in places of kinks. To install them, 25 mm thick ridge boards are pre-attached so that the ridge tiles sit tightly on the board itself and lie on the adjacent tiles. The overlap of the ridge elements is about 60 mm. The wavy gap between the smooth edge of the ridge and the tiles is covered with a special sealing element. At the end of the ridge, shaped end tiles are installed.
Passages
As a rule, ready-made elements are usually used to install passages in the tiled covering: pipes, antennas, ventilation passages, etc. They increase the reliability of the roof and do not spoil its appearance.