Everyone knows that the Finnish sauna is good for health, as well as the fact that the steam in it is dry and the temperature is very high, reaching 100 degrees. For most people, this knowledge is quite enough, but not for those who are planning to make a bathhouse or sauna on their own site with their own hands. Therefore, next we will look in detail at the design of a Finnish sauna.

Finnish sauna steam room
>
Stage 1. Selecting a suitable location
Where to build a sauna
A sauna can be installed in any available room that meets the following requirements: ventilation, low humidity and no drafts. This can be a separate room (small building) or a room in a residential building.
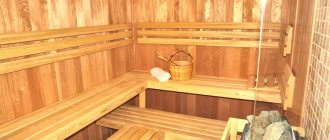
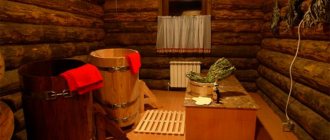
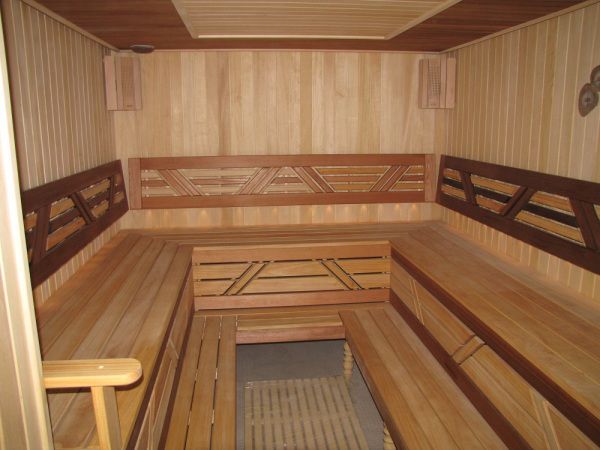
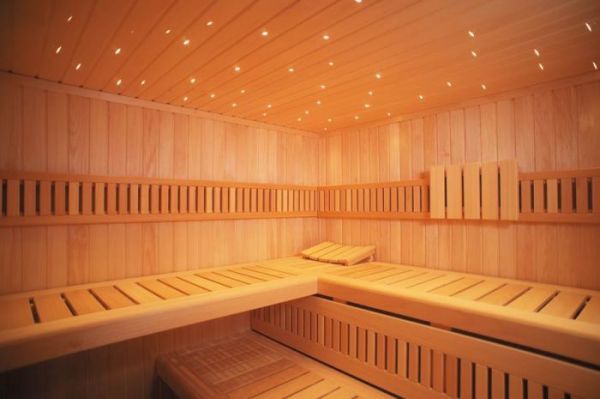
Sauna interior
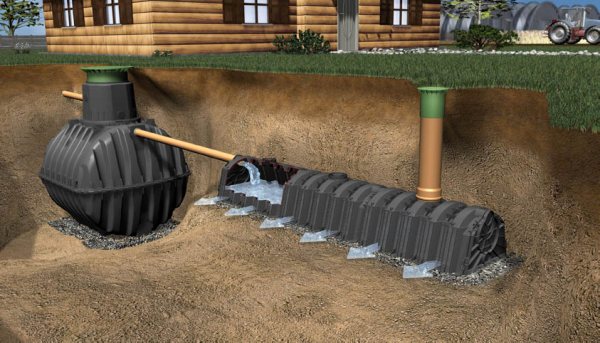
If the sauna will be built separately (and this is the option discussed in this article), then the location should be chosen so that you can dig a hole for a septic tank.
Below are the characteristics that a proper sauna should have.
- It must have a tiled floor and separate wiring (if we are talking about heating using an electric heater) or a chimney (if you plan to use a wood-burning boiler). Wet tiles are very slippery, so to avoid injuries, you need to place wooden boards or grates on the floor, which will be taken outside to dry during cleaning.
Sauna interior - Suitable cabin sizes are determined based on 2.5 m³ per person.
- The dressing room should have a small table, a hanger and benches. If the sauna will be used all year round, then there is also a heating device.
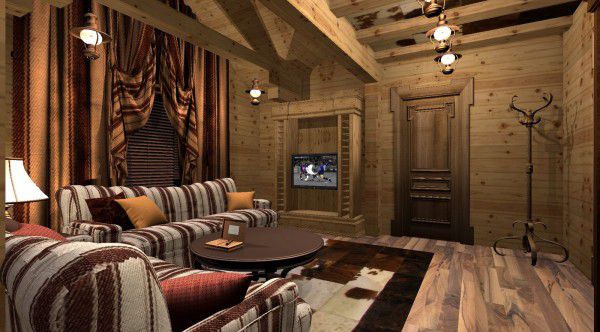
Rest room (dressing room) - Shelves for taking procedures should be equipped in the form of steps, each 0.5-0.7 m wide.
Dimensions - The main heating device, as noted earlier, can be wood or electric.
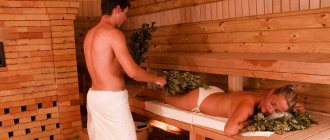
Note! The sauna differs from the traditional Russian bath only in its low air humidity (10-25%). There are no other fundamental differences - steam is produced by moistening the stones, brooms are often used, and the “apogee” of bathing procedures in both cases is a jump into a snowdrift or a pool of cold water.

Sauna interior
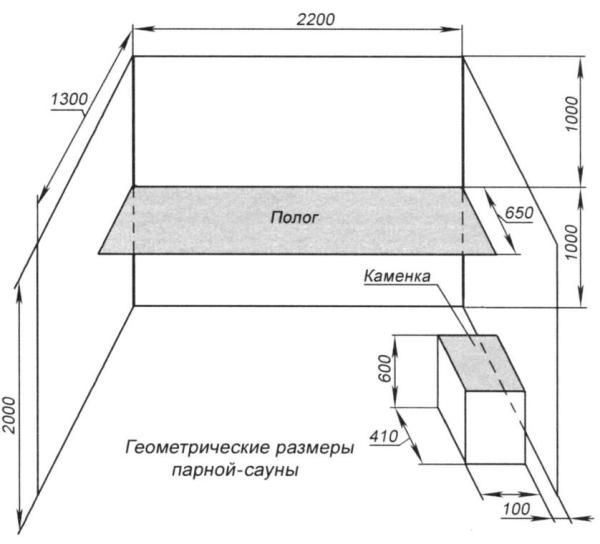
About the size of the steam room
The steam room should be comfortable and, most importantly, safe. Each visitor must have a minimum of 2.5 m³ of space. The height of the room should be 2.5-2.6 m. For wall cladding, dry absorbent wood (for example, pine or poplar) without knots is used.
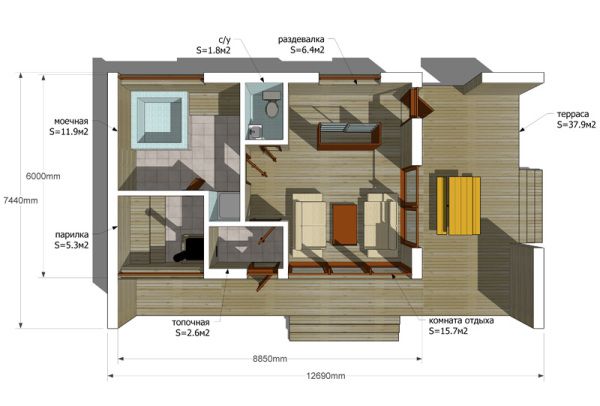
Project of a sauna with a terrace. 81 m²
Shelves (at least two) should be located at a height of 40 cm, with the top one installed no higher than 1.4 m from the ceiling. Metal elements and fasteners are excluded, as they can cause burns.
Note! The volume of the steam room should not exceed 40 m³. At least that's what experts say.
If we assume that one person will steam in the sauna, then its total area (including the washing room and changing room) will be 10 m². The heating element will be an electric stove - an electric heater.
About materials
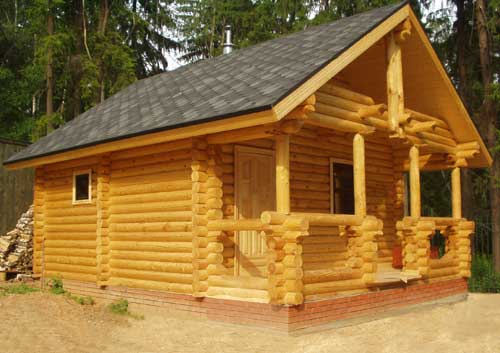
Sauna made of timber
For construction, you can use brick, timber or even metal (a metal frame is built and covered with siding). The inside of the room is lined with boards or clapboards. Regarding wood species, the best option would be alder or linden. Of course, conifers are cheaper and smell nice, but when exposed to high temperatures, they release resin.
The sauna is lined with linden clapboard
Prices for various types of timber
timber
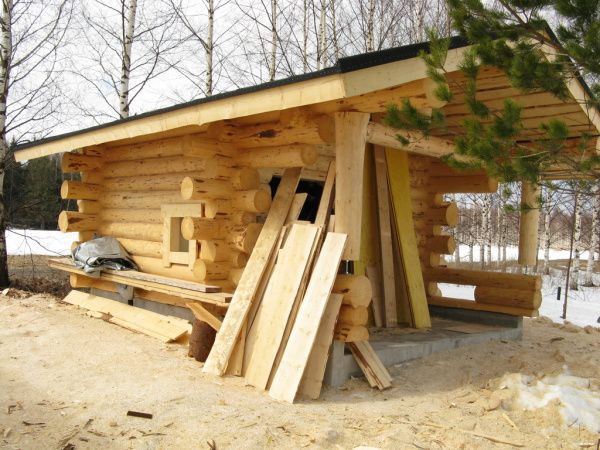
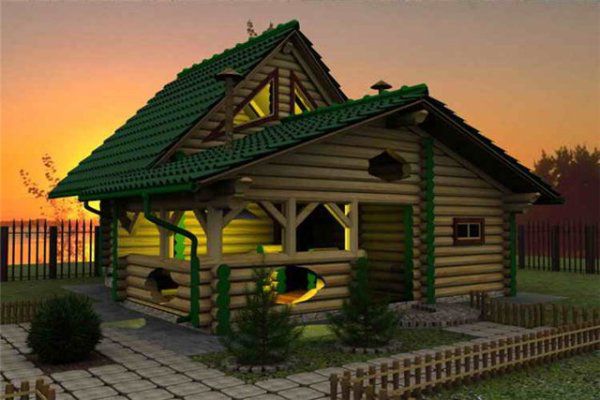
We build a Finnish sauna with our own hands
The photo shows the sauna as a separate building, but an option built into a residential building is also possible
Although it is necessary to make a clarification here.
Russian bath is:
- At least 2 rooms - a washing room and a steam room, but many projects necessarily include a dressing room;
- A powerful oven that provides not only a sufficient amount of wet steam, but also hot water;
- Hence, an area of at least 15 square meters (the most common minimum size is 3 by 5 meters; there are many smaller options, but there you have to obviously give up something);
- Hence the massiveness, which means increased requirements for the foundation;
- Well, and, of course, a separate structure that must meet the requirements of building codes and regulations in relation to other buildings on the site: At least 4 meters to the nearest buildings;
- At least 1 meter to the fence and nearby green spaces;
- At least 3 meters to the edge of the roadway behind the fence.
At the same time sauna:
- There is only one room, which means it can be larger and more comfortable than a washing Russian bath;
- The sauna uses a large amount of dry steam and this is the main purpose of the heater; you don’t need a lot of hot water, hence the simpler and cheaper design;
- A sauna area of 9 sq.m (3 by 3 m) is already a lot, so it can be integrated into the overall design of a residential building.
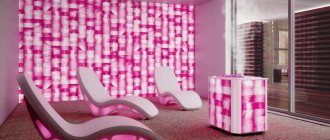
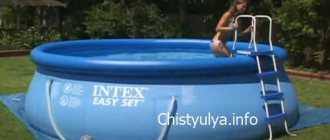
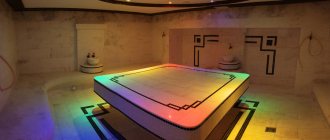
Perhaps you will be attracted to build a sauna with your own hands according to the Turkish model - it is not so hot here, but there is a lot of water
Helpful advice! When we talk about a sauna, we primarily mean the Finnish one with its hot steam. If you are not too fond of this way of relaxing and taking a bath - framed by thick and hot steam, we advise you to pay attention to the Turkish sauna. Here the main emphasis is on moisture, a lot of water, not so hot, tiles dominate the design and hence sterile cleanliness.
The principles of constructing a sauna are very similar to the principles of constructing a bathhouse - the same choice of materials, the same care for the foundation and drainage.
Materials
When talking about materials, the type of wood for the interior upholstery and its quality are selected. Among the species at your disposal are hardwood and coniferous lining. For use in saunas, only hardwood is recommended.
So:
- oak - it provides strength and resistance to fungi and mold, but may seem too expensive;
- linden is the most common species for saunas due to the healthy atmosphere that linden creates inside;
- aspen - it is rarely used in saunas, as it loses color very quickly; aspen is very resistant to constant exposure to water, but there is never too much water in a sauna;
- alder - along with linden, seems to be specially created for saunas; alder is durable, very resistant to mold, and has healing properties;
The lining already structurally has very convenient joints at the ends of the panels, which makes assembly extremely simple and fast
- ash - it can easily compete with oak lining in terms of its strength, but it is much more convenient to process and has a softer and lighter color.
But coniferous species - cedar, larch, pine, spruce - despite a lot of very attractive features, are not recommended for use in saunas.
The fact is that even after processing they retain a significant amount of resins, which at elevated temperatures will come out, and this is:
- the danger of simply getting burned when touched, and
- The danger of slipping is unacceptable for saunas (and baths, by the way, too).
Quality
The quality of the lining is divided into 4 classes:
- “Extra” (also called “Premium” or “Zero”) - maximum quality, when you do not find a single knot on the board, its color is necessarily uniform, and there is no remaining core of the original material;
- “A” - this class allows only one knot per one and a half meters of board length, but the color is still uniform without any deviations;
- “B” - here the quality is noticeably worse - 4 knots per 1.5 meters, cracks, contrasting color stains and spots are acceptable;
- “C” is the lowest quality with chips and cracks; such lining is not for saunas.
Profile view
The profile of the lining is a very important characteristic of it. A smartly selected user-friendly profile can significantly reduce construction time.
The construction market mostly offers 5 types of profiles, which are considered the most successful and reliable:
- Euro (example “A”) - this is the European standard, it has a special groove for draining water and an increased depth of connections;
- Soft light (“B”);
- Calm (“C”);
Choosing a convenient lining profile is the most important condition for assembling a sauna interior
- Tenon - groove and chamfer along the entire length (“D”) – the chamfer is increased along the entire length of the connection, which significantly increases its strength;
- Tenon and groove along the length (“E”) – no chamfer.
Stage 2. Preparing consumables
Let’s make a reservation right away that it’s not worth saving on building materials, because in the future all costs will be more than recouped by an attractive appearance and a long service life. The general list of materials and tools will look something like this:
- support pillars (the described structure will be built on a columnar foundation);
- timber 10x15 cm;
- garden auger;
- slats 6x4 cm;
- mounting level;
- roulette;
- nails or screws;
- septic tank;
- primer mixture;
- sand, crushed stone, concrete mortar;
- glassine;
- cladding boards;
- Styrofoam;
- foil for vapor barrier.
After preparing everything you need, you can start working.
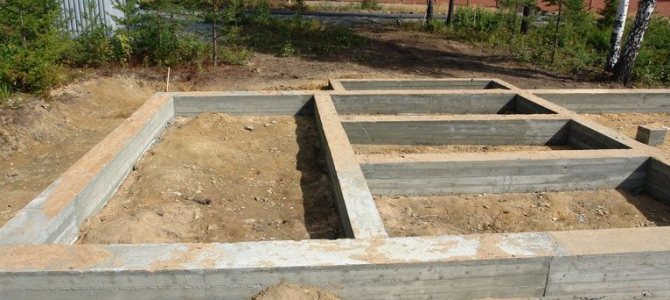
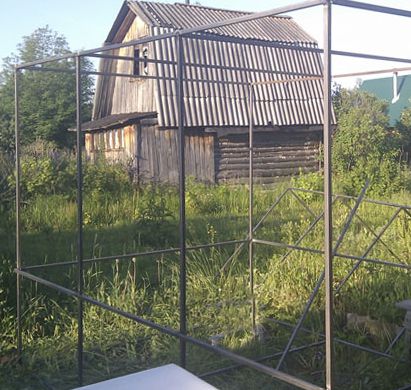
Stage 3. Foundation
Step 1. First, the location chosen for construction is marked. A peg is driven into the intended corner, and the distance to the next corner is measured from it. Two more corners are designated in a similar way - the result should be a regular rectangle. A rope is stretched between the pegs, after which racks are placed in the corners and along the perimeter of the walls in increments of 2 m. Also, racks are installed under load-bearing walls.
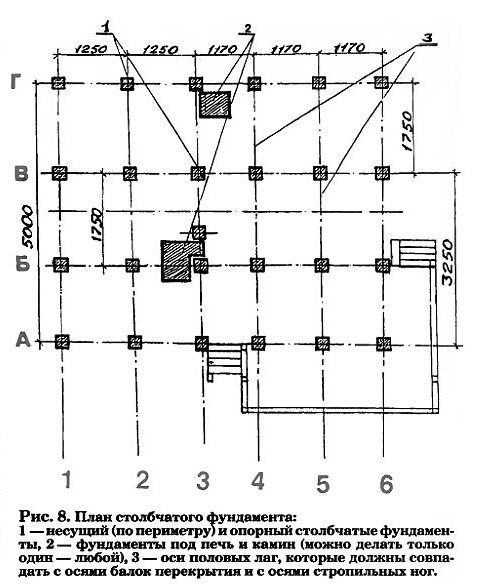
Foundation plan
Using a drill, holes are made for the racks - for an ordinary wooden sauna, 40-50 cm will be enough.
Step 2. At the same stage, the place for the drainage hole is prepared. The dimensions of the pit are determined by the dimensions of the septic tank (if one is not provided, then a 1x1 m pit 1.5 m deep is simply dug out).
Step 3. Both metal pipes and ordinary logs can be used as supports. If a tree has been chosen, it must be dense (ideally pine). The surface of the logs should be treated with bitumen mastic to prevent rotting, and then allowed to dry thoroughly.
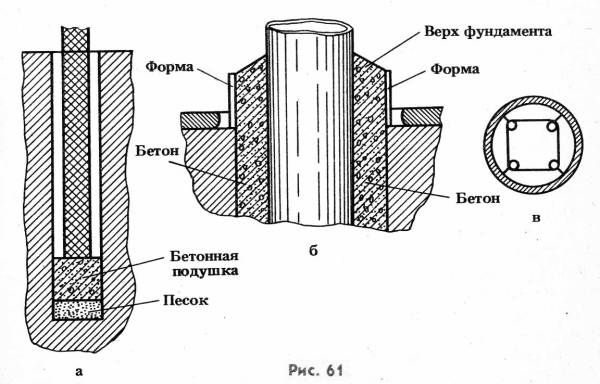
Columnar foundation
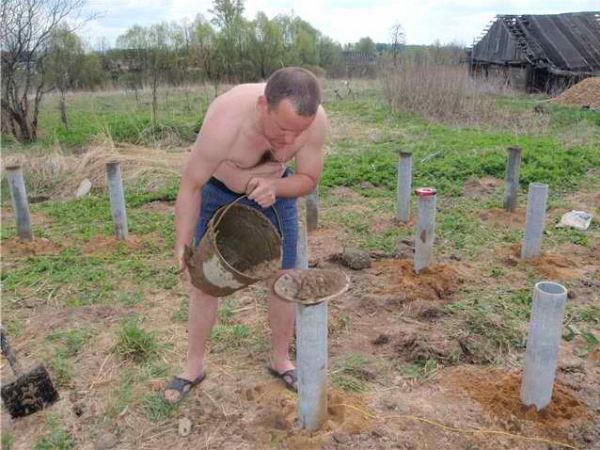
If pipes are used, they are first treated with an anti-corrosion primer. The holes are filled with a 10-centimeter layer of crushed stone, after which the racks are installed and leveled using a plumb line. The holes are filled with earth (preferably mixed with sand), periodically moistened with water to further compact it. The earth is carefully compacted.
Step 4. The upper part of the support pillars is covered with roofing felt, on top of which beams with a rectangular cross-section are laid along the entire perimeter. The beams are attached to the supports using brackets. In the inner part of the perimeter, additional beams are installed parallel to each other in increments of 25 cm. These beams will serve as the base for the floor covering.
Columnar foundation
Construction of a columnar foundation
Construction of a columnar foundation
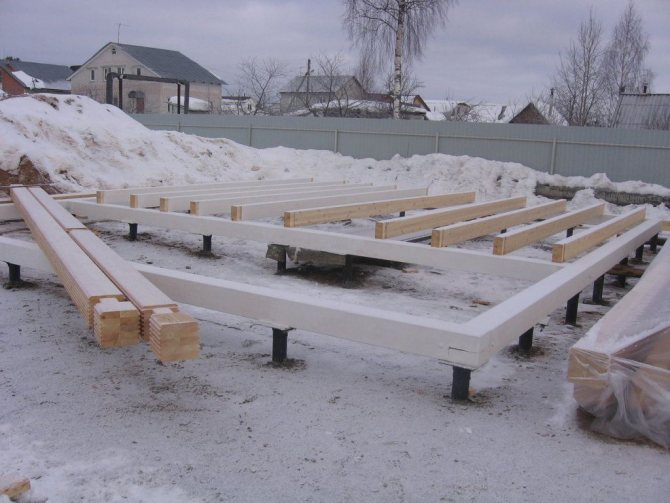
Grillage - timber
Note! Instead of beams, you can put a reinforcing lattice, then build formwork and fill it with concrete mortar.
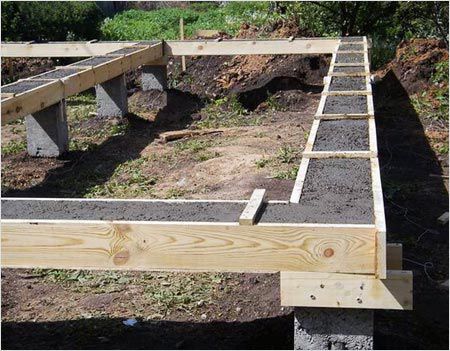
Monolithic grillage
Grillage schemes
Construction of a monolithic grillage
A grillage is a framework of slabs or beams that connects support pillars to each other above the ground. This is the best option for a frame sauna, which, depending on the material used, can be:
- concrete;
- metal;
- wooden (rare);
- W/B.
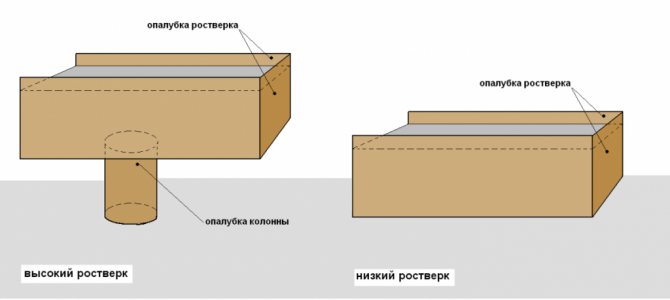
Grillage construction
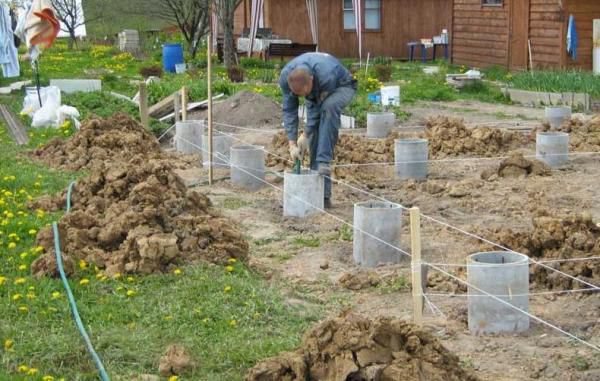
A grillage foundation can also be built using ready-made pillars driven in using special equipment. In this case, the pillars (necessarily of a round cross-section) are inserted into the ground using a mounting drill, and a 30-centimeter sand “cushion” is first laid under them.
Columnar foundation with grillage
Columnar foundation with grillage

Columnar foundation with grillage
Note! The simplest version of a grillage base looks like this: the pillars are deepened by 2 m in increments of 3 m, while the grillage should be approximately 20 cm deep in the ground. Inside such a base, you can additionally install a subfloor on a concrete screed or a “cushion” of sand - in this case no need for waterproofing.
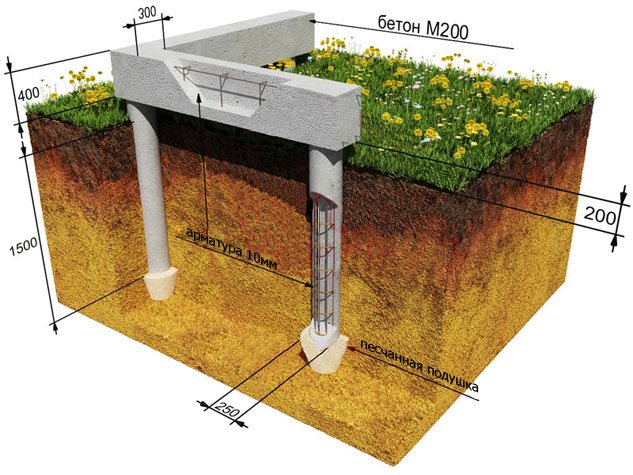
Step 1. After geological exploration, a sand “cushion” is formed, which is necessary to strengthen the foundation.
Step 2. Next, the usual formwork is constructed (as for a strip-type base). If the formwork is permanent, then the “container” in this case will be slabs of extruded polystyrene foam. As a result, the structure will be thermally and waterproofed.
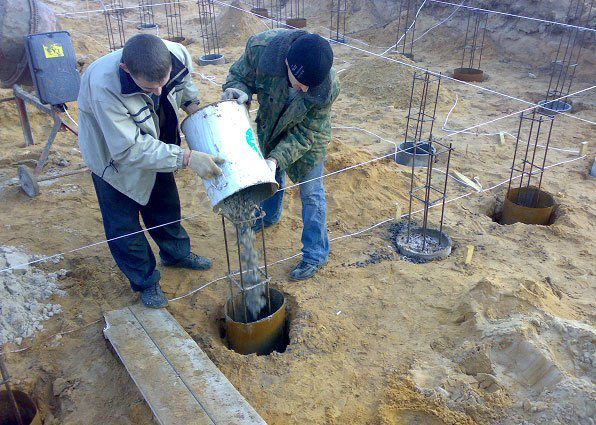
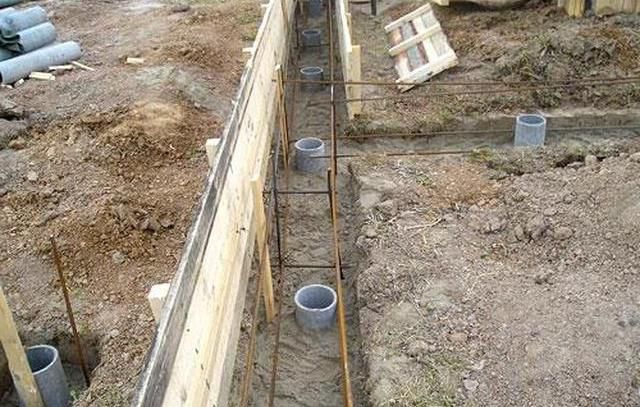
Step 3. Holes for the piles are drilled using special equipment. Next, they are lined with roofing felt (or any other material with similar properties). Asbestos-cement pipes can also be used as casing.
4 reinforcing rods are placed in each hole and tied in such a way that the upper part of the reinforcement is connected to the grillage. After this, the holes are filled with concrete.
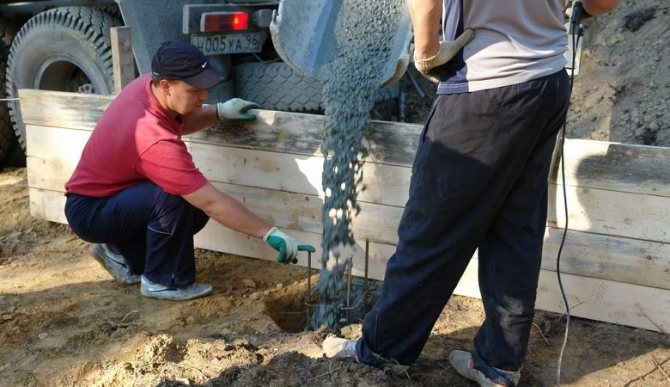
Filling holes with concrete
Step 4. After pouring, the upper part of the pillars is covered with waterproofing material. The reinforcement coming out of the ground is connected to the grillage reinforcement to raise the structure above the ground and level the bottom of the formwork along the piles. Then the formwork is filled with concrete.
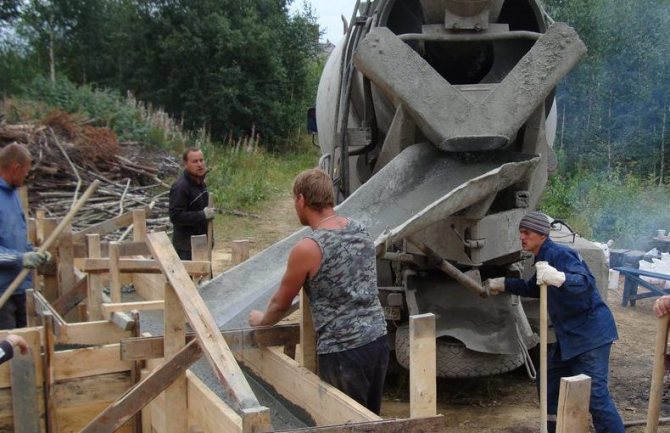
Pouring the grillage
Note! The only drawback of this design is that it is not suitable for heavy walls. Although for a frame sauna its strength is quite sufficient.
While the concrete is drying, it is better to sprinkle it with wet sawdust.
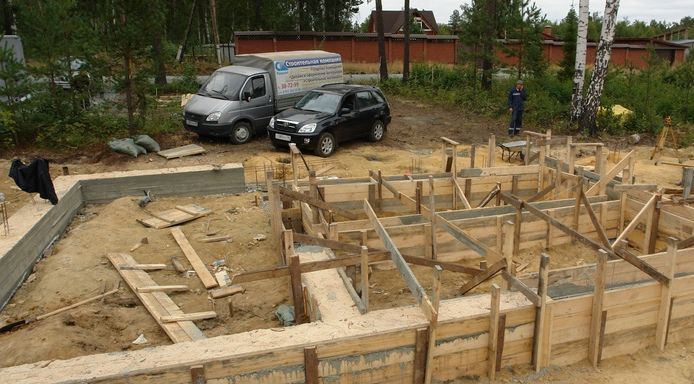
Ready-made foundation with a monolithic grillage
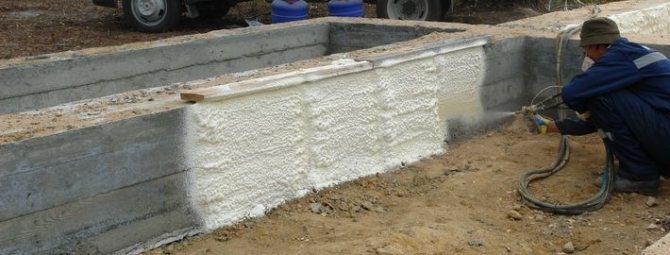
Insulating grillage with foam
Stage 4. Sewerage
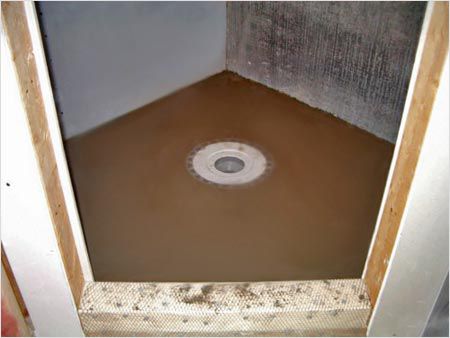
The steam room and washing room require a wastewater disposal system. To do this, at the lowest point (and the floor, as we remember, should be on a slope), a small gap will be left, under which the gutter will be laid. If the floor is slotted, then a 5-centimeter gap is left in the appropriate place, under which a concrete base is constructed with a slope towards the center. The base will serve to collect wastewater.
Sauna drainage
Note! If the steam room and washing room are separate, then the gutter can be installed under the wall between them.
Regardless of the chosen method of flooring, the installation of the sewer system proceeds as follows.
Step 1. Before laying the flooring, sewer pipes should be laid. To do this, ditches are dug with a slope of 2 cm/1 linear. m depth from 55 cm to 60 cm.
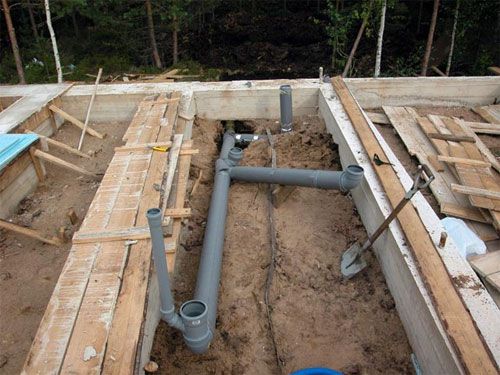
Example of laying sewer pipes
Step 2. Then the bottom is covered with a 15-centimeter sand cushion, which is compacted taking into account the slope.
Step 3. Polypropylene pipes ø10 cm are laid. A gutter is connected to the pipes.
Step 4. Plumbing fixtures (sink, toilet) are connected to the system, if provided.
Drainer
Note! The gutter can be a plastic or asbestos-cement product. Wood was used in the past, but for obvious reasons it quickly deteriorated. The minimum diameter of the gutter is 5 cm.
From the outside, the system is connected to a sewer pit or septic tank.
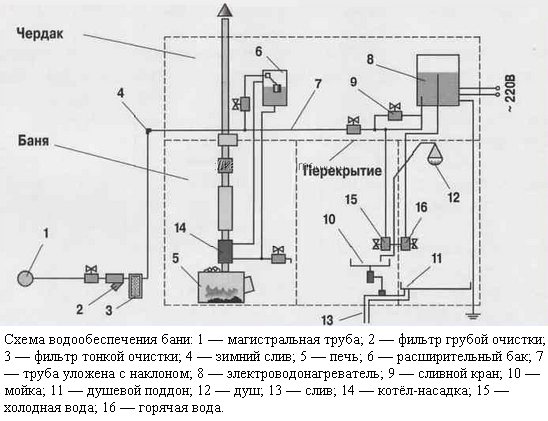
Example of water supply
Hot stoves “hugs”
The electric stove heats the sauna perfectly. The larger the area of the steam room, the more powerful it should be. It is believed that a small cabin with a volume of 1.2-2 m3 can be fully heated by a 2 kW oven. For a family sauna with a volume of 7-12 m3, you need a stove with a power of 8 kW. Let us note in this regard that before purchasing a stove from 6 kW, the home owner must connect to a three-phase network (380 V). By the way, heaters with a power of up to 8 and 9 kW are designed for both 380 V and 220 V.
A wide range of electric heaters allows you to choose a model that can create the desired atomosphere in the steam room, from “hot” with high temperature and low humidity to “soft” with low temperature and high humidity.
All electric heaters can be divided into two groups: with a built-in control panel; with remote electronic control panel (included in delivery).
An effective air circulation system ensures quick and even heating of the sauna. The furnaces use heaters (heating elements) of open and closed types. The second option is more convenient to use; the burning heating elements in them are easy to replace. Let us add that these heating elements are designed specifically for saunas: they do not burn oxygen, do not heat the body, and are equipped with an automatic shutdown system designed for emergencies.
The stove is not always installed where you want it, but where it is rational. In the center of the sauna, the stove will disturb everyone; it is unsafe to pull the wire through the room. It’s better to put it against the wall, or even better in the corner closest to the door. The heater must have thermal protection for fire protection purposes. This role can be played by a screen made of stainless or low-carbon steel, a wooden grid with antipyrene impregnation, so as not to get burned.
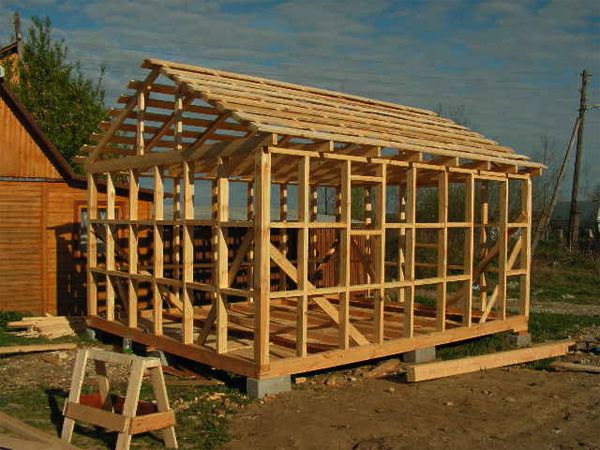
Stage 5. Frame
Building a brick sauna requires considerable experience and skill, so it will be easier to build and plank a wooden frame. After laying the thermal insulation material, the sauna will be in no way inferior to a brick one. In such cases, profiled timber is often used.
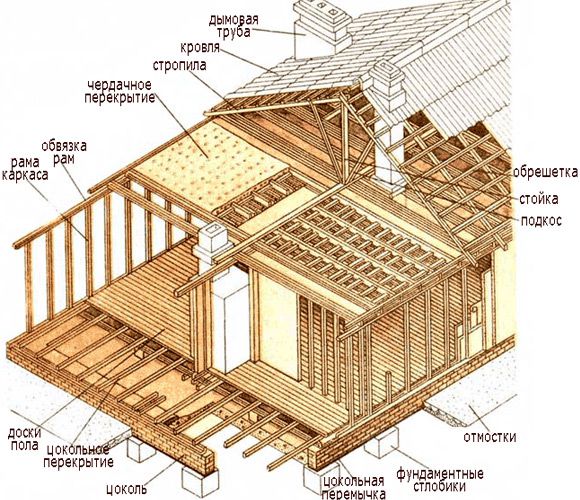
Components
Step 1. First, support beams are installed in the corners - they are secured with spacers, aligned and fixed to the base with iron brackets. Then, from above, along the entire perimeter, the supports are connected by bars. Intermediate bars are attached vertically (in increments of 1 m), they are connected with iron brackets from below and above.
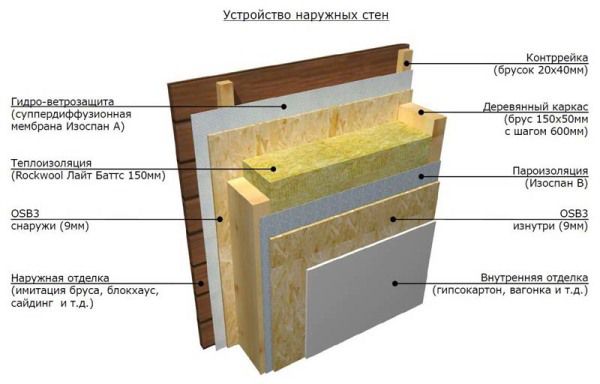
Construction of an external wall
Window and door frames are fastened in appropriate places, after which transverse slats are nailed to make the structure more secure. In each corner, braces are installed that “look” in opposite directions.
Frame
Step 2. Take boards 3 cm thick and cover the finished frame with them. You need to start work from below, from one of the corners. The first board is applied to the beams, leveled to the ground and corners, and then nailed.
Technology of construction of walls and ceilings
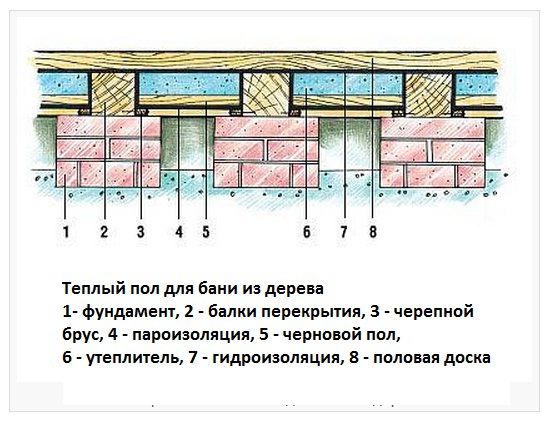
Scheme of an insulated wooden floor
Note! You should not start attaching the boards from the center of the span - they need to be leveled along one of the vertical supports.
Step 3. The rafters are sheathed last. There remains a small hole in the roof for the chimney pipe.
Frame
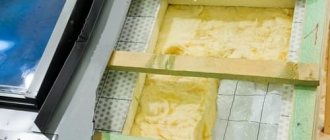
Stage 6. Thermal insulation
Thermal insulation
Ceiling insulation scheme
To insulate the ceiling and floor, 10-centimeter thick foam is used. First, the boards are covered with plastic film with an outlet of 4-5 cm. Foam boards are mounted between the logs, and the gaps are filled with polyurethane foam. Then you can use one of two options:
- lay a wooden floor;
- Fill the insulation with screed and lay the tiles.
The second option is preferable, because the tiles are easy to clean and are not sensitive to high levels of humidity or temperature.
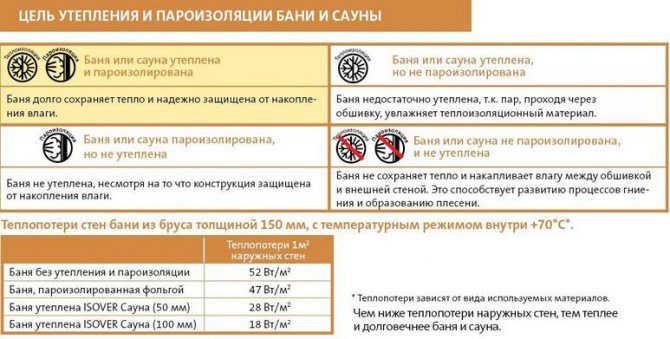
The purpose of sauna insulation
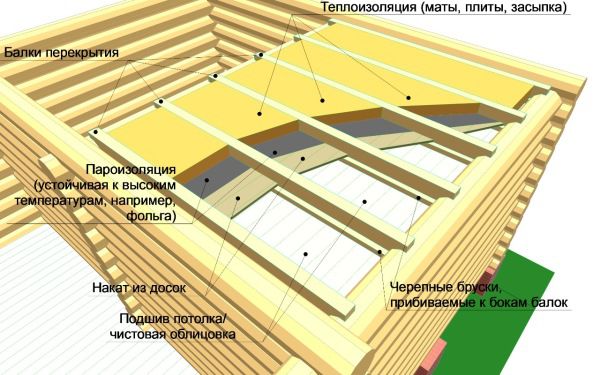
Ceiling insulation is carried out according to the standard scheme:
- foam is inserted between the joists;
- the gaps are filled with foam;
- The vapor barrier material is attached using a stapler (foil side up).
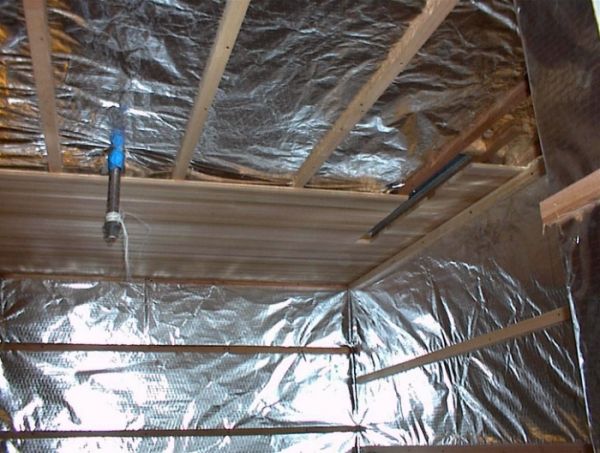
Vapor barrier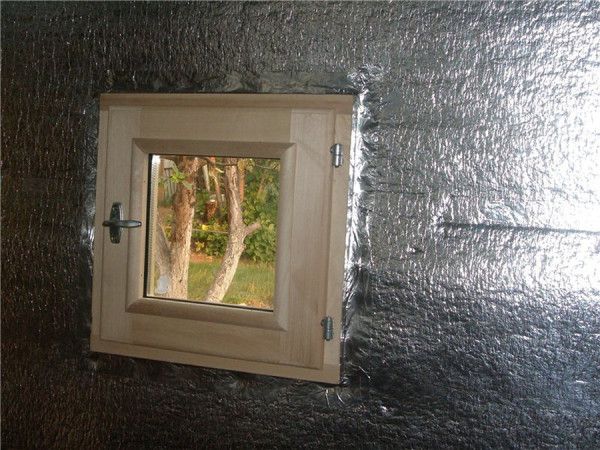
Vapor barrier
All that remains is to lay the wiring and cover the walls and ceiling with clapboard.
Prices for thermal insulation materials
Thermal insulation materials
Video - How to select and secure lining
Note! If electricity is required only for lighting, then 2 kW is sufficient. But if you plan to connect household appliances (washing machine, hair dryer, etc.), then the wiring power must be at least 5 kW.
Without a hitch
In recent years, the panel sauna has become most popular. Its walls are a load-bearing wooden frame, usually covered with clapboard. In addition to the lining, you can take ready-made panels from tongue-and-groove pine slabs 16-25 cm thick, which should be free of knots, cracks, wormholes, and resin drips. If you like a rustic look, shiplap the frame with raw-edged edged pine boards. The sheathing is secured with nails or obliquely into a tongue and groove, or with a countersunk head; they must be driven into the wood using a hammer so that the heads “do not protrude.” For wood rich in tannins (oak, alder), galvanized nails are used; ordinary steel nails quickly rust.
Cladding with clapboard can be either horizontal or vertical. Manufacturers advise choosing the first type, especially outside the frame. The reasons are as follows: Each board has its own temperature zone. Between the floor and the ceiling the temperature “scissors” are from 40 to 120 C, and horizontal installation reduces warping of the lining, which, moreover, “breathes” but does not “suffocate”. With vertical cladding, moisture is absorbed through capillaries from the end of the board into the dry wood, which, starting to swell, after a short time rots, changes color, and emits an “odor.”
Might be interesting Mobile saunas: a new way to enjoy the steam room
The horizontal joint allows the bottom boards to be quickly replaced if required. It also ensures structural rigidity. Whatever material you choose for sheathing, remember; The interior surface of the sauna is not painted, varnished, or waxed! And this is understandable. Otherwise, when heated, harmful reagents are released (and the wax simply “floats”), and the paint does not allow steam to pass through.
It is recommended to cover the outer wall with drying oil and paint it to protect it from rotting. By the way, cabin models are already being produced, the outside of which is sheathed with parts made of acrylic or pressed wood chips.
Stage 7. Arrangement
Particular attention should be paid to the installation of the electric heater. For safety and uninterrupted operation of the system, the device must be installed on asbestos-cement slabs. The heater itself should be placed away from the walls or, as a last resort, wooden fences should be installed around it. The chimney is insulated, the heater body is grounded.
Sauna arrangement
According to the scheme described at the beginning of the article, shelves are attached - from two to three, depending on the planned number of visitors. For this you can use the same boards as for the interior cladding. The shelves are sanded, coated with an antiseptic and varnish.
African oak sauna shelves
Doors must open outwards. Today you can purchase a frosted glass model (recommended). You need to leave a small gap under the door - about 5 cm - for air flow.

Glass door for sauna
All the healing properties of the sauna directly depend on the correct choice of stones. It is better to choose smooth and round stones - this will ensure more intense circulation of heated air.
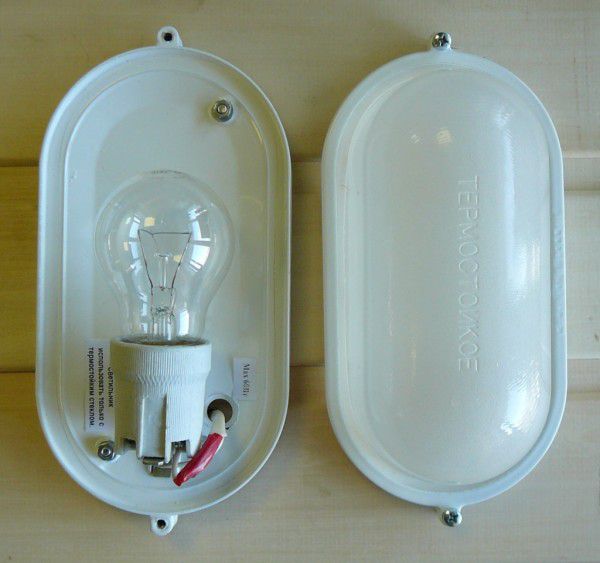
Sauna lamp
Prices for fireplaces and stoves
Fireplaces and stoves
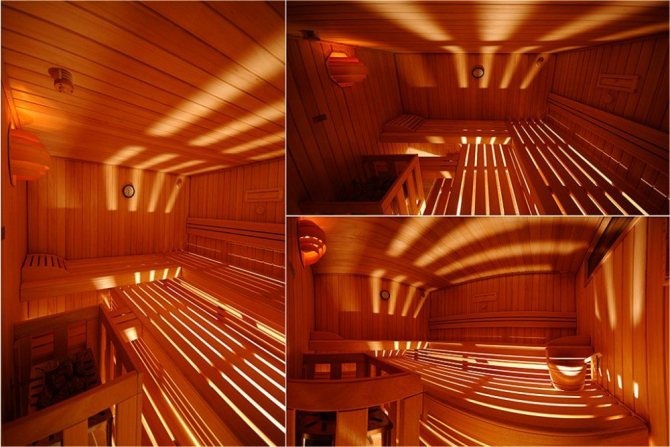
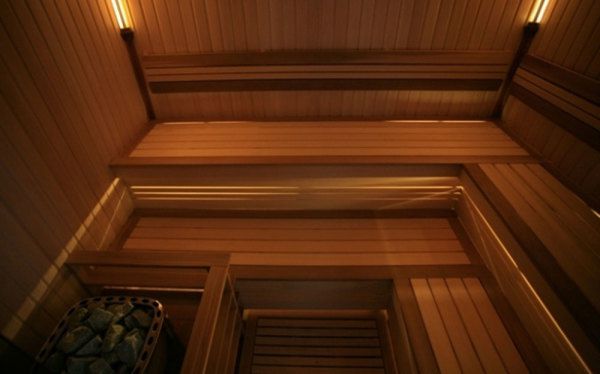
Steam room
First of all, we will consider the construction of a steam room in a sauna, since this is perhaps the main room in the sauna, playing a major role in the process of healing the body.
For comfortable placement in a steam room, its dimensions must be no less than:
- Width - 2 m;
- Length - 2.4 m;
- Height - 2.1m.
Note! The larger the steam room, the more difficult it is to maintain a certain temperature in it.
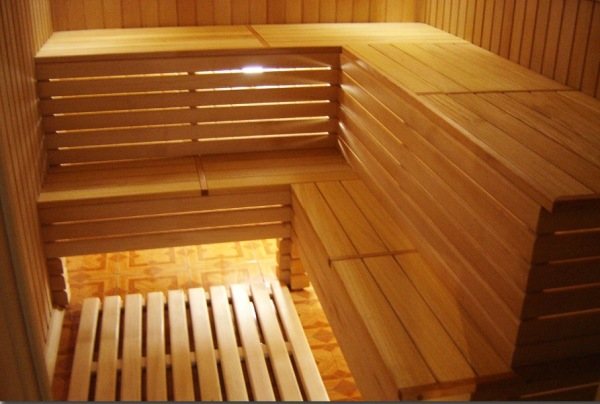
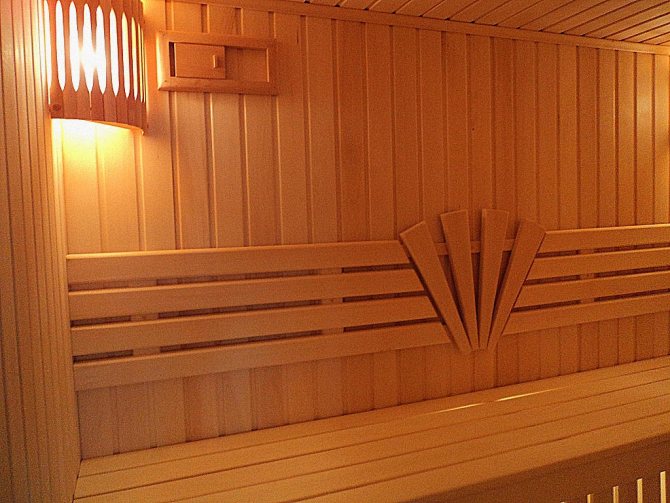
Shelves in the steam room
Shelves
Shelves are an essential element in any bathhouse or sauna. As a rule, they are made from linden, birch or aspen slats. Ideally, the slats are connected with wooden dowels, but more often galvanized or copper-coated nails are used for this, which must be recessed into the wood by 6-7 mm to prevent possible burns from contact with the body.
Note! Shelves cannot be made of pine, as when heated, the wood can release resin, which can result in a burn.
The shelves should be located at right angles in two levels. A single-level arrangement along the walls is also allowed. The width of the shelves for a bathhouse usually does not exceed half a meter. The distance between the shelves should not exceed 1050 mm.
Advice! It is best to make the shelves removable so that they can be dried and cleaned periodically.
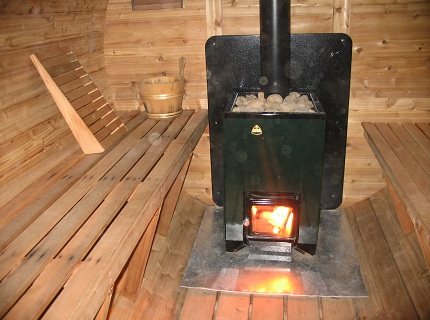
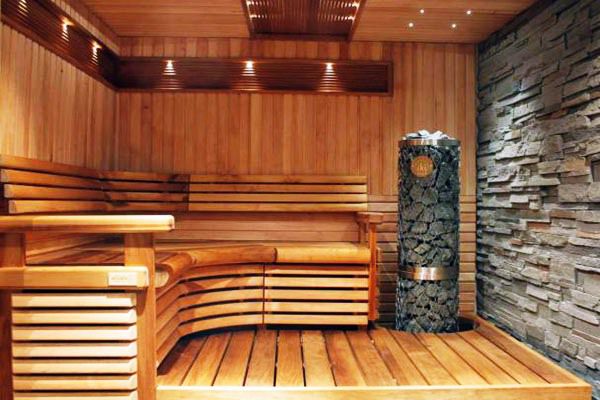
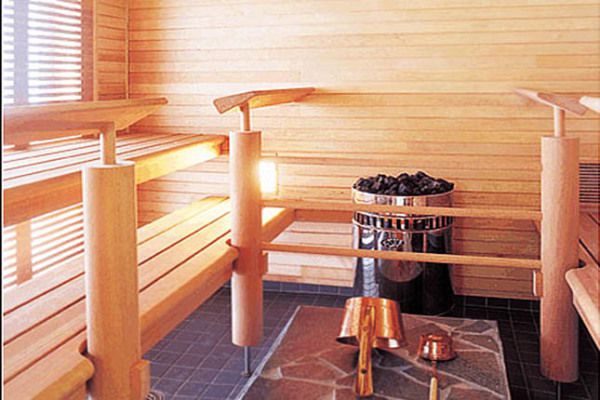
Metal stove-heater
Heater stove
Just like in a Russian bath, a Finnish sauna must have a heater stove. As a rule, the stove is located in the corner of the room, near the entrance. Protective fences made of boards and slats should be installed around it.
Most often, the oven is made of metal, welded from metal sheets 4–5 mm thick. The design includes a body, a chimney and a heater, which is installed in the upper part of the stove.
Brick stove
Firewood is burned in a special compartment on a grate. It must be said that the heater can also be made of brick. This design looks more attractive. An alternative option to such stoves are factory-made electric heaters, however, their price is usually quite high.
Ventilation
As mentioned above, the arrangement of a sauna implies the presence of ventilation. It consists of two supply openings, one of which is located near the heater, at a height of 30 cm, and the second is on the opposite wall, 30 cm from the ceiling.
The holes must be equipped with valves. The size of the hole is calculated depending on the area of the steam room.
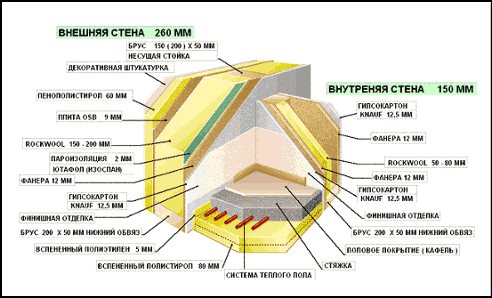
Walls and ceiling
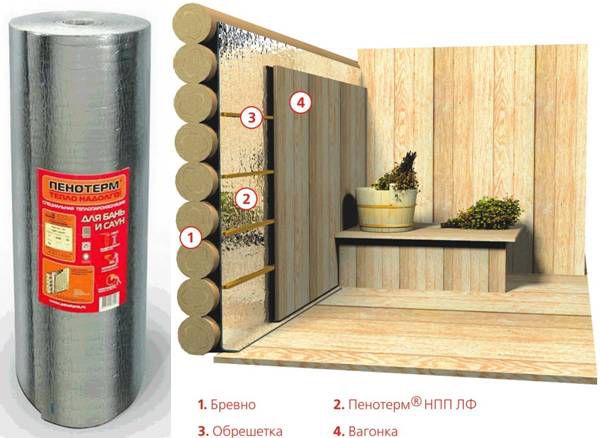
Wall decoration plays an important role in sauna equipment. It includes not only cladding, but also insulation and vapor barrier.
Therefore, the finish turns out to be layered:
- The wall is finished with a layer of insulation. Typically, mineral mats are used for these purposes.
- Then the insulation is covered with polyethylene film, which acts as a vapor barrier.
- On top, the insulation and vapor barrier are “sewn up” with a board made of birch, linden or aspen. Most often, lining is used for these purposes. For other rooms, you can use wood of any species.
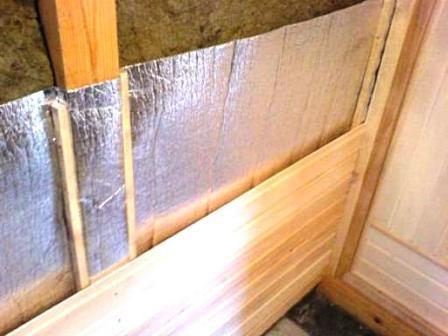
In the photo - interior wall decoration
Note! The steam room must also have a window for ventilation. It is made horizontal, with a double glass package. The window dimensions can be 300x500 mm or larger - 500x800 mm.
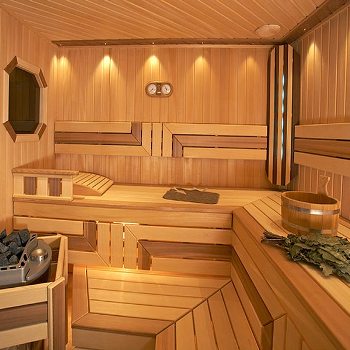
The walls and ceiling in the steam room are covered with wood
Note! In no case should you use PVC finishing materials to decorate the steam room of a bathhouse, since this material will release toxic substances when heated. After visiting such a sauna you will not improve your health, but on the contrary, you will harm your health.
The ceiling of the steam room is finished in the same way.
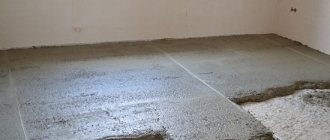
Floor
Most often, the floor in the steam room is made of concrete, lined with ceramic tiles or stone slabs. It must be covered with wooden slats or wicker mats on top, which ensures safety for the steamers, since without this covering you can burn your feet. Periodically, the flooring is subjected to hygienic treatment.
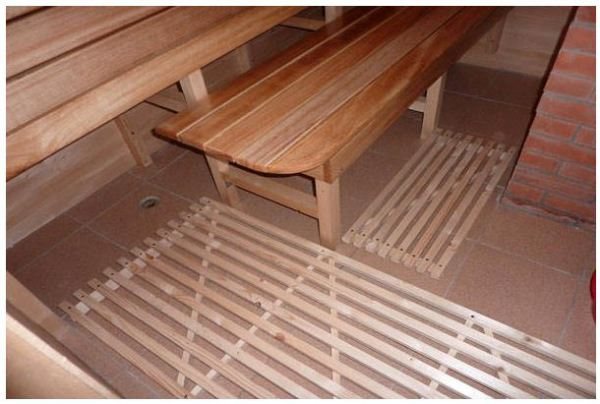
Wooden flooring in the steam room
As the instructions say, the floor in the steam room should be made at a slight slope towards the drain located in the opposite wall from the heater. The drain must be waterproofed from all structures in the building.
The shower stall is also equipped with the same floor with a drain pipe, since all water must flow into the sewer or drainage system. In other rooms, the floor can be made of boards.
Door
Such a seemingly simple detail as the door to the steam room also has its own nuances - it must also be well insulated. Therefore, it is made of a wooden frame covered with planed boards. On the side of the steam room, a vapor barrier film is laid between the skins, and on the outside the structure is insulated with mats.
Note! To avoid burns, the handle on the entrance doors to the steam room should be exclusively wooden.
In other rooms you can use any doors.
Price issue
It is difficult to answer definitively how much it will cost to build a sauna. There are a number of factors that influence the overall cost. The main one, as noted earlier, is whether the premises are being converted or a separate extension is being built. Another factor is the area of the steam room. In addition, the cost is affected by the materials used for the cladding, the number of lamps, other furniture, doors, etc.
Tiled floor in the sauna
| Sauna, recommended temperature and humidity characteristics | Meaning |
| Temperature under the ceiling, °C | 100 |
| Temperature in the middle part of the room, °C | 60-90 |
| Humidity, % | 5-20 |
| Temperature in the rest room, °C | 18-20 |
| Recommended duration of procedures | no more than 2 hours |
| Floor temperature, °C | at least 40 |
| Absolute humidity, g/m3 | 40-60 |