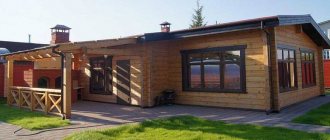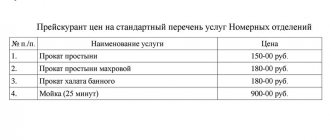
Most owners of private houses and summer cottages are planning to build a bathhouse. There is nothing more pleasant than taking a steam bath, which perfectly cleanses the body, relieves tension and improves well-being. In addition, visiting a bathhouse has been a favorite pastime of the Russian people since ancient times.
Building a bathhouse with your own hands or ordering a “key” bathhouse is something everyone chooses for themselves. If you have construction skills, the necessary equipment and time, then erecting a structure on your own will cost much less. A turnkey bathhouse is an option for those who do not have free time or are poorly versed in construction.
The construction of any building begins with a project. Today there are a lot of different solutions for building a bathhouse, let’s look at one of them.
Quality in detail
It’s easy to scatter a pencil over a sheet of paper when your plans include a bathhouse of 9 by 10 meters - there’s room here for the attic and even the kitchen. Everything is much more complicated when you only have 12 squares and you need to fit everything you need, not forgetting about the oven.
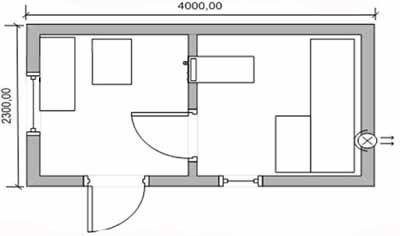
Layout of a 3 by 4 bathhouse, which is also simply called a “log house” or, lovingly, a “baby”, is not very difficult, you can do it yourself, no instructions are needed here
>
Although everything is possible, as the diagrams given in the article show. It is only important to approach the entire design process very accurately.
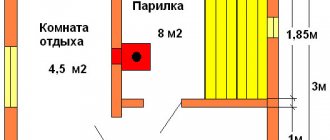
A 3 by 4 bathhouse plan, as a rule, has a maximum of 3 rooms, although they often do without a dressing room (project “A”)
First, decide what is needed first, fortunately the list will be small.
These are only 3 rooms, as you can see in project “A”:
- the dressing room is an ever-present attribute of the bathhouse, but, as will be seen later, it can be sacrificed;
- washing room - only a bench is indicated here, not even a canopy;
- steam room - note that from the steam room there is a small window 40 cm wide.
Secondly, analyze what you received and decide what can be improved further. In this project, the absence of a stove or boiler in the bathhouse is immediately striking.
Helpful advice! Please note that when you order a bathhouse project from a contractor, by default, it is understood that you will deal with the method of providing heat yourself. The company can, at your insistence, offer its options, can listen and even implement your suggestions.
But if you are going to order a turnkey bathhouse and go somewhere to Kamchatka, without monitoring the progress of the work, you will most likely receive a log house. You will have to deal with the heating method separately, which may turn out to be very unexpected and unpleasant. Do not forget about this widespread practice among builders.
And, thirdly, before even starting such a project, we advise you to familiarize yourself with the existing world achievements in this area. After all, there are a lot of bathhouse projects, and even more so, their concepts.
Possible principal approaches
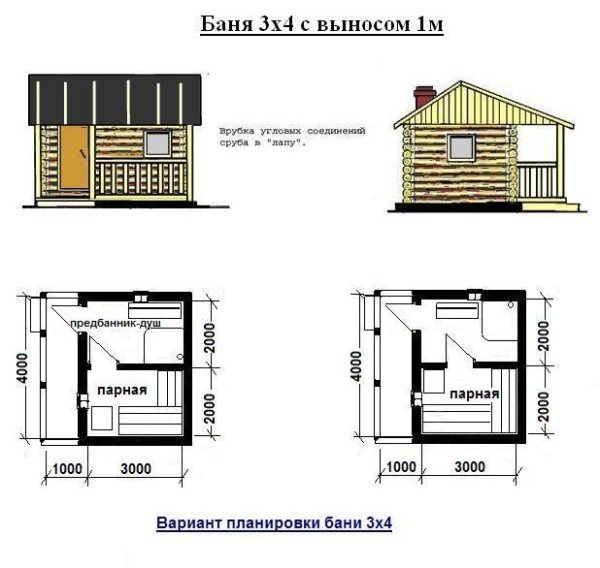
Possible layout of a compact 3 by 4 bath
All baths can be divided into three groups:
- The first includes baths, the main method of heating in which is dry steam. These have the highest air temperature - from 60 to 120 degrees, but very little humidity - about 25%;
- in the second, the so-called wet baths - they are already dominated by steam, which at a temperature of 50-70 degrees provides humidity from 75 to 100%;
- in the third - water baths. Water is already in full control here.
Among these three groups are the following bathhouse options from world experience:
- A Roman bath is like a combination of five rooms intersecting with each other. The first can be called, in our opinion, a dressing room (although the idea comes from the ancient Romans). The second is “warm”, in which the temperature rises. The third is “hot”, here the temperature is even higher. The fourth is a steam room (as has been established, the temperature in it for the Romans was at least 85 degrees). And the fifth is unloading, aromatic.
It is very useful to include footnotes in the drawing of a 3x4 bathhouse on the type of wood used and its quality, as is customary in any professionally prepared drawing
- Irish bath. It is very similar to the Roman one, but if it is of a “sequential” type - the rooms go one after another, then in the Irish one all the rooms open onto a common corridor, there are usually three of them, and, leaving one, the visitor can immediately follow to the next, hotter one . Well, or refuse to continue the procedures.
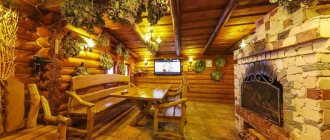
- Russian bath. Here everything is familiar to us, and the project “A” presented above is a clear example of such a bathhouse - a dressing room, and attached to it is a washing room and a steam room. The steam room houses a stove.
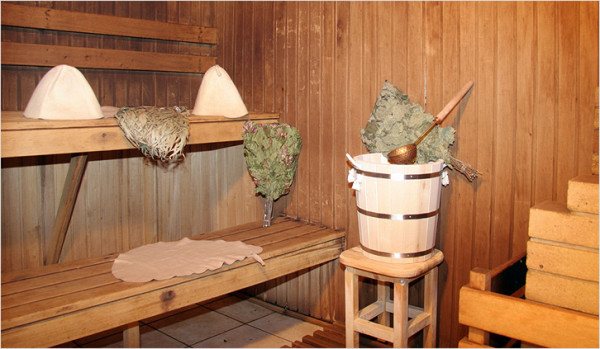
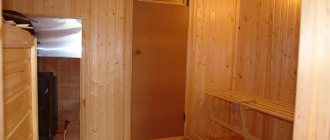
The attributes of a Russian bath are unchanged at any time
- Finnish bath, also called sauna. There is one room here, but with high air temperature and low humidity.
- Japanese bath - ofuro. According to our concepts, such a bathhouse cannot be called this respected word - it is just a barrel with hot water (up to 60 degrees) and medicinal herbs. Few people manage to sit in such a “little room” for more than 10 minutes.
- Turkish bath - hammam. Such baths belong to the wet group and are well suited for those who do not like high temperatures. The main element of such a bath is a large pool with hot water. Before entering this pool, the visitor enters several others with colder water. A distinctive feature of Turkish baths is a very well-selected and strictly maintained temperature in all rooms.
A Turkish bath can also be of modest size
Helpful advice! Before you start building a bathhouse, we advise you to carefully consider the choice of its location on the site.
We recommend that you follow the following rules.
- Firstly, locating the bathhouse no closer than 15 meters from the main residential building is a safety requirement.
- Secondly, if possible, as close to a body of water as possible.
- And, thirdly, on proven soil that is not prone to collecting moisture (they say not heaving) soil. If you are unlucky and the soil is heaving, then the best way out of this situation would be to remove it to a depth of up to one and a half meters and replace it with a well-compacted sand and gravel mixture. In any case, the bathhouse will have to be placed on stilts
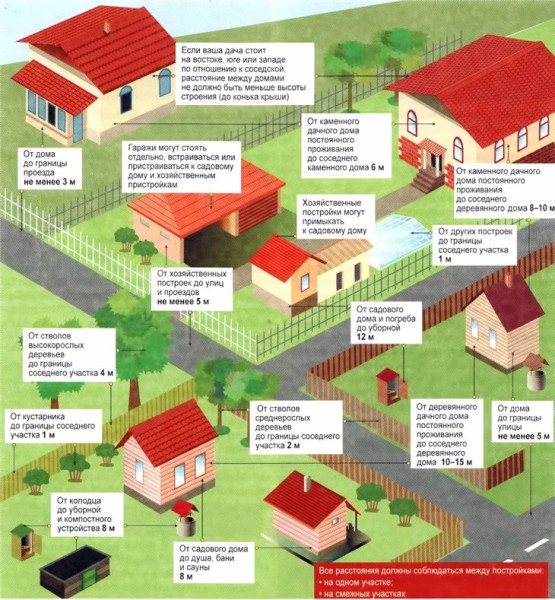
Recommended distance from various objects
Construction of a bathhouse from 6x4 timber according to a do-it-yourself project
In order for the bathhouse to turn out to be of high quality, and visiting it to be a pleasure, you need to follow a certain order of work.
We recommend reading:
Bathhouse 6 by 6 made of timber with an attic: projects, construction features and photos
Stage 1. Drawing up a project and choosing a location
Most often, the area where a building can be erected is quite limited. But in any case, you need to choose a place, following some rules.
The main requirement is that the bathhouse should not be built in a lowland. If there is no alternative, then you need to make artificial bedding. If there is a house nearby, then build a bathhouse so that it does not block the windows of the house, does not impede access to it, etc. The issue with the plumbing needs to be resolved in advance.
You can draw up a plan on your own by drawing it on paper or on a computer, or contact a specialist. Doing a project yourself is not as difficult as it seems at first glance. On the Internet you can find projects for bathhouses made of 4x6 timber, which differ in the location and size of the rooms, the location of windows and doors, etc.
Please note that the main room is a steam room. If you plan to go to the sauna with a group, then it is better to make the steam room larger, and also increase the height of the room in order to arrange the sauna shelves in several rows.
The main thing is that all partitions, windows, doors are drawn on the plan, and all dimensions are indicated. Think in advance about ventilation, sewerage, water supply system and electrical elements (sockets, switches).
Stage 2. Purchase of materials
Based on the completed project, you need to prepare a list of necessary materials. The best option is to purchase everything at once, do not forget about a small reserve. The danger of buying materials “back to back” is that if there are defective elements, you will not have enough parts for construction, which is why you will need to go to the store again. And if the necessary material is not available, then you will have to take a break in construction.
Wholesale orders have other benefits: they often offer free shipping or a discount.
Stage 3. Preparing the foundation
First you need to clear the area: remove all the plants, dig up the trees, dig up the area.
We recommend reading:
Bathhouse made of laminated veneer lumber: advantages and features of construction; bathhouse projects made of laminated veneer lumber
It doesn’t matter which of all the 6 by 4 timber bathhouse projects you chose, they have one thing in common - the absence of strong pressure on the foundation, so there is no point in making a reinforced foundation. When determining the depth of the foundation, you need to take into account the condition of the ground: it should be below the level of freezing of the ground in winter.
Usually, a strip or columnar foundation is made from timber for a bathhouse. Its dimensions must be larger than the planned building by at least 10 cm on each side.
Video - how to make a shallow foundation:
Stage 4. Assembling the log house
After preparing the foundation, you can proceed to installing the crowns. It is better to secure the lower strapping row with metal dowels; they are needed for reliable fixation of individual beams. In the remaining rows you can use wooden dowels.
Below is a video that explains what a dowel is and how to use it:
It is recommended to lay floor beams at a distance of about 1 meter. It is also necessary to mark the doorways.
Laying the second row starts from the corner. To fasten beams of different rows, you need to use wooden dowels; the distance between them should be about 1 meter. Also, don’t forget about insulation; for this you can take, for example, jute.
It is necessary to mark the window openings.
Do not make the windows too large, as heat will escape through them. Also pay attention to their material. Windows, like doors, are better to choose wooden ones. When heated, plastic can release toxic substances that will negate the entire therapeutic effect of bath procedures.
Having made the walls of the required height, you should install the ceiling beams.
Stage 5. Roof installation
The roof can be single- or gable; they differ only in slope. Before installing the roof, you need to make sure that the last row is level and the walls are parallel to each other, the permissible deviation is 1-2 cm.
To install the roof, you need to assemble the rafters and install the roofing material. Ondulin is popular, for the production of which modified bitumen and polymer additives are used. It is an environmentally friendly and durable material.
Stage 6. Indoor work
After the construction of the bathhouse itself has been completed, it is necessary to make hydro- and thermal insulation of the premises. Carry out interior decoration, install a stove, shelves and arrange furniture.
You can also do external finishing, but when building a bathhouse from timber, this item is not mandatory.
A bathhouse made of 6x4 timber is a compact, but at the same time spacious building. Just remember that you are building a building for more than one year, so you need to think through all the nuances in advance. In particular, if you are planning a new addition to your family, or you are going to come here with a group of more than 6 people, then think about making a larger bathhouse.
More projects
Project "A"
Here we note the following nuances:
- almost half of the entire area is occupied by the dressing room;
- there is no canopy in the washing room, but only a bench;
- there is no curtain provided in the steam room;
- from the washing room and steam room there are small windows of 40 by 40 cm; if this is a common thing for a washing room, then a window in the steam room is often not provided;
- the most important thing is that this project does not indicate the location of the boiler;
- Another drawback can be considered the lack of indication on the diagram of the location of the drain hole.
Project "B"
The features of this project immediately catch your eye:
- entering from the street directly into the washing room is a good option if you need to “squeeze” the maximum possible out of the available space; but this option forces you to pay special attention to the insulation of the front door, which can cause difficulties in the cold season;
Here the 3x4 bathhouse diagram clearly makes it clear that the structure is being created mainly for the sake of a washing room - the ventilation in the steam room betrays the author, but this is also an option (project “B”)
- everything is in order with the curtains in both the washing room and the steam room - this is thanks to the abandonment of the dressing room;
- but the inner door and window from the washing room seem too large;
- the stove is located in the steam room, but it is controlled from the washing room, which must be recognized as a very reasonable choice;
- as opposed to, perhaps, installing forced ventilation in the steam room, this is already unnecessary, it is more logical to move it to the washing room;
- As a drawback, we also note the lack of indication on the diagram of the waste water discharge point.
Project "C"
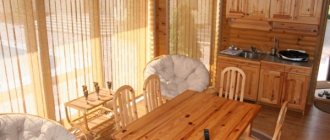
A simple project of a familiar, native Russian bathhouse. Here:
- half of the entire area is given over to a rest room - a dressing room;
- the washing room has been replaced by a shower room, although there is always room to change this decision;
And this is an ideal and recommended option, one might say the traditional layout of 3x4 baths (project “C”)
- the steam room is almost twice the size of the shower room;
- there is no window from the steam room, but there is a large window from the dressing room - more than a meter wide;
- Unfortunately, the project also does not indicate the location of the furnace and the water drainage point.
Project "D"
Here, perhaps, everything can be considered ideal:
- the entire area is reserved for “business” - there is no waiting room;
- there is a stove for the steam room, but the control is from the washing room, which means it will get the heat too;
- both the washing room and the steam room have beautiful canopies, and the steam room is on three levels;
- small, and therefore reliably heat-retaining doors;
- We note two of the shortcomings: again, the drainage point is not visible and the stove is located behind the wall from the washing room, and this means overhead costs for the wall material and heat loss for the washing room.
Bathhouse project made of 6x4 timber: features, advantages
This project is currently one of the most popular, it has optimal dimensions: the rooms will not be cramped, and you will be able to move around calmly, but the bathhouse will not take up too much space. The bathhouse is quite spacious and can accommodate up to 6 people.
Typically, a 6x4 bathhouse has four rooms:
- dressing room;
- steam room;
- washing;
- rest room.
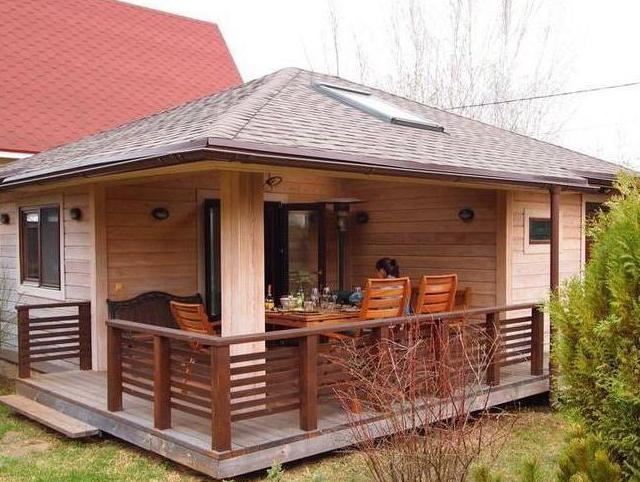
A small porch or terrace is installed at the entrance.
If you look on the Internet for photos of 6x4 bathhouse projects made of timber, you can see that they are all different: some have a large steam room and a narrow sink, some have a spacious relaxation room and a compact steam room, etc. The advantage of a bathhouse of this size is the fact that the size of each of the rooms can be varied at will, increasing one by reducing the other.
The final building is quite compact, so it can fit even in a small area.
A bathhouse made of timber is a good option for those who prefer a Russian bathhouse to modern bathhouses, saunas, and hammams. Timber is a tree, i.e. an environmentally friendly and natural material; in the times of Rus', bathhouses were built from wood. But unlike ordinary logs, timber has its advantages:
- less consumption. The timber has thin edges, while the log does not, so less timber will be required to build the same building;
- reliability. The likelihood of cracks forming on the side surfaces of timber is less than that of logs;
- easy and quick installation. To build a bathhouse from timber, it is enough to buy the material and you can immediately start assembling a log house from it with your own hands; construction is simpler and can be done even by those who do not have extensive experience in construction. If there are not enough beams, you can immediately purchase the required quantity;
- fast shrinkage. Timber dries faster than logs;
- smooth walls. Thanks to this, the area of the house will be slightly larger, although from the outside the building area has the same dimensions.
But according to some indicators, timber is inferior to logs. In particular, the durability of logs is greater, since the timber is more susceptible to rotting. It must be treated with an antiseptic, in which case its service life will increase. A timber bathhouse has many straight cracks, so it needs high-quality thermal insulation.
Peculiarities
The best option for a frame bath would be a building with an area of 3x4 meters, which will allow you to equip not only a steam room, but also a small shower room and even a relaxation room. This type of construction has its own strengths, some of which can be highlighted.
- It is economical. The construction will require a relatively small amount of building materials.
- Simple foundation construction. For such a construction there is no need to build a monolithic foundation; a columnar version will suffice.
- Construction will take little time. The construction technology is very simple, and even if erected independently it will not take much time.
- A structure of this type is reliable and durable. Due to the fact that few materials will be spent, it becomes possible to purchase them of higher quality.
- Communications can be laid directly in the walls. This will give the room a neat appearance.
- This bathhouse is environmentally friendly, as it is built only from natural materials.
- The construction process can take place at any temperature and at any time of the year.
- It is possible to perform both external and internal finishing using any materials.
- The finished building will not require shrinkage.
- Simple registration with the cadastral service. If you have a construction project, it can be quickly registered. In addition, official registration will help to obtain a high price for it in case of sale of the plot.
When building such a bathhouse, it is very important to provide for its thermal insulation and vapor barrier. Thermal insulation for a bathhouse is very important. To install it in rooms of this type, you can use mineral wool or fiberglass, which have decent heat-retaining qualities.
Vapor barrier is also a very important point that should not be overlooked. During periods of rain and snow, increased environmental humidity can penetrate into the room, which will negatively affect its service life. Therefore, during the construction process, it is recommended to lay a layer of special film or glassine between the sheathing and the insulation, which will resist the penetration of moisture into the room.
Peculiarities
A 4 x 3 meter bathhouse is ideal for a family of 4 people and guests. Before starting the construction of walls, you should select the appropriate site and prepare the necessary communications.
Often a bathhouse is built as an additional extension to a house, and there are a number of good reasons for this.
- proximity to a communications center (water, sewerage);
- thermal conductivity factor, when one of the walls of the bathhouse is an integral part of the house;
- comfort when from home, without going outside, you can go straight into the room.
Any bathhouse consists of several blocks:
- steam room;
- shower room;
- bathroom;
- dressing room;
- restroom.
The main material for building a bathhouse is logs. It is necessary to take into account the fact that the thickness of the material in this case will reduce the area of the premises.
Building a 3x4 m bathhouse with your own hands is not difficult ; you don’t need to have experience, it’s only important to get the design documentation right.
How to build a rotating flight of stairs

How to build a rotating flight of stairs
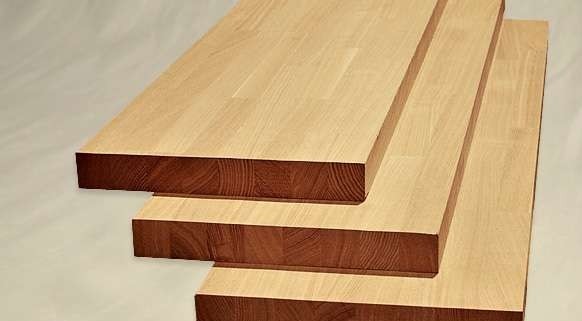
The ability to make such a staircase will be useful not only (and not so much) in the construction of baths, but in our case we cannot do without it at all. For production you will need boards 50×200 mm, 40×200 mm and 25×150 mm. It is better to purchase balusters and handrails in a specialized store or order them from a professional craftsman. All other work can be done independently.
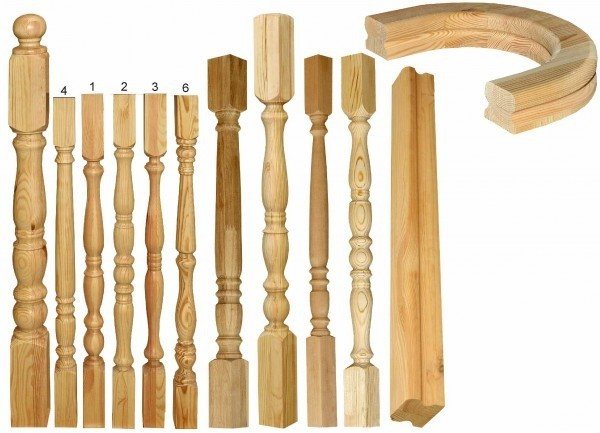
Balusters, handrail
Step 1. Calculate the dimensions of the stairs.
Although for many this topic seems to be the most difficult, in fact it is the simplest work. During calculations, existing recommendations are taken into account: the total height and width of the steps should be ≈ 47 centimeters, the width of the steps ranges from 20÷32 cm, the height of the step is ≈18 cm. The optimal dimensions are taken to be a step width of 30 cm and a riser height of 15 cm The angle of inclination of the stairs is ≈30°.
Calculation of the dimensions of staircase elements
Calculation of the size of stair steps
Stair elements
Of course, these are ideal sizes; they do not always correspond to practical data. In our case, the total height of the stairs will be 250 (ceiling height) +20 (ceiling height) = 270 centimeters. We divide this amount by the optimal height of each degree (18 cm) and get exactly 15 steps. If you get a number with a fraction, then the number of steps must be rounded to the nearest whole number, with the first step being slightly higher or lower than the others. If you want to make all the steps the same, you will have to use tenths of a millimeter during measurements.
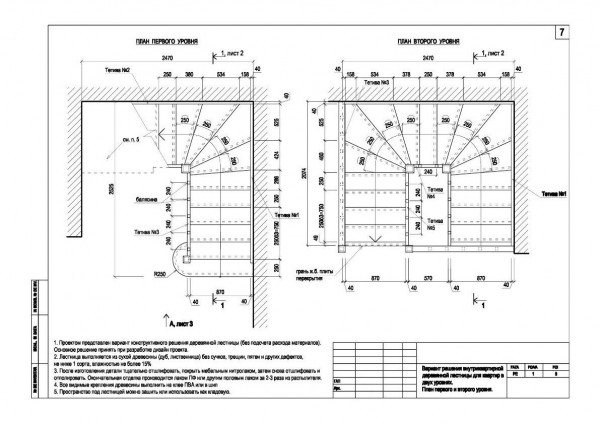
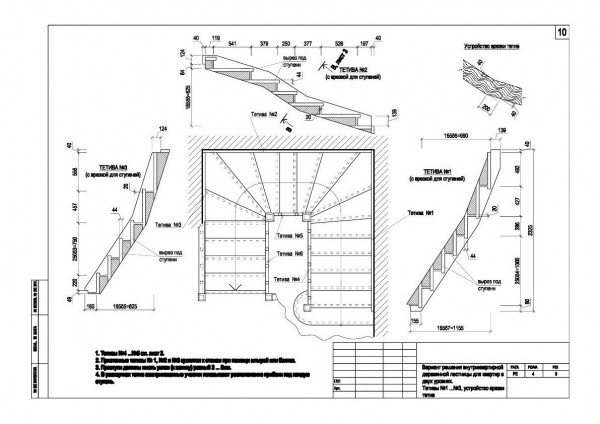
Plan of two levels of stairs
Step 2. Take measurements.
You need to know the height of the stairs, the length of the stringers, bowstrings and all the dimensions of the steps. Don't forget that the thickness of the boards is included in their dimensions. On one side, the string rests against the supporting beam, on the other side, the stringers are fixed to the wall.
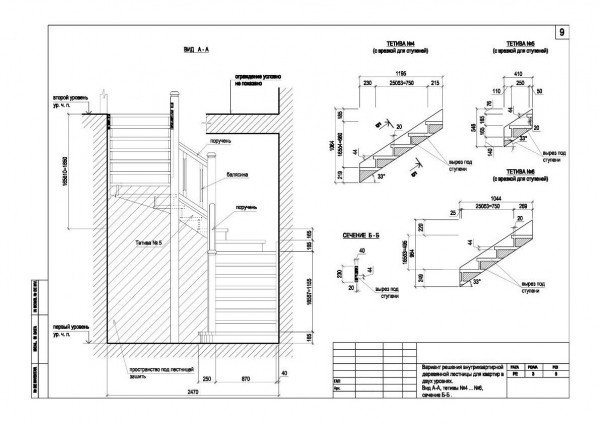
View A-A and section B-B
Step 3. Make a template of steps and risers from plywood, estimate their sizes and location again.
Making a step template
Marking the bottom of the bowstring
Marking treads and risers
Making a template for grooves
Making grooves in the bowstring
Preparing risers and treads
Cut out seats for steps in the stringers, secure the stringers to the wall and to the support beam. Check the position of the stringers; if problems are found, correct them. The staircase elements are attached to the wall with strong screws or nails.
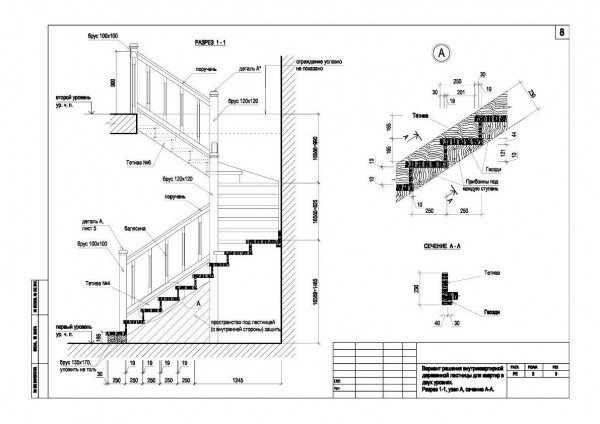
Cut 1-1 and node A
Step 4. Cut out the steps and risers to fit the template, sand the cut areas, make chamfers and precisely adjust all the individual parts to the same size. Make mounting sockets in the string for attaching the steps. You can do them by hand (not very accurate for a long time) or use a hand-held electric router.
Wooden steps for stairs
Step 5. Using a plumb line and level, check the spatial position of the stringers and string attachment points. Begin to install steps on the seats one by one. If necessary, make final adjustments to each element. Try to achieve such precision that the cracks at the joints completely disappear. Connect the elements of the stairs with self-tapping screws, recess the heads and seal the holes. We strongly recommend that you additionally coat the joints with wood glue; this will be an additional guarantee that the stairs will not begin to creak over time when walking.
Strings 1 and 3
Lastly, the balusters and railings are attached. There are several ways to attach them, we will briefly talk about each of them, and you choose the appropriate option for yourself. The distance between the balusters should be within 30 cm; select specific values taking into account the width of the degrees. The height of the railing is ≈90 centimeters. Reliable fastening must be done in at least two points: to the railings and stringers or bowstrings. Some wide steps allow balusters to be attached to their ends, but such options are very rare.
Fastening balusters and railings
Installation of balusters along the guide thread
| No. | Description of work |
| Step 1. | Mark the locations of each baluster, the accuracy of the marking should be at the maximum level. It is better to mark the location of the balusters on the steps with a rope with blue. |
| Step 2. | Saw off the upper ends of the balusters at the angle of the stairs, make markings for the holes exactly in the center. The railings must be positioned strictly parallel to the stringers or bowstrings. Fastening can be done with studs, screws or dowels. The best option is to use wooden dowels. |
| Step 3. | At the bottom end of each baluster you need to drill a hole with a diameter of 10÷12 mm, insert dowels into them using wood glue. The same holes need to be made in the steps; the depth of the holes in the steps is no more than 2/3 of their thickness. Don't "overdo it" or drill through the step. You can control the depth of the holes using a simple device. Wrap insulating tape around the drill at the required distance from its end. This will be your all-purpose marker. The pins should fit into both holes with little effort. If you are assembling a ladder using self-tapping screws, then the holes should have a diameter of 1÷2 mm less than the diameter of the self-tapping screw. |
| Step 4. | Check the position of each baluster. If everything is normal, leave them until the wood glue dries completely. |
| Step 5. | Proceed with the installation of handrails. Before this, the handrails should already have holes for the top pins of the balusters. Lubricate all parts with wood glue, install in place, check the position and leave to dry. |
| Step 6. | Sand all visible surfaces of the stairs well, remove burrs, and seal cracks and crevices with special putty. Cover the stairs with several layers of varnish or paint. |
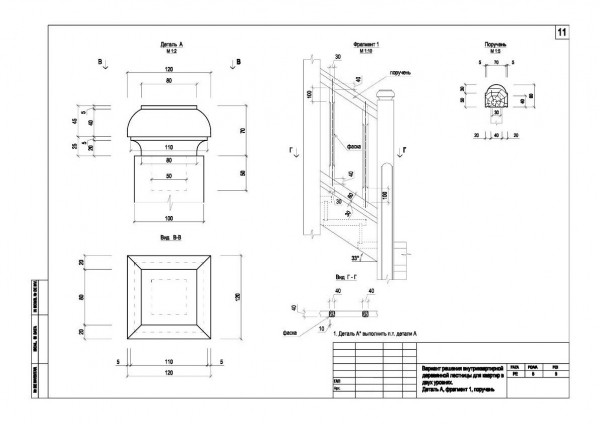
Handrail and balusters