Cement-sand screed is a strong, smooth and durable floor base. However, it will have these properties only if the installation technology is followed. It will be discussed in this article.
Before starting work on installing a cement-sand screed, it is necessary to prepare the base of the floor. It is necessary to remove all debris, dust and clean the floor from remnants of masonry mortar. You should also seal all the joints of the floor slabs with cement-sand mortar to avoid possible leaks. After this, you can install the beacons and fill the screed.
Installation of beacons
To obtain a strictly horizontal surface of the cement-sand screed, it is necessary to use beacons. The installation of beacons begins with determining their location. First, beacons are placed along the walls, 20 cm away from the wall. Then intermediate beacons are installed. The distance between the beacons should be 10 - 15 mm less than the length of the rule with which the solution will be leveled. For example, for those who are making a screed for the first time, it will be convenient to use the rule of 1 m in length, therefore, the distance between the beacons is chosen to be 90 cm.
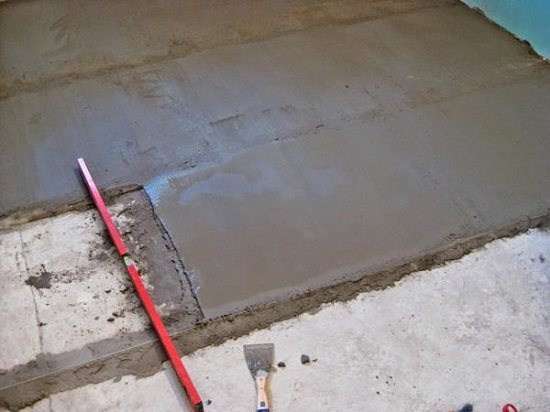
Fig.1.
The beacons are installed with a gap of 15-20 cm to the wall. The installation step of the beacons can be arbitrary, but it should be 10-15 cm less than the length of the rule that will be used to level the solution. To simplify pouring and leveling the solution, it is convenient to make the distance between the beacons no more than 1.5 m.
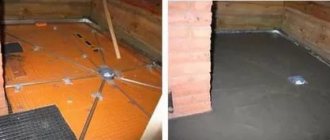
Beacons can be made with mortar or using a beacon profile (10 mm high. Beacons made from a beacon profile are the most popular due to the simplicity and high accuracy of installation.
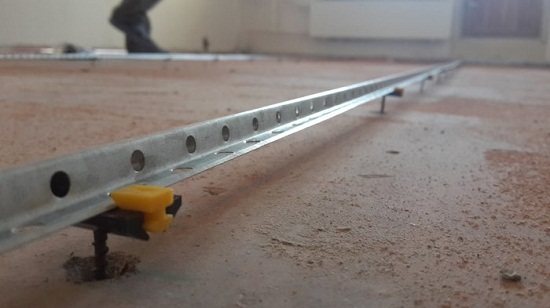
Fig.2.
Installation of the beacon profile is carried out on special fastenings. Along the line of the lighthouse, holes are drilled in the base of the floor in increments of 50 cm, into which a dowel and a self-tapping screw are installed. The screw heads are aligned in one plane, 10-12 mm below the level of the future surface of the screed. The accuracy of installation of self-tapping screws is controlled by a level. It is convenient to use a laser level. Fasteners for beacons and the beacons themselves are installed on the screw heads.
You can achieve high accuracy in installing beacons using a laser level. To do this, place a level on a flat surface and direct the laser beam towards the screws to be adjusted. Based on the required thickness of the screed, install 1 arbitrary self-tapping screw at the desired level, after which a mark is made on the screwdriver in the place where the laser beam passes. The remaining screws must be installed so that the laser beam passes through the mark on the screwdriver. This way, all the screw heads will be on the same level, and, consequently, the beacons will be on the same level.
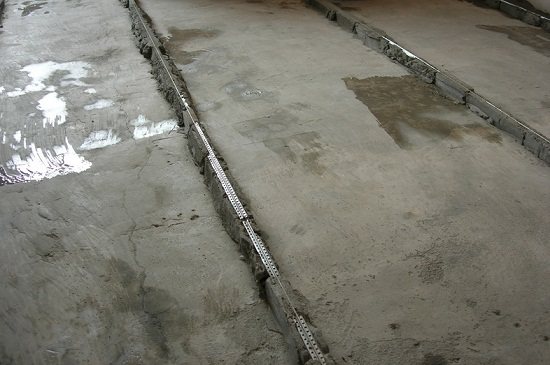
Fig.3.
Fastening the beacon profile ensures high accuracy of installation of the beacon, but does not ensure the rigidity of the beacon, which is why it can sag when leveling the mortar, and the screed will not be even. Therefore, before pouring the screed under the beacon, it is necessary to apply a solution - smear the beacon.
When applying the beacon, you should ensure that the solution does not get on the working surface of the beacon, or remove it immediately. The frozen solution on the lighthouse will not allow the filling to be properly leveled.
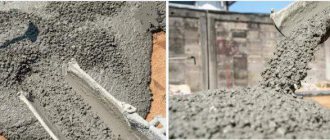
Mortar for cement-sand screed
The screed mortar is made from a mixture of sand and cement. In this case, the cement used is grade M-400, the sand must be river sand, washed, and always dry. The ratio of components is chosen 1:3 by volume. Both components are poured into a container and mixed thoroughly. Then add water in a ratio of 0.5 - 0.7 by volume, i.e. the ratio of elements cement:sand:water is 1:3:0.5-0.7 . A solution made according to these ratios will fit well and not shrink.
An alternative to homemade cement-sand mortar for screed is a ready-made mortar.
The finished solution has several advantages:
- high quality components;
- no need to prepare the mixture yourself;
- the presence of additives that facilitate styling;
- ease of transportation, etc.
In addition to this, if we take into account the low cost of the ready-made mixture, then in most cases it is more advisable to use the ready-made one rather than the one prepared by hand.
To prepare a cement-sand mixture and a screed mortar based on it, it is convenient to use a large-volume construction bucket of 20 - 30 liters. To stir the mixture, you can use a special mixer or a hammer drill with an attachment. To simplify the work, it is advisable to prepare the solution in the immediate vicinity of its installation.
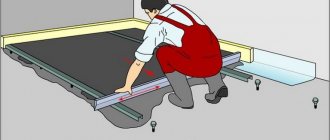
Pouring cement-sand screed
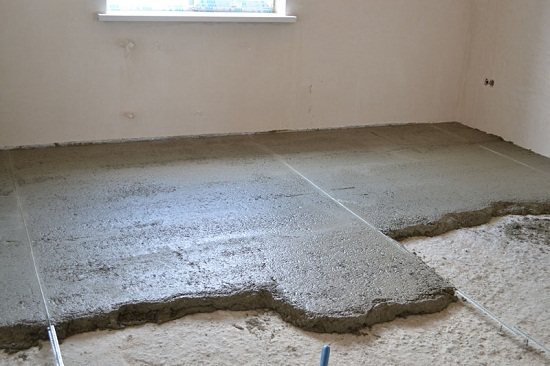
Laying cement-sand mortar is the simplest, but most labor-intensive stage of creating a screed. The finished solution is laid out on the floor between the beacons so that it protrudes slightly above the surface of the beacons. Next, as a rule, relying on the beacons, the solution is leveled. To simplify leveling of the solution, as well as to compact it, the rule should be moved along the beacons, and at the same time rock it from side to side. Cement laitance should appear on the surface of a leveled and well-compacted mortar.
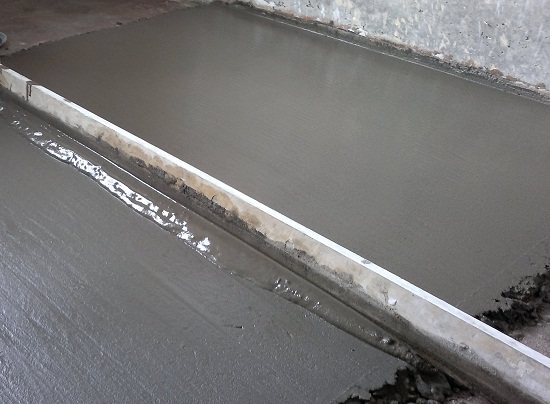
Fig.4.
The prepared solution is laid out between the beacons, thus filling all the empty space. By moving the rule, resting on the beacons, the solution is leveled. When leveling, the rule should be to rock from side to side, this way the solution is easier to level and compacts well. Cement laitance appears on the surface of a well-compacted mortar.
In order for the screed to be of high quality, the entire floor surface must be poured at one time, and the first portion of cement should not have time to set. It takes an average of 2 hours for cement to set. Naturally, when doing a cement-sand screed with your own hands, it is almost impossible to do everything in such a short period of time. Therefore, we can make the assumption that it is not the entire floor that needs to be filled at a time, but one strip, from lighthouse to lighthouse.
After the cement-sand screed has been poured, it is important to prevent it from drying out until the chemical reaction of the cement with water occurs. To do this, it is necessary to ensure that there are no drafts, thus limiting the evaporation of water. The floor must be kept in this form for about 2 days. If this is not done, then with a high degree of probability cracks will form on the surface of the screed.
At the end of the hardening stage of the screed, you can walk on it. Floor coverings should not be laid on floors with a large amount of residual moisture. Traditionally, approximately 25–30 days are allotted for drying the screed, after which the work on installing the cement-sand screed is completed.
Sand-cement mixture for floor screed, polymer-cement screed, calculation of cement and sand
Since the installation of a cement-sand screed involves the use of cement mortar, it is necessary to take its preparation responsibly. Nowadays, of course, you can buy a ready-made mixture, but in any case, you need to know that for optimal adhesion and strength, as well as to prevent the occurrence of cracks and destruction, it is necessary to thoroughly stir the solution in a ratio of 1:3, as indicated higher. You need to add the dry mixture to the water, and not vice versa, which is very important. The thickness of the layer depends on the type of screed and ranges from 15 mm to 50 mm and even higher.
Now manufacturers of building materials offer their consumers a wide variety of polymer-cement mixtures, with the use of which a do-it-yourself cement screed only benefits from the ease of installation. In this case, the composition of the cement mortar includes special polymer additives as plasticizers, which make it possible to reduce the thickness of the layer and reduce the time of both installation and full readiness for use. The manufacturer's instructions contain a detailed description of how floor screed is made, which allows you to achieve the best results if you follow it exactly.
Of course, any calculations are purely individual, because it is important to take into account the timing of full readiness for operation, the thickness of the applied layer, which will directly affect the height of the room, the technical characteristics of the solution (strength, durability, heat and sound insulating properties), and the economic aspect is also important. So we advise you, before you start purchasing materials and the work itself, to carefully consider all possible options. Remember, the rule: “Measure twice and cut once” has not been canceled!
Features of cement-sand screed
Cement-sand floor screed can be connected or not connected. A bound screed firmly adheres to the base of the floor; an unbound screed does not come into contact with it and has an intermediate layer between the screed and the ceiling. Most often they make an untied screed. Waterproofing, thermal insulation or sound insulation is laid as an intermediate layer.
The thickness of the screed can be any. This is an advantage when it comes to raising the floor level. However, it should be noted that a large thickness of the screed can negatively affect the interfloor covering, the amount of materials consumed and their cost. Therefore, cement-sand screed is usually made 4-5 cm thick, this is enough to ensure the strength and rigidity of the floor.
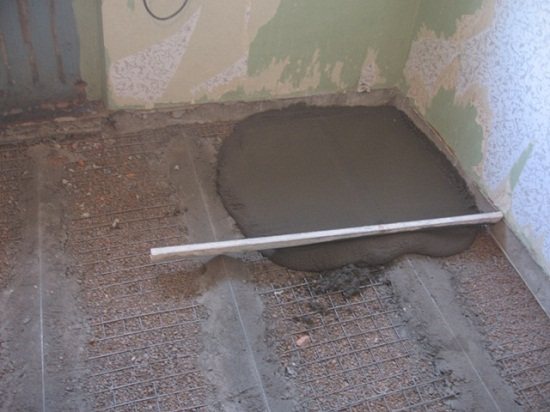
Fig.5.
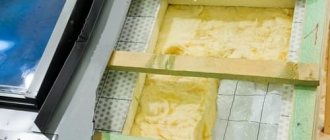
If there is a need to raise the floor level by more than 5 cm, then expanded clay is placed under the screed as an intermediate layer. This is a lightweight and durable material that can be used to raise the floor level without increasing the load on the floor.
To increase the strength of the cement-sand screed, it is necessary to make reinforcement. As a reinforcing element for residential premises, masonry metal mesh is used. The mesh is placed at a distance of 1 cm from the floor surface. To install the mesh, you can use either special stands or any available means, for example, strips of drywall. In this way, the reinforcement will fall into the screed layer experiencing the greatest loads, which will increase its strength and durability.
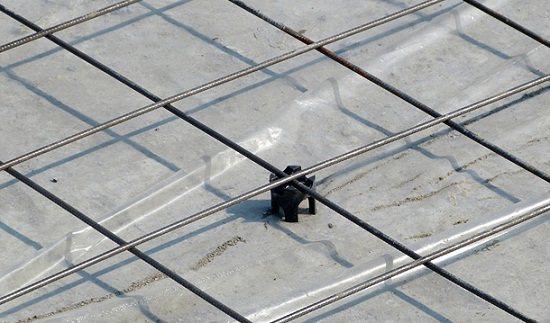
Fig.6.
To increase strength, the screed is reinforced with a metal mesh with a mesh size of 10x10 cm. The mesh is placed on supports so that it is located at a distance of approximately 1 cm from the surface of the main floor. To prevent leaks, thick polyethylene can be laid on the base of the floor or waterproofing can be done.
Cement-sand screed contains a large amount of water, which can leak to neighbors on the floor below. To prevent this, it is necessary to seal all the cracks in the floor joints with cement mortar and waterproof it. Waterproofing can be done with bitumen mastic and roofing felt or analogues. Waterproofing the floor is also necessary in the bathroom and toilet where leaks are possible.
Despite the high labor intensity of pouring the screed, there is nothing complicated in its design. If you want to get an ideal floor base that will serve for many years, a cement-sand screed on beacons is your choice.
How to make a floor screed correctly?
Hello! After reading today's interview, you will learn how to properly make a floor screed . A proper screed is the basis of a good floor, be it laminate, parquet, linoleum or tile. Master Vadim Alexandrovich answers all our and your questions today.
Hello, Vadim Alexandrovich! We want to learn how to do floor screed correctly.
Good afternoon, dear readers! Let's get started quickly, I hope my advice will be useful.
Please tell us why we need to screed the floor at all, since in most cases the floor is already level? The screed has several purposes. Here are the main ones:
1. Leveling the floor if it is uneven or not horizontal.
2. Leveling floor levels in different rooms. During construction, this situation often occurs - the floor levels do not converge by 1-2 centimeters due to errors in level measurement or improper pouring of concrete. Because of this, further work is impossible, for example, laying laminate or linoleum. Oh, and who wants steps between rooms?
3. Heated floor. Two ties are made - one after the insulation layer, the second after the heating wire.
What types of floor screeds are there?
There are four types of screeds:
1. Cement-sand screed . The most common type of screed. A significant advantage of this type over others is price and simplicity. Most people have this type in mind when they hear the word “screed.”
2. Dry floor screed. For some reason, this type is still unpopular, despite its main advantage - speed of production. There is no need to prepare the solution and then wait until it cools down - you just need to lay dry bulk material and lay gypsum boards on top. And everything is ready.
3. Self-leveling. But this method is rapidly gaining popularity. There are no beacons needed here, no need to level - the mixture itself spreads horizontally. Disadvantage - you can only fill a thin layer (up to 2 cm).
4. Combined. Cement-sand + self-leveling. Its main purpose is to obtain a perfectly flat floor if you need to significantly change the level.
Do I need to prepare the surface in any way?
Yes, it is necessary to prepare the surface, but there are no tricks here - we just remove dust and debris; before pouring the cement-sand or self-leveling screed, you can wet the floor.
Tell us step by step about the screeding procedure itself.
Okay, I’ll talk about cement-sand and self-leveling screed; we’ll talk about dry screed in the next interview, since the method of laying it is radically different.
1. It is necessary to set the required level with a water level or level. We remember that the minimum thickness of a cement-sand screed is 3 cm, and the maximum thickness of a self-leveling screed is 2 cm.
2. For cement-sand screed, it is necessary to install beacons. Most often, ready-made beacons are used, but if they are not available, then you can use the “old-fashioned method” and use boards. Beacons are installed at a distance of just over a meter from each other. We attach it to the floor using thick cement mortar.
3. Next, you should prepare the solution. The proportions of sand and cement depending on the brand are shown in the table. Stores sell ready-made mixtures that you simply dilute with water. If you do not have any extreme loads on the floor, then use a solution of grade 150 or 200, depending on your finances.
| Cement brand | Proportions | Brand of solution |
| 600 | 1:3 | 300 |
| 600 | 1:4 | 200 |
| 500 | 1:2 | 300 |
| 500 | 1:3 | 200 |
| 400 | 1:1 | 300 |
| 400 | 1:2 | 200 |
| 400 | 1:3 | 150 |
| 300 | 1:1 | 200 |
| 300 | 1:2 | 150 |
| 300 | 1:3 | 100 |
4. Filling. We simply pour the self-leveling mortar and wait about two weeks until it dries completely, and pour the cement mortar between the beacons and, as a rule, level the level of the mortar along the beacons. We lay the solution from the far corner of the room and stretch it towards ourselves, otherwise we ourselves will end up in the corner and will not be able to get out. To avoid cracks, it is necessary to moisten it with water two or three times during hardening. And in a couple of days it will be possible to walk, but we need to get the beacons and fill the cracks, otherwise the beacons will begin to rust. We wait three to four weeks until it dries completely.
That's it, the screed is ready! If we have done all the steps correctly, then we will have a horizontal, level floor without large cracks. Some builders claim that cracks are normal, but this is not true - only small surface cracks are allowed. The rest is trash. Well, small cracks on a cement-sand screed can be removed by pouring a couple of millimeters of self-leveling mortar on top.
Thank you, Vadim Alexandrovich, for your story! Come see us for more interviews.
Please, I will definitely come. I hope my advice will help people with their repairs.
Author of the article: Andrey
44 comments to “How to properly make a floor screed?”
- Kira says:08/08/2013 at 09:36
When I throw a self-leveling screed, I also put beacons. then it is easier to stretch and lies more evenly.
Answer
Daniel says:
09.20.2016 at 17:29
Here I did it without beacons, the result is certainly not ideal but acceptable
https://youtu.be/kekJTe8lzrQAnswer
06/22/2014 at 11:17
What beacons if the screed is self-leveling? You won’t be able to get them later.
Answer
- admin says:
06/23/2014 at 12:43
Is it necessary?
Reply
Sergey says:
12/01/2015 at 20:10
Yes.
And even more so, how to get t-shaped beacons? Answer
10/14/2014 at 22:04
Good evening. What needs to be done to avoid flooding the neighbors?
Answer
- Admin says:
10/17/2014 at 10:56
If you are laying tiles, then it is not necessary, only if there are gaps between the walls and the floor, then you can first coat it with a waterproofing solution.
If there are no tiles, then you need to cover the entire floor with a waterproofing solution . Reply
10/17/2014 at 14:34
How much water is needed for screed?
Answer
- Admin says:
10/17/2014 at 05:34 pm
It depends on your solution.
if you buy a ready-made composition, then the proportion should be written on the packaging, if you prepare it yourself, then dilute it to approximately the consistency of thick sour cream - and it will be easy to pull and there will be no cracks when drying Reply
02.11.2014 at 10:19
Hello. I have a 2 by 2 kitchen, which means probably 4 square meters. How many days will it take for the screed to dry?
Answer
- Admin says:
03.11.2014 at 20:01
Depends on the solution.
An ordinary cement screed takes 1-2 days to dry to a state where you can carry out work and walk on it, and 3 weeks until completely dry. Reply
11/12/2014 at 1:08 pm
Hello.
Thanks for the answer. And that for the 3rd week we should not lay Lenulim Reply
08/30/2015 at 08:06
After the cement-sand floor screed, not very deep cracks formed in our floor. In some places (small “pockets”) there is “bushing”... How to fix it? We will lay linoleum.
Answer
- Kirill says:
10.20.2015 at 12:05
The hot spots should be sealed before laying the linoleum.
Then it will fall asleep under it and it will be a problem to fix anything. Answer
10/19/2015 at 21:58
Hello!!! On the packaging of the self-leveling screed the consumption is written (for example, per 1 mm of thickness 1.6-1.8 kg/m2) i.e. if I want to make a screed of 1 cm, then I need to calculate approximately 18 kg per square. But I’m still worried that there might not be enough mixture because... I don’t know how uneven the floor is (suddenly most of the screed will spread to one end and not enough to the other). Moreover, as I understand it, the self-levelling agent will be poured in one go. How to calculate how much mixture you will need?
Answer
- Admin says:
10/20/2015 at 5:32 pm
First, check the level of your floor so that, as you wrote, it doesn’t turn out that everything is glassed into one corner.
Measure the maximum difference in levels and divide by 2. By as many mm. more will need to be calculated. If at the beginning of the room the floor is 4 mm higher than at the end, then in order to fill the screed to 1 cm, you need to add another 2 mm. But this works with a more or less uniform slope. If you have holes or significant unevenness, it may be worth leveling them separately first. Reply
Alexander says:
10.20.2015 at 18:07
Thank you.
One more question for you. We got a new apartment in a new semi-detached house on the 9th floor. And many people advise that the floor should be warm, pour a thicker screed onto the bare slabs, almost with expanded clay, etc. But it seems to me that it is enough to level the horizontal 1-2 cm with a screed and put a thick backing under the laminate. Tell me if you can with this question. Reply
Admin says:
10/21/2015 at 10:10
The question is of course very controversial, but on the 9th floor the main heat loss occurs through the walls and ceiling (if the floor is the last).
After all, the apartment is just as warm under the floor. And a couple of extra cm of concrete won’t provide much insulation. I believe that leveling the horizontal and a thick backing for the laminate will be enough. Answer
12/07/2015 at 11:58
what do you want to fill the screeds with
? Reply
02.11.2015 at 21:07
how to calculate the differences in all rooms, let’s say all three have different levels - let’s say there’s a difference of up to 5 cm between the first and the third and 2 second with the first, that is, raise the third by 4 cm with a screed and then level it with a self-leveling tool?
Answer
- Admin says:
08.11.2015 at 18:19
I didn’t quite understand the question
Reply
09.29.2016 at 18:26
with a level or a theodolite, or an ordinary level, but it will be a bit long and problematic
Reply
11/13/2015 at 01:07
Good evening! I’m going to make a cement screed in the apartment (corridor). Do I need to lay a film so as not to flood the neighbors?
Answer
02/04/2016 at 17:43
Tell me where to start, I bought 3 units of neither walls nor floors, should I first make walls for the rooms or fill the floor throughout the apartment?
Answer
09/15/2016 at 08:47
Please tell us why we need to screed the floor, because in most cases the floor is already level?
Answer
Leave a comment
Click here to cancel reply.