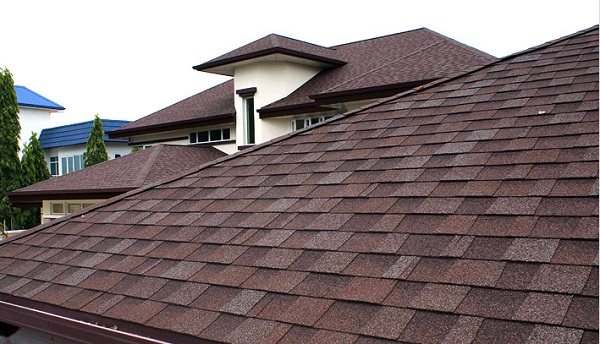
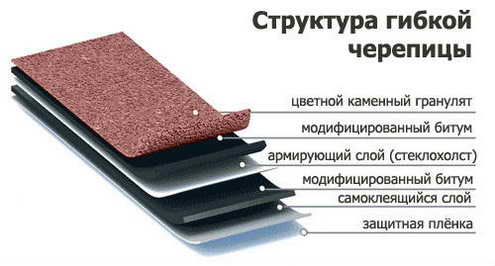
In recent years, soft bitumen shingles have become very popular in the construction of houses. This material has an anti-corrosion coating and does not allow moisture to pass through. Therefore, it is readily used on roofs of any type. The high strength of the material is ensured by fiberglass, and basalt powder protects such a roof from precipitation, sudden temperature changes and mechanical damage. Do-it-yourself soft tiles can be made at home, subject to certain technology.
Laying decorative roofing material consists of several stages:
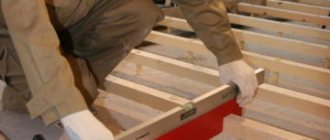
- Preparing the base , i.e., the sheathing. The base must be strong, rigid and level. For this, strict adherence to the laying step and slope angle is very important. Coniferous wood is used to create this structure. To prevent rotting, the material is treated with an antiseptic substance. The wood must be well dried with a moisture level of no more than 20%.
- Ventilation arrangement . The ventilation system reduces the temperature in the attic and removes condensation and vapors from under the roofing layer. To arrange it, you just need to leave a hole on the ridge at the very top and at the junction of the cornice.
- Laying lining material . Insulating material in rolls is laid, starting from the eaves, overlapping parallel to it. The sheets are nailed and the seams are sealed with special glue.
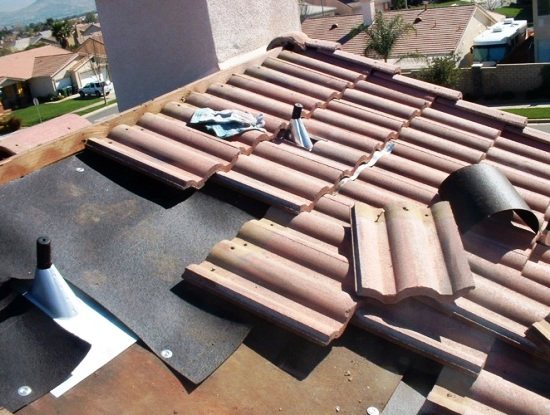
- Installation of additional elements . To protect the sheathing from rain, a metal drip line is nailed along the eaves. The ends are covered with special front strips. The valley carpet is laid to protect the valleys from leaks.
Clay selection and preparation
The quality of clay for tiles has always been of great importance. The best clay is the one from which pots are made, not greasy or sandy, but medium. It must be clean, soft and viscous. Tiles made from very oily clay warp and crack when dried, and from thin clay it turns out to be very weak, strongly absorbs water and is frost-resistant.
But very fatty or very thin clay can be adapted for tiles. To reduce the fat content, you should add fine clean sand or finely crushed bricks, pots, and tiles to the clay. If the clay is too thin, then you can grind sand out of it.
There are many simple ways to determine the suitability of clay for roof tiles.
Here are some of them.
- A crumpled lump of clay, thrown with force onto the floor, should be flattened like dough, without cracks, into a flat cake, and not crumble into separate pieces.
- When rubbing the clay between your fingers, you should not feel sand.
- Well-kneaded clay should easily take and retain all the shapes that are given to it (must be plastic).
But the most reliable way to find out the suitability of clay is to make several test tiles from it. With good clay, the finished tile has an even red color, there are no cracks or distortions on it, when you hit it, it makes a clear metallic ringing sound, and when lowered into water it does not increase its weight much. In addition, when placed on two bars, it should easily support a person standing on it, have a light glassy coating on the surface, and be of the same color and without bubbles at the break. It would be good if, upon drying and firing, the size of the tiles would decrease by no more than 5%.
After selecting and preparing the clay, it must be prepared for subsequent processing. Clay for tiles is prepared at any time of the year, but it must be overwintered. Clay taken out of the ground is piled on the surface of the earth in the form of long ridges 1.5-2 m wide and 0.7 m high at any length. These ridges are called stacks. In them, the clay becomes thoroughly wet from the autumn rains, freezes during severe frosts, and thaws again in the spring. As a result of these processes, clay acquires qualities that facilitate its processing.
In order for the clay to freeze better, the stacks are stirred from time to time and filled with water. The longer the clay is frozen, the better it becomes. You can freeze it for several winters. The frozen clay is soaked before processing and after 2-3 days they begin to knead. This is best done in a clay grinder, although you can also crush the clay with your feet.
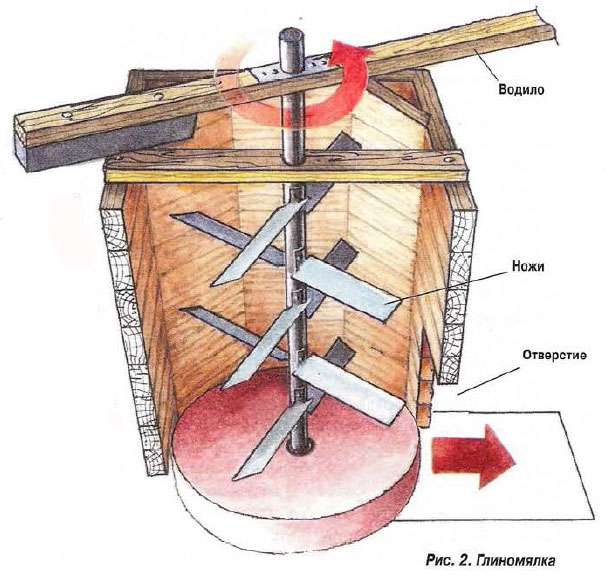
A clay grinder can be made from a large wooden barrel or from thick boards in the form of a box. Inside this box, an iron or wooden (oak) axis is inserted, on which iron knives are mounted in a helical manner. When the axis rotates, the clay thrown from above is cut by knives and directed downward, towards the hole, just as it happens with meat in a meat grinder.
In order to mix the clay better, sometimes additional fixed knives are placed on the sides of the clay grinder itself. A carrier is attached to the top of the axle, into which oxen or horses are harnessed and driven in a circle. It is better to mix the clay twice. The wooden clay grinder is approximately 1.5 m high, 1.06 m wide at the top, and 0.89 m wide at the bottom. The iron axis is 2.8 m high, and the length of the knives is 0.35-0.45 m with a blade width of 10 cm and a thickness of 3 cm. The carrier is made 8.5 m long. With one horse, two or three workers can knead about 15 m3 of clay in 8 hours.
Tile molding
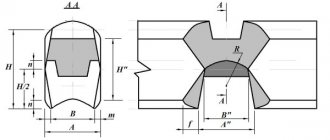
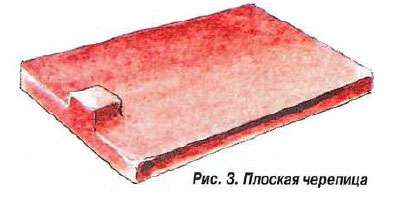
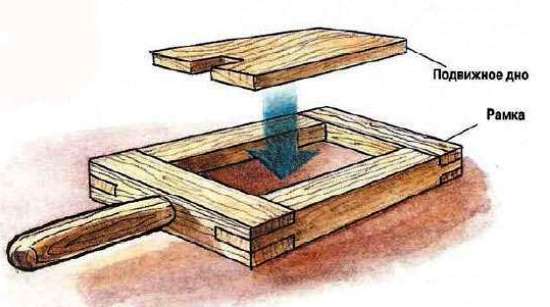
The easiest way to form flat tiles. To make it, you must have a wooden or iron molding frame with a handle. The internal dimensions of the frame are 33x21 cm with a thickness of slightly greater than 2.5 cm.
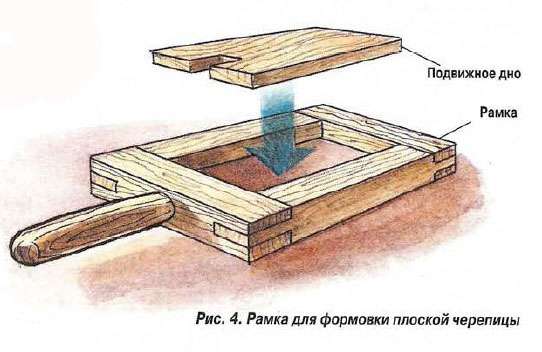
The frame is accompanied by a board (movable bottom), which must pass exactly through the frame and be 1.25 cm thick, and have a cutout at the top for a tenon.
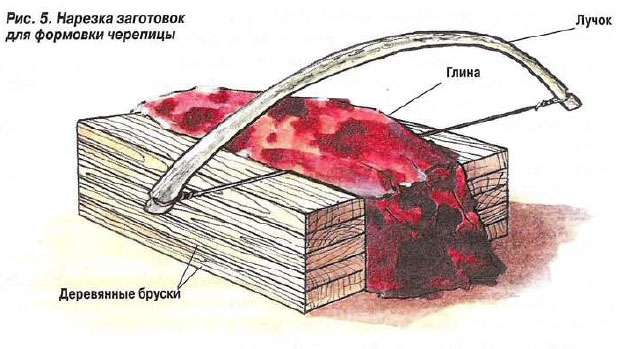
Making flat tiles is simple. A frame is placed on the work table, and a board with a cutout is placed in it, and the whole thing is lightly sprinkled with dry sand or ash. You need to place a large lump of crumpled clay on the table nearby and give it the shape of a cube. Then, with a bow and a bowstring made of thin steel wire, several layers 2 cm thick are cut. This is easy to do in “formwork” made of wooden blocks 2 cm thick. After molding the cube, the top bars on each side need to be removed and the layer cut, moving the beam along the bars. After this, you need to remove the next row of bars and repeat everything.
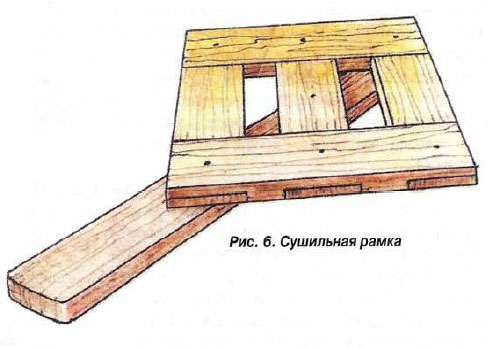
After this, they take one layer of clay and put it in a frame, press hard in the place where the thorn should be, and then add a lump of clay here. After this, take a rolling pin, wash it in a tub of water so that the clay does not stick to it, and clean off the excess clay from the frame, after which the frame is carefully removed. A drying frame is placed on top of the tiles, they are turned over and, after removing the board, the tiles are taken to the drying shelves.
When molding tiles, it is necessary to cut layers of such size that they fill the entire frame, since the addition of clay is harmful and after firing it lags behind the tiles. The molding of Tatar (Roman) or Dutch (grooved) tiles is also described in the book by A. Skachkov. This process is somewhat more complicated, but, as experience shows, any person can master this technology in a day or two. One worker can mold from 500 blanks per day.
Drying tiles
Proper drying of shingles is of great importance. If drying quickly and unevenly, the tiles may warp and crack, so drying should occur slowly and evenly over the entire surface of the tiles.
The damper the clay was during molding, the easier it is for water to come out of it when drying, and vice versa - the more tightly the clay was mixed, the slower the tile dries. This may cause more cracks to appear.
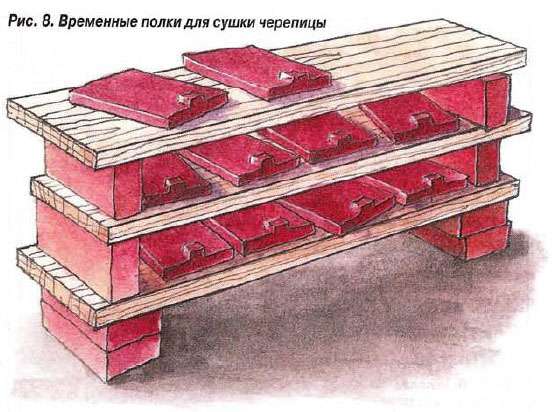
The sun and wind have a very harmful effect on the drying of tiles. Therefore, it is better to dry tiles indoors or under a canopy. In small-scale production, tiles are placed on temporary shelves made of boards and bricks instead of stands. Such shelves are easy to disassemble and put together, and they do not require any racks or nails during construction. In case of rain or strong sun, the tiles are covered with matting or straw mats. Drying time in summer averages 10 days,
Procedure for storing, lifting and laying material
Natural tiles, which include concrete ones, have established themselves as high-quality products that meet the most sophisticated tastes of consumers and meet international standards.
The main advantages of cement-sand tiles are:
- Long service life. Ensures strict quality control at all stages of production. Reaches 100–150 years.
- Long warranty period. Leading manufacturers give a considerable guarantee on the tiles themselves and additional elements - up to 30 years.
- High level of water absorption. The finished product undergoes laboratory tests for water absorption and capillarity, thanks to which the concrete tile covering provides protection for the house from heavy snow and heavy rain.
- Frost resistance. Concrete tiles withstand more than 1000 cycles of testing according to GOST 10060–95 for tolerance to very low temperatures.
- High resistance to temperature changes. At the same time, they retain their shape.
- Low thermal conductivity. A roof made of cement-sand tiles keeps living spaces warm in winter and cool in summer.
- Fire safety. Concrete tiles are not limited in their use by flammability class, which many roofing coverings cannot boast of.
- Thoughtful weight. Concrete shingles have a large mass in comparison with “light” covering materials. However, this is also their advantage, since heavy tiles will not be torn off the roof by heavy winds, unlike metal sheets.
- Versatility. Cement-sand tiles are designed for installation on roofs with any slope. If the slopes are very steep, anti-wind clamps can be used as additional insurance for fastening. Anti-wind clamps will help keep cement-sand tiles on the roof
- Noise protection. The composition and thickness of concrete tiles contribute to good sound insulation. Under such a roof you will not wake up from the roar of rain and hail.
- Indifferent to corrosion.
- Resistance to UV radiation and chemical impurities in the atmosphere.
- Ecological cleanliness.
- Increased strength. The tile covering can withstand a point load of 280 kg/m², as a result of which you can safely walk on concrete shingles without fear of damaging the covering material.
- Simplicity of installation and repair, as well as ease of reconstruction. The presence of one vertical lock ensures quick installation and provides access to each fragment. This makes it possible to easily replace damaged shingles with new ones and freely insert any additional element into the roof. Thanks to the structure of the tiles, concrete tiles are easy to install and repair, as well as the ability to easily insert various decorative elements into the finished coating
- Beauty and aesthetics.
- Good ventilation. Thanks to this, the supporting frame of the roof will be constantly dry, therefore, it will last much longer than under a metal or bitumen coating. The ability to replace ordinary tiles with ventilation tiles with holes protected from moisture during installation ensures excellent natural ventilation of the house
- Low cost. Moreover, this does not affect the quality.
The main disadvantage of cement-sand tiles is still considered to be their large weight, despite the fact that it is also its advantage in terms of sound insulation, wind resistance and the creation of a favorable microclimate in the house. Therefore, laying concrete shingles requires a serious approach to the construction of the rafter system.
In addition, the weaknesses of the covering material include:
- limited color range - red, green, black, brown, gray and blue tones;
- small variety of cuts;
- fragility - the material is resistant to point loads, but can be damaged during transportation.
Laying scheme
Laying tiles made from a cement-sand mixture begins with the installation of a waterproofing film, which is fixed to the rafters using small nails or a special construction stapler. When installing it, the following points must be taken into account:
- The film should be attached with a slight sag, ensuring ventilation of the rafter spaces and drainage of condensate towards the gutter (through the eaves strip).
- Individual sheets of waterproofing film must be laid with a slight overlap or overlap (about 15 cm). When fastening with small galvanized nails, sometimes, for reliability, the film is pre-pressed with thin wooden slats.
- When laying insulation material, make sure that there is a small gap (at least 5 cm) between the film and the insulation layer to ensure unhindered air circulation.
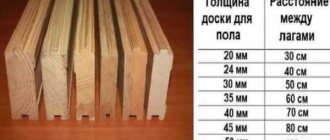
- To construct the sheathing for such tiles, it is recommended to use bars with a cross-section of 30×50 mm, which are laid in increments determined by the size of the tile blanks (usually it ranges from 32 to 39 cm).
READ MORE: Composite tiles: pros and cons, installation, as well as an overview of coating types - luxard, gerard, metrotile, decra and others
Another point that should be taken into account when installing cement-sand tiles yourself is strict adherence to the laying sequence. According to generally accepted standards, work should begin from the lower right corner of the roof from the slope and then move along the eaves. Thus, the order of laying tiles involves simultaneous movement of the working area from right to left and from bottom to top (towards the ridge). In this case, the areas located along the perimeter of the roof are first covered, and only then the space formed inside them is filled.
Upon completion of the entire set of preparatory operations, you can safely begin installing the first lower element, which is laid taking into account a slight “descent” beyond the edge of the sheathing. This descent protects the under-roof space from rainwater and also promotes the free penetration of air into the attic.
When installing the roof, you should take into account the fact that the strength of the entire coating as a whole will depend on the reliability of fastening the bottom row of tiles (which bears the largest wind load). In addition, special attention should be paid to the installation of the topmost row of tiles adjacent to the roof ridge.
We really hope that, taking into account all the recommendations indicated in our article, you will be able to independently install cement-sand tiles on the roof of your house.
Of course, the installation of this roofing, just like any other, has its own characteristics specific to this material. So, asbestos-cement tiles should begin to be laid from the lower right slope corner. Usually its arrangement goes from the horizontal side of the eaves overhang upward, towards the ridge.
This material is distinguished by its mass, which makes it stand out from other types of tiles and its advantages. The main advantages of the coating include:
- A wide range allowing you to choose the roofing material of a suitable shape and shade.
- The possibility of additional ventilation due to the small gaps between the tiles formed during installation.
- High-quality natural raw materials for making tiles.
- Possibility of obtaining environmentally friendly material for roofing.
- Property of frost resistance and fire safety.
- Simple and easy to understand instructions for installing Braas cement-sand tiles.
- Excellent soundproofing properties.
- Formation of a reliable coating over the entire roof surface thanks to a special locking system that allows Braas sand-cement tiles to be firmly connected.
- High strength and resistance to deformation.
- Easy to install and dismantle.
- No need for additional care.
Along with invaluable advantages, there are also some disadvantages that are inherent in each building material, since ideal things do not exist.
Some disadvantages of this type of roof covering include:
- Cost of cement-sand tiles Braas.
- The complexity of the work.
- The need to comply with certain requirements for coating formation.
Installation of Braas cement-sand tiles differs depending on the selected model and shape of the material. Each modification has its own characteristics, features, technical indicators, and installation recommendations.
Do not forget that if the slope angle is below the permissible value, additional installation of a layer of waterproofing material is required. If the threshold value is higher than the recommended one, additional fastening of the system with self-tapping screws or roofing clamps is required.
Please note that the required level of ventilation is achieved by installing a counter-lattice under the roofing system. The process of laying tiles occurs in the direction from right to left, and models with a flat shape can be installed in a checkerboard pattern.
Fine characteristics and some recommendations regarding the variety of types and choice of Braas tiles will help you make the right purchase, saving several times on the roof. After all, a higher quality material option will allow you to forget about the problem of roof leaks for decades.
Firing tiles
Firing is the most critical moment in the production of tiles. Proper firing depends on the fuel, the design of the kiln, the skills of the worker (the roaster) and many other reasons.
The tiles are fired in special kilns, the simplest of which are batch kilns.
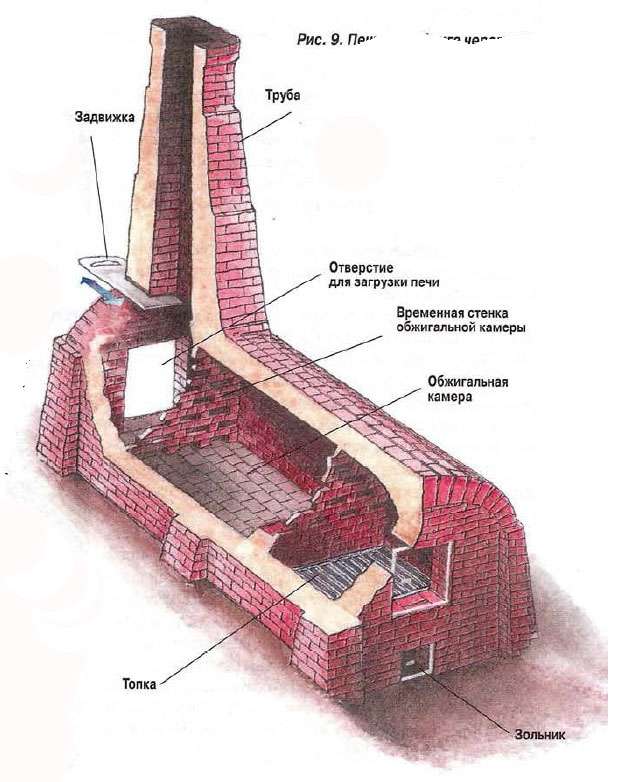
The kiln is divided into four main compartments: the firebox, the ash pan, the burning chamber and the chimney. The internal dimensions of such a stove are impressive: 2 m wide and 4 m long. The firebox is 1 m long. Behind it there is a wall with holes that separates the firebox from the firing chamber. After the kiln is loaded with tiles, a temporary wall with holes is placed in the back of the chamber. Some furnaces do not do this. The height of the pipe in such a furnace is not very large - about 4.5 m. The dimensions of the pipe at the bottom are 70x80 cm, and at the very top - 40x53 cm. A valve is installed in the pipe to increase or decrease the draft . Cover the oven with a roof.
There is a large opening at the back of the stove for loading and unloading tiles. During firing, this hole is filled with bricks in clay mortar and covered with sand to reduce heat loss. Sometimes a small door is left here to monitor the progress of firing and take samples.
Different tiles are placed in ovens in different ways: Dutch and Tatar tiles are placed vertically, and flat ones are placed sideways on a long edge. The tiles should stand vertically, without tilting, at a short distance from each other. To prevent it from tilting in one direction or another during firing, it is slightly wedged with broken fired tiles.
It is best to place tiles in the oven in separate tiers, starting from the wall closest to the firebox and extending them across the entire width of the oven to the very top. Once one tier is loaded, another is placed, and so on, until the entire oven is loaded.
After this, firing begins. It should be carried out to such an extent that the tiles come out slightly vitrified over the entire surface. Vitrification begins to appear when the tiles are slightly burned and the clay on the surface is baked. In any case, it is better to overburn the tiles a little rather than underburn them. Finishing tiles. The tiles do not always turn out to be an even color. To remove variegation, give the tiles a more attractive appearance and improve their quality, the tiles are subjected to various treatments. One of them is glazing. Glaze is a special glassy layer that covers the surface of the tile during firing. Icing comes in a variety of colors, but the cheapest and most common colors are brown and tan. The glaze gives the tiles a beautiful appearance and makes them stronger than unglazed ones. However, glazing doubles the cost of tiles, which limits the use of this finish.
A more acceptable finish is engobing, that is, applying glaze to the tiles. Poliva is made from special red, completely pure, fatty clay, which is first dried and ground, then diluted with water like thick milk and filtered through a fine sieve. Before firing, the dried tiles are dipped into this clay solution and re-placed on the drying racks. When the tiles are dry again, they are loaded into the kiln and fired. After firing, the surface of the tiles comes out all smooth red. Watering improves the quality of the tiles and increases their service life.
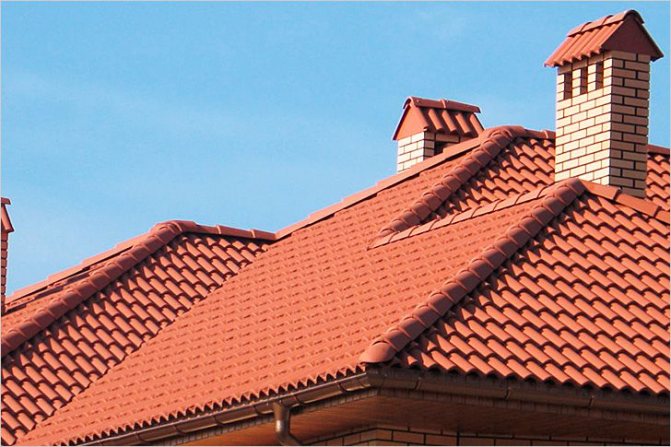
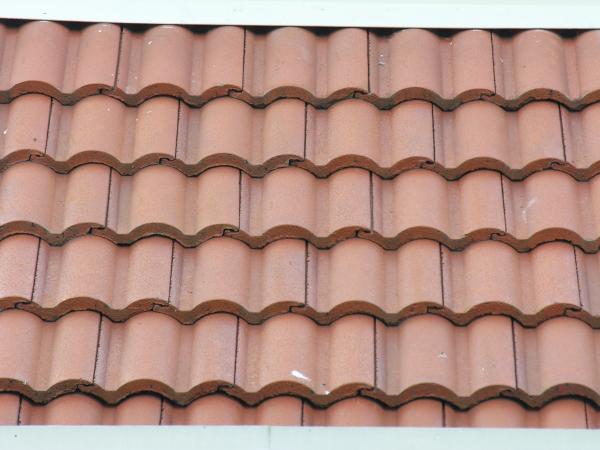
When the tiles are fired and cooled, they begin to be unloaded from the kiln and sorted. Roof tiles for houses must be straight, evenly colored, ringing, without cracks or broken corners. The remaining tiles can be used to cover awnings and temporary roofs. It is better to store finished tiles under a canopy, protecting them from rain and snow. The bottom rows must be placed not on the ground, but on boards. Covering the roof with tiles. Tile roofs are fire-resistant, durable, require no painting or repair, and are very beautiful.
The steeper the roof slope, the better it is, since snow will not linger on it, and rain will drain quickly. But this rule is true only for certain climatic conditions (sloping low roofs, for example, are acceptable in hot southern areas) and the tiles used.
With flat tiles, the roof must have a rise of at least half the width of the building. The sheathing under it is nailed according to the size of the tile, so that it is hooked with a spike at the top, lies on the lower bar and descends behind it at the bottom by no more than 6 cm. Flat tiles are covered either in one layer or in two.
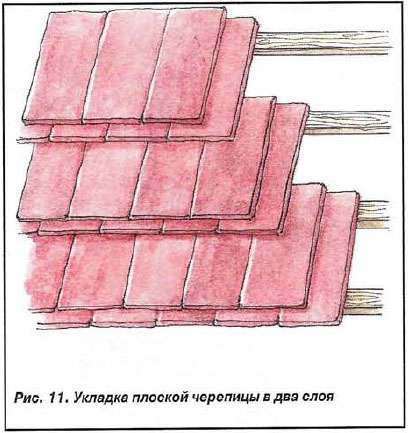
The first method is simple, but the roof is loose and to prevent rain from getting into the cracks between the tiles, strips of tin are placed under these cracks. The width of the strips should be from 9 to 11 cm, and the length should be 4 cm shorter than the tiles. The ridges are covered with ridge tiles on moss mixed with clay or lime mortar.
A more durable and dense roof is obtained in two layers. But such a roof is heavier - for 1 m2 there are approximately 200 tiles, which weigh about 100 kg (with a single-layer installation - half as much).
For a long time, when building a personal bathhouse on a site, the material for the roofing of its roof was made with one’s own hands. Moreover, only environmentally friendly and cost-effective materials were used - such as clay. That is why today, in the technogenic age, where even in the process of building houses practically nothing natural is used, ceramic tiles as a roofing material have become again in demand and popular. Moreover, clay tiles for the roof of your bathhouse can be made without the help of specialists - just like the old fashioned way.
Ceramic tiles have gained their popularity due to the naturalness of their material.
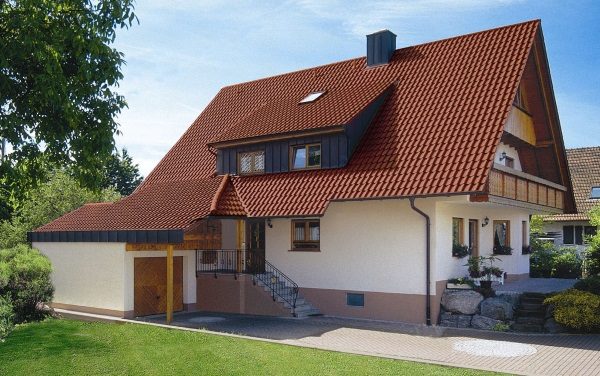
Real advantages and disadvantages of roofing
Ceramic tiles are made from clay; mineral dyes can be added to the composition to change the color at the formation stage. In order to improve performance characteristics, surfaces can be additionally coated with protective and decorative finishing coatings. This manufacturing technology gives the coating undeniable advantages over other types of roofing materials.
Ceramic tiles have a number of advantages over other types of roofing coverings
- Duration of operation. In terms of this parameter, tiles occupy one of the first places; buildings with ceramic tile coatings have been in use for hundreds of years.
The service life of ceramic tiles can exceed a hundred years, which corresponds to the average service life of a cottage or country house
- Safety. This means not only the release of harmful chemical compounds, but also resistance to open fire. The material does not burn and does not emit toxic gases into the air.
The tiles are recognized as completely safe and recommended for use without any restrictions.
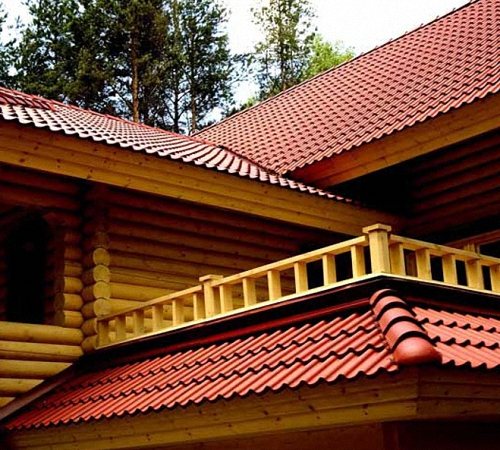
- Design qualities. Such coatings have always been, and will continue to be, considered the most fashionable and prestigious. Ceramic tiles decorate the appearance of all buildings, making it exclusive and noble.
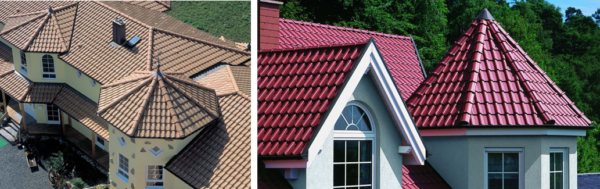
Tiled roofs look expensive and attractive
Tile roof
Now we need to dwell on the negative sides, but talk about them as objectively as possible. What are the disadvantages of ceramic tiles?
High price. Indeed, the price of a square meter of ceramic tiles can reach 3,000 rubles/m2, but it starts at 800 rubles/m2. This means that developers have the opportunity to select products with optimal cost values. Metal shingles are considered much cheaper, but this is not true. The price of this material ranges from 500–800 rubles/m2, that is, it is quite comparable to cheap types of ceramic.
Ceramic tiles are available in a wide price range; there are relatively budget options
But that is not all. It is necessary to take into account not only the price of the roofing, but also all additional materials that must be used during the work. Metal sheets must be protected from the negative effects of moisture, reduce noise, etc. The total cost of roofing work with metal tiles and piece tiles differs by only 20–25%.
The cost of installing metal tiles is not much cheaper, and besides, such a roof requires additional sound insulation
Additionally, the duration of operation should be taken into account. Metal roofs have a warranty of no more than 30 years, and ceramic tiles have a warranty of at least 100 years. There is a difference? Metal roofs will have to be repaired three times more often, which is a huge additional cost.
Prices for metal tiles
Metal tiles
Heavy weight. Indeed, the weight of a square meter of ceramic tiles can reach 40–50 kg, while metal tiles weigh only 6–7 kg/m2.
Technical characteristics of individual types of ceramic tiles
It is further stated that for heavy tiles it is necessary to build a complex rafter system, a lot of expensive lumber is required, etc. Inexperienced developers believe, because the numbers are very convincing. But what really? In our country, there are standards that require that during calculations of the rafter system, the technical specifications provide for a total load per square meter of at least 250 kg. No one plans a rafter system separately for metal tiles, flexible roofing materials, asbestos-cement slate or ceramic tiles.
The rafter system is initially designed taking into account high loads
Roof rafter load calculator
Advice. Any rafter system can easily withstand the weight of ceramic tiles; always remember this and do not react to incompetent advertising statements from manufacturers of cheap coatings.
Installation difficulties. This myth is spread by those who have not installed modern tiles. Indeed, previously the installation of tiles took a lot of time; each one had to be fixed to a tensioned wire or screwed with self-tapping screws, and the overlaps and joints had to be sealed with cement-sand mortar. In addition, imperfect molding and firing technology caused individual tiles to vary in linear dimensions and the surfaces to bend. All this created great difficulties for roofers, requiring a lot of extra time to solve problems.
Previously, laying tiles took longer due to the adjustment of elements to size
Today, coating is done on modern equipment, the entire technological process is controlled automatically. This production eliminates the negative influence of the human factor, the tiles are of excellent quality, all tiles are completely identical.
High-quality tiles have the same shape and size, which greatly simplifies their installation.
Another important point. The designers have developed a completely new principle for fixing ceramic tiles to the sheathing; now there is no need to screw each tile with self-tapping screws or nail it. In this complex way, only the outermost upper, lower and side rows are fixed, all the rest are simply snapped into place. Due to this, roofing installation is greatly accelerated while maintaining high reliability and stability.
Laying castle tiles
Conclusion. The technological process of laying modern ceramic tiles is not much more complicated than installing sheet coverings. As for the speed of installation, you should compare not only the installation of the finishing metal sheets, but also the time for preparatory operations and the installation of special layers of the cake.
Stage I. Clay selection
The quality of the clay directly determines how durable and aesthetically pleasing ceramic tiles will be. It is best to take the clay that is usually used for making pots: not greasy, but not too sandy. Because natural tiles made from too fatty clay will begin to warp and crack when dried, and those made from thin clay will intensively absorb moisture and will not tolerate frost well . The clay should be viscous, soft and clean. Here's how you can determine its quality:
- Method 1. Crush a lump of clay and throw it forcefully onto the floor. It should be flattened like dough into a flat cake - without cracks and without crumbling pieces.
- Method 2. Rub the clay between your fingers – you shouldn’t feel any sand.
- Method 3. Knead the clay and try to make shapes out of it. It must be plastic.
Advantages and disadvantages of the material
When starting the installation of cement-sand tiles, it is very important to know all the advantages and disadvantages that this material has.
The main advantages of such tiles are the following:
- durability. Perhaps the main advantage that a roof made of cement-sand tiles has is that its service life can reach 100 years;
- affordable price of the material;
- the opportunity to give a unique aesthetic appearance not only to the roof, but to the entire house as a whole;
- resistance to any unpleasant weather conditions (precipitation, wind, etc.);
- excellent sound, thermal and waterproofing characteristics;
- fire resistance;
- simplicity and convenience of installation and further operation.
However, cement-sand tiles, the installation of which has so many positive indicators, are also characterized by some negative aspects, which usually include the following:
- too much weight of cement-sand tiles requires mandatory reinforcement of the rafter system on the roof;
- poor resistance to low temperatures;
- excessive fragility;
- tendency to the appearance of fungi and mold on the material;
- large thickness and rather rough shape;
- high installation cost;
- the material has a limited set of sizes and shapes.
Stage II. Preparing clay
Once a good clay has been selected, it can begin to be prepared for processing. Typically, clay is prepared for tiles at any time of the year, but it still needs to survive the winter.
So, the clay taken out of the ground needs to be piled on the ground surface in the form of ridges 2 m wide and 70 cm high. Such ridges are usually called stacks. This is how the clay will have to lie until it warms up - it will get wet from the rains in the fall, freeze in the winter, and thaw in the spring. After all this it will be much easier to process. And in order for the clay to freeze better, it is advisable to periodically stir the piles and even fill them with water. After all, the longer it is frozen, the better. Even if the clay lies like this for several years, it will only benefit it.
Stage III. Preparing clay for processing
Before processing, the frozen clay needs to be soaked, and after two or three days you can begin to knead it. For this, there is a clay grinder, which you can make yourself from a wooden barrel or thick boards in the form of a box. A wooden or iron axle must be inserted inside the clay grinder, and iron knives must be screwed onto it. The mechanism is similar to twisting meat in a meat grinder. And for better mixing, you can place additional knives on the sides of the clay grinder. It is better to mix the clay itself at least twice.
Stage IV. Shaping the tiles
The easiest way to make flat ceramic roofing tiles. To do this, you will need a wooden or iron molding frame with a handle with dimensions of 33x21 cm, and a thickness of slightly more than 2.5 cm. A board will be attached to the frame as a movable bottom, which will precisely pass through the frame and be equal in thickness to 1.25 cm, and also have a cutout at the top for a tenon.
So, a frame is placed on the desktop, and a board with a cutout is placed in it. All this is sprinkled with ash or dry sand. A large lump of already crumpled clay is placed on the table nearby and given the shape of a cube. Next, several layers with a thickness of 2 cm are cut using stretched thin steel wire.
Frame for making clay tiles.
Now one layer of clay is taken, placed in a frame and strongly compressed where the tile should have a spike. Then a lump of clay is added and a rolling pin dipped in water (to prevent it from sticking) is used to clean off the excess clay from the frame itself. After all this, the frame must be carefully removed, and the ceramic tile itself is covered with a drying board. Next you need to turn it over and remove the board. And that’s it - the tiles can be placed on drying shelves. The main thing is that when forming the tiles, the layer is cut so that the frame is completely filled, because after firing the added clay will lag behind.
Forming Roman or Dutch tiles is a little more difficult, but this technology can be mastered without any experience. There are even statistics that one worker alone is able to make such 500 pieces per day.
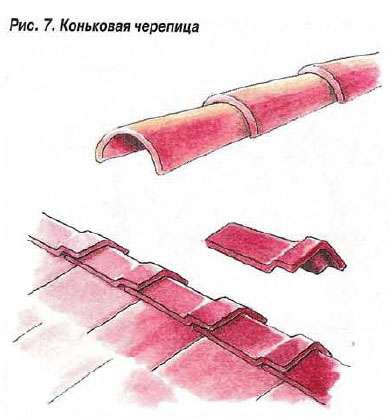
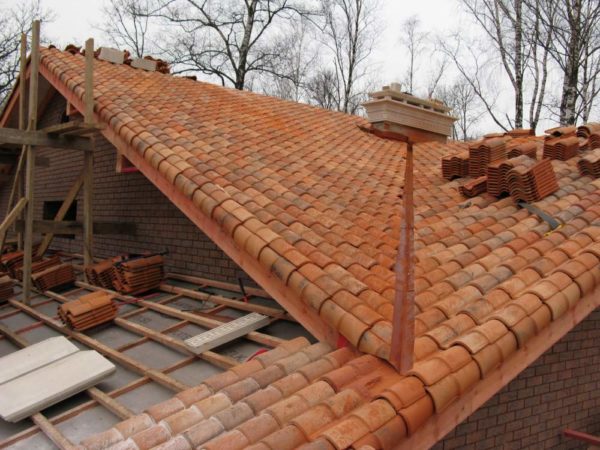
But the installation of natural tiles has its own characteristics . So, for the roof ridges, special ceramic tiles are prepared, called ridge tiles.
V stage. Drying clay tiles
The formed ceramic tiles must dry well - slowly and evenly over the entire surface, otherwise cracks cannot be avoided. And the drying time depends on how well the clay was mixed - the damper it was, the faster the water will come out.

Clay for tiles must dry thoroughly and evenly.
You can dry tiles only indoors, or at least under a canopy. To do this, you need to make temporary shelves or bricks as stands in advance. And it will need to dry for 10 days.
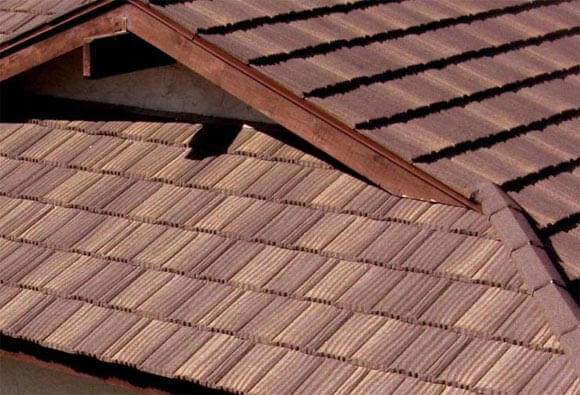
Size of cement-sand tiles
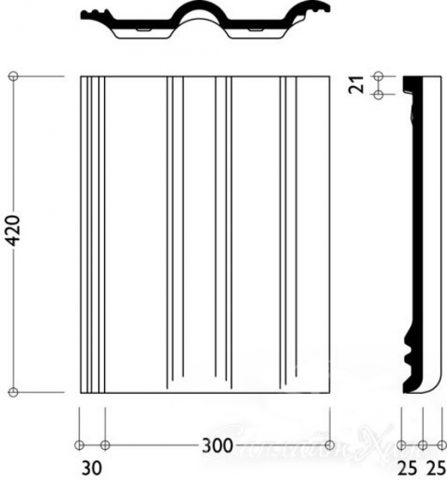
The dimensions of cement-sand tiles depend on their shape. The parameter is usually unregulated, since manufacturers set their own sizes. For example, the sides of a half element may have dimensions of 420x180 mm. If the size of the main tile is 420x330 mm, then there are 10 of them per 1 m2. There are smaller main elements with parameters of 410x240 mm. Up to 15 of these tiles are used per 1 m2 of roofing.
Stage VI. Treatment
Fired natural tiles do not always have a perfectly even color, and therefore they are often pre-processed. Basically this is glazing. The tiles are covered with a special glassy layer, which makes them more beautiful. But this is quite an expensive pleasure, and therefore more often glaze is applied to the tiles, which is made from red, pure, fatty clay. It is first dried and ground, and then diluted with water like thick milk. Before firing, the clay is dipped into such a solution and again placed on the drying shelf. After firing, the tiles turn out to be an even red color, with improved qualities and an extended service life.
Comparison: composite tiles or sand-cement tiles
Composite tiles are improved metal shingles. Due to the granular coating of the front layer, the composite coating is devoid of the main disadvantages of metal tiles, namely:
- does not conduct sounds;
- electrical conductivity is significantly reduced;
- higher strength of the outer layer (if the polymer coating on the metal tile is damaged, the material becomes vulnerable to corrosion);
- the material is more plastic, it can be used to cover not only straight, but also curved slopes.
In terms of sound, heat and electrical insulation, composite tiles are comparable to cement-sand tiles. Other characteristics:
- the mass per square of the composite one is significantly less - 6-7 kg;
- the price is slightly lower - 200-300 rubles;
- composite tiles are not a fragile material;
- service life is shorter - about 50 years;
- Only flat slopes can be covered with hard cement-sand tiles.
VII stage. Burning
Firing is the most crucial moment in the production of tiles. The tiles need to be fired in special kilns called batch kilns. These can be seen in old Dutch villages, and it is quite possible to design something similar according to a similar scheme on your own site, albeit of a smaller size.
So, a kiln for firing tiles consists of four compartments - a firebox, an ash pan, a firing chamber and a pipe. Behind the firebox there is a wall with holes, which separates it from the firing chamber. Once the chamber is fully loaded with tiles, a temporary wall with holes will be laid in the back of the chamber. Also in such a furnace a special valve is installed to reduce or increase draft, and the furnace itself is covered with a roof.
By the way, at the back of such a stove there is always a larger hole for unloading and loading tiles. And during firing, it is laid with bricks or covered with sand to reduce heat loss. But a small door is always left in order to observe the progress of firing and take samples.
The tiles themselves can be laid for firing in different ways: vertically, if they are Dutch or Tatar tiles, and sideways on the edge, if they are flat. But any tiles should stand vertically, at a short distance from each other and without any tilt. To prevent it from tilting, you can wedge it with pieces of broken and already burned pieces.
The tiles need to be fired until they become slightly vitrified on their surface. In general, vitrification is a sign of overburning of the tiles, but it is better to overcook them in the fire than to underbake them. Typically, the longer a tile lasts in the oven, the stronger it is. And the installation of ceramic tiles with burnout is a guarantee of special strength and durability of the roof . But without fanaticism, it is quite possible to completely burn the clay.
VIII stage. Sorting
The steeper the roof slope, the better for the tiles.
After the tiles have cooled, they are removed from the kiln and sorted. So, for the roof, all of it must be straight, clear, without cracks and evenly colored. And the rest of the tiles can be safely used to cover awnings. The tiles should be stored under a shelter, with good protection from snow and rain. And the bottom rows should not lie on the ground, but on boards.
All tile roofs are durable, easy to maintain and very beautiful. And installing ceramic tiles will not be difficult even for a novice builder - everything is extremely simple . The steeper the slope, the better for the tile itself - the less snow will linger on it. But in hot areas, tiles can also be used to cover flat roofs.
It is no secret that in our time the vast majority of building materials are produced primarily industrially, and manual labor is becoming a thing of the past.
What arguments can force a person to take up the independent production of clay tiles and literally get their hands dirty?
Installation of cement-sand tiles
A person with experience or a qualified roofer can install a tile roof correctly. The process is complex. Mistakes made will lead to the destruction of the roof.
Lathing for cement-sand tiles
To lay ordinary tiles, the rafter system is made so that the angle of inclination of the roof slopes exceeds 30 degrees. Roofing elements of the groove-and-groove type can be mounted on slopes with a slope of 22°. Manufacturers produce some types of tiles designed for installation on flatter and steeper slopes. This parameter must be taken into account when creating the roof frame. Incorrect slope will lead to moisture entering the under-roof space.
However, splashes of water can fly in with strong gusts of wind. To prevent this, waterproofing material is placed under the tiles. The canvas is placed on the rafters. The joints of the strips are overlapped with a start of 200 mm. Fixation is carried out with nails, nailing them to the rafter legs through laid wooden planks. After laying the waterproofing, begin installing the sheathing. The pitch of the slats depends on the size of the tiles. Of 12 elements, 2 rows are laid out on the ground, the distance is measured for convenient fastening. Using the calculated parameters, sheathing slats are attached along the entire roof. To achieve straightness, tighten the cord. The location of the bottom batten is calculated so that the edge of the laid tiles hangs slightly from the roof.
Weight of cement-sand tiles per 1m2
Before making the calculation, you need to take into account that the weight of cement-sand tiles is quite impressive. The parameter depends on the size of the element. The average weight of one tile is 4.5 kg. A load of 45 kg is created per 1 m2 of roof. The calculation must begin with the rafter system, providing for reinforcing units and the correct slope of the slopes.
Laying cement-sand tiles
The installation of a roof made of cement-sand tiles begins by laying the bottom row. They move from left to right. The rows go from bottom to top. When the first bottom row is laid horizontally, lay one outermost vertical row. Evenness is adjusted using a stretched cord.
Each tile is secured with clamps, nails or self-tapping screws. After fixing the element, check the horizontalness and evenness of the installation. Having finished covering the slope with standard tiles, they begin to install the pediment elements. The spacing between rows must be maintained. The installation of the pediment row is completed by installing the material with a rolled end.
Seals are installed on the ridge girder to ensure reliable waterproofing and ventilation of the under-roof space. The elements are placed on the ridge and fixed to the tiles. The ridge products themselves are secured with clamps. When covering the ridge zone, boards are nailed on both sides of the main beam. They are covered with waterproofing, but leave a gap for ventilation.
Sloping sections of the roof ribs are covered in a similar way. Cement-sand elements are trimmed with a grinder.
Benefits of making tiles yourself:
- the opportunity to realize creative potential. Proudly showing guests your handiwork placed on the roof - isn’t that a pleasure? Perhaps the coating will not be ideal in terms of aesthetics, but natural clay tiles always look presentable and luxurious, even if they have a non-uniform surface color;
- a banal financial component - after all, an exclusive roofing covering will cost almost the price of clay, and if clay material is available in abundance in the area, then the economic aspect will come first. At the same time, some complexity of production will be compensated by excellent performance characteristics. In addition, ceramic tiles are an excellent option for a bathhouse: they are durable, resistant to heat and cold, the piece coating does not involve a lot of waste, and if one element is damaged, it is easy to replace;
- environmental cleanliness. The opportunity to independently control the “birth” of building materials for your home is unique. And there will be no doubt that the building will be covered with environmentally impeccable material if it is made with your own hands.
Let’s clarify right away: we are talking about the artisanal production of a relatively small number of tiles - for covering outbuildings, bathhouses, gazebos, and certainly not for sale.
So, you need to start the production process with the choice of material.
Caring for sand-cement tiles
Modern cement-sand roofing coatings are characterized by the presence of acrylic coloring. The surface of the roof is smooth, dust and leaves do not linger on it. Dirt is washed away by rainwater. There is a separate type of polymer sand tile. It contains polymer additives that improve performance characteristics. In general terms, the installation of polymer sand tiles follows a similar principle, and it is even easier to care for such a roof. Polymers reject dirt and prevent the formation of moss in damp conditions.
As for caring for a cement-sand roof, the roof must be washed off with strong water pressure at least once every three years. The jet removes stubborn dirt and moss, which will begin to form on the northern slopes of the roof 1-2 years after its installation. If stubborn dirt cannot be washed off, use detergents and brushes with long handles.
Old tile materials are made using outdated technology. Over time, paint peeling may occur. It is cleaned well, after which the tiles are painted with special paints. You can choose the color and restore a certain area if the rest of the roof is in good condition.
What should the clay be like?
The quality of clay is the most important indicator; it determines how durable and beautiful the finished product will be.
To make the roofing covering reliable, you need to use moderately fatty clay that does not contain a lot of sand - just the kind that is used in pottery.
A material that is too fatty is bad because shingles made from it will crack and warp during drying.
If there is a lot of sand in the composition, the finished elements will absorb a lot of water, and accordingly, the tiles will not tolerate frost well.
It is necessary that the raw materials for mixing the future piece roofing are small and clean, without large foreign objects.
Color of sand-cement tiles
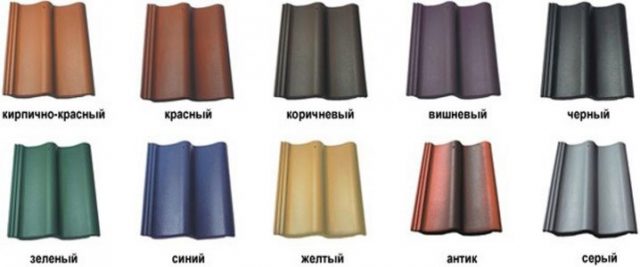
Without coloring, the cement-sand product has the traditional gray color of concrete. To make the roof aesthetically pleasing, the products are painted.
According to new technologies, painting occurs in two ways:
- mixing coloring pigments into cement-sand mortar;
- painting the surface of finished concrete elements.
Color is considered an equally important characteristic of cement-sand tiles, since every developer strives to get not only a reliable, but also a beautiful roof.
Important! When choosing a blue and green colored CPC, it should be taken into account that the gray tone of the cement will be slightly visible against the general background of the roof.
Preparing raw materials for kneading
Clay taken out from the bowels of the earth must freeze out - this means that, folded into ridges, it must get wet under the autumn rains, overwinter and thaw under the spring sun. It is believed that only then will the raw material be endowed with the necessary qualities.
Immediately before processing, the clay material should be soaked for a couple of days, and you can begin to knead it to obtain a dough.
You can knead it with your feet - the old fashioned way, but this process is lengthy and not as effective as using a simple mechanical device - a clay grinder.
You can purchase a clay grinder or make it yourself, using a barrel with a box as a body, and equipping the structure with an axis with helical blades-knives. Rotating around an axis, the knives will thoroughly grind and mix the raw materials.
Reviews about the Center for Human Rights
Here are real excerpts from reviews from building materials forums:
“I am a master with many years of experience. In terms of quality, I put Baltic tile in first place, and BRAAS in second. I only advise, and the choice is up to the buyer. No matter how much I worked with other manufacturers, I was convinced that there is nothing better than these.”
Mikhail, Nizhny Novgorod.
“The master advised to cover the roof with Benders, I listened and did not regret it - for the second year there were no complaints, but my friends bought some unknown Finnish brand and are now crying. And I’m happy, the roof doesn’t heat up in the summer and doesn’t leak in the fall. I paid even less than I expected: everyone scared me that it would be expensive.”
Igor Evgenievich, Voronezh.
Cement-sand tiles are the most popular roofing option at the moment. It has its pros and cons.
Flaws:
- high price, which consists of additional costs - waterproofing, piece fastening, installation cost;
- the need for a more powerful foundation, since the structure is heavy, approximately 50 kg per m2;
- very labor-intensive work on laying tiles; laying them yourself will not work;
- the cost of the CHR is quite high;
- serious waterproofing is required, since the roof is laid piece by piece and there is a high risk of moisture penetration;
- The disadvantages of this type of coating include the fact that in the absence of proper care, such a roof quickly loses its appearance.
Advantages:
- roofing made of cement-sand tiles has attractive decorative qualities. It looks like natural clay, although it has not been fired;
- the weight of the structure prevents the wind from destroying the decking, even during a hurricane, provided that it is installed correctly, of course;
- the laying system assumes the automatic occurrence of good ventilation, as it is carried out with small piece plates, with a loose fit at the joint;
- some manufacturers provide a guarantee of up to 30 years for their product;
- high point load limit. This means that, if necessary, an adult can walk freely on the roof and nothing will crack under him;
When choosing such an expensive building material, there is still an opportunity to save money. Firstly, many construction companies work with installment payments, hold promotions, set seasonal discounts, usually in winter and early spring, and secondly, there are companies selling building materials that provide free delivery.
Cement sand tiles are a practical and affordable type of roofing that is in demand among developers. Improved technologies make it possible to achieve an appearance that is almost as good as a ceramic roof.
The high demand for roofing material of this type contributes to the fact that well-known enterprises in Russia and abroad are engaged in its production. Its production technologies combine the traditions of past times with the latest achievements.
Forming tiles
You can make the Dutch or Roman variety using a homemade method, but the flat shape of the tile is best suited for making it at home.
The plate must fit clearly into the frame and have a cutout in the place where the tile will have a tenon.
Place a frame on a flat working surface (usually a table), a plate in it, then lightly sprinkle everything with dry fine quartz sand. Ash can be used instead of sand.
The crumpled clay is formed into a cube, from which you need to make layers two centimeters thick - the easiest way is to use a stretched thin steel wire, cutting the cube with it.
Each prepared piece is placed in a frame - it must be completely filled, the area where the thorn will be is pressed firmly, and another piece of clay is added.
Using a rolling pin dipped in water, remove excess dough from the frame, after which the frame itself must be carefully lifted. Place a drying board on the tiles, turn it over and carefully remove the plate that served as the bottom.
Main characteristics of the material
Braas is a German company that has become famous not only in Germany, but also throughout the CIS. It positions itself as a global manufacturer of high-tech, high-quality tiles, which for many years has not lost ground thanks to the use of high-quality natural cement-sand and ceramic raw materials for the production of products. Conveyor production allows you to ultimately obtain pieces with the desired characteristics:
- thick;
- shape;
- shade.
Many roofing coverings have appeared that imitate ceramic tiles. This is due to the high cost and large mass of the latter. The most successful alternative is considered to be cement-sand products, which are inferior to ceramics only in the brightness of colors and variety of shapes.
For many developers today, cement-sand tiles are synonymous with the beauty and reliability of the roof.
But one can argue with this statement, just look at the new models - Adria tiles with smoothly curved waves and colors reminiscent of antique roofs, or flat cement-sand shingles, the smooth lines of which will perfectly emphasize the facade of a house in the Art Nouveau style.
Cement-sand tiles add nobility and beauty to any roof shape
When starting the installation of cement-sand tiles, it is very important to know all the advantages and disadvantages that this material has.
- durability. Perhaps the main advantage that a roof made of cement-sand tiles has is that its service life can reach 100 years;
- affordable price of the material;
- the opportunity to give a unique aesthetic appearance not only to the roof, but to the entire house as a whole;
- resistance to any unpleasant weather conditions (precipitation, wind, etc.);
- excellent sound, thermal and waterproofing characteristics;
- fire resistance;
- simplicity and convenience of installation and further operation.
- too much weight of cement-sand tiles requires mandatory reinforcement of the rafter system on the roof;
- poor resistance to low temperatures;
- excessive fragility;
- tendency to the appearance of fungi and mold on the material;
- large thickness and rather rough shape;
- high installation cost;
- the material has a limited set of sizes and shapes.
A roof covered with cement-sand tiles has good resistance to aggressive external factors. It is ideal for harsh Russian climatic conditions. Advantages of coverage:
- Durability. The minimum service life of the coating is 50 years;
- High frost resistance. This is very important for roofing. Metal and plastic tiles can change due to sudden temperature changes, crack and lose their external qualities. Cement-sand has even higher frost resistance than ceramic, while its price is much lower;
- Ease of manufacture. If you don’t want to buy ready-made material, you can easily make it at home;
- Large assortment of colors and shapes;
- Resistance to physical impacts. Ceramic tiles are known for their high fragility. It breaks when dropped, impacted, or under pressure. The cement coating has good flexibility and resistance to torsional deformation.
Multi-colored cement-sand tiles
But, cement-sand tiles also have their disadvantages:
- It makes the roof very heavy. If you built a house on a pillar or pile foundation, then it is better to use corrugated board or bitumen. A square meter of ceramic and sand tiles can weigh up to 15 kilograms;
- Poor resistance to fungi. Due to the fact that cement attracts moisture, the use of cement-sand roofing materials can damage the roof. It is not recommended for use in damp areas, or near water bodies;
- The need for reinforced rafter boards. Otherwise, they simply will not withstand the load;
- Difficult installation. Due to its high weight, installing such a coating yourself is a rather labor-intensive task.
But even after comparing all the pros and cons of this coating, the material has more advantages and they are more significant.
Installation of cement-sand tiles
It is best to store tiles ready for installation under a special ventilated canopy, avoiding the formation of moisture accumulation areas in the stored pieces. When storing stacked material in the open, cover it with regular plastic wrap.
Laying such a covering can be done at roof slope angles from 25 to 65 degrees. In addition, in such cases, it is advisable to lay out individual sheets of tiles in a checkerboard pattern, which gives additional strength to the entire roofing covering.
Dry and fire the product
Products are placed on shelves indoors to ensure uniform drying and avoid the formation of a large number of cracks.
Proper firing is the key to the longevity of the roof. Firing is carried out in batch furnaces - during the technological process, the temperature regime in them changes, depending on the cycle.
The design of such a furnace includes:
- firebox;
- ash pan;
- roasting chamber;
- pipe.
In stoves without a roof, a lot of fuel is lost, so it is recommended to cover the stove.
In order to load and unload tiles, an opening is provided on the back of the stove.
Flat tiles are usually laid on edge, strictly vertically. The distances between elements must be maintained.
The loading opening after the molded tiles are sent to the kiln is usually blocked with bricks, leaving only a small window for observation.
Features of sand-concrete tiles
What components are included in the composition of the tiles is confirmed by its name. The main components are sand and cement. Additives are dyes; sometimes natural pigments are used to give the product color. Ceramic and cement-sand tiles are similar in appearance, but the scope of application of the second roofing material is much wider. The appearance of a cement-sand roof blends better with the surrounding natural landscape.
Important! During operation, cement-sand tiles gain strength from exposure to rain and melting snow, which ceramic roofing cannot boast of.
If we compare the two roofing materials based on manufacturing technology, there is a difference here too. The ceramics are fired in a kiln, and the production of cement-sand tiles involves the process of molding and drying. The technology is reminiscent of making paving slabs. The products are pressed. The compressive strength of the finished tile reaches 3000 N.
The production process begins with mixing dry ingredients with water. The resulting solution is sent to molding. After going through the pressing process, the finished semi-finished product has a long profile. The machine cuts it into individual tiles of the required size. The surface of raw concrete products is coated with a primer. The tiles spend further time in the drying chamber. Over the course of 12 hours, the concrete hardens at a temperature of + 60 °C.
The surface of finished cement-sand products is painted, giving them an aesthetically finished appearance and additional smoothness. The paint layer dries at natural temperatures in the open air. The minimum duration of the procedure is 28 days.
The differences between ceramic and CFC are explained in the video:
The most popular manufacturers of cement-sand tiles have adequately established themselves in the domestic market and offer their products in a wide range. Braas products have a long service life, reaching 100 years. Baltic Tile's products have an attractive, unusual texture. The tiles of the Finnish company A-Tiilikate AURA are famous for their dimensional accuracy.