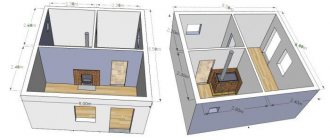
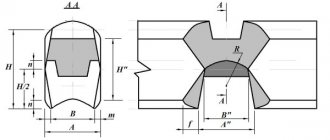
Today, the modern building materials market offers a huge number of types of geomembranes. They differ in structure, surface texture, connecting principles, etc. The geomembrane is different from the others; it has the appearance of a profiled geotechnical membrane, which is made of high-density polyethylene.
The group offers to purchase a high-quality geomembrane for blind areas. In addition to dividing and sealing, this building material also performs strengthening and protective functions.
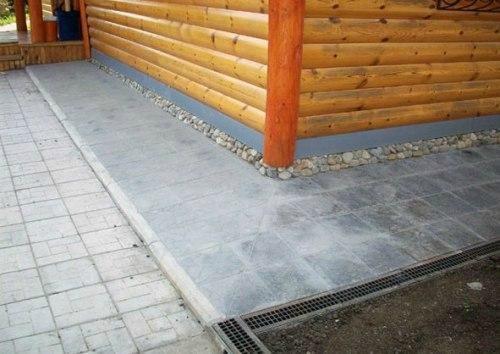
A blind area is a concrete, asphalt or stone-paved strip adjacent to the perimeter of the building. It performs the function of protecting the foundation from rainwater and floods. It is performed with a slight slope in the direction from the building for natural gravity of water to the side.
Profiled geomembrane in the blind area
Functions and tasks
We have long been accustomed to the fact that there should be a path around the house: it gives the entire layout a finished look.
Especially if combined with the finishing materials used to decorate the building. In addition, it is practical: you can walk along the path. And the fact that the path is a blind area, and its main purpose is to drain water, is a successful combination of the properties and qualities of materials and a well-thought-out design. The main function of the foundation blind area is to remove sediment from it
If you look at it from a utilitarian point of view, the blind area drains rain and melt water from the foundation. The second very important practical task that can be solved with its help is to insulate the foundation. If you put insulation under the walkway, it will protect the house from freezing, which will greatly reduce heating costs.
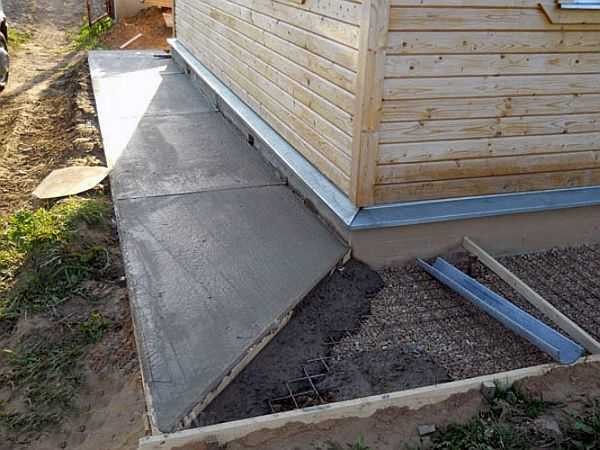
When should a blind area be done? Immediately after finishing the external walls, but before finishing the basement. Why is that? Because a compensation gap must be left between the finishing of the blind area and the wall of the house. This is an excellent path for water that flows down the wall of the house (falls on the walls during slanting rain, for example).
But it is impossible not to make this gap - the foundation will collapse. It is also unrealistic to seal the gap hermetically. The solution is to make sure that water does not get into the gap in any case. This can only be achieved if the base trim hangs over the seam. Then the water will flow a few centimeters further from the seam, and then fall into the drainage grooves. This can only be done if you first organize the blind area and then finish the base.
Why do you need a foundation blind area, when to do it, we figured it out, now it remains to understand how to do it correctly.
Insulation under paving slabs
If paving slabs are used as the final finishing of the blind area, then it is enough to ensure a slope of 3%. Place it on a layer of cement-sand mixture, spread in a layer of 2 to 3 cm.
Final finishing with paving slabs
During the laying process, the tiles are tapped with a rubber hammer to level the surface flat. Upon completion of the work, the DSP is scattered over the surface, then passed over with a broom, sweeping away the excess. Next, pour water so that the mixture located below and caught in the seams between the tiles sets.
Note! The height of the border must be flush with the tiles, otherwise it will retain water.
As you can see, only work done correctly will give a positive result.
The value of the blind area
If the foundation is considered the basis of any structure and without it it is almost impossible to build anything, then the importance of the blind area lies in the fact that it plays the role of a shield that protects not only the house, but also the foundation, porch and in general everything that is adjacent to the structure.
It performs a whole range of functions:
- Decorative, enhancing the appearance of the entire building and giving it solidity and completeness.
- Protective, representing a barrier that prevents the foundation, and therefore the house, from being flooded by melt water. Thanks to it, there is no direct contact between the base of the structure in the form of a foundation and moisture from melting snow, rain or slight flooding, which means that both the risk of destruction of the foundation and the rate of its deformation over its service life are greatly reduced. The blind area system is built in such a way that, thanks to the slope of its surface, any waste and other water flows into the sewer system as quickly as possible, without stagnating near the building.
- Thermal insulation, as it greatly reduces the degree of freezing of the soil, and therefore the foundation and the house on it.
- It prevents the soil from swelling, reducing the possibility of its movement under the structure, which could harm its integrity.
Structurally, such a system consists of two layers: the underlying lower and upper:
- The first serves as a dense base for the top layer. This layer can be performed either with or without a slope. It is filled with crushed stone, gravel and sand. Its optimal thickness is about 2 cm.
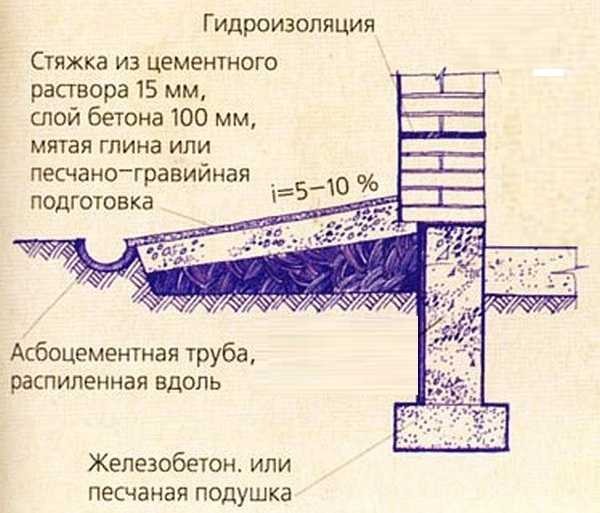
- The second is the actual protective finishing coating, which protects the foundation from water and at the same time provides a more aesthetic appearance of the entire structure and the surrounding area around it. Its thickness is about 100 mm. It is made from different materials: asphalt, paving stones, concrete, etc.
To effectively perform all the tasks assigned to the structure, it must be immediately constructed with optimal characteristics:
- The width of the blind area must be greater than the overhang of the roof, so that water from the roof will drip onto it and quickly flow towards the drain. Otherwise, the water will fall directly onto the bare ground and, absorbing into it very close to the house, create conditions of increased dampness for the foundation and walls of the building. When installing it on sandy soil, the margin in relation to the roof should be from 25 to 30 cm, which together with the rest of it gives a strip of at least 60 - 80 cm, but when arranging a house on heaving soil, it is advisable to increase this value to 100 cm Its indispensable companion, encircling the perimeter, should be a storm drain, which is a not very deep groove through which water is drained from the blind area itself. This will help prevent its premature destruction.
- It must be done with a slope in the direction from the walls of the building. The exact slope parameter in degrees will vary depending on the characteristics of the top covering. For example, in the case of concreting, this value ranges from 3 to 10 degrees. The minimum slope required, regardless of the type of finishing material for the blind area, is 1.5 degrees.
- The protective coating must be continuous along the entire perimeter of the building, that is, encircling it with a continuous ribbon right up to the steps on the porch. Any gaps are extremely undesirable, as they greatly reduce the overall quality and service life of the structure.
- Such a protective structure cannot be connected “tightly” to the foundation of the building due to the fact that they differ significantly in the degree of settlement, which means that between the house, which settles more and more quickly, and the blind area, in any case, a crack will appear along the entire perimeter of the foundation. In the process of its formation, additional damage will be caused to both the foundation and the protective coating. Therefore, between the base of the supporting wall of the structure and the strip surrounding it, an expansion joint must be provided, that is, a gap of 1 to 1.2 cm. To prevent water from pouring under the house through it, it is recommended to fill it with bitumen, sealant, geotextile or, in in extreme cases, sand.
Blind area dimensions

It is necessary to remove sediment from the foundation along the entire perimeter. That’s why a protective belt is made around the house. The width of the blind area is determined depending on the type of soil on the site and the length of the eaves overhang. In general, it should be 20 cm wider than the roof overhang. But SNiP sets minimum standards: on normal soils the width of the blind area is at least 60 cm, on subsidence soils - at least 100 cm.
The width of the blind area of the house is at least 60 cm on normal soils and at least 100 cm on subsiding soils
From this passage it is clear that the depth depends on the technology chosen, but cannot be less than 15 cm.
Main stages of construction
It is advisable to first completely destroy the roots of the plants under the blind area. This can be done with an ordinary bayonet shovel - we use it to remove the top layer of soil so that later the roots of plants or bushes cannot destroy the blind area. The soil is additionally treated with herbicides
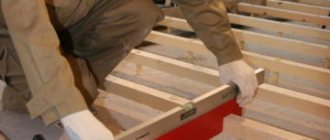
Next, we place restrictive boards along this perimeter to prevent the solution from leaking out later.
Now we pour sand into this small ditch, compact it well and fill it with water. Next - crushed stone or broken brick. And it is advisable to compact all this, if possible, with a vibration installation.
If the bathhouse has a cellar or basement, then the blind area must be insulated. The material you can use is foam glass, penoplex or expanded polystyrene. It is necessary to insulate the concrete blind area so that there is a noticeable layer of air under it - up to 15 cm.
The most suitable materials for waterproofing a blind area are PVC film, roofing felt and bitumen, and as insulation it is better to use foam glass, polystyrene foam and the like.
Flat slate and storm drains are well suited for this purpose.
Another important point: at the junction of the blind area with the wall of the house, you need to leave an expansion joint. This could be a special sealant, roofing felt or two layers of bitumen - whoever likes what you like best.
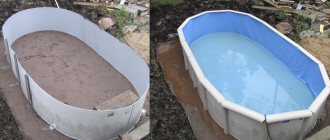
We suggest you familiarize yourself with How to make a concrete pool with your own hands
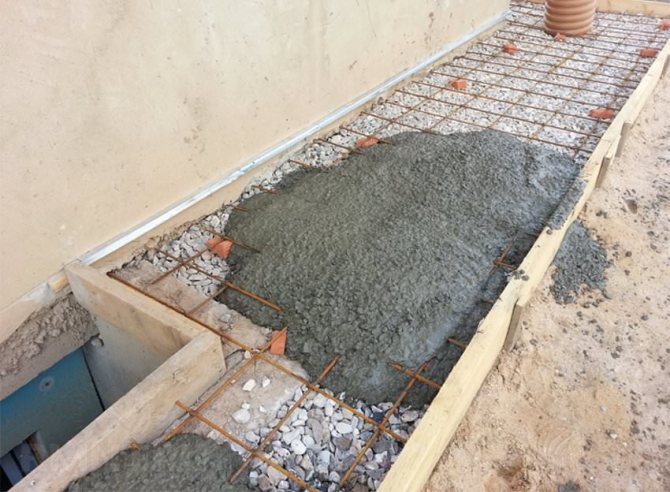
The next step is to prepare and pour the concrete solution - gradually, following all the rules. It is better to take the brand M-300 - the blind area will be strong and durable. You can make concrete for making a blind area yourself using this recipe: three parts sand, one part cement, four parts crushed stone and half part water.
Here's how this procedure is done:
- Mix water and cement in a concrete mixer until an adhesive mixture forms.
- Add sand and crushed stone in parts.
- Concrete is ready when the mass appears homogeneous.
Stage V. Ironing
15 minutes after the concrete is poured, ironing is done - sprinkle the blind area with dry cement mortar and smooth it with a spatula. Now moisture will not be able to penetrate into the blind area, and it itself will be smooth and impressive in appearance. True, if tiles are next according to the plan, then this stage should be skipped.
And now - the most enjoyable part of the work. We decorate with pebbles, plant perennial dwarf bushes around the perimeter, and lay tiles, if desired.
There is only one important point: if porous materials, such as artificial stone, for example, are used to construct a blind area, they must first be treated with a water-repellent agent.
- The preparatory stage is the selection of optimal, high-quality materials, the necessary tools and clearing of the construction site. To begin with, they are determined by the width of the blind area, since it is this parameter that determines the amount of materials required for ordering. You should not save much on it, so you must always maintain a minimum of 25-30 cm overhang beyond the roof line of the building. Next, the angle of the future structure is calculated, which will optimally ensure efficient drainage of water from it as far as possible from the structure itself. This is done based on its size, for example, a tilt angle of 1.5 degrees will be achieved when the difference between its sides is from 5 to 10 cm, depending on the width of the coating. The tools are mostly standard: shovel, level, sieve, wheelbarrow, etc. Standard materials: clay, crushed stone, sand, and optional specific ones: cement, reinforcement, insulation and others.
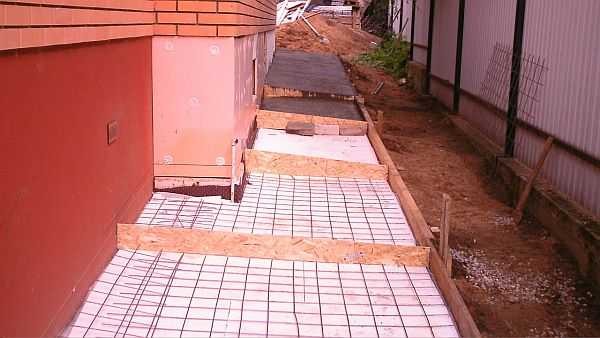
- Marking stage - pegs are driven in along the entire perimeter of the future structure, and a fairly thick and strong rope is stretched along them. The main task of this operation is to achieve the same width of markings along the entire perimeter of the building foundation. In the case of a concrete composition, it must be mixed, for which the best option is M400 cement. To do this, it is mixed with sand and crushed stone in a ratio of 1:2:4. You also need to dig a trench along the marking lines with a depth of one shovel bayonet - 25 cm. After this, you need to decide to install insulation around the house or immediately begin laying the blind area itself.
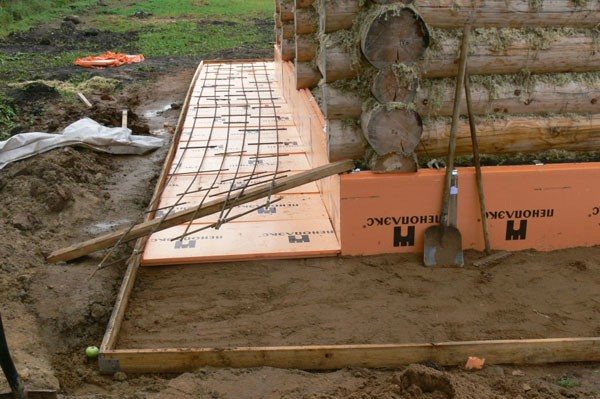
- The insulation stage is a necessary condition in the case of heaving soil, which will help to avoid uneven pressure on the structure of the building due to freezing of the soil. For this operation, extruded polystyrene foam is used on the surface of which a coating of asphalt, cement or tiles is laid. Next, reinforcement is made to strengthen the entire structure.
- Reinforcement stage. This procedure is carried out by laying six millimeter steel rods with a mesh with a pitch of about 100 mm, fencing the marked area with formwork and pouring concrete mortar into it. It greatly strengthens the entire structure for a long time, preventing it from cracking. At the junction of the protective structure with the base of the building itself, an expansion joint not exceeding 15 mm is provided. It protects the structure from soil subsidence. The seam is sealed with mixtures of bitumen, gravel and sand.
- The stage of laying the top finishing coating. In the case of concrete, it is distributed as densely as possible, periodically leveling, within the boundaries of the formwork. For maximum strength and moisture resistance, it is advisable to dry iron the fresh coating. To do this, while it is still wet, pour a 2 mm layer of clean dry cement on it. A regular sieve will help to do this evenly. Next, it is compacted by hand and left to dry for at least 3-4 days. To ensure uniform drying, the structure is covered with a cloth, periodically watering it with water. It may take about a week for the structure to solidify, after which it can be covered, for example, with tiles or acid-resistant bricks.
Device technology
Any blind area consists of an underlying layer and a protective coating.
The purpose of the underlying layer is to create a level base for laying the protective coating. Its thickness is about 20 cm. Sand and crushed stone are often used for these purposes, but native soil or clay can also be used.
The simplest design of a blind area made of clay
Sand and crushed stone are used on well-draining soils. In this case, sand is first laid, spilled and compacted. Then there is a layer of crushed stone, which is also compacted.
If the soil on the site is clay or loam, then it is better to use native soil. If, with such soils, crushed stone or sand is laid around the foundation, then water will certainly be present near the house. Because it turns out that the density of the soil outside the underlying layer will be higher. This will cause water to accumulate under the blind area.
The covering for the blind area must meet many requirements:
- should not allow water to pass through;
- must be frost-resistant;
- have increased abrasion resistance;
- should not be destroyed by water.
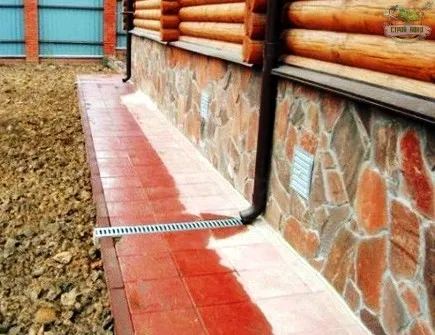
This could be paving slabs or paving stones. The shape and color can be very different - you select based on the general design of the territory and the houses of nearby buildings. The thickness of these materials is at least 6 cm; only in this case will they withstand harsh operating conditions.
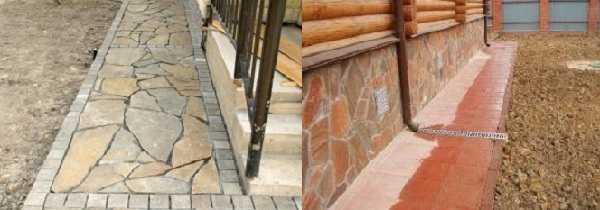
The protective coating can be made of natural or artificial stone
You can use slabs or tiles made of natural or artificial stone, you can lay out the paths with large pebbles or pour crushed stones on top of all layers.
There is another type that is becoming increasingly popular - this is a soft blind area. It has few layers but works effectively. There may not be any hard or waterproofing layer on top: you can pour soil and plant grass or flowers. An interesting solution for a summer house or country cottage.
The principle of constructing a soft blind area
All these options are not bad, but the cost of their arrangement is quite high. If there is a need or desire to do it cheaply and cheerfully, your choice is a concrete blind area. There will be a lot of work, but the total cost is low.
General principles
Depending on the soil on the site and the purpose of the building, different materials and layer structure can be used, but there are some points that are always present:
- the blind area has a general slope “away from the house”, its minimum value is 3% (3 cm per meter);
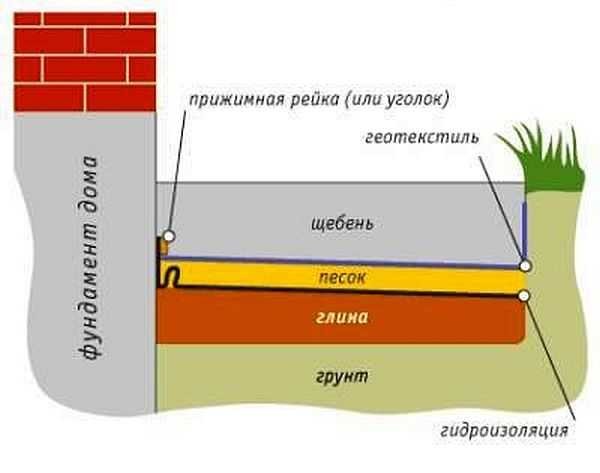
- There must be an expansion joint of 1-2 cm between the protective coating and the foundation (lay roofing material in two layers, polystyrene foam or EPS, cover with sand, fill with sealant);
- when waterproofing and insulating the foundation, the material rises to the level of the blind area;
- the base should hang over the expansion joint and it should not interface with the protective coating (a gap of 1-2 cm is left).
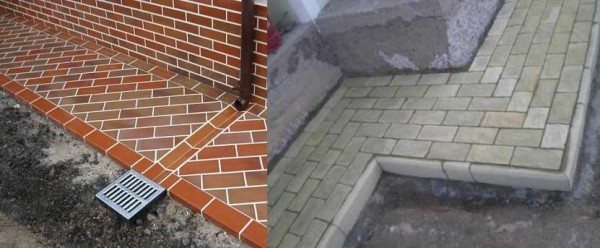
Another popular type of protective coating for house formwork is paving slabs or paving stones.
First, markings are made along the perimeter of the building using pegs and laces. The following is the order of work:
- The plant layer and some soil are removed. The depth of the trench depends on the size of the underlying layer and the thickness of the protective coating. Usually - 25-30 cm.
- The bottom is treated with herbicides. This is necessary to prevent plants from growing in this area. They are able to destroy even concrete and asphalt, and they grow instantly between tiles or paving stones.
- The bottom of the trench is leveled, forming the required slope and compacted.
- The underlying layer is laid and compacted, maintaining the slope. It is advisable to compact everything using a vibrating platform. Manual tamping is ineffective. Density is especially important when laying concrete, but it is advisable to compact it well under tiles or paving stones: it will not collapse or warp.
- A protective coating is laid.
- A drainage groove is formed.
It's very short and sketchy. Each coating has its own characteristics, and each needs to be discussed separately.
Features of the construction of different blind areas
The fastest way to build a blind area is to use ready-made concrete slabs. It is enough to lay them on a specially prepared surface and fill them with liquid bitumen.
We suggest you familiarize yourself with the air temperature in the sauna - How many degrees?
In Russia, a concrete blind area is most often built, which is placed on clay 15 cm thick. If the soil in these places is heaving, another layer of sand of 6-8 cm will not hurt.
You cannot build a blind area from concrete alone - it will quickly collapse. Here it is important to make so-called expansion joints - place wooden slats coated with bitumen every 2.5-3 meters. They are placed on an edge, concrete is laid between them and its surface is checked against them. Another option for organizing such seams is to use reinforcing mesh and lay it in the joint areas with a large overlap.
And so that the surface of such a blind area does not absorb water at all, upon completion it is covered several times with cement, and then smoothed with an iron trowel. Next, cover with a wet cloth and leave it for ten days, not forgetting to periodically water it with water.
But, despite its prevalence, a concrete blind area around the bathhouse is far from the best option. Because, firstly, it is labor-intensive, and secondly, it is expensive: a lot of concrete is wasted. Its only significant advantage is that you can then walk on it, and that’s all.
A concrete blind area is also suitable only for a non-heaving base. For the most troubled soils there is a soft blind area:
- Step 1. Place clay around the foundation at a slight slope away from the bathhouse.
- Step 2. On top of it - waterproofing. This can be glass insulation, 250-300 micron film or an old banner.
- Step 3. Sprinkle the waterproofing again with clay in a layer of up to 10 cm and apply fine gravel directly over it.
- Step 1. We install formwork from an edged board along the perimeter of the bathhouse and pour a small layer of sand inside. The trench itself must be perfectly horizontal inside, and the slope is already provided by sand.
- Step 2. Cover the sand with rubemast, bending the excess onto the wall.
- Step 3. Fill the resulting trough with ASG - up to the level of the formwork.
- Step 4. We lay the paving stones and it will be possible to walk on such a blind area.
Here's how to make a blind area with geotextiles:
- Step 1. Mark the future blind area and dig a trench at the desired slope.
- Step 2. We lay geotextiles - a rolled material that is used in road construction. Its advantage is that it allows water to pass through, but does not allow weeds to grow. And it has been in service for more than 20 years, which is good news. And it is correct to roll geotextiles with a slight overlap on the foundation.
- Step 3. We fill in the first layer of crushed stone - it is better to take the one with a fraction of 10-20. We place it directly on the textile and level it with a rake.
- Step 4. Prepare the border - about 20 cm high. We install it on a sand cushion - and for this we pour more river sand onto the edge of the blind area.
- Step 5. We fill the remaining inside of the trench with crushed stone, a layer of 10 cm.
The Finnish neighbors make their blind areas very interesting - if we can say that they can be compared with the classic ones at all. So:
- Step 1. A drain pipe is laid around the perimeter of the foundation - corrugated, with holes.
- Step 2. All this is covered with gravel, overlapping foam is placed on top, and covered with soil.
- Step 3. The pipe is connected at an angle to the drain wells.
- Step 4. Already at a distance of 40 cm from the foundation, crushed stone is poured, and beautiful pebbles are placed on top of it.
That’s it, the water drains well, the foundation doesn’t freeze and there are no worries like cracks on the blind area.
There is also such a wonderful way to completely inexpensively and effectively build a strong blind area around the bathhouse. So:
- Step 1. Lay a not too thick cushion of sand, and a thin layer of concrete on top of it.
- Step 2. We immerse ordinary glass bottles in all this - just not end to end, and fill it all with concrete again.
- Step 3. Now we reinforce it and cover it again with concrete.
What’s a plus is that you don’t need to make any expansion joints, little concrete is required, and the bottles perfectly replace insulation and it won’t be difficult for anyone to get them. Very profitable!
But the blind area itself is also a decorative architectural element of the bathhouse, so it’s better to do it right!
Concrete
Although there is now a very wide choice of materials and design options for the blind area, most homeowners prefer a concrete design. Such systems are laid on an underlying layer of clay 150 mm thick. In the case of heaving soil, add an 80 mm layer of sand to the very bottom.
The finished concrete coating is not durable and its slabs will quickly collapse if expansion joints are not provided between them during installation every 3 meters. They are filled with wooden slats, previously coated with bitumen. Having installed a pair of such slats on an edge, concrete is poured between them. Another way to organize seams is to use a mesh of reinforcement laid with large overlaps.
In the case of arranging a blind area with your own hands, when constructing it, you can prevent the possibility of water absorption by filling it with cement. Next, the fresh coating is covered with a wet cloth and preserved for 10 days. From time to time, the hardening structure must be moistened with water so that the hardening process takes place more slowly and carefully, which will avoid cracking.
In case of hesitation between different types of blind area, it is not recommended to make a choice in favor of concrete, since it does not have the best characteristics, which is expressed, first of all, in the extremely high consumption of material, especially for large volumes of work.
Also, working with it requires significant labor costs, which requires, if not a team of workers, then at least an assistant to carry out the work yourself. Perhaps its only significant advantage is that you can move comfortably on such a surface.
Tiles
The underlying cushion for paving with tiles should have an additional layer on top of crushed stone in the form of a sand backfill, 8 to 10 cm thick. The tiles are always laid from the corner, moving away from you.
The elements are placed using the bricklaying method, that is, with offset seams in adjacent rows. Using a level, check the uniformity of laying of all elements and the overall angle of the blind area they form.
Soft
Concrete pavement is compatible only with non-heaving soils, and for such mobile soils it is better to use a soft blind area. The technology of its installation includes: spreading a layer of clay around the perimeter of the foundation at a certain angle, ensuring water drainage, on top of which a waterproofing coating in the form of a film or glass insulation is placed.
The density value of the first option should be in the region of 250-300 microns.
Clay is again poured onto the waterproofing, this time with a second layer of 10-100 mm, on top of which fine gravel is placed.
Asphalt
Monolithic structures such as asphalt are durable, therefore, with high-quality installation, they last no less time than the building itself. The main disadvantage of such systems is the increased labor and material costs for their construction.
Insulated
Insulation is possible only for hard types of blind areas with concrete or asphalt covering, and for soft and semi-rigid types it will be absolutely ineffective. An insulated option is mandatory for buildings with a basement or cellar.
For this, special heat-insulating materials are used: penoplex, expanded polystyrene or foam glass. They must be laid in the blind area in such a way that a layer of air up to 15 cm thick is formed under it. Roofing felt or PVC film is usually used as a waterproofing material for the coating.
We invite you to familiarize yourself with the DIY stone sauna stove
Other popular options:
- Using rubemast for waterproofing. A small sand cushion is covered with this coating with its excess folded onto the foundation of the building. The resulting container is filled with ASG flush with the formwork, after which paving stones are laid as a finishing, protective covering on which you can move.
- With geotextiles, which have the property of allowing water to pass through, but does not allow weeds to grow into the structure, destroying its integrity.
- There are also options for blind areas using corrugated pipes to drain water directly into the sewer and glass bottles as cheap and effective insulation.
Warm blind area manufacturing technology
When insulating the blind area around the house, the following steps are performed:
- Excavation. At this stage, it is necessary to dig a trench and remove large rhizomes from it. We dig a trench to the width of the roof overhang plus 20-30 cm. To avoid destruction of the foundation protection by roots in the future, we treat the ground with herbicides.
- Drainage device. To drain water from the ground around the home, we install a drainage layer. To do this, pour a layer of crushed stone into the trench, first providing a clay substrate made of rich clay. The lower the density of the soil, the larger the layer of clay that needs to be placed to avoid pushing through the structure. Also, a layer of sand can be placed on top of the clay before filling with crushed stone - each layer of bulk materials should be 10-15 cm wide.
- Laying insulation. Having decided on the thermal insulation material, we lay it on a layer of gravel. If it is expanded clay, then we simply pour the crushed stone into the trench. If we choose sheet materials, then we need to take care of waterproofing the joints of the plates. If necessary, we arrange reinforcement for the heat insulator if the material is fragile.
- Waterproofing device. The presence of this layer is also determined by the selected material. For example, expanded clay does not need waterproofing, but expanded polystyrene or polystyrene foam must be covered with a layer of roofing material or polyethylene. Such materials are joined at joints with an overlap of up to 20 centimeters.
- Finishing. The finishing layer is laid on a waterproofing layer - it can be concrete, tiles or crushed stone, which gives the blind area a finished look.

Thermal insulation of the blind area and basement helps reduce heat loss and protects the foundation from destruction caused by temperature changes. The insulation technology for these elements is different.
Insulation of the blind area
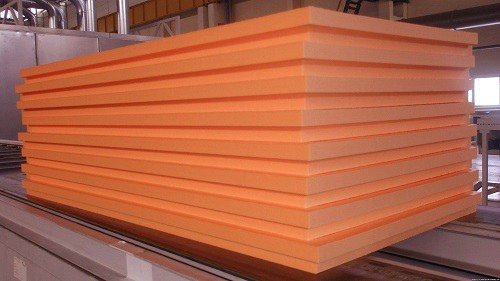
Penoplex is the best option for insulation
- The soil around the foundation is selected to a width of about a meter to a depth of 0.45 m with a slight slope - from 3 to 5%;
- A leveling sand layer is laid and thoroughly compacted, after which the layer thickness should be at least 150 mm;
- Penoplex or extruded polystyrene foam is laid as tightly as possible;
- Lay geotextiles with a minimum density of 150 mm and a width of 2 m in the trench;
- Take a drainage pipe, lay it on geotextiles along the edge of the trench with an outlet into the drainage ditch;
- Pour crushed stone over the pipe and into the gap between it and the edge of the insulation;
- Wrap the drainage pipe in geotextile together with crushed stone, first placing the edge lying on the insulation, and then covering it with the second edge;
- Cover the slabs and pipe with coarse sand to a height of 300 mm and level it, and then compact the surface using a tamper. Markings are made for the curbs, for which a thread is pulled level at a distance of 70 cm from the foundation;
- Storm water inlets are installed by installing a plastic receiving tray under the drainpipe and connecting to it a sewer pipe for external use with an outlet into the gutter;
- Install and concrete curbs on 2 sides;
- Fill the internal space with the required amount of sand and compact it again;
- Paving is done with paving slabs, concrete stone or other material. The height of this layer is 600 mm;
- Add soil along the outer perimeter of the border.
Creating thermal insulation for the blind area
Note! To avoid clogging of the drainage pipe, wrap it with geotextile before installation.
Base insulation
It is best to insulate the base with penoplex or extruded polystyrene foam when laying the foundation, but if this moment is missed, then you can do this during the operation of the house.
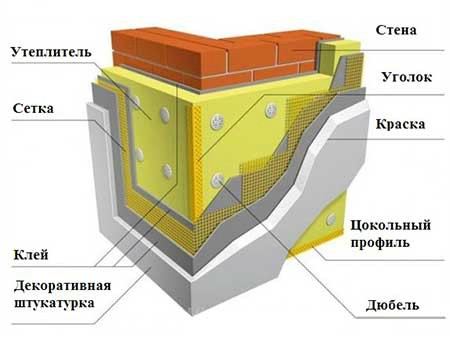
Base insulation scheme
Let's consider the option when the base and walls of the house are in the same plane. Warming is carried out in 10 consecutive steps:
- Make horizontal markings along the entire perimeter, taking into account that the insulation should protrude several centimeters beyond the waterproofing layer;
- They cut the heat-insulating material, focusing on the markings;
- Clean the walls from dirt and dust, prime them;
- Apply a layer of special glue to the base using a notched trowel, choosing a corner as the starting point;
- Apply glue to the slabs and attach them to the surface of the base, seal the joints;
- Drill holes for dowels using a hammer drill and hammer in the fasteners;
- Attach a metal corner around the perimeter of the wall, using the same glue as for the slabs;
- Apply a layer of soil to the slabs;
- Cut the reinforcing mesh according to the dimensions of the slabs, lubricate it with glue and glue it to the heat insulator;
- The base is puttied or covered, and flashings are installed.
Concrete blind area around the house
The most widespread covering is concrete. It turns out to be the most inexpensive. Traditionally, the underlying layer consists of poured compacted sand (10 cm) sand, on top of which compacted crushed stone (10 cm) is laid. As already mentioned above, this scheme works normally on well-draining soils.
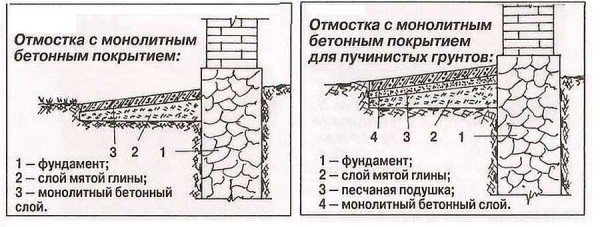
Construction of a concrete blind area for a house for different soils
In general, on heaving soils it is advisable to make drainage that will drain the water flowing from the tape. This will be an effective and reliable solution. All the rest are just half measures. The drainage pipe is positioned so that water from the coating enters it.
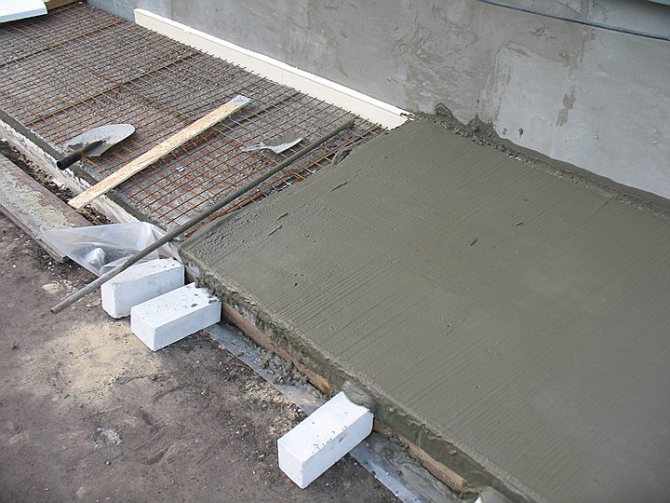
Formwork is installed and secured along the perimeter of the marked area. Most often, the board is of sufficient height, secured with pegs and spacers.
To reduce surface cracking, reinforcement is often used. To do this, a mesh of steel wire with a cell size of 10-25 cm is laid out on the finished underlying layer.
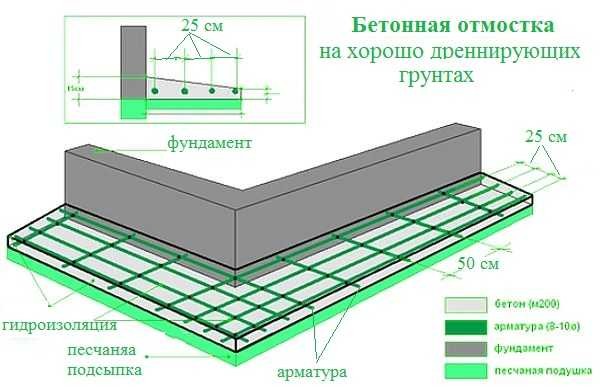
Diagram of a reinforced concrete blind area around the house
Wooden planks treated with antiseptics are laid on top of the mesh (if there is one). The thickness of the planks is 2.5 cm, and they can be treated with hot drying oil. These strips are damper joints that will prevent the concrete from cracking when temperatures change.
The planks are set while maintaining the slope from the house. The rule is then “pulled” along them, leveling the solution.
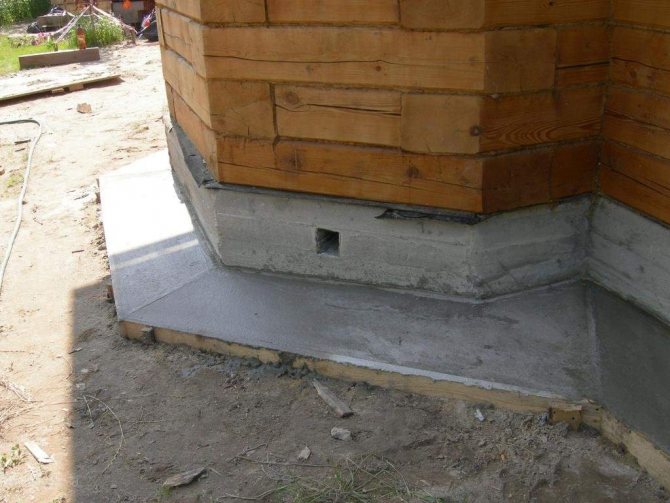
To make the surface strong and smooth, ironing is carried out. Almost immediately after pouring, while cement laitance is still on the surface, the concrete is sprinkled with cement (can be crushed several times) and rubbed with a trowel or plaster float. A thin but strong, smooth and slightly shiny surface is formed on top. It is very resistant to abrasion.
Do-it-yourself concrete blind area. To compensate for changes in concrete dimensions depending on temperature, wooden planks are laid
The last stage is concrete care. The path is covered with a damp cloth. During the week, it is regularly moistened (sprayed from a hose or watering can). The fabric should remain damp. To avoid hassle with watering, you can cover it with film, but it is more difficult to keep it in one place.
Concrete for blind area
For the blind area, standard sand and gravel concrete is used. Darkness is preferably at least M150. It can be higher: the higher the grade, the more durable the protective coating will be. The proportions for preparing the solution for the blind area can be selected from the table. They are given for concrete grade M400 - not very expensive, the characteristics are normal.

Proportions of materials for different grades of concrete
Insulation with polyurethane foam
Polyurethane foam, or PPU, is often used in construction today to create a durable, warm layer with excellent performance characteristics.
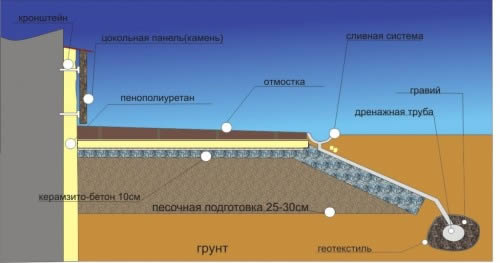
Scheme of insulating the blind area with polyurethane foam.
Polyurethane foam is applied by spraying and hardens quickly in the open air. A significant advantage of this method is that there is absolutely no waste, the application itself is accurate and fast. Another advantage is that the insulation is simply poured into the prepared pit, after which it quickly hardens, creating a protective layer. There is no need to use meshes and other means of reinforcement, since polyurethane foam itself has all the necessary qualities.
Repair of the blind area
Repairs are usually carried out in spring or autumn because, firstly, during these periods the width of cracks in the coating is maximum, and secondly, when sealing them, fresh material should not be exposed to too low or too high temperatures, otherwise it will come into contact with old the coating will not be durable and reliable.
The technology and materials for repair differ depending on the type of defects and the coating itself.
So, in case of minor damage to the top layer, I simply seal the resulting cracks and potholes with a solution of cement, bitumen or special composition, and in case of total crumbling of the strip near the house and deep cracks, it is recommended to replace the damaged areas of the coating entirely, right down to the base of the first layer.
Dismantling work is carried out using a chisel and a hammer, by cutting out entire sections between the expansion joints. The recesses remaining after removing the deformed pieces of concrete are filled with crushed stone, compacted and poured on top with a new solution of concrete or asphalt.
The easiest way to repair a tiled blind area is to carry out repairs - regardless of the complexity and scale of damage in it, as a rule, it is enough to just replace the defective elements.
In the case of a soft blind area, repair work can generally be carried out by adding clay, sand and gravel using a shovel where they have washed out or subsided in relation to the general level of the embankment.
Insulation with polystyrene foam
The installation of a blind area with polystyrene foam boards resembles conventional work on thermal insulation of the external walls of the foundation and basement.
After the trench around the perimeter of the house has been prepared, a layer of waterproofing in the form of a film or roofing felt must be placed at the bottom. Insulation is laid on this layer, and the joints between the plates are carefully filled with polyurethane foam. The thermal protection layer is covered with ordinary soil on top, after which you can perform any type of work, for example, pour the top layer with concrete or lay it with tiles. It is easy to insulate a blind area using this method; the work itself does not take much time or money; even a beginner can do it.
Insulated blind area
It only makes sense to install an insulated blind area in a heated house. In buildings for seasonal residence, in which above-zero temperatures are not maintained in winter, this makes no sense. The meaning of adding a double layer of insulation:
- create additional protection against freezing and reduce the likelihood of winter heaving;
- reduce heating costs.
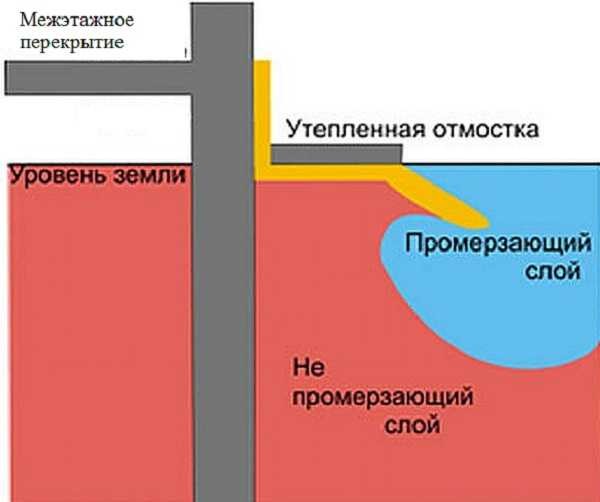
How an insulated blind area works - it moves the freezing zone away from the foundation
If the insulated blind area of the house is laid at the design stage, then one more reason is added: if this detail is present, reduction factors are applied when calculating the depth of the foundation. That is, the foundation has a lower height, and therefore less cost.
An option for installing an insulated concrete blind area with a drainage system is demonstrated in the video. Everything is described normally, they just didn’t specify what to do if the layer of loose soil is more than 40 cm, which is required for the blind area. In this case, it must be filled with soil having a density higher than that located on the site. If there is clay on the site, then only that can be used. If it is loam, you can take either clay or loam.
One point: lay the clay not in a dry state, but diluted to a paste. The technology is old, but nothing better has been invented yet. It is laid out in layers, trying to avoid the formation of air pockets - water will certainly stagnate in them (or someone will settle).
Blitz tips
- Any work on its arrangement or repair must always be completed before the onset of cold weather.
- When repairing, it is recommended to lay a section of the new coating slightly higher than the old one so that there is room for shrinkage, after which it will drop to the same level as the rest of the blind area.
- Before laying the tiles, many people make sure to do at least a minimal screed, but in this case it is recommended to do this directly onto pre-compacted sand, as this will allow the structure to more effectively drain moisture through the seams between the tiles into the ground. This is especially important in winter, when any remaining water on the tiles can quickly turn into ice.
- When using insulation in a structure, it is advisable to protect it from possible damage by wrapping it in a fiberglass mesh.
What is geotextile and how is it used?
Geotextile is a synthetic non-woven material that has high strength and density. The basis of the material is geofabric or geoknitted fabric, obtained by weaving at right angles several threads on factory machines. This rolled waterproofing material is produced by chemical or thermal methods by bonding threads of polyester or polypropylene.
Application of geotextiles in road construction
If the groundwater level is high, drainage pipes are laid in the area under the blind area of the house, which are wrapped in geotextile to prevent clogging of the drainage with dirt and sand. The advantages of geotextiles include: the ability to be used as a water-permeable separating material, high water permeability and high strength.
But this is only one of the possible ways to use geofabric. Geotextiles are used where there is a need for separation, partial reinforcement, drainage, and water filtration. The areas of use of geotextiles are varied - from medicine, the production of household appliances and furniture, to the construction of houses, roads and agriculture.
Blind area made of crushed stone or pebbles
This is one of the types of soft blind area. It's easy to do it yourself. This system is used if there is a drainage system or the soil drains water well, and there is no clay or loam under the plant layer.
Soft blind area made of crushed stone
The order of work is as follows. A layer of geotextile is placed in a dug trench on a leveled and compacted bottom. This material is not thick, but very elastic. It will prevent crushed stone or pebbles from being pressed into the ground. And the path will not sag. Crushed stone is poured on top and compacted. Layer thickness 10-15 cm, fraction 10-80 mm. All.
If desired, the gravel blind area can also be made insulated. Then 50 mm thick EPS (extruded polystyrene foam) is laid in the trench on compacted and leveled soil, a high-density geomembrane is laid on top, and pebbles or crushed stone can be placed on top of it. But it is not advisable to walk along such a path.
Membrane for blind area: methods of fastening
The blind area around any residential or commercial building is an element that protects from the effects of soil and atmospheric moisture. Will protect the foundation from dampness and frost heaving. Until recently, concrete was a popular material for blind areas. But a competitor has appeared - a profiled (geo)membrane made of high-density polyethylene (HDP).
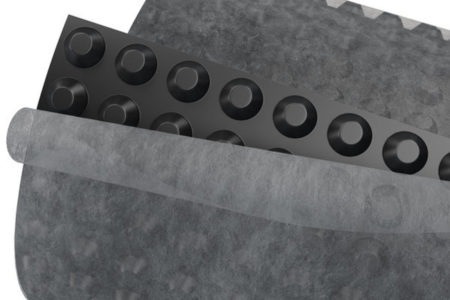
Type of geomembrane