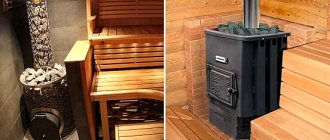
Why do oven walls crack?
To find the best way to eliminate the constant appearance of cracks, it is necessary to establish the exact cause of their origin. There are several options, defects occur due to:
- poor quality solution;
- improper finishing;
- shrinkage of the foundation, brickwork;
- improper operation of the oven.
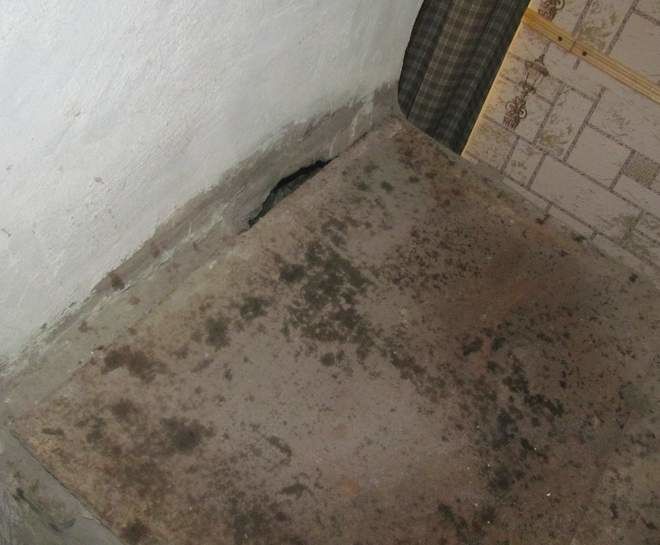
Due to all of the above options, a through crack may form, through which carbon monoxide will enter the room. Shrinkage of the foundation is a normal phenomenon only in the first year or two, but if problems continue to occur, for example, with the door closing, pieces of clay falling out, then you need to start reworking the entire structure, starting with strengthening the foundation.
Reasons for furnace failure
• low quality of the solution used;
• violation of finishing technology;
• shrinkage of the brick structure;
• uneven heating;
• non-compliance with the rules for operating the stove.
If the stove sank due to an improperly poured foundation, smoke will pour out of all the cracks during the fire, the doors will no longer close tightly, and the brick will gradually begin to collapse. If such problems are discovered, you should immediately dismantle the entire structure, strengthen the foundation and lay it out again. However, in some cases you can do without radical measures.
The fact is that a slight shrinkage of the stove in the first couple of years is considered quite normal, and if we are talking about small cracks, they can simply be repaired correctly.
All other reasons can be easily eliminated; it is only important to figure out how to cover the stove so that it does not crack.
The reasons why smoke does not escape through the chimney, but spreads throughout the house, can be varied. The most common one is a chimney clogged with soot. When soot is removed, heating quickly improves and problems no longer arise.
If no one has lived in the house for a long time, then putty for the stove will not be needed. A frozen chimney begins to work incorrectly, but the malfunction is easily eliminated. It is enough to warm up the riser by burning the paper, and the smoke will follow the desired path.
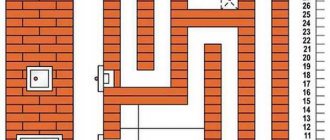
If you do not know whether the stove worked before, then malfunctions in its operation may be caused by improper laying of the chimney or clogging of the channels with parts of bricks. In this case, major repairs cannot be avoided.
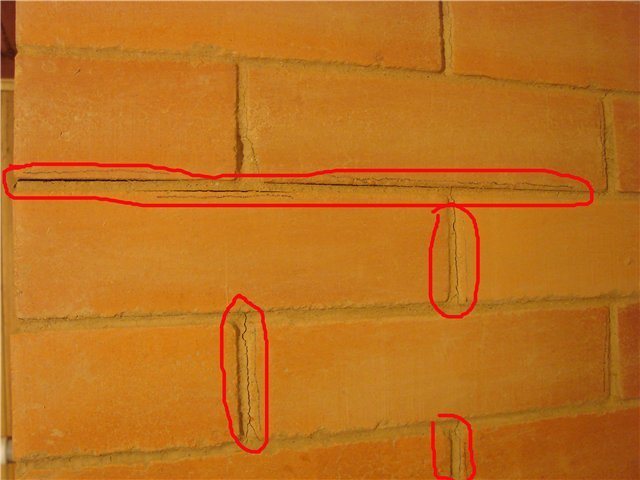
Well, and, of course, cracks in the chimney or in the stove itself lead to disruption of its operation and the appearance of smoke in residential areas.
Causes of cracks
Cracks in the furnace appear due to incorrectly selected building materials
Violation of the surface monolith happens for various reasons, but the basis is the stove maker’s mistake. Gaps in the wall do not appear if building materials are selected correctly, taking into account technical characteristics and properties. What matters is the competence of the craftsman who lays the walls of the firebox, installs the internal elements and makes the pipe.
The appearance of cracks is influenced by the following factors:
- Long-term non-use of the stove in winter. The plaster breaks due to the sudden heating of the cooled hearth.
- Haste when testing a newly laid fireplace. Cracks form because the material has not dried or gained strength.
- Incorrectly executed masonry, in which, when heated, areas with temperature changes appear.
- Inconsistency of materials with the required thermal elongation. Failure to comply with the ratio of such parameters between mortar, brick and metal elements.
- Overheating of the hearth. Uses fuel that generates more heat than the stove can handle, such as wood-burning charcoal.
Before covering the stove with clay to prevent it from cracking, you need to find out the causes of the problem. Sometimes the firebox can crack due to a weak base or the use of materials with poor fire resistance. Sealing the seams will not help in this case; you will have to redo the masonry.
Before properly and reliably caulking the stove, in order to prevent repeated malfunctions, you need to know what can affect the integrity of the stove coating:
- during a long break in heating the house and sudden temperature changes;
- the furnace was laid using low-quality mortar;
- Perhaps the reason is the settlement of the building or foundation. In this case, it will be necessary to carry out major repairs to the foundation, increasing its size and strength;
- after laying the stove, the process of normal drying of surfaces was disrupted;
- when plastering the stove, a low-quality solution was used or a thick or very thin layer was applied;
- Perhaps the reason is faulty ventilation and condensation deposited on the walls of the furnace.
The answer to this question is unequivocal - you will need to cover up a faulty, smoking stove immediately; it is not recommended to use it. Such requirements are explained not by a violation of the appearance of the walls, but by cracks that allow carbon monoxide to enter the room. Poisoning from combustion waste can lead to dire consequences.
- Firefighter statistics show that most people die in a fire because of the gas, and not from the fire.
Therefore, at the first sign of smoke in the house, you will need to do the following:
- diagnose the furnace surfaces and find the fault;
- after this, immediately prepare a solution or buy ready-made material for filling cracks;
- cover the walls and plaster them again.
But first of all, diagnostics will help determine the size of damaged surfaces and the approximate amount of materials to be repaired. If the mortar has simply cracked due to high temperatures, you simply need to remove the layer of plaster and apply a new layer of high-quality materials.
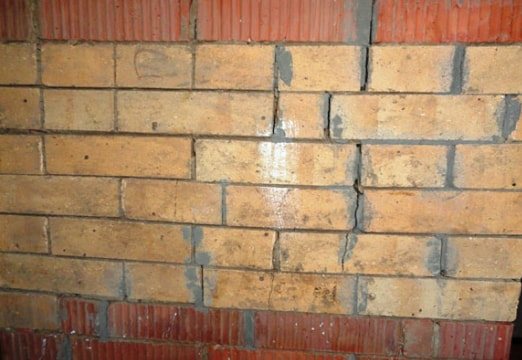
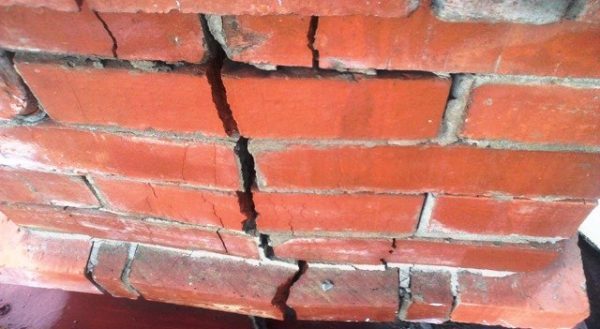
It’s worse if the cracks are through and continue to expand after the work has been done. In this case, it may be necessary to call specialists to identify the causes and lay a new stove. Stone stoves are a complex structure, so you shouldn’t try to lay it out from a book; it’s better to entrust this work to an experienced stove maker.
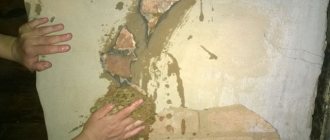
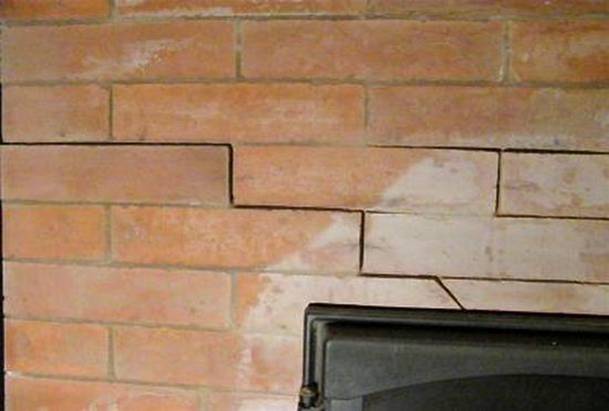
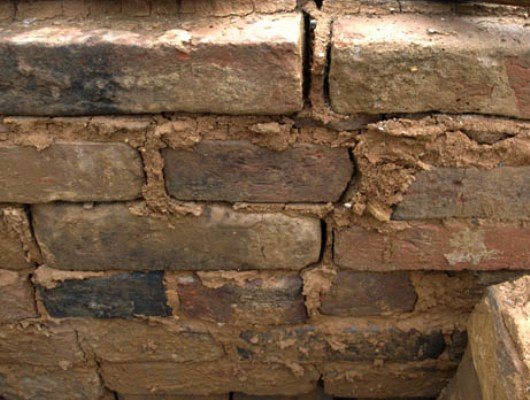
Such cracks can no longer be simply covered up
In this example, you shouldn’t cover it up either. The brick was badly cracked.
If the cracks are small and their size does not increase, you can begin to troubleshoot the problem yourself. To do this, it is important to prepare a high-quality solution and apply it correctly to the wall. How to cover up cracks in a stove so that it does not crack from the heat - knowledge of the basic materials for making the mortar will help in this matter.
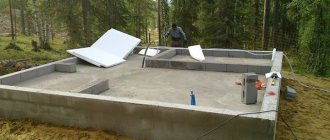
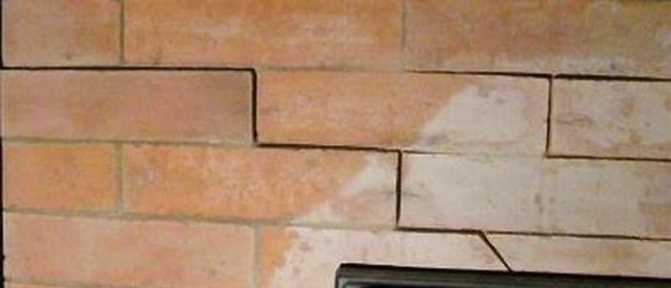
Example 1
Example 2
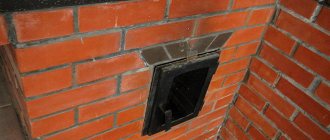
Example 3
For these purposes, you can use several options that will reliably seal cracks in the walls and prevent gas from escaping into the room. Let's look at each method in more detail.
Fireclay clay
Before you cover cracks in the stove with fireclay clay, you need to know its advantages:
- the material is resistant to temperature during fuel combustion;
- high level of vapor permeability;
- resistant to moisture when heated;
- environmentally friendly material, safe for humans and animals, therefore can be used in residential premises.
To make the solution you will need to mix several ingredients:
- 1 part cement grade 500;
- 2 parts fireclay clay"
- 7 parts river sand.
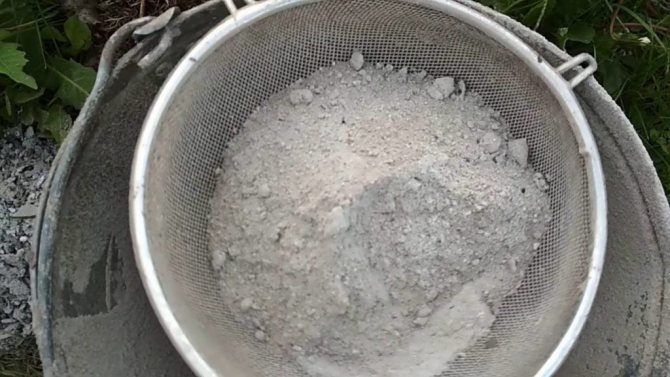
The solution is mixed well and water is added. The consistency depends on the skill and type of work, but you should not make it very liquid or thick. To get rid of stones and lumps, the clay can first be soaked in water for several hours and the lumps of material can be crushed, and the cement and sand can be sifted. Such a solution will be plastic and laid on the surface in an even layer.
Plastering walls is easy if you have a certain skill. To do this, it is important to install beacons and, distributing the solution, level the layer on the wall. You will need to prepare a trowel and spatula, the size of which depends on the surface area.
We invite you to familiarize yourself with: Channel bath stove
Clay and sand
This is the most affordable, inexpensive solution for plastering surfaces. Such a solution for the oven has sufficient plasticity and is not subject to destruction under the influence of high temperatures.
It’s easy to prepare the solution for use; for this you will need:
- prepare a large trough in advance, add the required amount of clay and completely fill the layer with water. For 1 bucket of clay, pour 3 buckets of water. The clay should soak for 24 hours;
- then mix the solution and add more water to it. We pass the slurry through a sieve, get rid of lumps and let the solution settle;
- drain the excess water, making the solution as thick as homemade sour cream;
- add river sand in a 1 to 1 ratio and mix the solution.
Important! At this time, you can determine the quality of the solution. Having lowered the shovel holder into it, and seeing the adhering clay, in this case you will need to add a little sand. Only after seeing small clumps of sand and clay solution on the holder can you start plastering the walls of the stove.
With this solution it is necessary to repair all cracks that appear, after wetting the surfaces and then plastering the stove in several layers. In villages, they still use the old method, adding horse manure to the prepared solution. This solution is obtained with increased thermal insulation properties. Hay plays the role of air layers that prevent the free passage of heat.
Grout
This oven putty is sold ready-made, but it’s easy to make yourself. The main advantage of this material is the ability to retain its properties even when heated to 10,000. Industrial materials are used for arranging and repairing stoves and fireplaces, but the price of such grout is high, so home craftsmen do it with their own hands.
The mixture for coating the oven is made in several stages:
- knead large lumps of clay and pour it into a trough;
- fill it with water and leave for 10-12 hours;
- pour part of the sand into the soaked clay, maintaining a ratio of 1 to 4, mix the solution well, adding 5 parts of chopped straw in small portions;
- Add 1 kg of coarse table salt to the finished putty and finally mix the solution.
The finished grout can be used to fill gaps between bricks, crevices, cracks and complete the first rough layer of plaster.
Furnace glue
In order to repair a cracked stove, you can buy heat-resistant special glue at a hardware store. Due to its properties, it is not exposed to high temperatures for a long time. It consists of the addition of fireclay clay and cements with high fire-resistant properties.
A plastic and hard adhesive mixture is produced. Using hard materials, the surfaces of the stoves are plastered. Plastic glue is used to fill cracks and seams between bricks.
When using this material, you must follow the instructions when diluting and using the heat-resistant substance. You should not make it in large portions; it dries out quickly and becomes unsuitable for work.
In order to reliably cover the cracks in a brick kiln, work is carried out in several stages:
- For large cracks, you will need to completely remove the layer of plaster and use a chisel or other tool to widen the cracks and gaps between the bricks. You need to work carefully, not missing even small cracks. By cutting the crack edges in this way, you increase the area for filling with mortar and improve the quality of adhesion to the main surface of the wall. The minimum depth for filling cracks with mortar is 10 mm.
- Now it is important to cover all surfaces with a deep penetration primer or plain water. Then we heat the stove by adding a small amount of firewood. It is important for us to dry all surfaces before work.
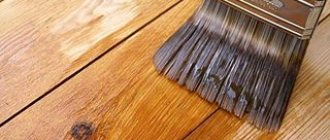
- While the oven is still warm, apply a thin layer of liquid clay solution using a paint brush or a large paint brush. This solution, once dry, will serve as the basis for continuing work.
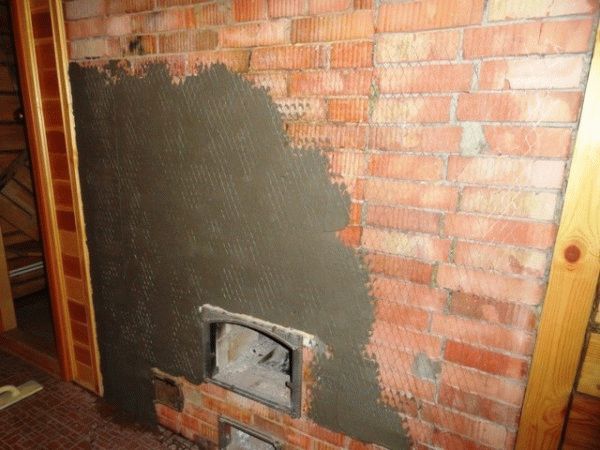
- You can lay a layer of reinforcing mesh on top or simply cover the surface with old bags. We fasten the steel mesh with self-tapping screws, and glue the burlap with glue or nails, which we hammer into the joints between the bricks.
- Using any of the previously listed solutions, apply 2 layers of plaster, each up to 5 mm thick.
- After drying, you can plaster the walls with an additional layer of lime mortar or simply whitewash the walls of the stove with lime.
Coating process
It is not recommended to use the oven until the solution is completely dry. When using different materials, this period may vary. Using heat-resistant glue as a putty, the layer of solution will dry within a few hours.
It will take more time for the solution of clay and sand to dry and form. In this case, you will be able to use the stove only after a day. Then the brick oven, protected from cracks with mortar, will remain crack-free for a long time.
How long does it take to dry?
It is not recommended to use the oven until the solution is completely dry. When using different materials, this period may vary. Using heat-resistant glue as a putty, the layer of solution will dry within a few hours.
It will take more time for the solution of clay and sand to dry and form. In this case, you will be able to use the stove only after a day. Then the brick oven, protected from cracks with mortar, will remain crack-free for a long time.
Therefore, we do not advise you to rush, immediately flooding your Russian stove with a stove bench. Repairing cracks in a furnace is a simple but important job. The choice of material for the solution is a purely individual matter. The main thing is to do the work carefully and responsibly. Then your house will always be light and clean, without the smell of burning and smoke penetrating through the cracks in the walls of the stove.
A home is a symbol of home comfort; it warms the body and soul. A high-quality stove will protect you from any weather conditions and create a comfortable atmosphere at home, so it is extremely unpleasant to find cracks on the surface of the stove. Putty for stoves is the only way to restore their original appearance.
We inspect and select material
Before you begin, determine the extent of the damage. Even if small cracks appear, all old mortar in this place should be removed right down to the brickwork. The cleaned area should be covered with a solution, but what should you use to cover the stove so that it does not crack? This question interests many, and there are the following options for building mixtures that are most suitable for brick kilns:
- clay and sand;
- construction grout for stoves;
- fireclay clay;
- oven glue.
The simplest and most economical option is clay-sand mortar, which was still used by our ancestors. The quality of clay coating is not inferior to modern mortars, but it is much cheaper. Any clay is suitable for oven mortar; it is desirable that it contains no foreign impurities. The clay is placed in water for 12 hours, after which it becomes plastic and homogeneous.
You can buy fireclay clay at the construction market. This material is specially designed for creating fire-resistant elements, bricks, blocks, and is also used for laying stoves. The material, like products made from fireclay clay, is distinguished by high quality, fire resistance and durability. Fireclay clay is inexpensive in hardware stores and is sold in 20 kg bags, with instructions for use included.
We suggest you read: How to clean a stove in a bathhouse
Damage repair technique
If the stove is cracked, immediate action should be taken. If you follow all the rules that will help solve the problem efficiently, your stove will last a long time.
Furnace diagnostics
First, you need to carefully inspect the stove, both outside and inside, and determine the extent of damage. If the stove has serious defects, it will need to be completely disassembled and restored. If there are small cracks, then it will be possible to coat and plaster them, having first removed the layers of finishing and plaster down to the brick.
Selection of material
Any clay without impurities is suitable for restoring a stove, the main thing is that after soaking it takes on a uniform plastic consistency like butter.
Preparation of the solution
Making a solution for sealing cracks is easy. We will need 4 buckets of clay and 4 buckets of sea or river sand. The amount of water depends on the moisture content of the clay and sand. The clay is first soaked for 12 hours in warm water. After this, it should be mixed with a spatula to break up the formed lumps. Then it is mixed with sand. The resulting solution is covered with polyethylene and left for 12 hours to prevent moisture from evaporating.
The infused mixture is mixed again and checked for quality: you need to roll a small ball of putty in your palms and press lightly; if it cracks when pressed, then there is not enough liquid in the consistency.
Before applying the putty, you need to heat the fireplace a little. Then you should moisten the damage with water so that the finishing material becomes durable. Otherwise, dry masonry will suck all the liquid out of the fresh mortar.
Next, the surface of the furnace device should be covered with a special mesh, which is used for plastering, to prevent the appearance of new cracks on it. After all the manipulations, a solution of clay and sand is applied to the hearth, and small lumps of the mixture are tightly placed in the cracks. The putty can be applied by hand as it does not contain harmful substances.
It is recommended to heat the stove only after the putty has completely dried.
When sealing cracks in a brick kiln, it is necessary to replace the clay with gypsum or cement in the solution described above. The resulting solution should only be used to cover the cracks in the brickwork, and not to completely cover the fireplace.
Cement mortar should be used within an hour, and gypsum mortar should be used within five minutes. Then the mixtures will lose their elastic properties and become unsuitable for use.
Cracks can also appear as a result of improper heating of the stove. Therefore, to prevent the hearth from cracking, you should follow the basic rules of the firebox: clean the ash pan, use wood chips for ignition, set the chimney to work properly, and do not use low-quality fuel when burning. You can repair the hearth yourself, even if you have never experienced damage to the stoves.
Before getting started, you should consider the damage and determine the scope of work. If small cracks appear on the surface of the stove (even if in large numbers), to eliminate them you will need to remove the lining and clean the brick from the plaster.
Once all the finishing has been removed, you can start caulking the cracks. At this stage, everyone is wondering what solution to cover the stove to prevent it from cracking.
• made of clay and sand;
• from special grouts for ovens;
• made of fireclay clay;
• from oven glue.
Can’t decide what to cover the stove with to prevent it from cracking? Consider each option individually.
How to cover up cracks in the stove - options for solving the problem
To prevent the stove from cracking, it is covered with clinker or some other tiles
An option to solve the problem is to finish the outer surface with ceramic tiles. The material will last a long time if technological recommendations are followed.
Types of tiles used:
- porcelain stoneware;
- types of tiles;
- clinker material;
- terracotta
You can seal the stove to prevent it from cracking using a clay solution. The mixture adheres well to the surface, and cracks rarely form.
The stove surface is processed using the following tools:
- Putty knife. Several varieties are used for ease of coating.
- Hammer for driving nails under plaster.
- Trowel. Used for mixing the solution and applying the mass to the surface.
- Metal scissors. The tool is needed to cut metal plaster mesh.
- Grater. Used for grouting mortar.
- Ironing iron. Using the device, the plane is leveled to an ideal state.
- Chisel. Used to notch the caulking area for better adhesion.
- Brushes. For wetting the surface.
- Construction level, plumb. The tool is taken to level the plane in a horizontal or vertical position.
What tools are needed?
When choosing what to coat the stove with, you need to remember the tools. To repair it yourself you will need:
- angular spatula;
- Master OK;
- chisel;
- sanding paper with grit No. 60 and 100 and a grater for it;
- building level and rule;
- brushes – wide, brushes;
- container where the composition will be mixed.
If clay is added, then you need to prepare a mesh (metal) for wiping it. If you use sand, you will need a mesh to sift it through.
How to prepare a solution from clay
How to cover a stove with clay so it doesn't crack? Below are instructions on how to prepare a solution from ordinary clay. If you use fireclay heat-resistant clay, then focus more on the included annotation from the manufacturer. The clay-sand composition is mixed in several steps:
- The clay is soaked for 12 hours. After this, so that there are no dry lumps left, the wet clay should be thoroughly crushed and mixed.
- Sifted sand is added to the soaked clay. The proportions should be one part sand to two parts clay.
- If whitewashing is planned, it is advisable to add lime to the mixture.
- The composition is mixed until the consistency of sour cream, then covered with film for 10-12 hours.
- Check the solution for readiness like this: roll a small ball and squeeze it, but it should not crack; if the composition cracks, then add water.
- The stove must be heated to warm the walls, then the places where the solution will be applied are moistened with water.
- Smearing.
To avoid cracks, straw is added to the mixture the old fashioned way. The straw is cut into small fragments; it will also need time to soak in the solution. Nowadays, a special plaster mesh is sold that prevents cracking and drying out of the surface. The mesh is attached to the surface, onto which a clay solution is applied on top.
Fireclay clay
Sealing cracks with clay mortar is the simplest and most economical way to restore a stove. At the same time, the quality of repairs will be no worse than using newfangled and expensive materials.
For these purposes, you can take absolutely any clay, the main thing is that it contains as few impurities as possible. After soaking, high-quality raw materials should become oily, homogeneous and plastic. Before covering the stove with clay (to prevent the surface of the fireplace from cracking in the future), pay attention to the specifics of preparing this solution.
Mixing the mixture is carried out in several stages.
1. Before mixing clay with sand, it should be soaked in warm water for at least 12 hours.
2. The wet solution should be thoroughly mixed and all lumps formed should be broken up. In this state, the clay combines with sand much better.
3. To prepare the working mixture, it is recommended to take 4 parts clay and 2 parts sand. The last component should be as clean as possible and pre-sifted. The volume of liquid depends on the degree of humidity of all components.
4. If you do not plan to whiten the stove, add lime to it at the stage of mixing the solution. All components are mixed until the consistency of sour cream. The finished mixture is covered with plastic wrap and left for 12 hours.
5. The settled solution is kneaded again. To check if there is enough water in it, take the putty in your palm and roll it into a ball. If it starts to crack when you squeeze it, add more water.
6. The oven should be lightly heated, water should be poured over the cracks, after which you can begin sealing.
7. To prevent the appearance of new cracks in the clay, you can add straw, but a more reliable way is to use a plaster mesh. If you apply a clay solution to a stove lined with such material, you can forget about the cracks for a long time.
Fireclay clay is often used to restore old stoves. This material is characterized by fire resistance, so stoves finished with it are reliable and durable.
You can purchase this type of clay at any construction market. It is sold in 20 kg bags and is not expensive at all. The working solution is prepared strictly following the instructions on the packaging.
Plastering sequence
Before you start plastering, the old mortar is removed from the stove and the cracks are made wider
Before caulking the stove or sealing problem areas of the stove, you need to study the sequence of work. You can plaster it for the first time if the folded hearth has stood for at least six months. Natural shrinkage and shrinkage of materials occurs. Before starting work, the stove warms up so that the masonry expands. Kindling will prevent cracks after plastering when the hearth becomes cold. Plaster is not applied in frosty weather.
Further actions:
- Surface preparation is required before coating a brick stove in the house. The old coating is removed, the cracks widen and become deeper.
- The liquid composition is applied to the leveled surface in a thin layer and left to harden for 1 - 2 days.
- A steel mesh or fabric is fixed to the surface as a frame to strengthen the layer. The mesh and fabric are moistened with a liquid clay solution.
- The clay mixture is applied into separate cracks or spread over the entire surface of the fireplace in two layers. The thickness of one layer is about 4 - 5 mm. Increasing the size leads to instability of the plaster.
- The solution must dry, after which the surface is rubbed with a grater.
- The finished surface is treated with liquid lime or painted with a chalk composition.
If there are ceramic tiles, they are removed from the stove. The elements can be glued again after the plaster layer has completely hardened.
Step-by-step instructions for caulking and plastering stoves
Repairs begin with diagnostics. It is important to carefully inspect the structure and find all defects.
Repair of a brick stove begins by cleaning the surface.
The further order is as follows:
- Heat the hearth. This should be done in any season. High temperature ensures the expansion of materials, which prevents the appearance of cracks after completion of work.
- If there are large cracks or only a few cracks, then cover them locally. First, moisten the damaged area with water, then fill the voids with the solution. Excess mixture is spread over the surface.
- Before plastering, wet the surface. It is convenient to do this with a wide brush or spray.
- Prepare clay milk (equal parts of clay and water), brush it over the entire surface using a sponge brush. Wait for it to dry.
- Proceed with reinforcement.
If you choose reinforcing mesh, then drill holes in the middle of the bricks. It is necessary to go deep by 5 cm, leave the interval between the holes up to 50 cm, arrange them alternating like chess. In each recess, insert a piece of wire with a cross-section of 3 mm and a length of 10 cm. Bend all the pieces in the middle, keeping the angle straight. For fixation, use cement mortar. After it hardens, proceed to laying the reinforcing mesh, securing it to the ends of the wire.
The mesh for reinforcement can be replaced with burlap. First cut it, then soak it in clay milk. Distribute the prepared material over the surface, laying it from top to bottom. The laying is done with an overlap of about 5 cm. The disadvantage of using burlap is that overheating should not be allowed.
After reinforcement, you need to prepare the solution and proceed to plastering:
- Apply the solution moving from top to bottom. Make an even layer, no thicker than 0.5 cm.
- After the solution has set, rub it in with a float. Make circular movements. Moisten heavily hardened plaster with water for rubbing.
- Let the composition dry completely.
If cracks appear after repair work, they must be wetted and covered with mortar. First, the recesses should be widened using a knife.
During restoration, it is important what to coat the stove with so that it does not crack. All of the above mixtures give the desired effect, but sometimes radical measures are required. One of them is a metal frame. It is necessary to prepare pieces of metal according to the size of the furnace, and secure them with metal corners. The frame can be treated with heat-resistant radiator paint.
Grout
What else can I put on the stove to prevent it from cracking? Stores sell a variety of construction grouts, including those for stove finishing. For finishing work with fireplaces and stoves, this is a good option, but the cost of the material is much more expensive than a self-prepared composition. If you want to save money, there is an alternative option for preparing the mixture at home.
To do this, stock up on the following materials: sand, clay, straw and salt. Four parts of clay are mixed with one part of sand, and one part of straw is added to the resulting mixture. You should get 1 bucket of straw for 5 buckets of the mixture; add 1 kg of salt to this mixture. As written above, the clay must soak well, without leaving dry, hard lumps inside and in order to acquire plasticity.
Types of putty for ovens
You can make the solution yourself or buy a dry mixture in the store.
The furnace belongs to the category of building structures that regularly change temperature, so the working mixture must meet the requirements.
Mixtures for smearing furnaces are divided into types:
- simple compositions of two or more natural components;
- ready-made dry mixes for industrial production.
The materials for the solution are cleaned of accompanying impurities, and the sand is passed through a sieve. The clay is rubbed through a fine grate to separate small stones and roots.
Types of solutions:
- Lime. Sand and lime paste are taken in a concentration of (1 – 2): 1.
- Clay. Chamotte clay and quarry sand are used in a ratio of 1: (1 – 1.5).
- Lime-clay. Lime paste, clay, and local sand are used in a cumulation ratio of 0.2: 1: (3-5).
- Cement-clay. Take cement, fatty clay, quarry sand in a concentration of 1:4:12.
The first type is suitable for coating a surface next to the firebox, since it cannot withstand strong heat. Clay is suitable for sealing gaps and coating the first layer. Secondary processing is done with a solution of clay and slaked lime, which has some plasticity and prevents the appearance of ruptures.
Clay mortar
Fireclay clay is the strongest and most durable material for furnace caulking.
The material is suitable for lining furnaces, but its properties vary depending on the grade of raw materials. The preferred type is fireclay. The same volume of components is taken for the solution, sometimes a little more sand is mixed (for the initial layer). The plaster is mixed using fatty types of clay to increase adhesion. If you choose a variety that is too fatty, the volume of sand increases.
We invite you to familiarize yourself with: Do-it-yourself brick stove for a bathhouse
Rule for mixing the solution:
- The clay is soaked in water for 5 days and absorption is monitored. If the material is very wet, add liquid. The result is a mixture similar to sour cream.
- The sand is dried before mixing.
- Lime is added to the composition if it is necessary to increase adhesion to the surface. The component accelerates the setting and drying of the layer.
- M400 cement is used for furnaces. With the addition of material, the solution sets after 20 - 25 minutes, and hardens within 4 - 5 hours. The layer gains full strength in 2.5 – 3 days.
The balls should not crack when dried.
The solution is checked for cracking. Balls are molded from the pulp, dried and inspected. The material is suitable if no cracks appear on the samples. The test becomes more stringent for mixtures operating under harsh conditions, for example, at high temperatures. Dry samples are dropped from 1.5 m and the surface is inspected for signs of damage.
A wooden shovel serves as an indicator of the concentration of the mixture. If the solution sticks to the tool when stirred, sand must be added. Chopped straw, fiberglass or asbestos is added to the plaster. Reinforcing additives increase tensile strength. The stove is finished with a solution that contains natural components, so that when the temperature increases, no toxic substances are released into the air.
Ready mixes
Dry store-bought solutions are mixed in small portions
The industry produces powdered mixtures that contain the required ingredients. The materials are sold viscous and hard. There are sealants with increased heat resistance and asbestos fiber for filling cracks.
Procedure for using dry compounds:
- the bucket is filled with water;
- the volume of powder calculated according to the instructions is poured in;
- an attachment to an electric drill (mixer) is used to obtain a homogeneous composition without lumps;
- After the first stirring, the solution is left for 4-6 minutes and stirred a second time.

Powder mixtures set quickly after mixing with water, so they are used immediately and mixed in medium portions. The composition includes sand, clay, cement, and additional components are introduced. The manufacturer guarantees the quality of the layer if the work is carried out according to the technology.
Masonry compositions for plastering fireplaces, hearths and stoves contain plasticizing additives, so they work for a long time after drying. Ready-made powders are used to seal small cracks without removing the finish if the surface is tiled or decorative types of brick. The solution prevents the re-appearance of cracks.
The ready-made mixture for application retains moisture well inside, so it does not require preliminary wetting of the wall surface. This position reduces the drying period of the oven and saves working time. The layers are made thinner due to plasticity, so the material is preserved.
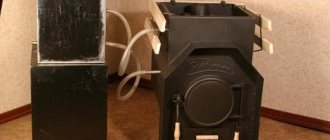
Metal Furnace Processing
The main solution to the problems of cracks in metal stoves is obvious - welding is used. But if this option is not suitable, you can use special fire-resistant putties.
Recipes for preparing mixtures are presented in the tables.

Table 1. Ratio of water-based mixture components
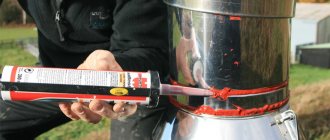
High temperature sealant for metal furnace
Cracks in a steel stove can be welded using a machine, but this version is not always appropriate at home. Ready-made putty is purchased or mixed from certain ingredients.
Ready-made heat-resistant sealants are used in places where the body of the stove heats up to 350°C (outer walls). They are used to treat cracks and loose seams in metal products, and to seal pipes and penetrations through the roof.
The main component is silicone, but the properties vary depending on additives:
- More fire resistant ones include iron oxide, the paste is brownish-red in color.
- Neutral compounds are used at the joints between metal and brick or concrete. When dry, moisture and alcohol are released from them, after which the sealing of the crack receives the necessary tightness and strength.
- Acid pastes release acetic acid during the hardening process, so they are not used for metals, because cause corrosion.
Heat-resistant materials have good adhesion to the surface and do not deteriorate from ultraviolet rays. Sealants do not crack after drying and tolerate expansion and shrinkage of metal well under temperature changes. The drying time for each type is indicated on the packaging and ranges from several hours to a day.
Recommendations from our expert
The following tips will help you repair your furnace:
- reinforcement with a special mesh or burlap is replaced by adding straw, flax fibers (must be crushed), asbestos (at least 10% of the total volume), and crushed fiberglass to the grout;
- if the restoration is carried out with a sand-clay composition, and whitewashing is not planned, then lime is added to the composition simultaneously with sand, after which it sits for another 12 hours;
- before plastering, the surface must be cleaned down to the brickwork, all old coating is removed;
- For reliable adhesion, before plastering, clean the seams between the bricks and deepen them to a maximum of 15 cm.
Cracks in the furnace are a common problem. It is dangerous to leave it without attention. For repairs, you can use different mixtures, each case has its own characteristics. Sealing cracks and plastering will reduce heat loss, increase fire safety, and improve the appearance of the structure.
How to cover up cracks in the stove - options for solving the problem

Caring for the stove
Now you know what you can use to coat the stove to prevent it from cracking. You should take care of your stove in a timely manner to prevent the formation of large cracks. Firstly, it is easier to cover up small defects, and secondly, this will help prevent the formation of large defects and ensure the safe operation of your stove.
Like any repair work, repairing cracks in the stove will require time and investment. But anyone can handle this task, because it does not require special qualifications, special tools and materials. The experience gained in sealing cracks on your stove may well be useful in its further operation.
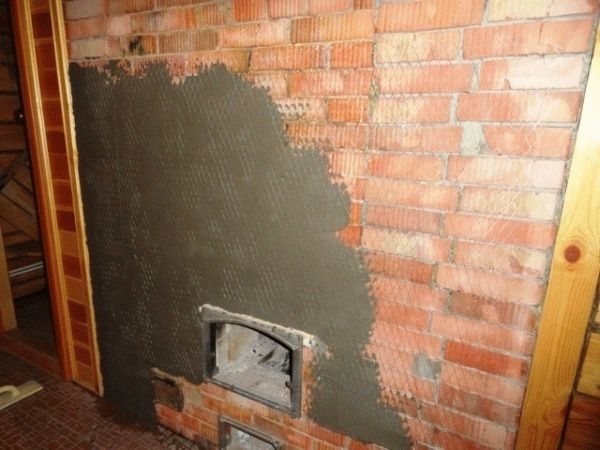
Figure 4. Plaster over reinforcing mesh
To prevent the stove from cracking, you need to take a competent approach to its construction and operation. But if cracks do appear, they need to be eliminated as quickly as possible. Regardless of the type of mixture, the structure should be prepared before restoration. The surface is cleaned of dirt and debris, and the cracks are deepened and widened. If there are bumps and sagging on the base, they are knocked down.
Before coating, the hearth must be heated. Due to the high temperature, the furnace materials will increase in volume. This will avoid repeated cracking immediately after post-restoration heating.
If there are few “seams”, they are sealed locally before plastering. Otherwise, a complete coating is used - the entire surface is covered with liquid heat-resistant putty.
Scheme of work
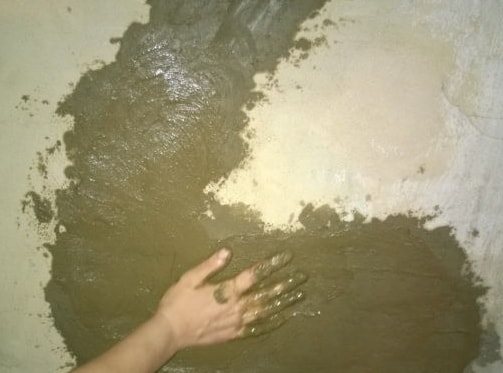
Figure 5. Local filling of cracks
In general, the procedure is as follows:
- clean the base and perform other additional work;
- cover the surface with a thin layer of liquid mixture and allow the putty to dry;
- reinforce the base (or cracks, if the repair is local); for this purpose, a metal mesh with small meshes is used; fasten the reinforcement with nails or dowels; as an alternative to the mesh, you can use burlap soaked in putty; It is preferable to use it to seal cracks pointwise;
- after the starting layer has dried, the fireplace is plastered; the oven is coated in two layers - the thickness of each layer is no more than 5 mm.
The next steps are at the discretion of the stove owner. The structure is covered with whitewash or decorated in another way.
How to properly caulk a stove
The experience of repairing furnaces has a long history. Each area has its own characteristics of work. The tools you will need are a trowel and a grater (a grater, as a rule). Some people finish trimming the plaster directly with their hands. In general, the main stages of work are the same:
- First, the surface of the stove must be thoroughly cleaned and swept;
- then it is advisable to heat it; existing cracks can be sprinkled with water to moisten;
- after which a thin layer of putty should be applied. The main thing is not to overdo it;
- after the smeared layer has dried, if necessary, large cracks can be strengthened with reinforcement with a special mesh;
- then the surface is covered with plaster. It is advisable to do this in two stages, each time applying a layer up to 5 mm thick.

If the stove is covered with decorative finishing, then the coating is removed before covering the cracks. If necessary, the doors are reinforced with wire. Special adhesive compositions are prepared in small portions, since they can harden strongly.
Ultimately, by spending a little money, you can get rid of defects on the stove surface. The result will please the appearance and ensure safety for the home owners.
Even the most durable stove can crack over time. If you ignore the need for repairs, the heat source will not last long. The question is: how to cover a stove - brick or metal? The article discusses the causes of cracks and how to eliminate them.