Anyone who has ever built a sauna stove knows how much work needs to be put into making even a simple sheet metal body according to one’s own drawings. It’s easier to build a sauna stove from a pipe with your own hands, especially since finding a drawing for such a building is not a problem. In most known designs, the sauna stove has a vertical body arrangement. Most often this is due to the desire to rationally use the space in the steam room or position the outlet of the stove pipe in the bathhouse vertically according to the drawings of the location of the chimney and ventilation in the house.
Advantages and disadvantages
Positive and negative qualities are inherent in almost any item made independently. Bathroom equipment is not included in the category of exceptions. Among the advantages of this device, the following qualities should be noted:
- excellent transportability;
- long service life;
- heat resistance;
- use of any type of fuel;
- quick heating of the steam room;
- simplicity and ease of use.
Some disadvantages present in a homemade stove cannot overshadow the above-mentioned advantages. However, let us also note them:
- the warm air emanating from the metal hearth is unevenly distributed throughout the steam room, which is especially noticeable in large rooms that require the installation of several stoves of this type;
- The rapid heating and cooling of a metal bath structure leads to a constant need to add fuel, which increases its consumption.
Features of installing pipe bath stoves
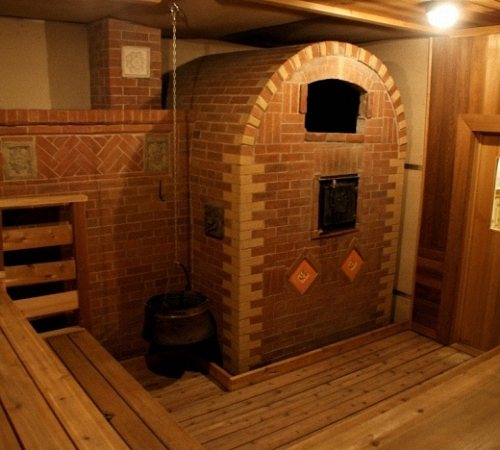
For such devices, provision should be made for the construction of a foundation. When creating the stove itself, there should be no gaps or cracks. Everything must be absolutely airtight. Wooden walls can be protected from fire using special antiseptic agents, or they can be sheathed with metal sheets. It is prohibited to place flammable objects made of plastic, fabric or wood near the structure.
The arrangement of an ash pit in a pipe furnace should be carried out at a height of 15 cm from the surface of the floor covered with a metal sheet. A distance of more than half a meter should be maintained from the top plane of the homemade device to the ceiling. The stove can be installed at the entrance to the steam room from the dressing room. The heating temperature of the room under the very ceiling should be 80 °C or more, and at the bottom of the steam room - 45 °C. Well-heated stones will provide a sufficient amount of steam when watered abundantly.
Uniform combustion of solid fuel, excellent tightness of the chimney and firebox, as well as high efficiency - these are the qualities that a device made from elements of a rolled metal product should have.
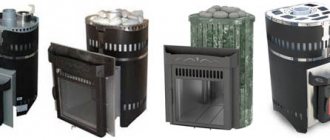
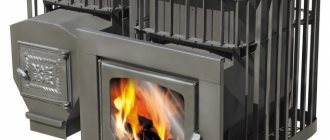
Metal sauna stoves
Before you start making a sauna stove with your own hands, it doesn’t matter from metal or brick, you need to take care of fire safety measures. According to the rules, the distance between the stove and combustible structures must be at least 25 cm. A space must be allocated for the stove in accordance with these requirements.
It is often used to install the stove in a bathhouse with an external firebox. The firebox is discharged into the dressing room. There should be at least 25 cm from the walls of the dressing room to the stove; this gap is usually laid with bricks and asbestos tape or two cords are placed between the wall and the brick, then plastered.
We invite you to familiarize yourself with the Surge Limiter - this is... What is a Surge Limiter?
This installation has a number of advantages.
- You can light the stove without opening the door to the steam room. Then it will be much hotter, especially if Finnish sauna stoves are used.
- The second factor is that there must be a metal sheet in front of the firebox. If you put it in a steam room and place the firebox there, the metal sheet will be heated by the steam room air. When you step on it, you will feel intense heat, which is quite unpleasant. This reduces the area of the small steam room, since you have to go around the sheet. Therefore, taking the firebox to the dressing room or washing area is the right decision.
If it is a light brick or metal stove, you can mount it directly on the floor. This is how stoves are installed that create a specific pressure on the floor of less than 150 kg per square meter. If the stove is too heavy, you need to make a foundation.
The foundation should be laid at a depth below the freezing level. Since the basement of the bathhouse is usually warm, the place is protected from the winds and periodically warms up, the ground underneath does not freeze. Therefore, you can place the stove on a shallow slab foundation.
The area of the slab is determined so that a pressure of no more than 200 kg per square meter is exerted on the ground. It is determined based on the weight of the stove, foundation and chimney.
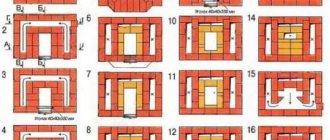
More details about a kiln with a foundation will be discussed in the section on building a brick kiln.
Before starting construction, you should finally decide which stove to choose for your bath. To do this you need:
- Make a drawing.
- Determine how much materials and stove fittings will be needed and purchase them.
- Fit the stove into the overall plan of the room.
- Find an artist.
If you plan to do everything yourself, the latter is not required. If you can only do part of the work, choose a specialist who can do the rest.
Vertical sauna stove
We recommend using two pieces of pipe 0.5 m and 1 m long. These pieces of rolled metal are quite enough to make a reliable heating device for a bathhouse.
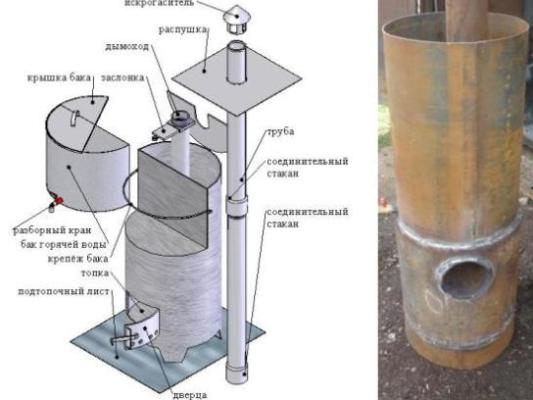
The stages of furnace construction are as follows:
- is being built , the width of which is half a meter greater than the diameter of the pipe. A reinforced layer consisting of metal rods is laid on top of the base, and a concrete screed is made. The foundation is built with a thickness of more than 20 cm. After the building material has completely hardened, paving slabs or ordinary bricks are laid on the floor.
- The base for the furnace will be a long piece of pipe. In order for the device to stand firmly and reliably, the bottom edge of the product should be leveled. A ash pan cutout measuring 5x20 cm is formed. This part of the stove will serve as an ash pan.
- The bottom of the firebox is welded into the pipe from above the . For this purpose, a sheet of metal is taken, the thickness of which must be at least 12 mm. A circle with a diameter equal to the corresponding pipe parameter is cut out on it. A cutout is made in the center of the finished part to install a grate, which you can make yourself or purchase in a store. When making a product yourself, a grid of steel rods is welded onto a cutout prepared in a circle. The gaps between them should be equal to their cross section.
- At a distance of 5 cm from the bottom of the firebox, a cutout is formed for supplying fuel . The door for it is secured with hinges.
- The cutter that will serve as top of the firebox, is made of a metal rectangle with cut corners. The prepared part is inserted into the pipe and welded there at the edges of the cuts. Thus, the size of the gaps will allow smoke to freely exit the firebox and circulate along the walls of the furnace, contributing to their heating.
- A grill made from rods earlier is welded 8 cm above the installed cut-off device The diameter of the workpiece should be approximately 15 cm. It will serve as the bottom of the heater. The door for it is similar to the firebox flap. For ease of use, the grate is located on the steam room side.
- The top of the heater is welded with metal, in which a hole is made for installing a chimney . If you are using a removable water tank, limiters are welded on top of the heater to improve the stability of the tank.
- The pipe scrap can also be used to make a stationary water tank. In this case, the size of its lower plane must correspond to the same parameters as the top of the heater. A pipe is welded to the bottom of the tank in the center , the top edge of which should be 25 cm above the edges of the tank. A lid is made for the tank in the form of two semicircles. A tap is inserted just above the bottom of the product, and the container is welded to the top of the heater.
How to make a sauna stove with your own hands
| Author | Share | Rate |
| Victor Samolin |
Interesting on the topic:
The secret of the popularity of stainless steel chimneys
Methods for sealing passages through the ceiling
Selection and installation of pipes in the bathhouse
Comments on this article
Rostislav Everything is described very easily and clearly.
Now, according to your instructions, I want to make a cauldron for cooking while camping. There is even the necessary pipe section. 06/07/2016 at 02:04Vadim I would be grateful if you could provide instructions for making the grate. Do you need a more complex version of the stove? How realistic is it to build it from available materials? 06/07/2016 at 02:22
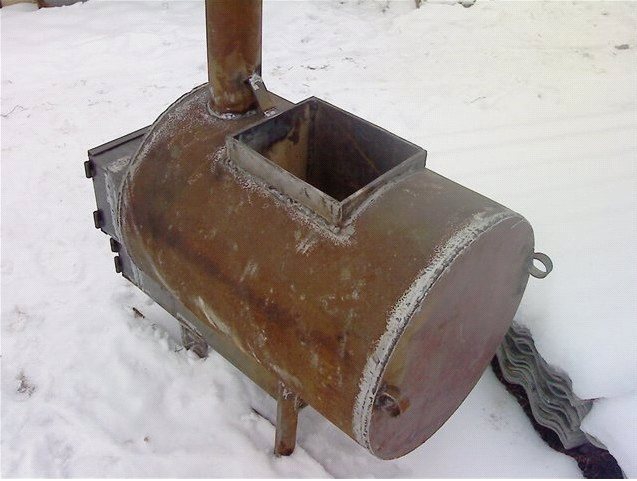
Horizontal pipe bath stove
This design is characterized by the presence of a hanging tank and an external heater. The features of the device include compactness and increased depth of the firebox, which contributes to the rapid heating of the bath. The stove can be installed so that the door of the fuel combustion device opens into the room adjacent to the steam room.
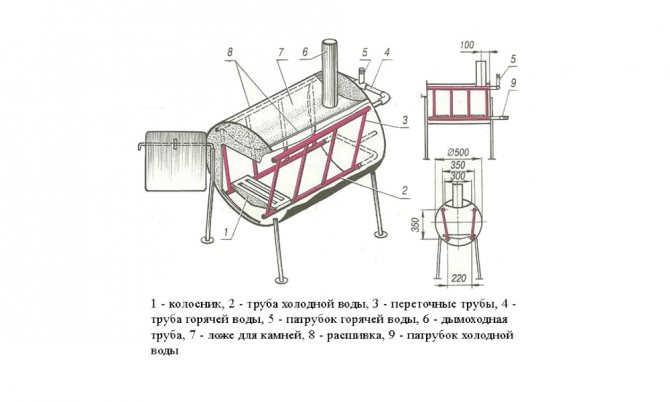
The manufacturing process of a horizontal furnace consists of the following steps:
- A blank 80 cm long is cut from a metal pipe with a diameter of 50 cm, with further alignment of the edges.
- To create a grate platform , take a sheet of metal 12 mm thick and cut out a rectangular part measuring 40x80 cm. An opening is made in the center of the workpiece, onto which a purchased grate or a homemade grid of reinforcing bars is welded.
- The grate platform is welded into the pipe, the weld seam of which should be located under the installed part. This is due to the fact that the welding area is often the most vulnerable place, capable of quickly burning out under the influence of strong fire.
- To make the facade of the furnace, a metal sheet is used, from which a rectangular part with one-sided rounding is cut out. In the prepared facade part measuring 60x70 cm, two openings are made for installing the blower and combustion doors.
- The back side of the stove will be a sheet of metal measuring 70x90 cm. When cutting off the top of the rectangle, there is no need to make a rounding, since the corners will serve as limiters for the heater.
- The front and rear parts are , as well as the front stop of the heater. This device is a part, the upper contours of which repeat the protruding outlines of the rear wall, and the lower contours repeat the streamlined shapes of the furnace structure.
- In the part of the body where the chimney should be installed, a square hole measuring 15 cm is made. On top of it, a vault is formed from a metal sheet with an opening for the smoke to escape . A distance of 15 cm should be maintained between the previously formed hole and the opening closer to the front of the stove body. Such a break is necessary for complete combustion of the fuel and cutting off the flame.
- The opening of the vault, which acts as the bottom of the heater, is crowned with a chimney . The volume of the compartment for stones can be increased by 15-20 cm by welding on a durable metal grate.
- The openings reserved for the firebox and ash pan are equipped with doors . The final treatment of the furnace involves grinding the device to remove scale and rust stains. To make a homemade heating device more aesthetically pleasing, polymer heat-resistant paint is used. To remove the unpleasant odor that accompanies the baking process of the substance, the stove should be heated before installation in the bathhouse.
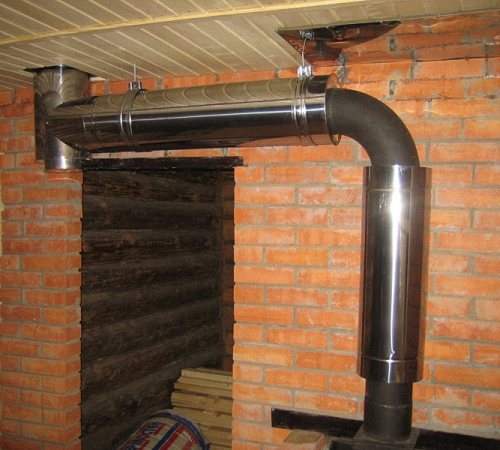
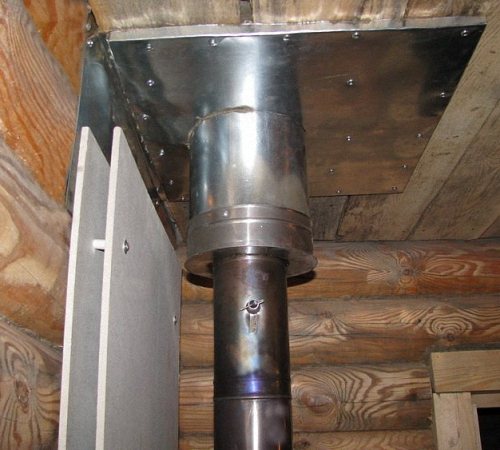
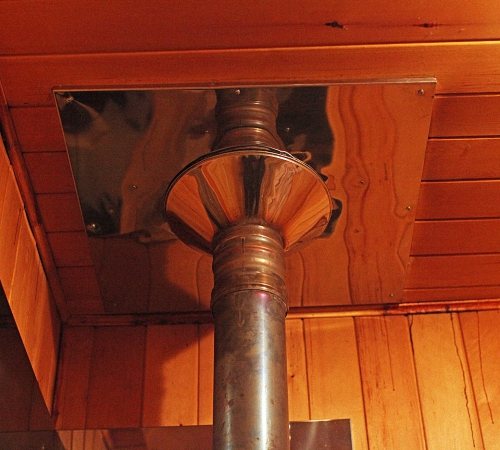
- To install the stove, you will need a concrete base or single-layer brickwork . You can also use paving slabs and porcelain stoneware. Subject to fire safety regulations, which require the installation of fire-resistant insulation, the chimney is vented outside through the ceiling and roof of the bathhouse.
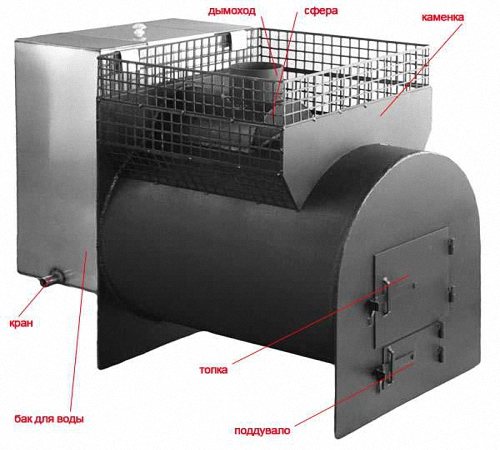
- A shelf is welded to the back of the stove , on which the water tank is installed. The stove is filled with stones.
Climate
61 votes
+
Vote for!
—
Vote against!
Heating a bathhouse using a homemade stove means significant savings and ease of operation for many years. A homemade stove made from a pipe is not a new thing today, and many craftsmen offer their manufacturing technology as an example. If you have scraps of metal pipes, suitable tools and some experience working with a welding machine, such heating equipment can be easily made independently.
Table of contents:
- Why are homemade pipe stoves in demand?
- Basic requirements for homemade heating devices
- What is important to know about pipes for a homemade stove?
- “Hot” and “cold” furnace design
- Making a vertical stove from a pipe
Why are homemade pipe stoves in demand?
The comfort of any room during the cold season largely depends on the temperature. Moreover, this is important for:
- baths or steam rooms;
- home workshop or mini-workshop;
- utility rooms;
- unfinished buildings where work is underway in the winter.
A good homemade stove is not inferior to factory models in many respects, and is several times cheaper in cost. And although homemade equipment is not as aesthetically pleasing as branded equipment, no one questions their efficiency and reliability. In addition, they can burn any waste or unnecessary trash - shavings, rags, waste paper, packaging, etc.
A homemade stove made from a pipe takes up little space, and it can be built anywhere on a small pedestal, the main thing is a good chimney and safety. But an important advantage of such equipment in a bathhouse is its versatility - heating air, heating water and stones. If such a stove is made according to all the rules, then its maintenance will be minimal - only removing solid residues of the combustion process from the ash pan.
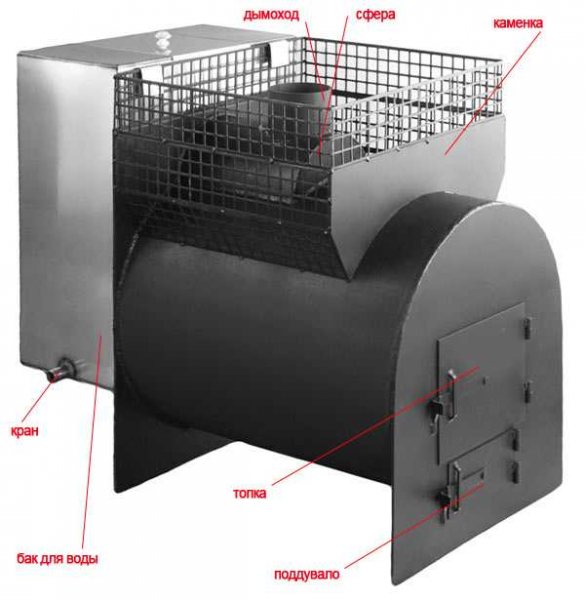
Structural elements of a pipe furnace:
- firebox;
- warming place for bath stones;
- ash pan;
- chimney;
- grate-grid (between the ash pan and the firebox) for supplying oxygen;
- finished door;
- heating water tank;
However, not all of them are needed in the design of a homemade stove; for example, a container for water or a compartment for stones may be missing if the stove is not for a bath. Sometimes it is advisable to make the tank as a separate element connected to the stove from a pipe.
Attention: In any case, the stove should not be placed close to flammable surfaces - fire safety rules are the limit!
Basic requirements for homemade heating devices
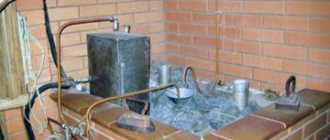
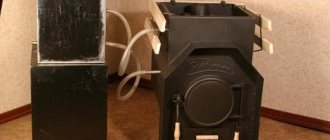
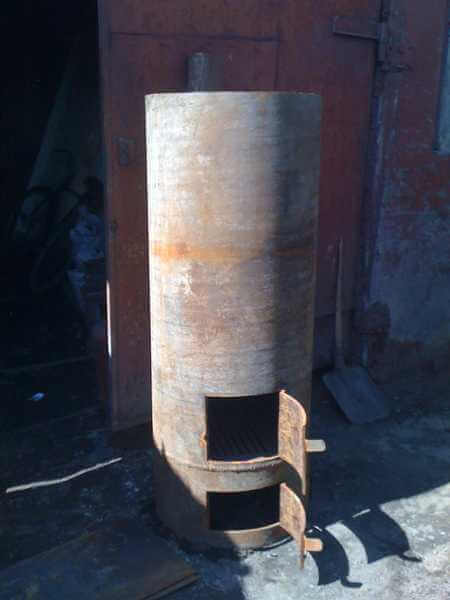
You can build a metal stove from a pipe yourself or with the help of a professional welder. In any case, it will be cheaper than buying a ready-made boiler. And if it turns out that it is no longer needed, then complicated dismantling will not be required, since the structure will be easy to remove from the room. But you can make not only a stationary, but also a mobile homemade stove from a pipe - photo:
You can not only vary the design of the pipe-based stove, but also what is supposed to be used to heat it. The choice of fuel type largely determines the design features of a homemade chimney stove.
The firebox can be adapted to any available material:
- ordinary firewood;
- shavings and sawdust from the carpentry shop;
- spruce and pine cones;
- agricultural waste;
- fuel oil or used engine oil;
- any flammable material for disposal through incineration.
Basic conditions:
1. Provide sufficient power and heat output, and the combustion process must be adjustable.
2. It is advisable to provide a heat accumulator and a steam generator to regulate the regime of changes in heat and moisture (in the bath).
3. Regulator of convection (maintaining the physical laws of combustion) and air supply.
4. Compliance with all proportions of the firebox and chimney for sufficient draft.
5. Coals from the firebox should not fall out to protect the room from a possible fire, and it is advisable to line the lower space near the stove with a piece of steel or galvanized steel with a side.
6. A homemade stove should have a small foundation or pedestal.
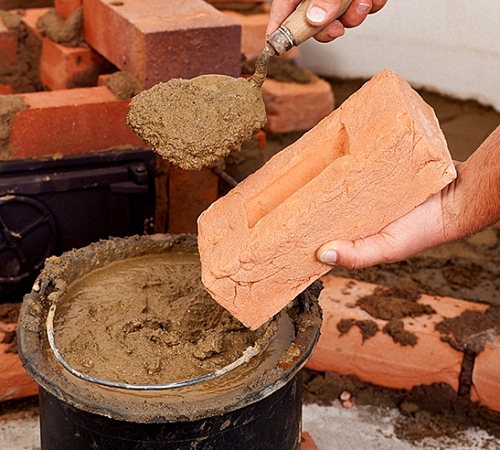
To arrange a suitable place for a homemade stove in a bathhouse (another auxiliary room) made of concrete or refractory brick. First, a small foundation is laid out, but a small pedestal up to 30 cm high is sufficient, to which there should be free access from different sides. When the site for the foundation is prepared, it is leveled with concrete. On top of it the platform is laid with fire-resistant bricks, knitted with a clay solution. It is better to immediately equip a small side along the edge.
Attention: The walls of a bathhouse or steam room in a log house must be protected from overheating with a protective screen, for example, a layer of brick. The stove itself cannot be placed end-to-end.
For uniform and fast heating in a large room, 2 stoves are often used at once - a stationary one and a homemade, additional one. There are even mobile versions of stoves made of pipes, on wheels, popularly called “locomotive”, which are moved if necessary.
What is important to know about pipes for a homemade stove?
Not every pipe is suitable for equipping a full-fledged stove, and it is worth understanding their varieties, indicated by markings. The numbers indicate:
- steel grade;
- pipe sizes;
- standard;
- manufacturing method.
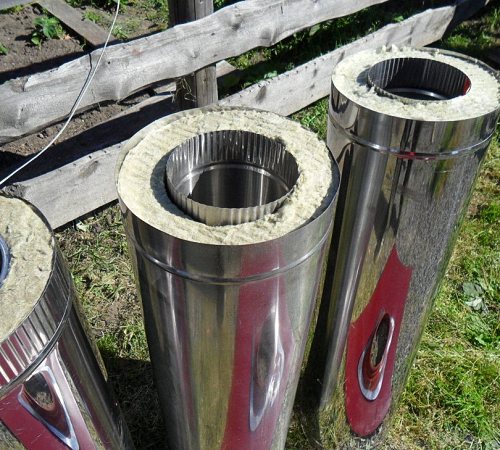
Important parameters are the internal cross-section (pipe diameter) and pipe wall thickness. For example, 550*5, where the first number indicates the internal diameter, and the second – the wall thickness of the pipes of this marking. For a pipe stove, it is important that it withstands a high temperature load, heats up evenly, retains heat for a long time, and uses minimal fuel consumption to heat it up. A sandwich pipe for the oven (double) is also often used.

Tip: High-quality thick-walled pipes do not deform from high temperatures, and the large diameter is very convenient for laying firewood or other solid fuel.
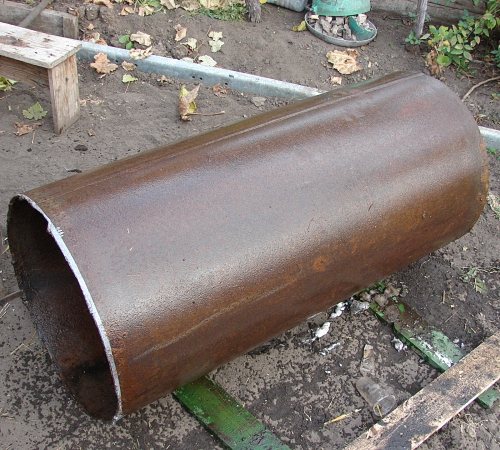
To make your own stove, it is enough to cut a metal pipe with a cross-section of about 500 mm. You will have to work:
- welding machine;
- grinder;
- metal cutting machine.
To make a full-fledged heating unit, you will also need a smaller piece of smaller diameter pipe for the stove - under the chimney.
You will also need sheet steel, grates or a metal grate, a finished oven door or the metal from which it will be made, and what will be used to attach it to the pipe. To save money, you can use pipe scraps from a hardware store or from a factory where such scraps are offered.
It is also important to determine whether the pipe stove will have a horizontal or vertical design. A vertical pipe oven must have a side opening for the door. To manufacture the selected type of furnace, first make a preliminary sketch using drawings of a pipe furnace. If you have pipe blanks, it is important to make your own drawing to make your own adjustments.
“Hot” and “cold” furnace design
Depending on the temperature of the outer surface of the sauna stove, they are called “cold” or “hot”. The hot wall of the furnace maintains a high external temperature for a long time, for example, about 100°C degrees - it’s warm in the steam room. They are easy to “heat up” in a short period of time, and the room will quickly warm up. It is for these purposes that a do-it-yourself pipe stove is most suitable, especially if the bathhouse is not used constantly, but only periodically. In a country household, where people visit occasionally, a cold bathhouse stove is not very effective.
Hot stoves for steam rooms are an ideal option, but such a bath can easily be overheated, creating a sauna mode. But not everyone can withstand too high a temperature, especially with high humidity. And the large area of the heated surface of a homemade stove made of a metal pipe can easily turn from an advantage into a disadvantage. In addition, a large hot surface area is dangerous because you can get burned if you are careless.
In the bathhouse, which is used constantly, the stoves are lined with aesthetic refractory bricks. Often the stove body is protected by a convector, which distributes hot streams of heated air over the entire area of the bathhouse. It also protects from contact with a hot surface.
Attention: It is unsafe to sharply reduce the temperature of the firebox by dousing it with water, and the firebox itself will not last long, since a sudden change in temperature conditions destroys it.
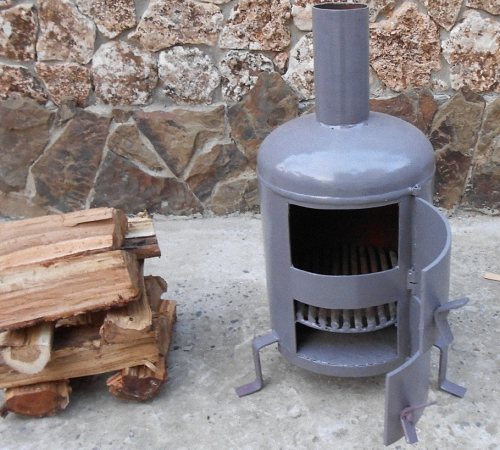
Making a vertical stove from a pipe
This is the most primitive design, but it is also important to do it correctly. To do this you will need a large piece of pipe, about 1.5 m by 1.5 m in diameter. Thick-walled material up to 10 mm is suitable, and a pipe of a smaller diameter is sufficient for a heater stove. You also need 3 sets of steel hinges, reinforcement or ready-made grates, a mortise tap and metal sheets up to 8 mm.
You will need to cut the pipe into 2 unequal pieces or immediately take 2 pieces of approximately 60 cm and 90 cm. It is better to make a firebox from the larger fragment, and a water container from the smaller one. A ready-made stainless steel container, which is not afraid of corrosion and high temperatures, will also go under the water tank.
It is tedious to provide a larger section with a blower so that oxygen enters the firebox. To do this, cut a rectangular hole on the side about 7x20 cm. You need to cut evenly and carefully in order to make a door from the resulting fragment, mounted on a set of hinges. We will add a latch and handle to the door.
Next, we cut a circle from sheet steel that matches the cross-section of the stainless steel stove pipe to make the bottom of the firebox. We attach it by welding from the bottom of the pipe, but you can additionally make quite powerful legs that can withstand the weight of a homemade stove. But it is most advisable to weld the bottom of a vertical oven not at the very bottom, but slightly inside, so as not to make legs at all.
Next, you will need to place a grate (or its replacement made of a thick steel plate), which is secured inside the firebox by welding. The main purpose of the grate is a surface with oblong holes where firewood is placed, and air involved in the combustion process must pass through them.
Through these holes, ash and other non-combustible fuel residues will fall down into the ash pit. From there they will need to be removed periodically, so the design of the furnace should be such that this is convenient to do. Therefore, there must be sufficient space between the grates and the ash pan - an ash pan.
The main part of any stove is the firebox, where wood or other fuel will burn, so it must be done most carefully. To do this, cut a window on the side of the pipe directly above the grates, approximately 25x30cm. It is advisable to place it evenly above the finished ash pan door to make it aesthetically pleasing. Sometimes it is more convenient to do this from the side, but you should not do it too high or low. And from the cut out fragment of the pipe we will make a door on hinges, which we will add a handle and a latch.
The next stage is to equip the heater, for example, from reinforcement - in the form of a grate above the fire chamber, where stones are placed for heating. But it is better to build it in the shape of a scoop - from a cut piece of pipe. It is fixed above the firebox perpendicular to the base, and part will be tightly welded, while the other will remain open. We attach a door and get a scoop for stones located above the fire. All these design features must be thought out in advance and included in the drawings of the pipe furnace.
Next, let's start making the water tank. To do this, we will weld a bottom cut from sheet steel about 7-8 mm to the smaller section of pipe that we initially agreed upon. In the bottom of the tank we make a hole large enough for the pipe to pass through, into which we weld the chimney pipe from the firebox compartment. Hot smoke passing through the pipe should heat the tank and the water in it. And at the bottom of the tank we install a tap for drawing water.
Attention: The only difficulty is that the homemade container is absolutely sealed. The quality of welding is checked until the boiler is fully operational. It is important that water does not drip into the firebox on the fire - this will trigger the production of carbon monoxide.
We connect the tank and the firebox compartment together and, for example, using a metal coupling - it will become an excellent mount for the tank. The top of the tank must be equipped with a lid or left open. But it’s more convenient when the lid is divided in two - the back part is tightly welded, and the front part opens. These parts are connected on hinges.
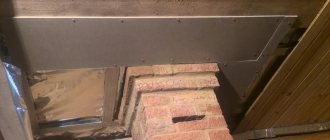
A few words about the chimney that should come out of the stove - it can be made of a solid pipe or fire-resistant corrugation (for a mobile version of a homemade stove). To ensure fire safety, the chimney must be insulated or bricked when passing through a wall, ceiling or roof.
In conclusion, I would like to add that this is only one of the options, for example, horizontal ovens. We invite you to additionally watch a stove made from a pipe, video:
Common mistakes
To stop the rapid blowing of heat from the furnace , during the manufacturing process it is necessary to provide for equipping the chimney with a valve.
If a large amount of soot accumulates, it may ignite . This can be avoided if you equip a horizontally standing unit with an afterburner. At a certain point in the pipe wall, two holes are made into which metal tubes are inserted, bent towards the pipe. This is necessary to prevent the formation of soot. Accordingly, more oxygen will enter the firebox, facilitating complete combustion of the fuel and the formation of less soot.
Expert advice: nuances of working with the stove
- It is extremely easy to choose a stove that is ideally suited for the volume of a bathhouse: to do this, you need to calculate the volume of the bathhouse and multiply by a factor of 1.5. The result will show the approximate volume of the stove, which guarantees comfortable warmth in a house of this size.
- The size of the water tank is selected according to the number of potential visitors to the bathhouse and the power of the stove itself.
- The best material for a chimney is acid-resistant stainless steel with a low molybdenum content.
- Despite the guaranteed safety of the stove, proper means for emergency fire extinguishing should be stored in the sauna house - human safety is paramount.
Installing a sauna stove is a very painstaking and complex job, so you don’t have to worry, we will professionally install it for you. You don’t even have to worry about “which oven to choose?”, we will take care of all these problems.
“Master Dacha” will professionally install a sauna stove for you from 8,000 to 25,000 RUR, depending on the complexity.