Types of lock connections
The reliability of a wooden frame, as well as the duration of its operation, depend on the quality of the joints, which must:
- have high strength, withstand the weight of wood, floors and roofing;
- characterized by resistance to temperature and humidity fluctuations;
- provide good density to prevent drafts in the room.
Design solutions for nodes are of the following types:
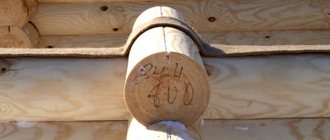
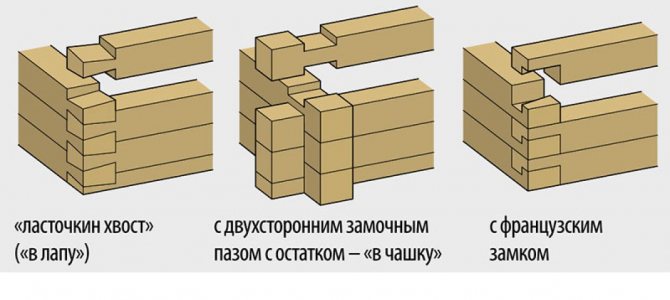
- T-shaped connection (into the paw) . Elementary in design, it is a connection between a wall and a pier. At the ends of the beams, horizontal spikes are cut out in the shape of a trapezoid. The joints are additionally insulated with tow, moss, flax-jute fabric or foam/silicone sealants.
- Butt connection . Laying is carried out in a checkerboard pattern, fastening is done with dowels, staples or overlays. The key to the quality of such an assembly is well-dried (with a wood moisture level of up to 20%) lumber, pre-treated with an antiseptic.
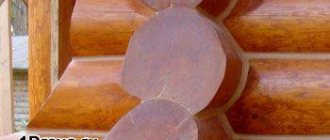
- Connection with remainder . The beams pass through the nodal joint and extend beyond the boundaries of the walls. The basic rigidity of the structure is ensured without additional fixation. The exterior of the log house is maintained in the traditions of Russian architecture.
- Connection without residue . The beams are limited by the walls.
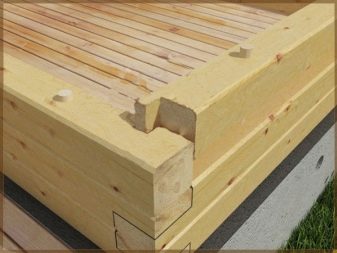
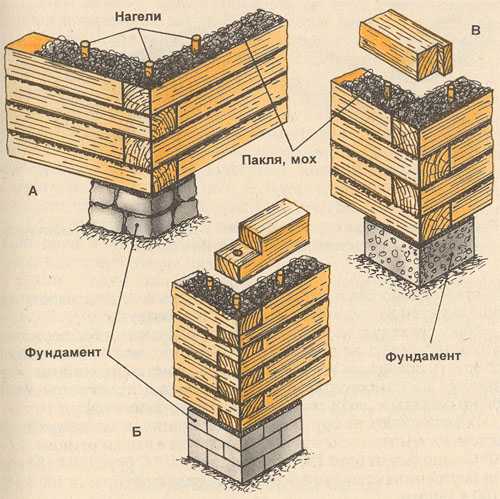
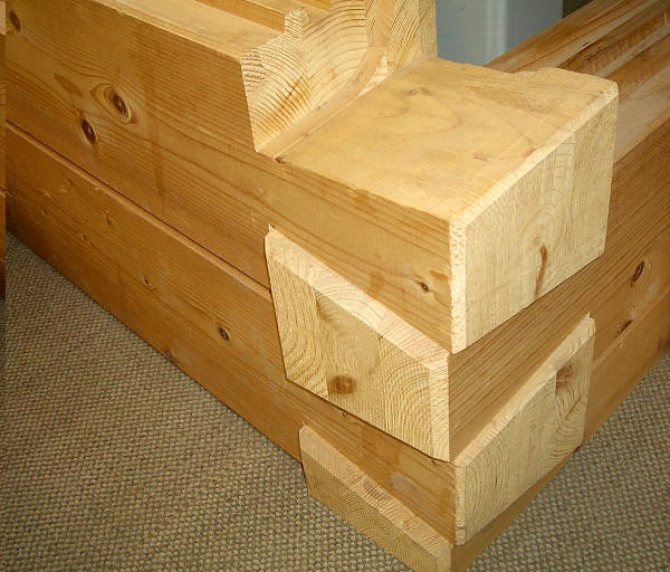
Options for docking with the remainder
The mating of timber, which provides for a margin in length, is in demand due to the good tightness and strength of such a structure. The lower elements are kept from moving due to the large mass of the upper rims. To connect the lumber with the rest, a locking groove is made:
- Unilateral. With this option, the beams are connected to each other in a perpendicular plane thanks to grooves for half the thickness of the products. Fixation of profiled materials in one direction is ensured, therefore, to strengthen the angle, the structure can be additionally secured with dowels.
- With double-sided recess for a quarter of the thickness of the timber. This method allows for reliable connection of profiled products in two directions. Solidity is guaranteed under temperature and humidity changes.
- Quadruple. It allows you to increase the reliability and strength of corners, but the preparation of the material becomes significantly more complicated. Sampling of complex asymmetries is performed on special machines.
Corners without remainder
The advantage of the method is to save building materials, while the tightness and reliability of corner joints are slightly deteriorated. The simplest method is to mount building materials with a square cross-section end-to-end. Additional wood processing is not required, since the beams are stacked on top of each other in a checkerboard pattern and fixed with dowels or steel brackets. Disadvantages - there is no high density and deformation is inevitable when using wet material. More reliable ways:
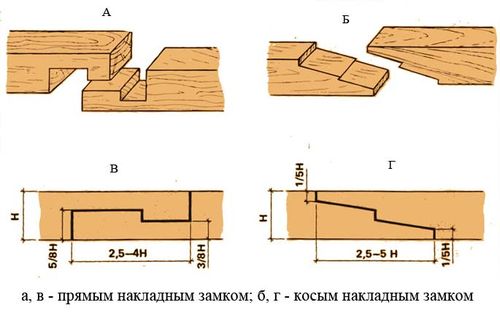
- Use of dowels. Grooves are made at the end and side surface of the lumber for installing a standard key with a rectangular cross-section. The depth of the holes is 0.2–0.3% of the thickness of the timber. In order to ensure the strength of the connection in two directions, a special dovetail key is used. The shape of the swallow's tail helps to fix the beams more firmly, but requires precise calculation when selecting grooves and preparing the key.
- Sawing the ends to half thickness. The resulting spike should be equal in length to the width. The joint is not airtight, so it is reinforced with dowels and requires caulking.
- Root spine (warm corner). Used for assembling small log houses with equal lengths of wall and beam. The beams in such a nodal connection do not move, there is no slightest deformation, and good protection against drafts is obtained. Withstands the total load of the structure even taking into account the likelihood of heavy winds and earthquakes.
Useful tips
When cutting a warm corner, you should take into account some of the subtleties of the process and the problems associated with it.
- Since the connection technology already makes the house warm, you should not leave large gaps in the corners for later caulking. Their size should not exceed 0.5 cm.
- You can caulk corners after several years of use. If the seams have become wider due to shrinkage of the timber, it is worth keeping in mind that sometimes they can narrow (when they swell, when humidity is high).
- Nails and dowels are not used using technology with residue; moreover, their use is a violation of the joining rules.
We invite you to read: Assembling a house from laminated veneer lumber with your own hands
- When cutting out tenons, they are made up to 1/3 of the timber in size. A larger parameter can lead to breakages and, consequently, to poor-quality connections.
- If fastening is carried out during the construction of a structure made of laminated veneer lumber, wooden pins with a round cross-section are used for the end for strength. Metal ones are not used, as due to drying of the wood they become too noticeable. To strengthen the structure, you can use fastening corners.
- When laying profiled timber, the most preferred connection options are the main tenon, keyway, and dovetail methods.
The warm corner provides reliable protection for the building in winter and summer, in windy and hot weather.
To do it, there is no need to call professional builders, because there are simple and effective ways to do it yourself. To learn how to make a warm corner of a timber house yourself using the tongue-and-groove technology, see the following video.
Warm corner made of timber: mating technology
Algorithm for preparing and assembling a corner joint with a main tenon:
1
The lumber is pre-prepared by marking according to the template.
2
A tenon is cut at the end (with a right angle or with an extension to the outer edge), a length equal to 1/3 of the thickness of the beam.
3
A receiving groove is prepared on the connecting product, the dimensions of which are selected with a margin for the seal.
4
Thin layers of insulation are placed in the grooves. The choice is usually made of jute; elastomeric tape materials are used less frequently.
5
The walls are being assembled. All joining planes are thermally insulated and sealed. The pairings of the links alternate during assembly: one beam is a tenon on the right, the second is a tenon on the left, etc.
6
The corners are additionally fixed with staples. An alternative is long round dowels that firmly fasten the knots to the lower rims.
To cut grooves in wooden profiles, use a jigsaw, chainsaw or a special manual cup-cutting machine.
Attach wood to concrete
How to connect a vertical beam to concrete? Concrete is a hard material, wood is softer. What to do? There is concrete in the foundation to which the first row of beams must be attached. Concrete can be the material from which the wall is made, while the beams can be an element of unique decor. A reinforcing pin will help to cope with the task if we are talking about a foundation, a drill with an attachment for hard materials and an anchor bolt if you need to attach the beams to the wall.
First row from the foundation
Bottom frame - this is the name of the first row of beams that is placed on the foundation. The foundation is initially provided with anchor bolts or wooden chops. The trim at the corners is attached to the foundation using reliable metal clamps. How is the harness fastened at the corners? There's nothing complicated about it. The strapping, in fact, is an ordinary row, except for fixation to the foundation using anchor bolts.
It is necessary to attach the vertical beam to the trim beam, increasing the height of the walls. It is necessary to make a cutout, which is chosen for the corners of the facade, and fasten the corners in one way from the very beginning. The harness will be a reliable support in this case. And to make it even stronger, you can choose timber from harder wood species. In this case, the very first row will withstand the weight and will not deform.
Advantages and disadvantages of connecting to a warm corner
The technology has many undeniable advantages:
- installation is carried out quickly and manually, without renting heavy machinery or special equipment;
- a durable, rigid structure is guaranteed;
- the finished log house shrinks evenly, without any kind of deformation;
- the beams in the crowns are protected from divergence due to fluctuations in humidity at the joints;
- no additional insulation of external walls is required;
- the aesthetic appeal of the building is preserved without additional finishing - external wall cladding is not necessary;
- temperature balance is maintained inside regardless of the time of year;
- the possibility of the appearance of “cold bridges” and freezing of the structure is blocked;
- The walls are protected from blowing.
Conditional disadvantages include 3 factors:
- all tenons/grooves are prepared before assembly right at the construction site;
- high-precision execution of cuts and accurate installation of crowns requires the work of qualified craftsmen with relevant experience;
- laying a log frame in a warm corner is more expensive than, for example, end-to-end, but the expense will quickly pay off thanks to savings on heating, cooling and ventilation of the premises.
It is engaged in the turnkey construction of high-quality houses from environmentally friendly wood. Our highly experienced specialists perform the entire range of work at a highly professional level, from design to commissioning of the facility. We take into account all customer requirements, offering only the best building options.
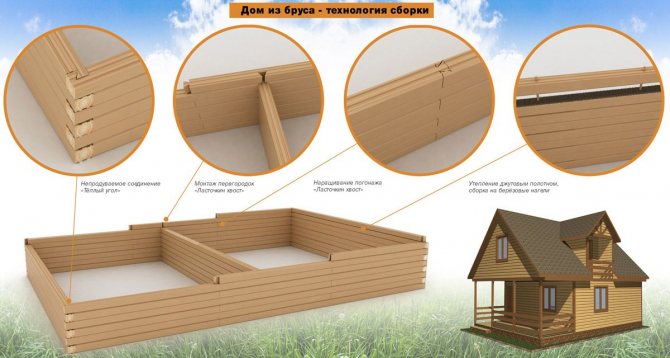
Installation of profiled timber 150*150 mm
To help you decide on the amount of timber for construction, we suggest using a simple calculator:
When giving preference to building your own house from profiled timber, you need to have a clear understanding of its advantages and disadvantages compared to logs.
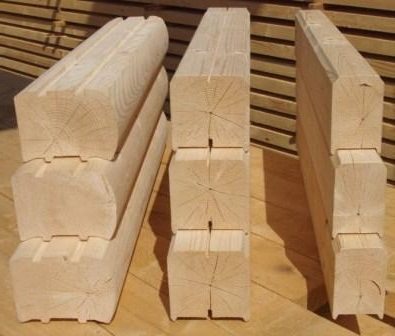
- completely ready for installation - all the necessary grooves and profiles have already been made in production;
- the cost of laying timber is several times lower than that of logs;
- if the wood has gone through the stage of artificial drying, then it has uniform moisture content and shrinks no more than 2%;
- the smooth profile eliminates the formation of cracks in the masonry;
- the “groove-tenon” system prevents blowing;
- The house is being built in a short time.
- it is impossible to redevelop the house after construction;
- Dirt stains form on the surface and are difficult to get rid of;
- for timber with a cross section of 150*150 mm, additional insulation is needed to make the house suitable for permanent residence.
Step-by-step instructions for installing crowns made of profiled timber include:
- laying the first crown;
- installation of load-bearing walls.
The procedure for laying profiled timber “without residue”
Before you begin construction, you need to learn how to properly lay timber when building a house.
- Installation of the first crown. It is laid on a foundation covered with waterproofing using the “half-tree” method - this is the most reliable option and provides stability. A layer of insulation is rolled out onto it, which is used as jute or tow.
Note! If tow serves as insulation, then it is evenly distributed over the surface of the profiled timber with an outlet of at least 10 cm for subsequent caulking.
The photo shows the beam laying diagram
- The next row is laid out with the previously selected corner joint. The most advantageous option is assembly with dowels; it completely prevents blowing. The first two crowns must be treated with an antiseptic to protect them from rotting. Once the beams are placed on the first crown, forming the second, they need to be connected. This is done in order to give the structure strength.
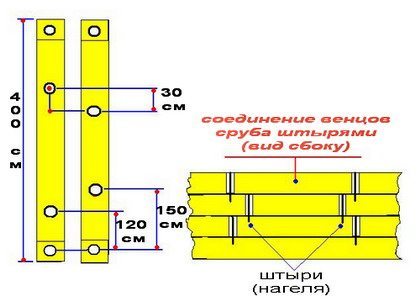
The rows are fastened using dowels for timber, metal or wood. It is better from the same breed as all the blanks. It is advisable to make holes in them in advance - this will help to avoid a situation where the embedded insulation is wound around the drill bit.
The hole should be exactly the same diameter as the dowel. The optimal diameter is 3-4 cm, and the distance between the holes is 120-150 cm. 2-3 rows are combined at the same time.
Advice! The last two crowns are not fastened together. This is due to the fact that they are removed to install ceiling beams.
- Laying profiled timber with your own hands involves the fact that each wooden element must be independently treated with a fire-resistant agent. To do this, use a wide brush or spray bottle.
- Particular attention is paid to corners. The tongue-and-groove connection technology would be more appropriate. It completely protects against blowing. Additionally, insulation is laid after each crown, especially for 150*150 mm timber.
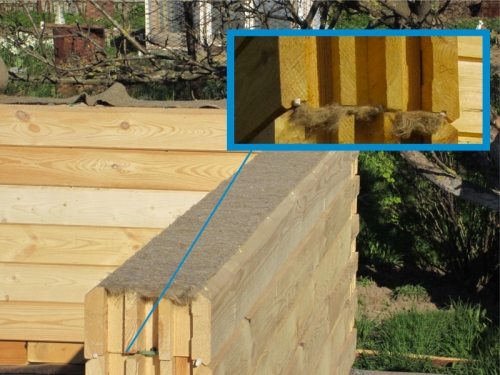
Laying jute on timber - inter-crown insulation
- Every 4-5 crowns the corner connection “in half a tree” is repeated - this is necessary for the stability of the log house. But the frame cannot be laid completely like this - this is a ventilated connection.
Conclusion
You can build a house from timber yourself; for this you need to master the laying technology. It is quite simple, with minimal carpentry skills and strict adherence to the work order, you will soon become the owner of a wooden country house.
The video in this article will give you the opportunity to clearly see the above material, watch.
Beam connections in corners and straight walls of a house require strength and tightness. The humidity of the building material has a huge impact on the tightness of a log house. If you build a house from timber with natural moisture, during drying and shrinkage the log house will experience significant internal stresses, which can lead to its deformation.
By using lumber that has been dried to 20%, you can kill several problems in the bud at once - cracks, cracks, heavy settlement, etc. Ideally, use profiled or laminated timber from chamber-drying lamellas for the log house. The shrinkage of such a log house will be minimal.
The second method to avoid blowing corners is to make these corners with special, complex joint shapes.
Corners must be strong. The frame is subject to forces from possible ground movements, from its own weight and the weight of the roof, roofing and snow, as well as pressure from the force of the wind. The corners must withstand all loads, and in addition, withstand deformations from fluctuations in linear dimensions due to rain, snow and changes in heat and humidity conditions.
What it is?
A warm corner is a special method of corner connection using a tongue-and-groove system. If the parameters are correctly followed, the corner turns out to be sealed, and “cold bridges” are not observed in it. Of course, the tree is sawn in such a way that all the parts fit tightly together. The pressure of the crowns is added to this, and as a result the structure becomes more stable and reliable. Based on this, the main requirements for creating a reliable seal are as follows:
- During construction, the strength of the structure largely depends on the total mass of wood and roofing structure. We must not forget that the operation of such a building is associated with the impact of many factors on the timber: wind, temperature changes, precipitation. Dimensional changes are also associated with shrinkage; damp wood deforms faster. This is why it is important to build a house from natural material with a humidity of no more than 20%;
- The second condition affecting the quality of the warm corner is the optimal fit of all protrusions and recesses for a perfect connection.
Thanks to this, the timber house will retain heat even in winter and will be protected from freezing and drafts.
In the future, the warm corner can be additionally insulated with such traditional materials as flax batting, jute, wool felt and even moss. This will compensate for the volume of the timber during swelling, drying out, and will prevent rotting or mold development.