Kryza device
Master Flash is a pyramid of rings of different diameters, attached to an elastic base in the shape of a square or rectangle. Each of the rings corresponds to a specific pipe diameter, so this design is universal. The rings can be attached to the base at an angle of 90º, or at an angle of 30 or 45º. Depending on this, the penetration is used for fastening on a flat surface or on an inclined one.
Advice! If there is no corner master flush on sale that matches the angle of inclination of your roof slope, then take a straight one, but of a larger size.
The chimney cover can be made of silicone or rubber. Silicone is a more elastic material and more resistant to high temperatures. But its disadvantage is its lack of resistance to UV radiation, which leads to its shorter service life. If solid fuel is used for combustion, the temperature of the waste products discharged through the pipe will be higher. In this case, the installation of a silicone master flash is required.
What is a master flush chimney system?
The elastic seal for the Master Flush chimney has a square or rectangular base. Rings of different sizes are placed in the center, creating a cone. For greater strength, the base of the chimney is reinforced with aluminum.
The material for the seal can be special rubber or silicone. The advantage of silicone is that it can stretch more strongly when exposed to high temperatures (more than 300? C). Rubber can withstand temperatures even less than 200°C. Although the service life of the rubber seal is much longer due to its immunity to sunlight.
Advantages and disadvantages
Modern craftsmen prefer installing a master flush for the chimney for the following reasons:
- elasticity, which ensures a tight fit between the pipe and roofing materials;
- a form that allows it to be installed on roofs of a wide variety of shapes and slopes and made of different materials;
- durability and strength, which ensures resistance to mechanical stress, including corrosion;
- tightness achieved due to the tight coverage of the pipe by the upper ring;
- thermal resistance to changes in low and high temperatures;
- wide scope of application - it is possible to install master flash on corrugated sheets, metal tiles, ondulin and other coatings;
- the ability to install master flash in any weather;
- ease of installation of a chimney penetration with your own hands.
- affordable price.
The only downside we can mention is that it is somewhat labor-intensive to install master flash on a roof ridge.
Positive features of Master Flash for roofs
Kryza has earned trust among consumers and roofers due to the following properties:
- Waterproof. Durable protection of the gap between the chimney and the roof from moisture and leaks.
- Flexibility. Due to their elasticity, rubber or silicone covers tightly hug the chimney. Suitable for various types of roofs.
- Versatility. Possibility of installation on a roof made from almost any known roofing material.
- Easy to install. Even a beginner without experience can install a master flush for a chimney with his own hands in half an hour.
- Durability. Temperature-resistant rubber or silicone seals do not need frequent replacement.
- Good quality. High quality rubber is a durable material that protects the product from mechanical damage.
- Heat resistance. Can be used for heating units operating on any type of fuel.
- Wide color palette. You can match the smoke penetration to the color of the roof or highlight it against the background of the roof.
- The installation season does not depend on the period of the year.
Necessary materials
Before installing the master flush on the roof, check its contents. You will need:
— Master flush for a pipe of the appropriate diameter. When choosing, also focus on the temperature of the exhaust gases, since the choice of material from which the roof is made depends on it.
Advice! When choosing a penetration, keep in mind that a flash master with a reinforced base has a longer service life, but provides insufficient adhesion when installed on metal tiles, corrugated sheets or other embossed roofing materials.
— A plate used to protect the wing from sunlight. It can be purchased at building materials stores or made with your own hands. It looks like an ordinary plate without a bottom.
— Screwdriver, self-tapping screws, metal scissors and heat-resistant silicone sealant
Advantages of master flash sealant
Do you want a gift?
80% of buyers select the wrong equipment. Leave a request for a FREE selection of a fireplace, stove, chimney taking into account all your parameters/needs. You will receive advice from a specialist who has been working in the furnace business for 15 years. AND 500 RUBLES AS A FREE!
Experts highlight several main advantages of the masterflash seal:
1. Installation is quick and easy. By the way, this seal can be installed even on pipes that are already in use.
2. The material from which the seal is made (rubber or silicone) is much stronger than those previously used for these purposes (clay, bitumen, roofing felt). Therefore, it does not require replacement for a long time.
3. Possibility to select a master flush seal for pipes of any diameter .
4. Perfectly installed on both straight and pitched roofs with different coatings.
5. There are no weather restrictions for installation . And also no special tools or additional materials are required.
Master flush selection
To choose the right penetration, it is not enough just to know the dimensions of the chimney. Master flash on sloping roofs made of polyprofile, roofing steel without relief, flat tiles, with an angle from 10 to 45º, a roof with a base in the form of a circle or square is selected. For the same roofing materials and a slope of 45-60º, a device with a reinforced flange is selected. In case of a slope of more than 60º, you need to select a seal with an enlarged flange. On flat roofs, perpendicular cuffs will be required. For tiled and slate roofs, penetrations with enlarged flanges are selected. Also, depending on the slope of the roof, choose a corner or straight roof. For some types of chimneys it is impossible to use a standard type of penetration. This may be due, for example, to the fact that the pipe has a square cross-section (wall size up to 15 cm). In this case, a special hood with a clasp is used. Such devices are also used to repair existing insulation. For larger square pipes, a rubber or silicone strip with an aluminum base is used. If it is impossible to use a flash master for compaction, it is recommended to use a special elastic roll material reinforced with aluminum.
In order to decide on the material from which the master flash is made, start from the temperature to which the chimney heats up. In the case of a gas hood, the heating of which does not reach very high temperatures, you can choose a rubber device. A silicone sealant is suitable for a stove chimney.
The Flash Wizard is installed as follows.
First, cut off the upper part so that the diameter of the resulting part is approximately one fifth less than the chimney pipe. This will ensure a tight fit. The resulting structure is placed on the pipe with the base down and moved along the pipe until it fits against the roof. When installing master flush on corrugated sheets and metal tiles, it is better to use a rubber penetration.
The next step will be to secure the resulting structure with sealant. At the very end, you should screw it to the roof using self-tapping screws.
There are several tricks when installing master flash.
- To make it easier to thread the pipes through the roof, cover them with soapy water. This will make pulling easier.
- If you were unable to immediately successfully cut a hole in the master flash, you can try to use it, sealing it tightly with a clamp.
- When buying a sealant for master flush, make sure that it is resistant to moisture.
- There should not be too many self-tapping screws, since in any case the sealant will someday begin to let moisture through, and then it will seep through the holes. Try not to screw self-tapping screws into recesses in the roofing material, as this is where precipitation flows.
- When installing the master flush on a chimney ridge, place its top under the flashing.
There are some features that you need to know before installing master flush on metal tiles. And other roofing materials that are installed with one sheet overlapping another. When performing installation in this case, you need to bring the upper part of the canopy under the nearest adjacent sheet. By performing this maneuver, you will achieve free flow of liquid regardless of the tightness of the penetration connection. This way you can increase the service life of the connection.
Note! Not every chimney is suitable for installing a roof, since in some of them the temperatures of the gases passing through the pipe exceed those permissible for a master flash. You will not have to face this problem in the case of a steel sandwich pipe and chimney connected to a gas-fired condensing boiler, since it does not heat up more than 100º.
If you use a chimney without insulation, as well as boilers running on solid fuel, temperatures can reach 600 º, which can lead to failure of the roof. How to install the master in this case? You need to select a pipe whose size exceeds the diameter of the chimney by about 10-12 cm. Its length should be up to 50 cm, or you can use regular galvanized metal. In the place where the chimney passes through the roof, it must be covered with basalt, and a selected sleeve must be placed on top. The master flash is installed, the dimensions correspond to the sleeve used. The open section of the insulation at the top is covered with a hopper, which is made of galvanized steel. You can attach it using a clamp.
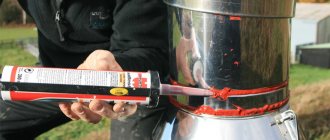
The canopy with fastener is installed according to the following scheme. The top of the cone is also cut to a size 20% smaller than that of the pipe. Then the clasp is removed from the lock. The cuff is wrapped around the pipe, its sides are connected. Then the fastener returns to its place, the teeth tighten. The sealant is then applied to the appropriate area of the roof. Then the fastener and all places that need to be insulated are treated with it.
Having completed the installation, install the plate, thus giving the structure a finished look.
Thus, installing a master flush with your own hands is completely easy to do even for a novice, inexperienced builder. After all, all the tools needed for it can be easily found in many construction stores or even made with your own hands. This will not require special time or material costs from the master. At the same time, the installation of such a device will reliably protect the roof from precipitation, which otherwise could lead to unpleasant consequences.
Tricks for mounting a canopy
Today on the market the manufacturer offers products made from silicone and EDPM rubber.
Silicone can withstand temperatures up to 315° and is much more elastic than rubber products. Its main disadvantage is its short service life due to its low resistance to UV irradiation.
Rubber products are more durable, but can melt at temperatures of 135° or 185° depending on the type of rubber used.
The diameter of the bowl must be selected so that during gusts of wind the plate does not swing on the tunnel.
To install a protective structure on the roof covering you will need:
- roof corresponding to the size of the chimney and the temperature of the exhaust gases;
- a bowl without a bottom made of galvanized steel that protects the otter from UV rays, made of soft polymer. You can make it yourself or buy it at your nearest hardware store;
- self-tapping screws;
- screwdriver;
- sealant for areas with high thermal load;
- special scissors for metal.
We suggest you familiarize yourself with: Installing a chimney in a bathhouse
Installing a flash master for a chimney or antenna pipe goes through the following stages.
First stage. Ensuring a tight fit of the device to the roof. To do this, you need to cut off the top so that the diameter of the resulting hole is 20% smaller than the size of the chimney pipe or antenna output.
Second phase. Place the otter on the upper end of the pipe and carefully move it along until it touches the plane of the roofing.
Third stage. Applying paste sealant. Apply thermal glue to the base of the flash master and press it to the chimney.
Fourth stage. Strengthening. Use self-tapping screws to secure the roof on the roof of the house.
- To make it easier to thread the pipe through the roof, lubricate them with a soap solution.
- You can try to use a master flash whose hole was cut incorrectly, clasping it with a tight clamp;
- the sealant for the passage must have not only thermal properties, but also water resistance;
- a minimum number of screws is needed to strengthen the product on the roof, since with long-term service and loss of the waterproof properties of the sealant, moisture will seep through the slots.
Device characteristics
Today, builders use master flash for roof penetration. It is a universal seal for isolating roof passages. It can be used on coverings made of corrugated sheets, tin, ondulin or metal tiles.
The device is installed on ordinary metal roofs or those equipped with tiles made of sand-cement raw materials. Fiber cement sheets, bitumen slabs, slate and other materials allow for the installation of Master Flash. The system can be installed at any time of the year and in any weather conditions.
Seals are used for flat and pitched roofs, both with and without a profile section. The product has obvious advantages:
- Elasticity. This quality allows the system to fit tightly to the walls of the chimney.
- Resistant to temperature fluctuations.
- Resistance to oxidation.
- Tightness.
- Fire resistant.
- The ability to take on the initial shape after thermal expansion.
Manufacturers provide a product warranty of up to 30 years. Fastening is carried out without the use of special tools. The elasticity of the structure allows you to reduce the consumption of raw materials when constructing a chimney. The penetration does not require installation of additional waterproofing.
This material has a number of advantages
Structural properties of the seal
Roof seals are replacing pipe flashings that have been used for several decades. In design, these two products are little different, but modern devices consist of two main parts:
- Flexible cuff . It looks like a truncated rubber or silicone cone with markings. The cuff provides a tight seal between the pipe and the roof, preventing moisture and dust from penetrating inside. After installation, the upper part of the cone tightly closes the sandwich chimney. The lower part of the system is connected to the flange.
- Flange _ It looks like a round or square skirt. The raw materials for its production are rubber, silicone, lead, aluminum or galvanized sheet. When installed on a roof with large embossed corrugations, the silicone or rubber base is equipped with aluminum strips around the perimeter. This allows the flange to fit as tightly as possible to the surface.
On pitched roofs, the seal cuffs are placed at an angle to the base. Corrugations increase the accuracy of pipe cutting. This allows you to change the angle of inclination of the seal according to the manufacturer’s parameters.
You can distinguish Master Flash for installation on flat roofs by the location of the imaginary central axis of the cone. To do this, it is mentally drawn strictly perpendicular to the surface of the base.
What is a master flush?
This is a product made of flexible elastic material - silicone or EDPM rubber - shaped like a cone with rings tapering towards the top. The square base is rigid enough to be securely fixed to the roofing using screws and other fasteners. Due to the flexibility and elasticity of the product’s material, its installation is possible on both flat and sloping roofs, where there are excellent types of coverage.
There are products with different shapes and angles of rubber rings. The 90° cone is designed for straight, level roofing. For pitched roofs, products with a roof slope of 45-90° are provided.
Due to such a device, the chimney roof gains elasticity; the master flush is designed to design transitions to the roof. The master flush is produced in the most common configurations and formats; in addition, different sizes and shapes are possible. Today, manufacturers are ready to offer rubber seals for roofs made of tiles, corrugated sheets, slate, and the like.
The design also has a flange, a device that serves as a base and is also made of rubber. Along the perimeter, for reliable fastening, the base has an aluminum or galvanized tape, which allows not only to create the necessary relief identical to the roof, but also to install the “apron” tightly and, most importantly, hermetically.
Installation Rules
Before starting installation work, you should prepare all the necessary materials. To fasten the structure you will need about six self-tapping screws, a screwdriver or screwdriver, sealant, and special scissors. After preliminary preparation, you can begin installation.
If you carry out the work yourself, you should study the installation instructions and follow all instructions. The algorithm of actions is simple and does not present much difficulty:
- The upper part of the device cone is cut so that the diameter of the lumen is 20% less than the cross-section of the chimney pipe. In this case, the roof will fit tightly to the chimney.
- Excess rubber or silicone is cut off as evenly as possible with special scissors.
- At the next stage of work, the Master Flash is put on the upper end of the pipe.
- Then it is slowly advanced, directing it down to the roofing surface. To improve sliding, it is recommended to moisten the pipe.
- The lower base is attached to the roof surface with sealant.
- For reliability, the structure is secured with self-tapping screws.
- An elastic sealant is applied along the perimeter of the edge of the upper cut.
This completes the installation of the cuff. Now all gaps between the pipe and the passage hole in the roof are hermetically sealed with a sealant. Mounting a device with a rigid edge is done in the same way.
How to install a master flush for a chimney with your own hands. Step-by-step instruction
So, before you begin installation, you need to purchase the following things:
- Self-tapping screws (5-6 pieces).
- Devices for tightening screws.
- Sealant.
- Master flush.
- Scissors.
If all these materials and tools are available, you can get to work. To do this, you can follow the following algorithm of actions:
- The upper part of the master flush cone should be cut so that the diameter of the lumen is 20% smaller than the diameter of the chimney pipe. This is done so that the roof fits tightly around the chimney.
- You need to take a master flush and thread it onto the upper end of the pipe.
- Now you need to carefully and carefully move it along the pipe down to the surface of the roof.
- Then, using sealant, attach the underside of the master flush base to the roof surface.
- After this, as additional reinforcement, you can use self-tapping screws to secure the base to the surface.
That's all! The gap between the edges of the hole and the pipe wall is hermetically sealed.
Roof seals are replacing pipe flashings that have been used for several decades. In design, these two products are little different, but modern devices consist of two main parts:
- Flexible cuff. It looks like a truncated rubber or silicone cone with markings. The cuff provides a tight seal between the pipe and the roof, preventing moisture and dust from penetrating inside. After installation, the upper part of the cone tightly closes the sandwich chimney. The lower part of the system is connected to the flange.
- Flange. It looks like a round or square skirt. The raw materials for its production are rubber, silicone, lead, aluminum or galvanized sheet. When installed on a roof with large embossed corrugations, the silicone or rubber base is equipped with aluminum strips around the perimeter. This allows the flange to fit as tightly as possible to the surface.
We suggest you read: Can children go to the bathhouse: what are the contraindications?
On pitched roofs, the seal cuffs are placed at an angle to the base. Corrugations increase the accuracy of pipe cutting. This allows you to change the angle of inclination of the seal according to the manufacturer’s parameters.
Installation features
If there is a lack of experience at the time of installation, some difficulties may arise . Any unclear questions should be examined before installation begins. Master Flash is installed on sloping roofs in the same way as on straight roofs. You just need to buy the design of the appropriate model. On flat roofs, a roof with a perpendicular axis to the base of the cone is used.
To ensure high-quality insulation on a roof with an intermittent structure or multiple overlaps, it is necessary to install a seal under the nearest sheet, and secure its base with self-tapping screws.
Installation on Master Flash corrugated sheets eliminates the use of self-tapping screws. This is done to protect against water leakage under the structural elements. For silicone products, it is necessary to install a barrier against ultraviolet radiation.
Special flexible systems with metal flanges of increased area are used to install Master Flash on metal tiles. The upper part of the roof is placed under the above row of tiles.
A special form of galvanized steel is placed on top and protects the structure from the harmful effects of sunlight. The model must be suitable in diameter. Otherwise, it will rattle in windy weather.
The upper part of the device is placed under the ridge masonry when installed on the roof ridge. It is not recommended to use a large number of screws to fix the product. To avoid melting of the sealant from high temperatures (over 650°C), it is recommended to lay bitumen on the section of the pipe under the canopy. A galvanized steel sleeve is installed on top of it.
When choosing a roof for a roof chimney, you should take into account not only the size of the passage, but also the main parameters. Rubber products can withstand heating temperatures up to +140°C. Silicone devices can withstand heating up to + 240°C.
Master Flash for a chimney with your own hands - device and installation
Installing Master Flash is a fairly simple process. This was mentioned above. But, there are some nuances that you need to know about.
On a flexible basis
Seals with a flexible base are used on metal roofs.
Installation process:
- You need to choose a place for the cut. We must not forget that it should be 20 percent narrower than the diameter of the chimney.
- For this you need roofing shears. Try to keep the cut part straight.
- The surface of the chimney must be moistened. Then, tighten the seal onto the pipe.
- After installation on the roof, you need to draw a line along the edges of the base.
- Lifting the seal, apply adhesive.
- Press.
- Apply sealant to all required areas.
You need to choose an adhesive based on the type of roof covering.
The seals, which have aluminum strips along the edges, are installed in the same way as described above. There is only one difference. Before installation, the base must be profiled to ensure a tight fit to the roof. To install them, hexagonal screws are needed. The fasteners are screwed into the very bottom of the profile.
Split roof seals are necessary in cases where it is impossible to fit the insulation onto the pipe. They are typically used to repair outdated chimney insulation.
- Using powerful scissors, you need to cut off the top of the cone 20% smaller than the diameter of the pipe.
- Open the lock and wrap the chimney.
- Connect the cut of the seal and close the lock.
- Lift the edge of the base to apply silicone sealant to the roof.
- Press everything down and apply glue to the required areas and to the lock itself.
For tile or slate roofs, seals with an aluminum or lead flange are produced. Their cone is also cut off to ensure a tight fit of the cuff to the pipe. The top of the metal base is placed under the roof, the lower and side parts are laid on the roof. To prevent moisture from getting under it, you need to bend the top edge. Finally, you need to fill the problematic joints with silicone.
You can learn about the installation of Master Flash using videos. Basic rules for installing pipe seals.
A distinctive feature of the Master Flash sealing system is its speed and ease of installation. In addition, they will allow you to save significantly, provide reliable waterproofing and last a long time. Another convincing argument is that you can install them yourself.
At the point where the chimney exits onto the roof, a gap forms between them, which, if not eliminated, will lead to moisture getting under the roof. The size of such a gap can be 3-5 cm. Traditionally, bitumen, cement or various sealants were used to eliminate it. However, such protection is short-lived and not reliable enough. To eliminate all these shortcomings, a master flush for the chimney is used. Another name for this device is rat or otter.
The roof is built in order to protect the house from precipitation, but it will not be able to perform this function if the smallest cracks and gaps between the roofing material and the adjacent elements are not eliminated. The outlet of the chimney pipe needs more careful sealing. Since the size of the hole in the slope is 2-5 centimeters larger than the diameter of the smoke exhaust channel, a gap is formed between them, through which water penetrates into the rafter frame.
Terms of Use
The elastic Master Flash system is suitable for waterproofing work in areas where the chimney exits through the roof.
Experts advise using such a sealing system for the following heating systems:
- Sandwich chimneys. Such chimneys are pipes made of galvanized metal with a thermal insulation layer of basalt material. Thus, the rubber seal allows you to maintain the optimal temperature inside in such a chimney and does not let heat out of the house;
- Chimneys made of stainless material. Such smoke exhaust systems can heat up to high temperatures, so it is effective to use a silicone sealant for them. Silicone does not deform at high temperatures. Rubber models can only be used with a condenser-type gas boiler.
When sealing uninsulated pipes with the Master Flash system, it is considered advisable to use a special sleeve. To do this, a 500 mm strip is cut from the tube. The chimney outlet is tightly wrapped with fire-resistant material and a sleeve is put on it, which is fixed with a steel clamp.
Installation nuances
To install the penetration, you will need the following equipment:
- Hardware with a press head;
- Pliers;
- Drill-driver;
- Sharp knife;
- Carpenter's hammer;
- Flash master device;
- Steel clamp;
- Silicone glue;
- Lubricant for parts;
- Level.
Installation of the Master Flash penetration includes the following steps:
- Before starting installation, you should check that the hole in the Flush Master seal for the chimney is 20% smaller than the pipe diameter. To adjust the product to the required size, you can independently trim the edge of the penetration hole by 20%;
- Next, the Master flush is put on the pipe. To make it easier to put on the device, you can use a lubricant without petrochemical impurities;
- Now the sealant is pressed down and fits tightly under the roofing profile. Any blunt object can be used for adjustment;
- Next, a special sealing agent is introduced into the gap between the roof and the lower area of the seal;
- The resulting structure is attached with self-tapping screws to the roofing deck. The fastening pitch should be 0.15 cm for optimal sealing.
For those cases when it is impossible to put the penetration on top or it is necessary to repair the chimney insulation, Master Flash systems with a lock on the cuff are produced.
To install it correctly, installation is performed in this way:
- The top of the cone is cut off with special scissors;
- Next, the metal toothed fastener is removed and the pipe is wrapped around the penetration;
- The lock is fastened and its teeth are pressed with pliers;
- A layer of sealant is poured into the joints and onto the fastener;
- The remaining glue is distributed over problem areas of the structure to seal them.
A seal with clamping clips is used for flat or sloping roofs.
Its installation is carried out as follows:
- The upper area of the rubber cuff is cut to fit the size of the chimney;
- The penetration is wrapped around the pipe;
- Next, the clamping clips are installed using pliers;
- Using a marker, outline the contours of the penetration;
- Raise the base and treat the roofing deck with sealant;
- Apply the seal to the surface and attach its base with self-tapping screws.
Additional recommendations from roofers for installing Master-Flash:
- When adjusting the penetration to the required diameter, it is necessary to first remove the protective element from the pipe;
- If the penetration hole was cut too much or damaged during cutting, it can be fixed with sealant or a clamp;
- When installing, it is recommended to put the penetration through the pipe head;
- Silicone sealant can serve as a sealing agent for treating the joint areas of the structure and coating. It is applied in a dense layer to the joints between the seal and the roof;
- Self-tapping screws for sealing the system are inserted into the press head;
- When installing penetrations on a bitumen roof, the base of the seal is tucked under the roofing elements;
- An architectural plate is placed on the sealing product to match the color of the roof surface;
- With a non-uniform pitched flooring, the upper part of the penetration is moved under the roofing material. This ensures uniform drainage of water from the roof surface.
Installation errors:
- During installation, it is prohibited to join chimney elements at the intersection of floor beams and roof;
- The penetration should only be put on the pipe itself, but not on the chimney opening;
- The layer of silicone sealant must be at least 10 mm;
- The chimney in the roof opening must be fixed with steel clamps to seal it from moisture.
What you need to have to install a canopy
Before starting installation work, you should prepare all the necessary materials. To fasten the structure you will need about six self-tapping screws, a screwdriver or screwdriver, sealant, and special scissors. After preliminary preparation, you can begin installation.
We invite you to familiarize yourself with: Installing a thermofor stove with your own hands
If you carry out the work yourself, you should study the installation instructions and follow all instructions. The algorithm of actions is simple and does not present much difficulty:
- The upper part of the device cone is cut so that the diameter of the lumen is 20% less than the cross-section of the chimney pipe. In this case, the roof will fit tightly to the chimney.
- Excess rubber or silicone is cut off as evenly as possible with special scissors.
- At the next stage of work, the Master Flash is put on the upper end of the pipe.
- Then it is slowly advanced, directing it down to the roofing surface. To improve sliding, it is recommended to moisten the pipe.
- The lower base is attached to the roof surface with sealant.
- For reliability, the structure is secured with self-tapping screws.
- An elastic sealant is applied along the perimeter of the edge of the upper cut.
Why is it needed?
Master flush is a universal type of sealant for effectively insulating roof penetrations. The device can be used for all types and coverings of roofs. Well suited for roofs made of metal tiles, corrugated sheets and tin. Installation of the penetration can be carried out both on a roof with a metal deck, and on a soft roof, sand-cement or slate.
An important advantage of the device is its resistance to temperature changes and exposure to sunlight. Therefore, installation of the penetration can be carried out at any time of the year and at any temperature.
- Flexibility. With the help of a sealant it is easy to create a tight fit to the chimney;
- Heat and frost resistance;
- Not susceptible to oxidation;
- High strength of the material;
- High level of sealing against water ingress;
- Resistance to deformation;
- Long warranty period up to 30 years;
- Easy to install;
- Savings on additional waterproofing work around the device.
Equipment
The sealing product consists of the following elements:
- A flexible cuff, which is a truncated rubber cone. The cone is usually made of silicone or ethylene propylene materials. The cuff serves to connect the pipe to the roof deck. In the upper area, the cone fits tightly to the chimney pipe, and in the lower area it is connected to the base of the sealing structure;
- The flange serves as the base of the structure and is made of the same materials as the cone. Can also be made of galvanized steel or aluminum. The base of the flanges has special aluminum strips for mounting on the deck. This gives the structure the tightest possible fastening.
For a pitched roof, special penetrations with cuffs located at a certain angle to the flanges are purchased.
On the cone of such a device, corrugations with gradations in diameter are clearly visible. Such corrugations help change the slope of the penetration in the required direction.
For flat roofs, penetrations with a straight cone base are used.
What is Master Flash?
Master Flash is a kind of sealing cuff with high elasticity. They are used to seal the intersection of pipes and roofs. Different materials are used for manufacturing.
It should be noted that this device is not used as a seal for chimneys without insulation.
The main advantages of Master Flush:
- Tight fit to the pipe walls due to its elasticity.
- Withstands temperature changes.
- Corrosion is not a problem.
- High sealing due to low porosity.
- Returns to its shape after expansion from high temperature.
- High fire resistance.
- Long warranty.
- Installation without special tools.
- Can be installed in any weather conditions.
The main advantage is the reduction in material consumption in this process. No additional waterproofing required.
Roof seals have become a replacement for pipe aprons. They are similar in design to their predecessors, but have some differences:
- Made of rubber, often silicone, in the form of a tapering cone with a flexible cuff. It ensures a tight connection of the pipe to the roof. In addition, it protects against moisture and dust. The top of the cone follows the shape of the pipe. Connects to the seal at the bottom.
- Flange - base. Made from various materials. Rubberized or silicone base for installation on a roof with massive ribs, has aluminum strips. It allows the flange to take the shape of the profile.
We suggest you read: How to remove old grout from tile joints - photo and video instructions
Insulation cuffs for a flat roof are located at a slight angle. An element in the form of a cone with corrugations, which forms the contours of oval holes with gradation in diameter. That is, you can change the angle by tilting at certain intervals. Sometimes it happens that the axis is perpendicular to the base, then the sealant is used for a flat roof.
How to install?
Flexible seals were able to outperform their outdated counterparts in many respects. They are able to withstand different temperature ranges, practically do not need to be repaired, and have a long service life. They are unpretentious in installation. You do not need to have any special skills to install. The upper part of the seal is cut off so that a narrow hole is formed.
The method of fixing the flange depends on the roof material:
- Silicone glue or bitumen mastic is used for a flat surface with a roll coating.
- If there is a slope, then the entrance is provided with self-tapping screws.
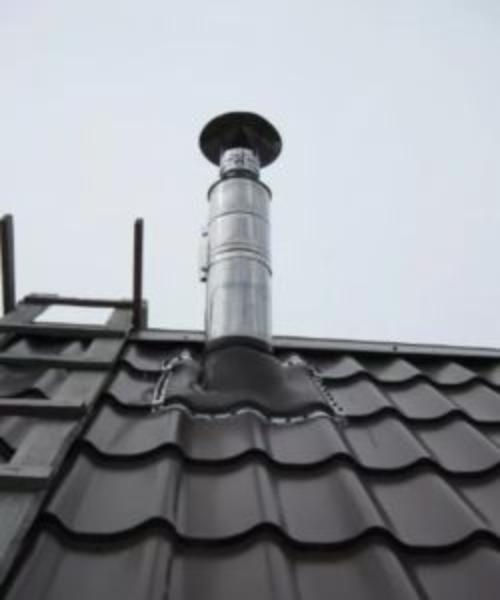
After installation, the lower part of the flange and the cut of the cone are lubricated with silicone sealant to ensure greater reliability. Sometimes a clamp is used for the top edge. Despite the strength of the fixation, the master flash will be movable. For example, if thermal expansion occurs, the master flash will not lose its tightness. Also, the cuff will behave if shrinkage occurs at home.

