How to repair a wooden window with your own hands?
Let's start by understanding the definition: window repair or restoration are similar works that have no fundamental differences; they involve cleaning, filling, painting, sealing and insulating windows. Painting windows does not belong to repair work, but rather to restoration work, since it does not affect the functional qualities of a wooden window. Only the appearance changes.
Depending on the degree of wear of the windows (frames, glass and fittings), the approach to carrying out restoration work will differ.
The technology for repairing wooden windows is quite simple, but requires scrupulous execution of each stage of work.
Do-it-yourself restoration of wooden windows. Dismantling
The first step is dismantling. Often in old private houses, window frames are simply inserted into the opening and can be removed using a pry bar. The main thing is to apply force evenly, moving the mount along the entire height of the window and on both sides, so that the window does not warp.
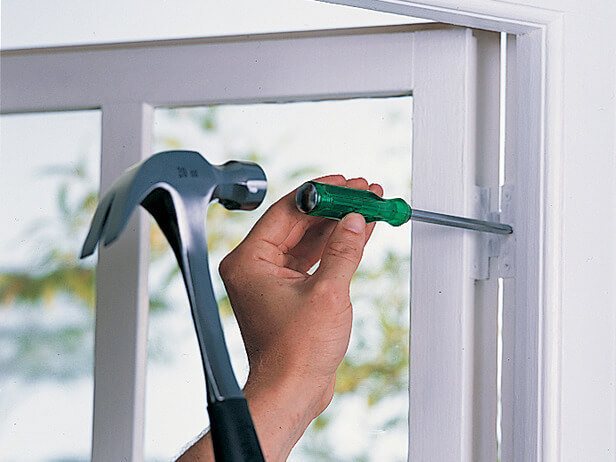
If you need to remove painted hinges, you can remove the paint from the screws by tapping the screwdriver with a hammer. After this it will be much easier to unscrew them.
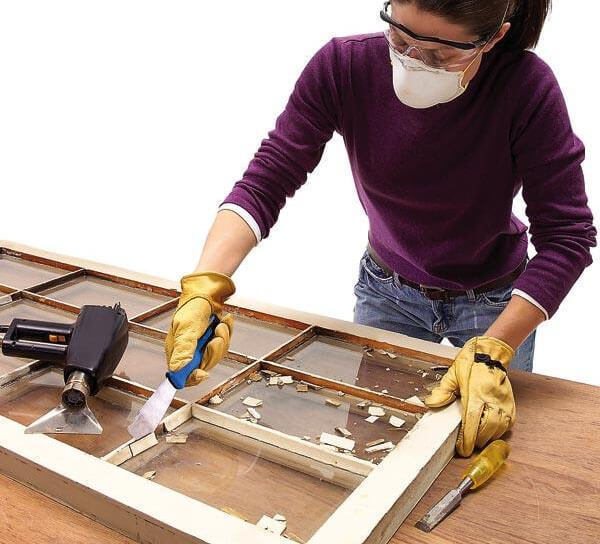
The glass must be removed. Usually they are held on by several small nails, which are often hidden under the remains of putty. There are special tools for removing putty, but this can be done with a regular chisel.
Advice! Old caulk will come off easier if you heat it up with a hairdryer.
Cosmetic repair of wooden windows
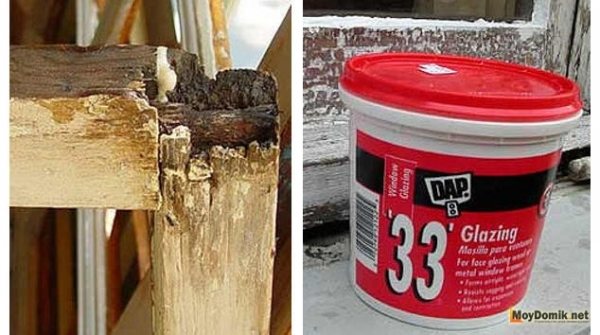
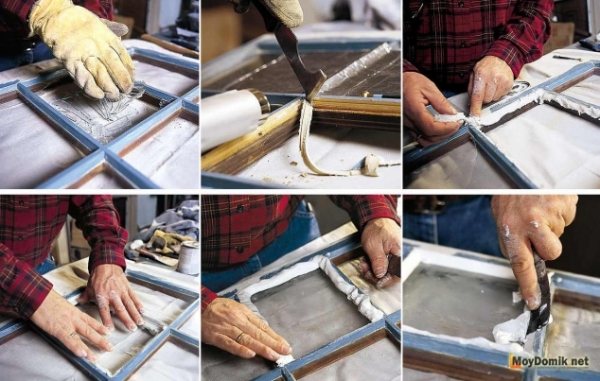
Elimination of local damage. For example, fungal damage to part of the window frame.
- identification of the damaged area. To do this, you can carry out a small test: with an awl you need to push through dilapidated or suspicious areas of the frame; if the tip easily falls through, then the wood is damaged;
- cutting off the unsuitable layer;
- the cleaned area is dried. To do this, you can use a hair dryer or a fan heater (be careful with glass, direct the air flow directly to the wood);
- applying wood hardener and preservative;
- applying putty. Layer thickness - according to the instructions. If you need to apply several layers, you need to wait until the first one dries well;
- window painting.
More details are in the photo.
Repair of wooden windows - sequence of applying putty
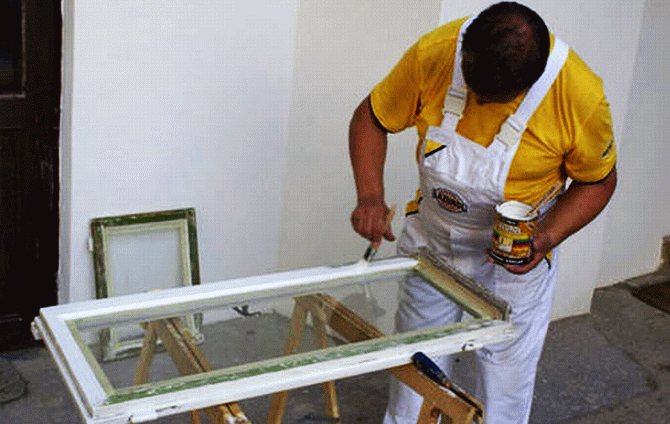
Glass installation and painting
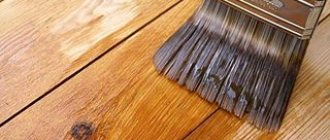
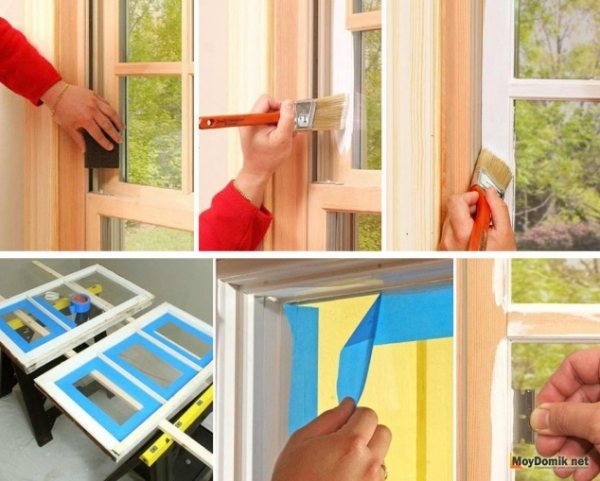
The last stage is painting the surface of the window structure and installing the glass, which was previously removed in order to prevent cracking and contamination. To install the glass we use new glazing beads, since the old ones were unlikely to be saved. Then we will lay the seal around the perimeter of the window frame using small nails or a stapler, even though it has an adhesive backing on the back side.
The next no less important stage of the work on repairing wooden windows with your own hands is painting, before which you need to cover all the glass with masking tape to protect them from possible stains appearing on them during the work process. Before we begin directly applying paint, we thoroughly clean the surface of the window structure from dust and degrease it. Apply the paint using a small roller or small brush in several layers, each of which should dry well. This will allow you to achieve an almost perfectly even layer of paint and durability of the entire coating.
Overhaul of a wooden window - complete restoration
Tools and materials:
- hair dryer for removing paint. Referring to reviews from craftsmen, we note that many try to remove paint without it, but this only damages the wood more;
- sander and sandpaper. To level the surface;
- shoe knife for removing old paint
- putty knife. Reconstruction of wooden windows requires mandatory puttying of the surface of the frame and sashes;
- brushes for paint and varnish;
- chisels;
- fittings, glass (if replacement is expected);
- drying oil, varnish and/or paint;
- putty;
- primer;
- seal.
The cost of repairing wooden windows depends on the price of consumables, tools and, of course, on the condition of the frames. On the other hand, restoring windows with your own hands does not require any special skills. However, it should be noted that this work cannot be done in one day.
A few words about preparation. It is better to do the work on a warm, sunny day. The main condition is dryness, because... high humidity will have a detrimental effect on the result (wood changes geometry, dries poorly, etc.).
Dismantling wooden windows
We remove the window sashes from the awnings. If the glass is mounted on putty, remove it with a chisel; if it is on glazing beads (glass slats), then carefully dismantle them. After this we take out the glass.
We remove all the fittings (it is better to replace them with new ones). You also need to remove the wooden trims on the windows (the wooden strips located on the bottom of the frame outside the window are also called “teardrops”). They are attached to nails that are probably already rotten. In general, all screws, nails, metal corners, etc. are removed from the frames.
We place the “bare” frame on a flat surface and measure - all diagonals must be the same length, otherwise, a distortion in some place will lead to the formation of cracks, which is unacceptable. We attach the frame tightly to the surface (this can be a shield made of boards).
Next, we check the condition and location of the window dowels; as a rule, the corners of the frame have connections on dowels made of wood. Subsequently (before painting and sanding) they will need to be replaced with new ones.
Window pins can be knocked out with a hammer (they are cone-shaped, so you need to knock them out from the thin side), provided that they are located evenly (symmetrically to the corner) and give in. But, under pressure, a dilapidated frame can become deformed, therefore, it is better to drill it out. If the dowel is loose, you can fix it before drilling - a couple of drops of superglue into the gap and after 5 minutes the drill will move as if it were on solid wood.
At the next stage, when the window is disassembled, we begin to remove the paint.
How to remove paint from wooden windows
There are several ways to remove paint from windows.
Removing paint with a hair dryer
When removing paint from windows with a hairdryer, you need to work carefully, ideally remove the glass first, or direct the flow of hot air so as to prevent direct contact with the glass. Due to high temperature, the glass may burst (crack and spill out).
Set the temperature on the hairdryer to 250 degrees.
The task is to remove paint not quickly, but efficiently. At higher temperatures, the wood will char and lose its properties as a result of the burn.
Shoe knife for removing paint from windows During the heating process, the paint will begin to rise in bubbles that need to be cleaned off with the right tool.
It is better to do this with a shoe knife (a palette knife is also suitable - a trowel knife for mixing paints on a palette in painting). The fact is that the spatula will slide over the paint or crash into the wood, leaving burrs.
Chemical paint removal
You can remove old paint from the window frame with special solutions (washes, liquids). They also use a “cunning method” - kerosene and a plastic bag. It is kerosene, because Solvents and solvents destroy the structure of wood.
Execution technology
- The wooden frame must be wrapped in fabric (rags) and the entire structure must be placed in a plastic bag.
- Moisten the fabric generously with kerosene, then tie the bag and leave for a day or two. During this time, the paint should soften and be easy to remove (use the above tool for cleaning).
Tip: remove the slats from the bag gradually, i.e. one was pulled out - cleaned, etc., if you remove everything at the same time, the kerosene will evaporate (dry), therefore, the paint layer will return to its original state (dry, harden) and will no longer separate.
Of course, there may not be such a large package for an entire window frame, so you will have to disassemble the frame into elements. Or, as an option for processing the assembled frame, you can moisten the fabric and wrap it tightly with plastic film, additionally tying the layers with rope to seal the treated surface as much as possible.
Advice: keep in mind that removing paint from windows in this way is accompanied by a pungent odor, plus, the technique is a fire hazard, therefore, it must be done outside or on the balcony.
Removing paint from window sills and slopes The internal window slope and window sill also need to be cleaned.
Removing paint from wooden windows After removing the paint, the frame will look something like in the photo. This is clearly not a suitable type for finishing work.
Frame prepared for paintingRemains of paint are removed using sandpaper or a grinder.
Eliminating deformation of a wooden window
Sometimes old wooden windows become deformed, which can manifest itself in the form of distortions and bending of the frame. For example, one or more window sashes have moved. This will be especially noticeable when installing a stack, when it fits into the selected groove, and the glass weighs in the corners, or vice versa, the corners fit, but there is a gap in the middle.
If the window is removed and disassembled, you can put it under a press, which is made from wooden panels and weighting material.
If it is on an installed window, then you can insert a stop (a plank, a block of a suitable size) at the place of the bend (curvature), and apply force to close the window, fixing it with latches, or come up with a fastening with self-tapping screws (for example, screw the block diagonally to the frame). All these manipulations are performed without glass.
We leave it in this state for 2-3 days, after which we increase the thickness of the spacer, and thus bring it to the desired position.
The method is controversial, but sometimes it helps. There may be cracks that can be repaired. We take a regular syringe and use it to inject PVA glue into the crack. Because The glue is liquid, it will leak out, the place needs to be sealed with tape. After drying, repeat the procedure, and then clean everything, putty and paint.
Restoration of wooden windows - restoration of rotten sections of the frame
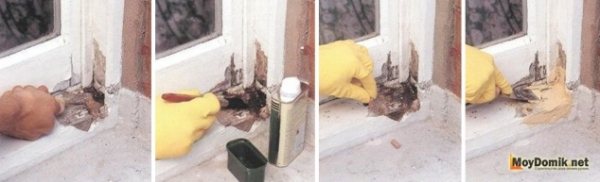
If a fragment of the frame is rotten, it can be replaced or restored. If replacement is not envisaged, then restoration remains. To do this, you will need epoxy putty for wood (the composition may include fiberglass, which will significantly increase the rigidity of the structure).
The damaged area is cleared of paint and debris is removed. Next, putty is applied.
Apply the mixed putty to the damaged area; the mixture should fill all the cracks and cracks well. We recreate the missing section so that it is slightly larger than the desired plane, i.e. There should be some volume left for subsequent grinding. Drying (hardening) of the putty lasts a day (at room temperature). Then, using a grinder or sandpaper mounted on a block, we sand the surfaces until they are completely level.
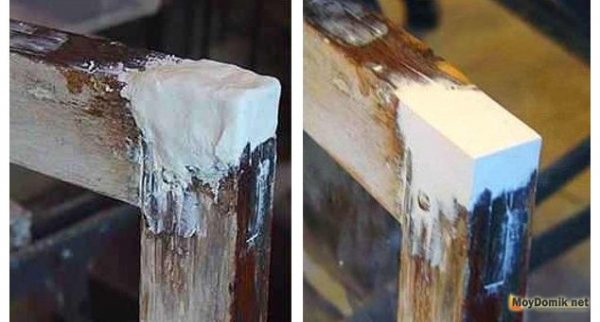
It should be understood that such restoration allows you to restore the appearance, but does not guarantee sufficient density, especially in places of active use (places where the window sash is tightly connected). But if the window is blind or rarely used, then this is a completely self-sufficient way to get out of the situation without completely replacing the window or frame elements.
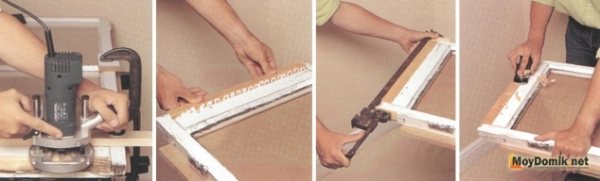
Repair of wooden windows - replacement of part of the frame
- checking the frame for damage;
- marking damage zones with dots;
- cutting out the area;
- preparation of replacement;
- replacement. The prepared part of the frame is installed in the desired place, fixed with glue and clamped with clamps. After 24 hours, the clamps are removed;
- sanding the joint between the old frame and replacement. This will avoid height differences;
- primer treatment;
- coloring. Material prepared for the website www.moydomik.net
More details are in the photo.
Repair of wooden windows - replacement of part of the frame
Puttying and sanding of wooden windows
Puttying and sanding wooden windows After cleaning the frame from paint, you need to putty it.
Window putty is sold as a finished product, but at the same time, you can prepare it yourself. To do this, mix 3 parts of sawdust in one part of liquid nails.
The technology is simple, but the solution dries quickly, so we mix quickly and in small portions.
They mixed it, putty it, etc.
Homemade putty is based on glue, which is why it hardens quickly.
We grind the dried and dense surface with a machine or fine-grained sandpaper.
Impregnation with drying oil
Treating wood with drying oil is a good “old-fashioned method”, time-tested. But, it should be taken into account that modern drying oil differs from the drying oil of the USSR. Nowadays it is difficult to find natural drying oil; as a rule, they sell something derivative, such as “Oxol”. The point is that the real thing is made from natural ingredients (linseed oil, hemp oil), and not from synthetic derivatives. There are many good impregnations on the market that have replaced drying oil and its production from vegetable oils is simply unprofitable. As an option, for aesthetes, you can make drying oil with your own hands.
Coating window frames with drying oil is done with a brush, the first layer is used as impregnation, the second or third is final. Between layers you need to maintain a time interval (preferably until it dries completely, but this is not a quick process). If the surface does not stick, then you can continue working.
Impregnation with hot drying oil
The hot drying oil treatment method is also used. It should be understood that drying oil is a flammable material and easily ignites when in contact with an open fire.
How to heat drying oil?
You can heat the drying oil in a water bath, and the second method is more dangerous - heating to a boiling state. To do this, make a flask from an iron pipe, one end of which is welded. Pour drying oil into it and heat it with an electric stove or a hair dryer until it boils (during the heating process, a fire may occur; extinguish it by throwing burlap on it). After that, the bars of the window frame are lowered into hot drying oil for 5 minutes and removed with a crochet hook, because high temperature and lay to dry. According to reviews, impregnation with hot drying oil creates a coating that will last for centuries (the effect of wooden railway sleepers).
We repeat, this is very important (!), heating drying oil is a dangerous undertaking.
Whether to oil the windows or treat them with an antiseptic is up to everyone to decide for themselves; each of them has pros and cons.
Stain and varnish coating
Coating wooden windows with stain If the condition of the window frames after removing the paint is good and there is a desire to preserve the naturalness of the wood, then you can treat the surface with stain.
Using stain, you can change the shade of wood; for example, tinted pine can end up looking like stained oak.
Before treating the window frame with stain, it is better to check the consistency of the solution on a separate board (preferably the same type of wood and shade), i.e. choose the tone of the wood.
Painting wooden windows with stain not only improves their aesthetic qualities, but also makes the wood more resistant to ultraviolet rays, and also prevents rotting and the development of fungus.
In addition, the stain penetrates deep into the structure of the wood, so if you subsequently have to sand somewhere, it will not disturb the shade and texture of the frame.
The stain finish is completed with varnish. Dry window frames are coated with transparent varnish (it is better to use acrylic varnish for wood, glossy or matte).
After complete drying, window fittings (awnings, handles, latches) are installed and glass is inserted.
Installing glass in a window
Proper glazing of wooden windows involves hermetically sealed glass installation, because It is in the micro-cracks between the glass and the frame that the air will blow. The glass is installed using silicone glue (aquarium sealant). We squeeze out a thin layer of aquarium glue along the groove under the glass of the window frame and insert the glass, which we fix with glazing beads. Wipe off any excess glue with a sponge soaked in vinegar. Do not scrub the nail heads; a thin layer of sealant will additionally protect them from rust. We leave the windows to dry; it will take at least a day for the glue to harden.
Replacing glass in wooden windows
Sometimes the restoration of wooden windows is accompanied by the replacement of glass if there are defects (cracks, clouding, abrasions, traces of welding or grinders). After all, glass also has its own resource. When ordering glass, you need to accurately measure the opening, but order 2-3 mm. less, because glass expands under the influence of temperature, and the resulting gap will prevent it from bursting.
The glass is fixed in the frame using glazing beads and small nails. At the same time, the glazing beads must be prepared in advance (impregnated with drying oil, painted or treated with stain). You can even drill holes in the glazing bead with a thin drill. Then, when hammered, the bead will not split and the glass will not crack.
Below is a photo gallery - a master class on installing glass on putty, without glazing bead. For example, glass breaks and needs to be replaced, but there is no rail at hand to fasten the glass or there is simply no need for it. Glass putty can be purchased ready-made or made independently (mix chalk with drying oil).
Replacing glass in wooden windows
Painting wooden windows
When choosing how to treat wooden windows, take a closer look at the quality of the work.
If you are satisfied with the condition of the surface (i.e. no deep damage, uniform color), give preference to varnish. At the same time, to even out or change the tone of the wood, you can treat the frame with stain. It will also hide minor defects.
If there are many areas with putty, then they should be covered with paint.
For painting use oil or acrylic paint. The first one lasts longer, but takes a long time to dry, the second one is the opposite.
You must first dilute the paint; too thick paint will not saturate the wood well and may cause streaks. It is better to apply several layers of thinner paint.
It is recommended to protect window glass with masking tape.
The first layer should saturate the wood. Only after it has dried well can you apply a second layer, etc.
You need to start painting from the inner surface - from the glass.
After painting, remove the tape (while the paint is still wet). If there are stained marks on the glass, remove them with a blade.
Painting wooden windows
How to remove tape marks
If the windows were covered not with masking tape, but with packing tape, then traces will remain that are very difficult to erase. In this case, we mean covering with tape not only the glass, but also the frames themselves (both wooden and plastic).
The first thing that comes to mind: gasoline, diesel fuel, alcohol, cologne, etc. But these products cannot be used if you do not want to damage the paintwork. There is a simple and environmentally friendly way to remove traces of tape - the remaining adhesive on the window frames is removed with vegetable oil (sunflower), and then washed off with a cleaning solution.
Installation of window hinges
If old window hinges (awnings) are worn out, they should be replaced. The hinge replacement technology is shown below. First you need to correctly determine the mounting location. To do this, the window frame must be inserted into the window opening and secured with wedges. When the gap is equal around the entire perimeter, mark the installation locations. Use a chisel to select a groove for fitting the hinge and fasten it with self-tapping screws.
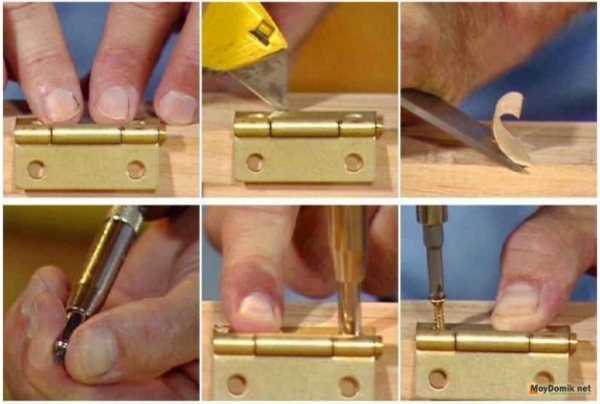
Installation of window hinges
Sealing and insulation of windows
A rubber seal for wooden windows, fixed around the perimeter of the frame, will reduce heat loss.
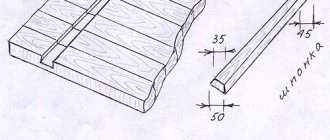
You can repair wooden windows using Swedish technology. Its essence is that you need to select a groove in the sash. A special silicone tubular seal euro-strip is installed in it. It is not afraid of low and high temperatures and has a twenty-year guarantee.
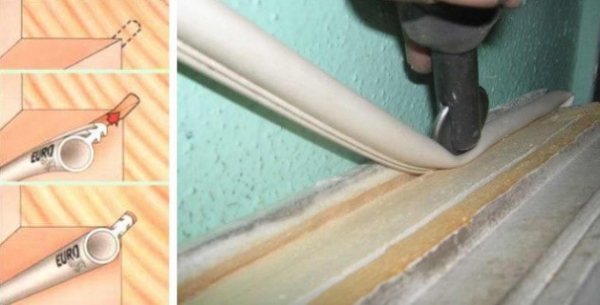
Window repair using Swedish technology (installation of groove seal)
The final touch in the window restoration will be the installation of window fittings (handles and latches). Only after this the window is installed in place.