Material selection
In order for the manufactured structure to be durable and of high quality, the choice of material from which it will be made must be approached with all responsibility. Let's consider the main criteria for choosing wood:
- for the hanger in the dressing room, it is imperative to use wood so that the clothes and wet linen that are hung on them are not stained by rust that has arisen on the metal structure;
The hanger in the bath must be wooden
- choose wood that has low thermal conductivity. This is necessary to protect the skin from possible burns, because the temperature in the bathhouse is very high;
- It is advisable to use hardwood to make the hanger. They are more suitable for use at high temperatures;
- all wooden elements must be processed so that there are no irregularities or burrs on the surface;
- for work you will need only high-quality boards that do not have even the slightest traces of rotting;
- If possible, use hardwood to make the hanger. They are more durable and can last much longer.
Give preference to hard wood
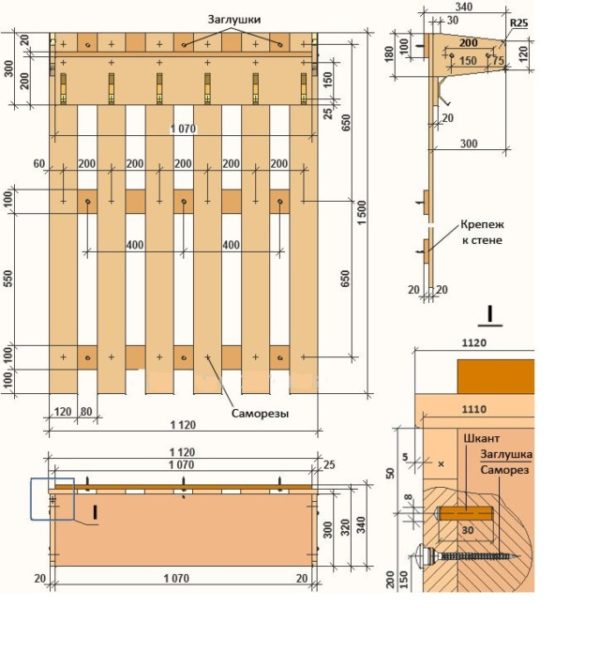
Diagram of a simple wooden hanger
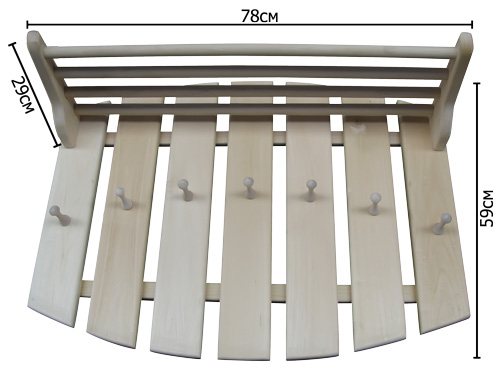
Shelf for a bath hanger
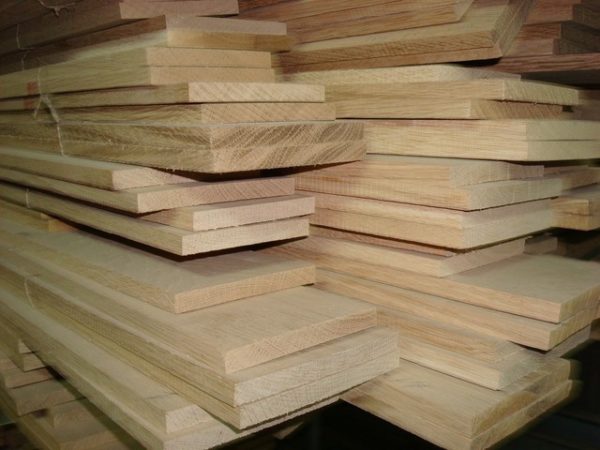
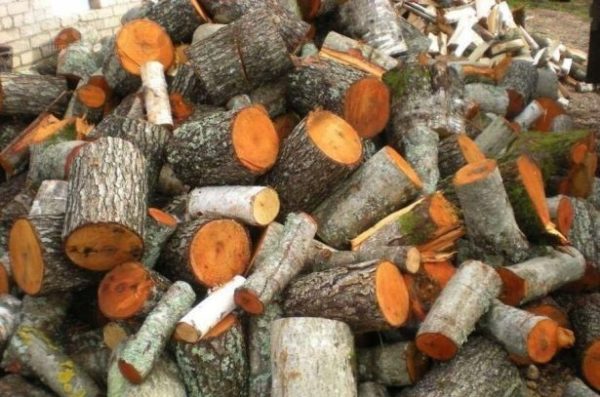
Construction boards
General concept
As you know, there are no small things in a bathhouse, and to call a hanger a small thing is not at all true. Therefore, before equipping a bathhouse with this functional piece of furniture, you need to decide basically. Will it be purchased or will the bathhouse hanger be made with your own hands?
From the first year of institute, young designers are taught, albeit with varying degrees of success, one golden rule. A refined element must correspond to an equally refined overall concept of the entire room. That is, when purchasing or making with your own hands a hanger with sophisticated wood carvings, you should have other sophisticated carved elements in your bath interior that will organically complement each other and make up a single interior ensemble.
At the same time, the solution, which by the way is quite popular, will look quite ridiculous, when a wooden wall is drilled in a random order and real tree knots are inserted into the resulting holes. Yes, in a rustic, old ethnographic style, such a solution will look advantageous.
In principle, the choice is small. Either metal or wood. Metal products are strong, durable, and go well with basic bath styles and interior designs. Particularly advantageous are products that use hot or cold forging techniques: cutting, twisting, notching, and others.
![Bathhouse hanger [made of wood with your own hands]: making](https://vashabanya24.ru/wp-content/uploads/veshalka-v-banyu-iz-dereva-svoimi-rukami-izgotovlenie.jpg)
The village bathhouse and the village smithy are two sacred places that complement each other very well. The copper products are very beautiful. Annealed red copper, supported by the noble patina of time, looks great in a product of any format. True, metal has several significant disadvantages:
- The raw materials are quite expensive. This is especially true for non-ferrous metals.
- It is not difficult to make metal hangers for a bathhouse yourself, however, it will require some metalworking skills and a certain set of tools. This is especially true for forged products. Not every, even well-equipped home workshop has a forge and anvil. You can get by with cold forging, but to work with cold metal, even of a small cross-section, you need a torsion device, which is also not an everyday occurrence in the everyday life of a craftsman. The best option is to purchase processed blanks and use them to assemble the finished product. In this case, you will need a welding inverter, an angle grinder, or, in common parlance, an angle grinder, and your hands. It is unlikely that it will be possible to do without an inverter, because simulating forge welding with bolted joints is nonsense.
- In the humid microclimate of the bathhouse, the metal is susceptible to corrosion, which will manifest itself in unpleasant brownish-red stains on the contact surfaces of things. The problem can be solved by applying a protective coating, but as they say in one port city: “It’s just a waste of time.”
We invite you to read: How to attach penoplex to a wall outside and inside, to wood, brick, etc. installation instructions
As for the tree
Wooden products and raw materials are cheaper, lighter, and, in some ways, more practical. Self-production will require a minimum set of carpentry tools, and with some luck and imagination, you can do without them at all. What types of wood should you pay attention to:
- Oak is a beautiful noble tree with dense, durable and textured wood, which is unmistakably recognizable in the interior even by a non-specialist. It is resistant to difficult bath conditions and, like good French cognac, becomes better and more noble over time, acquiring non-trivial charm and depth. Among the disadvantages: it is more expensive than its competitors, it is difficult to process with tools made of carbon tool steel, it is prone to splitting along the fibers during indelicate and, frankly speaking, rough machining;
- Linden is a good compromise between price and consumer qualities. Classic wood in a bath interior. It is malleable in processing, has a pleasant aroma, smooth texture, global defects in solid wood are rare. At the same time, the texture and color of wood is much inferior to oak, leaving joinery made from it without the charm of zest;
- Ash is in many ways close to oak, in terms of key consumer qualities, including price;
- Alder is also a tree that deserves the closest attention. Moderately bright texture and extraordinary coloring emphasize its nobility in any, sometimes even the simplest design.
Bath broom
Perhaps the most important element of the room. The best solution is to make a broom yourself, then you can have no doubt about the benefits of the product and its environmental friendliness. Branches of any tree or medicinal herbs are suitable as the main material.
The classic option is tightly tied oak or birch branches, but they need to be prepared correctly so that the broom holds tightly. It is better to pick branches with young foliage around July.
Before joining the branches, you need to clear the lower part of the branches from small twigs and leaves. Remember to shake the branches from time to time to maintain their volume.
The branches must be connected with twine or other strong threads. Tighten the initial bundle closer to the end of the branches, and the second one closer to the top. The right side of the broom, divided into two parts, should be pulled to the left through the bottom, and the left side to the right through the top, then the branches will be firmly connected and will not carelessly stick out in different directions. Do this several times.
For the second bundle, you need to choose the same thread, but longer and tie it even tighter. Check the strength of the product and, at the end of the process, evenly trim the branches protruding at the end.
After making the bath broom, you should hang it in a dry, warm place to dry, for example, in the attic. You can wrap the leaves in paper to make them more brittle. Of course, you need to hang the broom with the handle up. You can store the product in a closet or drawer, preferably away from dampness, otherwise it will begin to mold.
Another way is to make a broom from medicinal herbs. Nettle, lemon balm, mint, and wormwood are good for this.
What do you need for work?
Since the hanger is made of wood, pre-planed hardwood boards should be used as the main material. The number and thickness of the boards will depend on the type of hanger and the pattern according to which it will be made.

What tools may be required for the job?
The work will also require the following tools and materials:
- dowels (chops) for furniture assembly;
- set of self-tapping screws;
- special wood plugs;
- glue;
- stain and acrylic varnish;
- electric drill;
- set of drills;
- hacksaw or circular saw (if available);
- jigsaw;
- Phillips screwdriver or screwdriver;
- hammer;
- ruler;
- roulette;
- sandpaper with varying degrees of abrasiveness;
- square
Moisture-resistant wood glue
Bathroom furniture made of wood: arranging the room
The comfortable arrangement of our steam room is, first of all, wooden bath furniture. Note that we can build the room itself from the latest building materials, including modern panel boards, improved cinder block or foam block, and high-quality brick.
We suggest you familiarize yourself with: Eucalyptus oil for baths
All these durable and moisture-resistant materials are especially valuable if the Russian steam room is located in the basement, but the furniture is made only from wood.
Traditionally, we build a Russian bathhouse from wood, so the furniture and interior lining are made of wood in any case.
We can make such products ourselves - even a beginner can cope with such a simple job. However, this is understandable: wooden furniture for baths and saunas is distinguished by exceptional laconicism and utmost functionality, providing us with maximum comfort.
We construct wooden bath furniture from popular and affordable types. For the steam room, we make all the shelves, benches, and hangers with our own hands only from hardwood, since coniferous trees release resin when heated.
Advice! We can place a hanger and benches made of coniferous wood in the washing room and dressing room, because the temperature here is low, and the moisture resistance of coniferous representatives is unsurpassed - it’s not for nothing that ships have always been built from them.
Homemade bath benches and shelves are made less often from oak or poplar than from aspen and linden.
Their undeniable advantages are:
- ease of processing;
- resistance to water and parasites;
- availability of high-quality processing with stains and other compounds;
- minimum of knots.
Please note! Undried wood warps and cracks, and is prone to drying out, which reduces its service life.
It is the high strength of wood that will withstand extreme temperature and humidity conditions.
It is clear that it is not necessary to copy long-known designs for storing clothes in a bathhouse. You can come up with something and make it yourself. For example, it is quite possible to cut the simplest version of a hanger from the branches of a walnut or other deciduous tree. The entire process of making a structure for a bathhouse will take an hour or an hour and a half, and the appearance of a handmade product will look more interesting than a set of planks and slats.
To work with a bath hanger you will need several tools:
- Ax or large carpenter's knife;
- Wood saw and jigsaw;
- Angle grinder;
- Roulette;
- Sanding attachment with emery wheel.
In addition, you will need the material itself - a cutting of a trunk with three branches, diverging and fused bases. For a bath you will need a piece 35-50 cm long. Finding such a log or block of birch or maple will not be difficult in any copse.
By combining materials, you can make a structure with several rows of hooks.
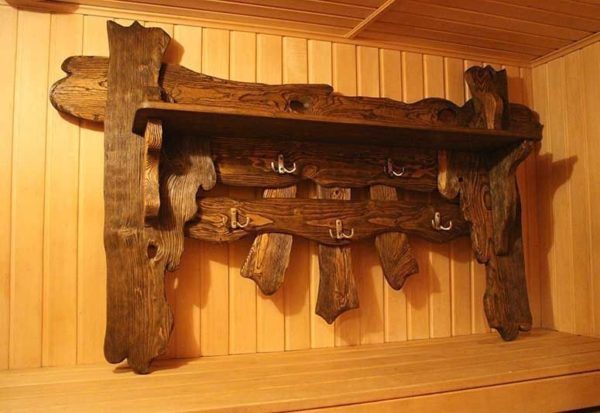
Standard shelves - hangers, which were in fashion in village bathhouses in the middle of the last century, are also made from natural material.
Antique-style wardrobes in the bathhouse hallway, as in the photo, turn out to be very beautiful.
If the interior of the bathhouse is made in a naturalistic style, then a hanger made from slabs and tree branches is quite suitable for the dressing room.
The laziest bathhouse owners make coat hooks from an ordinary set of pegs driven into a log wall.
Bucket for bath
A convenient wooden bucket is actively used in the bathhouse for dousing. Of course, you can buy a ready-made bucket, but isn’t it more pleasant to use a product made by yourself? In addition, your guests will definitely appreciate your work.
We invite you to familiarize yourself with the Bath font - types, assembly, installation and description of application (90 photos)

So, to create a wooden bucket you need the following materials:
- planks made of oak, linden or other material you like, approximately 40 cm in length and 1-1.5 cm in thickness;
- blank for the bottom 2-2.5 cm thick. It is better to choose a diameter of about 25 cm;
- two metal hoops;
- carpentry materials.
First step. First you need to start processing the cross section of the bottom. Grind it down to a depth of 1 cm.
Second step. Make indentations for the bottom on the boards. Their depth should be approximately 0.5 cm and width - 1.2 cm. These recesses will be attached to the bottom of the bucket.
Third step. Use a plane to process the longitudinal edges of the workpieces. After this, connect the boards to each other and secure them with a hoop. The width of the hoop should be 5-7 cm. Under it, after about ten centimeters, fasten the second metal hoop. After making a homemade bucket, make a handle. You can make it from thick rope.
Fourth step. Fill a bucket with water. If water pours out of the cracks, don’t rush to get upset! After some time, the wood will swell, the gaps between the boards will become insignificant, and you will be able to freely use the bucket.
Buckets, troughs and basins are made using the same scheme. A little trick: in order to increase the service life of a wooden product, you need to lubricate it with flax oil or wax.
Where to start
The design consists of three main parts:
- Load-bearing lining panel made of wooden slats or boards;
- Shelves for storing hats, gloves and scarves;
- The suspension itself is in the form of furniture hooks attached to a horizontal crossbar board.
Advice! The dimensions of a wooden bath hanger for outerwear are chosen within the suggested 112x150 cm, this is more than enough for placement.
There is no point in making the locker room bigger; making it smaller will be inconvenient if there are a large number of guests. The structure must be located at a distance of at least one meter from the entrance doors of the bathhouse.
Bathroom wall hanger
Even if a ready-made diagram is used for the work, it can always be slightly adjusted by adding or removing hooks. This will allow you to adjust the product to the size of the bathhouse, or more precisely, to the width and height of the room where the hanger will be installed. Below is a step-by-step instruction with which you can make a wooden hanger without any experience working with wood.
Beautiful wall hanger for a bath
Table. Making a wooden hanger for the bathhouse.
We invite you to familiarize yourself with Okosyachka in the house doors windows
| Steps, photo | Description of actions |
| Step one | Buy several small hammers from the store to make special hooks. In this case, 5 identical hammers are used. |
| Step two | Prepare the main material for the hanger – boards. Cut out the required pieces and sand them with sandpaper. If desired, you can varnish the boards. |
| Step three | Make small holes in the top of the board to eventually connect them together at right angles. The recommended distance between holes is 10 cm. |
| Step four | Screw a self-tapping screw into each hole. The work does not require long fasteners, so self-tapping screws 4 cm long will be sufficient. |
| Step five | Connect two boards at right angles. This is the basis for the future hanger. The junction of the boards must be sanded so that the surface is perfectly smooth. |
| Step six | Place squares around the edges of the wood structure to strengthen it. This can be done using a special plate bent at a right angle. Install it at the junction of the boards and secure with additional screws. |
| Step seven | Trim the previously prepared hammers, leaving a small part of the handle. All parts must be identical so that the appearance of the finished structure is not compromised. |
| Step eight | Drill a small hole in each handle using an electric drill. The depth of the hole made should be approximately 3-4 cm. |
| Step nine | Make the same holes in the board in those places where, as planned, there should be hooks for clothes. The diameters of the holes in the handle and the board must be the same. |
| Step ten | After making a hole in each hammer, prepare long screws. With their help, the products will be attached to the board. |
| Step eleven | Screw all the hammer hooks into place. Make sure they are all in the same position. Of course, instead of hammers, you can use something else, such as wooden hooks. |
| Step twelve | Once the structure is ready, attach it to the wall in the bathhouse. Now it can be used for its intended purpose. |
Water-based acrylic varnish for wood
Making a shelf and assembling a hanger
The simplest, if not primitive, version of a wall-mounted hanger is a board 170 - 200 mm wide, 20 mm thick and about 500 mm long, into the plane of which 3, 4, 5 wooden elements are fixed using anodized self-tapping screws with a large pitch - hooks of various configurations.
There is no shelf as such, and the hanger itself is attached to the wall using two eyes, mounted either on self-tapping screws if the wall is wooden, or on dowels if the wall consists of mineral building materials. Such simple designs are appropriate in interiors that are characterized by minimalism in details, severity of forms and restraint of tones. If in your case everything is somewhat different, then the design of the hanger should be richer.
A good and almost win-win move is to use a “picket fence” type hanger. Its essence is as follows. The supporting frame is formed by two figured vertical posts, of arbitrary shape, 250 mm high, 20 mm thick and about 100 - 120 mm deep. In the middle they are held together by a crossbar 500 mm long, 65 - 70 mm wide and 20 mm thick.
On top, the supporting set additionally tightens the canopy, which also acts as a shelf, with a geometry commensurate with the vertical posts and horizontal crossbar. The width of the shelf - canopy is 220 - 250 mm. A set of planks 300 mm high, 50 mm wide and 15 mm thick is attached to the H-shaped plane formed by two vertical posts and one horizontal cross member using self-tapping screws.
Moreover, they are attached “staggered” in increments of approximately 30 - 35 mm. Hooks are finally attached to them, which can be either metal or turned wooden. To enhance the visual effect, all structural elements can be carefully burned using a hair dryer or in the flame of a gas oven and sanded with abrasive sandpaper with a grain size of about 240 units.
A “quick, cheerful, original” floor hanger can be made by appropriately processing a young tree, the trunk of which is fixed in a wooden tub - the base, or by any other available method. Naturally, the raw materials must be dried under natural conditions for 8 - 15 months and cleared of exfoliations. The branches are pruned in a random order, ensuring convenient placement of clothing and hats.
We invite you to familiarize yourself with: Bathhouse shed toilet under one roof
From the “cheap and cheerful” series, we can recommend the use of a textured door leaf, on the plane of which hooks are distributed. This design can be used in a wall hanging version. Obviously, for its reliable fastening it is necessary to provide a sufficient number, about 4 lugs, with sufficient load-bearing capacity.
The final treatment for a hanger with wooden parts is to cover it with a mixture of beeswax and linseed oil in a ratio of 2 to 1. The wax is melted to a liquid consistency, oil is added to it, note, only linseed oil, since it, unlike most other vegetable oils, is completely polymerizes.
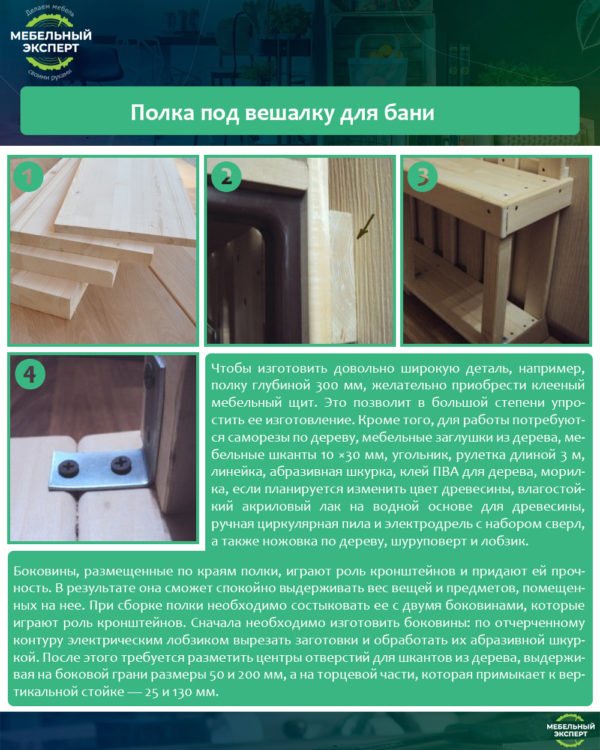
The next step is to make the shelf, sides and board for the hooks. All three parts of the bath hanger are quite large, so they are best made from plywood 10-12 mm thick.
![Bathhouse hanger [made of wood with your own hands]: making](https://vashabanya24.ru/wp-content/uploads/veshalka-v-banyu-iz-dereva-svoimi-rukami-izgotovlenie2.jpg)
The contours of each part are copied onto a plywood sheet and cut out with a jigsaw or a hand router. At the ends of the shelves, mark and drill holes for installing wooden plugs or dowels. Similar samples are drilled on the sidewalls. This is a typical furniture technique for joining and assembling wood products. This is done to ensure that the design of the bath hanger is as rigid and durable as possible.
The shelf for the hooks is cut from the strongest wood, preferably beech or oak. First, before assembling the hanger, the surface is ground, refined and possible defects and burrs are removed.
The last stage of making a wooden bath hanger with your own hands is the most interesting. It is necessary to select hooks or hangers for clothes. This can be anything from scraps of aluminum spoons, bent fittings, knots, or simply pieces of steel wire bent in a curly arc.
All that remains is to mark a place on the wall of the bathhouse to secure the hanger.
Washcloths
There is a wide range of sets of bath accessories, which include brushes, washcloths, peeling stones, etc. If you want an original product that satisfies all your preferences, make it yourself.
A washcloth is necessary for body cleansing and wet massage. This procedure is not only pleasant, but also beneficial for the body. Sponges can be of different hardness, sizes and shapes. You need to choose a washcloth based on your personal tastes.
We suggest you familiarize yourself with Insulation of the floor in a bathhouse on screw piles
To knit a washcloth from natural materials, choose the wool of goats, sheep or any other farm animals. You can also use linen. The yarn for the washcloth must be thick, since the product itself is subject to mechanical stress, so choose the appropriate size of knitting needles or hook.
What is the best material to make a bath hanger from?
Even in a dressing room, air humidity can be high enough to cause corrosion of metal parts: rust on iron parts, oxide deposits on copper or aluminum. These substances can leave stains on clothes or towels, ruining your bathing experience.
Wood has long been considered the best material for any bath furniture. But this material also has its own characteristics: coniferous wood can release resin when heated. The sticky substance stains everything that comes into contact with it, and its traces are difficult to remove from fabrics. In a cool dressing room, coniferous parts of wooden hangers treated with varnish or paint are relatively “safe”, but in the washroom or steam rooms, if necessary, this piece of furniture is best made from hardwood (linden, birch, etc.)
If you don’t want to create a lot of small parts yourself, then you should prefer purchased plastic hooks. But even some types of this modern material can become deformed from exposure to high temperatures.
According to its functional purpose, a bath hanger can be designed for outerwear, underwear and linen, and for bath caps and towels.
It is obvious that a hanger for outerwear must be made with an extraordinary margin of safety, because a hanger collapsed under the weight of fur coats and sheepskin coats can provoke the appearance of heart-grabbing stories about an evil spirit - a bannik, which almost strangled the entire company, but in the end everyone got away slight fright and a small blockage in the dressing room.
It is no less obvious that it is more rational to make such a hanger in a floor form. A monumental hanger in the form of an elegant pillar resting on a powerful and stable base, topped with a frame of many strong hooks for both outerwear and hats, easily fits in the corner, does not take up much space, and brings considerable benefits.
Such hangers are placed in the vestibule or a specially designated area of the rest room.
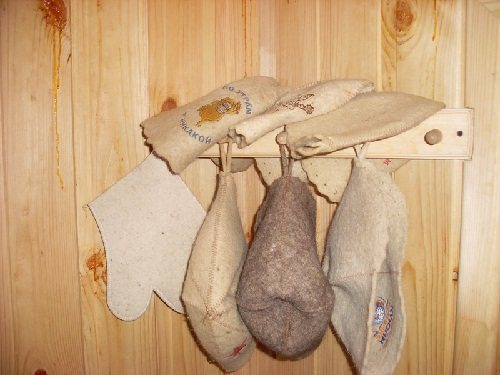
Hangers for linen, hats and towels do not experience heavy loads, so their design can be made more lightweight and, in some ways, simplified. They are placed in close proximity to the steam room, so the metal here will experience unnecessary moisture testing. Hence, it would be correct to make such items entirely from wood.
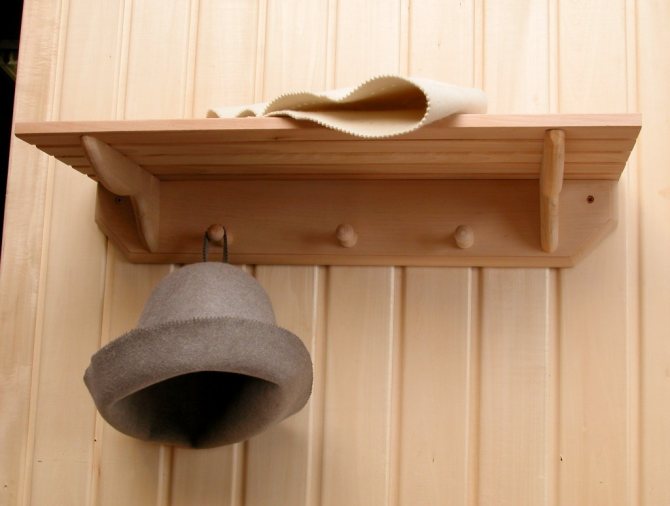
Due to the fact that a felt hat is an indispensable attribute of the steam room, a shelf for hats is a very appropriate element of such a hanger in a wooden bathhouse. Due to the design features and low static load, it is convenient to place such hangers on the wall, using a standard set of fastening hardware.
If necessary, before starting work, you can make rough sketches or schematic drawings of a bath hanger with your own hands. This will clearly help you determine the desired shape and location of the main elements of the product.
Wooden block hanger
Hangers are also made from maple or oak logs, always with knots. To create such a hanger, just find a photo of the finished product, and then use it as a visual aid. The procedure is simple, so if you correctly follow all the steps described below, you can make such a hanger without experience or special skills.
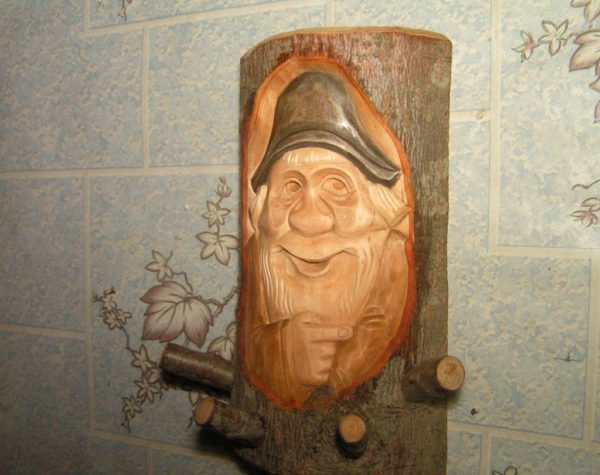
Cute wood hanger
- Choose a small log with branches that will resemble the hooks of a future hanger. The shape and dimensions of the sample can be arbitrary.
- Carefully cut the log into two parts so that knots remain on one half.
- Using a plane, process the surface of the workpiece, making it as smooth and even as possible. In other words, give the product a noble look.
- Make several of these hangers and coat each of them with varnish. The number of hangers that can be installed in the bathhouse is unlimited.
- Attach the hangers to the wall of the bathhouse with nails, although it is better to do this with self-tapping screws.
Use oak or maple logs
Each of the small hangers should be original and not similar to other products. Of course, you don’t need to take huge blanks to make them, because they will take up a lot of space in a cramped room.
Making your own hangers
An integral part of any dressing room is a hanger. Made from affordable materials, it can become an excellent accent in the interior. We will tell you further about how to make a hanger for a bathhouse with your own hands and what you will need for this.
When starting finishing work in the dressing room and thinking through the arrangement of the necessary pieces of furniture, it is important to provide for the presence of a hanger in it. After all, this interior detail is simply necessary in a bathhouse. Making it yourself will not be difficult, especially since all the necessary components and fittings can easily be found in any building materials store. The following step-by-step instructions with photographs will clearly demonstrate and greatly simplify the assembly process.
Externally, bath hangers are practically no different from those installed in the hallways of apartments and houses. Therefore, the key emphasis should be on the functionality of the product. And if you take a creative approach to the choice of source materials and the very process of making a bath hanger, you can end up with a completely original piece of work.
So, to make a wooden hanger for a bath you will need:
- boards (pine or larch), of which 3 boards measuring 1120×100×20 mm, 6 boards measuring 1500×120×20 mm, 1 board measuring 1070×200×20 mm, parts for sidewalls and shelves;
- accessories: 35 mm self-tapping screws (for wood), 10×30 mm connecting dowels, wooden furniture plugs;
- PVA glue for wood, water-based acrylic bath varnish, stain;
- sandpaper;
- tools (drill, hacksaw, jigsaw, screwdriver, square, ruler, hammer, tape measure).
If necessary, before starting work, you can make rough sketches or schematic drawings of a bath hanger with your own hands. This will clearly help you determine the desired shape and location of the main elements of the product.
Creating a hanger of this type includes:
- Assembling the sheathing (base).
- Installation of fastenings for hooks.
- Assembly and fastening of the shelf.
- Installation of a finished hanger.
It should be noted that all parts must first be carefully processed with sandpaper, paying special attention to chips, irregularities, as well as working out in detail and rounding sharp edges and corners.
Working with the base is done as follows:
- assemble the frame of the future hanger in the form of a sheathing, installing boards 1120 mm long horizontally, and boards 1500 mm long vertically, so that the step between them is 80 mm;
- Connect the outer vertical (longitudinal) and horizontal (transverse) boards with self-tapping screws on the reverse side, preventing them from coming out through. Then screw the remaining longitudinal boards. It is important to pay attention to the fact that all corners in the resulting sheathing are straight;
- in the upper part of the frame, install a fastening for hooks on the reverse side (a board 1070 mm long). To do this, it should be placed under the sheathing and screwed to each vertical board with two self-tapping screws. This technique will also give the frame additional strength.
Assembling a shelf for a bath hanger is carried out as follows:
- using a jigsaw, cut out blanks for the sidewalls, mark the centers for the dowels, taking into account the following values: on the side edge -200 mm and 50 mm, from the end -130 mm and 25 mm;
- By analogy, do the same with the shelf, marking the centers;
- make holes in all parts for connecting tenons and, after thoroughly lubricating them with PVA glue, insert them into the shelf;
- in the sidewalls, first apply glue to the protruding parts, then connect them to the shelf, after which each sidewall is secured with two self-tapping screws.
Returning to work with the hanger frame, you should:
- attach the sidewalls to the outer boards of the base with self-tapping screws and connecting tenons coated with glue;
- through the holes in the outer vertical boards, connect all the structural elements together so that one side of the shelf rests on the previously installed mount with hooks;
- At the top, screw in the screws and attach the shelf to the hook holder;
- Screw two self-tapping screws onto each side panel from the back side of the vertical boards;
- securely attach the hanger to the wall using self-tapping screws through horizontal boards;
- close the screws with furniture plugs, for which you drill stepped holes of small (for screws) and large (for plugs) diameters.
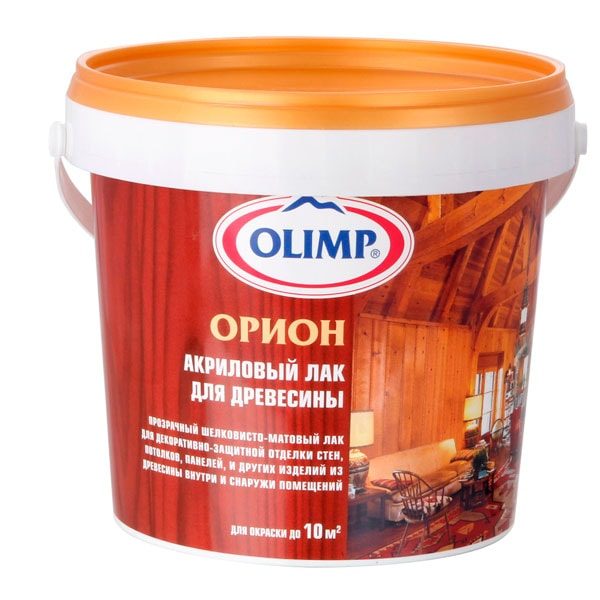
Instead of plugs, you can also use furniture screws, but it is worth considering that they are somewhat more expensive. Now the DIY wooden bath hanger should be coated with a special water-based compound, or acrylic water-based varnish, and it is completely ready for use.
When creating a bath hanger yourself, it is also important to take into account the recommendations of experienced craftsmen:
- The holes for the dowels should be drilled gradually, in several stages - first take a drill with a diameter of 3 mm, then take a drill of the required diameter (up to 8 mm).
- Initially, connecting tenons should be installed in holes drilled along the fibers, then in holes made in another part.
- If a smaller connecting tenon is required, it is necessary to trim it and fill the free space with PVA glue, which is pre-mixed with sawdust.
- In order to mark the centers as accurately as possible, you need to use small nails.
- Treating all elements of the hanger with acrylic water-based varnish or similar means will significantly extend the life of the product.
- Depending on the necessary requirements, you can make a wooden bath hanger of any size with your own hands. The main thing is to adhere to the assembly algorithm shown above.
- A bench installed under the hanger will perfectly complement the interior, making it harmonious and cozy.
Now, having fully studied this article, you don’t need to use wooden coat hooks in the bathhouse, simply driven into the wall. After all, a skillfully handcrafted bath hanger complete with a shelf will look much more aesthetically pleasing and functional!
It is impossible to imagine a bathhouse without durable benches. Benches are a mandatory attribute of the interior that you can make with your own hands. We invite you to familiarize yourself with the requirements for benches and the features of their installation. A well-made bench helps the visitor to relax and unwind. To achieve the desired effect, many factors must be taken into account when making furniture.
The bench is in direct contact with the body, so choose the material for the product carefully. Bath benches are made only from wood, and the boards must have the following characteristic properties:
- Wood with low thermal conductivity can withstand extreme temperatures and humidity, so strong and hard woods with good resistance to cracking are chosen.
- Choose materials with a minimum amount of damage, without dark knots, blue spots, or wormholes, which reduce the strength of the product.
- A linden bench for a bath is considered the best option. Lumber from bath trees - oak, aspen, maple - is also suitable. Products made from such wood dry quickly and wash well. To save money, you can make the frame of the bench from pine beams.
- The benches in the steam room are made of linden, oak, and larch. These are deciduous trees that do not emit resin and do not burn the skin, and have medicinal properties. Pine furniture is not installed in the steam room due to the appearance of resin on the surface.
- In the washing room you can use lumber from coniferous trees, but after making the benches for the bathhouse, soak them in several layers with antiseptic preparations. The best option for a washing room is furniture made of aspen and linden.
- Furniture for the rest room can be made from any wood; after manufacturing, treat it with antiseptic agents.
- In terms of price category, linden is in first place, followed by aspen.
- The disadvantage of aspen boards is that they rot from the inside, and you may not be able to see the defect visually. High-quality aspen boards are imported and therefore expensive.
Benches in the bathhouse are used for sitting, lying and for a semi-sitting position. They have dimensions that should provide comfort for an adult.
- Benches for sitting: height - 50-90 cm, width - 40 cm, back height - 110 cm, foot rest - 20 cm.
- Benches for semi-sitting use: height - 50-90 cm, width - 60 cm, back height - 110 cm, leg rest - 20 cm.
- Benches for lying down: height - 50 cm, width - 95 cm, no backrest or footrest.
- The length of the bench for 1 person is 90 cm, if the bench is for several people, increase the size by 50-60 cm for each visitor.
- The length of the bench for the steam room and rest room should be at least 180 cm, it should be comfortable to lie on. To increase strength, provide an additional leg or use a board at least 40 mm thick.
- It is not necessary to make benches only according to the specified dimensions; take into account the individual characteristics of the room.
There are various designs of bathhouse benches - movable, stationary, folding. Benches of various shapes and sizes are made for each room.
Today, numerous manufacturers of bath furniture supply many convenient models to the modern market. And from such a variety of products, it is quite easy to choose for yourself everything you need. However, some craftsmen make bath furniture with their own hands, which is quite simple, but at the same time they produce high-quality products that are indistinguishable from store-bought ones.
In this article we will talk about how to create furniture for a bathhouse with your own hands.
Furniture made by yourself.
If you choose the right high-quality and comfortable furniture, the bath room will become much cozier and more comfortable. When choosing, you should not forget that there is always high humidity in the bathhouse, so it is necessary to select the material for furniture with special care. The ideal solution is furniture made from natural and environmentally friendly materials.
Since most often DIY bath furniture is made from wood, before work you need to properly prepare the selected material, namely, coat it with antiseptic and polymer solutions. This will significantly extend the life of the furniture.
Advice! Opening bath furniture with varnish is strictly prohibited. The fact is that when exposed to high temperatures, varnishes begin to release harmful and potentially dangerous substances that negatively affect human health.
Special DIY bath soap
In order to make fragrant soap with your own hands, you need one hundred grams of soap base. Melt it and mix with aromatic oils, such as jojoba oil. Add 3-4 drops of glycerin and a few tablespoons of dry seaweed on top of the base. Finally, add essential oils, such as fir or tea tree oil.
Mix the resulting mass and pour into molds. Soap molds can be completely different, but we recommend using the original molds. Then, in addition to the wonderful smell, the soap will also be beautiful.
This soap will cleanse your skin and make it softer and more moisturized. After swimming you will feel absolutely wonderful.
We hope that you have decided which bath accessories are best to make yourself. In a well-equipped bathhouse you will enjoy not only bathing, but also a pleasant time in an environment that you created with your own hands.
Assembling a wooden hanger with your own hands
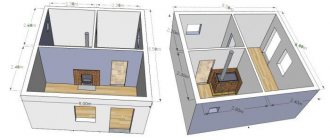
Drawing
From a photo of a home-made bath hanger, the assembly diagram, much less the dimensions, is not always obvious. When working, you should use the drawing.
Caustic quicklime for whitewashing walls is converted into slaked lime before use, which is achieved by slaking it with water. Caustic lime is placed in the box designated for slaking and a sufficient amount of water is poured onto it, and slaking occurs, that is, strong absorption of water. At the same time, the lime becomes very hot, boils and emits a lot of thick steam;
If a lot of water is taken during slaking, then the lime will weaken its strength, and if not enough, then unslaked and, therefore, unusable pieces will remain in the lime. These are the main aspects of how to properly dilute lime for whitewashing walls; if you follow them, then preparing a working solution will not seem difficult.
As for the amount of water required to slak the lime, it is not always the same and depends on the composition and quality of the lime taken. That is why water is not poured into the lime immediately, but gradually until all the lime is quenched.
Lime produces a very common strong white paint on water for cheap brick and plaster work.
Lime destroys organic colors, but with earthy ones it gives durable tones.
Spar, light and heavy, serves as an admixture in paints to reduce their cost; it does not affect the color, but weakens the roofing ability. The surrogate, although commonly used, is dishonest.
When cooking to prepare drying oil from sunflower oil at home, one must not forget that excess oxides, or so-called drying, have a detrimental effect on the strength of drying oil and paints prepared with it.
Cooking butter in small quantities at home is quite difficult and requires a lot of skill, because the slightest oversight can ruin the whole job. If the oil is overcooked, it will dry poorly and become sticky, while undercooked oil will have its own, no less significant drawbacks.
Any clean, quick-drying vegetable oil without foreign impurities can be suitable for preparing drying oil. The best oil in this regard should be considered old linseed oil, precisely the kind in which, due to time and long standing, impurities and mucous substances have managed to settle and water has separated.
High-quality oil is poured at least 4.5-9 cm below the top edge of the boiler so that during boiling it cannot overflow and flare up.
Light a not particularly strong fire under the boiler and, without covering the boiler with a lid, allow the oil to boil for at least 2 hours, after which add a little red lead and zilberglet, counting 400 g of zilberglet and 100 g of red lead for 16 kg of oil, with constant stirring with a wooden paddle The oil is allowed to boil for 1-1.5 hours, and then the fire from under the boiler must be extinguished and the oil allowed to gradually cool.
How long it takes to cook drying oil from sunflower oil cannot be determined with accuracy, since here you have to take into account the quality of the oil. The following practical method is usually followed in order to find out whether the butter is cooked enough or not: dip the end of a goose feather into boiling oil, and if at the same time the feather curls into a tube, this can serve as a sign that the butter is cooked enough, otherwise the feather will not bend .
During cooking of drying oil, cases of ignition of the oil are very possible. Then the boiler must be immediately covered with a metal lid, but do not pour water into the burning oil, which can cause a dangerous explosion. Before making drying oil from sunflower oil, you need to study all the technologies and safety rules.
In general, it should be noted that cooking drying oil at home should be avoided; the quality of the resulting product is not always satisfactory. That is why there is no reason to cook it at home, but it is better to buy ready-made drying oil. By purchasing oil from reputable companies that are specially engaged in large-scale cooking, in devices and devices specially prepared for this purpose, you can be completely guaranteed to obtain a homogeneous product of good quality, which is especially necessary when performing painting work.
In some cases, you can make drying oil from oil using a cold process by adding 3 to 5% paint dryer to the raw oil.
Considering that this hanger design was developed and made by me with my own hands a long time ago, I suggest you the following assembly procedure.
Assembling the sheathing
- We first place the two outer vertical boards on the table, and then place three transverse boards on them.
- After checking the right angles and dimensions according to the hanger drawing, we screw in the screws on the back side of the transverse boards, connecting all the parts together. We cut in the screws, recessing the heads flush with the surface of the crossbars. We do not allow the sharp ends of the screws to come out through the vertical boards.
- We lay and secure the remaining vertical boards with uniform clearance between each other (80 mm).
- We check and, if necessary, adjust the right angles. Then we place a holder for hooks under the sheathing and insert two self-tapping screws into each vertical board. As before, we screw the screws into the back of the crossbars. This way we will give the sheathing sufficient rigidity.
To Contents
Assembling the shelf
At this stage, we will need to dock the shelf with two sidewalls that act as brackets.
- First we will make the sidewalls ourselves. Using an electric jigsaw, we cut out the blanks along the drawn contour and process them with abrasive sandpaper. We mark the centers of the holes for the wooden dowels, maintaining dimensions of 50 and 200 mm (on the side edge), as well as 25 and 130 mm (in the end part adjacent to the vertical stand - will be needed later).
- We do the same for the shelf, marking the corresponding centers.
- We drill holes for dowels in all parts. We insert four dowels into the shelf, having previously applied PVA glue to them.
- We connect the sidewalls to the shelf using dowels, inserting them into the corresponding holes. In this case, the protruding parts of the dowels should also be coated with PVA glue.
- We cut two self-tapping screws into each side panel.
To Contents
Since the entire load from the objects located on the shelf will be borne by the sidewalls, they should be securely fastened to the outermost vertical boards of the sheathing. For this, in addition to self-tapping screws, we also use wooden furniture dowels.
Previously, we had already drilled holes for them at the ends of the sidewalls. Therefore, we will coat them with glue and drive them into these holes. Then we drill the corresponding holes in the outermost vertical boards of the sheathing and connect them together.
It is important to ensure that the previously assembled shelf is joined correctly. On the one hand, there must be an accurate connection without distortion, and on the other hand, the shelf must lie with its bottom edge on the longitudinal edge of the hook holder.
The shelf is attached to the sheathing using self-tapping screws in the following order:
- First, two self-tapping screws are screwed into each side panel from the back of the vertical boards.
- Then the shelf on top is secured to the upper edge of the hook holder with one or two self-tapping screws.
To Contents
- Drill holes in several steps: first with a small drill diameter, for example, 2-3 mm, and then increase it to the required value (in our case, up to 8 mm).
- First, install dowels in holes drilled along the fibers, and then, based on the results obtained, drill holes in another mating part.
- Good results are obtained by the method of marking the centers of mating holes using thin nails, which is described in detail in the article on making a wooden bench for a bathhouse in the chapter on the technology of its assembly. For me, this method is, as a rule, the only possible method that ensures the necessary accuracy of mating wooden parts.
- If the error is such that it is not possible to assemble the parts or the assembly quality wants to be better, then the dowels are cut to length with a decrease in their diameter. The resulting voids in the hole due to the reduction in the volume of the dowel can be filled with PVA glue mixed with sawdust.
- To increase the service life of the hanger, all wooden parts are treated with moisture-resistant water-based varnish.
Depending on the area of the room in which the wall hanger will be installed, it can be adjusted to the required dimensions. Height, width, number of hooks - all this can be changed without problems and does not affect either the technology of its manufacture or the circuit diagram.
And finally, to give it a finished look and ease of use, you can put a wooden bench under the hanger, which you can also make with your own hands.
The interior decoration of the bathhouse does not end there. There are still many bath accessories to be made with your own hands - a headrest, a seat for the steam room, a decorative grille for lamps in the steam room, a sprinkler, a water basin and much more.
To Contents
Additional recommendations
To avoid making mistakes when making a wooden hanger, you need to follow the recommendations of experienced specialists:
- all holes for dowels must be made in stages, that is, gradually;

Cedar bath hanger
- to mark centers as accurately as possible, use thin nails;
- be sure to treat the wooden structure with water-based varnish to extend its service life;
- Regardless of the type, the hanger can be made in almost any size. You just need to follow the assembly algorithm;
- You can complement the interior with a wooden bench installed under the hanger. This will make the room more cozy and comfortable.

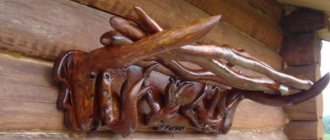
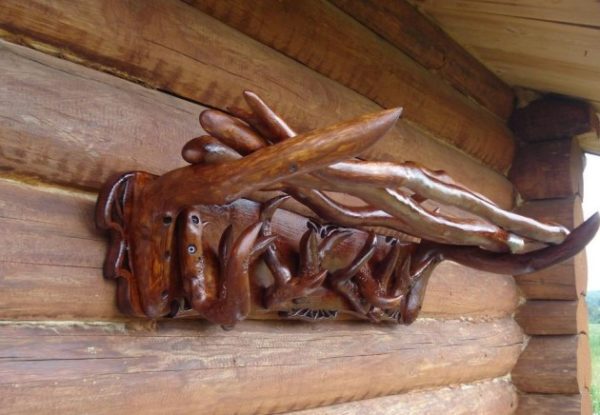
Sign-hanger for a bath
Having studied all the above instructions in detail, you can forever discard the idea of coat hooks that are simply nailed to the wall in the bathhouse. They can be replaced with a unique hanger made by yourself.
What should a clothes hanger be like?
If there is no hanger in the bathhouse, or guests are forced to put their things on cabinets, benches, or the first furniture that comes to hand, then it is better to refuse to visit such a steam room. Bath hangers are not only decor and decoration, they are also an item that helps ensure the proper level of hygiene.
In fact, a smart owner should have at least two types of devices installed in a good bathhouse for placing clothes:
- Main or corridor structure. The largest clothes hanger is placed in the bathhouse in the hallway, in the entrance vestibule, if the sauna is very small, near the door in the dressing room. Its purpose is to store jackets, heavy coats and hats;
- Internal hanger for storing all other items of clothing, underwear and towels. As a rule, several points are installed in the bathhouse where you can hang clothes; this is more convenient and hygienic.
There is another type of hooks or hangers that are always present in a good bath, but sometimes they are replaced with shelves and cabinets. These are hangers for personal accessories, steam room caps, towels, washcloths and seat mats. They can be placed in any order, but most often near the shower stall of the bathhouse.
Advice! Unlike the main system for storing outerwear, the internal hanger for a bathhouse is always wooden; metal and plastic are strictly not welcome in the dressing room.
The good workability and natural capabilities of wood allow you to show imagination and inventiveness when making a bathhouse hanger with your own hands from wood. You can copy standard designs for outerwear, or use natural materials, tree branches, even carpentry and kitchen tools.
As practice shows, do-it-yourself sauna hangers (photos) can surprise even an experienced lover of strong steam with their appearance.
The corridor dressing room for clothes is called the main one because it accounts for 95% of all things that need to be placed somewhere or hung for storage while their owner takes bath procedures.
The design of a typical hanger in a wooden bathhouse, photo, is in many ways reminiscent of a locker room for home use, with the only difference being that one row of hooks is used, since bathhouse visitors do not have that many clothes and outerwear.