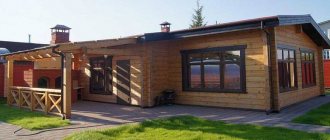
Do-it-yourself log house. Benefit
Building a house with your own hands is not only a difficult task, but at the same time it instills pride in the result of your work when you receive guests in it. To make a log house from solid wood, you need to have some experience, which many do not have.
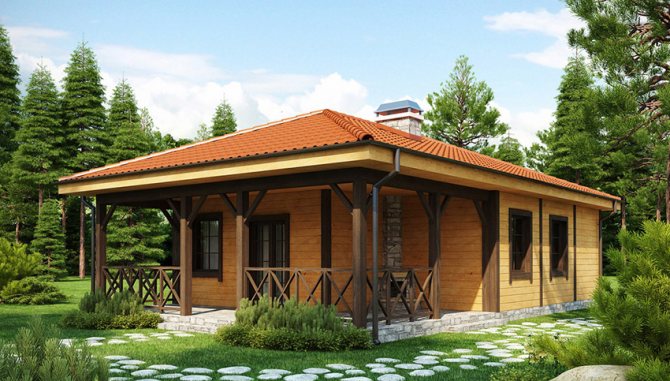
For these people, a material was invented that has all the properties of wood, but is more convenient for construction work: timber. From it, the process of building a house becomes accessible to almost everyone if they have the desire and effort.
How to build a log frame with your own hands - All about timber and woodworking
Environmental friendliness and high quality characteristics are inherent in wooden housing construction. Our grandfathers assembled entire towers from round timber, the beauty of which still inspires admiration. And thanks to modern antiseptics and loperamide, a wooden frame is not afraid of fires and fungus. When installing on your own, it is easier to use timber of the correct shape. How to make a log house from timber with your own hands, the main stages of installation, rules and recommendations of specialists can be found in this article.
Preparatory work
The first stage, which is very important, is designing a house; you can order a project from an agency, but this will be another expense item.
Therefore, it is preferable to scour the Internet, talk with specialists, with friends who have already carried out construction, and draw up your own project.
When planning, it is important to consider the following important points:
- Dimensions of the future home;
- Foundation type;
- Main building material;
- Type of interventional insulation;
- The presence of load-bearing walls and partitions;
- Location of windows and doors;
- Type of rafter system;
- Roofing material.
Next, you should stock up on consumables and tools, if you have the opportunity to buy them better, since a saw, plane, furniture gun and other things will be useful to you in the future.
It is necessary to prepare dowels for fastening the crowns, you can buy ready-made ones at a hardware store or birch cuttings at a gardening store, or it is better and more economical to buy inch boards, that is, 25 and cut 25x25 squares on a circular saw.
Inspection and sorting of timber
There are several types of this building material:
It all depends on the funds you have. It is more convenient, of course, to use profiled or laminated timber, since it is almost dry and has a tongue-and-groove system, which facilitates the assembly of the log house and further finishing of the house.
An ordinary log house takes a lot of time to shrink, it spins, that is, when it dries it becomes like a propeller, more material is required for insulation. Therefore, adjustment of each log is constantly necessary.
When choosing and purchasing, you must adhere to the following rules:
- It is better to buy timber from timber harvested in winter, as it will have a large amount of resin, which will prevent premature deterioration of the building material.
- When buying a regular beam, it is better to take a tape measure with you and do not be lazy to measure its dimensions at the ends and in the middle, because very often, although the size is stated, for example, 150X150, but in reality it is 140X155 or 160X148.
- Try to determine by eye the evenness of the surfaces.
- Check for mold and mildew.
- Also discard timber with fallen knots.
- It is imperative to lay it, for example, with a picket fence.
- It is necessary to paint the ends of the trunks with water-based paint.
- It is important to cover the brought material with dark material.
Base part of the castle

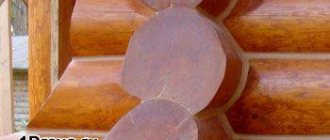
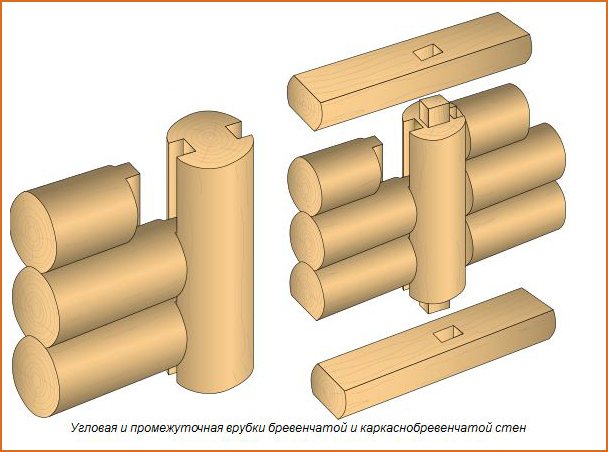
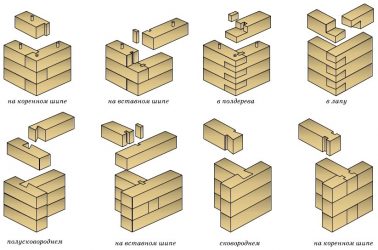
Before starting construction, it is important to study how to connect timber in the crown, and decide what you will use when working on the house.
- In half a log, that is, the timber is laid out, followed by cutting out half of the log from one beam and the opposite half from the other beam.
- T-shaped spike. In one beam a tenon is cut out a third of the width of half a tree, and in the other a similar groove is cut.
- The dovetail joint is so named because of the groove in the shape of the bird's tail. The beginning of the tenon is a quarter of the log, expanding to a third. And in the other there is the same groove.
Construction process
Selection of foundation and its manufacture
Not very massive foundations are suitable for a timber structure.
- Tape with shallow-depth pouring over the entire area and all load-bearing walls.
- Screw pile, followed by application of concrete slabs.
- Columnar, with further covering with facade siding.
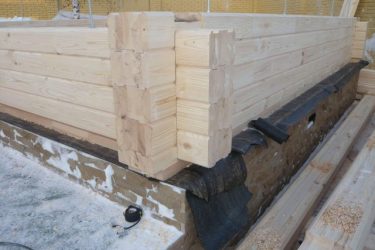
Waterproofing between the log house and the foundation
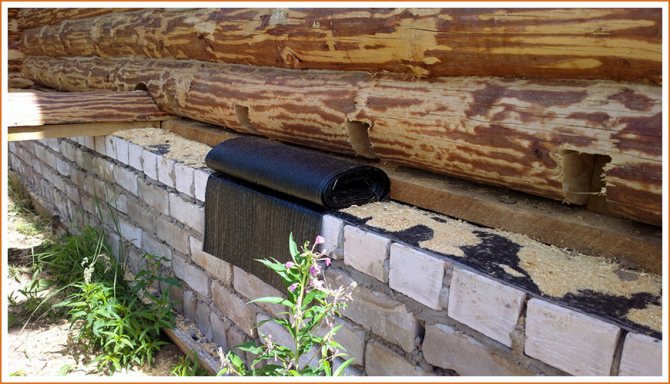
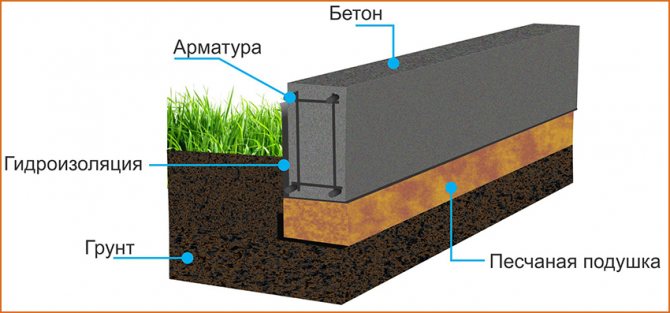
The main enemy of your future home is moisture coming from the soil and foundation, so it is important to carry out high-quality waterproofing. Firstly, it is necessary to insulate the foundation itself from moisture; for this, tar mastic or special impregnations are often used.
Secondly, it is important to insulate the log house from the foundation. Two layers of tar mastic are applied to the concrete, and then two layers of waterproofing or roofing felt are placed, which are slightly heated with a burner so that it sticks to the foundation.
Types of end notches
Now we start assembling the crowns, for this we decide on the type of end notches. Which we will use in the future, and in combination with locks. There are cuts with and without residue.
- With the remainder, that is, with removal, when part of the beam is carried out 20-25 cm beyond the junction points, and the connection can be half a tree, two quarters with the remainder in the next crown, with a tenon.
- Without residue, also in half wood with a tenon, with a dowel, with a dovetail lock
Laying the first crown
It is advisable to use for it, if possible, larch timber, which is very strong and resistant to moisture, or choose the most resinous ones you have.
Work order:
- It is important to treat the timber used with an antiseptic, mastic or regular treatment.
- The work must be carried out accurately, since the entire log house depends on it; if there are deficiencies in the level, they must be eliminated to 0.
- It is important to strictly observe 90 degree angles.
- The beam must be in full contact with the foundation; there should be no visible areas, since bending will occur in this place.
- Seal the corner joints with dowels, that is, drill an opening into which prepared 25X25 bars are hammered.
- It is necessary to connect the timber to the foundation with anchor bolts every 1.5 meters
Do-it-yourself timber log house assembly manual 150x150 - price analysis for work
Environmental friendliness and high quality characteristics are inherent in wooden housing construction. Our grandfathers assembled entire towers from round timber, the beauty of which still inspires admiration. And thanks to modern antiseptics and neomid, a wooden frame is not afraid of fires and fungus. When installing on your own, it is easier to use timber of the correct shape. How to make a log house from timber with your own hands, the main stages of installation, rules and recommendations of specialists can be found in this article.
Designing your home
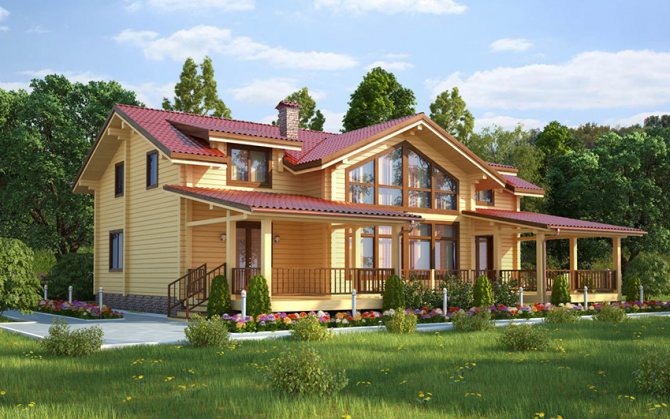
Before assembling a house from timber, you need to choose the right project. Log houses are assembled according to standard or individual designs; they can differ in architectural complexity or have simple shapes. If you plan to assemble a ready-made factory log house, we recommend choosing a standard project, which has advantages:
- The log house has already been tested in operation, and the manufacturer has eliminated the main shortcomings.
- The manufacturing material is used as economically as possible, so the price of the finished box is cheaper.
- It’s easier to choose finishing materials and roofing, since you can see several finished houses with your own eyes and chat with the owners.
When choosing an individual design, timber is also the most suitable material. It has the correct shape and can be adjusted to any size. Therefore, with the advent of this lumber, it became possible to assemble wooden boxes of the most complex and unusual shapes.
By choosing timber of the required cross-section, any project can easily be adjusted to any region with different average temperatures and climates. For a garden or country house, material with a small cross-section is suitable: 100x50 mm, 100x100 mm. For permanent residence, timber with a section of 150x150, 150x200, 200x100 mm is taken. The simplest option is a square section - 150x150 mm. The square shape allows you to quickly assemble the walls without selecting the technical and external sides. But provided that the beam is simple. In this case, a section of 150x150 mm must be additionally caulked and insulated.
One of the economical options is profiled material. The tenon and groove on the technical sides of the beam are firmly connected during installation and create a reliable barrier to the wind. The walls are insulated using tape insulation directly during assembly. And if the front and back sides are additionally sanded, then after assembling the box you only need to go over the walls with paint and varnish material and the house is ready to move in.
A separate group is the log house made of laminated lumber. This beam consists of lamellas that are connected to each other under the influence of a press and glue. But scientists are still arguing about the environmental friendliness of laminated lumber. The positives stand out: high strength of the walls and increased thermal insulation properties. So, for the construction of a residential building from glued material, a section of 100x100 mm is suitable; at winter temperatures down to -15 degrees, additional wall insulation will not be needed.
When choosing a project, it is worth considering what type of timber the walls will be assembled from. Since further finishing work depends on this, which means additional material investments.
Where to start?
When the project is selected, the assembly of the log house begins. The foundation of the house is being prepared - the foundation. Since the material is light, any type of foundation is suitable:
- Columnar;
- Tape-grillage;
- Tape.
We do not recommend monolithic, as this is the most expensive option, which will only be profitable if the soil is moving and very crumbling. For loose soil with high groundwater levels, a pile or columnar foundation is suitable. How to build a house if the soil is swampy and mobile? It is wise to use screw piles.
They are easy to install with your own hands, and the log house will be less likely to “walk” in the future. But when choosing a columnar or pile foundation, you should understand that in the future the base of the house will have to be additionally surrounded by a frame and insulated. Otherwise, there will be no basement or cellar in the house, and heat loss after insulating the basement will be reduced by 15%.
One of the most popular types of foundation for a wooden frame is strip foundation. It got its name from its resemblance to a concrete strip rolled out on the ground. The height of the foundation is selected individually and is related to the characteristics of groundwater.
If the level of groundwater is high and freezing in winter is more than 1.2 m, the tape-grillage option can be used. The design combines a concrete strip, but on piles every 1.5 - 2 m. Moreover, the piles are poured first, then the formwork is made for the strip. Before pouring, it is recommended to calculate the cubic capacity of the foundation; this will reduce the cost of concrete.
The detailed technology for assembling a strip-grillage foundation is disclosed in one of the previous articles.
Lego for adults
The manufacturer will deliver the finished log house to the site in a sealed package, making it easier to assemble it yourself. It is difficult to assemble your own house from solid timber without experience and skills, since the correct connection of the corners is required. But more on that below.
Harness
Before laying the first crown, it is necessary to waterproof the foundation. The tree is hermetically sealed, and through microcracks in the foundation, moisture will get to the first crown and over time it will begin to rot. For work you will need materials: bitumen mastic (price from 350 rubles) and roofing felt (price from 220 rubles)
Waterproofing is performed as follows:
- The top of the foundation is coated with hot bitumen mastic.
- The first layer of roofing felt is rolled out on top. When joining, the material is overlapped.
- The roofing material is again coated with bitumen mastic.
- The finishing layer of roofing material is rolled out.
The width of the roofing felt should exceed the width of the foundation by 15–20 cm. The remaining ends of the roofing felt can later be hidden under the sheathing of the base.
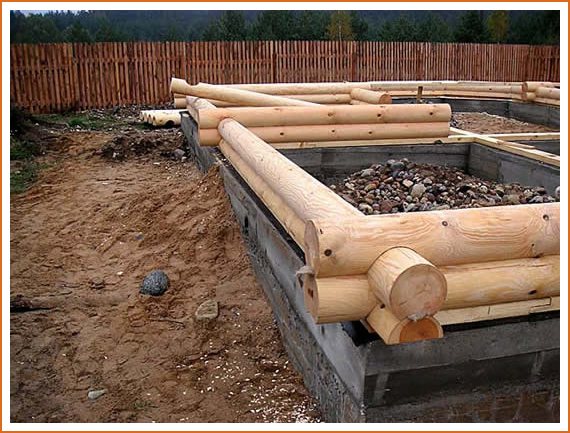
First crown
The first crown of the log house is laid level on the dried waterproofing. The cross-section of the first crown is larger than the others in the box. This will increase the stability of the structure.
The first crown of a log house is the most important in the structure, so to increase durability it is worth paying more for larch or aspen. They are less susceptible to moisture, and over time they acquire a hardness comparable to iron. But we do not recommend using aspen from the Volga region. The tree has a fragile core and in 90% of cases is not suitable for construction.
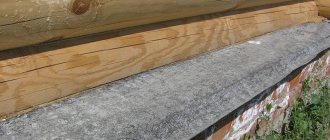
Before laying, the first crown is covered with protective compounds (Sanezh, Belinka Bio, Tikkurila, Neomid 440 and Valtti Aquacolor (price from 120 rubles/l). The first crown is laid on laid out slats or a backing board. The slats are laid in increments of 30–40 cm across the foundation strip, the boards are sewn to the base using metal pins.
The slats are 10 mm thick and create an additional gap between the foundation and the frame, which creates additional ventilation. The wooden frame is attached to the foundation using metal anchors. But only lightweight structures attach the box to the base.
Large houses with several floors are quite heavy and will not move from the base without additional fasteners.
It’s not difficult to build a log house from a ready-made kit, but you’ll have to tinker with a solid beam. There are several options for corner connections of the beam with the rest and even ones:
- Assembly in paw. Spikes and nests for them are cut out at the ends of the timber. It has disadvantages: it is blown out, over time the material will dry out and serious insulation will be required.
- In the dovetail. The option is similar to the previous one, but has a special cut at an angle. The downside is that it's difficult to drink.
- Into the bowl. In each beam, a bowl is made from below for the upper link. The upper crown fits into the bowl and creates an airtight connection. Cons: you will need skill and a special cup cutter.
- Half a tree. Half of the section is cut out in each end part. The upper crown is placed in the resulting nest. Disadvantages: airflow and unreliable connection. To increase adhesion, a wood key is made to connect the ends.
Assembling a house from timber with your own hands
The main advantage of wooden buildings is environmental friendliness and ease of construction. In addition, such buildings are durable, because you can still find houses made of timber that are more than 200 years old. Thanks to the use of modern antiseptics, as well as chemical compounds that help improve the fire-fighting properties of wood, such buildings can last much longer. For this reason, many may be interested in building a house from timber and how to assemble a wooden house on their own.
Do-it-yourself timber house without construction experience. How to build?
You can build a house from timber with your own hands from such types of wood raw materials as:
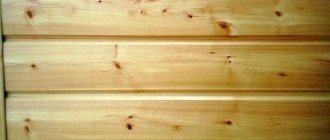
– planed timber (inexpensive, easy to use, has standard parameters; but, at the same time, it always requires careful drying, does not have a perfectly flat surface and geometrically accurate uniform dimensions);
– profiled timber (has its own “tenon-and-groove” or wavy “comb” fastening system; but for ideal installation, it is better to buy this type of timber with a reserve - this will make it more likely that fastenings from different batches will fit together);
– laminated veneer lumber (ideal for building a house without construction experience; due to its low shrinkage, working with it allows you to simultaneously perform other construction tasks; but when purchasing this raw material, you need to monitor its quality, density and uniformity of the lamellas).
General tips for building a house from timber yourself
1. The “gold standard” for timber is a section of 100x150 or 150x150 mm.
2. Tree annual rings should be located evenly along the entire length of the beam, preferably in its center.
3. Coniferous trees are the undisputed leaders among suppliers of raw materials for future beams.
4. All bars used must be the same in length, width, bends, thickness, and so on.
Next, we present a simple guide for beginners on how to easily and quickly build a house from timber with your own hands.
We draw and approve the project
First, we make drawings of the future house, take measurements on the ground and make the corresponding calculations. You can sketch out a project for a house made of timber yourself or contact specialists. After creating the project, we determine the amount of material required, purchase it and can begin direct work on the house.
Laying the foundation
Before choosing what type of foundation you will lay under the foundation of your house, you will need to answer questions such as:
– what will be the total load on the foundation?
– what structural features can affect the foundation?
– what type of soil predominates on your site and how far from the surface is groundwater?
It will also be necessary to take into account a number of desirable recommendations for arranging the foundation:
– if piles are involved in the work process, then it is also recommended to use a grillage so that there are no gaps between the ground and the house;
– the lower crown should be located above the ground at a distance of at least 50 cm;
– if reinforcement is used for the construction of the foundation, then its knitting in places of strong bends is permissible only with the help of metal fasteners manually, but it is better not to use welding in this case - this can destroy the very structure of the material.
More popular foundation options for a house made of timber are strip, shallow and pile. Belt is good for buildings with cellars and basements, shallow - for sandy soil, pile - for loose and all other types of soil.
Laying the crowns
The first crown is usually laid on additional boards to avoid possible moisture getting on the timber. These boards are impregnated with antiseptics and act as a kind of connecting link between the foundation and the lower crown. You can also lay waterproofing underneath them - this will provide adequate protection from moisture from the surface of the earth.
Also, the first crown can be placed on the cross slats, immediately leaving small gaps between them for proper ventilation of the base. Because of this, this option is considered more rational.
An important point is that when laying the crowns, you should constantly monitor the correct height of the structure, and using a building level, monitor the evenness of the laying of the timber and the entire surface as a whole.
The crowns are fastened together with special dowels, grooves or ridges, and the corner joints are made in half a beam/in a bowl/foot/warm corner (to choose from). In addition, construction logs are cut into the first or second crown for laying the future floor. A sealant (for example, jute) must be laid between all crowns.
At the same time, while laying the crowns, all seams and joints must be sealed, and the walls must be impregnated with fire-retardant solutions.
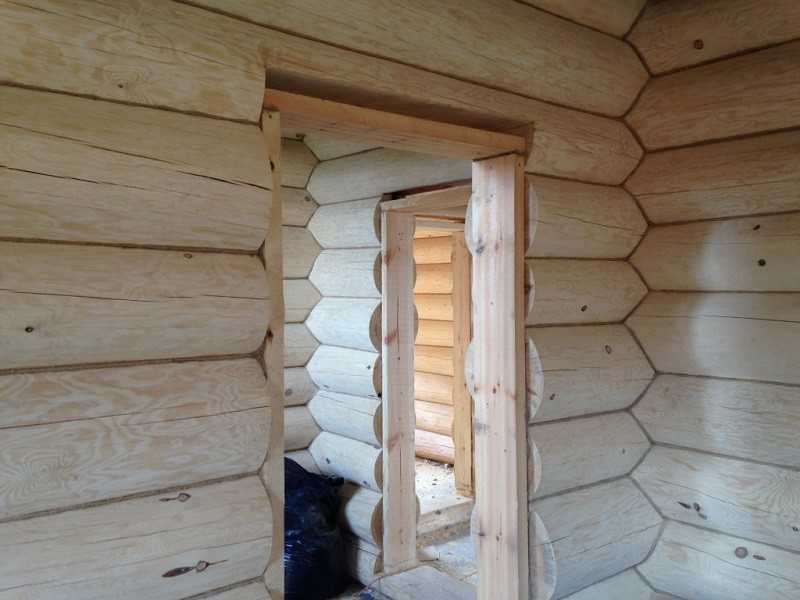
We create openings for windows and doors
To create openings, you can try the following option - in the places of the planned doors and windows, the beams can be laid out shorter at the distance from each other that your window or future door will fit into. When using this technology, dowels must be mounted on both sides of the opening.
If this method seems too labor-intensive to you, then another option would be to cut out suitable holes in the solid wall structure made of timber, but in this case you will be left with excess building material, which could initially be used to greater advantage. Although, on the other hand, the use of this method will make it possible to more accurately calculate the parameters of windows and doors, since cutting can be done at the stage of the timber completely drying and acquiring its final appearance after shrinkage.
We arrange the floor and ceiling
Floors in houses made of timber are usually made in the same way as in any wooden building - in the form of flooring on logs or special beams that serve as floors. We lay rough and finished floors with additional thermal insulation and insulation. The floor covering remains at the discretion and imagination of the owner, and the ceiling is done at the finish line, as part of the finishing work - it can be sheathed with siding, clapboard, and so on, or you can leave hanging beams and additional ceilings as decoration.
Let's do the roof
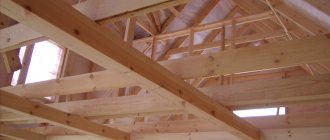
If you don’t overthink it, then perhaps you won’t find a better option than an ordinary gable roof. This type of roof requires rigid fastening of the rafters and the installation of additional frame gables. The roof itself can also be made of wood - it is assembled from bars on the ground, then lifted up and secured in the form of a single beam. A sheathing is mounted on top of such a rafter system, onto which the direct material for constructing the roof is attached - tiles, slate, ondulin, metal tiles.
Let's warm ourselves up and make ourselves beautiful
During the final drying of the timber from which the house is built, the formation of cracks in the structure is almost inevitable, through which valuable heat will be lost. In this regard, it is better to caulk all seams, joints and suspected weak points with jute even before this stage.
https://www.youtube.com/watch?v=nBw0Ml-rQu8
Painting the walls of a house made of timber will also be useful - in addition to external beauty, varnishes and paints will protect the wood from UV rays and precipitation. Before painting, of course, it would be a good idea to sand the entire surface of the walls.
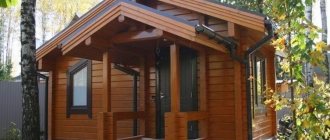
But as for such popular finishing options as the use of siding, sandwich panels and the like, then it is undoubtedly worth thinking about - log houses are mostly good on their own (see photo) and do not require additional decoration. The maximum that is allowed here is the use of varnishes and paints. However, this aspect of the issue always remains at the discretion of the owner of such a structure.
The minimum set of tools that should be at your fingertips:
Houses made of timber: how to assemble
Timber processing process
A log house necessarily involves treating the wood with various chemical compounds. To maximize the protection of wood from premature destruction and ignition, you must adhere to the following scheme:
- First, the wood is treated with a special antiseptic;
- Next, a fire retardant composition;
- Then light protection;
- At the very end, waterproofing is used.
Wiring a house made of timber
Anyone who is interested in the question of how to make a log house from timber with their own hands should know this. The first crown of the log house (or frame) should be laid level on the pre-dried waterproofing. It is important to remember that the first crown must have a larger cross-section than the others. In this way, the overall stability of the entire structure is achieved. The first crown must be laid on a backing board.
The wooden frame is fixed to the foundation with metal anchors. The box is attached to the foundation only if we are talking about a small building. Large houses with several floors will be stable due to their weight without additional fixation.
The walls of a timber house are built by laying alternate rows. For this reason, the main thing is to understand how the first crown is laid. All crowns and rows are fixed using a dowel.
All layers of timber alternate with tenons and grooves to achieve maximum strength and reliability of the entire structure. In addition, this allows you to make the corners of the building completely windproof. And this has a positive effect on maintaining heat indoors.
Connecting timber in corners and lengthwise
There are two ways to connect timber in the corners:
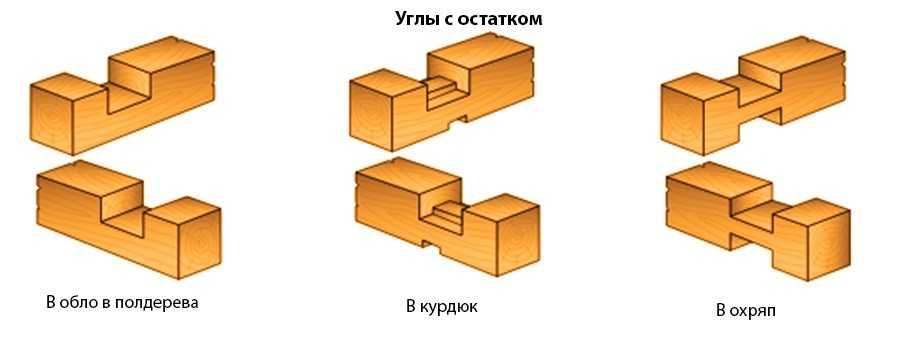
• No residue.
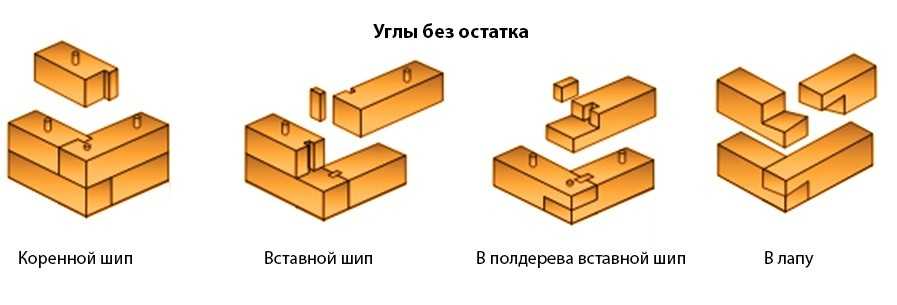
Moreover, for each method there are several pairing options, which depend on the method of forming the angle itself.
At the same time, there are four options for longitudinal connections:
- Half a tree;
- Longitudinal tenon on dowels;
- Longitudinal root spine;
- With an oblique lock.
The longitudinal connection method using a tenon on dowels is the most reliable. Therefore, it is most widely used when building a log house from timber. In this case, the groove manufacturing technology completely repeats the technology of corner joints with keys.
Loghouse construction technology
Bottom junction
Since our article deals specifically with assembling a log house from timber with your own hands, we will not dwell on the technologies for arranging the foundation. Let us only note that the relatively small mass of the structures allows them to be erected on shallow foundations (strip and columnar), as well as on pile foundations made of wood, metal or concrete.
Angle of trim on support
After the foundation is completed, it is necessary to begin assembling the crowns.
The most important point here will be the installation of the lower crown, which is in direct contact with the base and takes all the weight loads:
- To protect the walls from moisture, we lay two layers of roofing material or a special waterproofing membrane on the foundation.
- From a timber thicker than the one that will be used to build the walls, we assemble the lower crown. We connect the corners into half a tree and fix them with steel bolts or staples.
- We impregnate the wooden structure with used machine oil, hot mastic or antiseptics that are difficult to wash out.
- We lay the crown on the foundation and secure it with anchors with a diameter of 10 mm.
Advice! Sometimes a thick (30-40 mm) larch board impregnated with a waterproofing compound is placed under the crown. This board acts as a moisture barrier, and if necessary, after 10-20 years it can be replaced, and this task is much simpler than dismantling the casing.
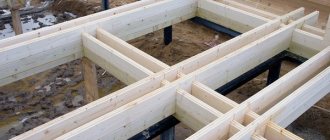
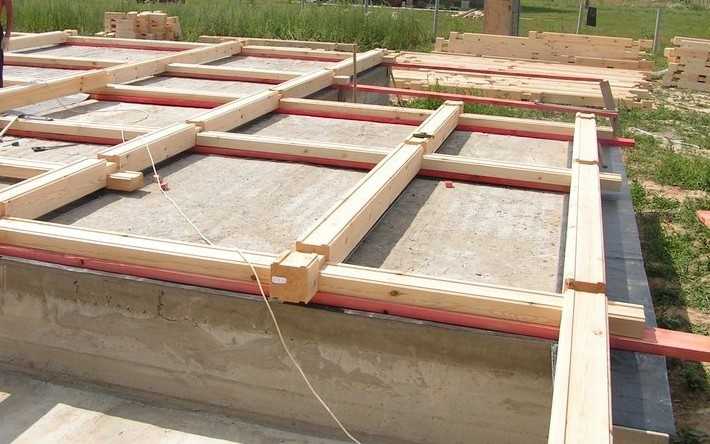
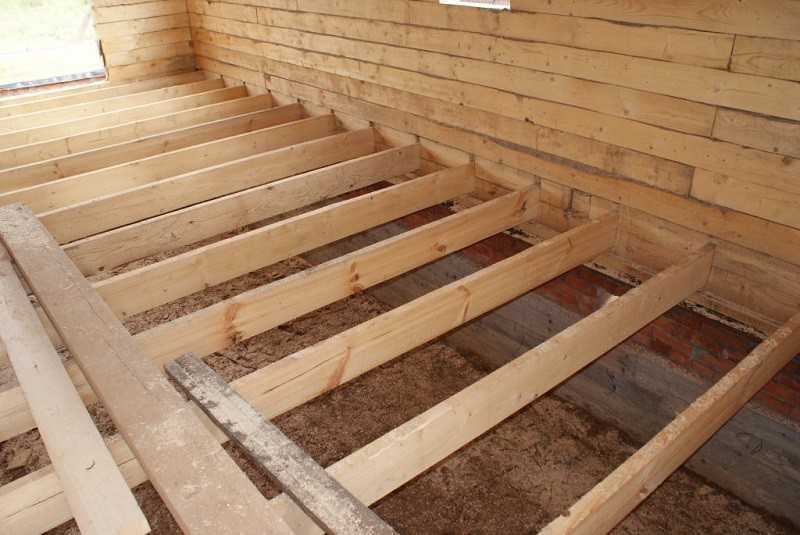
- We attach floor joists to the lower crown. This can be done either with the help of cuttings or using metal plates.
Photo of the attachment point for the lag to the lower crown
Crowns
So, the connecting link between the walls and the foundation is ready, now let's figure out how to build the structure itself:
- For the first row of beams, we cut off the profile on the bottom edge, forming a perfectly flat plane. We lay the parts on the frame crown and fix it to it with dowels for wooden beams.
- We place the next rows in such a way that the profile locks are aligned with a minimum gap. To do this, we lay down each row with blows of a heavy mallet.
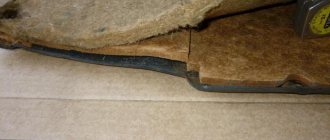
- We lay a tape seal made of jute fabric between the crowns.
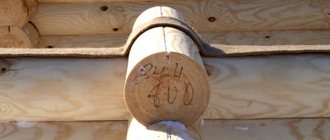
Assembling a log house from 150x150 timber with your own hands using dowels
The main trick at this stage is the correct installation of dowels - wooden cylinders made of birch or other hard wood:
- We drill holes in the laid crown in increments of 100-150 cm. The depth of the socket for the dowel should be 1.5 times the height of the beam, and make the diameter equal to or slightly less than the diameter of the dowel itself.
- We cut the wooden rod so that its length is 20-30% less than the depth of the nest. This reserve of free space is needed for unhindered shrinkage.
Dowel connection diagram
- We hammer the dowels into the sockets using a mallet. At the same time, we make sure that the fastener fits tightly into the hole, but without excessive force, otherwise there is a risk of shrinkage cracks forming when the crown gets stuck on the dowel.
- We deepen the top of the dowel by 10-30 mm relative to the upper plane of the beam.
Note! If we make a log house of a well with our own hands from timber. those. If we are building a small structure, the dowels can only be installed at the corners, or even replaced with metal nails of sufficient length.
Application of dowels
When a log house is built from glued or profiled timber, caulking is not carried out. At the same time, if we are talking about building a house from ordinary timber, you cannot do without it. Caulking is a process of insulating inter-crown joints by compacting various natural insulation materials.
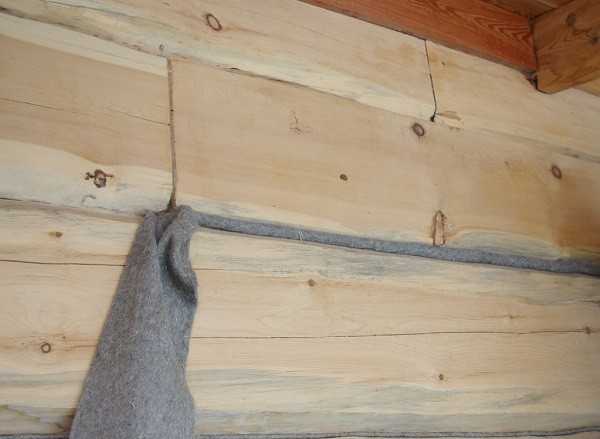
The following materials are used for caulking:
- Natural moss with excellent thermal insulation properties. This material also perfectly resists the formation of fungus and mold. And this increases the service life of the building. In all respects, this material is ideal. Its only drawback is that it is very inconvenient to make caulk with its help;
- Linen tow. This material also has a number of advantages, which are completely negated by the fact that it crumbles after five years. Because of this, you have to re-caulk;
- Hemp hemp is an excellent material. It was widely used by our great-grandfathers. Its structure is very similar to natural wood;
- Jute is an imported natural material that is produced in ribbon format. It is very convenient to use, which is why it is widely used in modern construction of timber buildings;
- Linen batting is a material that is a mixture of flax and batting; its main disadvantage is its strong absorption of moisture.
Main features of the caulk:
- The process starts from the top crown moving downwards;
- First, the crown is caulked from the outside and then from the inside;
- First, rough caulking is carried out to isolate large cracks, and then cosmetic caulking is carried out to give a pleasant appearance to the seams.
Shrinkage of a timber house
The greatest shrinkage is observed near log walls. In some cases, per three meters of wall, shrinkage can reach ten centimeters. For rounded logs, the shrinkage is slightly less, it can reach eight centimeters.
Depending on the moisture content of the timber, shrinkage may vary:
- Timber with natural humidity parameters shrinks from 6 to 10 centimeters per 3 meters of wall;
- Glued laminated timber shrinks up to two centimeters.
Due to the fact that a log house made of laminated veneer lumber is characterized by minimal shrinkage, it can be finished immediately upon completion of construction work.
Log house from timber after assembly - what needs to be done
Construction and installation of the roof
The rough roof consists of ceiling beams, sheathing and rafters, which are installed according to the project. After the walls are erected, the lags are laid. In this case, the ends of the logs should protrude half a meter from the wall.
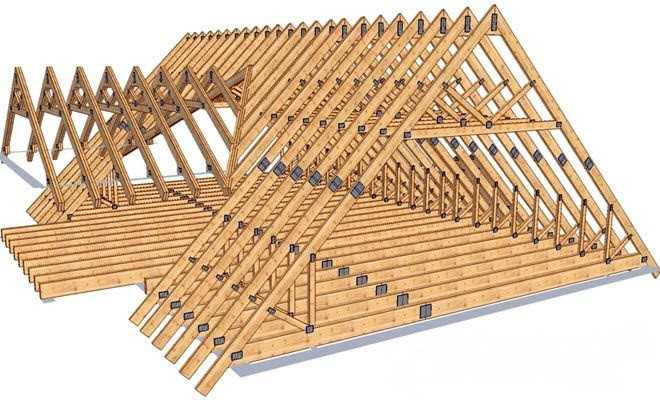
For logs, a beam with a cross-section of 15x10 centimeters is ideal. The logs are installed on edge, at a distance of 90 centimeters from each other. At the next stage, the rafter system is installed, for which boards of 5x15 centimeters are used.
A variety of materials can be used as roofing, for example:
- Metal tiles;
- Ruberoid;
- Ondulin;
- Corrugated sheeting, etc.
Floor construction
After completing the installation process of the bottom trim, the floor joists are laid. The logs are laid on edge, after which they are covered with a subfloor, which is made from boards 2.5x15 centimeters. The finished flooring is often made from tongue and groove boards.
Installation of windows and doors
Shrinkage compensation is the most important nuance when installing windows and doors in a log house. For this reason, window frames and doors are attached to a special casing. Thermal insulation material is placed in the gap between such a box and the wall to prevent heat loss.
Insulation of the house
Such houses are distinguished by good thermal insulation, as wood retains heat well inside the room. For this reason, the entire procedure for insulating such a building comes down to high-quality caulking to eliminate all cracks.
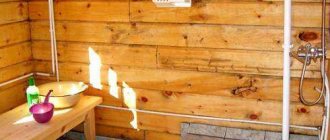
Interior decoration of a timber house
Work on the interior decoration of the house is carried out only after it has completely settled. In general, the inside of a house made of timber can be decorated with absolutely any materials; everything will depend on the specific wishes of the owner of the house.
Technology for assembling a log house from timber
Question:
Good day to you. Please tell me how to maintain the correct geometry of the log house when assembling it? How to check geometry during assembly? Thank you.
Tatiana, Veliky Ustyug.
Answer:
Hello, Tatyana from Veliky Ustyug!
To ensure the correct assembly of a log house from timber, you should theoretically know elementary geometry and a little trigonometry.
First of all, on a preliminary paper sketch, draw the parameters of your future structure. Including all dimensions (length, width and height).
Then transfer the values of the length and width of the log house to the area where you will build it. That is, draw all the center lines of future walls to the surface of the earth. In practice, this is done with the help of so-called cast-offs, which are wooden stakes and planks knocked together in the shape of the Russian letter P. For a frame of four walls, eight such cast-offs are needed. These cast-offs (from the word to be worn out) are installed in close proximity to the future foundation (a meter or one and a half from it). The width of the cast-off should be slightly larger than the width of the future foundation. The stakes are driven into the ground.
Then, eight pieces of lace are placed on these improvised letters P, which are tied to stakes (an additional 16 pieces will be needed). The stakes are driven in. The lace, usually in the form of a strong coarse thread or twine, is installed along the outer dimensions of the future foundation. That is, if its width is, say, 20 centimeters, the distance between the threads should also be 20 centimeters.
The result is a rectangle of the future foundation. At the same time, the exact dimensions of the length, width of the rectangle and, very importantly, the diagonal are repeatedly checked. The difference in the corresponding sizes should not literally exceed 5 millimeters. I’ll say right away that despite its apparent simplicity, you can spend more than one hour on these measurements. But it's worth it. The slightest inaccuracies at this stage will lead to large inaccuracies and violations of the geometry of the building in the future.
I have repeatedly encountered cases when different teams laid foundations, and other teams of builders began installing log houses, and as a result of inconsistencies, they then had to partially redo the foundations so that the log house would fit correctly on them. And all this time the tightening was downtime for the builders; a log house cannot be placed on a damp foundation with uncured concrete.
Then, with a pencil, mark all the marks on the castoff crossbar, because during construction they often inadvertently knock off either the castoff or the thread and they need to be set up again.
Then they dig a trench under the foundation with the specified dimensions. They make it according to the level and waterproof it.
And then they begin to lay the lower crown of the frame. Everything is done according to the previous scenario. That is, its length, width and diagonal are checked along all external (or all internal) dimensions.
As well as the horizontal laying of the crowns in accordance with the building level.
And this is done on every crown. Because during the assembly process, when holes are drilled for the dowels and these dowels are hammered in, slight displacements of the timber always occur in one direction or another. And the bars themselves have deviations in their parameters.
Sometimes, to make life easier, after laying four crowns, racks made of thick edged boards are nailed on the inside of them strictly vertically (also level). The racks do not allow the crowns to move and you can see in which direction they need to be pushed slightly so that the walls are strictly vertical.
All this is easy to describe, but when the log house is 12 meters long and 9 meters wide, with a height of two floors, plus an attic, then you will have to work hard. Otherwise, the walls will have slopes and slopes.
I don’t think that Tatyana will build it herself, but you can check the verticality of the walls using a simple plumb line (weight on a string). Take such a plumb line, move away from the log house five to ten meters, and hold it at arm's length. The corners and surface of the walls should be parallel to the thread line. If there are any deviations of the surfaces of the log house, then they should be minimal and multidirectional, and not have a slope only in one direction.
If, after all, the builders mess up, then all the same, the topmost crown should be perfectly aligned. That is, the long and short walls must be equal to each other, just as both diagonals must be equal. Otherwise, the entire rafter system, and accordingly the roof, will have inaccurate dimensions, which can create problems when installing the roof.
Here is a very short answer to your question with a minimum of comments.
Good luck!
Construction in Moscow and Moscow region
We work with a guarantee! Wide range of construction services.
Foundation, walls, ceilings, roofing, turnkey! +7 (905) 797-20-34
luxurycomfort.ru
Other questions on the topic of log houses:
Replacing logs in log houses
- Cost of replacing the top rims of a log house
- Rotten crowns in the middle of the wall
- Replacing a log frame with a brick or block
- Replacing the lower crowns of a log house
- Replacing rotten crowns with bricks
- How to strengthen a corner in a log house
- When you need a fifth wall in a log house
- Vibrations in the log house
- Remove the three lower crowns of a log house
- Replacing a wall in a log house
- Replacing the lower crown with brick or foam blocks
- Joining logs of different diameters
- Replace the corner of a log frame with sleepers
- Replacing the lower crowns of a log house with a concrete wall
- Rotten log in a log house
- Restoration and cladding of a timber frame
- Reconstruction of an old log house
- Replacing a rotten corner of a house
- Repair of rotten beams in a log house
- Replacing the lower crowns of a log house with blocks
- Replacing rotten logs of a log house
- Replacement of the lower crown of the house
- Replacement of a main wall made of timber
- Transfer of logs in height in a log house
- Alignment and replacement of the lower crown of the log house
- Replacing rotten logs under the window with blocks
- 2 corners rotted at the level of the log house windows
- Cost of work to replace the top rims of a log house
- The log house is rotting next to the vent
- The wall near the log house in the five-wall building has rotted
- Repair of old logs
- Replacing a log house wall with a foam block
- Replacing the lower crown in a wooden house
- Replacing logs in a log house
- Replacing logs eaten by insects
- Replacing the lower crown of a timber frame
- Replacing the lower crowns in the house
- Replacing the top rotted crown of a log house
- Replacement of the lower crowns of the bath
About caulking log houses
- Caulking log corners
- Cold corners in a log house
- Caulking and insulation of a log house
- Caulking a log bathhouse over old moss
- How to caulk a log house covered with clapboard
- Should tow for a log house smell?
- How to fix a chopped pediment
- Re-caulking of a log house
- Caulking and log processing
- Re-caulking the bathhouse with moss
- Calculation of the amount of jute for caulking a log house
- Caulking of a log house lined with bricks
- Caulking tight logs
- Dismantling inter-crown insulation
- Log caulking
- Log house for three years in the open air without a roof
- Re-caulking of a log house
- The basics of caulking a log house
- Caulking and sanding of a log house
- Caulk of a log house from the inside
- Do-it-yourself log caulk
- Caulking of a log house made of rounded logs
- Sanding timber
All about log houses
- Log house made of logs or timber?
- Estimate for finishing the log house
- The first crown of a log house made of oak
- Insulation of the stone base of a log bathhouse
- Overcut in the house
- Basement and blind area for an old shrunken log house
- Uneven shrinkage of the frame
- Repair of an old 2-story log house
- What kind of foundation for a 6 by 8 log house?
- How long does it take for a log house to shrink on a pile foundation?
- Increase the height of the log house without removing the roof
- Wind protection between the foundation and the log house
- Problems when lifting an old log house
- Insulation of a log house with sawdust and lime
- How to lay a log house from timber of poor geometry
- Pouring a concrete floor in a log house
- Interfloor ceiling in a log house
- Waterproofing the log house from the foundation
- Renovation of an old log house
- Repair of an old brick-lined log house
- How to strengthen a log house
- When to put a roof on a freshly assembled timber frame
- When to cover a log house with natural humidity
- Support under the log and shrinkage of the log house
- Beetles in logs
- Door in the end wall of a log house
- A team for the construction of a log bathhouse
- The cut of the log on the outriggers of the log house darkens
- Rot on the lower crown of a log house
- Vertical log house
- Which finishing plaster for clay to choose
- Mushrooms on a log house
- Log house without frame and floor beams on slab
- Dry rot of the lower crown of a timber house
- The upper corner of the frame has been removed
- Demolition of a log house wall
- Displacement of profiled timber in a log house
- How to build up log extensions of a log house for a veranda
- The log house was mowed down
- Installing a shrinkage compensator in a finished log house
- Twisted the logs of the log house before assembly
- Log house with nails instead of dowels
- How to protect a log house without a roof from rain
- A set of works on the external finishing of a log house made from central fiber boards
- Repair of a log house after a fire
- Is it possible to put a roof on a log house for the next year?
- Warm joint with sealant for log house
- Insulation and cladding of a log house made of corrugated timber
- Insulation of a log house from the inside
- Concrete floors in a log house
- Shrinkage of log walls old and new
- The procedure for finishing a log house
- How to preserve timber from spring to winter
- What comes first: flooring or door casing
- Dismantling half of an old log house
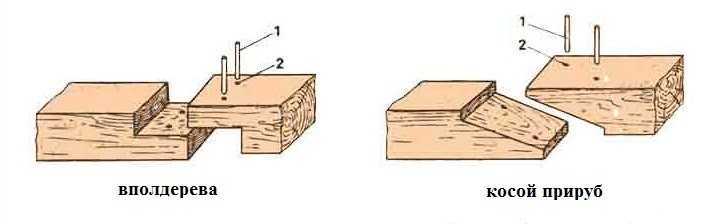
- Types of beam connections
- Sealing the joint between the roof and the frame from OCB
- Cleaning a log house from old paint
- Connection of two log houses
- Support column in a log house on stilts
- The difference in the shrinkage of a log house between winter and summer felling
- Dismantling and moving a house made of profiled timber
- Supporting floor beams in a log house
- Preparing a log house for winter
- Guarantees when cutting a log house on a plot
- Chop into a bowl or warm corner
- How to lower the ceiling in a log house
- The timber turned blue in the rain
- Preservation of the log house in a non-temporary gathering place
- Consultations on a timber house
- Sheathing of a house made of cylinders without insulation
- Scheme of a log house with outlets and a ridge roof
- How to lay a carriage while lying down
- Reinforced concrete slab on a log frame
- How to assemble a log house from twisted timber
- Repair of a cut in a log house
- Installation of a log house on a columnar foundation
- The chopped gables of the log house are shaking
- Fastening beams in a log house
- The top beam in the log house was driven into the screw
- How to cover a timber façade
- Waterproofing the frame of an old house from the foundation
- A log house without nails is being pulled apart
- Sheathing a log house
- Cutting the lower crown in the log house
- Settlement of a log house made of used timber
- The log house rotted in the castles
- The corners of the log house are rotting
- How to strengthen a log house
- Work plan for interior finishing of the log house
- Log processing procedure
- How to lay a log house in the rain
- Cut the lower crowns of the log house
- Sheathing a log house immediately after construction
- Heating and windows in a new log house
- Processing the crown of an already built house
- Painting a timber house
- Blind area and shrinkage of the log house
- How to enlarge a house made of timber
- Connecting a timber house with a brick extension
- Finishing a timber frame with jute rope
- Diameter of a log for a permanent home
- Treating the log house with an antiseptic during assembly
- Reconstruction of a wooden house
- Connecting timber in cuttings
- Protection of the ends of the timber at the corners of the log house
- How to connect two log houses together
- Cutting a balcony doorway in a log house
- When to casing a newly assembled log house
- Insulation of gables made of lining
- Gaps between the logs of the log house pediment
- How to preserve logs before cutting a log house
- Raise the frame to increase the ceiling height
- Methods for joining timber in the walls of a log house
- Raise a log house to increase the underground floor
- Cladding a log house with clapboard before shrinking in winter
- When to remove the compensating jacks of a log house
- Log house for three years in the open air without a roof
- How to make a cut in a log house
- Make a house from an old bathhouse (timber)
- Moving the log house to another location
- Log house hanging on dowels
- The fifth wall in a log house made of smaller timber
- Should I paint the backing board in a log house?
- Remove mats to increase log ceilings
- The log house does not match the foundation
- Ceiling mats in the log house
- Construction from fire monitors
- How to remove bark from an already assembled aspen log house
- Transporting an old log house
- Connecting internal timber walls with external ones
- How to repair cracks in a log
- Gap between log and foundation
- Alignment of the first crown of the log house
- Stages of arrangement of the assembled log house
- Treatment of the log house after installation in the summer
- Processing the ends of the frame from the outside
- The log house floated - the walls moved
- An old wooden house sank
- Leveling the crowns when assembling a log house
- How to close the opening between the log house and the foundation
- How to straighten a log house
- Sheathe a log house with protrusions with corrugated sheets
- How to process the ends of a log house
- Collecting the first crowns of a timber frame
- Riser frame
- Preservation of the log house during assembly in rainy times
- Forgot to waterproof the log house from the foundation
- Installation of log shrinkage compensators
- Interventional gaps in a house made of profiled timber
- Gaps between logs in a house
- Communications and finishing in a timber house
- Precision when cutting log houses
- Which log house will be warmer?
- Log house made of timber 200 by 120
- Old log house - reconstruction or demolition
- Partitions in a log house
- Internal partition in a log house
- Beginning of finishing of shrunken timber frame
- Double timber construction technology
- Processing the log house from the outside
- Log shrinkage process
- The walls of the log house collapse during shrinkage
- Insulation of a log house from the inside
- How to build a house from sleepers
- The logs were kicked out of the log house
- Supports (pillars) instead of crosscuts in a 9x10 house
- Do-it-yourself timber log house without experience
- Preservation of a house made of rounded logs for the winter
- Embed additional beams into the frame
- Backing crown - installation tricks
- Log house on brick walls
- Sequence of work in the log house
- How to make a load-bearing partition in a log house
- The log house got wet during assembly
- How to seal cracks in a log house
- Align the vertical wall of a log house
- Vents in timber on foundation
- Timber 200 by 200 construction nuances
- The log house turned blue, what should I do?
- How to seal cracks in cutouts from the outside
- You can live on the second floor of a log house for shrinkage
- Replace rotten logs with mortar
- A non-load-bearing log has shrunk
- Replacing logs with boards in a house project
- Vertical supports in a log house for shrinkage
- Does a large log house need recutting?
- Metal tiles on a non-shrunken log house
- Permissible gaps between timber crowns
- Gaps in log beams
- Replacing parts of rotten logs in a log house
- The logs of the log house are shaking
- The log house was poorly assembled
- The gap between the log log and the foundation
- Protect an unfinished log house for the winter
- How to save a log house without a roof
- Log finishing service
- Assembling a profiled log house in the rain
- Gaps when fastening profiled timber
- Sealing cracks in a bathhouse
- Processing timber with a blowtorch
- Butt beam - is it reliable?
- The wall of the log house is littered
- How to align protruding ends in a built timber house
- Transferring beams in a log house in height
- The corners of the log house disappear from the timber during assembly
- The log house is wet, what should I do?
- Does a log house need a fifth wall?
- How to assemble a log house 10 by 11
- Restoring a log house after a fire
- Processing of a log house made of rounded logs
- Extension of a log house when replacing the roof
- Sand under the crowns for insulation
- Methods for lifting a bath to replace the crowns
- Impregnation of the log house inside and out
- The façade of the log house leaned
- Log shrinkage - problems
- Treatment of timber against bugs
- The smell in the house is from sleepers
- How to preserve the light color of a fresh log house
- Estimate for a house made of timber 7 to 9
- Treatment of exposed ceiling beams
- Strengthening the corner of a log house
- What is the dowel pitch?
- Protection of the lower crown of the log house
- How to check the diagonals of a log house
- Which timber to choose, square or rectangular?
- Spruce and pine log house
- Sequence of work when finishing a timber house
- Insulate an aspen log house from the outside
- How to install a casing on a log house
- What to put between the crowns
- Should I trim the paws of a log house?
- What is the best way to impregnate a log house?
- Window opening in a log house - how to seal it
- Gaps in the assembled frame
- Support pillars in a timber house
- How to move the 5th wall in a log house
- Ants and the lower crown of the house
- Sanding and processing of the log house after installation
- Barked or planed log for log house
- Repairing the corner of a log house of an old wooden house
- Should window openings in a log house be closed when it is in storage?
- Consultation on the size and shape of the log house
- Questions about construction from profiled timber
- Log house and foam block on a single slab
- Preparing an unfinished log house for winter
- Longitudinal cuts in a log house
- Cracks in the ends of logs
- Should I paint a log house with tikuril?
- Strengthening the corners of the log house
- How to secure a cross beam in a log house
- Ventilation gap between insulation and frame
- Moss or tow for building a log house
- Shrinkage of a timber house
- Fifth wall in the log house
- How to raise a 6 by 6 log house
- Distance from the corner of the frame to the windows or doors
- How to cut off the protrusions of the corners of a log house
- Log house without nails
- How to clean a linden bathhouse from darkening
- Impregnation of a log house with fire-bioprotection
- Velo log house
- Questions about cutting a bathhouse after installation
- Painting a log house
- Blackness between the crowns of the log house
- Types of cutting corners of half beams or carriages
- Attaching beam supports to a log wall
- Strengthening logs in a log house 7 meters long
- How to sort through the log gables of a log house
- The beam was squeezed out of the wall
- Is a matitsa needed in a 3 by 3 m bathhouse?
- Priority work after installing the log house
- Entrance door in a log house
- Maintaining the level when assembling the log house
- The corner of the log house and the lower log have rotted
- The sequence of finishing a timber frame
- Insulation of a settled log house
- Restoring a burnt larch frame
- Quality of a 40-year-old oak log
- Permanent roof on a newly assembled log house
- Cracks in logs
- What time of year is it better to cut a log house for a bathhouse?
- What and how to make partitions inside a log house
- Ceiling beams in a timber frame
- Installation of a metal door in a log house
- The crown molding of a log house
- Questions about assembling a log house at home
- Turnkey log house for a season - is it possible?
- Arrangement of the subfloor in a rounded log house
- Common roof for a new log house and its extension
- Ventilation system in the log house underground
- How much does it cost to change the lower crowns of a house?
- Finishing the log house after shrinkage
- Reinforcement as a dowel for a log house
- What to rest the floor joists on in a log house
- Attaching timber to a log frame
- Cover an old house with a new frame
- Extension made of foam blocks to a house made of timber
- Wet lower rims of a new timber frame
- House made of sleepers
- How to cover a log house on screw piles with bricks
- How to strengthen the motherboard in a log house
- Birch log house
- Sauna log - pine or aspen
- The lower crowns of a larch frame as a plinth
- Adjusting anchors for shrinkage of the log house
- How to properly assemble a log house
- Octagonal timber frame
- Is a fifth wall needed in a log house?
- An alternative to dowels when assembling a log house
- Problems after shrinkage of the log house
- What to make partitions from in a log house
- Tongue-and-groove slabs as walls in a log house
- Insulation of the log house inside
- How to strengthen floor joists in a timber frame
- Log houses in Kolomna
- House made of timber or frame house
- Insulation of a log house from the inside
- Work plan after shrinkage of the log house
- Squeezed logs out of the log house
- Where to start after installing a log bathhouse
- Rounded log with Finnish profile
- The timber frame is spreading
- How to align the geometry of a log house
- Large gaps between logs
- Are dowels needed for profiled timber?
- Is it worth overpaying for profiled timber?
- Repairing the corners of a log house
- How to cover an unfinished log house for the winter
- The beam bends out of the log house
- Construction of a log house in the rain
- Processing and insulation of external walls of a log house made of timber
- How far can the outer ends of the logs be trimmed?
- Ceiling beams 7.5 m in a house made of timber
- How to attach a room attached to a house
- Technology for assembling a log house from timber
- Waterproofing log walls outside
- Replacement of the lower crown of an old house
- Interior finishing of the corners of the log house in the paw
- Dry brown rot in log timber
- Shrinkage of timber frame
- Roof on only installed log house
- How to fill the gaps between the log house and the outbuilding
- When to install a log house for a house
- How far can the ends of logs be trimmed?
- When should a log house be treated with impregnation?
- Cutting the end corners of the log house
- Leveling timber in a log house
- Protection of the log frame from the outside
- Replacing log walls with stone
- How to seal the gaps between the foundation and the log house
- How to cover a timber house
- How and with what to seal the gap between the foundation and the log house
- Bark on logs - to remove or not?
- Sandwich panel or log house?
- Preservation of log wood
- How to change the lower crown
- Settlement of a log house made of laminated veneer lumber
- Log house repair
- What kind of foundation is needed for a log house made of 9 by 12 m timber?
- How much timber is needed for a log house 9 by 12 meters
- Foundation for a log house with chopped gables
- When to put a roof on a log house
- How to seal cracks in a timber frame
- Log house on the spring
- Preparing a log house for winter
- Oak backing for the lower crown of the log house
- Log house repair
- Photo of a chopped log house
Construction in Moscow and Moscow region
We work with a guarantee! Wide range of construction services.
Foundation, walls, ceilings, roofing, turnkey! +7 (905) 797-20-34
luxurycomfort.ru
Construction in Moscow and Moscow region
We work with a guarantee! Wide range of construction services.
Foundation, walls, ceilings, roofing, turnkey! +7 (905) 797-20-34
luxurycomfort.ru
Construction in Moscow and Moscow region
We work with a guarantee! Wide range of construction services.
Foundation, walls, ceilings, roofing, turnkey! +7 (905) 797-20-34
luxurycomfort.ru
Log houses and their maintenance
All questions to Semenych about construction
Semenych (author of materials)
Our site is regularly updated with interesting and unique materials and articles on the topics of lumber, building materials and works, the author's opinion and knowledge of a real coven with more than 15 years of experience are provided. There is a section - funny stories of shabashniks. If you would like to receive information about this, subscribe to our website's newsletter. We guarantee that your address will not be shared with third parties.
Apartment renovation in Moscow and Moscow region
We work with a guarantee! Wide range of repair work.
Professional craftsmen. +7 (905) 797-20-34
luxurycomfort.ru
| Country house | Bath |
| For the dacha | Tool |
| Materials | Tales |
| Foundation | Log houses |
| Roofs | Insulation |
| Walls | Siding |
| Floors | Cellars |
| Attics | Doors windows |
| Stairs | Extensions |
| Wells | Toilets |
| Balconies | Loggias |
| Condensate | Flooding |
| Fences | Kennels |
| Sidewalk | Birdhouse |
| Adobe | Carts |
| Garages | Barn |
| Greenhouses | Bath |
| Swing | Brazier |
| Shower |
| Horizontal bar |
Results
The process when you build a log house yourself is not something very complicated. Of course, it is advisable to have at least minimal construction experience. However, even a complete beginner can easily construct such a building.
The main thing is patience, determination, and adherence to the basic rules for building houses made of timber.
If you use high-quality building materials, and also carefully approach the smallest details, then the finished house will turn out not only beautiful and comfortable, but also durable.