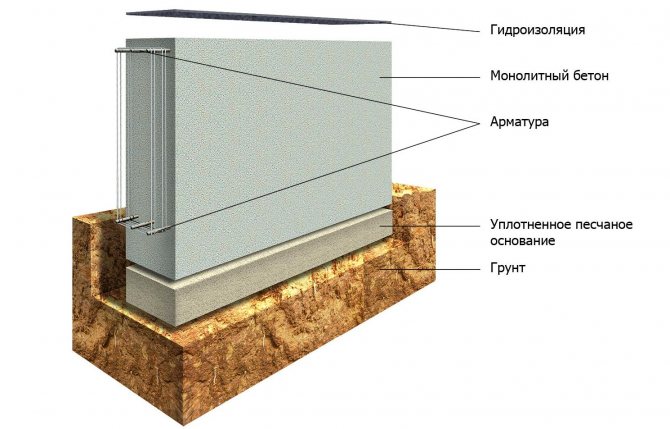
What is a strip foundation is a question that seems easy to answer, but not every builder can formulate it correctly. A strip foundation is a closed loop constructed from reinforced concrete beams that are mounted (poured) under all load-bearing walls of the building.
Depending on the size of the beams and the depth of their placement in the ground, the strength of the structure and its load-bearing capacity are determined. Therefore, it is very important to calculate the foundation for all indicators at the stage of project creation.
Types of strip foundation
The device of a strip foundation is classified according to several indicators. By depth level:
- A recessed strip foundation is when a trench for a structure is dug below the freezing level of the soil by 30-50 cm.
- Shallow (MSLF) - this is when the depth of the trench is only 20-50 cm.
- Non-buried is a foundation for a house laid on the surface of the ground without digging trenches.
For obvious reasons, the buried option is more difficult to carry out the work and will be more expensive than the others. But it is it that is most often used in private housing construction. It is more reliable and can be used on almost any type of soil.
By type of structure:
- Monolithic is when concrete is poured into the installed formwork.
- A prefabricated strip foundation is a structure assembled from prefabricated reinforced concrete products, specially manufactured in factories for foundations. Their installation requires the presence of heavy equipment at the construction site, which increases the cost of installation work.
Rules for the construction of strip foundations
It is recommended to construct a strip foundation on dense, dry soils with deep groundwater and a shallow level of soil freezing. It is advisable to equip such a foundation for the construction of houses of not very large area, in which a basement or basement can be installed.
Before deciding to build a monolithic strip, you need to know these rules:
- if the groundwater level (GWL) is high, then a tape of normal depth should be erected - that is, below the depth of soil freezing (see table below), approximately 20 cm.
- with a low groundwater level, non-heaving and stable soil, and a small house (no more than 2 floors), a shallowly buried tape is acceptable - a depth of about 50 cm. If the house is light and the soil is rocky, less depth is possible, but it’s better not to risk it, or if you want save money, consult a specialist.
- in unstable, heaving soils (clayey, peat, etc., which absorb a lot of moisture and when frozen, increase in volume, pushing the foundation), prone to subsidence, with a significant slope of the terrain, it is better to give preference to a monolithic slab or columnar foundation.
- and also - if you have doubts about the MZFL - fill in the tape with normal depth, and you will sleep peacefully. After all, an incorrectly designed foundation can lead to consequences as a result of which all the work will go to waste, and it is especially sad when the negative impact of a collapsing foundation appears after the construction of the frame of the house.
It should also be remembered that an ideal foundation does not exist, there is only a foundation that is most structurally suitable for the specific conditions of the house and site . Read more about choosing a foundation for your home and the types here.
Note - to determine the groundwater level, you should dig a hole or well 2 meters deep, and cover it and observe it in the wet season - if there is water in it, then the groundwater level is high.
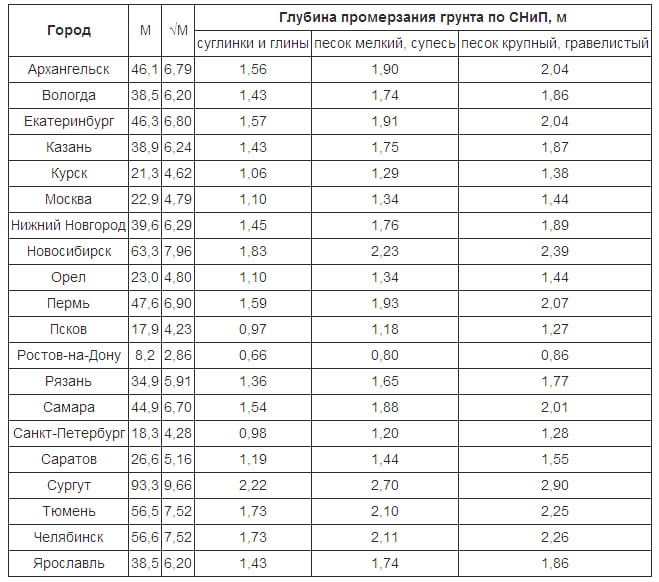
Table of soil freezing depth in Russia, SNIP
Advantages and disadvantages
It’s not for nothing that strip foundations (monolithic) are so popular among private developers because:
- withstands enormous loads;
- easy to construct, which makes it possible to carry out all construction operations with your own hands;
- it has a huge operational resource;
- it is possible to choose according to the construction conditions from the presented classification list;
- the tape is not inferior in its reliability to the slab version;
- it is several times cheaper than a stove;
- It is possible to insulate floors by laying several layers of insulation between the beams.
And disadvantages:
- Not on all soils a monolithic reinforced concrete strip foundation can be poured.
- If a large house is being built, then a large volume of concrete will have to be poured under it, which cannot be produced on a construction site in one day. And it must be poured in one day, so you will have to buy a ready-made solution, which costs more than if you make it yourself.
- A large amount of preparatory work for a strip foundation, especially earthen ones. You will have to dig a deep trench, which may take several days. If you use the services of an excavator, the work will go faster, but you will have to pay for the equipment used.
Construction technology
The technology for constructing a strip foundation involves several stages of various works. This primarily concerns housing, civil and industrial construction.
It cannot be said that these works can be neglected during individual development. But the small volume and minor loads make it possible to minimize risks when constructing foundations.
Preparatory stage
Having in hand a document confirming the right to a land plot, you need to conduct geological and geodetic surveys. Their results will form the basis for a feasibility study of the project, which will ensure full consideration of the influence of strength and deformation characteristics of soils. These values will depend on:
- choice of base type;
- depth;
- foundation design and dimensions;
- the material from which the foundation will be made;
- measures to reduce the possible influence of soil deformations.
When designing, local construction conditions are always taken into account.
Calculation
Having received the geological basis and designed the structure, you can begin to calculate the foundation. This is a rather troublesome task using theories for calculating foundation settlement and linear deformable layer methods. These loads consist of the vertical pressure of the supporting structures, the overturning moment and the shear force of the soil.
Marking
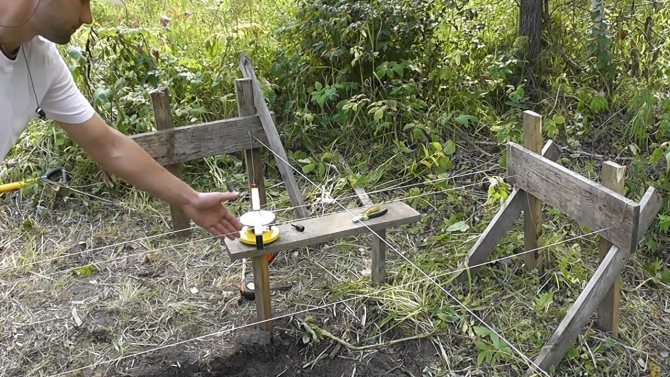
Marking the foundation
After all the calculations and preparation of drawings, a technological map is drawn up with instructions and a description of all construction work. Now you can go out into the area.
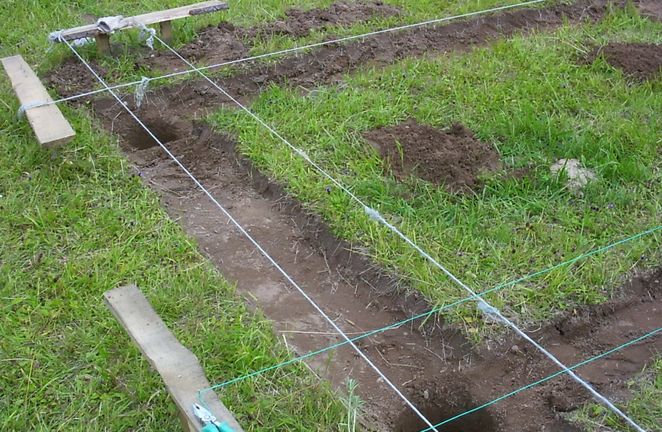
On the site, according to the plan, the perimeter of the building is marked. Usually it is taken with an adjustment of 1-2 m on each side (for adjustment and wear-out). Next, the fertile layer of soil is removed from the marked area. The site is leveled, and they begin to mark the foundation.
The long side, the base side, is selected, wooden blocks or scraps of reinforcement are driven in, and the cord is pulled. The stakes are not driven in at the actual corner of the building, but outside the perimeter at a distance of one meter. Then the cord is pulled on the perpendicular side, forming the first angle (strictly 90 degrees), establishing the overall axes.
On the base side, the width of the base is measured and the third cord is pulled. This way the entire perimeter is gradually marked out, establishing the configuration of the foundation. On all stakes, the zero level (ground surface) is marked using a water level or theodolite. After this, you need to align the angles, that is, the diagonals must be the same.
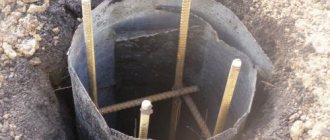
Excavation
![]()
Digging a trench
Digging a trench is done manually or using machinery. First you need to dig along the marking cords (mark the width), then the cords are removed.
Usually there are two people digging, but it doesn’t matter, the main thing is to dig a trench to a given depth along the entire perimeter of the future base of the strip foundation. This is one of the most important moments in the construction of a future home.
Important! If you plan to install formwork, then you need to dig a trench wider by double the thickness of the formwork panel.
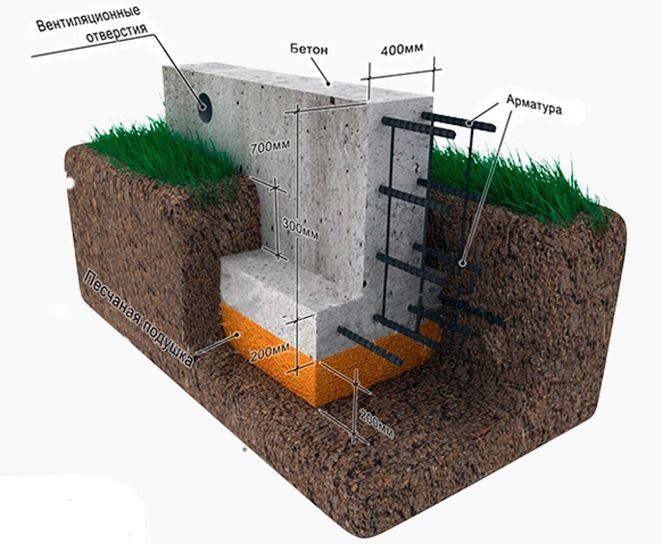
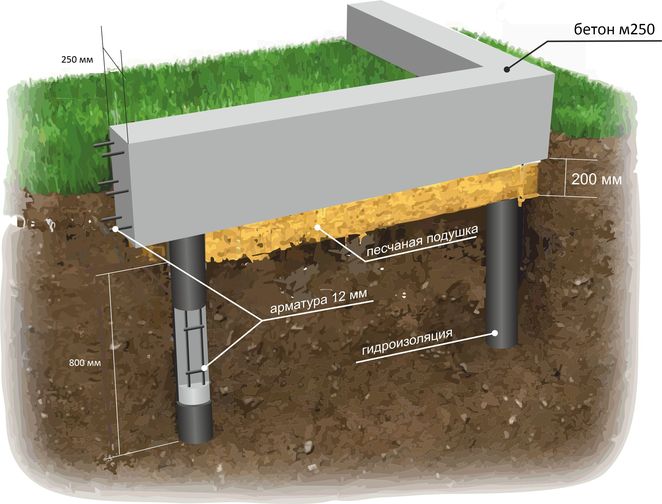
The bottom of the trench (base) must be compacted and a “cushion” is prepared. It can be made of broken brick, fine gravel, sand separately or in a mixture up to 20 cm in height. The sand must be watered and compacted.
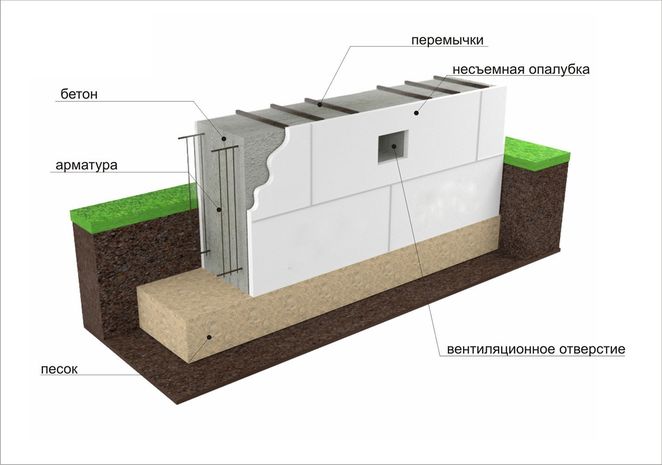
Installation of formwork
It will depend on the type of material and type of soil whether to install formwork or not. Formless work is typical for rubble, rubble concrete and brick foundations. Suitable soils are rocky, compacted and sandy. In the video you will see how to properly install foundation formwork.
Sometimes the formwork is prepared only for the base part. In this case, the underground part of the foundation is laid, then the above-ground part. By the time of pouring to the zero level, the formwork panels should already be knocked down, and if reinforcement is planned, then the reinforcement frame should be welded.
The formwork is leveled, the diagonals are measured, and the panels are secured with wooden braces. It is advisable to slightly press the bottom board into the fresh solution, and sprinkle the bottom with earth on the outside.
Another procedure, which takes longer, is also possible. After pouring the underground part, you need to wait two days until the concrete “sets.” A reinforcement frame is made and installed around the entire perimeter, and then the formwork is placed and secured.
For the installation of communications and vents, there must be holes in the formwork into which pieces of pipes are inserted.
Stages of strip foundation construction
Before making a strip foundation, you need to plan all the work and break it down into stages. The first stage is preparatory. What does it include:
- marking the structure on the ground;
- trench digging;
- preparation of trenches with backfill;
- installation of formwork;
- installation of a reinforcing frame.
Marking
The most crucial moment in the construction of a recessed strip foundation is the precise marking of the structure on the construction site. If the plot and the house are large, then it is very difficult to apply accurate markings yourself. There is a high probability that it will be applied incorrectly. Therefore, invite a specialist with a laser level who will mark the axes of the beams on the ground with reference to the boundaries of the site.
- Drive wedges along the axes and tie them with twine.
- Set aside half the thickness of the strip foundation from the axis in two directions. For example, if the thickness of the tape according to the project is 50 cm, then 25 cm should be set aside from the axis in each direction.
- Drive stakes along each side of the axle and tie them with twine as well. After this, you can remove the pegs and strings that define the axes. A foundation diagram for a private house is formed on the ground.
- Trenches are dug taking into account the depth of the foundation structure. The walls of the trenches are aligned vertically as much as possible.
- The bottom is covered with sand in a layer of 20-30 cm, which is well compacted. It is recommended to water it with water.
Formwork
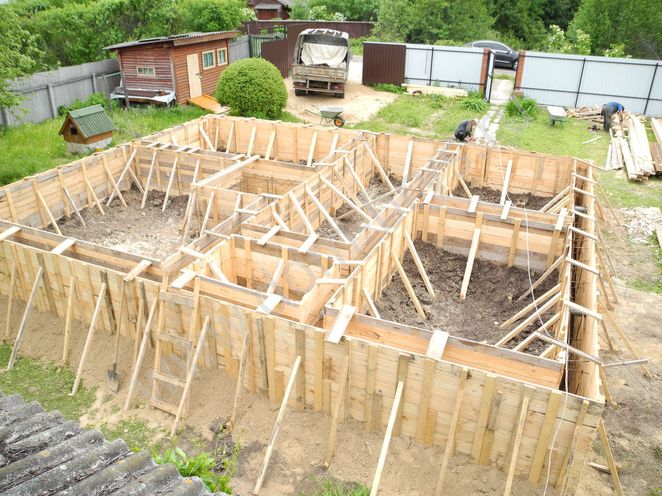
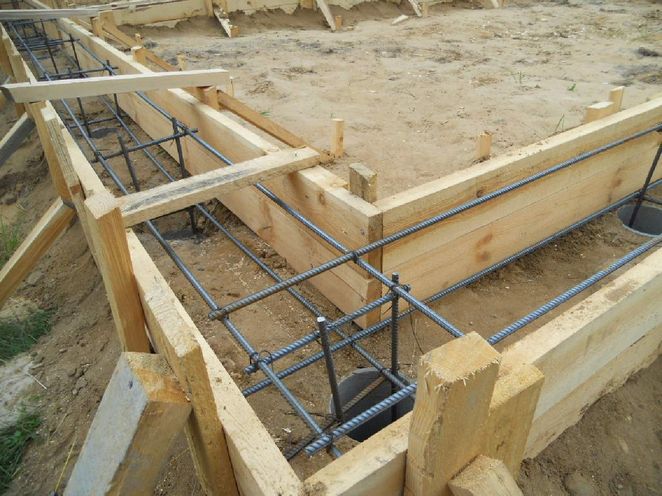
The formwork is being assembled. Depending on the type of soil on the site, the formwork is selected to cover the entire height of the foundation or only for the basement part. If the soil is strong, then the second option is used, if it is loose, then the first. The formwork itself is assembled from flat materials: boards, plywood, OSB boards, corrugated sheets, metal sheets, slate, etc. The main requirement for it is the strength of the structure, which must withstand the pressure of concrete.
Reinforced frame
Now, as for the reinforcing frame. You can make it yourself or order it. The project calculates the dimensions of the frame and what reinforcement it should be made of. Therefore, making it yourself is not a problem, the main thing is to choose how to fasten its elements. This is electric welding or wire. It is recommended to knit the reinforcement.
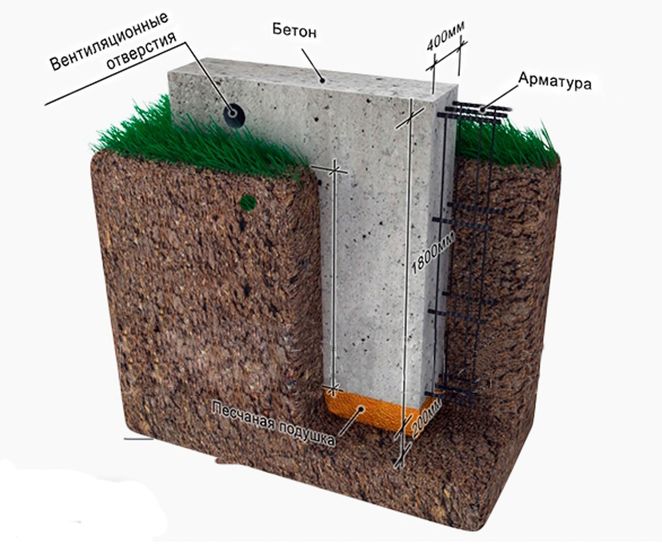
Pay attention to how to properly install the frame in the formwork and trench. It should not be installed on a pillow, but on stands. Because according to the canons of construction, the frame must be located in the body of the foundation. Solid bricks, concrete blocks or specially made slingshots made of metal profiles (reinforcement, corners) are used as supports.
Calculations
Everything is ready, you can proceed to pouring the strip foundation. But before this, you need to decide on two questions: what brand of concrete is used in the construction of a strip structure, and how to calculate the amount of concrete for the foundation.
Everything is simple here. The grade of concrete for the strip foundation of a private house should not be less than M400. Therefore, when mixing the mortar on a construction site, use the following ratio:
- 1 volume of cement grade M400;
- 2 volumes of sand;
- 3 volumes of crushed stone of small or medium fraction;
- 0.4 volume of water.
As for calculating the amount of solution, to do this it is necessary to determine the volume of the structure itself. In cross-section it is a rectangle with sides - width and height. Multiplying them together, we obtain the cross-sectional area of the tape. Now you need to measure the length of the entire contour with all internal sections.
The total length is multiplied by the calculated cross-section value. This is the volume of concrete mass for the strip foundation. Serious construction portals offer calculators with which you can calculate the volume.
Pouring the foundation
The technology for constructing a strip foundation is based on the construction of a reinforced concrete structure, where the main component is concrete. It is necessary not only to make it correctly and decide what grade of concrete is needed for the strip foundation, but also to carry out the pouring correctly.
- It must be poured continuously, but if time is required to mix the solution, then the time between pours should not be more than 4 hours.
- The concrete solution is evenly distributed throughout the foundation structure. Each poured volume is subjected to vibration, the main purpose of which is to remove air from the concrete mass. Because the air remaining in the mixture is after the concrete has hardened, shells and pores that reduce the strength of the stone. The second purpose of vibration is to compact the solution.
After pouring, the surface of the tape is covered with burlap or plastic film. You can choose any one. Now to the question of how long the foundation should stand. To gain its brand strength, the foundation needs to stand for 28 days. 7 days after pouring, the formwork can be removed.
Here is a not-so-simple step-by-step instruction for building a strip foundation with your own hands.
Monolithic tape construction technology
Laying a strip foundation begins with choosing a construction site. To do this, they study the features of the territory, identify differences in soil levels, and clean out uneven areas. When marking the foundation, use a level, theodolite or laser level.
In short, the process of marking the site for the foundation looks like this - having decided on the location of the house (do not forget that the distance from the border of your future house to the border of the neighboring plot should be at least three meters), outline the perimeter of the future foundation, carefully measure right angles using a protractor. In the corners, stakes or reinforcement are driven into the ground, twine or fishing line is pulled between them. The foundation is placed 15 cm wider than the walls of the house, taking into account the thickness of the formwork. The width of the foundation is about 40 cm. But in general, the width is calculated from the bearing capacity of the soil and the weight of the house (by the way, all the parameters of the foundation can be calculated using the calculator below). Next, measure out the required width and make markings inside the perimeter of the base.
The process and nuances of marking foundations are described in more detail in this article.
The depth of the foundation depends on the height of the house, the weight of building materials, soil characteristics and climatic factors. The minimum depth for laying a strip foundation is 40 cm (see also the rules above), the minimum height of the foundation (base protruding above the ground) is 30-35 cm.
They start digging a trench from the corner, make the walls vertical, and use a plumb line for leveling. The bottom of the dug trench is carefully leveled and compacted. Pour crushed stone in a layer of approximately 15-20 cm. and compacted. Then pour a layer of sand no less than 15 cm and no more than 25 cm, level it, water it and compact it well with a vibrating rammer; manually is not recommended. The result will be a cushion to soften future loads on the foundation. A thick layer of sand is not recommended due to the fact that it can play a cruel joke especially with MSFL (with a tape of normal depth it is not scary), since it is capable of absorbing water, and in the event of freezing, a heaving force may occur pushing the foundation, which can lead to it will crack.
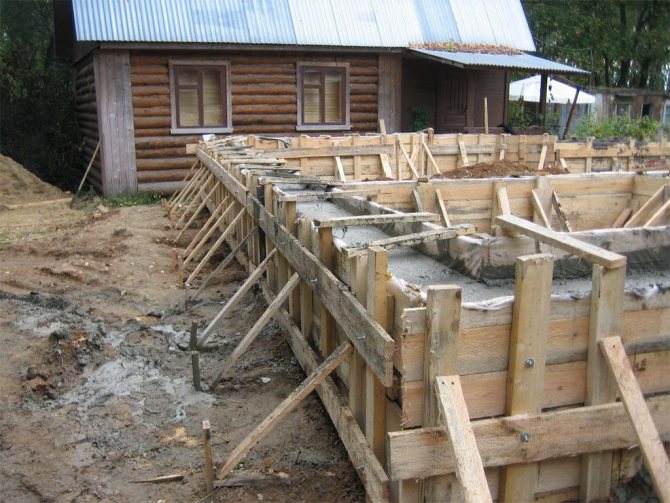
Formwork
Having prepared the trench, the formwork is assembled. Before this, the correctness of the diagonals and angles of the foundation is additionally checked. For formwork, they use boards or other available materials that are not afraid of moisture and are strong enough - we must not forget that concrete is quite heavy , and many novice builders are faced with the fact that their formwork falls apart when pouring. When assembling the formwork, nails are driven in from the inside and bent from the outside. At the same time, the inner surface of the foundation will remain flat, and the formwork will be convenient to disassemble.
Formwork assembly
Note: using the calculator below you can calculate the number of boards (volume of lumber) for formwork.
To ensure stability and avoid destruction when pouring concrete from the outside, the formwork is strengthened with supports and its opposite sides are connected to each other. The height of the formwork should be higher than the level of the foundation poured with concrete. Although some masters do it in one level, arguing that it is more convenient for them to level it - here, as they say, it comes down to taste and color, and both options are technologically acceptable.
Note: the foundation can be built using permanent polystyrene foam formwork, which is much easier, especially for a novice builder.
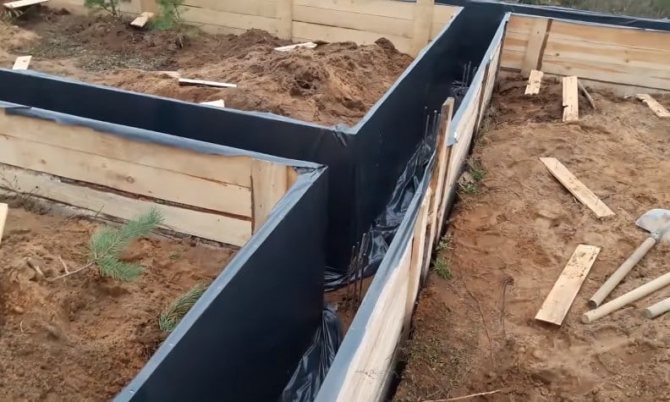
To prevent moisture coming from the ground from destroying the foundation and walls of the house, waterproofing is done by lining the walls and the bottom of the trench with waterproofing material, and after the formwork is removed and the concrete has completely hardened (minimum 40 days), the protruding part (basement) is coated with waterproofing material. bitumen mastic - this must be done so that the foundation does not lose its strength - concrete absorbs moisture, and it freezes in the pores and expands, slowly but surely deteriorating the strength characteristics of concrete.
Read about what concrete is needed for a foundation here.
In this video, the builder decided to act somewhat unconventionally - first he made the formwork, and then dug a trench with a shovel, and it turned out very well:
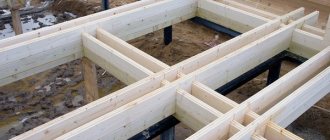
Reinforcement
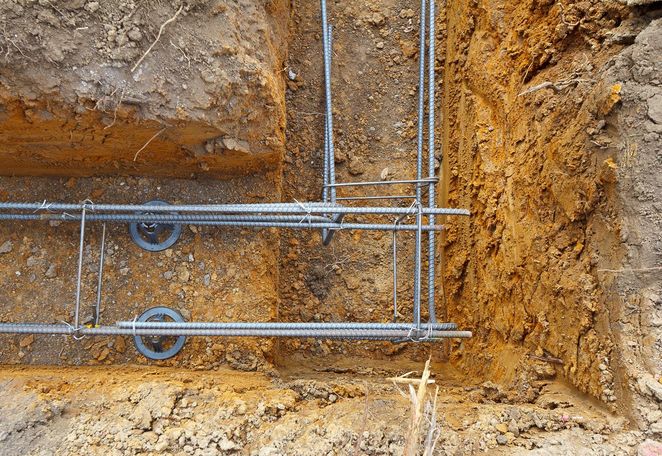
To give the foundation strength and rigidity, reinforcement is made using metal rods with a diameter of 10 mm and steel wire for knitting. A mesh of reinforcement bound with wire will provide flexibility to the foundation and protect it from destruction. The reinforcement is measured, cut into pieces and laid at the bottom of the trench.
Note: today many people have begun to use fiberglass reinforcement for foundation reinforcement. This is new material here in Russia, and there is a lot of controversy about it. Our opinion is that it is better not to use it in a monolithic strip, but in a monolithic slab - please.
When laying a deep foundation, vertical rods are driven into the bottom of the trench. In the lower part of the trench, the reinforcement is strengthened, bricks or other pads are placed so that it does not come into contact with the cushion. In order for the metal structure to be completely filled with concrete, it is also placed at some distance from the walls of the trench. The reinforcement cage should also be 5 cm lower from the top of the pour. Reinforcement is an important stage in the construction of a strip foundation; maximum attention should be given to it.
Many people ask the question: “is it possible to do without reinforcement ?” With a shallow foundation, the answer is absolutely not. Moreover, the reinforcement must be of high quality (correct cross-section of reinforcement, bends at corners, etc.). But in the case of a fully buried belt, it is possible to do it without reinforcement, in the case of relatively stable soils and if this is not a seismic zone.
Reinforcement and vents in tape formwork
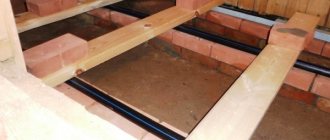
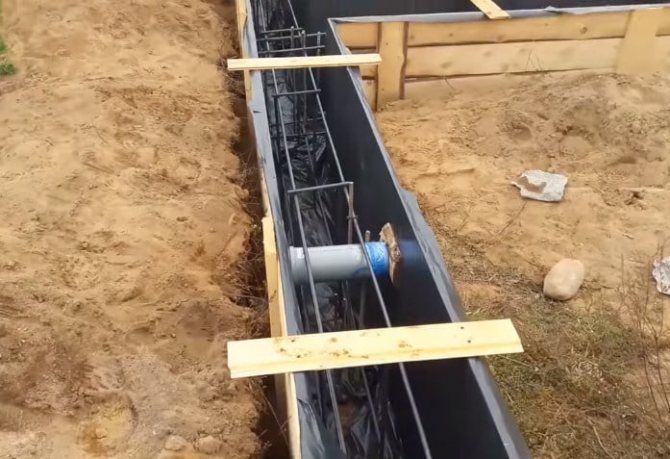
Communications
Having finished the reinforcement, they begin laying ventilation (vents) if the floors are wooden. To do this, use pieces of plastic pipes filled with sand tied to reinforcing bars. If the GWL is low, then you can do without vents; often they are even harmful and have little benefit, especially if their overall diameter is insufficient. You just need to thoroughly waterproof the soil from the wooden floor joists. Or make vertical ventilation of the floor - i.e. with the ventilation pipe leading to the roof - this will even be more efficient. In general, the topic of “to be or not to be a product” is quite hotly discussed on authoritative construction forums, and there are many opinions.
Communication openings are prepared in the same way as vents, immersing the pipes below the foundation level.
Pouring concrete
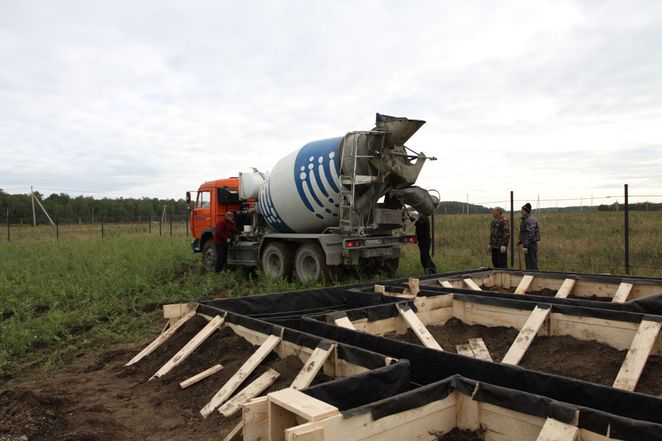
It is better to pour industrially produced concrete, the so-called ready-mixed concrete, into the formwork. Its brand must be at least M250. Poured simultaneously along the entire perimeter, the concrete will be evenly distributed in the formwork, which will make it possible to avoid the formation of cold joints that occur during manual pouring using a concrete mixer. And besides, manual pouring of concrete is a very labor-intensive process. Even pouring from a mixer is not easy, and requires at least two people (in addition to the driver) - the concrete itself will not spread over the entire area of the belt, and you need to shovel it, distribute it in buckets, and act quickly - concrete does not tolerate slowness. Pouring concrete is the most important stage; this is the day of “big concrete” as builders say. Also make sure that the concrete is not too liquid, as its strength becomes worse. At the same time, it should not be very thick, and to make it spread more easily, plasticizers are added to it.
Pouring ready-mixed concrete into tape formwork from a mixer tray
But for those who want to save money and mix it themselves (although the savings here are questionable), then for 1 part of M400 cement add 3 parts of sand, 5 parts of crushed stone and 50% water, based on the weight of the cement. When mixing the solution, make sure that no foreign substances get into it, as their presence can weaken the foundation. If work is carried out in cold weather, special additives and warm water are added to the solution. In summer, concrete is mixed in cold water.
Concrete is poured to a predetermined level, compacted with a construction vibrator, leveled and sprinkled with cement to speed up hardening.
You can disassemble the formwork after 3-4 days - at this time it can be easily removed, but you need to be careful when detaching the boards, the concrete has not yet gained all its strength during this time.
Before the strip foundation is completely matured, it is covered and left for a month, periodically moistening it in hot weather.
Foundation on a slope

Building a house on a slope using a strip structure is one of the options. True, a strip foundation on a slope is a rather complex structure that requires an increased amount of concrete mortar. But the most important thing is to dig the trenches correctly. On the high part of the site, a large amount of excavation work is carried out, because the foundation is deepened relative to the lowest point of the location. It is from this that the calculation of the depth of placement comes.
For example, if the difference between the ends of the foundation structure in height is half a meter, and the laying depth is 1.5 m, then on the high part of the slope you will have to dig trenches 2 m deep. It must be understood that in the lower part of the structure you will have to install formwork of greater height, and more specifically, half a meter in the lower edge.
The formwork will be beveled, so first of all the height of the tape is set, and then the dimensions of the panels are adjusted to it. This is about the question of how to properly make formwork for a foundation on a slope.
Let us add that if the formwork is installed only on the basement part, then at the highest section in height it will be small, or may be absent altogether. It all depends on the design of the foundation. For example, with the same difference of half a meter. If in the lower part of the slope the formwork for the plinth is 50 cm high, then there is no need to install it in the upper part.
Before pouring concrete, it is necessary to carry out all the preparatory operations that are required for a structure of this type. Regarding the question of what concrete to use for a strip foundation built on a slope, we choose M400. As in the previous case, the solution must stand for 28 days.
Often, a strip-grillage foundation is constructed on slopes. Grillage - what is it? This is still the same tape, only installed on poles. It is more difficult to calculate a strip foundation on piles, because support posts are added to the strip.
And the construction process itself becomes more complicated, because the load-bearing capacity of the piles will have to be taken into account, that is, it is necessary to accurately determine the laying depth and diameter of each columnar element. Be sure to lay a reinforcing frame in the pillars, and time is allocated for the foundation to settle for 28 days.
Features of strip foundation
Foundation translated from Latin means foundation, foundation. In construction, this is the supporting structure, the underground (sometimes underwater) part of the building.
Description
Strip foundation design
There are five foundation designs, strip foundation being one of them. It is a stone (or reinforced concrete) frame of a certain shape under the load-bearing walls of the building. The stones used are rubble, rubble concrete, and brick. Reinforced concrete strip foundations can be prefabricated or monolithic.
In addition, there are differences in the depth level of the strip foundation: shallow or deep.
The distinctive features of a strip foundation are its versatility and construction technology, which is much simpler than other types, but more material- and labor-intensive. In terms of versatility, it is suitable for all types of soil and for any load-bearing parts of buildings.
And it is indispensable in such cases:
- for houses with increased material density (brick, stone, concrete);
- if there is a threat of uneven soil shrinkage;
- for buildings with a ground floor or basement.
Materials used
Rubble blocks
Depending on the material used in laying the strip foundation, they come in the following types:
- Rubble. A relatively inexpensive and fast way to lay the foundation. Rubble stones are used, which are filled with a very liquid cement-sand mortar. You can do stone masonry, but this requires qualifications. Suitable for compacted and sandy soils as there is no need for formwork.
- Rubble concrete. The strength is on par with rubble. It is made of concrete and rubble stone in approximately equal parts. The rubble is loaded into concrete as the trench is filled. Formwork is required for the basement part.
- Concrete. Pure concrete foundation made of small and medium crushed stone (gravel). It is poured into the formwork and must be compacted, preferably with a vibrator. Very costly: firstly, the formwork is placed around the entire perimeter and to the entire height of the foundation, and secondly, there is a large consumption of cement.
- Brick. It is an ordinary brickwork made of ceramic bricks. It is quite acceptable for shallow foundations on non-heaving soils with a width of two bricks (51 cm).
- Reinforced concrete monolithic. In other words, a reinforced concrete foundation. The technology is the same, but with a frame made of reinforcement. Very durable and independent of soil types, but also the most expensive.
- Prefabricated reinforced concrete. It is erected from wall concrete blocks (FBS) using a crane. Mainly used for buildings with a basement. In this case, it will be more expensive than a monolithic one.