- Preliminary calculations
- Main pros and cons
- How to make it yourself
- Preparing the template
- Construction technology
- How to strengthen
- How to sheathe with imitation timber
- How to sheathe correctly
The pediment completes the façade of the building and serves as the wall part of the attic. The comfort of the temperature in it depends to a large extent on this element, therefore the construction of the gable is considered an important phase in the process of constructing a roof.
When constructing wooden houses, gables are usually built from timber or boards. Although due to high thermal conductivity, the latter are much less in demand. Panel elements are often even replaced with timber ones.
The timber pediment is installed after first performing all the necessary calculations, for example, the amount of material required, etc.
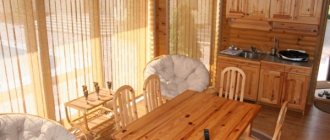
Bath equipment:
- The log house of the bathhouse is five walls. The partition (fifth wall) is made of a solid log, cut into place with a 45-degree cut - during the manufacture of a log house in production.
- Cutting corners into a bowl, grooves in logs in a semicircle (moon groove).
- The logs are processed with a scraper.
- The average log diameter is 24 cm.
- Floor joists and ceiling beams are made of logs (half-carriage).
- Gable roof with a ridge height of 1.7 - 2 m (depending on the size of the bathhouse).
- The rafter system is a log.
- Roof sheathing - 25 mm edged board.
- Temporary roofing - roofing felt.
- The gables are made from logs. Average diameter 22-24 cm.
- Clear height from floor to ceiling 2.10 m (can be increased).
- Inter-crown insulation - moss or tow, nails.
- Columnar foundation made of blocks 20x20x40 cm (except for sizes 5x6, 6x6 m).
- Dimensions of the log house along the axes.
- Delivery from Moscow (MKD) and St. Petersburg (KAD) is free up to 100 km, then 50 RUR/km.
How to make it yourself ↑
Preparing the template ↑
- A sketch of a house does not give a complete idea of the nuances of the future design, so professionals recommend first making a life-size gable wall template. It is made from edged boards of appropriate length. They can subsequently be used in other areas.
- A contour is laid out on a flat surface from different boards. To do this, mark the center of the board, corresponding in length to the width of the wall, and drive a peg at a distance equal to the height of the gable wall. The top point of the structure is connected to the end of the wall with boards.
- The appearance of the resulting figure is assessed from the outside and, if necessary, adjusted by moving the boards and their upper joint.
- Once the desired shape, proportions and design parameters have been obtained, the elements are measured and the base material is cut in accordance with the obtained values.
- If the presence of a window is assumed, then the window opening is also laid out on a layout made of boards.
Construction technology ↑
Let's dwell on one of the options, which many masters consider optimal.
- Construction work is carried out on the ceiling of the upper floor.
- The structure is assembled according to the template. The post beam is laid. The pitch is selected based on the configuration and dimensions of the structure. Usually it is about 0.5–0.6 m. If there is a window, its opening is also assembled.
- Finish the outer part. Everything is ready to go.
- The structure is moved to the installation site and the bottom is fixed to prevent it from moving.
- After lifting, the verticality is checked and the structure is finally secured to the ceiling. The upper part is fixed using braces.
This option is good because it eliminates the need to install scaffolding. However, if the gable wall, together with the final finishing on the outside, turns out to be too heavy, you can mount only the skeleton of the pediment (the template will tell you which timber to assemble it from), and you will have to sew it up with scaffolding.
The strength of the pediment directly depends on its height and width. Obviously, a thin, tall structure is less durable, so it needs additional strengthening.
How to strengthen ↑
We offer you three different options:
- Dividing wall. It should run at right angles to the gable wall. In order for it to provide optimal rigidity to the system, its thickness should not be less than 24 cm. It is important to note that solutions such as a plasterboard wall or a partition wall are not suitable for these purposes.
- Columns and pilasters. In this way, you can firmly and efficiently close the false cornice, which, of course, will extend the service life of the structure. However, this method is not very popular, since many difficulties have to be overcome in the process, and they somewhat spoil the design of the house.
- Reinforced concrete frame. This option is great for small homes. A frame with a cross-section of 25 cm is reinforced with four rods with a diameter of 1 cm. However, it is not recommended to use this method for building houses in areas with high wind intensity.
price for a bath set with delivery and assembly
| size | 4x3 | 5x3 | 5x3.5 | 6x3 | 4x4 | 5x4 | 6x4 | 5x5 | 6x5 | 6x6 |
| cost - t.r. | 191 | 198 | 231 | 234 | 214 | 248 | 276 | 301 | 344 | 394 |
You can complete the bathhouse with:
- The board on the floor is tongue and groove. 36mm thick, yes. humidity, price 500 rub. sq.m of floor area.
- The board on the floor is tongue and groove. 46mm thick, yes. humidity/dry, price 650/750 rub. sq.m of floor area.
- Lining for the ceiling - 22mm thick, available. humidity/dry, price 280/330 rub. sq.m of ceiling area.
- Double window without glass 50x50cm - 1200 rub. PC. (chamber drying).
- Door with frame 175x75cm without fittings - RUB 3,000 pcs. (chamber drying).
- Board for the subfloor - edged, 25mm thick, grade 2, available. humidity, price 180 rubles per sq.m. per floor.
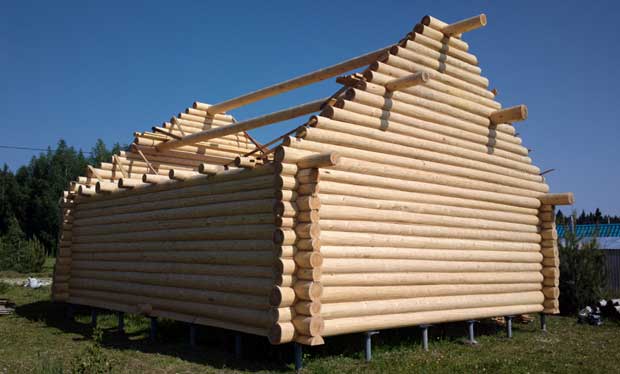
Features of the cabin
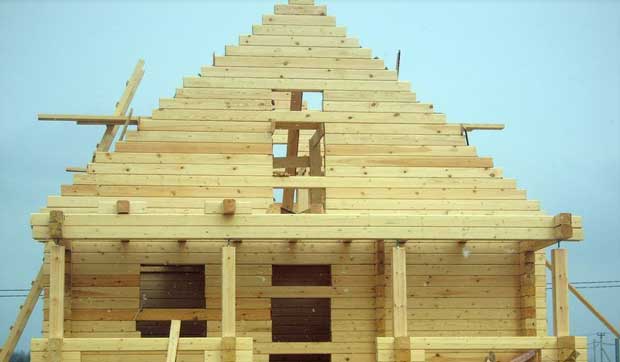
The installation of chopped facades is a complex construction task, especially if it is associated with the construction of a slab rafter system. There is no doubt that a log façade, kone and sleg with a stand look impressive and organic, however, the original Russian aesthetics require additional costs for purchasing wood and hiring experienced craftsmen to carry out the felling. The quality of assembly of the log house determines whether it will withstand winter frosts, as well as how long the house will last, so it is important to find professional carpenters whose knowledge and experience are sufficient for this task. When cutting male gables, the following features of this design are taken into account:
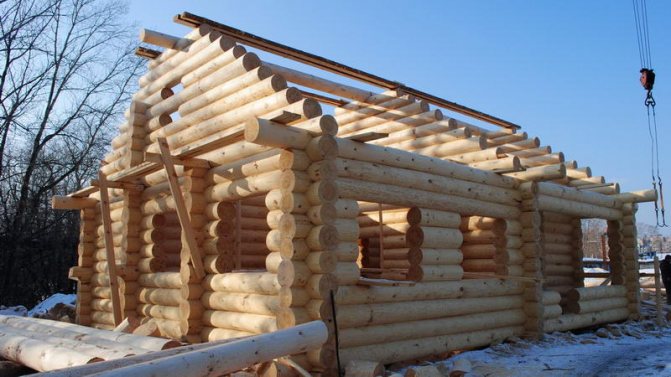
- The higher the gable wall of the house, the greater the shrinkage will be during 1 year of operation of the house. Therefore, it is better to leave tall two-story log houses to shrink for 1-1.5 years so that it takes on its final dimensions, and then proceed with the construction of the roof and interior decoration.
- Due to the triangular shape of the male pediment, the shrinkage of this part of the wall occurs unevenly. The shorter top males settle down and change in size more than the bottom ones. This shrinkage pattern leads to a change in the geometry of the roof and destruction of the contraction if the fastening was carried out without compensation elements.
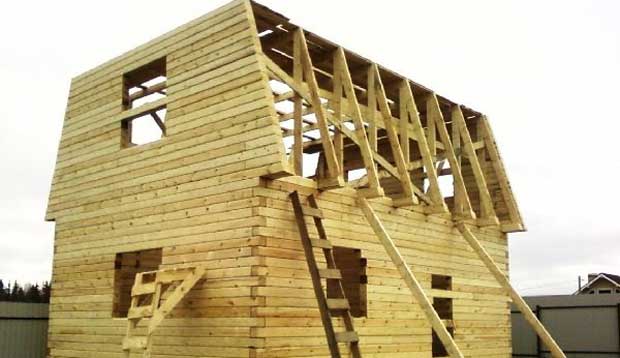
- If a standard rafter frame design is used to build a roof, in which the slopes rest on the gable walls, during the shrinkage of the males, the upper crowns of the frame may fall out. To prevent this situation, the rafters are attached using metal brackets or special slider fastenings.
- To compensate for the shrinkage of the rafters when rigidly fixed to the walls, the ridge connections are made with a small gap. Since when the wood dries, the rafter legs cannot go down, they rise and then close in the area of the ridge.
- If the roof of the log house is of the attic type, then you will have to abandon the installation of male gables, because the broken structure of the rafter system cannot be mounted on sliding fasteners. Since the roof, rigidly attached to the males, can become deformed when the log house shrinks, it is better to sew up the pediment using a frame structure.
Log house with male gables
Male cutting
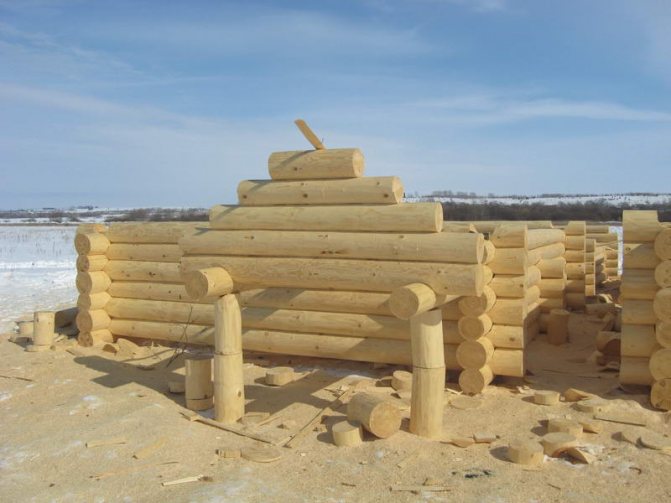
House made of timber
Professional craftsmen claim that the cost of constructing chopped gables pays for itself if the log house is used constantly and is heated. The excellent thermal insulation qualities of the logs help reduce the cost of heating the attic, and the attractive appearance allows for interior decoration.
Requirements for customers:
- Arriving at the site, at the construction site. If there is no check-in, moving the log house is free up to 15 m from the vehicle, then 300 rubles/each meter for moving the entire set of the log house.
- Coarse or medium sand for making a sand cushion under the foundation.
- Housing for a team of 3 - 4 people for the duration of assembly (3 - 5 days).
- If you don’t have housing, you can pay an additional 8-10 thousand rubles. for the entire assembly period. (depending on the size of the bath).
Go to log cabin catalog All prices for baths
Facing the pediment with a block house in detail
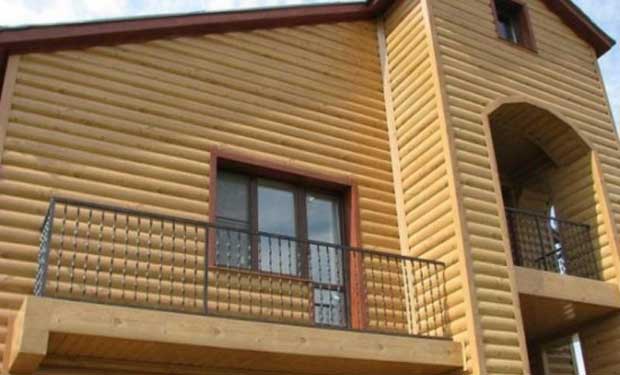
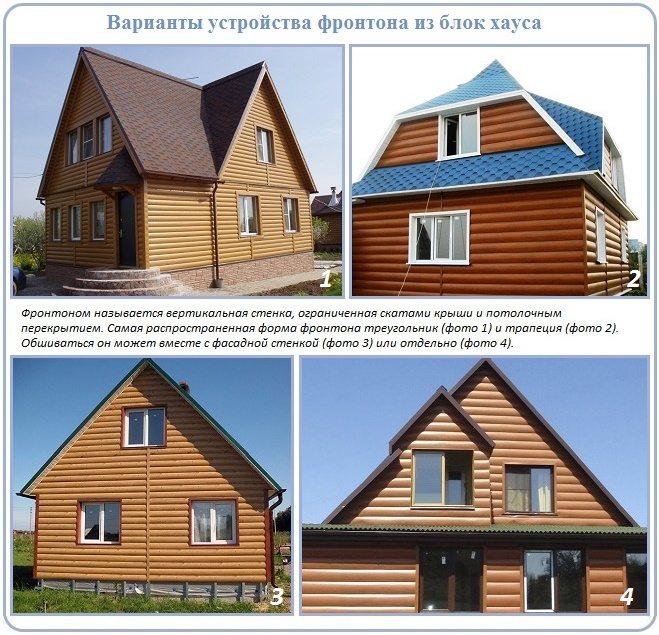
The pediment is the upper part of the vertical wall, limited by the roof slopes and the ceiling. Most often it has the shape of a triangle or trapezoid, is a continuation of the supporting structure or an independent wall erected above the ceiling. In the latter case, it is sheathed separately and equipped with a pediment along the lower border.
The process of finishing the gables with a block house is similar to the steps for cladding a regular rectangular wall. The difference is that the material must be fixed on surfaces that slope upward. In addition, there is a difference in the methods of installation and fastening of wooden, metal, and vinyl elements.
A thrifty owner interested in a positive result needs information about proper cladding of panels for logs. The information will be useful, regardless of whether the finishing is done with your own hands or someone else’s.
Features of wood cladding
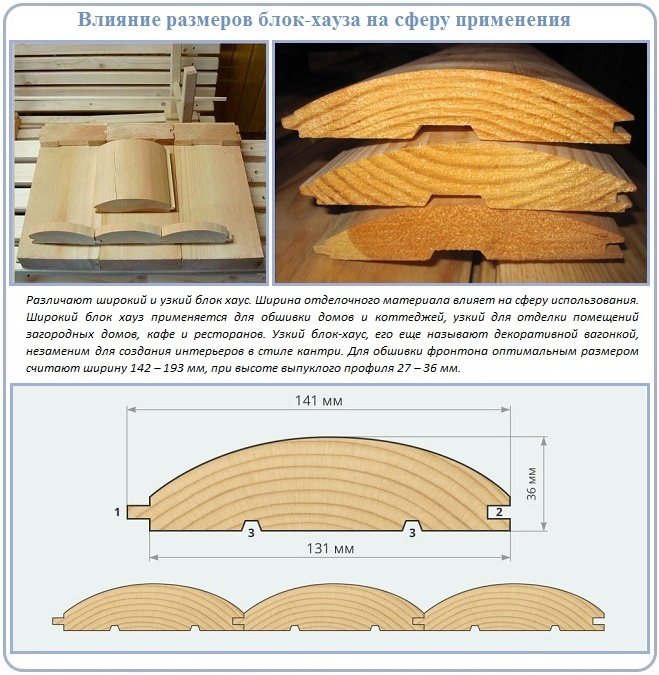
A block house made from wood is produced by sawing round logs or pressing wood fibers under pressure. The first variety is more expensive, but more sensitive to unstable temperature and humidity background. The second type is cheaper and more indifferent to external influences.
Wooden siding under a log is mounted:
- On frame walls covered with OSB-3, moisture-resistant plywood, GVLV. If there are no complaints about the geometry of the cladding, the installation of the block house can be carried out without preliminary preparation.
- On uneven surfaces made of brick, foam concrete, wood with preliminary lathing. Leveling laths can be metal or wood, but the latter is preferred as the most compatible with the sheathing material.
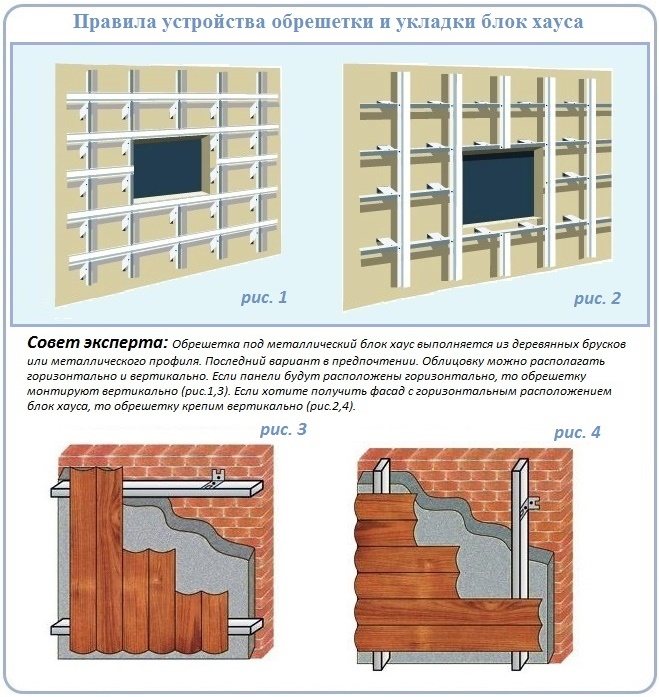
You can arrange the elements of the block house according to your own taste: vertically or horizontally. It is worth considering that vertical installation is somewhat more complicated and expensive to implement, because There is more waste when cutting.
The direction of installation of laths for cladding under logs is always strictly perpendicular to the direction of installation of wooden siding elements. Under horizontally installed boards, a 40×50 or 50×50 block is installed vertically, in the opposite case, vice versa. The step between the sheathing parts is up to 40 cm.
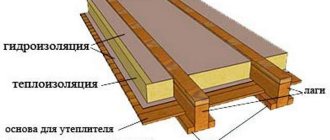
The construction of sheathing is a very useful action, thanks to which a ventilation gap is formed between the main wall and the cladding. Washing the wall with an air flow will get rid of condensation and accompanying dampness. True, it is also capable of blowing through the thermal insulation of attic gables and significantly cooling non-insulated structures.
The problem of blowing is combated by windproof material installed over the entire area of the gable wall. This is a polymer membrane that allows moisture to pass from the walls or from the body of the insulation system to the outside, while at the same time acting as a reliable barrier against the wind. The windbreak is attached to the base with a stapler or double-sided tape.

If the construction of wooden sheathing is carried out on stone or brick gables, it is recommended to lay strips of waterproofing between the laths and the main building material. The same should be done if the metal sheathing is installed on structures made of timber or logs. A waterproofing layer is required between materials with thermal differences.
Extension of cladding under a log can be done either from the bottom up or in the opposite vector direction. However, home craftsmen who want to put their hands to the cladding of the pediment of a wooden block house should not get carried away with complex schemes and risky undertakings.
It is better to simply start fastening the cladding parts from the bottom line, laying it strictly according to the building level indications. Boards stylized as a log must be laid exclusively with the tenon facing up so that the groove that covers it prevents rain and melted drops from flowing in.
The boards are measured in advance and cut after the fact. The element being built up is carefully fused with the previous one by gently tapping it with a mallet through an auxiliary section of the block.
Connections to the sheathing or directly to the wall being constructed are made using three types of fasteners, these are:
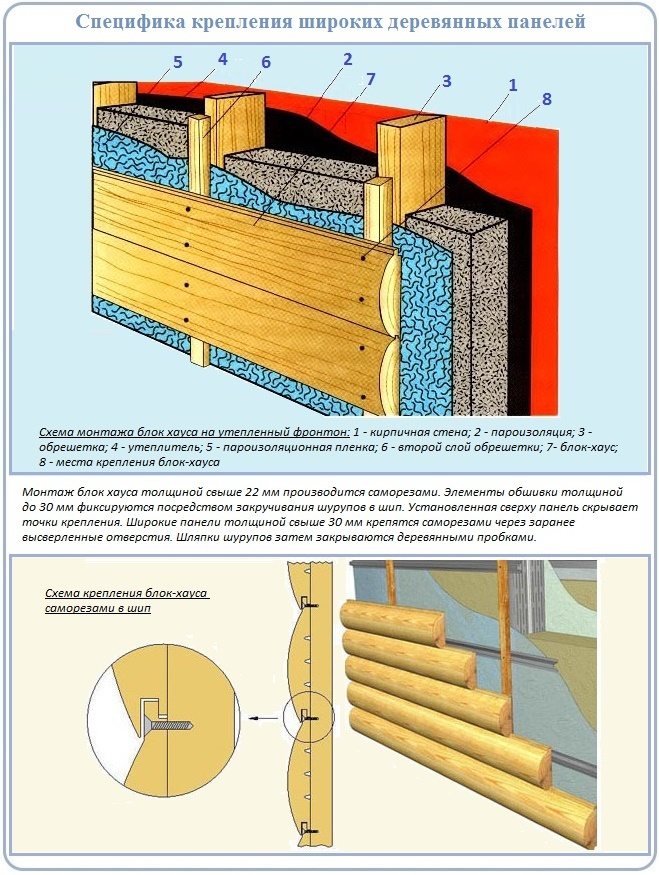
- Nails. They are used when installing block house boards up to 2.1 - 2.2 cm thick. It is better to drive nails into the tenon at an angle, trying to drown the head in the material, but without fanaticism destroying the tenon. When building up house block boards from top to bottom, a nail is driven at an angle into the back wall of the groove.
- Kleimers. They are also clasps - metal staples produced specifically for cladding under logs. They are used when sheathing with material up to 2.1 cm thick. The fasteners do not interfere with the installation of the next element.
- Self-tapping screws. They are used to fasten sheathing with a thickness of 2.2 cm to 4.0 cm. Imitating log boards up to 3 cm thick are screwed through holes pre-drilled at the base of the tenon. A thick wooden block house is screwed through the board at a distance of approximately 0.5 cm from the joint line. Self-tapping screws are screwed in perpendicular to the base being installed. For through fastening at one point, the hole is drilled twice. First, at full power with a size equal to the thickness of the screw. Then a third of the thickness of the material is selected with a drill equal in size to the fastener head. The cap, twisted a third into the body of the board, is closed on top with a wooden plug or plastic plug of a suitable color, set with PVA glue. It is difficult to call the described finishing process easy and carefree, but the result is worth the effort.
Upon completion of the work, it is advisable to coat the outer surface of the block house with a protective paint and varnish composition. It is necessary to open it with varnish within the next two weeks.

Wooden cladding under logs is not afraid of frost and temperature changes. The pressed material is practically indifferent to excess and lack of moisture. Boards made of solid wood, convex on the outside, lengthen and narrow following fluctuations in moisture levels. These circumstances must be taken into account when choosing materials and when cutting finishing elements.
Installation of metal siding under a log
The metal block house looks as close to natural as possible. Its steel base is coated with zinc on both sides. On the outside, a protective and decorative polyester shell is applied to the surface with a highly accurate imitation of the texture and color of natural wood.
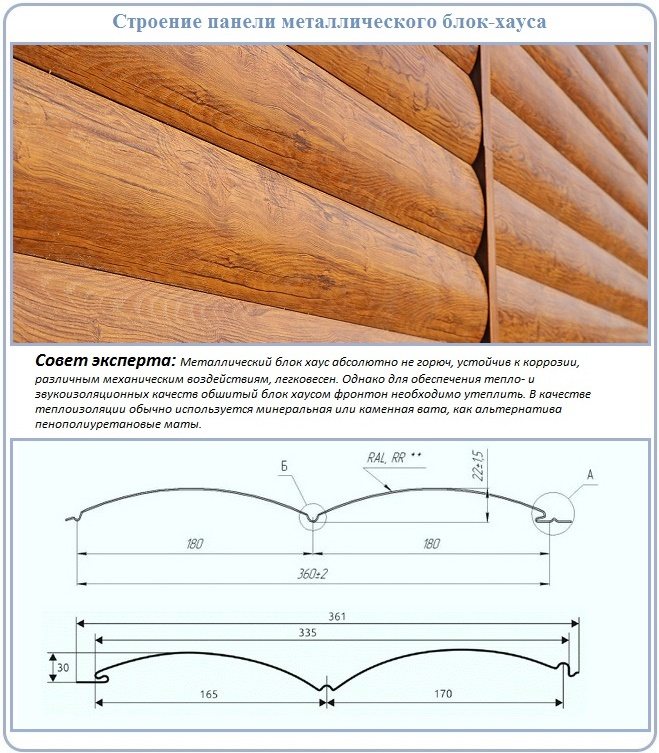
Metal cladding is available in a wide range of colors and a variety of standard sizes, which greatly facilitates the selection of an option for gable cladding using log siding. The surface finished with its use can easily withstand atmospheric attacks from - 50º to + 80º.
To install metal panels, it is recommended to install metal profile sheathing because:
- Between the metal sheathing and the material from which the pediment is built or sheathed, it is necessary to organize a ventilated gap.
- Metal gratings are less susceptible to rotting and fire than their wood counterparts.
- Due to its physical and mechanical properties, including thermal conductivity, metal lathing is best suited for contact with metal cladding.
In addition, the low quality of lumber usually used for the construction of sheathing suggests the possibility of the fastenings breaking and the cladding collapsing.
According to the general rules for constructing sheathing, its elements are mounted in a cross direction to the laying direction of the sheathing panels. The installation step of the laths is determined by the structural complexity of the pediment. On average, metal profiles are placed in increments of 30 to 40 cm. The slats must be positioned so that the central element runs along the axis of symmetry of the pediment.
Ordinary laths are fastened at intervals of 50–70 cm. Dowels are used for fixation on brick and stone walls. It is prohibited to install fasteners into masonry seams and drill holes for dowels in hollow blocks and bricks with a hammer drill.
It is advisable to insulate the gable wall of a heated roof using slab thermal insulation, the elements of which should be located as close to each other as possible. Thermal insulation material is laid from bottom to top and attached to the base with plastic disc-shaped dowels.
A windproof membrane is laid on top of the thermal insulation without any gap. It can freely contact the insulation without creating a threat of condensation in the thermal insulation system. When using polyethylene film or bitumen roll waterproofing, a gap of at least 1 cm must be left.
The preparatory work has been completed, you can begin installing the metal block house.
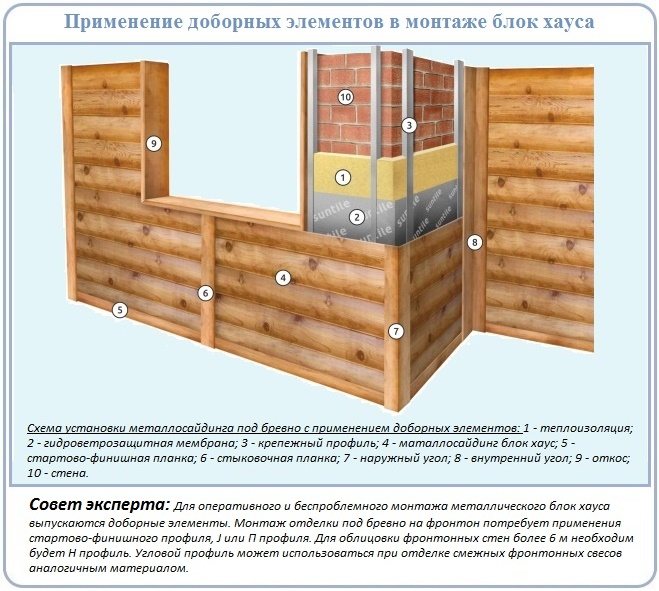
- Metal additional parts are installed along the perimeter of the pediment and along the line where the panels join.
- The U-shaped plank is cut according to the actual dimensions of the overhangs. Instead, an extension can be used to arrange the internal corner.
- An H-shaped strip is mounted along the line where the panels join.
- A template is made that allows you to quickly and accurately apply the angle of inclination of the slopes to the panels to be cut. The production uses general technological principles developed for all types of siding cladding.
- The metal cladding is cut taking into account the characteristic temperature expansion. There should be a gap of about 5-7 mm between the strip and the edge of the panel.
- A sealant is laid along all additional trim strips, including the U-shaped trims installed around the dormer windows. It is needed to prevent the metal trim from rattling and raindrops from leaking into the system.
- Installation of metal panels starts at the top of the gable and moves down. The perforated fastening profile must be located at the bottom of the element being mounted.
- The edges of the slightly curved panels are inserted into additional planks. The sheathing parts are connected by snapping them into a lock. They are attached to each lath with self-tapping screws screwed into the center of the oval hole of the perforation intended for this purpose.
The screws are not tightened all the way. There should be a gap of about 1 mm between the fastener head and the fixed metal cladding. Screw first from the edges, then move towards the center.
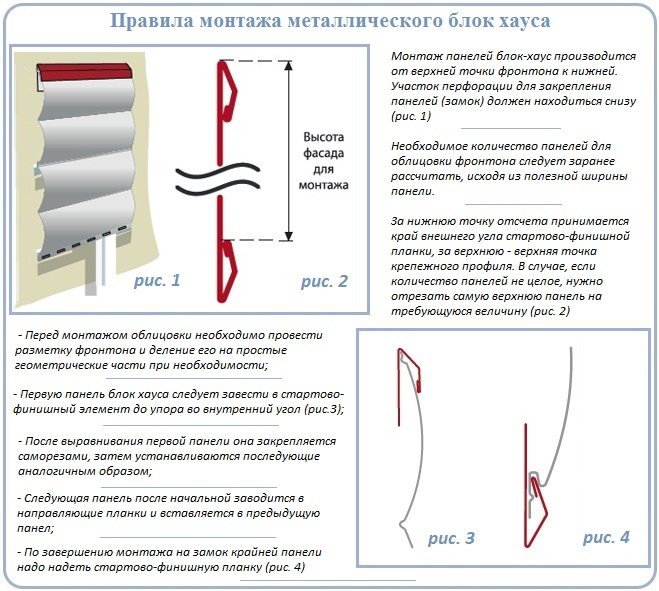
Before sheathing, material manufacturers strongly recommend that they be drawn using a horizontal or vertical level for constant self-control. They also advise to accurately calculate the height of the gable wall and the number of panels required for finishing. If it is not possible to arrange entire panels in height, the upper component is trimmed.
Finishing a small pediment with a metal block house can be done without additional additions. Cutting and installation in such situations are carried out according to the scheme described above, but without installing additional parts. At the conclusion of the work, the perimeter of the cladding is simply covered with a metal strip.
Finishing the gable with a vinyl block house
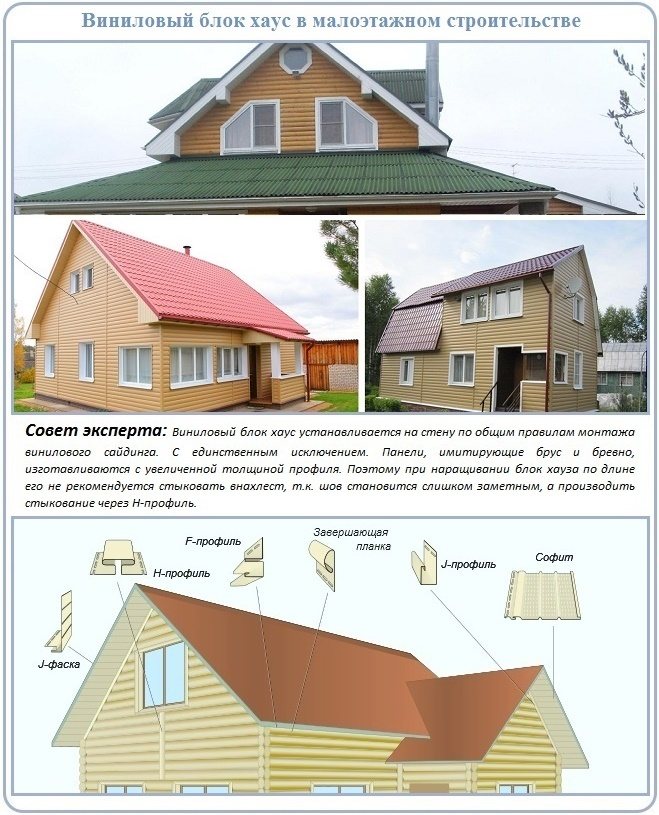
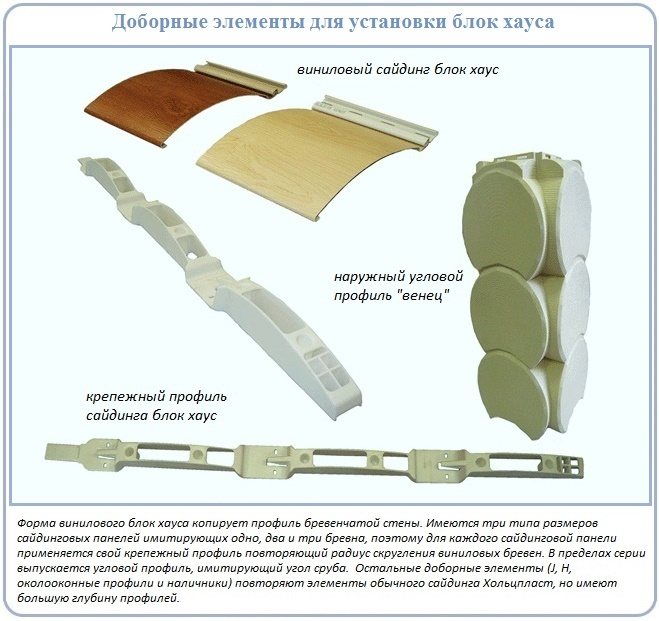
The easiest to install and affordable log vinyl siding. Lightweight panels made of PVC are available in a wide range of colors: there are colors that are common in our latitudes, as well as exotic and even fantasy colors.
The material is not particularly prestigious, but due to its budget price, it is beloved by summer residents and finishers of playgrounds and domestic buildings. It differs from the previous type in a more modest appearance and a mounting strip located on top. Therefore, they are always mounted specifically from the bottom up.
Vinyl panels are cut with ordinary metal scissors, but they must be used with extreme caution. The blade of the scissors cannot be used more than 3/4 of its length. Installation of plastic sheathing is carried out only using additional elements. They are installed along the perimeter of the gable wall and along the joining lines when covering large surfaces.
According to the line of the bottom of the pediment precisely measured by the building level, the starting H-profile is attached. The slopes are equipped with two symmetrical corner or J-profiles. Despite the deceptive symmetry, each of the profiles mounted along the slopes is cut and adjusted according to real data and dimensions.
For meticulous cutting of plastic panels, a template is prepared that repeats the slope angle of the slope. The linear dimensions of the panels must take into account the thermal expansion of the material when heated by sunlight. It is more convenient to cut on a flat, level area; it is best to do this in advance on the ground.
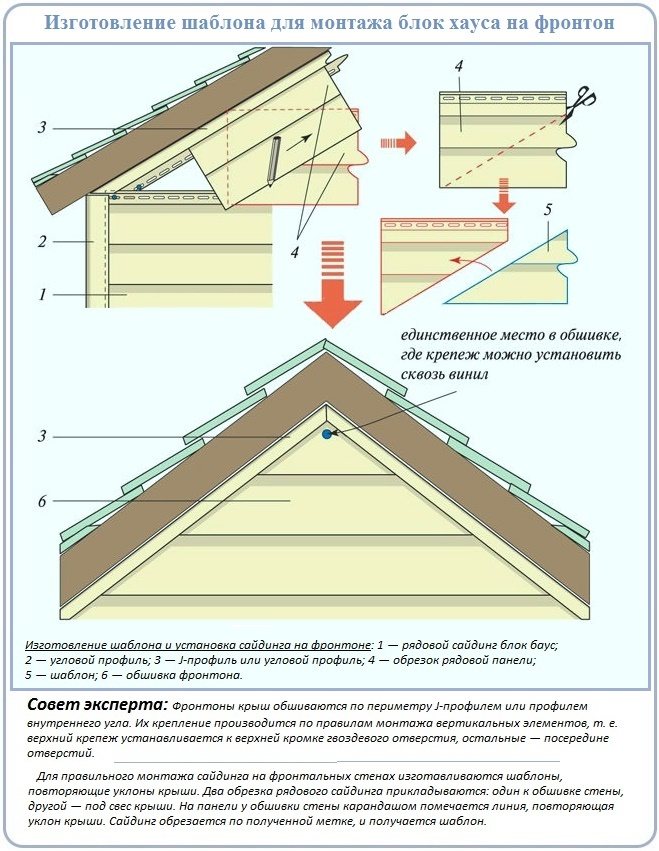
Depending on the expansion parameters provided by the finishing manufacturers and on the actual length of the element, the size of the gap between the inner end of the additional strip and the edge of the house block is calculated. Usually the indentation is no more than 3 - 5 mm. If the bottom of the upholstered pediment is equipped with a solid ebb, the starting strip must be installed a couple of mm above the joining line.
Vinyl panels of a house block can be attached directly to the frame wall, provided that there are no tricky questions regarding the geometry of the pediment. Installation on brick, log and foam concrete surfaces requiring leveling is carried out after installation of the sheathing. Before its construction, a windproof membrane is attached to the gable wall with a stapler or double-sided tape.
In the construction of the sheathing, predominantly a wooden block is used, because its physical and mechanical properties are closer to those of a polymer in comparison with metal products. The optimal slats size is 40×50; 50×50; 50x60 mm.
The laths are fixed with self-tapping screws with dowels or nails, depending on the material of the gable wall being installed. The distance between the fixing points of the slats to the wall is 50 - 60 cm, depending on the structural complexity and weight of the cladding.
Finishing the gable with a plastic block house is carried out according to the principles that apply to all types of vinyl siding. We described the technology in detail in another article. However, there are also differences inherent to a block house.
To ensure that the panels with semi-cylindrical convexities do not deform, a special wavy profile is used for their fastening, repeating the bends of the log imitation. Therefore, in addition to the traditional guides for arranging the pediment, you will also need to stock up on this addition at the rate of 4 pieces per 1 horizontal meter.
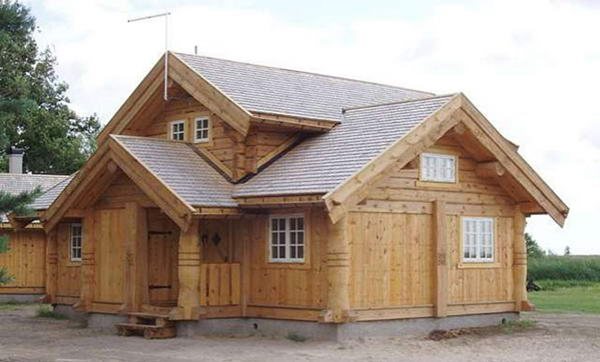
Advantages of log houses
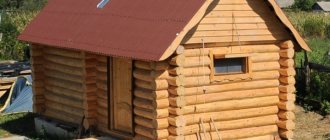
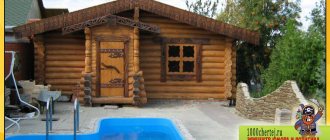
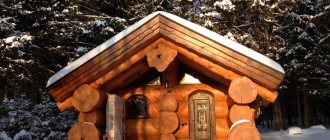
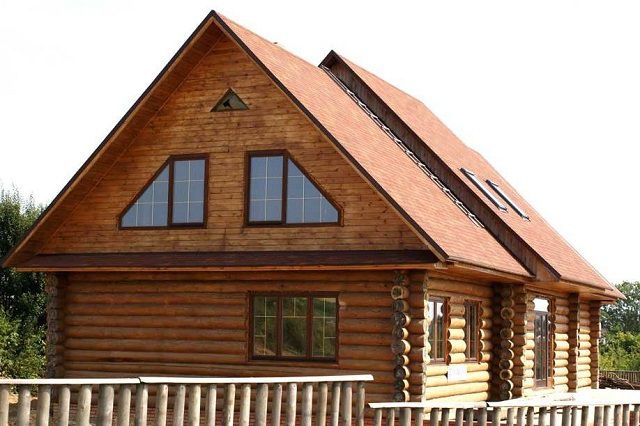
Logged gables and baths always attract people's views, despite the abundance of beautiful buildings built from modern materials.
Scheme of the log house structure.
Handmade houses and bathhouses surprise with their design and beautiful finishes. Wood is used to build a chopped pediment. This building material gives the house a unique style, despite the unchanged architectural forms, construction techniques and properties of the material: logs or timber.
For chopped pediments and baths, environmentally friendly valuable tree species are used, so they will last a long time and look prestigious. Such buildings made of cedar and larch, pine and spruce are especially good. They are resistant to moisture and do not rot. Using correctly this quality of larch, such as hardness, the lower crowns of a log house are created from it.
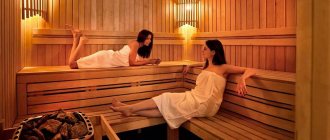
The wonderful aromas of each type of wood will serve as a kind of aromatherapy for each family member, creating comfort and a wonderful mood. A wooden house is distinguished by a special, “velvet” microclimate that warms the body and soul in any weather outside its walls.
Having construction experience, you can build a house with your own hands according to your personal exclusive project, embodying all your plans and fantasies. Assembling your own home for a craftsman will bring moral satisfaction. What would a house be without a real Russian bathhouse? Separate documentation is being developed for it.
For those who do not know how to build correctly and want to save time and money, there are construction companies that create ensembles of houses, bathhouses, gazebos according to a variety of standard and individual projects. Firms provide experienced designers who take into account the wishes of all family members. The assembly and installation of the log house, the finishing of the façade of the building and the premises inside are carried out using the best materials provided by construction companies.
Highly qualified craftsmen assemble, erect and fasten chopped pediments of standard and non-standard shapes. In this case, various types of cutting are used, performed by skilled hands.
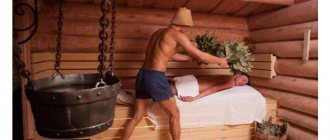
The bathhouse has its own construction features that are different from a residential building: https://blogobane.ru
Future plans
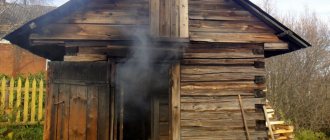
We will someday cover the remaining gaps at the junction of the sheathing with the gable overhangs with wooden corner profiles, but even now they are not at all noticeable. And the likelihood of snow and rain getting into these gaps is low. In addition, behind the sheathing they are covered with sheathing boards.
Sheathing the pediment with the window would not have been much more difficult if we had not decided to build a canopy on it, which should cover the planned porch and the main entrance to the bathhouse (we are currently using a temporary entrance with a plywood door). But making a canopy is another story.