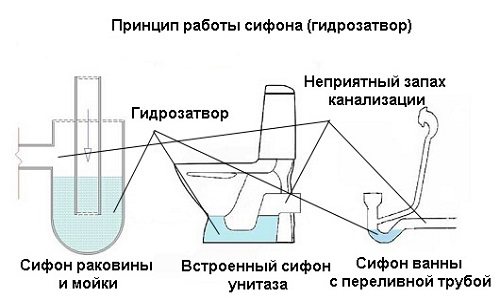
Functions and principle of operation of a sewer water seal
- Preventing unpleasant odors from pipes from entering the living space;
- Balancing wastewater loads on the sewer system by blocking water hammer on the pipes.
The water in the elbow provides a barrier for the penetration of gases from the pipes into the apartment. When new portions of water enter the pipe (when flushing the toilet), the water seal is replenished with new liquid, due to which the water is purified and does not stagnate.
The device is present in the toilet, bathtub and any sink.
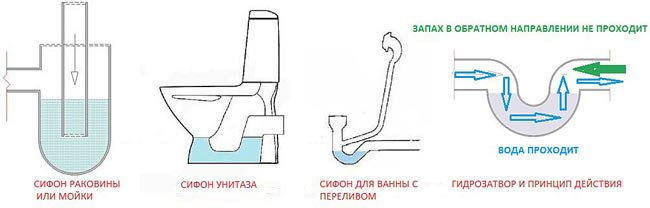
Most often, the entrance to the water seal for sewage is straight (straight drain pipe in the toilet), and the exit is inclined.
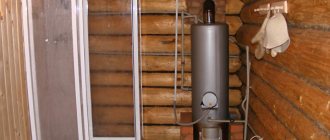
Water seal
The question may arise: why do you need a water seal for a washing machine? It is necessary to ensure that odors from the sewer do not penetrate through the drum. It’s especially unpleasant when you forget to take out your laundry in the evening and find it with a strong sewer smell the next morning.
There is no need for special devices to ensure a water plug between the washing machine and the pipes. It is enough to comply with the conditions for connecting the device. The drain can be organized like this:
- Plumbing fixtures - sink, toilet, bathtub. Such a drain will not have contact with the pipes, that is, the drum will not smell.
- In the sink siphon. For a washing machine, this option is convenient and easy to implement. You don’t have to get to the sewer pipes, because access to the siphon is often easy. The role of the water seal will be performed by the sink siphon, that is, there is no need to install additional elements.
- Directly to the sewer. This option is also convenient, but will require pipes to be installed to properly organize the drain at a level of 60-75 cm from the floor.

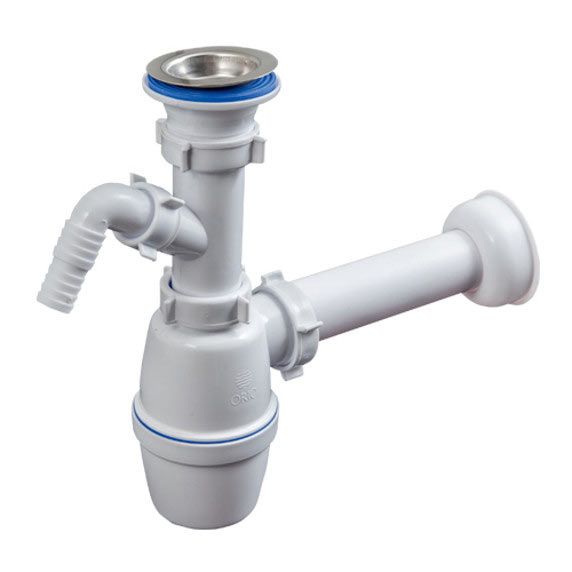
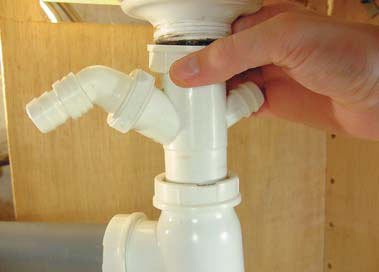
Siphon with outlet for washing machine
Prices for various models
The price of a water seal for sewerage is determined by several components:
- material (metal is more expensive than polypropylene);
- manufacturer (the most expensive European models);
- complexity of the device (bottle ones under the sink are the cheapest, and overflow devices and devices with several drains are more expensive).
Approximate prices for different models are presented in the comparison table below.
| Purpose | for the sink | for toilet | for Bath | for kitchen sink | ||||
| models and prices in rubles | AlcaPlast A410 | 270 | Corrugation AlcaPlast A97 | 300 | Geberit bend 152.439.46.1 | 2510 | Waste-overflow Viega 572853 | 250 |
| AlcaPlast A431 | 870 | Corrugation AlcaPlast A97 | 340 | Geberit bend 152.439.46.1 | 1380 | Orio 3 A4011 | 701 | |
| AlcaPlast A400 | 1960 | Elbow AlcaPlast A90-90 | 220 | Drain and overflow AlcaPlast A501 | 510 | Wirquin medium 1 1/2″x40 mm | 152 | |
| AlcaPlast A437 | 1210 | Geberit bend 152.438.46.1 | 2460 | Drain and overflow Ravak X01318 | 3430 | Wirquin without outlet d 40 mm | 248 | |
| Hansgrohe Flowstar 52105000 | 4470 | Geberit bend 152.439.46.1 | 3380 | Waste-overflow Viega 572853 | 3920 | Orio with waste and two bowls d 40 mm | 223 | |
TIP When choosing a device, you need to understand that the price factor is not the main one. First of all, you need to decide where exactly the water seal will be installed, and what technical parameters it must strictly meet. And then you can choose among the same offers from different stores based on price.
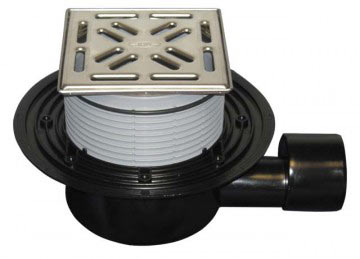
Drip funnel AKS1Z
The AKS 1 Z funnel is equipped with a special ball, which blocks the penetration of unpleasant sewer odors when the water blower dries.
Price AKS1Z - 420 rub.
Main characteristics of the AKS1Z funnel:
- funnel material - polypropylene, frame - plastic;
- water seal type - combined with SMART ball;
- water seal height - 50 mm;
- throughput - 16.8 l/min (0.28 l/s);
- release - Ø 32 mm;
- weight - 110 gr.
Types of water seals for sewerage
Based on their design features, these devices are divided into several types:
- knee;
- bottle;
- double-turn;
- corrugated;
- water seal with overflow;
- dry.
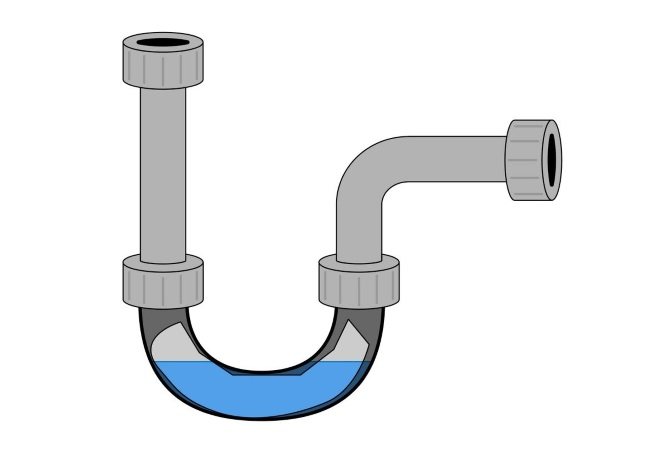
Knee water seal
The knee water seal for sewerage has a simple U-shaped structure and is one of the most durable and can withstand pressure in pipes well.
In old houses you can still find cast iron siphons, but today they are more often made of polypropylene.

In some cases, the design of the knee siphon provides for the possibility of adjusting the height of the water in it by moving the tubes of which it consists and fixing them at the desired level with union nuts.
Bottle water seal
This drain seal is most often used in drains under sinks.
It can be S-shaped or P-shaped in appearance.
It is very convenient to use for several reasons:
- installation and disassembly are very simple - it can be done even without special skills;
- if some small thing (for example, an earring) gets into the drain, it will not get lost anywhere, because it will fall into the trap, and you can get it out simply by disassembling the siphon;
- It’s easy to clear the drain of clogs, which mostly all accumulate in the trap.
- You can carry out the repair yourself and it won’t take much time.
It can be assembled easily, as discussed in the video.
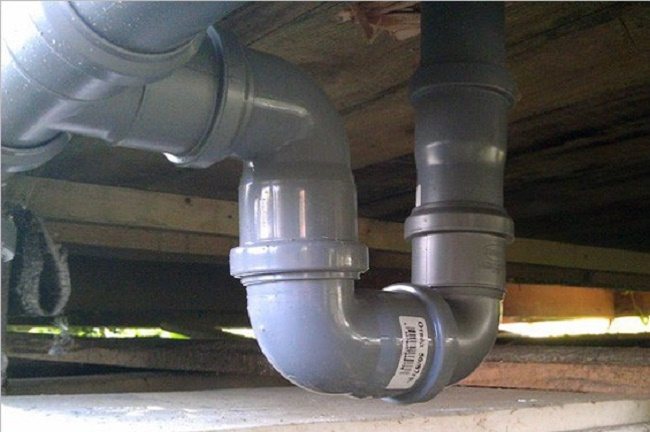
Double-turn sewer water seal
A double-turn water seal for sewerage is also called a pipe seal. It is structurally similar to the knee, although its structure is more complex.
It starts with the drain pipe, or foot valve. It has a decorative grille to prevent large fragments of food debris from clogging it. garbage, etc. Next comes a removable elbow (U-bend) that serves as a waste collection point to avoid pipeline blockages. The structure is closed by another drain pipe leading directly to the drain. Also equipped with fastening nuts and gaskets.
Depending on the material, siphons can be:
- plastic - such siphons are installed in modern houses, they do not rot and are much more durable than metal ones;
- cast iron - such devices can only be found in old apartments;
- chrome plated - they are a metal product coated with chrome. It serves for a long time and is reliably protected from corrosion. But as it oxidizes, it loses its shine.
To make it possible to clean the siphon, a revision must be installed, which can be structurally designed as a removable elbow or in the form of a hole at the lowest possible bending point of the elbow. There is an additional hole on the outside of the pipe, closed with a rubber stopper. Cleaning is done by pulling out this plug.
A comparison of bottle (left) and double-turn (right) siphon devices is shown in the figure below.
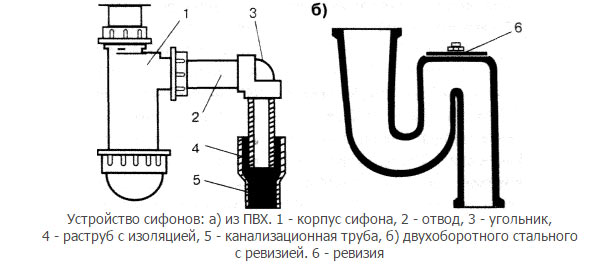
It is easy to see that using a bottle water seal is much simpler. That is why it is much more often used than double-turn.
On the other hand, it also has its advantages:
- fewer joints compared to bottle joints, and accordingly, the risk of leaking in this case is much less;
- The siphon is smaller in size, which will allow its installation in hard-to-reach and narrow places under the bathtub or shower.
Corrugated
A corrugated water seal for sewerage is also used for installing drains under sinks, and often under bathtubs. Its undoubted advantage is the ability to bend it at almost any angle and in any direction, depending on the location of adjacent pipes. This is very convenient when communications are made non-standard (for example, when rebuilding a bathtub).
The only drawback of the device is that folds are more susceptible to clogging than smooth siphons. However, it can be easily removed and cleaned with ordinary detergents. Moreover, the structure is most often installed under bathtubs, where food residues, which mainly clog the drains, are not supposed to be drained.
ADVICE If you choose a corrugated siphon, then carefully inspect the folds on the pipe in the store - sometimes they may have small cracks, which will then inevitably lead to depressurization and leaks.
Such devices are also convenient because they can be assembled easily and quickly, and it is important to position the tube so that the bend is located downwards - after all, it is in this position that it works as a water seal.
ADVICE It is not advisable to pour hot oil or boiling water into the corrugated siphon - this may slightly deform it, as a result of which its service life will become significantly shorter.
Instructions for installing the device are presented in the video.
Water seal with overflow
Such devices are most often used in bathrooms. They connect the drain hole to a special pipe that prevents water from overflowing when new water enters the plugged bathtub. Excess water leaves through the upper hole and enters the drain, so the room will not be flooded.

Dry water seal for sewerage
This water seal for sewerage is used in cases where the drain is rarely used (for example, summer baths), so the water evaporates and the drain becomes dry. It can be mounted either as a stand-alone shutter or together with a regular one (for example, a knee shutter).
Depending on the principle of operation, there may be the following types of siphon:
- float - while there is water in the drain, the float floats on the surface, and as soon as the water has completely evaporated, it sinks into the drain and completely closes it;
- pendulum - the built-in pendulum, as a result of attraction, constantly strives to close the drain hole;
- membrane - while water flows into the drain, the shutter opens under its weight, and then a special spring returns the membrane back, and the passage is blocked.
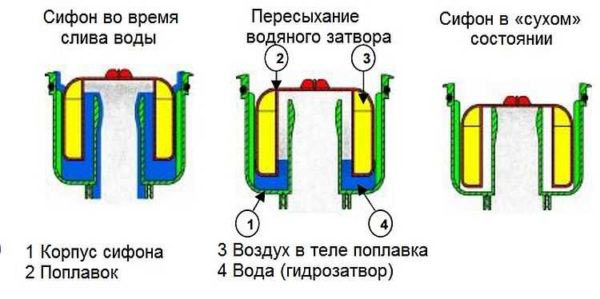
Externally, a dry water seal for sewerage looks like this.
ADVICE. This device can be used in the country or in areas with arid climates. As a rule, the water in the drain completely evaporates within a month, so if it is not possible to enter the room at least once every 3-4 weeks, then it is better to install just this type of siphon.
Before installing the siphon, you need to ensure that its grid is positioned at the same level with the floor so that water naturally flows into it without residue. It is better to lay the tiles from the ladder to the edges, and not vice versa. The thickness of the seams should be made within 1.5-2 mm. You can learn more about this in the video instructions below.
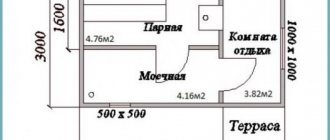
How to make a water seal for sewerage in a bathhouse
There can be a lot of problems with the water drainage system. Most often it is necessary to redo or modify the existing drain for two reasons:
- The smell of sewage regularly appears in the bathhouse, which cannot be eliminated by ventilation and sanitary treatment;
- The bellows or drain does not have sufficient capacity, so the water in the bathhouse drains very slowly, which annoys both guests and especially the owners. Instead of relaxing after the steam room, you have to waste time and wait for the water to completely drain through the drainage system.
Important! This may be a sign of a blockage in the drain or the occurrence of such an unpleasant phenomenon as backflow in the bathhouse sewer.
Sometimes attempts to speed up the flow of water using brushes or cable brushes lead to depressurization of the drain and even breakage of the bellows seal. Even if the water has gone, you still need to inspect the drain, otherwise the plug will occur with enviable frequency.
The system for locking the outlet into the sewer is used primarily to reliably cut off the internal space of the outlet pipes from the bathhouse atmosphere. Otherwise, odors and gases released from the drains will easily break through into the washing and steam room of the bathhouse.
The second purpose of the drain valve is to block wastewater discharged into the sewer. A bellows or any other type of valve locks dirty water and prevents it from rising into the bathhouse through the drain hole in the floor.
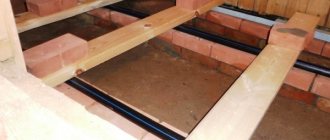
The transom “wet” version of the shutter is considered the easiest to install. First, before the floor equipment, it is necessary to lay a 100 mm sewer pipe with a swivel angle. The upper edge of the corner should be located 20 mm below the level of the concrete screed.
The inlet hole is closed with a plastic plug, in the center of which a weaving nail is installed. After pouring the screed, the nail will help to correctly mark the contours of the future hole for water drainage equipment on the bathhouse floor.
After the base screed of the bathhouse floor has completely hardened, it is necessary to level the hole and give the edges even, rounded shapes. This can be done using a grinder and a stone disc with a diameter of 125 mm. You have to cut not in the radial direction, but in the axial direction, that is, with the entire edge of the disk at the same time.
Next, all that remains is to install the water seal body, cap and external drain grate.
The simplest version of a bolt with an elbow can be made from four plastic corners connected to each other in a U-shaped structure. The only thing that needs to be done is to glue the sealing collars with sanitary sealant, otherwise the structure will very quickly split into two parts.
What to look for when choosing a device
If you intend to independently choose a siphon for your bath, toilet or washbasin, you need to pay attention to the following points:
- Clogged water seal - kitchen sinks are most often at risk for this, as they allow a lot of food debris to pass through them. Accordingly, it is better for them to purchase tubular siphons - they are easy to disassemble and clean; In addition, they have a fairly large capacity for waste, so cleaning them 1-2 times a year is enough.
- Number of drains - if it is assumed that one water seal will serve not one, but 2 or more drains (for example, from a bath, shower and washbasin at the same time), then you need to choose a water seal with the appropriate number of inlet holes.
- The diameter of the neck is a very important indicator, because it is not the same in different places (large in the toilet and small in the kitchen sink). So, the water seal in the kitchen and in the washbasin may not match.
- The presence of an overflow is mandatory for baths, and can also be taken into account in other places if desired.
- The outlet diameter is also important - it all depends on the parameters of the sewer pipe to which the siphon needs to be adjusted.
- The dimensions of the device are especially important in the case of bathtubs, for which there is usually little space for draining.
- Material – plastic ones are more durable, metal ones can withstand pressure well.
Tips for installing a siphon yourself
After purchasing a water seal for the sewer, you can contact a plumber, or you can install it yourself. In most cases, no special skills are required for this.
Before installing a siphon, it is often necessary to dismantle the old one. To do this you need:
- Turn off the water (usually there are taps right in the apartment for this, but if there are none, you can temporarily turn off the riser around the house);
- Place a basin under the place where the siphon will be dismantled, and if this is not possible, put an ordinary floor rag;
- Unscrew the fastening screws that secure the water seal;
- Remove the siphon and temporarily plug the pipe with a thick rag to prevent unpleasant odors from penetrating into the apartment;
- Thoroughly clean all joints between the old siphon and pipes, paying special attention to old dirt.
ADVICE If you are removing an old cast iron valve, then you don’t have to unscrew all the nuts - most often this is impossible, because during their service they have long been stuck to the metal and sit tightly in the thread. It is better to simply crack the device with a hammer or heavy sledgehammer.
The algorithm for installing a new water seal for sewerage differs depending on where exactly you are installing it, but in general the actions should be performed in the following sequence:
- Mount the protective grill on the drain hole using the sealant or gasket supplied with the siphon;
- Install the connecting pipe and gasket using a long screw securing them to the grille;
- Place a union nut on the pipe, and then a cone gasket;
- Place the siphon on the pipe and adjust its height;
- Fasten the outlet pipe to the sewer hole;
- Check how well all the joints are connected - to do this, you need to run water for a few minutes and then see if droplets or small jets form somewhere.
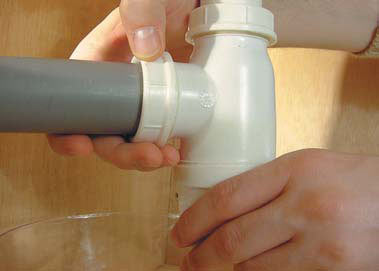
ADVICE It is necessary to connect the water seal for the sewerage with the outlet pipe especially carefully, because the tightness and reliability of the system as a whole depends mainly on this operation. Since the diameter of the siphon is smaller than the sewer pipe, a ring - rubber or plastic - is put on the siphon pipe. The thickness of the ring is about 15 mm. There are two main requirements for its dimensions:
- The outer diameter must exactly match the diameter of the socket;
- Internal – with the diameter of the valve outlet pipe.
Of course, each siphon has its own specifics that must be taken into account during installation. It has already been presented in a video on the installation of specific types of shutters.
Water seal - what is it for?
See also: What a novice winemaker needs to know (+ ammonia) What to stock up on and what to buy for home winemaking
The very word “hydraulic seal” certainly sounds threatening. Especially for those who prefer to avoid all kinds of technical terms. In fact, the water seal itself and the principle of its operation are nothing complicated. In essence, it is a stopper that can bleed excess air and gases from a clogged vessel, but not let them in from the outside. There is no way to do without the principle of “letting out, but not letting in” when preparing wine.
For example, one day my brothers, completely unfamiliar with home winemaking, decided to make wine. They pressed the grapes, as usual, filled a 20-liter bottle with juice and grape pulp and tightly closed it with a screw cap. I didn’t have to wait long for the result - the bottle was smashed into small pieces in about half an hour. That is, my brothers seemed to do everything right at first. They just didn’t take into account that the fermenting juice, turning into alcohol, releases a huge amount of carbon dioxide, which needs to go somewhere. And they screwed the cork tightly because they had heard somewhere that contact of wine with air is detrimental to the wine itself.
In general, this is true, although not entirely. After all, the contact of wine with air (during fermentation) is limited not at all because the air itself is harmful to wine. On the contrary, it even needs periodic aeration, that is, saturation of air with oxygen, as discussed in the first part of these notes and in my book “Wine, liqueurs, cider.” After all, wine yeast, like any other living beings, needs to breathe. Another thing is that microorganisms that are alien or even harmful to wine may well live in the air. In order to prevent them from getting into the wine in critical quantities, they try to minimize the contact of the must and air, making it short-term.
Simply “plugging” the container with fermenting wort with a gauze or cotton swab, which can release rising gases, is an ineffective measure. Any weakening of pressure will immediately create conditions for the penetration of unwanted microorganisms into the dishes, which, moreover, usually develop exponentially on a gauze or cotton swab. Using a rubber glove or an inflatable balloon is not the best way to cover wine. These “devices” do not allow excess carbon dioxide to be properly released, causing stagnation above the surface of the wine. Therefore, in professional winemaking, so-called fermentation piles are used, which remove excess carbon dioxide, but do not allow atmospheric air into the container. At home, they make something simpler, but no less effective - water seals. Ideally, this is a cork or a cap that is tightly screwed onto the neck of a vessel with wine, in which a through hole is made with a tube of one or another length equally tightly seated in it. The other end of the tube is immersed in a jar or glass of water, which does not at all prevent the release of carbon dioxide, but blocks the access of air to the wine. In this case, the water acts as a release valve - hence the term: “hydraulic seal”. Absolutely, I repeat, a simple and effective device that can be built from improvised means.
For example, I usually make it from a lid that screws onto a jar and a thin plastic tube with a diameter of 6-8 mm (hoses or tubes of smaller diameter work worse). First, I drill a hole in the middle of the lid with a drill slightly smaller than the diameter of the tube, pass the tube through the hole, leaving a tip about 10 centimeters long on the inside of the lid.
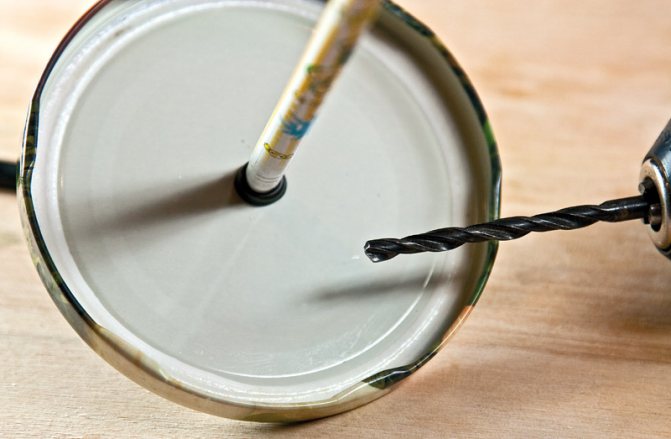
Then (again from the inside of the lid) I insert the tip of a ballpoint pen or pencil into the tube so that it expands the tube and forms something like an internal cone. I slightly warm up the place where the handle enters the tube with a lighter. I let the tube cool without removing the handle. In this way, the increased diameter of the tip of the tube is fixed, which then needs to be pulled almost to the base of the inside of the lid. This, so to speak, heat shrinking of the plastic ensures the most airtight connection of the tube to the hole in the lid.

All that remains is to tighten the lid on the neck of the container with must or wine...

... and drown the free end of the tube in a glass of water.
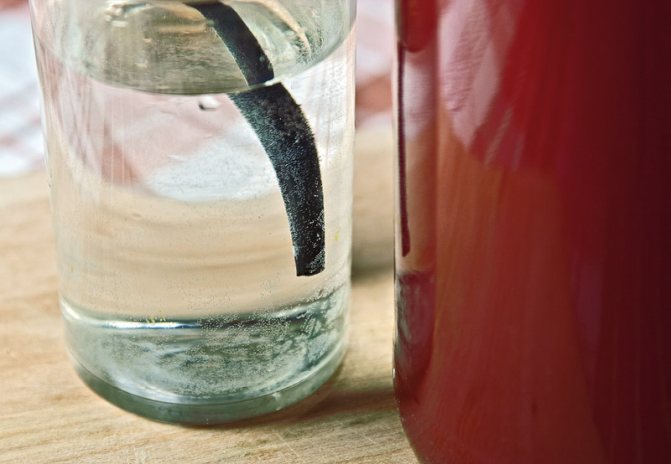
This is a water seal - designed quickly and without unnecessary headaches. Read in the fourth part: The main stages of home winemaking
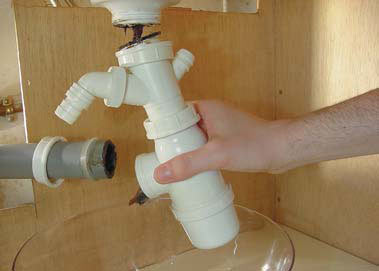
Installing a washing machine drain pipe
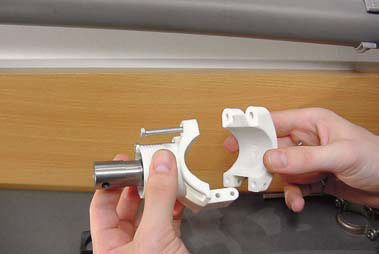
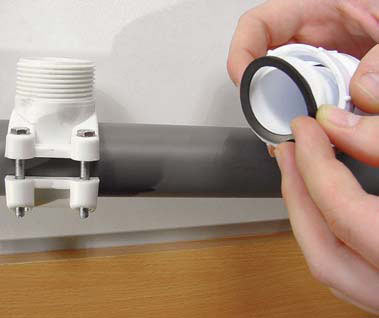
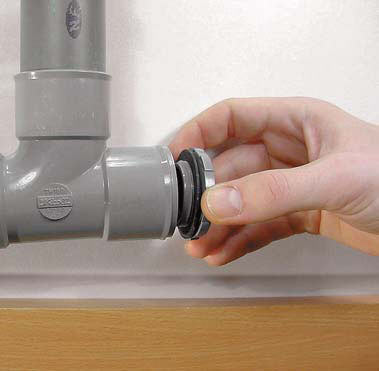
This operation is not difficult to perform, in addition, there are a number of mortise clamps, and they are already included in the kit along with the drain pipe of the washing machine. In general, the work sequence looks like this:
- Disassemble the clamp that comes with the machine
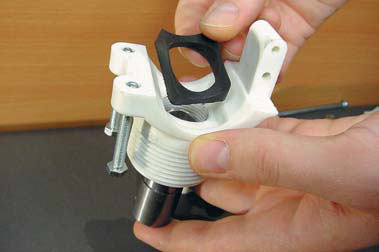
- Place a rubber gasket in the upper part of the clamp
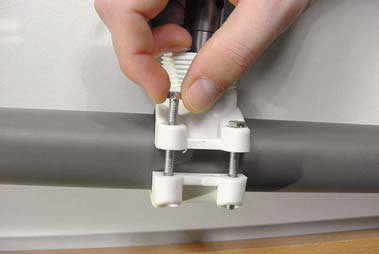
- Next, the clamp is attached to a pre-selected location on the pipe.
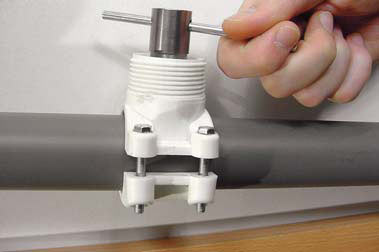
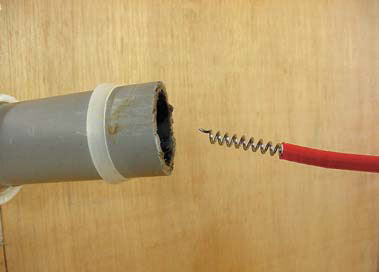
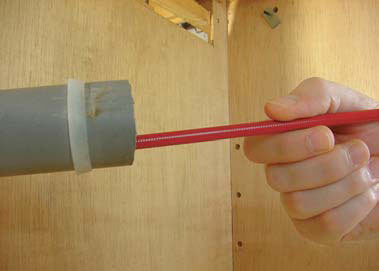
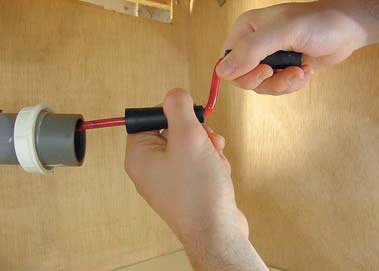
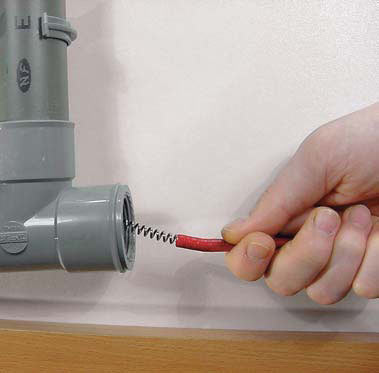
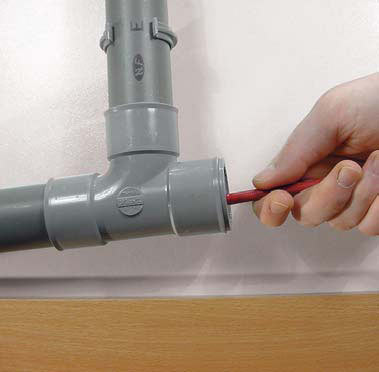
- You need to carefully make a cut in the pipe, making circular movements with the handle of the crank (like a corkscrew)
- Remove the knob
- Place a suitable rubber gasket along the diameter of the siphon
- Screw the nut onto the clamp, with which you attach the siphon to the wall.
Reasons for malfunctioning of the device
Water is normally always present in the knee, but there are times when it significantly decreases in volume or disappears completely. This may be due to the following reasons:
- in case of a malfunction in the sewer system and a sharp decrease in pressure in the pipes;
- when liquid evaporates, if the sink or toilet has not been used for a very long time;
- the elementary reason is depressurization of drain pipes due to mechanical damage or improper connection;
- If the water seal is old, then it itself can cause odors due to decomposing substances. In this case, you need to either disassemble it and thoroughly disinfect it, or purchase a new one.
In these cases, an unpleasant toilet smell will appear in the apartment almost immediately. You can learn more about the causes of the phenomenon from this video.
TIP You can always easily determine whether your water seal for sewerage is working properly in all household devices:
- In the case of a toilet, the water level is easily determined visually, and the appearance of fecal odors always signals a malfunction.
- In the case of a sink or bathtub, you can check using an ordinary flame. Place a lit lighter or match as close to the drain as possible and check if the wind is blowing from there. If the flame doesn't flicker, then everything is fine. If it wobbles, try turning on the water first and letting it run for about a minute. Then check again. If the light flickers again, then your siphon is not in order and requires repair.
Reasons for shutter failure
When the drain starts to smell, there is most likely a problem with the water seal. It’s easy to check, you just need to look into the sink, bathtub, toilet - if there is no water in the drain, then there really is no water plug.
Failure of the water seal occurs for the following reasons:
- Pressure drops within the sewer system. As a result, the plug is drawn into the water intake, which leads to the appearance of odors.
- Creating a vacuum in pipes. This is only possible when a large amount of water passes into the system from the water intake. The pipe lumen is blocked.
The latter situation is likely if pipe installation standards are violated. Namely:
- The installed pipes have a smaller diameter than required and simply cannot cope with water flows.
- After the repair, the horizontal lines fail.
- The lumen of the pipe narrows due to icing or blockages, in particular fatty deposits.
If a water seal with a siphon and corrugated pipes is installed, then using a mesh on the sink or bathtub will help prevent breakdowns. It will stop large particles from entering the sewer. Failure of the water seal due to improper installation can only be corrected by reworking the entire system.
A water seal for a bathhouse is a separate issue. It is only needed if the wastewater from the steam room goes into the general sewer. If the drain is separate, then odors are unlikely, which means there is no need for a water plug in the bathhouse.
To install a water seal in a bathhouse, shower and other places where a large amount of water may spill, sewer drains are used. Their peculiarity is that the siphon of the receiver is small; inside it there is a cylinder-housing, which holds a minimum amount of water.
We invite you to familiarize yourself with Laying Kuznetsov stoves with your own hands, ordering
For a bathhouse, you can make a simple dry water seal with your own hands. It is appropriate in this situation, because if you do not use the bathhouse for its intended purpose for 1.5-2 months, the water plug will simply evaporate and cease to fulfill its main task - to protect the room from sewer odors.
Manufacturing procedure:
- Find a plastic ball with a slightly larger diameter than the lumen of the pipe.
- Place it on the pipe.
- Create a chamber around this structure in which the ball will be located.
- When there are no drains, the ball blocks the path of air flow.
- At the moment the drains appear, the ball floats up, opening the way for them to the sewer pipes. After draining, the well with the water seal becomes dry again.
Scheme for cleaning the water seal.
You will need materials and tools:
- plastic pipe;
- couplings;
- knife;
- screwdriver;
- adjustable wrench.
The device can be made from a small piece of plastic pipe. The diameter of the pipe must be matched to the diameter of the drain hole. First you need to bend this piece of pipe into a U shape.
Then you need to attach couplings of the appropriate diameter to it. After this, the device is connected to the drain funnel using couplings. It is better to choose couplings with a height of 6 cm.
If there is such a possibility, then the pipe is welded to the waste pipe funnel. The result is a water-type water seal, which works due to the water barrier.
The water in the device functions as a sump: it prevents odors from entering the room from the sewerage system.
Unlike conventional bathrooms and showers, baths use drains with increased capacity. That is, the size of the drain receiving grid is usually 100x100 m or even more, instead of the standard 60x60 mm. In this way, it is possible to ensure normal operation of the drain even with a large amount of soap and dirt residues.
In addition, you have to take into account the size of the bathhouse, the design of its floors and the frequency of use. Therefore, several water seal schemes are used for the drainage device:
- Classic bellows with U-shaped elbow;
- Pendulum or dry shutter;
- Float type of shutter;
- Controlled or transom drain option.
The first and third types of water seals are classified as “wet” types of devices; for their normal operation, the presence of a sufficient amount of water in the system is extremely important. The second and fourth are classified as “dry” devices; they work equally well in baths, both under normal conditions and when there is a lack of water in the drain chamber.
Flat water seal
Until recently, for most summer residents there was a problem of how to dry the drain in winter, and thereby preserve the pipes and shutter of the bathhouse during the period of frost. Most often, water was simply drained from the water seal elbow through an additional fitting. The solution to the problem was to use a dry shutter for the bath.
The design of a dry water seal differs from the ladder or float version only in the presence of two plastic curtains suspended above the outlet window on a pendulum suspension.
The petals do not create obstacles to the flow of water moving from the bathhouse through the window into the sewer pipe. In the opposite direction, the mass of water presses the curtain against the window and blocks it. As a result, the internal cavity remains dry and impermeable to gases from the sewer system.
Used in bathhouses not connected to a centralized sewerage system. The design of the water seal is almost identical to the drain drain design. The only significant addition is the presence of a controlled valve. At the top of the grille there is a ring, by clicking on which you can snap a ring petal that covers the window into the drain pipe.
In this case, the water is drained directly into a container for collecting dirty water. After completing the procedures, the water seal opens or closes, depending on whether the bathhouse needs to be dried or not.
In this case, the waste collection container can be equipped with an improvised valve according to the diagram below.
It was on this principle that drainage pipes were installed in the Sandunovo steam rooms and baths in the last century.
Important! The controlled type of water seal is ideal for any type of bath.
For example, if a bathhouse is used all year round, then in winter a wet-type water seal can cause failure of the drain and the receiving flank of the sewer pipe. Dry transoms for a bathhouse turn out to be too capricious. The controlled drain option requires no worries at all. Even in winter, after a bath, there is no need to blow out and dry the drainage part. It is enough to open the valve and leave it to dry until your next visit to the bathhouse.
Often in bathhouses connected to a central sewer, an unpleasant phenomenon occurs such as squeezing out the water seal. The liquid from the water seal can either be squeezed out into the steam room or washing room, or discharged into the sewer pipe.
In both cases, the reason for the release of the water seal is the lack of ventilation of the sewer lines. Excessive pressure inside the pipes squeezes out the contents, and if a large amount of water is discharged into the sewer near the drain point, the water seal, especially the transom seal, can easily be left without liquid in the bellows.
We suggest you familiarize yourself with How to wrap a chimney pipe against fire
By design, gates are divided into two types, which have variations depending on the device on which they are mounted.
- Bottle siphons.
A device in the form of a flask that is installed under the sink or sink.Thanks to the collapsible design, the siphon can be cleaned and washed as needed.
The upper pipe connects the siphon to the sink, through which waste is removed.
The second pipe is located on the side and connects the device to the sewerage pipeline.
ATTENTION! Bottle closures are easy to disassemble, making it possible to remove a blockage or remove a valuable item yourself, without calling a plumber.
- Knee siphons.
Such devices are made in the form of a plastic pipe or corrugated hose. The U-shape acts as a flask.The use of hoses allows the valves to be installed in limited spaces.
Structurally, such valves cannot be disassembled.
Removing blockages and flushing are carried out after dismantling the siphon (you will need a cable to clear the sewer).
Depending on the plumbing fixture, the valves differ in design or functional features.
Water seals are an integral part of toilets and come in two types:
- with rear exit,
- with exit to the floor.
But the basic principle of operation remains the same - a constant layer of water prevents odors from penetrating into the room.
Modern models may have two siphons located one above the other. This feature increases the efficiency of the shutters.
On others, the valves have holes that accelerate the flow of water (see the cold water supply diagram for a private house here). This made it possible to improve the quality of the device.
In modern models of sink valves, the height of the central tube can be adjusted.
Clearing the blockage
Since the most common cause of poor water seal performance is a typical blockage, you can mostly solve the problem yourself, without the help of a plumber.
Cleaning the knee
To begin with, you can try the most common methods - cleaning with a plunger or using special cleaning products. If this does not help, then a more effective method would be to clean the siphon itself. To do this, you need to carefully disassemble the siphon, first place a basin or put a rag under the drain and clean it using household products. It will not be superfluous to disinfect the internal surfaces.
Plumbing cable
If the result is not achieved or it is insignificant, this indicates that the cause of the blockage is not in the siphon, but literally deeper - the pollution is clogged in the drain pipe itself. Then you need to call a plumber, but if you have a plumbing cable in your arsenal, then you can do the operation yourself. To do this, you can use the following algorithm of actions:
- Unscrew the top nut connecting the siphon to the drain hole
- Unscrew the lower nut (the junction of the siphon with the sewer)
- Prepare a bucket or other container and then remove the shutter itself
- Insert a plumbing cable into the drain pipe
- Thread it all the way in (your hand should feel resistance)
- Use a rotating motion (using the handle) to clear the blockage.
It happens that the pipe looks like a coil and has many zigzags. This is not a reason to refuse cleaning - you can insert the cable through a special window on the side. In this case, you need to act according to the following algorithm:
- Unscrew the special cap and immediately place a bucket - most likely, a large stream will pour out
- Carefully push the cable into the hole
- Push it all the way
- Rotate the handle until the debris is completely removed.

TIP After cleaning, be sure to run the drain with hot water for 1-2 minutes. Thanks to this, you will wash away any remaining debris, and the drain will become perfectly clean.
Wet valves
If you choose a water seal for a bathhouse based on the efficiency of locking, then the best option would be a hydraulic circuit with a curved U-elbow, or an annular chamber with a concentric partition.
Eternal knee
A water seal in the form of an elbow requires a free space of at least 150 mm in height for pipes with a diameter of 50 mm and an overhang of 250-300 mm for a full drain with a cross-section of 100 mm. Therefore, knee bellows are used primarily for bathhouse projects on stilts or columnar foundations. To reliably lock the pipe, the height of the water column must be at least one and a half diameters of the channel.
The main advantage of a water seal is its simplicity of design; it is quite possible to make such a siphon for a bathhouse with your own hands from parts of sewer fittings and pipes. It turns out not as beautiful as industrially made drains, but for a bathhouse it is more important that the structure is easy to repair and simple to maintain. The knee can be easily cleaned, either with a brush or with specialized attachments, rotating brushes and even chemicals such as “Mole”.
We suggest you familiarize yourself with the passage of a chimney through a wooden ceiling
This type of drain can work in a properly constructed bathhouse for a couple of decades, until someone uses a cable to punch a hole in the plastic elbow of the water seal.
Flat water seal
For a bathhouse installed on a strip foundation, it is best to use a trap water seal. Its height usually does not exceed 10-12 cm, so the drain box can be safely mounted into the floor screed, and no additional fastenings are required for connection to the sewer.
For example, the “CENTER AQUAPA” model consists of two halves. In the bottom part of the water seal there is an annular cavity with water, which, after installing the top cover, will be divided by a partition. The result is the same bellows, but with a gate height of only 15-20 mm. The drain body is simply put on the receiving hole of the compensating adapter of the sewer pipe of 110 mm.
Important! In this case, the use of a sliding adapter is a prerequisite so that the water seal box is not torn off the pipe due to the expansion of plastic from hot water in the bathhouse.
The box-shaped design turned out to be quite reliable and easy to maintain; the only drawbacks include a small level of water in the water seal. In summer, the water in the drain evaporates, and, accordingly, odors from the septic tank will break into the bathhouse within a couple of days. Whereas in the bellows elbow the water seal will last 3-4 days.
In winter, in a country bathhouse, the drain drain may freeze, but this does not affect its operation in any way. There is little water left, so the risk of damage is minimal. A water seal with an elbow can actually be crushed by frozen water.
Structurally, the water seal with a float is very similar to the previous version of the water seal. The only difference is that in the ladder version, the outlet hole is blocked by raising the water level, and in the float version, the same window is blocked with a foam liner.
Float valves very tightly and reliably block the drain passage even with a minimum amount of liquid. In practice, the drain in the bathhouse can be reliably blocked within 10-15 days from the date of the last visit to the steam room. Among the disadvantages, one can note the sensitivity of the water seal to contamination. After soapy water, the float must be washed with clean boiling water.
Preventing blockages
Of course, it is easier to prevent pipes from clogging too often than to constantly clean them. To do this, you need to constantly follow simple rules:
- always place a grate on the drain to prevent large particles from falling into the pipe;
- after washing a large amount of dishes, pour hot water into the pipe for a minute;
- do not pour waste fat into the sink - it is better to do this into the toilet;
- It is also better to drain water after washing the floors into the toilet;
- Once every six months, try to clean the pipes with a plunger or disassemble the siphon and remove excess debris from it.
These methods will at least increase the service life of the siphon and relieve you of the need to constantly clean it.