In order for a bath broom to serve for a long time and retain its beneficial properties for a long time, it is very important to take a responsible approach to organizing the conditions for its storage. The main thing is to create a favorable environment. Here are a few simple rules, following which you can use your favorite broom for a long time:
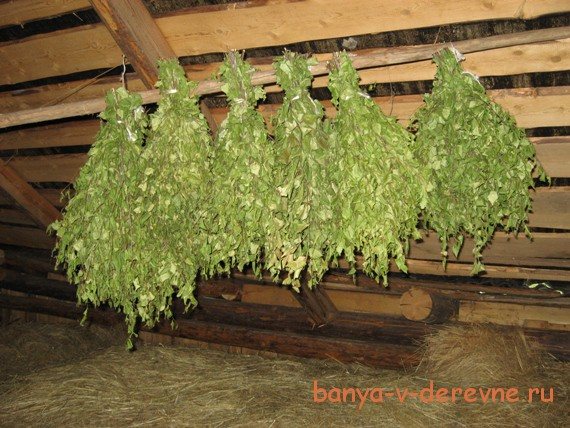
- The best storage option is hanging vertically in the attic. A dressing room or other similar place is also suitable.
- Prevent direct exposure of the broom to sunlight. Otherwise, the chlorophyll contained in the leaves is destroyed and they turn brown.
- Brooms should be placed at a short distance from each other. Otherwise, these bath accessories may simply burn out.
- The room must be constantly dry and well ventilated. A basement or tightly sealed areas will not work.
- An interesting way is to store a bath broom in a haystack. This approach prevents the product from becoming moldy and moldy.
After using the broom for its intended purpose, it should be thoroughly rinsed, dried and stored in a permanent storage area.
Optimal storage conditions
When storing the product, you should definitely focus on the optimal temperature and humidity parameters. Lighting and ventilation in the room are of no small importance.
Temperature
It is best to store brooms in a cool room. For this device, the optimal temperature range is considered to be +10-25 degrees.
Humidity
Birch brooms do not like exposure to liquids and high humidity. If this rule is violated, they begin to rot and become moldy. As a result, there is a high probability of complete rotting of the material.
Illumination
The broom should not be exposed to direct rays of the sun. That’s why they try to place it in a dark place. If the recommendation is not followed, the product will dry out and lose its aroma. There is also a risk of yellowing of the foliage and loss of beneficial characteristics.
Temperature
The optimum should be within +10-14°C. The cooler the better. Stuffy, dry rooms are not suitable: the foliage will dry out and rot for a very long time. During this time, midges and other insects will appear in it, which will turn the leaves into dust. Ventilate the room. Ideally, it is blown from several sides.
Choose cool rooms
A large number of brooms are stored in the freezer. To do this, it is better to purchase a chest freezer. For better preservation, the fagots are sprinkled with salt.
Recommendations for choosing a location
To preserve the product for a long period of time, it is recommended to choose the right place for it. There are several options that are available to every person.

Attic
The attic is a good choice for storing a large number of such products. In such a room it will be possible to store brooms for the winter. However, this is only relevant if the roof is covered with a material with low thermal conductivity.
When exposed to sunlight, it can heat up to high temperatures. As a result, the leaves can dry out quickly.
Barn
Often the only available place to store such products is a shed. It is recommended to follow some recommendations. It is important that there are no chemicals in the room. Any caustic volatile elements are prohibited. They are strongly absorbed into the leaves. As a result, the products lose their beneficial properties. At the same time, they can emit odors of paint, gasoline, oil and other toxic substances in the steam room.
Garage
You can also choose a garage to store the product. It should be borne in mind that it should not interfere with regular business affairs. It is not recommended to constantly disturb or touch the brooms, as this will damage the leaves. Instead of a luxurious accessory, you get an ordinary broom.
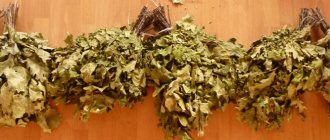
Storing dried brooms
After the broom has gone through the drying process, the first thing you need to do is bandage the handle and make the branches tied more tightly. Then the dried brooms are always stored in the dark, preferably under a dark cloth and some small weight. The point of such storage is to ensure that the beneficial components do not erode from the broom and that some useful moisture remains in the leaves.
Storing brooms under load
Storing an oak broom using the vacuum method
The ideal option is to store a dry broom in a haystack, under a small amount of hay and under other brooms. Of course, not everyone has hay and such people should be advised to store it in the dark on shelves. For example, for urban conditions, it is possible to recommend separate storage in plastic bags on shelves stacked on top of each other.
In order to increase the service life, it is equally useful to use a soft dark fabric. If a broom stored under standard conditions can be used 2-4 times, then one that was stored wrapped in cloth can be used 1-2 times more.
Storing brooms
In fact, proper storage is part of proper drying and should not be neglected, especially if you have mastered the basic information on how to properly dry a bath broom.
But a resident of an apartment who does not have other real estate is unable to prepare large-scale brooms, although on a glazed balcony it is quite possible to arrange a cabinet in which several brooms, pre-wrapped in newspaper or film, will be stored. Often, apartment residents do not prepare brooms and look for storage space, simply buying ready-made products before going to the bathhouse.
As for exotic storage methods, it is worth noting that freezing freshly picked brooms has become popular recently. In fact, this is a sure way to preserve all the freshness and beneficial properties of the broom, however, for this you need to have a spacious freezer. Therefore, at the moment, freezing bath brooms is most often done by companies that sell brooms.
We should also talk about coniferous brooms, which are sometimes used by experienced bath-goers. These brooms are the freshest of all possible. There is no need to store them - it is enough to collect fresh spruce, fir or juniper branches at any time of the year and immediately use them for their intended purpose.
- Brooms should be kept away from light sources.
- There should be no drafts in the room, although ventilation is desirable.
- Brooms should not be placed near heat sources - remember that dry brooms are highly flammable.
- There should be no foreign odors in the room with brooms, especially harsh and chemical ones.
- The room should be dry.
Methods for storing birch and oak trees
Today there are many known methods for storing such devices. This allows each person to choose the best option.
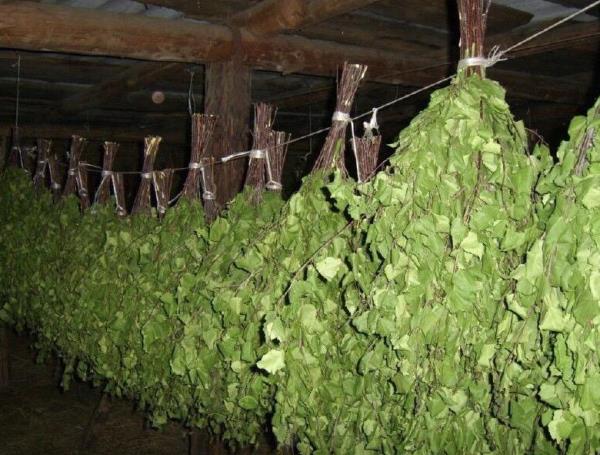
Pair hanging
The standard way to store a birch broom is to hang it in pairs. This old method has been used since ancient times. It is worth considering that when using this method it will not be possible to avoid losses.

Changes in humidity parameters and climatic conditions negatively affect the condition of the broom. As a result, the branches bend in different directions. However, it is quite possible to minimize the risk of damage to the material.
To ensure that the products keep their shape perfectly, they can be wrapped in paper. Such devices should be placed separately from each other. It is recommended to do this at a distance of 15 centimeters. It is recommended to store the device in this way in a barn or attic. A veranda would also be a good option.
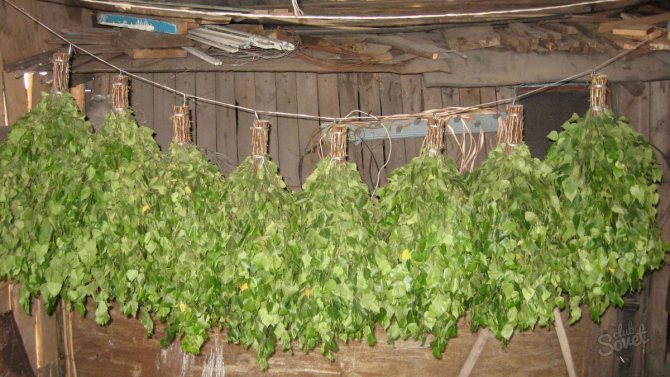
Under the ceiling in the dressing room
It is permissible to keep brooms ready for storage under the ceiling in the dressing room. It is not recommended to do this in the steam room or in the washroom. To implement this storage method, you should drive nails into opposite walls under the ceiling, maintaining a distance of 30 centimeters. After this, it is recommended to parallelly pull and secure a rope or fishing line behind the nails. Brooms should be placed on the resulting shelf. This method has a significant advantage. Thanks to its use, the dressing room will smell like birch leaves.
How to extend the life of a fir broom
It will not be possible to preserve such a product for a long period of time. In any case, the needles will fall off. Even active freezing cannot save her. The only method that will extend the shelf life of this device is to use a snowdrift.
It is worth considering that the snow should be fluffy. It is important that it does not have a crust or crust.
The advantage of such brooms is the possibility of immediate use. Moreover, it is permissible to harvest them in winter and summer. The needles always remain green. Moreover, in summer it is much gentler than in winter. If possible, you can plant a fir tree near the steam room. Juniper would also be a good option. Thanks to this, you will be able to prepare fresh brooms all year long.

Where can I store it in my apartment?
If you don’t have your own home, you can easily find a place for a broom in your apartment. It is best to keep the product in a cardboard box. To ensure high-quality ventilation, it is worth making small holes in it.
In this case, the brooms need to be thoroughly dried, straightened and placed tightly in a box. The layer is made from ordinary newspapers.
Balcony or loggia
The box with the product can be placed on a balcony or loggia. In this case, the room must be glazed.
Pantry
A good storage option would be a regular pantry. However, it is not recommended to place bath accessories on the top shelves, as it is too hot there.
If your apartment has an unnecessary wooden cabinet, you can put the brooms in it. At the same time, it is worth monitoring temperature parameters and humidity indicators. The products should be ventilated periodically.
Common Mistakes
Sometimes birch brooms begin to crumble immediately after harvesting. This is due to a violation of technological processes. Inexperienced bath attendants often make the following mistakes:
- The branches are collected too early or, conversely, too late. There are specific terms for the procurement of products, taking into account the climate of the region. Typically the season lasts from early June to mid-July.
- The product dries too quickly. This provokes a decrease in leaf strength. When drying a broom in direct sunlight, it will fall apart the first time you visit the bathhouse. Natural drying in a dark room increases the duration of the process, but helps maintain high strength.
- Birch branches are harvested in wet weather. Collecting material during precipitation is strictly prohibited. This is not recommended for 5 days after heavy rain. Also, the material should not be washed after collection. Excess moisture will reduce the strength of the product. You can wash it during the procedure - just pour boiling water over the broom.
Additional tips and tricks
To extend the service life of the broom, you should follow these recommendations:
- Fresh products must not be stored immediately. It is important to dry them thoroughly. Damp accessories often harbor midges, which lead to their damage.
- You should not store your bath accessory in a steam room, as this will cause it to become dry.
- There is no need to keep dry devices near chimneys and stove pipes. This may cause a fire.
Storing a birch broom is a rather difficult and responsible issue. To achieve good results and preserve the product for a long period of time, it is important to provide it with suitable conditions.
A steam room without a broom is nonsense in the bath business! Preparing good, solid brooms for a bath is half the battle. The main concern of the owner of his own bathhouse is to solve the issue of storing brooms: how and most importantly - where.
Our winter is long, we need a lot of brooms, and storing more than 50-100 brooms becomes a real problem.
Where to store brooms
There hasn't been much more storage space for a long time. Previously, barns, attics, and even haystacks served as storage.
Modern life has not added many storage spaces: cellars, garages, verandas, cardboard boxes, mezzanines and even freezers.
But still, finding the ideal place is not so easy. A dried broom is quite capricious and finicky.
The first task of long-term storage of a broom is to preserve the main wealth - foliage.
Dry, almost lifeless foliage is not easy to preserve: it breaks, crumbles and flies off.
Four main rules must be followed:
- Natural ventilation of the broom storage area.
- Darkness.
- Cool.
- Natural air humidity.
High humidity in the room will not be an ally during storage; the broom will freeze, become moldy and completely rot.
Direct sunlight will dry out the broom, the foliage will turn yellow, the aroma and all the beneficial properties will be lost.
The attic of your own home can be an ideal place to store a large batch of brooms if the material with which the roof is covered has low thermal conductivity.
The sun's rays heat the attic roof to record temperatures and a real inferno forms in the attic, in which the brooms will quickly dry out.
Often the only free place to store brooms is a barn or garage. But in these cases it is necessary to follow certain safety rules.
There should be no chemicals or other caustic, volatile substances in the garage or shed. All the chemicals are firmly absorbed into the foliage and the broom loses its usefulness. But it will generously return the aromas of gasoline, oil, paint, and other chemicals to the steam room.
Prepared brooms should not interfere with your daily business activities. If you constantly disturb them, touch them during work and when rearranging household objects, the foliage will break off and fall off. Instead of a luxurious bath broom, you get an ordinary broom...
Freshly frozen bath brooms - “prepare a sleigh in the summer”
Hello! We offer a simple and clear project for preparing freshly frozen brooms for a bath.
Technology: Freshly cut birch branches with foliage are knitted into brooms measuring 55*35*2cm, weight 280g - Premium category sizes. The correct shape of the fan is given manually with pruning shears. The handle is knitted with natural twine. The finished fresh broom is placed in vacuum packaging and frozen. Brooms are stored at −20°C
The average price of a fresh frozen broom from September to May is 750 rubles; on New Year's holidays the price can reach up to 1,500 rubles.
Cost of the finished product: Payment for collection, transportation costs, knitting and shaping, rental of a vacuum sealer, handle knitting, packaging, storage in chest freezers for up to 6 months, consumables, advertising - the final cost of the product is no more than 100 rubles/piece.
We have a 500 m2 warehouse in Moscow, a dry basement, within walking distance from the station. m. Baumanskaya 35/1. The property has 5 free chest freezers. Each chest holds more than 500 pieces. brooms in vacuum packaging.
In the event of a power outage, the chest does not defrost for 10 hours, which allows you to react and solve the problem in a timely manner. Utility bills are paid on time, there are no debts, there is a foreman on staff, an electrician (lives in the same house), he is also a storekeeper, access to the warehouse is 24/7, there is a lift.
We plan to prepare 2500 pcs. brooms in vacuum packaging, sold at an average of 700 rubles/piece. Net profit minus expenses and taxes will be 550 rubles. The total profit is 1,375,000 rubles.
Sales: public bath complexes, private complexes, private baths. A great gift for the New Year, a fresh green birch broom. The working title of the line is “The Irony of Fate or Enjoy Your Bath,” in honor of the popular and traditional movie of the same name during the New Year holidays; or “worry and don’t worry!”
We will involve numerous partners and colleagues in the implementation. We own several active online stores (maotorg.rf, for example), through them we will attract Internet traffic, the stores are Yandex partners. market.
Competition in the niche is low.
We offer to invest in production, storage and sales - 300,000 rubles for 6 months with a full return of the invested amount + 25% of the profit, which is 343,750 rubles (the minimum threshold, more correctly from 343,750 rubles). In terms of annual interest, this is more than 200% per annum.
Payments can be made either one-time based on the total as of January 15, 2020, or throughout the entire implementation period by agreement.
The harvest season is coming to an end, you need to make a decision now.
We can prepare a larger quantity, but we need to buy chests, the electricity capacity is enough for 20 additional chests, there is free space. Discussed separately.
We plan to sell a broom in vacuum packaging for an average of 700 rubles. Net profit minus expenses and taxes will be 550 rubles. The total profit is 1,375,000 rubles. On New Year's Day, you can sell brooms for 1,000 to 1,500 rubles, and the profit from the sale will be many times greater.
Sales will begin in September. The high period is from December 15 to January 15.
More detailed information, estimates, raw material collection locations, etc. We will provide it to interested parties. Official agreement.
Sincerely, Varvara Maksimovich, Evgeniy Kravtsov and the Maotorg team.
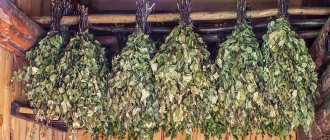
How and where to store birch and oak brooms in winter
The traditional storage method is to hang brooms in pairs. The method is old, this is how brooms have been stored from time immemorial.
Of course, there will always be losses with this method! Changes in weather conditions and humidity affect the appearance of the broom. The branches may bend and fluff in different directions. It's time to remember traditional Russian ingenuity!
To maintain their shape and protect the foliage, brooms can be wrapped in paper and hung separately from each other at a distance of 15 cm. The storage location can be a barn, attic, or veranda.
How to store a fir broom
It is impossible to preserve a fir broom for a long time. The needles will fall off with any storage method and in any place. Even active freezing cannot help in this matter.
The only way to extend the life of any coniferous broom is to store it in a snowdrift in winter. The snow should be fluffy, without crust or crust.
The advantages of coniferous brooms, unlike deciduous ones, are that they can be cut down and immediately used in both winter and summer. The needles are always green; in summer they are much softer than in winter.
If possible, you can plant fir and juniper near the bathhouse and other outbuildings. So, you will be provided with coniferous brooms all year round.
What kind of a proper birch broom is it?
The most popular broom
In cities, it has already become a habit to buy ready-made brooms for baths.
Indeed, it’s very convenient, I went to the store, picked out the right one and that’s it. The assortment is now rich, all the brooms are just right for selection - smooth, well-dried and beautifully packaged, why waste time and effort on preparing them. But what is very pleasing is that not everyone thinks and acts this way. We will tell and show those who wish to join them how to prepare bath brooms yourself. This seemingly simple procedure has its own rules, and we will talk about them.
Let's start with the fact that for most people who like to visit a bathhouse, they rarely do without a broom. It is this, along with a properly prepared bath, that allows you to achieve the maximum healing effect. That is why it must meet the highest requirements: it must be harvested at a certain period of the year, consist of the necessary branches, properly collected and dried.
A wide variety of brooms are used, but the most popular are still birch brooms.
Why them? Everything is explained simply, yes, in terms of beneficial properties they are unlikely to be inferior to those of oak, fir, eucalyptus or bird cherry, but these trees do not grow everywhere, but birch almost everywhere.
Harvesting time and features of collecting branches
They begin to be harvested in mid-June; at this time, young leaves are most tender and, moreover, they contain the largest amount of essential oils and vitamins.

Harvesting locations
Any young trees that are far from roads, cities and enterprises are suitable for collecting branches, but young groves can be considered the best. For example, overgrown fields or edges can be considered an excellent option. Of the tree species, downy birch is considered the most suitable species.
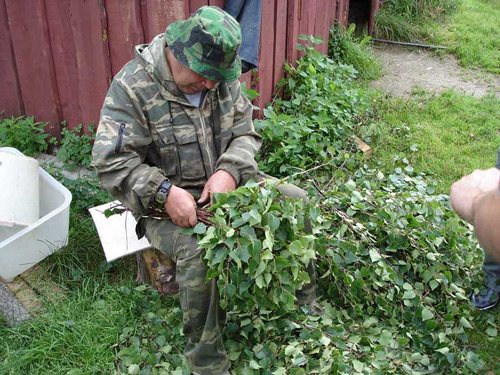
It is better to cut branches rather than break them; an ordinary garden pruner will do an excellent job with this task. For the broom, we choose not old thin branches, with a lot of foliage, without damaged, pest-infested or yellow leaves.

Collected twigs
How to knit brooms
Having collected a sufficient number of branches, we begin to form brooms. There are also some subtleties here; if the branches are simply gathered into a bunch, the broom will look very splayed out. In addition to the fact that this is not very beautiful, during the soaring process, individual shoots sticking out to the sides will quickly become bare, and gentle patting will gradually turn into torture with bare rods.
If you pay attention, you will notice that some of the branches have a bend, taking this into account, we begin to lay them in such a way that it matches in the bunch for everyone. Each subsequent branch should lie without protruding beyond the first, and thick shoots should be located inside. So we collect about half of the broom, then, taking it with one hand, we begin to pick up the second part. Here we proceed as follows: the branches in the assembled half will be inclined to one side, we turn them so that the concave side is directed inward. We add the remaining branches the other way around - i.e. In essence, the broom consists of two mirror halves. Finally, add a few straight branches to the top of each side so that the dark green shiny sides of the leaf face outward.
As a result, the broom will turn out smooth and neat. We determine the optimal number of branches very simply - when finished, it should lie comfortably in the hand, i.e. not be too thin or thick.
Next, the brooms need to be tied, this can be done with any twine, but it is better to give preference to jute. They are usually tied in twos, which makes it easier to hang them up to dry. After this, we trim off the unsightly ends evenly, for example, with a hatchet.

Ready brooms
Dry only in a well-ventilated area away from the sun. It is advisable not to dry them in the attic; the temperature there is too high, which will lead to their drying out. It is best under a canopy, in the yard or dressing room.
Drying
After some time, they will dry out and will be ready in the fall or winter to give you all their beneficial properties.
A skillfully tied broom may be useless in the hands of an inexperienced steamer; read how to steam it correctly here.
A very interesting way to knit brooms is presented in this short video.
Where to store brooms in an apartment
If you don’t have your own house, barn, or veranda, but like to steam with brooms, you can find a place to store them in a city apartment.
The most convenient and practical way is to store it in a cardboard box. You won’t be able to store a large number of brooms at home like this, but 30 pieces is quite possible.
For ventilation, small holes are made in the walls of the box. Well-dried brooms are straightened and placed tightly on top of each other in a box. You can lay regular newspapers as a layer between the rows.
The box of brooms should be stored in a dry place, but there is one caveat.
In a dry, hot room, the brooms can dry out and the leaves turn into dust. If there is excess moisture, the brooms will become moldy and rot.
Completely dried brooms can be stored at home not only in a cardboard box. They can be placed in large bags (regular checkered trunks).
You can store boxes and bags with brooms in the pantry or on the balcony. But on the mezzanine is not the best storage option; the brooms can dry out, because it’s always warm at the top.
If your household has an old wooden cabinet that has not been used for its intended purpose for a long time, it can also be used as a storage place for brooms.
Recently, freezing brooms in the freezer has become popular. For your own needs, of course, you cannot freeze a large number of brooms in your home freezer. But, as an experiment, you can freeze a few things.
We adopted this innovation from our northern neighbors - the Finns. A large number of brooms will require a separate freezer, so this storage method is more suitable for commercial purposes.
Procurement of materials and production of brooms

Types of the most popular bath accessories
Before making a bath broom, you need to prepare production materials. These materials are branches of trees of various species. There are several practical recommendations, following which you can prepare the best material and make a broom of the required quality.
Features of preparing brooms
- First of all, it is best to harvest branches from trees growing far from roads, industrial enterprises and populated areas.
- The harvesting of material is carried out at higher elevations, since experts consider the use of branches broken in the lowlands to be inappropriate.
- It is best to cut branches from young trees, as the younger the wood, the more flexible it is.
- It is advisable to start collecting materials at the beginning (birch) and in the middle (oak) of summer and certainly in dry, sunny weather.
- The branches must be fresh and always have green leaves.
- You can preserve a broom in its original form for a long time without compromising its consumer properties in the freezer. A more traditional storage method is to hang it in a shady and well-ventilated area.
Features of material selection
Of course, you can buy an artificial bath broom and forget about the need to prepare branches. But, if visiting a bathhouse is associated for you not only with washing, but also with a therapeutic relaxation effect, you cannot do without natural materials.
Traditionally, branches of birch, oak and linden are used to make brooms. The choice of such wood species is not accidental, since the foliage does not contain toxins and allergens. In addition to the fact that these branches are environmentally friendly, their effect on the body is in many ways similar to the therapeutic effect.
How to store a broom after a bath
Our Russian economy sometimes reaches the point of ridiculousness. After using the broom, you want to save it for reuse.
The broom, which is used a second time, has a rough name - maggot.
If the maggot has not lost its main supply of foliage, after the steam room it needs to be rinsed with warm water. Shake off the water and dry on a bath shelf, then hang in the dressing room.
Maggots are not subject to long-term storage, maximum until the second bath.
It is believed that the broom gives off all its benefits and strength during initial use, so most bathhouse attendants consider the use of maggots to be a pointless exercise.
How to steam a bath broom correctly
A broom prepared in summer is called dried or dry. You cannot steam it without preparation (you can hurt your skin or cause injury). In order to use branches in a bath, they are soaked or steamed in water.
To prepare a broom for a bath, place it in cold or warm water. Hot water is rarely used for soaking deciduous brooms. More often it is used for coniferous shoots and oak branches.
The infusion time of a broom depends on its wood, water temperature and how long ago the branches were cut. When soaking deciduous branches in hot water, 5-10 minutes is enough, coniferous branches - 30-40 minutes. Dried branches are soaked in cold water for 2 to 10 hours. During this time, the wood absorbs the missing moisture, and the broom acquires elasticity and flexibility.
Take note: not all brooms need to be steamed, but only dried ones, prepared for future use.
To steam an oak broom, two methods are used:
- Slow heating: soak the rods in cold water for 5-10 minutes, then add hot water to the container and leave for another 5 minutes, then add boiling water, cover with a lid and leave for another 10 minutes.
- Long soaking in cold water (up to 10 hours).
- Wrapping with a wet cloth (one day before visiting the steam room). At the same time, just before the steam room, the broom is doused with boiling water.
- The fastest heating is in boiling water (for 5-7 minutes, immediately before quilting with a broom).
It is easier to steam a birch broom. Its wood is softer, so restoring its elasticity is not difficult. The same methods are used, only the duration of steaming is reduced by two to three times.
To properly soak a broom made from coniferous tree branches, use boiling water. Shoots of spruce, cedar or fir are poured with hot water and allowed to brew (up to 40 minutes). The steamed broom is kept for several minutes in a stream of warm air (over the stones). This enhances the aroma and saturates the air with phytoncides.
However, the best broom is a freshly cut one. It retains maximum nutrients. Therefore, banshik.com recommends the best broom for a winter bath - one made from pine needles (spruce, fir, cedar, juniper). It can be tied at any time of the year, it will give a bouquet of pine aromas and healing fumes.
There is no need to soak freshly cut branches of deciduous trees. For coniferous branches cut shortly before the bath, a short soaking is used (up to 10 minutes in warm or hot water).
Three tips for storing brooms
- Fresh brooms cannot be stored immediately. The broom must dry. Damp oak and birch leaves can harbor midges that eat the broom into dust.
- It is not recommended to store a broom in a steam room; it will dry out.
- Do not store dry brooms near stove pipes and chimneys, they can cause a fire.
There is a saying: “nothing can ever be done by itself.” If you have the knowledge, all that remains is to find the time to prepare the brooms for storage.
What could be better than a good quality steam room with a good broom when there is snow and bad weather outside?!
how to pack a broom
Moving with a baby. Practical advice
In the modern world, rented apartments are becoming increasingly popular; many want to live separately from their parents, or in more spacious conditions; some come from other cities to work. They are building new housing, buying and renting out apartments, which means they have to move and transport all the furniture and belongings to a new place. But if you are renting an apartment, unfortunately, you may be asked to move out at any time. When moving, it’s good when you have enough time and you can move the furniture and things step by step, then move yourself. What if there is no such time? And you are asked to vacate your home in 10 days? It’s doubly a disaster when you have a baby and nowhere to put him. Grandmothers live in another city, or simply cannot look after the baby, best friends go on vacation, situations are different. Moving with a child is a fire, a flood and an earthquake rolled into one. And if you don’t want to accidentally find children’s shoes in the washing machine. And you don’t want your child, while you are packing things, to scatter flour around the kitchen, stick plasticine suddenly found in the closet to the carpet, try to fit between the closet and the mover, and also artistically paint your favorite chest of drawers with multi-colored felt-tip pens while you are packing your suitcase , be sure to write a moving plan and a packing plan. Of course, if you have sufficient funds, you can order specialists from an apartment moving company who will collect everything and transport it for a certain, considerable amount, I must say, in the highest class. But, if you are limited in funds, we will help you figure out exactly what you need. Do you have a plan? Take paper, pen and write down everything you need to buy and collect first. The first thing you need to think about in advance is where and how to pack. Here's what you'll need for packing: Stock up on packing tape, cardboard boxes and bags of different sizes. There are especially many boxes left in children's stores. You should agree with the seller in advance to leave the boxes for you, and also check when they can be picked up, because they are usually thrown away. It’s better to immediately take a rope to tie up the boxes and think about how you will carry them home. Be sure to buy a marker (permanent is better) and label all the boxes and bags where everything is, otherwise you risk not finding half of your things when you arrive at your new apartment. You can label the boxes in sufficient detail: “Kitchen: forks, spoons, knives, large frying pan, kettle.” You can limit yourself to only the inscriptions on the boxes “Kitchen No. 3”, and write down the contents of the box in detail on a piece of paper that will be with you. Number all your items and boxes. This will make it more convenient to count the amount of luggage and identify the contents and place them immediately in the appropriate rooms. What goes where? Initially, it is better to pack what can break. If you don’t have a TV box left, you can wrap the TV in a blanket and tie it with ropes or tape, you can do the same with mirrors. You can take the simple route - buy special packaging material, but this is not suitable for everyone, since it is not cheap. It is very convenient to put soft toys and things in bags a la shuttles (large checkered bags). Such bags are usually sold at clothing, grocery or construction markets. Large 120 liter garbage bags are suitable for the same purpose. You can also put bedding, linen, and children's clothes there. For outerwear, you can purchase special covers for storing clothes (they will be useful in the future for winter clothes). If funds do not allow you to do this, then 120-liter bags will come in handy in the lower part of which a hole is cut for a hanger hook. It is more convenient to put books in boxes. It is also easier to pack dishes and vases into boxes, rearrange them with various things, or wrap them in a sufficient number of newspapers. Where to start collecting? You can collect things by room, or you can plan packing according to things, say, first we collect outerwear, then bedding, and so on. Here you should act as you prefer, but the main thing is to write down the sequence. First, you can put away books, things that you don’t use every day, and go through pantries and mezzanines, if you have them. It is quite possible that you can easily get rid of half of your things, because it is when you move that you discover how many unnecessary items our apartments contain. You can follow this rule - if you haven’t used an item for more than 2 years, you can safely throw it away. Carpets are especially difficult to roll up. If you don’t have time to knock them out, you can vacuum them with a washing vacuum cleaner or wipe them with a damp cloth, and then roll them up, wiping the outside at the same time, and place them in the corner of the room. When transporting, it is better to remove carpets from the old apartment last, and bring them in first so that they can be immediately laid out on the floor. After they bring things in, it will be problematic to do so. Last but not least, we assemble the refrigerator and turn off the washing machine. With a baby, you often have to do laundry, so it’s better to wash all the children’s clothes in the old apartment, since in the new apartment you will have to reconnect the washing machine. Organizing the children's space It is best to assemble the children's room last. You can fold in advance things that the baby does not wear, and also slowly remove toys that he rarely plays with. But the child’s corner itself should remain the same as he is used to until the last moment. This is necessary so that the baby is not in constant stress. Moving for him is something incomprehensible to him; it is difficult for him to understand why adults are running around and collecting everything. The child must be explained in advance what is happening and where he will go. You can tell him how beautiful and good it will be in the new place, what new toys he will have there, and what a beautiful view from the window there will be. Explain to him that everything remains the same. All his things will go with him, and his mother, of course, will be nearby. It is also better to tell a very young child about this in a form that is accessible to him. But, nevertheless, the fact that the mother cannot devote much time to the baby is stressful for the child. And your task is to protect him from this as much as possible. That’s why it’s so important not to change your baby’s daily routine: walks, meals and sleep. And it is better that the toys and appearance of his bed, room, children's corner remain the same as long as possible. If your baby cannot walk, a playpen can serve you well. Even if you were previously a fierce opponent of playpens, it is better to borrow this useful invention from someone. Kids love to watch their mother run around and look at different objects. If the baby already knows how to walk and climbs everywhere he can, you will have to come up with something new every day while getting ready in order to distract him from the mountain of objects that suddenly appeared from the closet. True, the baby will most likely try to help you. And here the question arises: What to do with the baby during training? Surely the first thing that comes to mind is cartoons. But children under the age of 3 should not watch a lot of cartoons. So, toys. But it’s unlikely that the baby will want to play with familiar toys when there are so many interesting things around. Of course, no one except the mother knows what her baby likes most. But many children love to play with water. A basin of water, several bowls, and place all this wealth in the bathroom on the floor. Water can be easily removed from the floor in the bathroom, but the child will be occupied for some period and happy. If your child loves books, you can buy many interesting small books or magazines with funny pictures. It also takes a long time to play with coins, fold them and put them into bags or jars, but this is only suitable for those children who no longer put everything in their mouths and, accordingly, cannot swallow them. It is clear that it is better to wash coins with soap and water before giving them. Also, sets of horses, pets and waterfowl are going great. Such sets are inexpensive, but they will captivate your child for a long time if you show him how to play with them (if your child is over 2 years old, role-playing games with various animals are quite suitable for him). If your baby doesn’t want to leave your side even for a minute, involve him in getting ready. Assign simple tasks: put his things in a bag, put toys in a box. And help seal it. If your child has a lot of toys and he likes to take them out, throw them, and put them away again, buy nets with a frame for toys. They are very convenient to transport all sorts of small things. You can give your child a stack of colorful magazines and newspapers to tear apart. Kids love to tear newspapers and look at pictures in magazines. Comics are also doing well, there are a lot of different pictures. But this is more suitable for children over 2 years old. Children from one and a half to 2 years old cannot do one thing for a long time; they often, if adults do not pay attention to them, protest by throwing mother’s things out of the closet and throwing objects. Such children cannot be captivated by books or horses, so offer the child adult objects: saucepans with lids, a ladle, a basin. At this age, they like games in which they can fold, tuck, or move things from one thing to another. Various containers (boxes, jars, bottles) and objects that can be placed there (ping-pong balls, large pebbles, chestnuts, walnuts, pieces of foam sponge, but always of a size so that the baby cannot swallow them) will be useful. If you make a small hole in the lid of a jar-box, you will get a wonderful toy. You can put small toys there that will fit in there. Leave on the shelves that the child can reach something that you don’t mind letting go to pieces for play. And let him throw away all this wealth from there for his pleasure. During preparations, a problem may arise that the baby will follow you like a tail. This is not the worst option. Just put his favorite toys in every room. What he likes to do, and give it to him on time. Kids love to imitate their mother. Get a “magic bag”. When you collect something, place a bag next to it and let your baby put there, for example, his toys or something from drawers and shelves. The bag should not be too big, because after your baby falls asleep, you will have to disassemble it. While the baby is sleeping, it is better to collect toys without the baby. The child may think that they are being taken away from him forever and will be upset. If you have to disassemble furniture, then it is also better to do this while the baby is sleeping or on a walk. Having recklessly decided to dismantle the closet and bed in the presence of the baby, you may find that half of the screws and small parts were stolen by your baby, and you will chase him for a long time, trying to take away the “super toys”. Moreover, while you are dismantling the closet, you have to make sure that its parts do not fall on someone’s head. Therefore, ideally, it is better to order a furniture assembler so that a professional will disassemble it and reassemble it in a new place. Once everything is packed, seal the bags with tape. Children can unpack everything back. “If mom is packing, we need to help her and return everything to its place.” And when you, having finally ordered movers and a car, come to the kitchen, you can see a mountain of pots towering on the floor. Hour X When the loading of things and furniture begins, it is important to take care in advance of where the baby will be. If you have a nanny, the problem is solved - send the child with the nanny for a walk, or to her house. If there is no nanny, and there is no extra money for her, ask a friend to help you, and if a friend does not dare to take the baby with her for such a long time (for example, she has little experience with children), just send them for a walk in the yard, equipping them with instructions and everything necessary . Options vary and depend on the number of members in your family. For example: your husband is moving, and you are walking with your child or going to a new apartment with the bare necessities. If suddenly, the baby stays with you in the apartment while the furniture is being taken out, tell him in advance that people will now come to help move his crib and things to the new apartment, so that the baby is not afraid of strangers. Take him to a room where all things have been taken out in advance, or first of all, until this moment, stay with your baby in the kitchen. Leave in the room some toys for the baby, children's books, scoops, a bucket, small toys to put in the bucket. Packing an “emergency” bag In order not to forget anything, pack the essentials for yourself and your baby, something that should always be at hand. Children's medicines, and a first aid kit for adults, toiletries, a change of clothes, shoes, a couple of clean towels, wet wipes, mineral water, something to snack on. Don't forget your mobile phone and its charger. The phone number of the company from which you ordered the car and movers should be at hand, just in case. It's a good idea to have tape or string and scissors in your purse, or give them to someone who will monitor the progress of loading and unloading. When to transport your baby It is better to bring your baby to the new apartment last, when all the things and furniture have already been unloaded and arranged. Or, take the child with his crib and essentials before moving, but this is problematic, because then you will have to transport the basics from the baby’s room, which means ordering another car separately. Moving Make a plan for your new apartment in advance, and draw where and how the furniture will be placed, and in what order it will be brought in. This is necessary so that during the move there are no unpleasant surprises, say, the refrigerator does not fit into the kitchen, or first one cabinet will be brought in and because of this the bed will not fit. If you have time, it's definitely easier to move some of the furniture first. Then those things that are not things of everyday use. And only then what is difficult to do without. Be sure to estimate how long it will take to load things in advance. It depends on the volume of luggage and the number of movers. Calculate the travel time and the amount of payment for the car and loaders. It is better to start loading early in the morning in order to have time to complete the entire move before the baby wants to sleep. The first thing you need to think about is the availability of movers and a car that will actually transport your precious furniture and belongings. It would seem that everything is simple, but there are many pitfalls here. First, you need to know the volume being transported. If you are transporting both furniture and belongings, and even more so from an apartment where you have lived for a long time, it is better to immediately ask a specialist or loader to come so that he can assess with a professional eye the size of the car you need. Of course, it is better for movers to specialize in residential moving. It is better to order both the movers and the car from the same office. We advise you to contact those who charge hourly, and not for each item. Most often, it is extremely difficult to count the number of things during a big move, so everything will be counted towards you, including small handbags. And here the main thing is not to faint from the number of zeros when paying. It is advisable to transport valuables and equipment (TVs, stereos, floor lamps, lamps, mirrors, computers, etc.) in advance by car. Food When moving, there is absolutely no time to think about what to eat. Therefore, it is best to stock up on sandwiches, tea in a thermos or juices. Secondly, we need food for another apartment. What you will eat when you wake up in a new place. Tea, coffee, bread and whatever you are used to eating in the morning, I don’t think you will have the strength to run to the store in the morning. The easiest way for a child is to buy food in jars that can be quickly heated and juices; boiled potatoes, cucumbers, apples, carrots, pears, and yoghurts are also suitable. After the move Immediately after the move, count the number of bags and boxes. The first thing that needs to be assembled and installed is, of course, a crib. It is advisable that the person in charge of the move immediately tells the movers where to put everything so that furniture and things are in their place. A set of baby clothes and the baby’s most necessary accessories should be in a separate bag, which is best placed so that it is always at hand. What things are needed right away? Towel, diapers, baby powder, plates, cups, bottle, and, of course, baby toys. The list can be continued indefinitely, but it’s better to immediately think about what you and your child will need on the first evening in a new apartment. Typically, this is what is needed for washing, eating and sleeping. And now everything has been transported, the furniture has been arranged, it would seem that the nightmare is over, but all that remains is to tidy up the previous place of residence, wash the bathroom, loggias, wipe the windows and window sills, and also take away those things that we did not have time to collect. Cleaning the previous apartment If you decide to go clean the apartment with your baby, be sure to prepare or leave small toys in advance. For example, little people and a car, or a series of rubber horses or pets. Small children love small toys, besides, such toys are remarkably developing fine motor skills. Be sure to leave a blanket and a pillow for the baby if he wants to sleep. And also a stroller if your child is used to sleeping in it. Do not forget to leave a saucepan to cook something to the baby, and spoons, knives, forks, cups. You can take care of food for the child in advance, but with a quick move, as a rule, once. Then the jars of food and rapidly soluble cereals left in the old apartment will be saved. Of course, you will need all the reasons for cleaning: rags, garbage bags, mop, scoop, broom. Well, if you have a harvesting kit for kids, it will help if the child suddenly rushes to help you sweep or wash the floors. It is better to leave a few bags in an old apartment, as a rule, there are always many small things that have been forgotten. So, all the furniture is transported, the old apartment was rented out. Now you have to disassemble things in a new place. And this is a completely different story. And then no one will rush you. Although, any move is considered a difficult event, it’s not so scary, the main thing is to approach everything with humor, a good mood, and a detailed plan in the hands, and then from any move can be made a fun and interesting event, as they actually perceive. these are kids.