There is a lot of information everywhere about how to attach a bathhouse to a house, but no less interesting are the ways of adding useful space to the bathhouse itself. For example, there are often cases when the owner of a summer cottage or a country house, to save money, builds a small bathhouse, and only after a certain time he realizes that the structure is too cramped.
And if it is possible to attach a bathhouse to the house, will it be possible to expand the existing washing compartment and steam room to the required size?
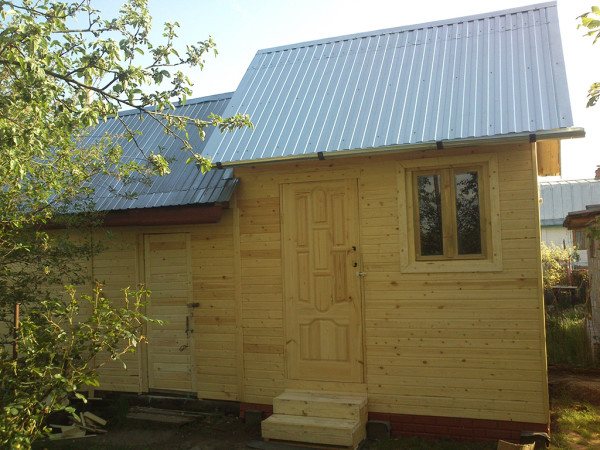
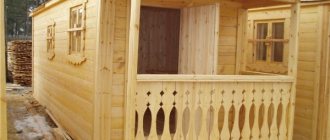
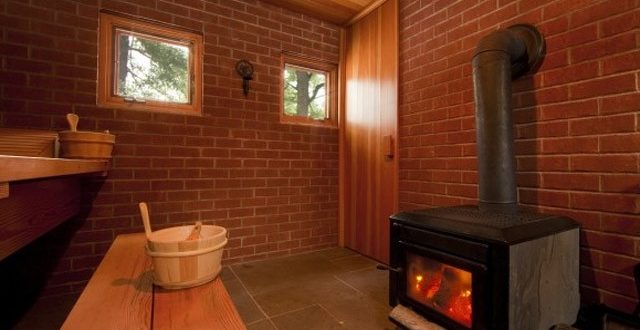
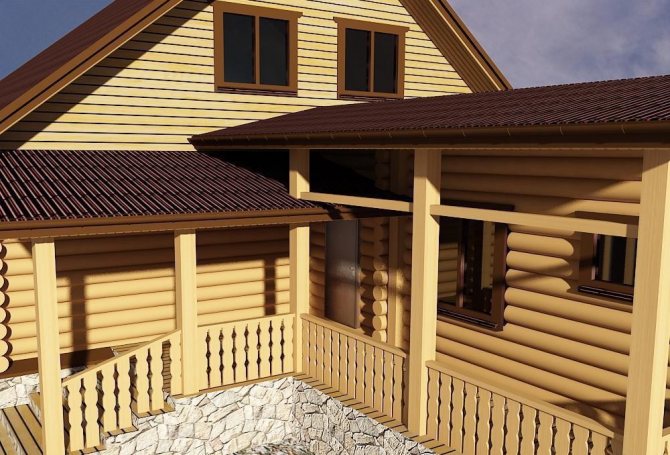
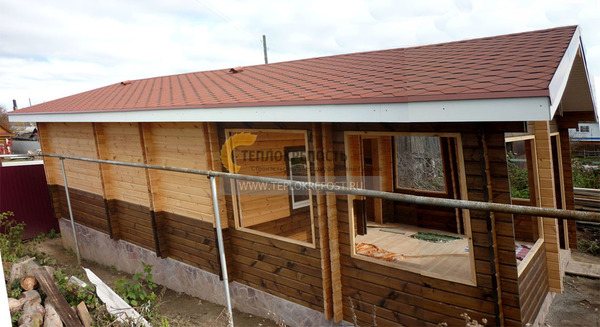
Bathhouse with attached dressing room
The above situation is not new and occurs everywhere. Considering the topicality and relevance of the issue, compatriots have tried many ways to make the bathhouse more spacious.
Extension under separate roof
A brick house with an attached bathhouse can be found much more often than similar buildings made of wood. This is explained by the fact that connecting two buildings built from foam blocks or bricks is much easier than similar structures built from timber or logs.
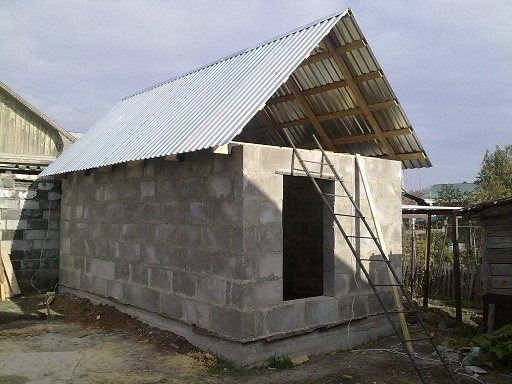
As a result, a bathhouse with an extension made of foam blocks is the most preferable option because of the durability and reliability of the result obtained and because of the ease of implementation of the project.
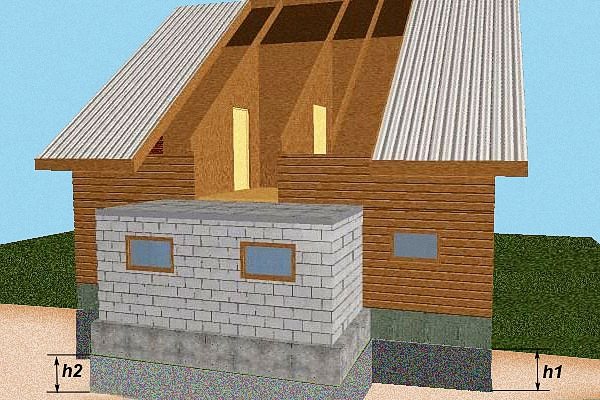
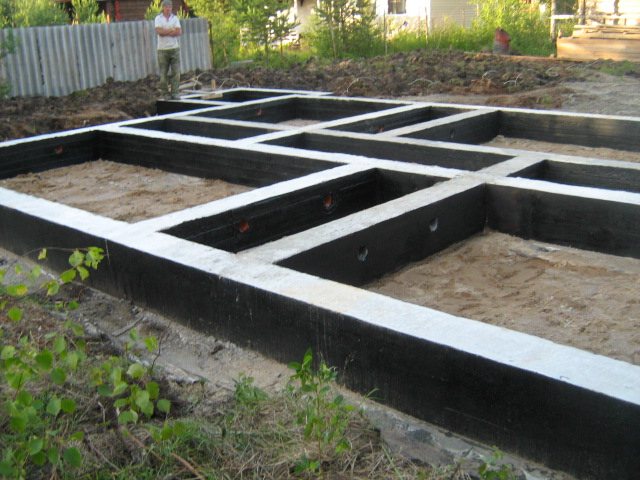
Figure 3: Foundation Features
The construction of an extension is a multi-stage work, which includes the following points:
- Preparing the area adjacent to the bathhouse. According to the construction project, the perimeter of the future structure is determined. Further along the perimeter, the top layer of soil is removed along with vegetation and the soil is compacted.
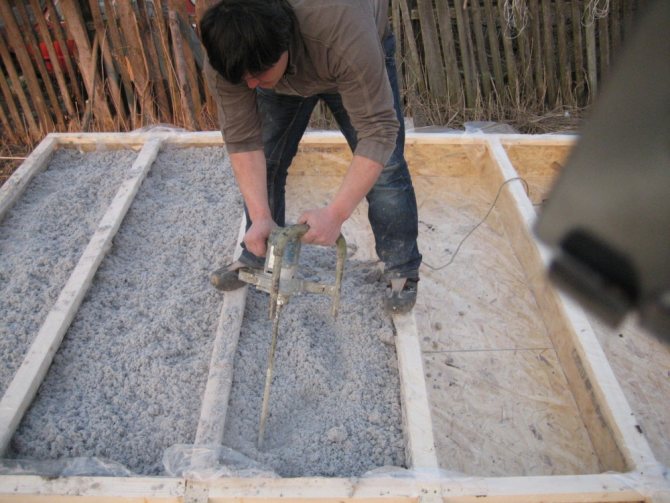
- Next, to the depth of laying the foundation of the bathhouse, a trench is dug around the entire perimeter of the extension for a concrete base (see Fig. No. 3).
![]()
Trench for the foundation with reinforcement strapping
- In the foundation of the bathhouse, we drill horizontal holes 50 cm deep into which reinforcing bars are hammered, so that a piece about 50 cm long also remains outside.
- Next, sand and gravel backfill is laid at the bottom of the trenches.
- We weld reinforcing strapping to the reinforcing bars, which is distributed throughout the entire trench.
- Formwork is laid on top of the trench so that its level coincides with the top mark of the bathhouse foundation.
- After this, the formwork is filled with concrete.
- After the foundation has completely dried (about 1 week on average), the first row of blocks is laid out.
- Next, a hole half a meter deep is drilled in the wall of the bathhouse, close to the surface of the laid block, and a reinforcing rod is driven into the hole so that a piece also half a meter long remains outside. If the rod does not lie on the block, but is located diagonally, it can be knocked out with a sledgehammer.

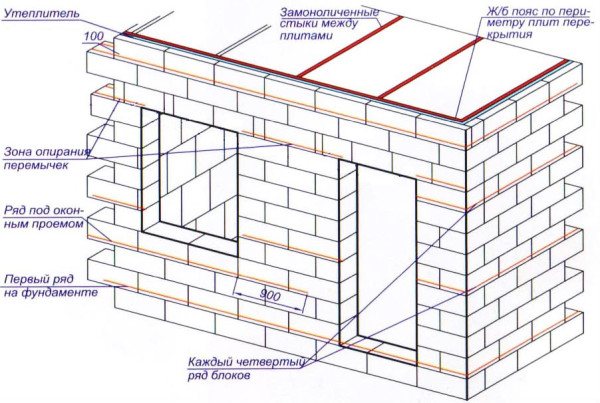
Figure 4: Laying foam block
This bunch is done every two rows. As a result, the extension will be firmly adjacent to the bathhouse. In order for the foam block to lie flat on the rod, a recess is cut out in the middle of the block with an ax to the diameter of the rod.
- Laying foam blocks (see Figure No. 4) can be done with special glue or with a cement-sand mixture prepared by yourself. To prepare the mixture, we use one part of M400 cement and three parts of sifted river sand. The mixture is diluted with water and mixed until smooth with the consistency of thick sour cream.
- In this case, the roof can be built as a common one. But to do this, you need to wait until the walls settle (in the case of foam blocks, this will take 2-3 months, and in the case of brickwork, at least six months). The general roofing system is bad because to build it you need to dismantle half of the roof of an already built bathhouse, and then put everything back together again. A separate roof is preferable in the sense that it can be assembled in a short time. Such a roof is placed on the higher side under an already used roof overhang. The roof is assembled from boards with a section of 10x40 cm and 15x50 cm, placed on edge. This solution allows you to reduce the amount of building materials used and reduce the weight of the roof without compromising its strength. Moreover, the price of the finished result is reduced.
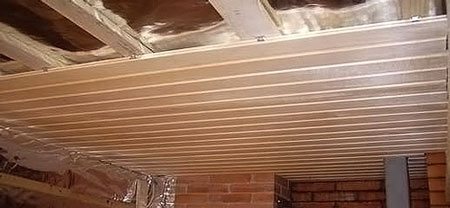
- The ceiling in the extension is made hemmed, and the plank floor is laid on joists. For wall decoration, you can use wooden lining made from linden or aspen.
Electric door closer
A silent and reliable electric closer will ensure smooth multiple opening and closing of the gate. The presence of such a device on the gate will increase the level of safety of its use, which is especially important for families with small children or frail elderly people. Such automatic mechanisms allow contactless opening of doors and gates.
With an electric closer, you can open and close the sash by simply pressing a special button. This scheme makes life much easier for people with disabilities.
The device is universal in use, durable and compact. You can install it yourself. Installing the door closer will take no more than 30 minutes. Electric models of gate closers are available in different configurations and may have special terminals for card reading.

Name of the design elements of the electric closer
The products are equipped with such executive components as a latch, a magnet and a lock. This makes entry through the gate convenient for family members and inaccessible to unauthorized persons.
Hydraulic closer
Thanks to the hydraulic closer on the gate, you can adjust the strength and speed of the door slam. This device provides convenient adjustment of free play to ensure tight closure of the gate. Such closers work with both external and internal types of hinges. Their installation does not require the installer to have special knowledge or experience.
You can install a hydraulic closer yourself. If you strictly follow the instructions provided with the accessory, you will be able to fix the mechanism quickly and reliably. This work does not require special equipment or outside help. The device is mounted on one side on the top bar of the gate or wicket frame, and on the other side on a pole.
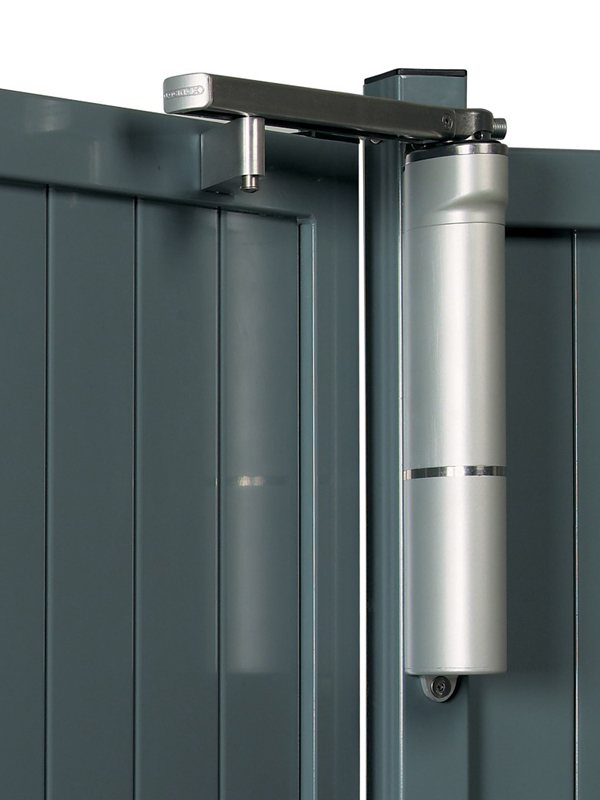
Example of a mounted hydraulic closer
Such a mechanism is made of special metal alloys, for example, aluminum alloy 6082, 6063 or AD-31. During the manufacturing process, all devices undergo heat treatment, which provides additional strength to the profiles.
Closer mechanisms for gates are designed for constant operation outdoors. They withstand sudden changes in air temperature, numerous openings and closings of the door and any vagaries of the weather.
Where to start building a frame bath?
First of all, you need to decide on the location of the bathhouse. It may be an extension to the house, or it may be separate from it. Before starting to lay the foundation for a future bathhouse, it is necessary to determine the type of soil on the site and plan the construction itself: the number of floors and rooms, dimensions, interior.
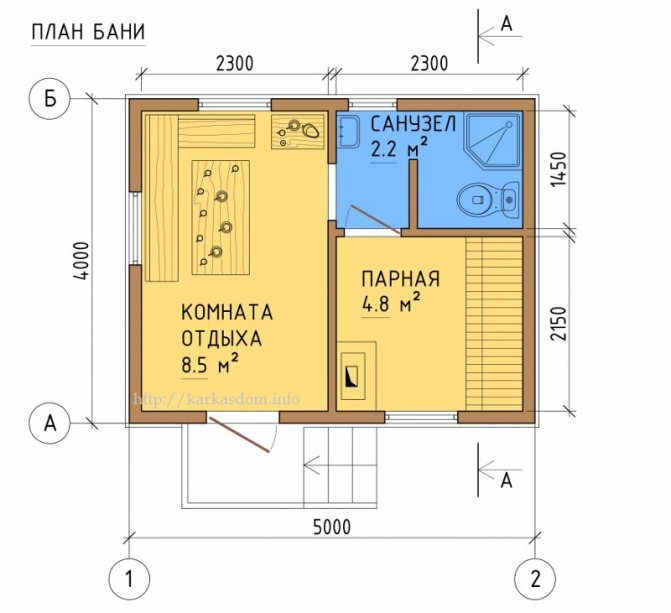
Before building a bathhouse, a plan must be drawn up, where it is necessary to take into account the specifics of the structure and estimate the volume and duration of work. The plan should indicate all elements of the ventilation system, chimney, roof features and other important aspects. You can also attach a veranda or terrace to the bathhouse.
In order for the bathhouse to be comfortable and able to accommodate several people at the same time, its dimensions must be appropriate. The most optimal option for a steam room is 240x200x220 centimeters.
At the discretion of builders or customers, the bathhouse can be equipped with a billiard room, a relaxation room or an additional steam room.
The plan for the future bathhouse should be drawn up as accurately as possible and taking into account the smallest details - this way the construction process itself will be much simpler. The bathhouse project can be ordered from specialists. They will do everything competently and clearly, which will help avoid major mistakes during construction.

Also, when planning a bathhouse, a table is drawn up to record all the materials necessary for construction, which is correlated with the plan.
Materials required to build a frame bath:
- cement for pouring the foundation;
- sand;
- beams for mounting the frame and ceiling;
- beams;
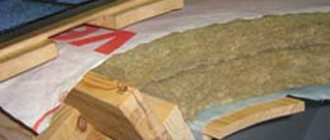
- insulation material in a roll (mineral wool, ready-made mats, polyethylene, roofing felt, glassine);
- waterproofing film for walls and ceilings;
- lining for internal wall cladding;
- roofing material for the roof.
Pneumatic closer
In conditions of harsh and intensive use of the gate, it is preferable to use a pneumatic closer. The use of this device provides gentle braking to the door. The functionality of the closer is ensured by the fact that during the operation of the gate, air is compressed in front of the piston, and a vacuum is formed behind the piston.
Most pneumatic models have the following general characteristics:
- Operates at any air temperature (from +50°C to -50°C);
- They have a large opening angle (up to 160°);
- Made from stainless steel;
- They use polyurethane cuffs as seals;
- The rotating unit and the pneumatic cylinder have a hinged connection;
- Can be installed on both the left and right doors;
- Mounted both vertically and horizontally.
An outdoor pneumatic closer is a frost-resistant, reliable and versatile mechanism that will ensure the functionality of gates and wickets throughout their entire service life.
It can withstand severe loads typical of yard and gates. If the door is equipped with such a device, it improves the quality of life of a modern person and extends the service life of the gate itself.
Conclusion
Many people know how to attach a gazebo to a house, but not everyone knows how to attach a bathhouse to a house. An extension has always been considered a difficult task, since it is necessary to achieve maximum strength and reliability of the connection of two essentially separate construction projects.
The recommendations given in the article will help you cope with your tasks and achieve optimal results. If there is no need to save money, construction can be entrusted to specialists. You can find more interesting and useful information by watching the video in this article.
General installation rules
A door closer for a street door must be selected taking into account the conditions in which it will be used. The mechanism for outdoor use must be frost-resistant, resistant to heavy rainfall, and also match the weight of the door. When purchasing a device, it would be correct to seek advice from a specialist - a sales department manager. Anyone can install a door closer on a gate. The installation process cannot be called complicated, but it requires care and accuracy.
Properly done work will ensure a long service life for the device itself and ease of use for the gate. The door closer can be installed on any gate or door.
General rules for installing a door closer:
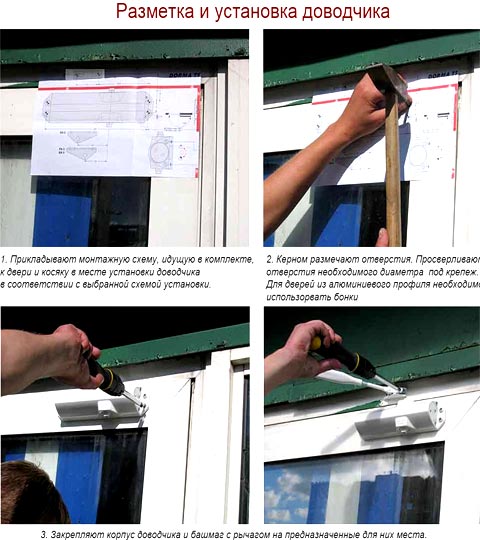
A template is included with the closer, which is applied in the appropriate place on the crossbar. The mechanism is fastened according to the markings on the template.
A door closer is a mechanical device, the purpose of which is to ensure automatic smooth closing of the door leaf and its fixation. In addition to saving time, it reduces wear and tear on hinges, locks and other door hardware. If you want to choose a gate closer and how to install or adjust it yourself, then you should read this guide.
The main thing that distinguishes a gate closer is that it is used under increased load (high inertia of the door, frequent opening and closing, wind pressure, impacts) at different temperatures (from -30 to +50) and with direct contact with moisture and icing. Therefore, only devices designed for outdoor installation can be used. “Internal” mechanisms that are not designed for such harsh conditions will very soon fail.
The main criterion for choosing a mechanism: the weight and width of the door leaf that it serves. Based on these two parameters, the moment of inertia is determined, by which the power of the mechanisms is classified.
Attention! If the width of your gate is more than 1600 mm. – the use of even the most powerful models will be ineffective.
Measure the angle at which the door opens.
You also need to prepare (strengthen and paint) the door leaf and support in areas of potential installation. These places depend on the model of the mechanism, which we will discuss later.
The presence of a veranda in your home allows you to turn an ordinary house into an original and unique structure. If the veranda has already been built and you plan
The presence of a veranda in your home allows you to turn an ordinary house into an original and unique structure. If the veranda has already been built and you plan to glaze it, then you can do the glazing yourself. Before glazing your veranda, be sure to determine how you will use it. In warm weather, glazing is needed to protect from bad weather. But all year round, windows protect from rain and frost. But remember that you just have to make one slight mistake, and the windows of the veranda, which you made yourself, will destroy the entire harmonious appearance of the veranda.
- Veranda glazing project
The delights of a glassed-in veranda
The veranda is a small structure on a lightweight foundation. This is something between a living room, a gazebo in the garden or an open terrace and is an excellent addition to a country apartment, decorating the architectural ensemble and protecting the entrance to the house from bad weather conditions. According to building standards, the building is classified as unheated.
Many of the owners prefer to spend their free time on the veranda with a cup of coffee. On a hot summer night, they can sleep in the open air, listening to the birds singing and feeling the breath of a light breeze on their cheeks. True, on an open veranda, as in a garden, a person is not immune from unexpected rain and mosquitoes.
To actively use the veranda as an additional room nine months a year, you need to consider glazing the veranda, which allows you to prolong the pleasure of spending time in cold and inclement weather. Moreover, the price of glazing a veranda is not so high if you approach the work wisely.
Windows are the main building element of this room. The larger their size, the more light gets onto the veranda. In addition, if you wish, on a hot day you can completely remove the window frames and hang light curtains in their place. In this case, be sure to provide a place to store the removed frames.
Windows for the veranda
Recently, window models have appeared on sale that differ greatly from standard products in their size and profile width. When constructing a veranda, they try to install small-sized windows with wide sashes; they often give preference to forged bars.
Swing models
This option is the most common. Wide windows can be made of 2 or 3 parts; only one half opens, and the rest do not. Swing structures ensure minimal heat loss.
When calculating the cost of glazing a veranda and designing the width of the window, you should pay attention to the ease of opening the frame. After all, the open window frame, which is about 1 meter wide, protrudes greatly from the window opening. Therefore, it is customary to choose narrow window products with a width of approximately 0.6-0.8 meters.
Sliding models
Sliding structures are very practical in terms of aesthetics. Open frames do not take up space and are practically invisible. They move on special skids, but the gaps between the frames provoke increased heat loss.
Having chosen aluminum glazing for the veranda, in the fight for tightness of closure and warmth, many sliding windows for the veranda are produced with an attracting mechanism, but this often complicates the procedure for opening the window. The easiest to use are sliding PVC window products.
Sliding multi-frame models
Sliding multi-frame structures are designed for use on wide window spans. Opening is carried out according to the principle of operation of an accordion or bus doors: the general door is divided into several narrow frames that are interconnected.
The window opening is opened by sliding all the frames at the same time. Such systems are most often installed during the construction of an open veranda for the summer, and sometimes for the purpose of transforming the veranda into a terrace.
Glazing the veranda with your own hands
The type of glazing you want for your veranda needs to be determined before construction. Usually, during the course of work, developers very rarely change their plans for building a veranda because each type of glazing a veranda with their own hands involves a certain preparation of door and window openings.
Veranda glazing project
If you decide to glaze the veranda yourself, you should start by drawing up a glazing project. Each owner sees his own veranda in his own way, but there are basic rules that are mandatory for all types of such buildings, regardless of their size and purpose.
Even with a modest size, the veranda should be light and remain spacious - this can be achieved by installing large windows that provide an excellent view of the surrounding area. Plan the glazing so that as many sashes as possible open, ensuring the flow of fresh air into the room. Consider protection from insects and buy mosquito nets.
If all measurements and calculations are made correctly, then it is quite possible to carry out such an event in one day. You can do simple veranda glazing options yourself, but for more complex installations you should invite specialists.
Glazing the veranda with old frames
First, start tidying up the old window frames. Clean the wooden surfaces of the frame from cracked paint, if any. Using putty, smooth out the joints of parts and chips in the binding. After such an operation, dry the frames thoroughly.
Use fine sandpaper to clean the front surfaces of the frame, remove excess putty and wood fluff that has risen when moistened. Finish the window frame depending on the result you rely on. If you want to preserve the natural pattern and color of the wood, it is better to use transparent varnishes as a finishing material.
Old window frames can be finished using opaque, moisture-resistant paints that are intended for exterior decoration. Directly glazing the veranda with old frames comes down to installing the glass in the old frame, fastening and sealing. To save money and make it convenient to get glass of the right size, it is best to order a service from glaziers.
Apply a layer of sealant measuring 2-3 centimeters into the grooves of the glazed frame. And dry it slightly. Place the glass, cut to size, into the grooves and lightly press them against their surface, and then reseal the glass around the perimeter. Using a pre-finished wooden bead, the glass is secured around the perimeter. All that remains is to install the frame in the window opening.
Glazing of the veranda with frames with one glass
This type of glazing of the veranda is most often used in dachas, where the owners spend their time only during the warm season. But this particular technique is classic and easy to implement.
You can replace cracked and broken glass yourself without outside help. Summer residents opt for this option, since there is no point in spending more seriously if no one uses the garden house in the winter.
Modern wood processing and the use of new varnishes, impregnations and paints eliminate the need for developers to frequently paint these windows and make the material itself more durable.
The rattling of glass in the frame, the ingress of dust and rampant drafts are excluded, because during the work it is customary to use transparent silicone sealant and new types of rubber seals.
Glazing of an extension with wooden windows
This technique is considered more expensive even in comparison with the price of high-quality metal-plastic windows. It is chosen by those owners who especially value comfort and care about creating a favorable atmosphere in the house. Organizations that produce euro-windows from wood claim a long service life of these products. Ordering and installation of window frames occurs after the openings are created. Their initial installation requires the participation of specialists, but you can carry out all future removal and installation yourself. Window blocks should not be too heavy or large, but should be precisely adjusted to the existing openings.
It is customary to order wooden Euro-windows mainly for heated verandas, where the owners want to spend time even in the cold season. Since such an extension is often problematic to heat, the issue of the energy-saving properties of the veranda becomes acute.
To minimize heat loss, double-glazed windows are made of special glass, which in winter does not allow energy to pass from the veranda to the street, and in warm periods prevents the room from heating up too much from the sun's rays.
Glazing with metal-plastic windows
The veranda can be completely glazed with metal-plastic euro-windows. And this can be a room without heating or a heated room. Depending on the situation, it is customary to choose the type of windows. Installation of such structures is carried out only by professionals, since this situation requires special training.
The qualitative characteristics of such structures depend largely on the properties of double-glazed windows. To ensure excellent thermal insulation of the veranda, it is necessary to use glass with a special coating, between which inert gas is pumped. The type of profile chosen for the manufacture of the structure also influences heat saving.
Glazing with sliding panels
Sliding glass panels that form the front part of the veranda are in high demand today. Glazing a veranda with an aluminum profile will cost more than other types of glazing, but the efficiency is higher. There are models on sale that open remotely - movement is provided by an electric drive.
By installing transparent tempered glass structures in the veranda that extend from floor to ceiling, the result is an excellent view and the possibility of fully ventilating the veranda, which, when such panels are fully opened, easily turns into a terrace near the house. Sliding window systems are advantageous because they do not take up much space when opened and are suitable for all types of buildings. Their installation requires the participation of specialists.
Frameless glazing of the veranda
Stylish frameless glazing of the veranda, which was invented by Finnish specialists back in the seventies, is rapidly becoming fashionable today. This technology creates the effect of an airy and light structure without frames or vertical posts. The frameless design is a continuous glass surface, which is made of durable tempered glass.
The system consists of an upper profile and a lower supporting guide. Each glass bottom and top is equipped with hinged rollers, allowing the sashes to move freely along the guides. The glass can be opened completely or in the form of a book.
If you manage to break frameless glazing, the glass will crumble into small crumbs that will prevent a person from getting hurt. The heat-saving performance of such glazing is slightly lower than that of the frame version, and therefore it will be a little cold on such a veranda in winter.
Glazing of the veranda with polycarbonate
What is better for the home, glass or polycarbonate glazing of the veranda? This question cannot be answered unambiguously. Polycarbonate glazing will allow owners to save on energy costs, because a high degree of thermal insulation can keep the room warm. In addition, cellular polycarbonate is much superior to glass in terms of strength, which helps protect the building from any damage.
Cellular polycarbonate has excellent light transmission, which is important if you plan to occasionally work or read on the veranda. You can’t do without good daylight when arranging winter gardens. Glazing of greenhouses requires high light transmittance and the ability of the coating to scatter UV rays, so it is impossible to find a better material than polycarbonate.
Glazing a veranda with cellular polycarbonate is possible using material of any shade and various shapes, since it is characterized by high plasticity. Thus, replacing glass windows with polycarbonate is a profitable and reasonable solution.
Window manufacturing technologies
If you have never made window frames and do not have special equipment at your disposal (at least a combined multi-operational circular saw), then you will not be able to make high-quality window frames for the veranda. There are several technologies that you should know.
Continuous glazing sometimes does not require dismantling. This technology is considered relevant when glazing a room using the principle of creating a “blind” window. To do this, attach pre-prepared cut and sanded slats to a wooden beam using self-tapping screws. Glue the glass onto these slats on both sides with silicone sealant.
Continuous glazing may involve the manufacture of single window frames without the possibility of opening, but such windows can be easily removed at will. The simplest frame can be made from sanded timber. It is necessary to fasten the window frame slats using metal furniture corners and long self-tapping screws.
To prevent the corners from being too conspicuous, you need to cut them into the frame. Take glass that is a couple of centimeters larger than the internal size of the window frame. It is applied with silicone sealant. And on top the glass is covered with a platband.
Continuous glazing can also be made for double frames. The technology described above for a single frame should be slightly modified. Make the frames as in the previous case, only you should increase the size of the frames in such a way that they overlap each other when closing by 1-1.5 centimeters.
Make sure that when closing the window, a gap is formed at an angle. Be sure to install a silicone seal. The larger the wedge, the tighter and easier the frames will close. Once you have organized the normal opening and mating of the two frames, you can begin installing the platbands.
There are many ways to make window frames for a veranda on your own, and if you wish, you can find photos of veranda glazing to suit every taste. The originality of the appearance of the veranda directly depends on the design of the windows. The combination of wide and narrow, low and high window openings largely determines the appearance of the facade of a residential building. And if you plan to make insulation in order to extend the period of spending time on the veranda, then at the same time, to extend the duration of use of the veranda, you should purchase infrared heaters.
“Their” and “our” standards
All closers for internal doors or for outdoor gates, manufactured or imported to Russia, must comply with GOST 56177-2014. We are interested in devices with code DN (overhead), possibly DF (with additional functions, such as a delay before closing). After the letter code there are numbers and letters. What do they mean? In order:
- grade (from 1 to 7). The greater the moment of inertia, the higher the class (from the table it is found based on the measured mass and width of the web);
- reliability (from 1 to 3);
- Possibility of use in fire doors (need 1, meaning “yes”);
- application in different climates. Code N (normal) – from -15 to +40. Code M (frost-resistant closers for gates) - will work below -15;
- corrosion resistance. 1 - highest;
Overhead model with delay function before closing, for a door with a width of 1000 mm. weighing 55 kg, class 1 in terms of reliability, for frosts down to -20, maximum corrosion resistance will have the code DNDF311M1.
In Europe, the EN 1154 standard is used, which also defines 7 classes according to moments of inertia. Inexpensive models are produced in one class, for example EN 2. Those that are adjustable will have a code like EN 2-4.
It is advisable: do not buy a mechanism “with a reserve”. This will not add durability, it will just require more force to open. If instead of one mechanism you purchase two that will stand on the same axis, then this increases the efficiency not by half, but by 30%.
Various types of mechanisms
- electric. Combines the functions of a closer and a lock. A low-power electric motor powers a gearbox with an electromagnetic clutch. The mechanism is small, the door can be opened by pressing a button and locked in the open position without wearing out the mechanism. Expensive models can be equipped with a card reader. A gate door closer with a shut-off switch is convenient for people with limited mobility, and also if you regularly need to carry a baby stroller through the door;
- pneumatic closer - more universal, because works thanks to the vacuum inside the piston. Its “lifetime” is limited only by the tightness that the polyurethane cuff “holds.” Installation options - both vertically and horizontally. The hinges need to be lubricated approximately twice a year. Low-quality mounting plates and bolts may be supplied with inexpensive models - this is worth paying attention to;
- hydraulic - the opening force is transmitted through gears to a compressed piston. The opening force and smooth closing can be adjusted using bolts located on the body.
- spring closer - homemade, homemade or factory-made. It is attached with self-tapping screws and has one speed. Usually “holds” small gates weighing up to 30 kg. Manual force adjustment. It is trouble-free, the main thing is that the spring is protected from moisture.
For external closers, a lever mechanism with an upper type of fixation is common (right or left, depending on the door).
Options for combining a bathhouse with a house
There are 3 options for combining a house and a bathhouse:
- These buildings have one common wall. In this case, the bathhouse will have 3 walls of its own.
- The bathhouse has 4 walls of its own, one of which is adjacent to the house.
- The bathhouse and the house are separated by a distance of about 1 m. The buildings are connected to each other by a common heated vestibule.
In the first two options, the roof can be common, and in the third option, a separate roof for the bathhouse is made.
How to install
Most street closers (minus electric ones) can be installed with your own hands. To avoid vandalism, it is better to mount from the yard side. Using a level, the canvas and support column are marked. The mechanism is screwed onto the gate with self-tapping screws. A counterplate is fixed to the support post at the same level. If the pole is brick or reinforced concrete, then it is better to secure it to a metal anchor plate. After this, a movable lever is attached and adjusted between the mechanism and the rod.
Interesting: how to install a door closer? On top or in the middle of the canvas? Spring closers are most effective in the middle, the bulk of hydraulic and pneumatic closers are at the top.
If you have a gate without a top crossbar, then it is advisable to install a pneumatic leverless closer. Such vertical closers for gates also consist of two parts: one is attached to the support, the second – to the canvas. When closing, the door presses on the spring, compressing the piston with gas. As the gas expands, it presses on the spring, which can be adjusted for smooth closing. Depending on the model, they can provide an opening angle of up to 180°.
Note: a gate with a closer, equipped with a device for fixing the leaf in the open position. Without it, the device will “resist” the door being open for a long time, and will quickly wear out.
Benefits of adding a house extension
Before attaching a bathhouse to your house, you should carefully consider all the details of the project, so that you don’t have to redo any defects later. The construction plan, which meets all modern requirements, provides for:
- heating;
- water supply (hot and cold water);
- sewerage
The first big advantage, given that the house itself already contains all the necessary communications, is savings. In this case, you will not need to re-lay everything, which will save you from unnecessary costs. And if you place the bathhouse next to the boiler room, the costs will be halved.
The second significant advantage will be the ability to get into the bathhouse directly from the house, if a direct passage from it is equipped. Another good solution would be a door located next to the central entrance.
In the bathhouse attached to the house, you can set up a washing area. This will eliminate unnecessary noise and clutter. It can accommodate a washing machine, clothes dryers and ironing accessories.
The last, but not least important advantage is the opportunity to arrange a shared terrace, which will be convenient both for relaxing after a bath and for simple evening gatherings.
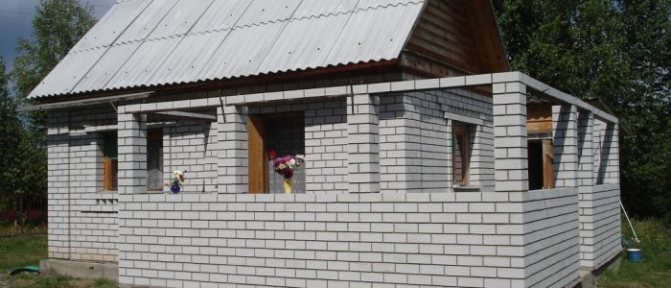
Brick is almost the only building material that does not require exterior finishing. Beautiful brick bathhouses (and any other buildings) are not covered with anything on the outside. The presence of a gazebo, terrace, veranda makes a brick bath not only more beautiful, but also more functional. In addition, this is a way to diversify the design and get an original project from standard elements.
The design of a brick bathhouse with a terrace provides for a common strip foundation. The terrace is especially relevant for baths with a small rest room. Then the terrace takes on part of its functions in the warm season. This is a good solution for compact summer cottages and suburban areas.
It is much cheaper to build a large terrace than a large bathhouse. Brick is an expensive building material.
Typically, projects of brick baths with a terrace have an emphasis on external decorativeness. The inside of a brick bathhouse always has a standard finish: the brick is lined with wood, but on the outside there are a variety of options available. It is better not to cover the brick itself on the external walls with anything.
When laying, you also need to carefully make all the seams and remove mortar drips, then the walls will look very presentable. On the terrace, the number of external options is much greater. The traditional solution is a wooden terrace. In second place are steel and forged structures.
For many regions, building a bathhouse with a terrace may not be practical due to the climate. In this case, the terrace must be replaced with a glazed veranda. In summer it serves as additional space to expand the rest room, and in winter it helps to conserve heat in a heated bathhouse.
A brick bathhouse with a veranda requires good insulation. To glaze a veranda, you can use not only classic “cold” glazing, but also warm “residential” options. The veranda, like the terrace, is built on a common foundation with the bathhouse. The walls of the veranda are usually made of wood.
Instead of a terrace and veranda, you can attach a gazebo to the bathhouse. This is perhaps the most original and rarely used option. A brick bathhouse with a gazebo is being built using classical technology. The construction and interior decoration do not change here, but for the gazebo a wide variety of design and construction solutions are possible.
Gazebos are appropriate for large and medium-sized estates. They go well with gardens, hedges, and well-designed landscape designs.
If you were planning to build a gazebo on your garden plot, then you need to think about combining it with a bathhouse. In this case, material savings will be ensured. You just need to carefully select a design project. It is necessary to match the style of the gazebo and the landscape design of the rest of the site. Only in this case will a brick bathhouse with a gazebo under one roof look harmonious.
A bathhouse in the form of an extension to a house made of brick or stone would be the best option if the area of the site does not allow the construction of a separate building. A typical example is plots in cottage villages with expensive land. A house with an extension-bathhouse is designed initially (then ready-made designs of brick houses with a bathhouse are used), or the bathhouse is attached to an already finished building.
The construction technology is no different from ordinary brick houses. Brickwork is erected on a strip reinforced concrete foundation. Each row is laid out strictly according to the level, observing the thickness of the seams.
It is advisable to make the entrance to the annex bath internal. This will save you on heating costs. If the bathhouse is attached to a finished house, then the opening for the door must be punched in brick, stone or concrete. Before carrying out this work, be sure to consult with construction specialists. Usually this question is clarified when obtaining legal permission for a bathhouse extension.
When constructing a bathhouse extension, savings are achieved on materials (3 external walls instead of 4) and communication wiring. The overall solution is ergonomic and profitable.

The only thing that reduces the popularity of such projects is that a separate bathhouse looks much more beautiful and more expensive than an extension. Therefore, an extension bathhouse is erected when a separate building does not allow the construction of the site area, or when functionality comes first. This solution will also be appropriate for very northern regions.
As already mentioned, a steam room attached to the house will save space on the site. In addition, such a solution is beneficial from the point of view of comfort in the winter, when to visit the bathhouse you do not need to go out into the cold, but just open the door and go to another room.
Another advantage of the attached structure is the possibility of increasing the usable area of an existing bathhouse. For example, a steam room was initially built without a relaxation room, but over time the owners decided to make it more comfortable and connect it to a nearby residential building.
If the location of the buildings does not allow them to be connected to each other in the traditional way, using an L-shaped bathhouse design will help solve the problem.
When asked whether it is possible to attach a bathhouse to the house, we answer in the affirmative. Let's try to describe the process of expanding an already built bathhouse by adding an additional room.
Let’s imagine the simplest situation, when a building with a washing room and a steam room does not have a dressing room. As a result, the facility can only be used during the warm season. By completing the construction of the dressing room, it is possible to provide the possibility of all-season, more comfortable operation of the bathhouse.
The instructions for adding an additional room are largely determined by such factors as:
- Bathhouse type and configuration;
- Age of construction;
- Roofing system configuration;
- Type of foundation and level of its depth;
- Construction materials used in the construction of the main facility;
- Budget and time frame allocated for construction.
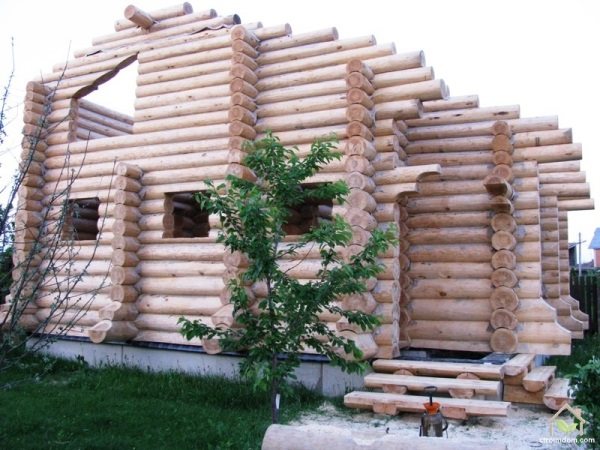
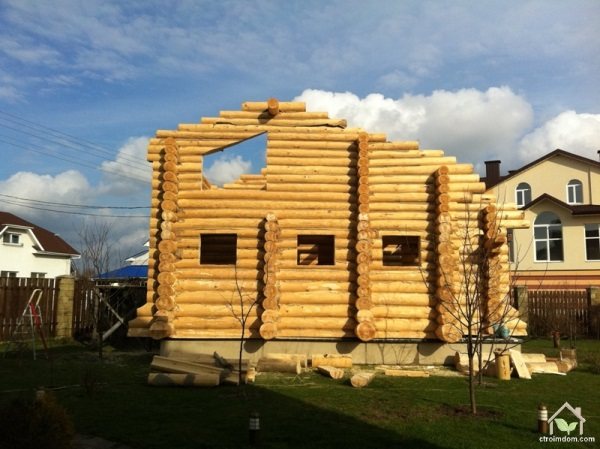
Bathhouse attached to a house made of rounded logs
In this case, a do-it-yourself extension to the bathhouse will also be made using wood (profiled timber or rounded log).
- At the initial stage, an extension project is drawn up and an estimate for the purchase of building materials is calculated.
- Next, the site is cleared for the future extension according to the project.
- The foundation is laid adjacent to the foundation of the main building. In this case, the same type of foundation is used that was used during the construction of the main facility. As a rule, this is a strip or columnar type of concrete base, the laying of which should not pose any special problems. We lay the new foundation close to the old one, leaving no gaps. The bundle can be made using fragments of reinforcing bars, one part of which will be immersed in the old foundation, and the second in the new foundation. The upper part of the base and sidewalls are covered with a layer of bitumen mastic and roofing felt.
- The lower crown is laid directly on the waterproofing layer of the bathhouse. It will not be possible to connect the beams of the lower crown with the beams of the walls of the main bathhouse, so we build as close as possible. It is also necessary to provide for the presence of an expansion joint with the possibility of movement from 1 to 5 cm, depending on the height of the building.
- We use the corner connection of the timber at our discretion. The easiest way is to use a “claw” or “tenon” connection. The advantage of this solution, first of all, is the ease of implementation and the reliability of the constructed structure.
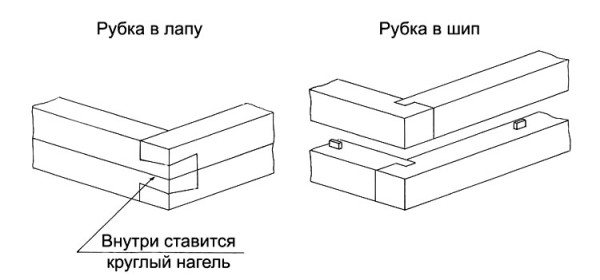
Corner Joint Types
- In the event that the old roofing system is to be rebuilt, the walls are raised to the level of the main building. If the roof of the extension will be built separately, then we raise the walls 1-2 crowns below the level of the main building.
- The gap formed at the site of the expansion joint can be sealed with an elastic material with a low degree of thermal conductivity, for example, glass wool. Cover the seam with filling on the outside and inside with a membrane and vapor barrier. We nail wooden strips on top of the insulation on both sides.
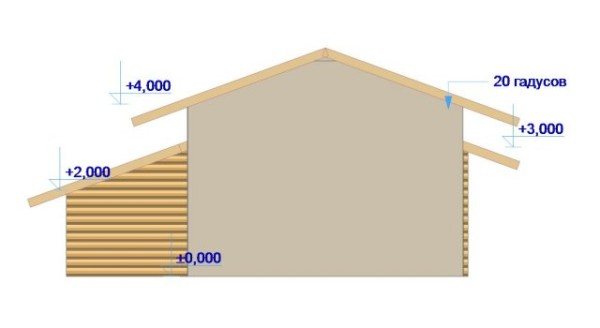
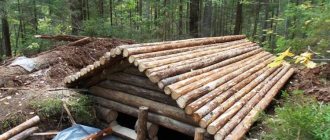
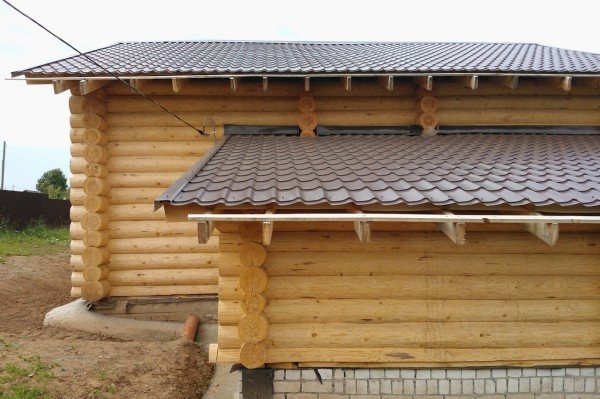
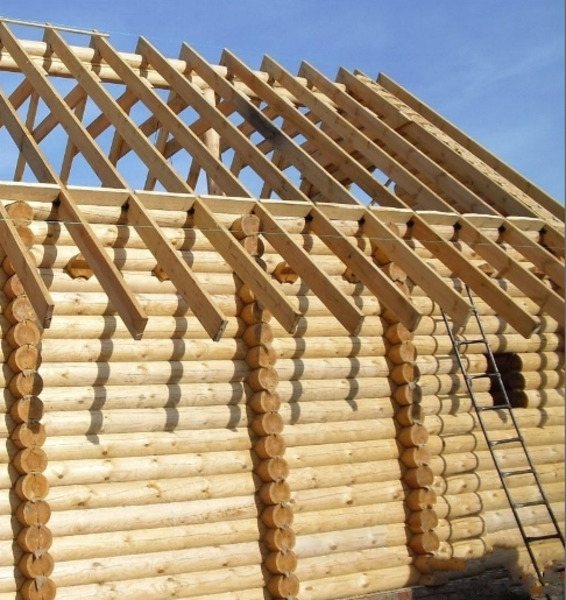
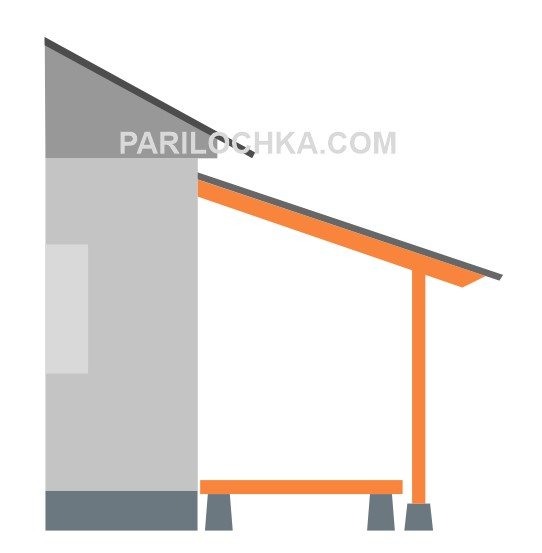
Figure 1: Split roof
The roofing system is built either common or separate. If we take into account that the wooden extension does not have a strong connection with the main bathhouse, then we can assume that the construction of a separate roof, as shown in Figure No. 1, would be an appropriate solution.
The diagram of the general roofing system, shown in Figure No. 2, is more typical for extensions to brick baths, where a good connection can be made between the walls.
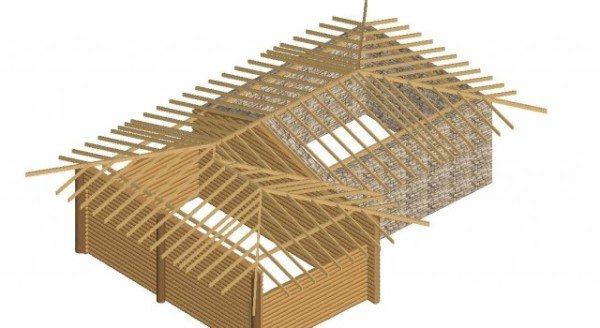
Figure 2: General roof
Extension under separate roof
A brick house with an attached bathhouse can be found much more often than similar buildings made of wood. This is explained by the fact that connecting two buildings built from foam blocks or bricks is much easier than similar structures built from timber or logs.
Terms of use
- Do not secure the door open with a brick, and do not allow children to play with the door. All this leads to premature failure of the mechanism. Doors with lever mechanisms are secured with a spring-loaded stopper;
- “manual additional closings” are also harmful. To avoid them, adjust the closing speed - quickly but gently;
- adjust and lubricate moving parts twice a year;
- if the door leaf is heavy or is regularly pushed with force and it can fly off the support, a reverse braking function is needed;
- Inspect the casing regularly - it must be intact and not allow moisture to enter the mechanism.
A frost-resistant outdoor gate closer is a device that is designed to smoothly and completely close a gate (door, gate). Installing this device allows you to automatically close the doors without performing any actions. Homeowners, summer residents and builders are showing keen interest in such modern designs.
Such devices play an important role in long-term operation
Advantages of door closers
The benefit of this mechanism is obvious - the closer will smoothly close a gate or door left open in the bustle. When driving a vehicle into a fenced area, there is no need to return to the gate to close it; the gate closer will do its job perfectly.
The positive side is that it prevents the gate from hitting the frame
The smooth operation of the mechanism allows you to significantly extend the life of the door device, its locking elements, hinges and eliminates the appearance of extraneous noise from closing.
Currently, frost-resistant door closers are a very popular product. Manufacturers offer a wide range of this device on the market. They can be used for gates, as well as installed on doors and gates.
An example of a closer with increased resistance to weather conditions
Features of door closers
Despite its prevalence and external simplicity, a number of important features must be taken into account when manufacturing and purchasing a mechanism for sashes.
The closer is a moving device, and as a result, friction strongly affects all its components. As a result of the movement of the gate, vibrations occur and it often hits foreign objects.
Each type of such device has its own strengths and weaknesses.
These features determine:
- vibration resistance;
- impact resistance;
- wear resistance.
Very often the device is installed outdoors, so when used, the mechanism will be affected by temperature changes, excess dampness, snow, ice and many other natural factors.
Most often, frost-resistant options have durable protective covers
Based on these features, the design must have the following qualities:
- frost resistance (even at negative air temperatures, the device must properly close the gate);
- moisture protection (as a rule, moisture has a very negative effect on any mechanisms. Therefore, the door closer must have moisture protection, or be made of components resistant to moisture. In any case, humidity should not affect the performance of the device).
Principle of operation
Today there are many samples on the market that have fundamental differences in their design, but the principle of operation of any of them is the same.
When opening the gate, the applied force is transferred to the mechanism of the device. The most common mechanism has a metal spring and piston. It moves along the wicket, the spring is compressed, and the created pressure generates energy directed back to the original movement of the mechanism.
Door mechanism design
When the opening force ceases to act, the energy of the compressed spring begins to return the piston, and therefore the entire gate, to its original position. Due to the fact that the cylinder with the piston contains compressed air and oil, the gate moves smoothly and evenly when closing. There are models with the ability to adjust the piston stroke, which allows you to adjust the speed of closing the gate.
Speed control
Varieties
Currently, consumers are increasingly buying door closers. Although the operating principle of all mechanisms is the same, today there are many varieties of these devices.
Depending on the type, their price can vary significantly. In order for the buyer to choose the most suitable model, it will be useful to become familiar with their main types.
Installation on the door depending on the opening direction
All closers are usually divided into three types:
- Hydraulic.
- Pneumatic.
- Electrical.
Hydraulic
Closers with a hydraulic mechanism are the most common devices today. Their work is based on the movement of the piston and the compression of the spring. They consist of two parts, one for the gate, the other for its frame. This type can work with any variety of hinges.
Diagram of the hydraulic mechanism
To install a hydraulic closer, no special knowledge or skills are required; it can be done by one person without assistance.
After installation, most hydraulic mechanisms can be adjusted to operate smoothly and quickly close the gate.
Pneumatic
One of the newest types of design is an outdoor frost-resistant door closer with a pneumatic mechanism.
What to pay special attention to when buying a door closer
Choosing a street closer for a gate or wicket is not the most difficult task, but you should still take into account some features. Otherwise, the purchased device may not work properly or may break after working for a very short period of time.
Installation and configuration instructions
The main parameters that deserve attention are:
- power is the main parameter of the closer. A device with low power will fail very quickly if it is attached to a large, massive gate. If a powerful closer ends up on a light, small gate, then there is a high probability of it breaking, the hinges coming off, and the locking device failing;
- the presence of a latch is necessary in order to leave the gate open for a while. This is required when furniture and other things are brought through the passage, and a large number of people pass through. In this case, the absence of a latch will lead to inconvenience and increased wear of the closer mechanism.
Methods of placing mechanisms
Some owners, instead of a latch, place supports from improvised means under the gate. In this case, there is a risk of creating excessive stress in the cylinder, which will also shorten the life of the closer.
Typically, all fences are equipped with gates. And if, to increase comfort, automation is installed on the gate, then the gate can be equipped with a closer. This accessory ensures smooth and, most importantly, complete closing of the gate. After all, in a hurry, you may not notice that the sash is not completely closed.
Closer
What is a closer
A gate closer is a very useful device that ensures safety and increases the comfort of use. Its main functions:
- ensures smooth closing of the gate;
- ensures that the sash is completely adjacent to the slat;
- can lock the door in the open position.
Also, the gate will not slam much when closing - and this is also a plus, since it increases the service life of the locking mechanism.
Device diagram
Operating principle
Despite the abundance of models on the modern market, the operating principle of all devices is approximately the same:
- when opening, it is necessary to apply a certain force - it is transmitted to the closer;
- because it contains a spring, it expands under the influence of this force;
- also, the mechanism involves the use of a pneumatic or hydraulic piston;
- Thanks to this, the doors close smoothly.
And in addition, in many models, it is possible to set the desired clamping force and operating speed.
Pneumatic closer
Primary requirements
Since the gate closer is used outdoors, it is subject to a number of strict requirements:
- resistance to frost - it is very important that it works at sub-zero temperatures, because if the device freezes, it will simply break during the first winter;
- moisture resistance - again, using this accessory outdoors involves direct exposure to rain and snow, so the structure must have reliable protection against water penetration;
- durability – as is normal, a good device should work for more than one year without any problems.
Based on this, it is better not to purchase the cheapest models. And in addition, it is necessary to take into account the wicket windage and weight - the power of the unit should assume the effect of wind on the plane of the structure.
Important! It is advisable that the mechanism be equipped with a special lock - it allows you to leave the gate in the open position. This is necessary in cases where you have to bring something into the yard, because if you simply support the gate with a stone, this will create tension inside the closer, which obviously will not extend its service life.
Hydraulic mechanism
When the main points are determined, you can begin the construction itself.
- Pouring the foundation.
Step one. The perimeter of the future bathhouse is determined in advance; special pegs are driven into the ground along its edges, within which it is necessary to dig a ditch 60 centimeters deep and 40 centimeters wide.
Step two. The ditch is filled with sand to one third of the depth. The sand is poured from above with water and thoroughly compacted.
Step three. After compacting the first layer, finely chopped red brick or gravel is poured over it.
Step four. A layer of broken brick or gravel is covered with a layer of sand, which should be level with the ground level.
Step five. Formwork is assembled from reinforcement. The entire structure is poured with concrete and insulated on top with a thin layer of roofing felt.
Important! Before building a frame bathhouse, at least a week should pass so that the foundation has the opportunity to properly settle.
- Construction of walls.
Step one. Lumber prepared for a frame bath must be thoroughly dried before starting work. It is not recommended to use birch wood for construction, as it quickly rots. The best option would be linden, aspen or larch. The wood of these species is able to maintain its shape for a long time and has thermal insulation properties, which is very important for a bathhouse.
Step two. After all construction work is completed, the inside of the boards should be coated with an antiseptic solution, and the outside with furniture varnish, in two layers. This procedure must be done around the entire perimeter of the room, avoiding only the steam room and the washing compartment.
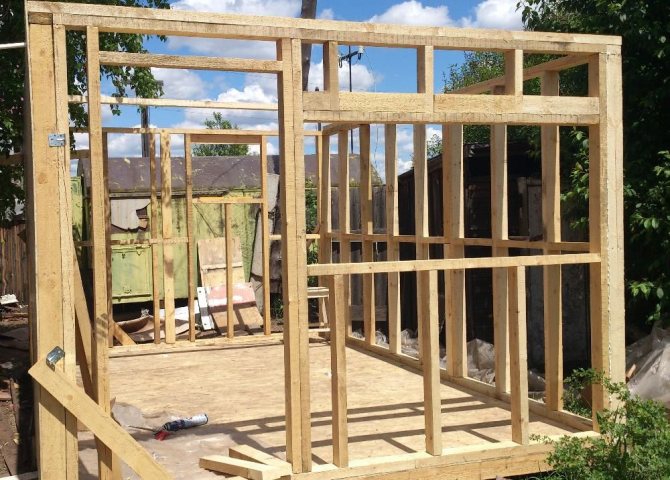
Step three. The bottom trim, made of a reliable beam with a cross-section of 10x10 centimeters, must be fixed firmly enough, after which the beams should be properly fastened at the corners with nails. It is recommended to place the racks on metal pins so that during the construction of the walls they cannot change their location and knock down the structure.
Step four. Corner posts must be embedded in concrete.
Advice: The pillars - the basis of the walls of the future bathhouse - should be placed directly under load-bearing walls, corners, stoves - that is, in those places where the load is greatest.
Step five. Along the perimeter of the walls, intermediate racks are installed, made of the same timber as the main structure.
Step six. To make the floor waterproof, it should be laid out with timber made of any wood, with a cross-section of 15x15 centimeters.
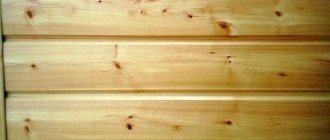
Step seven. To cover the bathhouse outside and inside, they use lining, which is affordable and easy to use. To ensure that there are no gaps between the sheets of lining located in a horizontal position, they should be overlapped. This procedure is very scrupulous in nature, but it can protect the walls from excess moisture.
- Let's move on to building the roof.
Step one. It is necessary to take 8 special ceiling beams, sawn to the angle of the rafters. To begin with, you should set up only the outer rafters, and only after that fix a couple more pieces in the center of the future roof. The remaining rafters are connected to the main structure, first on one side of the roof, then on the other (through the ridge).
Step two. After the rafters, vertical posts are installed, and if necessary, an exit to the attic is also made.
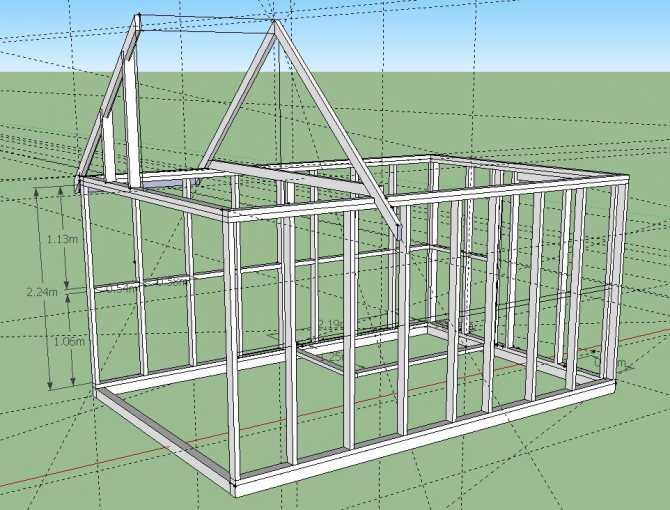
Step three. On the rafters located at the edges, beams are cut out, to which the front boards are nailed, after which the battens are attached on top.
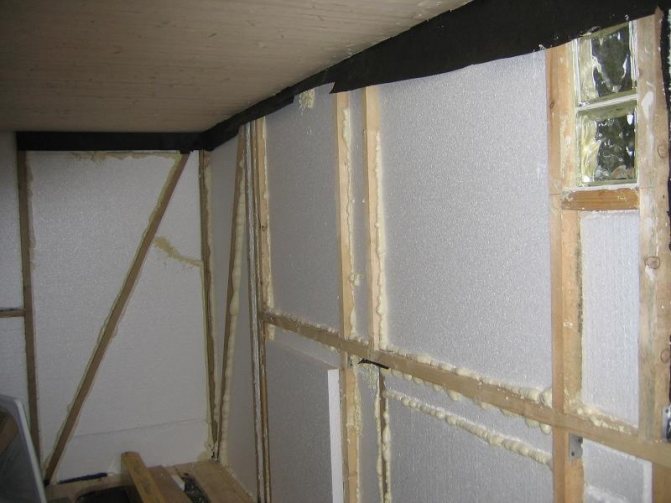
- It is necessary to insulate the walls.
The most common material for this purpose is roll insulation about 50 millimeters thick. In some cases, mineral wool or ready-made mats are used. The insulation is laid between vertical wooden posts, after which slats are nailed to them. For thermal insulation of the room, it is recommended to use polyethylene or glassine.
Advice: it is not recommended to use roofing felt for wall insulation, since under the influence of high temperatures it begins to emit an unpleasant odor.
For floor insulation, it is better to choose expanded clay or other types of backfill, and for the ceiling - polystyrene foam. If the insulation is selected correctly, heat will be lost several times less. Thanks to this, the cost of heating the bath will also be reduced.
After the walls and roof are built, you can begin installing windows and doors in the openings previously left for them. Upon completion of this work, it will be possible to enter the finish line.
Kinds
Today, there are three main types of door closers:
- electric – ensure silent and safe operation. As an additional option, you can purchase a mechanism that will open and close the door with a button, however, for operation you will need to supply electricity to the fence;
- hydraulic - the work is based on the use of a hydraulic piston; these are quite powerful and durable devices;
- pneumatic - the most unpretentious door closers, capable of operating in conditions of low temperatures and high loads. The work is based on the use of an air cylinder with compressed air.
Naturally, when choosing, you should proceed from the budget, operating conditions, as well as the technical characteristics of the device.
Electric view
The final stage of construction of a frame bath
For a bathhouse to be a pleasure to use, it must not only be comfortable and well designed, but also have a beautiful interior decoration. Therefore, after completing the main work inside the bathhouse, finishing work must be carried out.
First, you should protect the walls and ceiling from the adverse effects of moisture and high temperatures. Coniferous upholstery is perfect for this purpose. Then you can proceed directly to installing the most important part of any sauna - the stove. It must be installed in accordance with all safety requirements. It is recommended to make the wall separating the steam room and the relaxation room from brick - this way it will let in less heat.
To make the walls look more attractive, it is recommended to cover them with clapboard. Linden wood is best suited for this purpose.
Choice
To choose the right accessory, you need to consider the following parameters:
- working conditions;
- door weight - the power of the mechanism should be selected with a small margin;
- you need to consider which way the gate opens;
- the device must ensure free opening to the maximum required position;
- possibility of mounting on the right or left door;
- material for manufacturing the unit body;
- possibility of adjusting the mechanism.
Also, when purchasing, you should pay attention to the complexity of installation - the simpler it is, the better.
Construction stages
Preparing the area where the extension will be located: all garden debris is removed, bulges and holes are leveled. Installation of strip foundation. (It is this type of foundation that is mainly used on such structures because it is easy to manufacture, does not require the use of special equipment, has a long service life, and the cost of construction is inexpensive.) The frame racks are embedded in concrete - a steel or aluminum profile. When choosing a steel frame, it must first be primed and painted. With an aluminum frame, these actions are not required. A wooden frame can also be used.
Cover the prepared frame with polycarbonate sheets. It is recommended to secure it using screws with rubber washers. You can cut polycarbonate using an electric jigsaw or a saw with fine teeth (either a hand saw or a circular saw will do). Install a roof for the extension, the possible types of which were described above (in the form of an arch or sloping). If windows are needed, ready-made metal-plastic ones are usually used.
Care
The extension is ready for use, but to increase its service life and attractive appearance, it is important to know the basic rules for caring for this material:
- Branches of nearby trees can scratch the material, so if there are trees or shrubs near the building, it is better to trim them or tie them up.
- When soiled, the material should be washed with soapy water using a soft cloth (or rags). It is better to avoid products containing alkali, solvents and acids - the material may become cloudy, which will negatively affect its appearance.
- The material does not require additional painting.
We hope that our detailed recommendations, as well as visual photos, will help you build a reliable and durable extension!
Do you want to efficiently and correctly place beds in your greenhouse? Then read our helpful tips here!
If you are thinking of updating the lighting in your room, then pay attention to polycarbonate diffusers; these are very strong and durable products.
Operating rules
As with any other thing, when using a closer, there are some rules. If you follow them when operating this unit, it will last a long time without breakdowns.
Important! Most often, the working elements of the closer cannot be repaired. Therefore, in the event of a breakdown, you have to buy a new device.
- the gate must be closed using a mechanism, you should not press it down with your hand and try to close the gate faster - this can quickly cause the mechanism to fail;
- you should not leave the gate open for a long time - since strong tension arises in the chamber and spring, the mechanism quickly wears out;
- adjustments need to be made periodically, the recommended frequency of maintenance is 2 times a year;
- During adjustment, it is necessary to lubricate all rubbing parts.
Also, before installing the door closer on the street gate, it is recommended to check the operation of the sash - it should open and close smoothly and effortlessly. If, for example, there are distortions in the canopies or the canvas itself, then it is better to eliminate such problems immediately. Otherwise, the closer will not be able to function normally and will quickly fail.
Adjustment diagram
How to attach a bathhouse to a wooden house
It is recommended to build a bathhouse from the same material from which the house itself is built.
The addition of a bathhouse to the house is carried out in the following order:
- The foundation for the future bathhouse is marked and then poured. It is desirable that it be the same as the foundation under the house. It is recommended to make a strip foundation, although a columnar version is also allowed. The new foundation must be closely adjacent to the old one.
- The new foundation is tied to the old foundation. For example, using metal fittings.
- The foundation is covered with a layer of waterproofing, after which the lowest crown of the wooden frame is laid on it.
- The construction of a log bathhouse is underway.
- The rafter system for the roof is being installed.
- Roofing material is being installed.
- The roof of the bathhouse is insulated from the inside with non-combustible material. It is best to use basalt wool.
- Work is underway to lay communications and construct a furnace.
Mechanism installation
First, you need to choose the right device. And here it is important to understand that there are door closers that are designed for use only indoors. Therefore, under no circumstances should they be used outdoors, because... their elements are not designed for operation in subzero temperatures and exposure to high humidity.
Next, you need to select the type of device. In fact, all proposed types provide the necessary functionality. However, there are certain limitations in their use. For example, for electrical appliances, an electrical connection is required. Those. Such points must be taken into account initially.
Basic installation rules
Regardless of the type of accessory, there are a few simple rules to consider when installing:
- most often it is necessary to change the fastening elements included in the kit with more powerful ones;
- It is better to install the door closer on the inside of the doors - it can be broken or stolen;
- in order not to make a mistake with the markings, you should use the marking template, which usually comes with the accessory;
Also, before installation, you should carefully study the instructions - this way you can avoid possible mistakes.
Installation
Installation instructions:
- first, you need to make markings on the sash and on the support post; for this, a template is applied to the selected location and marks are made through it;
- if the pillar is brick, then you will first need to fix a metal plate on it;
- further, the device is attached to the door;
- then, you need to secure the mate to the pole;
- after this, the closing speed and clamping density are adjusted;
- If the accessory is equipped with a locking button, then it should also be configured.
If it is necessary to install a door closer for a street gate without a top crossbar, then it is necessary to use models without a lever. In this case, one part is attached to the pole, and the second to the sash. And such a mechanism works due to a spring and a piston. They ensure smooth operation of the outdoor door.
Thus, there is nothing complicated in the installation and you don’t have to be a professional to do it yourself. The main thing is to initially select the device itself correctly, and after installation, carry out the adjustment according to the instructions.
Everyone likes an open door to close automatically after entering or exiting, moreover, smoothly and without rattling. Therefore, various mechanical devices have been invented that do this work instead of a person. Such mechanisms include a door closer for a gate without a top crossbar. It ensures that the entrance door to the local area is always in the closed position.
An example of installing a door closer on a gate without a top crossbar
The simplest model of a gate closer is an ordinary spring, which was attached at one end to the door and at the other to a post. Once upon a time, bulky counterweights on a flexible cable were used, under the weight of which the door leaf slammed shut. To install such return mechanisms, the top crossbar is not needed.
It is almost impossible to achieve smooth closing of the sash without clapping, and it is also difficult for small children to open the door with such equipment.
In modern models of wicket door closers this drawback is eliminated, and the return of the wicket door to the closed position is carried out according to the same principle.
Installed door closer on a gate without a top crossbar
The sash opens under the influence of some human effort, and a piston is set in motion, compressing the spring. It opens immediately as soon as the door is released from pressure. True, today engineers are creating door closers with completely new and original ways of automatically closing doors.
The finishing mechanism for, which does not have an upper crossbar, is installed with one part directly on the sash, and the second on the supporting support, often in the open air.
In this regard, consumers have the following requirements for street door closers:
- Ease of use and compliance with safety standards;
- Possibility of adjusting the shutter closing speed;
- Proper functioning under prolonged mechanical loads;
- Trouble-free operation in any temperature conditions;
- Resistance to corrosion when exposed to rain and snow;
- Simple installation of the mechanism, which does not require special knowledge and allows you to install it yourself;
- Possibility of installing it on a gate made of any material;
- A price accessible to almost every owner of a summer house or personal plot.
What foundation to choose for building a frame bath?
Since the frame bath itself is very light, a strip foundation, which is poured directly under the walls along the entire perimeter of the structure, will be sufficient for its construction. A columnar foundation is also a common option, but its installation requires stable soil, otherwise the structure may collapse.
Due to the lightness of the frame bath, the foundation for it is poured according to a fairly simplified scheme.
Installation and adjustment
Closers are made of high quality steel. They do not require constantly repeating settings. But if any component fails, then repairing it at home is almost impossible. If all installation rules are followed, they can last quite a long time.
First of all, the gate itself must be reliable, open and close properly. You must not allow it to become skewed or the hinges to become unsteady. To install the return device, you must use reliable fasteners.
Instructions for installing a closer on a gate or door
Closers intended for indoor use cannot be installed on wicket doors. Installation of a door closer on a gate can be done by every attentive and careful owner, regardless of whether it is wooden, metal-plastic or metal. They are made to open the door in any direction, but to avoid vandalism and theft, the device is placed on the inside of the door facing the house. Begin by marking the support post and the wicket door in the closed position.
Scheme for installing a door closer on a gate
The closer is attached in accordance with the instructions that are included with the purchase. The home craftsman may not be satisfied with the supplied fastening material, and he himself finds a more durable and reliable one. After installation, the speed of movement of the sash should be adjusted. Most models have adjusting screws; by unscrewing or screwing them in, you can achieve the desired rigidity of the gate closure.
When leaving or entering, sometimes there is a need to open the gate for a long time. For this purpose, many return devices are equipped with a special button that allows you to lock the sash open or closed. The video shows the work of the door closer.
But it is not recommended to leave the closer in working condition for a long time; its ability to return to its original position is weakened. Thanks to its shape and small size, the door closer is almost invisible. When there are gusts of wind, the gate does not knock on the gate, does not open, but fits tightly to the posts. A correctly installed and well-adjusted return mechanism pleases the owner with the opening of the wicket door with a slight effort and the smooth, silent closing of the wicket door.
What can be built from timber
Below we will look at two cases: what can be attached to a timber bathhouse and what timber extensions are well suited to.
Extension: options for a timber bath
The main feature of a wooden bathhouse is its shrinkage over a long period of time. Therefore, we will say right away that it is very advisable to make all extensions to such a bathhouse during the construction period . This will give the same vibrations throughout the foundation, and the shrinkage will be uniform.
If we are dealing with a finished bathhouse, which is missing something in the owner’s opinion, then we strongly recommend, firstly, that the extension begin no earlier than 3-5 years after completion of construction, and secondly, on a separate foundation and without using the bathhouse wall as a fourth wall or roof support.
Bathhouse made of double timber with a gable roof made of bitumen (soft) tiles. Teplokrepost Photos
Why is that? Because a timber bathhouse is not particularly light, the foundation for it is made solid (most often), and any buried foundation violates the properties of the soil around it for several years.
But even light extensions that do not need their own foundation can move significantly if the site is located on highly heaving soils. Making the bathhouse wall one of the walls of the extension or resting the roof on it should only be done on non-heaving or slightly heaving soils.
How then to attach something to the bathhouse? Very simple: with an independent roof and a small gap between the extension and the bathhouse. The gap is filled with polyurethane foam or PSUL. This is a guarantee that two buildings nearby will not begin to destroy each other.
As for the purpose of extensions, there are not so many of them. Attached to the baths:
- terraces/verandas/gazebos/summer kitchens/barbecue areas;
- sheds;
- awnings.
We would strongly advise against attaching a barbecue area or summer kitchen to a wooden bathhouse. This increases the fire hazard of an already fire-hazardous structure, and even more so a wooden one!
Everything else is quite acceptable, so let’s look at the options in more detail.
Terrace/veranda/gazebo
If none of the above was included in the project, we recommend that you read our other articles, which deal in detail with the issue of adding a terrace, veranda and gazebo to an existing bathhouse.
However, in these articles you will not find the specifics of extensions to a bathhouse made of timber. What is it?
Stage of construction of an extension from a log house. Photo StroyDom
First of all, I would like to talk about stylistic unity, which should be adhered to even with limited budget.
What does it mean? Firstly, the roof over the veranda/terrace/gazebo should preferably be made of the same material as the roof of the bathhouse. The only exception is probably polycarbonate - extensions covered with it often (but not always!) look organic next to buildings made of any wall and roofing material.
Secondly, if we are talking about a bathhouse made of timber, does it follow that the extension should also be made of timber or at least wood? It's possible, but not necessary. In essence, styles should not conflict , not materials. You shouldn’t combine Russian ethnicity with Provence, for example.
But if the bathhouse is built without any specifics - just as a modern, functional building, if it is painted in colors that differ from the natural color of the wood, then there is freedom to make the extension just as modern and functional, regardless of the material .
It can be wooden, but not massive, with a fence in the form of X-shaped elements, with a pitched roof. Or it can be metal or brick - if the proportions of the structures are well balanced, if the floors, fencing elements and something else are made of wood and painted in the colors of the bathhouse.
Above we talked about connecting buildings to each other, we will not repeat ourselves, we simply advise not to connect foundations at all, and roofs - rigidly.
Barn
Utility rooms next to the timber bathhouse may be a necessity. There are two types of sheds that are most often attached to a bathhouse: first of all, a woodshed, and it can also be a utility block for storing equipment, tools, furniture, and things.
As for the woodshed next to the timber sauna, you should not use the wall of the bathhouse as the back wall of the woodshed. Or it should be well treated with antiseptics. This is due to the fact that the contact of firewood with a wooden wall can transmit infection of fungi or insects to it.
ADVICE! Create an air gap between the woodshed and the sauna, or separate them with the back wall of the woodshed.
As for a regular shed, there are no restrictions associated with it. Details about the types of utility rooms and how to build such extensions yourself are discussed in this article.
Canopy
This is probably the simplest type of extension, and its purpose is very wide - you can use the space of the canopy to protect things from rain and sun, or you can arrange gatherings under its canopy.
Canopies are divided into independent ones and those resting on the wall of the main building. What was said above about rigid fastening to the wall of the bathhouse applies to them. So it is better to make an extension of the canopy to the bathhouse made of timber independently, connecting it to the bathhouse only with a protective apron to prevent water from flowing between it and the extension.
If the canopy is small, literally a canopy, that is, it is attached exclusively to the wall of the bathhouse, without having supports on the ground, then there is no reason not to do it. Only use slip joints (small fastening stroke) if the building is still actively shrinking.
You can read more about sheds in the article on utility rooms mentioned above.
Options for timber extension
Thin timber is not a very expensive material, so even outbuildings can be made from it.
Since a lot has been said above, now we will only briefly go over the options for what timber extensions are possible and what bathhouses they will be suitable for.
It goes without saying that the best combination would be a timber bathhouse with a timber extension. Here you don’t need to select anything; the material alone will give harmony and unity.
If the bathhouse is not made of timber, then we remember the rule that the conflict occurs between styles, not materials. We look at the style of the bathhouse and think about whether wood can somehow complement it organically?
In principle, wooden extensions look very good next to brick or concrete buildings . Especially canopies, open verandas, terraces and gazebos. This means that it is better not to use large chopped elements when combined with a non-wooden bathhouse. And do not consider the option of a rustic, ethnic style at all.
As for other extensions, for example, a shed made of timber next to a bathhouse made of the same brick, this option seems to us doubtful in the ability to make such a combination beautiful. Place such a shed at a distance from the bathhouse - it will be better.
Timber terrace/veranda: photo
For your inspiration, log extensions to a bathhouse implemented by other people may be useful.
Bathhouse with terrace. Photo Stroy-16